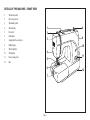
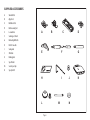
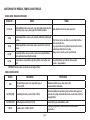
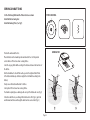
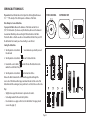
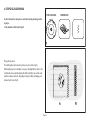
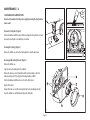
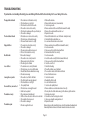
1
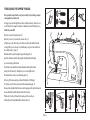
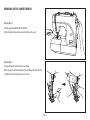
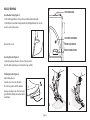
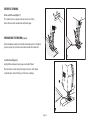
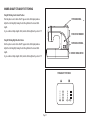
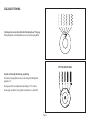
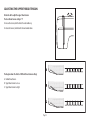
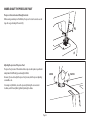
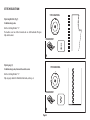
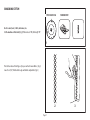
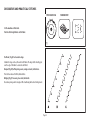
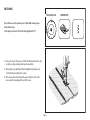
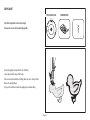
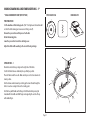
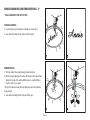
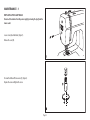
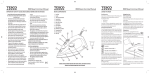
EJ09
Sewing Machine
User Manual
IMPORTANT SAFETY GUIDE
Please follow all the precautions listed below for safety and to reduce the
risk of fire, injury or electrical shock.
Read all the instructions before operating the appliance and keep them for future reference. If you pass the product on to a third party, include these instructions.
Always unplug the sewing machine from the mains supply when removing covers, lubricating, or when making any user or servicing adjustments mentioned in the
instruction manual.
Do not unplug the unit by pulling on the cord. To unplug, grasp the plug, not the cord.
Ensure there is adequate room to operate the unit.
Never operate this appliance if it has a damaged cord or plug, if it is not working
properly, if it has been dropped or damaged, or dropped into water. Return the appliance to a competent service centre for examination, repair, electrical or mechanical
adjustment.
This appliance is not intended for use by persons (including children) with reduced physical, sensory or mental capabilities, or lack of experience and knowledge, unless they have been given supervision or instruction concerning use of this appliance by a
person responsible for their safety.
Children should be supervised to ensure that they do not play with the appliance
Do not use outdoors or in damp or wet conditions.
Before operating, ensure that the surface on which the unit is placed is stable. Never operate the appliance with any air openings blocked. Keep all ventilation
openings of the sewing machine and foot controller free from accumulations of lint,
dust, and loose cloth.
Do not insert any object into ventilation slots.
Keep fingers away from all moving parts. Special care is required around the sewing
machine needle.
Always use the proper needle plate. The wrong plate can cause the needle to break.
Do not use broken, deformed or blunt needles.
Do not pull or push fabric while stitching. It may deflect the needle causing it to break.
Switch the sewing machine off when making any adjustments in the needle area,
such as threading the needle, changing needles, threading bobbins, changing the
presser foot and the like.
Do not operate where aerosol spray products are being used or where oxygen is being
administered.
This appliance is only for household use. Industrial or professional use will invalidate
the warranty.
Do NOT use this appliance for any purpose not covered by the instructions.
THE APPLIANCE MUST NOT BE LEFT UNATTENDED WHILE IT IS CONNECTED TO THE
SUPPLY MAINS.
ELECTRICAL INFORMATION
Before using this appliance ensure that the voltage of your electricity supply is the
same as that indicated on the appliance.
The means of disconnecting this appliance from the mains supply is the mains plug.
This should be unobstructed and readily operable at all times
SPECIFICATIONS
Voltage Rating: 220 -240V AC, 50Hz
Power Consumption: XXXXXXXXX
Noise Performance ( SPL) : 75dBA
Net Weight: XXXXX
Page 2
CONTENTS
Safety Guide
Details of the machine- Front View
Details of the machine- Rear View
Accessories
Fitting the snap-in sewing table
Connecting power
Attaching the needle
The presser foot
Winding the bobbin
Inserting the bobbin
Checking the bobbin tension
Threading the upper thread
Bringing up the lower thread
Basic sewing
Reverse sewing
Removing the work
More about Straight Stitching
Zig-Zag stitching
Adjusting the upper thread tension
Page 2
Page 4
Page 5
Page 6
Page 7
Page 8
Page 9
Page 10
Page 11
Page 12
Page 12
Page 13
Page 14
Page 15
Page 16
Page 16
Page 17
Page 18
Page 19
More about the pressure foot
Matching the needle, fabric and thread
Sewing on buttons
Sewing buttonholes
Attaching zippers and piping
3-step zig-zag sewing
Stitch selection
Smocking stitch
Decorative and practical stitches
Patching
Appliqué
Monogramming and embroidering -1
Monogramming and embroidering -2
Maintenance -1 (Replacing the Light Bulb)
Maintenance -2 (Cleaning and Lubrication)
Troubleshooting
After Use
Care
Warranty
May we suggest that before you start to use your sewing machine, you discover its many features and
advantages by going through this instruction book, step by step, while seated at your sewing machine.
Page 3
Page 20
Page 21
Page 24
Page 25
Page 24
Page 25
Page 26
Page 27
Page 28
Page 29
Page 30
Page 31
Page 32
Page 33
Page 34
Page 35
Page 36
Page 36
Page 36
DETAILS OF THE MACHINE – FRONT VIEW
1.
2.
3.
4.
5.
6.
7.
8.
9.
10.
11.
12.
Thread tension dial
Presser foot pressure
Thread take-up lever
Thread cutting
Presser foot
Needle plate
Sewing table/ Accessories box
Bobbin stopper
Stitch length dial
Stitch display
Reverse sewing lever
Base
1
2
8
3
9
10
4
5
6
7
Page 4
11
12
DETAILS OF THE MACHINE – REAR VIEW
13.
14.
15.
16.
17.
18.
19.
20.
21.
22.
23.
Spool pin
Bobbin winder
Hole for second spool pin
Hand wheel
Patten selector dial
Power switch
Main plug socket
Bobbin thread guide
Upper thread guide
Handle
Presser foot lever
13
20
14
21
15
22
16
23
17
18
19
Page 5
SUPPLIED ACCESSORIES
A.
B.
C.
D.
E.
F.
G.
H. I. J. K. L. M. N. Standard foot
Zipper foot
Buttonhole foot
Button sewing foot
L-screwdriver
Seam ripper/ brush
Lubricating Oil bottle
Pack of 3 needles
Seam guide
3 Bobbins
Darning plate
Spool holder
Second spool pin
Spool pin felt
A
B
C
E
F
H
I
M
L
Page 6
D
G
J
N
K
FITTING THE SNAP-IN SEWING TABLE
Hold the the snap-in sewing table horizontal, and push it in the direction
of the arrow.
The inside of the snap-in sewing table can be utilized as an accessory box.
Page 7
CONNECTING POWER
1
A: Switch the machine’s Power Switch OFF – “0” position
B: Plug in the Machine Power connector firmly.
C: Place the Foot Controller in a convenient unobstructed place.
D: Plug in the Mains Plug to the mains supply and switch on.
E: Adjust the position of the foot controller (see Fig. 2 below)
Now remove your foot from the control.
F: Switch the machine’s Power Switch ON – “I” position
Your sewing machine is now ready for use.
A
D
C
B
C
2
Page 8
E
F
ATTACHING THE NEEDLE
D
LOWER
The Presser Foot Assembly is raised and lowered
with the Preser Foot Lever (No.23 on P.XX). This also
raises and lowers the needle.
23
RAISE
A
Insert the needle following the illustrated instructions (Fig. 1)
Loosen the needle clamp screw (A).
Insert the needle with the flat side towards the back (B) and the eye facing
the front (C).
Push the needle as far as it will go (D).
Re- tighten the screw.
B
Attention: ALWAYS swith the power off when attaching needles.
CAUTION: Always exercise care when attaching needles. Store needles
safely away from children and pets and dispose of them with great
care with the points protected.
C
1
Change the needle regularly, especially if it is showing signs of wear
and causing problems.
Needles must be in perfect condition. ( Fig. 2) Problems can occur with:
A. Bent needles
B. Blunt needles
C. Damaged points
2
Page 9
B
A
C
THE PRESSER FOOT
A
LOWER
The Presser Foot Assembly is raised and lowered
with the Preser Foot Lever (No.23 on P.XX)
A
23
RAISE
First, switch the power off:
To attach the Presser Foot Holder- Refer to figure 1:
A: Raise the presser foot clamp.
B: Attach the presser foot holder as illustrated.
You can use the provided screw driver to loosen and tighten the screw.
To attach the Pressure Foot- Refer to figure 2:
Place the All Purpose foot (F) on the needle plate
Gradually lower the presser foot holder (B) until the cut-out (C) is directly
above the pin (D) on the plate.
Raise the lever (E). Lower the presser foot holder fully onto the presser foot
and the presser foot will lock automatically in place. Release the lever.
E
B
D
1
B
2
E
3
Page 10
F
STANDARD FOOT
G
To remove the Pressure Foot- Refer to figure 3:
Raise the presser foot. Raise the lever (e) and the foot disengages.
To Attach the Seam Guide- Refer to figure 4:
The seam guide is a useful accessory to help you gauge the position of
seams etc. but its use is not essential.
Attach the seam guide (g) in the slot as illustrated. Adjust according to
need for hems, pleats, etc.
C
4
WINDING THE BOBBIN
Your sewing machine works by stiching two threads. The main thread is contained
on the spool which is at the top of the machine. A second thread is contained in a
compartment under the machine. This thread is wound onto a “bobbin” from the
main spool.
Place the main spool as shown in the top illustration.
For large spools of thread place the spool holder with the large side next to the spool
(Fig 1). For small spools of thread place the spool holder with the small side next to
the spool (Fig 2).
To wind the bobbin:
Wind thread clockwise around bobbin winder tension disc (Fig. 3).
Thread the bobbin as illustrated and place on spindle (Fig. 4).
Push the bobbin to the right (Fig. 5). This is the “bobbin winding” position.
Hold the thread end (Fig. 6).
Switch the power on:
Step on the foot control pedal (Fig. 7). Gradually apply pressure to increase speed.
Allow the bobbin to wind sufficient thread. Remove your foot from the pedal.
Now cut the threads (8).
Press the bobbin to left (9) and remove. Moving the bobbin to the left places the
machine in the “sewing” position.
1
2
3
4
5
Note:
When the bobbin winder spindle is in “bobbin winding” position, the machine will
not sew.
To start sewing, push the bobbin winder spindle to the left (sewing position).
6
Page 11
7
8
9
INSERTING THE BOBBIN
23
1
When inserting or removing the bobbin, the needle
must be fully raised.
Switch the power OFF
1 .Open the hinged cover.
2. Hold the bobbin case with one hand. Insert the bobbin so that the thread runs
in a clockwise direction (arrow).
3. Put the thread under the tension spring.
4. Hold the bobbin case by the hinged latch.
5. Insert it into the shuttle. Press it fully home and then release the latch.
2
3
CHECKING AND ADJUSTING THE BOBBIN TENSION
The bobbin tension is factory preset and should not need adjusting. However if the
tension is not correct the thread will not feed properly.
To test the bobbin thread tension:
Remove the bobbin case and bobbin and
hold it by suspending it by the thread. Jerk
it once or twice. If the tension is correct, the
thread will unwind by about 25-50 mm.
If the tension is too tight, it does not
unwind at all. If the tension is too loose,
it will drop too much. To adjust, turn the
small screw on the side of the bobbin case.
5
Page 12
4
THREADING THE UPPER THREAD
This operation is important to carry out correctly as by not doing so many
sewing problems could result.
We suggest you read through the procedure carefully and carry out this process
several times before using the machine to familiarise yourself with the process.
Switch the power OFF.
Raise the needle to its highest point (1).
Raise the presser foot to release the tension discs. (2)
Lift up the spool pin. Place the spool of thread on the holder with the thread
coming off the spool as shown. For small thread spools, place the small side of
spool holder next to spool. (3)
Draw thread from spool through the upper thread guide. (4)
Guide the thread around the thread guide (5) pulling thread through
pre-tension spring as illustrated.
Thread the tension module by leading thread down the right channel
and up the left channel (6). During this process it is helpful to hold
the thread between the spool and thread guide (4).
At the top of this movement pass thread from right to left through
the slotted eye of the take-up lever and then downwards again. (7)
Now pass thread behind the thin wire needle clamp guide (8) and then down to
the needle which should be threaded from front to back.
Pull about 6-8 inches of thread to the rear beyond the needle eye.
Trim the thread to length with built in thread cutter. (9)
Page 13
BRINGING UP THE LOWER THREAD
Refer to Figure 1
Hold the upper thread LOOSELY with the left hand.
Turn the handwheel forwards to lower and then fully raise the needle.
Refer to Figure 2
The upper thread will catch and raise the lower thread.
Pull on the upper thread to bring the lower thread up through the stitch plate hole.
Lay both threads to the back under the presser foot. (2)
Page 14
BASIC SEWING
1
Basic Machine Setting (Figure 1)
Set the Stitch Length Dial to 2. This provides a small/medium stitch length
Set the Pattern Selector Dial to display A in the Stitch Display Window. This sets the
needle to centre stitch position.
STITCH LENGTH DIAL
1
STITCH DISPLAY WINDOW
23
Raise the Presser Foot
PATTERN SELECTOR DIAL
A
REVERSE SEWING SWITCH
C
Inserting the Fabric (Figure 2)
Lay the uper and lower threads to the rear of the presser foot
Insert the fabric under the presser foot and line it up carefully
B
Stitching the Fabric (Figure 3)
2
Switch the machine on.
Lower the presser foot onto the fabric.
Press the foot pedal to start the machine.
Keeping a steady pressure on the foot pedal,
guide the fabric through the machine with a
steady hand.
2
Page 15
3
REVERSE SEWING
At the end of the seam (Figure 1):
Press down the reverse sewing lever A. Sew a few reverse stitches.
Release the lever and the machine will sew forwards again.
REMOVING THE WORK (Figure 2):
Turn the handwheel towards you to bring the thread take up lever to its highest
position, raise the presser foot and remove work towards the back and side.
To cut the thread (Figure 3):
Gently pull the work away releasing a generous length of thread.
Place the threads over the cutting slot B and press down to cut the thread.
Lay the threads to the back of the presser foot before continuing.
Page 16
MORE ABOUT STRAIGHT STITCHING
Straight Stitching Centre Needle Position
Turn the pattern selector dial so that “A” appears in the stitch display window.
Adjust the stitch length by turning the stitch length dial to the desired stitch
length.
To get a reinforced triple straight stitch, turn the stitch length dial to position “S1”.
STITCH LENGTH DIAL
STITCH DISPLAY WINDOW
Straight Stitching Right Needle Position
Turn the pattern selector dial so that “B” appears in the stitch display window.
Adjust the stitch length by turning the stitch length dial to the desired stitch
length.
To get a reinforced triple straight stitch, turn the stitch length dial to position “S1”.
PATTERN SELECTOR DIAL
REVERSE SEWING SWITCH
STRAIGHT STITCHES
Page 17
ZIG-ZAG STITCHING
Turn the pattern selector dial so that the stitch display shows “C”-zig-zag.
Turning the pattern selector dial will increase or decrease the zig zag width.
STITCH LENGTH DIAL
Using the stitch length dial while zig-zag stitching
The density of zig-zag stitches increase as the setting of stitch length dial
approaches “0”.
Neat zig-zag stitches are usually achieved at settings of “2.5” or below.
Closed up zig-zag stitches (close together) are referred to as a satin stitch.
Page 18
ADJUSTING THE UPPER THREAD TENSION
Rotate the dial to adjust the upper thread tension
The basic thread tension setting is “4”
To increase the tension, turn the dial to the next number up.
To reduce the tension, turn the dial to the next number down.
The diagram shows the effects of different thread tension settings:
A. Normal thread tension
B. Upper thread tension too loose
C. Upper thread tension too tight
Page 19
MORE ABOUT THE PRESSURE FOOT
The presser foot can be raised through two levels
When sewing several layers or thick fabrics, the presser foot can be raised a second
stage for easy positioning of the work. (A)
Adjusting the pressure of the presser foot:
The presser foot pressure of the machine has ben pre-set and requires no particular
readjustment for different types and weights of fabric.
However, if you need to adjust the presser foot pressure, turn the presser adjusting
screw with a coin.
For sewing very thin fabric, loosen the pressure by turning the screw counter
clockwise, and for heavy fabric, tighten by turning it clockwise.
LOOSEN
Page 20
TIGHTEN
MATCHING THE NEEDLE, FABRIC AND THREAD
NEEDLE, FABRIC, THREAD SELECTION GUIDE
NEEDLE SIZE
9-11(65-75)
FABRICS
THREAD
Lightweight fabrics-thin cottons, voile, serge, silk , muslin, interlocks, cotton
Light-duty thread in cotton, nylon or polyester.
knits, tricots, jerseys, crepes, woven polyester, shirt & blouse fabrics.
12(80)
Medium weight fabrics- cotton, satin, sailcloth, double knits, lightweight
woollens.
14(90)
Medium weight fabrics-cotton duck, woollen, heavier knits, terry cloth,
denims.
16(100)
Heavyweight fabrics-canvas, woollens, outdoor tent and quilted fabrics,
denims, upholstery material (light / medium).
Heavy woollens, overcoat fabrics, upholstery fabrics, some leathers and
vinyls.
IMPORTANT: Match needle size to thread size and weight of fabric
18(110)
Most threads sold are medium size and suitable for these
fabrics and needle sizes.
Use polyester threads on synthetic materials and cotton on
natural woven fabrics for best results.
Always use the same thread on top and bottom.
Heavy duty thread, carpet thread. (Use heavy foot
pressure – large numbers.)
NEEDLE, FABRIC SELECTION
NEEDLES
EXPLANATION
TYPE OF FABRIC
Standard sharp needles. Sizes range thin to large. 9
(65) to 18(110)
Natural woven fabrics-wool, cotton, silk, etc. Not
recommended for double knits.
15x1/705H(SUK)
Semi-ball point needle, scarfed. 9(65) to 18(110)
Natural and synthetic woven fabrics, polyester blends. Knits-polyesters,
interlocks, tricot, single and double knits. Can be used instead of 15x1 for
sewing all fabrics.
15x1/705H(SUK)
Full ball point needle 9(65) to 18(110)
Sweater knits, Lycra, swimsuit fabric, elastic.
Leather needles. 12(80) to 18(110)
Leather, vinyl, upholstery. (Leaves smaller hole than standard
large needle.)
HAx1
130 PCL
Page 21
SEWING ON BUTTONS
Set the Stitch Length Dial and the Pattern Selector as shown
Install the Button Sewing Foot
Install the Darning Plate. ( See Fig 1)
STITCH LENGTH DIAL
DARNING PLATE
Position the work under the foot.
Place the button on the marked position and lower the foot. Set the pattern
selector knob on “B” and sew a few securing stitches.
Select the zig-zag stitch width according to the distance between the two holes of
the button.
Turn the handwheel to check if the needle goes into the right and the left hole
of the button without any obstruction (adjust the stitch width according to the
button).
Slowly sew on the button with about 10 stitches.
Select pattern “B” and sew a few securing stitches.
If a shank is required, place a darning needle on top of the button and sew. (Fig. 3)
For buttons with 4 holes, sew through the front two holes first ( Fig. 2), push the
work forward and then sew through the back two holes as described. (Fig. 3)
Page 22
SEWING BUTTONHOLES
Preparation: Attach the buttonhole foot. Adjust the stitch length dial between
“0.5” - “1”. The density of the stitch depends on thickness of the fabric.
Note: Always test sew a buttonhole.
To prepare the fabric: Measure the diameter of the button and add 0.3 cm
(1/8”) for the bartacks. If you have a very thick button, add more to the diameter
measurement. Mark the position and length of the buttonhole on the fabric.
Position the fabric so that the needle is on the mark that is furthest from you. Pull
the buttonhole foot towards you as far as it will go. Lower the foot.
Sewing the buttonhole
1
1. Turn the pattern selector dial to
the end mark.
. Sew at moderate speed until you reach 2. Turn the pattern selector dial to
2and sew 5-6 bartack stitches.
4
STITCH LENGTH DIAL
3. Now turn the selector dial to 3 . Sew the left side of the buttonhole to the mark at the end furthest from you.
4. Turn the pattern selector dial to
4
and sew bar tack stitches.
2
Remove the fabric from under the foot. Draw the upper thread through the
reverse side of the fabric and knot upper and lower threads. Cut the centre of the
buttonhole with the seam ripper, being careful not to cut the stitches on either side.
Tips:
- Slightly reduce upper thread tension to produce better results.
- Use backing material for fine and stretchy fabrics.
- It is advisable to use a gimp cord for stretch or knit fabrics. The zigzag should sew over the gimp. (5)
Page 23
BUTTONHOLE FOOT
ATTACHING ZIPPERS AND PIPING
STITCH LENGTH DIAL
Set the machine as illustrated. (Figure1)
The zipper foot can be inserted right or left, depending on which side of the foot
you are going to sew. (Fig. 2)
To sew past the zipper pull, lower the needle into the fabric, raise the presser foot
and push the zipper pull behind the presser foot. Lower the foot and continue to
sew.
It is also possible to sew in a length of cord, into a bias strip to form a ‘welt’. (Fig.3)
Set the stitch length control between “1” - “4” (according to thickness of fabric).
Page 24
ZIPPER FOOT
3-STEP ZIG-ZAG SEWING
STITCH LENGTH DIAL
Use this technique for sewing on lace and elastic, darning, mending, reinforcing edges.
Set the machine as illustrated. (Figure1)
Place patch in position.
The stitch length can be shortened to produce very close stitches. (Fig. A)
When mending tears, it is advisable to use a piece of backing fabric to reinforce. The
stitch density can be varied by adjusting the stitch length. First sew over the center
and then overlap on both sides. Depending on the type of fabric and damage, sew
between 3 and 5 rows. (Fig. B)
Page 25
STANDARD FOOT
STITCH SELECTION
STITCH LENGTH DIAL
Triple straight stitch: (Fig. 1)
For hardwearing seams.
Turn the stitch length dial to “S1”.
The machine sews two stitches forwards and one stitch backwards. This gives
triple reinforcement.
STANDARD FOOT
Triple zig-zag: (2)
For hardwearing seams, hems and decorative seams.
Turn the stitch length dial to “S1”.
Triple zig-zag is suitable for firm fabrics like denim, corduroy, etc.
STITCH LENGTH DIAL
STANDARD FOOT
Page 26
SMOCKING STITCH
STITCH LENGTH DIAL
STANDARD FOOT
Use for seams, hems, T-shirts, underwear, etc.
Set the machine as illustrated. (Fig. 1) Pattern selector “D”, stitch length “S1”.
1
This stitch can be used for all types of jersey as well as for woven fabrics. (Fig. 2)
Sew at 1 cm (1/4”) from the fabric edge and trim the surplus fabric. (Fig. 3)
2
Page 27
3
DECORATIVE AND PRACTICAL STITCHES
STITCH LENGTH DIAL
Set the machine as illustrated.
Turn the stitch length dial to suit the fabric.
Shell hem ( Fig. A) For decorative edges.
Suitable for edges on sheer, fine and stretch fabrics. The larger stitch should go just
over the edge of the fabric to create the shell effect.
Rampart (Fig. B) For flat joining seams, sewing on elastic, visible hems.
This stitch can be used for firm, thicker fabrics.
Bridging (Fig. C) For seams, place mats, tablecloths.
Decorative joining seam for a fagoted effect. Gathering with cord or shirring elastic.
Page 28
STANDARD FOOT
PATCHING
STITCH LENGTH DIAL
These stitches are used to join two pieces of fabric while leaving a space
between their edges.
Set the pattern selector on “H”. Turn the stitch length dial to “S1”.
1. Fold over the edges of the two pieces of fabric for the hem and baste the edges to a thin piece of paper leaving a small space between them.
2. Stitch along the edge, pulling both threads slightly when beginning to sew.
* Use thicker than normal threads for sewing.
3. After sewing, remove the basting and the paper. To finish, tie knots on the reverse side at the beginning and the end of the seams.
Page 29
STANDARD FOOT
APPLIQUÉ
STITCH LENGTH DIAL
Turn stitch length dial to the desired length.
Turn pattern selector dial to small zigzag width.
Cut out the appliqué design and baste it to the fabric.
Sew slowly around the edge of the design.
Trim excess material outside the stitching. Make sure not to cut any stitches.
Remove the basting thread.
Tie top and bottom thread under the appliqué to avoid unravelling.
Page 30
STANDARD FOOT
MONOGRAMMING AND EMBROIDERING - 1*
* USING AN EMBROIDERY HOOP (NOT SUPPLIED)
STITCH LENGTH DIAL
PREPARATION
Set the machine as illustrated opposite. (The “0” setting means the machine will
not feed the fabric leaving you to manoeuvre it freely yourself).
Remove the presser foot and the presser foot holder.
Attach the darning plate.
Lower the presser foot lever before starting to sew.
Adjust the stitch width according to the size of lettering or design.
OPERATION -1
Draw the desired lettering or design on the right side of the fabric.
Stretch the fabric between embroidery hoop as firmly as possible.
Place the fabric under the needle. Make sure the presser foot bar is down in its lowest position.
Turn the balance wheel towards you to bring up the lower thread through the fabric. Sew a few securing stitches at the starting point.
Hold the hoop with thumb and forefingers of both hands while pressing the material with the middle and third fingers and supporting the outside of hoop with smaller finger.
Page 31
DARNING PLATE
MONOGRAMMING AND EMBROIDERING - 2*
* USING AN EMBROIDERY HOOP (NOT SUPPLIED)
MONOGRAMMING
1. Sew, moving the hoop slowly along the lettering at a constant speed.
2. Secure with a few straight stitches at the end of the last letter.
EMBROIDERING
1. Stitch the outline of the design by moving the embroidery hoop.
2. Fill in the design working from the outline of the design to the inside and from the inside to the edge of the outline until the design is completely filled in. Keep the stitches close together.
* A long stitch is made by moving the hoop rapidly and a short stitch is made by
moving it slowly.
3. Secure with a few straight stitches at the end of the design.
Page 32
MAINTENANCE - 1
REPLACING THE LIGHT BULB
Disconnect the machine from the power supply by removing the plug from the
mains socket.
Loosen screw (A) as illustrated. (Figure 1).
Remove the cover (B).
Unscrew the bulb and fit a new one (C). (Figure 2)
Replace the cover and tighten the screw.
Page 33
MAINTENANCE - 2
CLEANING AND LUBRICATION
Disconnect the machine from the power supply by removing the plug from the
mains socket.
Remove the stitch plate: (Figure 1)
Turn the handwheel until the needle is fully raised. Open the hinged front cover and
unscrew the needle plate screw withe the screw driver.
Cleaning the feed dog: (Figure 2)
Remove the bobbin case and use the brush supplied to clean the whole area.
Cleaning and lubricating the hook: (Figure 3)
Remove the bobbin case.
Snap the two hook retaining arms (A) outwards.
Remove the hook race cover (B) and the hook (C) and clean withe a soft cloth.
Lubricate at the point (D) (1-2 drops) with sewing machine oil ONLY.
Turn the handwheel until the hook race (E) is in the left position.
Replace the hook (C).
Replace the hook race cover (B) and snap back the two hook retaining arms (A).
Insert the bobbin case and bobbin and replace the stitch plate.
Page 34
TROUBLESHOOTING
If your machine is not working saftactorily, please work through this checklist before returning it to Tesco or taking it for service.
The upper thread breaks
The lower thread breaks
Skipped stitches
Needle breaks
Loose stitches
Seams gather or pucker
Uneven stitches, uneven feed
The machine is noisy
The machine jams
1 The machine is not threaded correctly
2. The thread tension is too tight
3. The thread is too thick for the needle
4. The needle is not inserted correctly
5. The thread is round wound the spool holder pin
6. The needle is damaged
1. The bobbin case is not inserted correctly
2. The bobbin case is threaded wrongly
3. The lower thread tension is too tight
1. The needle is not inserted correctly
2. The needle is damaged
3. The wrong size needle has been used
4. The foot is not attached correctly
1. The needle is damaged
2. The needle is not correctly inserted
3. Wrong needle size for the fabric
4. The wrong foot is attached
1. The machine is not correctly threaded
2. The bobbin case is not correctly threaded
3. Needle/fabric/thread combination is wrong
4. Thread tension wrong
1. The needle is too thick for the fabric
2. The stitch length is wrongly adjusted
3. The thread tension is too tight
L Poor quality thread
2. The bobbin case is wrongly threaded
3. Fabric has been pulled
1. The machine must be lubricated
2. Fluff or oil have collected on the hook or needle bar
3. Poor quality oil has been used
4. The needle is damaged
1. Thread is caught in the hook
L Rethread the machine
2. Reduce the thread tension (lower number)
3. Select a larger needle
4. Remove and reinsert the needle (flat side towards the back)
5. Remove the reel and wind thread onto reel
6. Replace the needle
1. Reinsert the bobbin in the case. The thread should pull easily
2. Check both bobbin and bobbin case
3. Loosen lower thread tension as described
1. Remove and reinsert needle(flat side towards the back)
2. Insert a new needle
3. Choose a needle to suit the thread and fabric
4. Check and attach the foot correctly
1. Insert a new needle
2. Insert the needle correctly (flat side towards the back)
3. Choose a needle to suit the thread and fabric
4. Select the correct foot
1. Check the threading
2. Thread the bobbin case as illustrated
3. The needle size must suit the fabric and thread
4. Correct the thread tension
1. Select a finer needle
2. Readjust the stitch length
3. Loosen the thread tension
1. Select a better quality thread
2. Remove bobbin case and retread and insert correctly
3. Do not pull on the fabric while sewing, let it be taken up by the machine
1 .Lubricate as described
2. Clean the hook and feed dog as described
3. 0nly use good quality sewing machine oil
4. Replace the needle
Remove the upper thread and bobbin case, turn the handwheel backwards and
forwards by hand and remove the thread remands. Lubricate as described.
Page 35
CONCLUSION
AFTER USE
Disconnect the machine from the power supply by removing the plug from the
mains socket.
Remove the cord connecting the foot pedal.
Store the machine securely together with all accessories in a cool dry place away
from heat and damp and where it cannot be interfered with by children or pets.
CLEANING THE CASE
The case of the sewing machine may be cleaned with a barely damp cloth and then
dried thoroughly. Do not wet the appliance body, cord or mains plug. NEVER allow
water to penetrate the case or foot pedal.
CAUTION: Never use scouring pads, abrasives or harsh cleaners.
WARRANTY
Your TESCO appliance is covered by a warranty for 12 months from the date of
purchase. If a fault develops during this period, please contact the TESCO electrical
help line on 0845 456 6767. Please have your original purchase receipt with you
when you call. This warranty in no way affects your consumer rights.
UK: Waste electrical products should not be disposed of with household
waste. Separate disposal facilities exist, for your nearest facilities. See
www.recycle-more.co.uk or in-store for details.
ROI: Produced after 13th August 2005. Waste electrical products should
not be disposed of with household waste. Please recycle where facilities
exist. Check with your Local Authority or retailer for recycling advice.
Tesco Stores Ltd, Delamare Road, Cheshunt, Herts, EN8 9SL