1
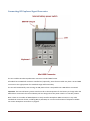
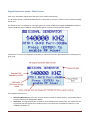
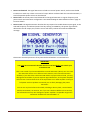
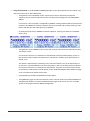
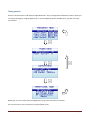
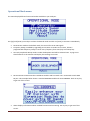
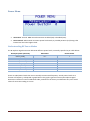
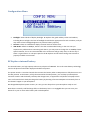
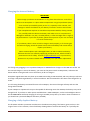
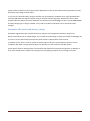
RF Explorer Signal Generator User Manual Updated to Firmware Version 1.12 BETA 15 ® RF Explorer ® RF Explorer is an affordable Handheld Spectrum Analyzer and Signal Generator family of products with a growing list of features. This little powerful unit is the tool you need to reduce the implementation time and cost of your next wireless project. Updates of the RF Explorer User Manual are available online. Please consider the environment before printing this document. Table of Contents Introduction ......................................................................................................................................................... 5 Description of main features ............................................................................................................................... 6 Feature ................................................................................................................................................................ 6 Specification ........................................................................................................................................................ 6 Connecting RF Explorer Signal Generator ........................................................................................................... 8 Signal Generator mode - Main Screen ................................................................................................................ 9 Using menus ...................................................................................................................................................... 12 Operational Mode menu ................................................................................................................................... 14 Frequency Menu................................................................................................................................................ 16 Power Menu ...................................................................................................................................................... 17 Understanding RF Power Modes ................................................................................................................... 17 Configuration Menu .......................................................................................................................................... 19 RF Explorer internal battery .............................................................................................................................. 19 Charging the internal battery ........................................................................................................................ 20 Charging a fully depleted battery .................................................................................................................. 20 Automatic idle mode with battery charge .................................................................................................... 21 Expansion Modules ........................................................................................................................................... 22 Protecting your instrument from damage ........................................................................................................ 23 RF Explorer Holder............................................................................................................................................. 24 RF Explorer accessories ..................................................................................................................................... 25 SMA-BNC adapter SMA Plug to BNC Jack straight ........................................................................................ 25 SMA-N adapter SMA Plug to N Jack straight ................................................................................................. 25 RF Adapter RP-SMA Jack to SMA Plug straight-long version......................................................................... 26 SMA adapter SMA Plug to SMA Jack right angle ........................................................................................... 26 50cm length - SMA male to SMA female RF pigtail Coaxial Cable RG316 ..................................................... 27 50cm length - SMA male to SMA male plug pigtail cable RG316 .................................................................. 27 SMA Termination – 50 ohm dummy load ..................................................................................................... 27 SMA Attenuator - 10dB ................................................................................................................................. 28 SMA Attenuator - 30dB ................................................................................................................................. 28 SMA Male/Female Adaptor ........................................................................................................................... 29 Specifications ..................................................................................................................................................... 30 Acknowledgments ............................................................................................................................................. 30 FCC and CE regulations ...................................................................................................................................... 30 License ............................................................................................................................................................... 30 Introduction RF Explorer Signal Generator has been designed to be intuitive and easy to use. There is no need to read large user manuals to get advantage of its advanced functionality. For simple actions, only a keyboard click is needed to start transmitting signals. For most advanced features like Tracking SNA, the RF Explorer for Windows software will easily guide through steps required so analyzing RF devices becomes a few minutes task for even the most novice users. We welcome your feedback and look for ideas to make this manual more useful. Please contribute with ideas, suggestions, typo corrections and comments on the official discussion list www.rf-explorer.com/forum RF Explorer User Manual page 5 Description of main features The RF Explorer Signal Generator is a powerful, wideband fully programmable RF signal generator. It is the perfect companion for Spectrum Analyzer RF Explorer product line. As a standalone unit, RFE6Gen can generate CW and Sweep signals by selecting embedded menu options. When connected to a PC, it can be fully programmed with the RF Explorer for Windows software tool. Furthermore, the unit can work as a powerful Tracking Generator when used with RF Explorer Spectrum Analyzer connected to the same PC, offering full Scalar Network Analyzer (SNA) capabilities. The SNA feature allows full characterization of filters, amplifiers and any 2-port RF device. Feature Pocket size and light weight Solid aluminum metal case Lifetime free firmware upgrades available, open to community requested features High capacity Lithium for 10hs+ of continuous run, rechargeable by USB RF Explorer for Windows PC client Open Source Can be extended with internal Expansion Modules for additional future band support and functionality Wide band support Specification Frequency range supported: 23.4 to 6000 MHz Frequency step/resolution: 1KHz Frequency stability: 0.5ppm Temperature compensated (0-45C) Backlight for great indoor visibility Standard SMA 50 ohms connector Programmable Amplitude with included internal programmable attenuator: o -40dBm to -30dBm in 3dB steps o -10dBm to 0dBm in 3dB steps Amplitude accuracy: +-0.5dB (normalized) or +-3dB (absolute compared to expected curve, see section Understanding RF Power Modes in page 17 for more details) RF Explorer User Manual page 6 Sweep measurement point speed < 10ms Graphics LCD 128x64 pixels, great visibility outdoors PC Windows client supports Windows XP/Vista/Win7 both 32 and 64bits Functional modes: o CW signal generator at any frequency in the range o Tracking generator functionality working together with RF Explorer when connected to the same PC. o Sweep generator between any to frequencies in the range, with selectable step size and speed Expansion: o Expansion port for future enhancements (higher RF power modes, additional frequency bands) Weight: 185g Size: 113x70x25 mm www.rf-explorer.com/models RF Explorer User Manual page 7 Connecting RF Explorer Signal Generator The unit includes 50 ohm impedance RF connector standard SMA format. All models have a SMA left connector installed and, optionally, some future models may have a second SMA connector at the right position for extended range and functionality. The unit will automatically start running on USB power when a compatible mini-USB cable is connected. Important: The internal battery power switch must be in the ON position for the battery to charge when the USB cable is connected. The internal battery will not charge when the power switch is in the OFF position. Note: There are a number of SMA adapters to easily interface RF Explorer SMA connector to any other standard RF connector format, including BNC, N, RP-SMA, etc. For more information of adapters available see section RF Explorer accessories in page 25. RF Explorer User Manual page 8 Signal Generator mode - Main Screen Upon start, RF Explorer Signal Generator goes to this mode automatically. The RF output power is disabled by default and it is important to connect a LOAD in all cases before enabling the RF port. The below screen is an example of a RF signal generator mode configured at 5.9GHz (5900000KHz) with the internal 30dB Attenuator enabled, and the power switch in mode 0 (lowest possible power). All elements on screen are important parameters to understand how the Signal Generator is working at any given time. The available indicators are: Selected CW frequency: This is the currently selected carrier (or CW) frequency, expressed in KHZ. It can be modified in the FREQUENCY MENU. Attenuator: The Signal Generator includes an internal 30dB nominal attenuator. This allows the unit to generate low level signals for multiple purposes. The attenuator is enabled if marked as 1, and disabled if marked as 0. RF Explorer User Manual page 9 Power Level Switch: The Signal Generator includes an internal power switch, with a nominal 3dB increment on each step. There are a total of 4 steps. When combined with the internal attenuator, a total of 8 possible power values can be selected. Power level: the actual power level delivered for the Signal Generator at a given frequency and power switch and attenuator configuration. See Understanding RF Power Modes section in page 17 for more details. Power mode: The Signal Generator describe the step required to enable the RF output signal, at the selected frequency and selected power level. By clicking on ENTER key the power signal will be delivered to the RF output port, and the screen will clearly indicate that with RF POWER ON message. Please note standard precaution of RF power delivered without a connected load. IMPORTANT You must have connected a 50 ohm antenna or RF load before you switch your transmitter ON. This is not critical if you have enabled the internal attenuator (ATN:1) as in this case the attenuator works as an effective load. However, with internal attenuator disabled, if you switch the transmitter ON without a proper external load, you may damage the RF module of your RF Explorer Signal Generator, as the power amplifier will not have a load to feed. Think of the equivalent to an audio amplifier running at full power with no speakers connected: you are likely damaging the power transistors. You can use any kind of RF 50 ohm load, including a dummy load, a coaxial with a 50 ohm termination, an antenna, etc. If you use a load too different than 50 ohm, the reflected wave may also damage the power amplifier. Acceptable ranges with attenuator disabled are external VSWR < 2. RF Explorer User Manual page 10 Using the keyboard: In the RF SIGNAL GENERATOR mode screen, the keyboard can be used for easy and convenient tasks as described below: o Using buttons LEFT and RIGHT on this screen will increase or decrease the selected frequency by the amount expressed on the Freq Step value configured in the FREQUENCY MENU. For instance, if the Freq Step is configured to 100MHz, clicking on RIGHT will increase the CW frequency in 100MHz increments everytime the key is pressed, and similarly clicking on LEFT button will decrease the CW frequency by 100MHz. An example of two times, 100MHz increment sequence, starting at 5.4GHz on each RIGHT button click: o Using buttons UP and DOWN on this screen will increase or decrease the selected RF power, one step at a time. For instance if the unit is in Attenuator:1 and Switch:0 (Lowest possible power) a press on the UP button will increase into Attenuator:1 and Switch:1. Another press will increase to Switch:2, etc. The Switch is sequentially increased up to the max level Switch:3 and, if the Attenuator is 1 at that point, it will be disabled to increase the power in the next increment with UP button. For instance if the unit is in Attenuator:1 and Switch:3, the press of UP button will increase to Attenuator:0 and Switch:0. See RF power section Understanding RF Power Modes on page 17 for more details on power level modes. o Using ENTER key enables and disables RF output power o Using MENU key goes to the last used menu. Note: if the RF power was enabled, MENU will automatically disable it to avoid unattended power signal to be active. You can re-enable power once you get back from MENU configuration. RF Explorer User Manual page 11 Using menus There are several menus in RF Explorer Signal Generator. They are organized on different screens, which you can iterate through by using the [Menu] key. If you click [Menu] button multiple times, you will visit every one of them: Optionally, you can use the [Left] and [Right] keys to go from one screen to another. You can exit from a menu anytime by using the [Return] key. RF Explorer User Manual page 12 The first time you click on [Menu] button in a RF Explorer session, Frequency Menu will open. This may change as we will see later, so every time you click on [Menu] from Signal Generator main screen, you actually re-open the last menu you were working with. In this way you save time by not having to navigate through all the menus to go the same place you were before. RF Explorer User Manual page 13 Operational Mode menu The menu display different functional modes available in your Analyzer. Use [Up] and [Down] arrow keys to select the desired mode and click on [Enter] to activate it immediately. RF Generator mode is the default mode, this is used for carrier CW signals Frequency Sweep, available by upgrading to Firmware v1.12 Beta 15 or newer, allows a programmable frequency sweep to cover every frequency from start/stop and sweep hop. Currently Amplitude Sweep mode is under development and will be released soon. Trying to use these features at the moment will display this message on screen: RF Connections enumerates the installed RF modules and how each one is connected to each SMA RF port. This example below shows a standard RFE6GEN model with 24 to 6000MHz. Click on any key to get out of this screen. About displays information about installed firmware and versioning. Use any key to get out of this screen. RF Explorer User Manual page 14 Note: if you enable this screen for more than 30 seconds while connected to USB port and power switch in the unit set to ON, RF Explorer will automatically go to low power mode and will switch the LCD off, but will keep charging the battery. This is suggested when you intent to charge the internal battery but not make use of the unit for measurement. RF Explorer User Manual page 15 Frequency Menu CW Freq: CW frequency selected for transmission in MHZ Freq Step: Frequency step in MHZ used in Sweep modes and LEFT-RIGHT button increments in CW mode. In Frequency Sweep mode, this represents the frequency hop used while sweeping. Start Freq: Lower frequency in MHZ used in Sweep modes Stop Freq: Higher frequency in MHZ used in Sweep modes Step Delay: Selected delay for Sweep step in seconds (with 1 millisecond resolution) To navigate through the menu, just use [Up] and [Down] keys to go to the option you want, then click on [Enter] to edit that option, [Left] or [Right] to go to the digit you want to change, and [Enter] to confirm or [Return] to cancel. RF Explorer User Manual page 16 Power Menu Attenuator: internal 30dB nominal attenuator enabled (ON) or disabled (OFF). Power Switch: 3dB nominal increment power level switch, 4 possible positions (0-3) being 0 the lowest level and 3 the highest level. Understanding RF Power Modes The RF Explorer Signal Generator delivers 8 different power levels, nominally specified as per table below: RF output power (nominal) 0dBm (1mW) -3dBm (0.5mW) -6dBm (0.25mW) -9dBm (0.125mW) -30dBm (1uW) -33dBm (0.5uW) -36dBm (0.25uW) -39dBm (0.125uW) Attenuator OFF OFF OFF OFF ON ON ON ON Power Switch 3 2 1 0 3 2 1 0 These are ideal power levels that are not actually constant with frequency. Actual power levels are a function of frequency, as depicted in graph below. This graph is generic but every RF Explorer Signal Generator includes an internal calibration table, produced in the factory at calibration time, with actual values for accurate reading on screen. RF Explorer User Manual page 17 The delivered power levels have a linear response up to about 2GHz, for higher frequencies there are some roll off and power becomes predictable but not linear. The unit is fully calibrated and includes an internal amplitude calibration table to allow accurate power normalization and measurement done in Tracking mode. The exact power level available on each frequency point is now available on screen in firmware v1.12 Beta 15 and higher, as well as in the RF Explorer for Windows application v1.12.1511.2 and higher. If you need more details in the meantime or power level accuracy is important to you, please contact us. RF Explorer User Manual page 18 Configuration Menu Backlight: Several levels of display backlight. RF Explorer has good visibility indoor and outdoor, including direct sunlight. The level of backlight should be the appropriate for each condition, and you may want to limit backlight brightness to preserve battery capacity. Contrast: There are 10 different display contrast levels to choose from. USB Bauds: Default is 500Kbps, which is also the recommended setting. In the rare case you experience a problem when connecting with the PC, you may want to change this to 2400bps slower speed. However, this is not recommended as the connection will go really slow, so do this only if there is a good reason to. The port speed in the RF Explorer and PC Client settings must match to properly establish a connection. RF Explorer internal battery The internal battery is a high capacity Lithium-ion polymer of 1000mAh. This is the same battery technology used in cell phones and modern laptops and tablet computers. The power switch is a true hard switch that connects the battery when in ON position or fully disconnect it in the OFF position. As the battery is fully disconnected in the OFF position, you can keep your RF Explorer stored for months and the battery will keep the charge intact, as opposed to cell phones or laptops which uses a soft switch which slowly discharge the battery by drawing a few microamperes continuously from it. This doesn't happen in your RF Explorer. We designed RF Explorer power circuitry in a way you can always have your RF Explorer ready to use! Note there is actually a self-discharge effect in the battery but it is so negligible that you can store your device for a year or more and a battery will not be depleted. RF Explorer User Manual page 19 Charging the internal battery IMPORTANT Never charge your device unattended or in any place where there is a risk of fire. Never store RF Explorer in a place where temperature may go beyond 50ºC (122F). A car can heat up incredibly quickly in the sun, especially in the summer, and damage or reduce the lifetime of your battery if stored in such an environment. If you manipulate RF Explorer to assemble an Expansion Module, always proceed very carefully with the Lithium Ion battery and make sure it is not punctured, damaged or inflated in any way. A healthy battery is a flat rectangle with no signs of any deformation. If you have any doubt, please take a picture of your unit and send it to us for further help. If your battery doesn't seem to hold a charge or work properly, or if the unit gets hot when charging, switch the power button OFF immediately and review and/or replace your battery. Never use RF Explorer with a damaged battery or with a Lithium Ion battery different than the one officially supplied by technical service, which includes a protection circuit for safety. Contact [email protected] if you have any question on any matter related with your battery or if you need a replacement. You charge it by plugging it in to a powered USB port or USB wall-wart charger via the USB mini socket. For the internal charger to access the battery, you must set the power switch to ON position, otherwise the device will be running but will not use the battery at all nor charge it. RF Explorer Signal Generator may draw up to 500mA according to USB standard, and may take up to 3hs max to charge a fully discharged battery in normal conditions. We recommend the first time to be charged for up to 8hs. It is ok having the battery connected forever to the USB port, the internal charger will stop and start the charge when needed. If your USB port is unpowered it may not be capable of delivering more than 100mA; the battery may not be charged at all. If you have no other option available than a 100mA USB port, set the LCD backlight to OFF in the OPTIONS MENU and keep charging for as long as needed (it may take up to 24hs in these conditions so you should use a powered USB port whenever possible). Charging a fully depleted battery The firmware includes a protection mechanism to shutdown everything if the battery goes too low, in the range of 3.3V or less. However, this will still keep drawing about 1mA from the battery so if you keep the RF Explorer User Manual page 20 power switch to ON forever the battery will be depleted to a safe 3V level where battery protection circuitry will reduce the leakage to about 50uA. In any case, the internal battery charger will take care of the battery conditions once it gets powered back from the USB and will charge the battery using an internal efficient algorithm. However for that to work properly when the battery was fully depleted, you should set the LCD backlight to OFF in the OPTIONS MENU and keep charging for as long as needed, it may take up to 8hs for the battery to be revived and fully charged. Automatic idle mode with battery charge RF Explorer Signal Generator includes features to improve the management of battery charge time. When connected to a PC or a USB charger, the unit will automatically go to sleep and switch the backlight off if you set it on the About Screen and put the power switch to ON and wait a few seconds. In addition to this, there is now an option for the RF Explorer device to automatically switch the screen completely OFF when running the RF Explorer for Window, use the Automatic LCD OFF option. These options help on reducing power consumption and therefore accelerating charge time. In addition to that, these simple actions reduce the wearing of the LCD lighting components, increasing its life time. RF Explorer User Manual page 21 Expansion Modules RF Explorer Signal Generator includes an internal expansion port to enhance the RF power capabilities and frequency coverage of the main unit with RF Explorer Signal Generator compatible Expansion Modules. Note: Spectrum Analyzer modules cannot be connected to the Signal Generator, they are incompatibles and have a changed gender connector to avoid any change of connecting incompatible modules. Currently under development, to learn more about different expansion options available in the future, please visit www.rf-explorer.com/models RF Explorer User Manual page 22 Protecting your instrument from damage Please protect the RF port from static discharge. This is ESD1 sensitive device. The RF output port is DC decoupled and can sustain up to 25V DC external voltage. 1 http://en.wikipedia.org/wiki/Electrostatic_sensitive_device RF Explorer User Manual page 23 RF Explorer Holder This is a great accessory for the RF Explorer Signal Generator, a high quality stand / holder for the desk while USB cable is connected. The holder is made of robust laser cut blue acrylic and has provisioned room for a USB cable to connect to a PC. The USB cable can be connected from behind the holder or any of the two lateral large holes on each side. They're even large enough for bulky USB cables with ferrite beads. A pre-drilled support bracket at the bottom allows for optionally securing the stand onto a bench for permanent position. Feature Sturdy 3mm acrylic body Colour: blue and silver Secure support for your RF Explorer Signal Generator for working on the bench Nice and practical design Comes flat-packed, assembly required. RF Explorer User Manual page 24 RF Explorer accessories RF Explorer uses standard SMA quality connectors. By using adapters you can connect RF Explorer to any RF device or antenna. You can buy SMA adapters and devices on any RF shop, but sometimes is difficult to find what you need and have the certainty the connector you are ordering is the right one. Therefore we have included a selection of quality connectors, adapters and RF devices that are fully compatible with RF Explorer. You can order them from SeeedStudio as well as many of the RF Explorer distributors. www.rf-explorer.com/buy SMA-BNC adapter SMA Plug to BNC Jack straight Usually HAM and two-way handheld radio antennas and devices are designed for BNC connectors. This BNC-female to SMA-male connector will easily interface your RF Explorer to any other BNC antenna or cable. SMA-N adapter SMA Plug to N Jack straight Laboratory grade RF bench size instruments use N connector size cables in most cases. This N-female to SMA-male connector will easily interface your RF Explorer to any other bench size instrument or cable. RF Explorer User Manual page 25 RF Adapter RP-SMA Jack to SMA Plug straight-long version Some WiFi antennas and cables are designed for RP-SMA (reverse polarity SMA) and cannot be connected to a standard SMA plug. RP-SMA is a variation of the SMA connector specification which reverses the gender of the interface. The reason for that was a decision made by FCC in order to prevent end-users from manipulating certified WiFi devices at home, using other available SMA antennas. That led to SMA and RP-SMA devices not being able to connect without an adapter, check Wikipedia for more details2. If you want to use some standard WiFi antennas you may need this adapter in order to interface them with RF Explorer. By plugin in this adapter your RF Explorer will be able to connect with any RP-SMA antenna, cable or device. SMA adapter SMA Plug to SMA Jack right angle This RF connector is ideal to use RF Explorer deployed horizontally, with any antenna connected onto it. For instance when you are on the road and you don't have a RF Explorer Stand, you can still easily fit the USB cable, the antenna and connect to a computer with easy. It is also useful to create a more reliable ground-effect for a dipole antenna if RF Explorer is over a metallic structure such as a car. 2 http://en.wikipedia.org/wiki/RP-SMA#Reverse_polarity_SMA RF Explorer User Manual page 26 50cm length - SMA male to SMA female RF pigtail Coaxial Cable RG316 RF cables are required when connecting RF Explorer to other instruments or devices. This 50cm cable is good for any frequency up to 3GHz, and can fit RF Explorer with any external SMA-male device or antenna. If you need extra length for your connection, you can easily daisy chain two or more of these cables in series. 50cm length - SMA male to SMA male plug pigtail cable RG316 RF cables are required when connecting RF Explorer to other instruments or devices. This 50cm cable is good for any frequency up to 3GHz, and can fit RF Explorer with any external SMA-female device or antenna. SMA Termination – 50 ohm dummy load Using SMA termination or Dummy Load is suggested for protection of the SMA port of your RF Explorer when the device is exposed to unwanted high radiation or strong electronic fields. For instance, if you carry on your RF Explorer that is exposed to an X-Ray scanner in the airport, you should remove the SMA antenna and plug a protection 50 ohm SMA termination. RF Explorer User Manual page 27 SMA Attenuator - 10dB SMA attenuators are used to reduce the input power, and therefore enable RF Explorer to measure stronger signals. It is also used to protect the input SMA port of RF Explorer when unknown strong signals may be in the environment, so you can use this attenuator on demand. You can easily unplug the attenuator when measurement is for weak signals. You can also combine multiple attenuators to get additional values. For instance a 10 dB + 30dB attenuators connected in series will give you 40dB total attenuation. RF Explorer firmware includes an “Offset DB” feature in the Attenuator Menu, you should specify +010 dB in this setting when the attenuator is connected in order to get correct readings on screen. This 10dB attenuator will extend the valid protection range of most RF Explorer models to up +15dBm safely (32mW). SMA Attenuator - 30dB SMA attenuators are used to reduce the input power, and therefore enable RF Explorer to measure stronger signals. It is also used to protect the input SMA port of RF Explorer when unknown strong signals may be in the environment, so you can use this attenuator on demand.You can easily unplug the attenuator when measurement is for weak signals. You can also combine multiple attenuators to get additional values. For instance a 10 dB + 30dB attenuators connected in series will give you 40dB total attenuation. RF Explorer firmware includes an “Offset DB” feature in the Attenuator Menu, you should specify +030 dB in this setting when the attenuator is connected in order to get correct readings on screen. This 30dB attenuator will extend the valid protection range of most RF Explorer models to up +30dBm safely (1W). RF Explorer User Manual page 28 SMA Male/Female Adaptor All RF connectors wear with use. The RF Explorer SMA ports are subject to minimal wear each time the connector interface is coupled and de-coupled with an antenna, a SMA cable, an attenuator or a RF device of any kind. If you repeat plug/unplug operations over the RF Explorer SMA port hundreds of times, the SMA port may underperform over time and exhibit undesired attenuation. To protect the SMA port for frequent plug/unplug operations, you can use this adaptor and keep it directly attached to the RF Explorer port. Then you plug/unplug other RF devices into this adaptor, not the original SMA port. After hundreds of operations, if the adaptor wear and show attenuation or reliability problems, you can just replace it by a new one and always keep your original RF Explorer SMA port intact. RF Explorer User Manual page 29 Specifications For a complete list of features and RF Explorer Signal Generator models, expansion boards available, and accessories please check the RF Explorer Model Map online. www.rf-explorer.com/models Acknowledgments This product could not be possible without the SeeedStudio Team who manufacture, test and distribute RF Explorer worldwide. RF Explorer is a reality thanks to the great community behind, always suggesting features and providing useful feedback. FCC and CE regulations RF Explorer is a Test and Measurement device, and therefore compatible with US FCC regulation 47 CFR Part 15.103(c). RF Explorer is certified for CE compliance under regulations EN/IEC61236 and EN/IEC61000. License RF Explorer embedded firmware is copyrighted © by Ariel Rocholl, 2010-2015 RF Explorer for Windows is Open Source software released under GPL v3, so you are free to modify, distribute and use it based on GPL terms. RF Explorer is a registered trademark in USA, Australia, China and all EU Countries. RF Explorer User Manual page 30