1
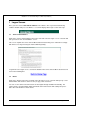
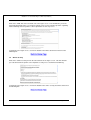
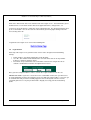
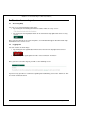
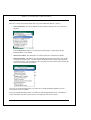
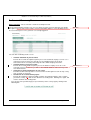
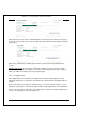
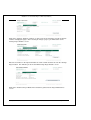
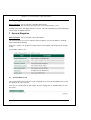
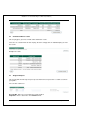
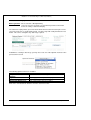
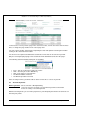
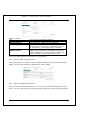
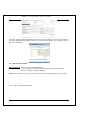
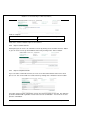
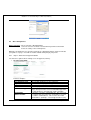
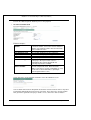
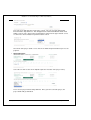
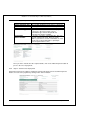
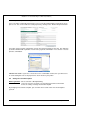
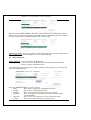
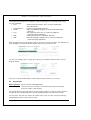
WebBank 1.6 - Internet Banking User Manual (Individuals)
Internet Banking User Manual
Individuals
K Nicholls, Nedbank GSS
Last Updated: 2006/11/03 01:30 PM
Private and Confidential to BastionZA
Page 1
WebBank 1.6 - Internet Banking User Manual (Individuals)
1
LOGON SCREEN.......................................................................................................................... 3
1.1
1.2
1.3
1.4
1.5
1.6
2
TERMS AND CONDITIONS ......................................................................................................... 3
DEMO ..................................................................................................................................... 3
FAQ ....................................................................................................................................... 4
ONLINE SECURITY ................................................................................................................... 4
DOCUMENTS ........................................................................................................................... 5
LOGIN SECTION ....................................................................................................................... 5
STANDARD SCREEN LAYOUT................................................................................................... 6
2.1
2.2
2.3
2.4
2.5
2.6
2.7
ACCESSING HELP .................................................................................................................... 6
LOGGING OFF ......................................................................................................................... 6
MENUS ................................................................................................................................... 7
PROFILE NUMBER AND USER ID DISPLAY ................................................................................. 8
LIMIT INFORMATION ................................................................................................................. 8
BALANCE INFORMATION ........................................................................................................... 8
LINK TO BANK W EBSITE ........................................................................................................... 8
3
ACCOUNT SUMMARY SCREEN ................................................................................................. 8
4
PASSWORD CHANGE ................................................................................................................. 8
4.1
4.2
5
SETTING PASSWORD AT FIRST LOGON ..................................................................................... 8
CHANGING OF PASSWORD ....................................................................................................... 8
PAYEES ........................................................................................................................................ 8
5.1
PAYEE SUMMARY .................................................................................................................... 8
5.2
PAYEE MAINTENANCE.............................................................................................................. 8
5.2.1 Adding a payee ................................................................................................................. 8
5.2.2 Deleting a payee ............................................................................................................... 8
5.2.3 Changing a payee............................................................................................................. 8
6
PENDING TRANSACTIONS......................................................................................................... 8
7
GENERAL ENQUIRIES ................................................................................................................ 8
7.1
7.2
7.3
7.4
7.5
7.6
7.7
8
ACCOUNT BALANCE LIST ......................................................................................................... 8
CREDIT CARD BRANCH CODES ................................................................................................. 8
STOPPED CHEQUES ................................................................................................................ 8
CHEQUE BOOK ORDERS .......................................................................................................... 8
FULL PAYEE DETAILS............................................................................................................... 8
STATEMENT ............................................................................................................................ 8
PROFILE LIMITS ....................................................................................................................... 8
INTERNET BANKING ACTIVITIES .............................................................................................. 8
8.1
BALANCE ENQUIRY .................................................................................................................. 8
8.2
STATEMENT ENQUIRY .............................................................................................................. 8
8.3
ACCOUNT PAYMENTS .............................................................................................................. 8
8.3.1 Step 1: Enter payment details.......................................................................................... 8
8.3.2 Step 2: Confirm account payment .................................................................................... 8
8.3.3 Step 3: Complete account payment ................................................................................. 8
8.4
INTERACCOUNT TRANSFERS .................................................................................................... 8
8.4.1 Step 1: Enter transfer details ........................................................................................... 8
8.4.2 Step 2: Confirm transfer.................................................................................................... 8
8.4.3 Step 3: Complete transfer................................................................................................. 8
8.5
ONCE-OFF PAYMENTS ............................................................................................................. 8
8.5.1 Step 1: Enter once-off payment details ........................................................................... 8
8.5.2 Step 2: Confirm once-off payment ................................................................................... 8
8.5.3 Step 3: Complete once-off payment ................................................................................. 8
8.6
CHANGE ACCOUNT DESCRIPTION ............................................................................................. 8
8.7
EMAIL STATEMENTS ................................................................................................................ 8
8.8
STOP CHEQUES ...................................................................................................................... 8
8.9
CHEQUE BOOK ORDER ............................................................................................................ 8
9
SESSION TIMEOUT...................................................................................................................... 8
Last Updated: 2006/11/03 01:30 PM
Private and Confidential to BastionZA
Page 2
WebBank 1.6 - Internet Banking User Manual (Individuals)
1 Logon Screen
Once you have entered the website address in the address line of your Internet browsing
software window and pressed <Enter>, a screen will display with a login section at the top:
1.1
Terms and Conditions
Click on the “Terms and Conditions” link on the left-hand side of the logon screen. This link will
take you to the Terms and Conditions screen.
This screen explains the terms and conditions that internet banking users undertake to comply
with when accessing and using the Internet Banking facility.
To get back to the logon screen, scroll to the bottom of the terms and conditions document and
click on the following link:
1.2
Demo
Click on the “Demo” link on the left-hand side of the logon screen. This link will open up a new
window which will contain a demo version (or copy) of the actual site.
You can use this demo to do transactions and navigate through available functionality. All
required values and information will be defaulted and no transactions will actually take place.
Close this new window to exit the demo.
Last Updated: 11/3/2006 1:30 PM
Private and Confidential to BastionZA
Page 3
WebBank 1.6 - Internet Banking User Manual (Individuals)
1.3
FAQ
Click on the “FAQ” link on the left-hand side of the logon screen. This link will take you to the
Frequently Asked Questions screen which contains a list of some common questions regarding
Internet banking and also provides a brief explanation of some key issues.
To get back to the logon screen, scroll to the bottom of the FAQ’s document and click on the
following link:
1.4
Online Security
Click on the “Online Security” link on the left-hand side of the logon screen. This link will take
you a document which explains some important security issues around Internet Banking.
To get back to the logon screen, scroll to the bottom of the online security document and click on
the following link:
Last Updated: 11/3/2006 1:30 PM
Private and Confidential to BastionZA
Page 4
WebBank 1.6 - Internet Banking User Manual (Individuals)
1.5
Documents
Click on the “Documents” link on the left-hand side of the logon screen. This link will take you to
the Documents screen which contains links to the application forms, change forms, ect.
To view one of the documents, simply click on the appropriate link. The document will then open
up in a new window. You can also save the document to your PC by right-clicking on the link
and selecting “Save As”.
To get back to the logon screen click on the following link:
1.6
Login Section
At the top of the Login screen you will need to enter 3 values to login to Internet Banking,
namely:
•
•
•
Profile number – this will be provided to you by the bank
User ID – this number will be defaulted to 1 for retail clients and can be any number
between 1 and 9 for corporate clients.
Password – the password has to be a minimum of 8 characters long and needs to
contain a combination of numbers and alphanumeric letters.
Once you have completed all three values, click on the “Logon” button to enter the site.
IMPORTANT NOTE: If you have selected to receive confirmation emails, then you will receive
an email stating that someone has logged in on the site with your profile number. If you ever get
an email like this and you haven’t actually logged in, then it is likely that someone else has
somehow gained access of your password and is illegally accessing your Internet banking
profile.
Last Updated: 11/3/2006 1:30 PM
Private and Confidential to BastionZA
Page 5
WebBank 1.6 - Internet Banking User Manual (Individuals)
2 Standard screen layout
2.1
Accessing Help
You can access help information in two ways:
• By clicking on the following link which should be visible on every screen:
•
By clicking on the Help button which can be found on the top right-hand corner of every
screen:
Once you have clicked on one of the help links, a new window will appear that will contain help
information on the current screen.
2.2
Logging Off
You can exit the site in two ways:
• By clicking on the Log Off button which can be found on the top right-hand corner of
every screen:
•
By selecting the Log off option from the “Select a function” menu box.
Once you have selected to log off, you will see the following screen:
If you have any questions or comments regarding Internet Banking, click on the “Click here” link
to send an email to the bank.
Last Updated: 11/3/2006 1:30 PM
Private and Confidential to BastionZA
Page 6
WebBank 1.6 - Internet Banking User Manual (Individuals)
2.3
Menus
There are 3 menus that remain visible at the top of the window at all times, namely:
•
Select a function: This menu will list all of the functions that you can use on Internet
Banking.
The “Do My Banking” option is used to perform transactions. Upon logon “Do my
Banking” will be set as default.
•
Select an account: This will list the accounts that have been linked to the profile.
•
Select an activity: This will list all of the available transactions that can be done on the
currently selected account. The items in this list depend on the client’s internet profile
setup and also the account category of the currently selected account. Not all clients will
have access to all of these functions.
“Select an account” will only become accessible once the Do my banking option has been
selected from “Select a function”.
“Select an activity” will only become accessible once Do my banking has been selected from
“Select a function” and an account has been selected from “Select an account”
Last Updated: 11/3/2006 1:30 PM
Private and Confidential to BastionZA
Page 7
WebBank 1.6 - Internet Banking User Manual (Individuals)
2.4
Profile Number and User ID Display
The profile number and user ID of the currently logged in user will display in the top right-hand
corner of every screen:
2.5
Limit Information
The available daily limit information will display at the top of every screen and will update as
transactions are done:
The limits are reset everyday and transactions will not be allowed if the limits have been
exceeded. Monthly, per transaction, user and account limits can also be set. To view these
limits, go to the General Enquiries function and view the Limit enquiry.
2.6
Balance Information
The current and available balance figures for a specific account will display underneath the limit
information once you enter the Do my banking function:
These balance amounts relate to the currently selected account.
2.7
Link to Bank Website
The bank logo at the top of the screen and also on the log off screen is linked to the bank’s
official website.
Simply click on the logo and a new window will open up in for the bank’s site.
Last Updated: 11/3/2006 1:30 PM
Private and Confidential to BastionZA
Page 8
WebBank 1.6 - Internet Banking User Manual (Individuals)
3 Account Summary Screen
How to get there: Select a function > View A List Of My Accounts
The Account Summary provides easy access to all the accounts you have linked to your profile.
At a glance you can view each account's current and available balances. This will always be the
first screen that you see once you have successfully logged on.
Deleted: s
You can do the following on this screen:
View the statement of your accounts
Click on the account description to quickly access the statement enquiry screen to see a
statement of your account. Here you will see the available balance and a list of
transactions for the selected period. Only 10 entries will be displayed at a time.
• View the balances of your accounts
Click on the account number to quickly access the balance enquiry screen to see an
overview of your account. Here you will see the available balance and a summary of the
last 10 transactions.
• View your accounts and payee's on one screen
Click the text link at the top of the screen. Click the text link again to return to only seeing
your accounts on one page.
• Sort the list of accounts and/or payees
Click on the underlined column heading (example “Account Description”) of the column
you wish to sort by. This will sort the column in ascending order. Clicking once again, will
sort the column in descending order.
You can also view your linked payee’s (beneficiaries) on this same page by clicking on the
following link:
•
Last Updated: 11/3/2006 1:30 PM
Private and Confidential to BastionZA
Page 9
Deleted: name or
WebBank 1.6 - Internet Banking User Manual (Individuals)
The screen layout will change as follows:
To change back to the original view where only the list of linked accounts are visible, click on
the following link:
4 Password Change
How to get there: Select a function > Change My Password
Your Password is vital to using Internet banking. It is used to identify you and grants you access
to your account information. Your Password is as important as your signature and should not be
shared. Keep it to yourself.
The Bank makes provision for secrecy by displaying stars (*) on the screen as you enter your
Password. This protects your Password from anyone looking over your shoulder as you type.
Password rules:
• Should be between 8 and 20 characters long
• Should be both numbers and letters (at least 1 numeric and 1 alphabetic)
• Should not have any special characters such as %&#@*()
• Must not be all zeros
• Must not be easy to guess numbers such as 1234 and 8888
• Will be invalidated if entered incorrectly for three consecutive times
If your Password is invalidated, please contact the help desk for assistance. You will not be able
to use internet banking until you do this.
The Bank will give you a temporary Password that must be changed immediately when you gain
access to internet banking and be replaced with your very own password.
Last Updated: 11/3/2006 1:30 PM
Private and Confidential to BastionZA
Page 10
WebBank 1.6 - Internet Banking User Manual (Individuals)
4.1
Setting Password At First Logon
The bank will provide you with a profile number, user ID and temporary password. Use this
information to logon. You will be required to change your password the first time you logon.
4.2
Changing Of Password
You can change your password at any time using the “Change My Password” option from the
“Select a function” menu.
5 Payees
5.1
Payee Summary
How to get there: Select a function > View A List Of Payees
The payee Summary provides easy access to all the payees you have requested the bank to
link to your profile. At a glance you can see the last date each payee was paid and the value of
the payment.
IMPORTANT NOTE: You can have up to 999 payees on your profile.
Last Updated: 11/3/2006 1:30 PM
Private and Confidential to BastionZA
Page 11
WebBank 1.6 - Internet Banking User Manual (Individuals)
5.2
Payee Maintenance
How to get there: Select a function > Change List Of Payees
OR “Payee Maintenance” link on the Payee Summary screen.
This facility allows you to add a new payee, delete a payee or change the narrative details of an
existing payee.
5.2.1
Adding a payee
You have three options when adding a new payee, namely:
•
Account at this bank
Fields to complete:
Account Number
Your Statement Text
Payee’s Statement Text
This has to be a valid account number at the bank.
The text that will display on your statement.
The text that will display on the payee’s statement.
Click on the “Add Payee” button to add the payee to your profile, or click on the “Cancel”
if you do not wish to continue with the new payee addition.
Last Updated: 11/3/2006 1:30 PM
Private and Confidential to BastionZA
Page 12
WebBank 1.6 - Internet Banking User Manual (Individuals)
•
Account at another bank
Fields to complete:
Other Bank Branch
Number
Account Number
Your Statement Text
Payee’s Statement Text
Enter a valid branch number. If you do not know
the branch number, click on the “Search” button
to find the correct branch number based on the
bank name and branch name.
This has to be a valid account number.
The text that will display on your statement.
The text that will display on the payee’s
statement.
If you click on the “Search” button, it will take you to the following screen:
Select a bank name from the “Select Bank” drop-down list and enter the branch name or
any other keyword that will identify the branch in the text field.
Then click on the “Search” button to start the branch code search. If you wish to get
back to the payee details screen, click on the “Cancel” button.
The next screen will show the results of the search.
Select the appropriate branch from the drop-down list. This will populate the “Other Bank
Branch Code” field with the correct code. Click on the “Next” button to get back to the
payee details screen. If you wish to exit this search, click on the “Cancel” button.
Last Updated: 11/3/2006 1:30 PM
Private and Confidential to BastionZA
Page 13
WebBank 1.6 - Internet Banking User Manual (Individuals)
After you click on the “Next” button, you will go back to the Payee Details screen where
you can continue to complete the rest of the input fields.
Click on the “Add Payee” button to add the payee to your profile, or click on the “Cancel”
if you do not wish to continue with the new payee addition.
•
Approved Payees
Click on one of the letters of the alphabet -- take the first letter of the payee name.
Then select a payee from the drop-down list.
Once you have selected a payee, you will be taken back to the Payee Details screen
where the payee details will already be defaulted. You will only be required to complete
the following two fields:
Your Statement Text
Payees Statement Text
Last Updated: 11/3/2006 1:30 PM
The text that will display on your statement.
The text that will display on the payee’s
statement.
Private and Confidential to BastionZA
Page 14
WebBank 1.6 - Internet Banking User Manual (Individuals)
Click on the “Add Payee” button to add the payee to your profile, or click on the “Cancel”
if you do not wish to continue with the new payee addition.
IMPORTANT NOTE: If you have selected to receive confirmation emails, then you will receive
an email stating that a beneficiary has successfully been loaded to your profile.
5.2.2
Deleting a payee
Click on one of the payees under the “Your statement text” column on the Payee Maintenance
screen. This will take you to the following screen:
Click on the “Delete” button if you wish to remove a payee from your profile.
After selecting to delete a payee, you will be taken to the “Confirm Payee Deletion” screen:
Last Updated: 11/3/2006 1:30 PM
Private and Confidential to BastionZA
Page 15
WebBank 1.6 - Internet Banking User Manual (Individuals)
At this point you need to click on “Confirm Deletion” to delete the payee from the list of payees,
or you can select to click on the “Cancel” button if you do not wish to continue with the deletion
of the payee.
Click on the “Return to Payee Maintenance” button to get back to the Payee Maintenance
screen.
IMPORTANT NOTE: Once you have confirmed the deletion of a payee, the payee will be
removed from your profile immediately. If you wish to make payments to this payee again in
future, you will have to add the payee to your profile again.
5.2.3
Changing a payee
This facility allows you to change the description of the narratives that will appear on your
statement and the payee’s statement. This will make the statement more meaningful and user
friendly.
Please note that you are not able to change the payee’s account or branch numbers. If you
wish to do so you will have to delete the payee and then add it again with the new information.
Click on one of the payees under the “Your statement text” column on the Payee Maintenance
screen. This will take you to the following screen:
Last Updated: 11/3/2006 1:30 PM
Private and Confidential to BastionZA
Page 16
WebBank 1.6 - Internet Banking User Manual (Individuals)
Click on the “Change” button to continue, or click on the “Cancel” button if you do not wish to
continue changing the payee. After selecting to change a payee, you will be taken to the
“Change Payee Details” screen:
Enter the new values in the input field under the “New” column and then click on the “Change
Payee” button. This will take you to the “Confirm Change Payee Details” screen.
Click on the “Return to Payee Maintenance” button to get back to the Payee Maintenance
screen.
Last Updated: 11/3/2006 1:30 PM
Private and Confidential to BastionZA
Page 17
WebBank 1.6 - Internet Banking User Manual (Individuals)
6 Pending Transactions
How to get there: Select a function > Pending Transactions
OR “Pending Transactions” link on Account Summary screen.
Pending Transactions only apply to business clients. This list of pending transactions will always
remain empty for individual clients.
7 General Enquiries
How to get there: Select a function > General Enquiries
This function allows you to view certain predefined enquiries not covered within the standard
Internet banking functionality.
All of these enquiries can be printed out by using the “Print” button at the bottom of the enquiry
results.
The available enquiries are:
7.1
Account Balance List
This enquiry shows all your linked accounts along with their current and available balances and
also totals for all of the accounts.
There are no selection fields for this enquiry, therefore simply click on “Submit Enquiry” to view
the results:
Last Updated: 11/3/2006 1:30 PM
Private and Confidential to BastionZA
Page 18
WebBank 1.6 - Internet Banking User Manual (Individuals)
Example of results:
7.2
Credit Card Branch codes
This enquiry gives you a list of valid credit card branch codes.
There are no selection fields for this enquiry, therefore simply click on “Submit Enquiry” to view
the results:
Example of results:
7.3
Stopped Cheques
This enquiry will show all stop cheque requests that have been posted on a certain account on
your profile.
The selection criteria are:
Account No: Enter one of your linked account numbers
Stop Date: Enter a date in the YYYYMMDD format.
Last Updated: 11/3/2006 1:30 PM
Private and Confidential to BastionZA
Page 19
WebBank 1.6 - Internet Banking User Manual (Individuals)
After you’ve entered your selection criteria, click on “Submit Enquiry” to view the results.
Example of results:
7.4
Cheque Book Orders
This enquiry will show any cheque book orders that have been placed on any one of you linked
accounts.
The selection criteria are:
Account No: Enter one of your linked account numbers
Order Date: Enter a date in the YYYYMMDD format.
After you’ve entered your selection criteria, click on “Submit Enquiry” to view the results.
Example of results:
7.5
Full Payee Details
This enquiry will list all of your payees along with their full account details.
The selection criteria is:
Last Updated: 11/3/2006 1:30 PM
Private and Confidential to BastionZA
Page 20
WebBank 1.6 - Internet Banking User Manual (Individuals)
Page No: If you leave this field blank of if you enter a 1 and click on "Submit Enquiry", then the
first 99 payees will be returned. If you enter a 2 or more, the beneficiaries from 100 and up will
be displayed (99 per page number). If you have less than 99 payees, then you can leave the
selection criteria empty.
Example of results:
If you see the following at the bottom of the results, this means that you have more payees to
view:
Click on “Another Enquiry”, then select “Full Payee Details” again. This time enter a page
number than is one more than the one you last entered.
If this line is not visible, then you have reached the end of your payees.
If you enter a page number that isn’t applicable to the number of payees that you have, you will
get the following message:
7.6
Statement
This enquiry will show you a statements of all transactions on your account over a specified
period. The results will be similar to the normal Statement Enquiry, but this enquiry is designed
to be printable and there are also additional columns for the Posting Date and Transaction
Charge.
Last Updated: 11/3/2006 1:30 PM
Private and Confidential to BastionZA
Page 21
WebBank 1.6 - Internet Banking User Manual (Individuals)
The selection criteria are:
Account Number: First you need to enter your account number.
Date: Enter a date range. You have the following options:
Equal to - statement entries on a specific date.
Not equal to - statement entries on every other day except this date.
Less Than Or Equal To - statement entries on and before a specific date.
Greater Than Or Equal To - statement entries on and after a specific date.
Greater Than - statements entries after a specific date.
Less Than - statement entries before a specific date.
(Remember to enter the date in the following format: YYYYMMDD)
Page number: Start with 1 (or blank), then if you see "Next Page..." at the bottom of the results,
click on "Another Enquiry" > Statement > Use page number 2, ect. If you don't see "Next
Page..." at the bottom of the results, it means that you have reached the last statement entry.
Example of results:
If you see the following at the bottom of your statement results, this means that your statement
entries still continue on another page:
Therefore you will click on "Another Enquiry", select "Statement" again and enter the next page
number.
If this notice is not at the bottom of your statement results, then this means that you've reached
the end of your statement.
Last Updated: 11/3/2006 1:30 PM
Private and Confidential to BastionZA
Page 22
WebBank 1.6 - Internet Banking User Manual (Individuals)
If you see the following, there were no entries for the date range specified or account specified:
(retry with another date range and check that the account number is correct)
If you try to access the statement of an account that is not loaded on your profile, you will get the
following error message:
7.7
Profile Limits
This enquiry will show all your current Internet Banking limits and also shows how much of the
limit you have already utilised.
There are no selection fields for this enquiry, therefore simply click on “Submit Enquiry” to view
the results:
Example of results:
Last Updated: 11/3/2006 1:30 PM
Private and Confidential to BastionZA
Page 23
WebBank 1.6 - Internet Banking User Manual (Individuals)
If you wish to print out the results of any of the enquiries, click on the “Print” button. This will
open up a printer friendly version of the results in a new window.
After printing, you can close this window to go back to the General Enquiries results window.
Click on the “Another Enquiry” button if you wish to run another enquiry.
8 Internet Banking Activities
8.1
Balance Enquiry
How to get there: Select a function > Do My Banking
Select an account > Select the account which you’d like to work with
Select an activity > Balance Enquiry
The balance enquiry will show the current and available balances for the selected account. It
will also show any uncleared effects and overdraft limits, as well as a list of the last 10
transactions that took place on the account.
Last Updated: 11/3/2006 1:30 PM
Private and Confidential to BastionZA
Page 24
WebBank 1.6 - Internet Banking User Manual (Individuals)
8.2
Statement Enquiry
How to get there: Select a function > Do My Banking
Select an account > Select the account which you’d like to work with
Select an activity > Statement Enquiry
The statement enquiry allows you to view the detail of all transactions that took place on the
selected account over a specified date period. The date range will usually default to the last
month. This can be changed to any date range required.
In addition to selecting a date range, you may also select one of the optional criteria to refine
your statement search.
The following optional criteria are available:
Amount is between
Enter a “From” and “To” amount value.
Cheque Number is
Enter a “From” and “To” cheque number value.
between
Payee Name contains
Enter a payee name or part of the payee’s name.
Statement Text contains
Enter a phrase or keyword.
Transaction Reference is
Enter a transaction reference number.
Click on the “Get Statement” button to view the statement results.
Last Updated: 11/3/2006 1:30 PM
Private and Confidential to BastionZA
Page 25
WebBank 1.6 - Internet Banking User Manual (Individuals)
To move to the next or previous page of the statement results, click on the “Next” and “Previous”
links, or change the page number in the “Go to page” box.
You can request another statement by completing the date and optional criteria again and then
clicking on the “Get Statement” button.
You also have the option to download the statement to a file that can be stored on your PC.
Only the currently displayed page of the statement will be downloaded, not all of the pages.
The following statement download formats are available:
•
•
•
•
•
CSV – Can be used in Excel and Text readers.
OFC – Can only be used in MS-Money
QIF – Can only be used in Quicken
NedInform ASCII/Text format
NedInform Spreadsheet format
After selecting a format, you will be able to either view the file or save it on your PC.
8.3
Account Payments
How to get there: Select a function > Do My Banking
Select an account > Select the account which you’d like to work with
Select an activity > Account Payments
With Account Payments you can make payments to your third-party beneficiaries that have been
linked to your profile.
Last Updated: 11/3/2006 1:30 PM
Private and Confidential to BastionZA
Page 26
WebBank 1.6 - Internet Banking User Manual (Individuals)
8.3.1
Step 1: Enter payment details
Fields to complete:
To
Amount
Optional Narrative
Confirmation Type
Confirmation
Address/number
Select a payee from the drop-down list
Enter the payment amount.
Enter any narrative detail. This field is optional.
If you wish to send a confirmation of this payment to the
payee, then you need to select a confirmation type from
the drop-down list. Currently only email is available.
If you have selected a confirmation type, then you need to
complete this field. Enter the email address you wish to
send the confirmation to. This needs to be a valid email
address. (Example: [email protected])
Click on the “Make Payment” button to process the payment.
8.3.2
Step 2: Confirm account payment
At this point you have the option to confirm the payment by clicking on the “Confirm Payment”
button, or to cancel the payment by clicking on the “Cancel” button.
8.3.3
Step 3: Complete account payment
If you selected to confirm the payment, the next screen will confirm that the payment has been
processed. You can do another account payment by clicking on the “Another Payment” button.
Last Updated: 11/3/2006 1:30 PM
Private and Confidential to BastionZA
Page 27
WebBank 1.6 - Internet Banking User Manual (Individuals)
If you wish to print out this confirmation, click on the “Printer friendly version” link. This will open
up another window with a printable version of the payment confirmation. You can then select to
print the confirmation.
8.4
Interaccount Transfers
How to get there: Select a function > Do My Banking
Select an account > Select the account which you’d like to work with
Select an activity > Statement Enquiry
With interaccount transfers you can move money between the linked accounts on your profile.
8.4.1
Step 1: Enter transfer details
Last Updated: 11/3/2006 1:30 PM
Private and Confidential to BastionZA
Page 28
WebBank 1.6 - Internet Banking User Manual (Individuals)
Fields to complete:
To
Amount
Select an account from the drop-down
list.
Enter the transfer amount.
Click on the “Transfer” button to process the transfer.
8.4.2
Step 2: Confirm transfer
At this point you can choose to confirm the transfer by clicking on the “Confirm Transfer” button
or you can choose not to go ahead with the transfer by clicking on the “Cancel” button.
8.4.3
Step 3: Complete transfer
If you selected to confirm the transfer, the next screen will confirm that the transfer has been
processed. You can do another account transfer by clicking on the “Another Transfer” button.
If you wish to print out this confirmation, click on the “Printer friendly version” link. This will open
up another window with a printable version of the transfer confirmation. You can then select to
print the confirmation.
Last Updated: 11/3/2006 1:30 PM
Private and Confidential to BastionZA
Page 29
WebBank 1.6 - Internet Banking User Manual (Individuals)
8.5
Once-off Payments
How to get there: Select a function > Do My Banking
Select an account > Select the account which you’d like to work with
Select an activity > Once-off Payments
With Once-off Payments you can make payments to a third-party that has not been linked to
your profile as a payee. You will not need to add this third-party to your profile.
8.5.1
Step 1: Enter once-off payment details
You have three options when making a once off payment, namely:
• Account at this bank
Fields to complete:
Account Number
Your Statement Text
Payees Statement Text
Optional Narrative
Amount
Confirmation Type
Confirmation
Address/number
Last Updated: 11/3/2006 1:30 PM
This has to be a valid account number at the bank.
The text that will display on your statement.
The text that will display on the payee’s statement.
Enter any narrative detail. This field is optional.
Enter the payment amount.
If you wish to send a confirmation of this payment to the
payee, then you need to select a confirmation type from
the drop-down list. Currently only email is available.
If you have selected a confirmation type, then you need
to complete this field. Enter the email address you wish
to send the confirmation to. This needs to be a valid
email address. (Example: [email protected])
Private and Confidential to BastionZA
Page 30
WebBank 1.6 - Internet Banking User Manual (Individuals)
Click on the “Make Payment” button to process the payment.
•
Account at another bank
Fields to complete:
Other Bank Branch
Number
Account Number
Your Statement Text
Payees Statement Text
Optional Narrative
Amount
Confirmation Type
Confirmation
Address/number
Enter a valid branch number. If you do not know
the branch number, click on the “Search” button to
find the correct branch number based on the bank
name and branch name.
This has to be a valid account number.
The text that will display on your statement.
The text that will display on the payee’s statement.
Enter any narrative detail. This field is optional.
Enter the payment amount.
If you wish to send a confirmation of this payment
to the payee, then you need to select a
confirmation type from the drop-down list.
Currently only email is available.
If you have selected a confirmation type, then you
need to complete this field. Enter the email
address you wish to send the confirmation to. This
needs to be a valid email address. (Example:
[email protected])
If you click on the “Search” button, it will take you to the following screen:
Select a bank name from the drop-down list and then enter the branch name or any other
keyword that will identify the branch in the next field. Then click on the “Search” button.
Or if you wish to get back to the payee details screen, click on the “Cancel” button.
Last Updated: 11/3/2006 1:30 PM
Private and Confidential to BastionZA
Page 31
WebBank 1.6 - Internet Banking User Manual (Individuals)
The next screen will show the results of the search. You can select the appropriate
branch from the drop-down list. This will populate the “Other Bank Branch Code” field
with the correct code. Click on the “Next” button to get back to the payee details screen,
or click on the “Cancel” button to perform another search.
Once back at the payee detail screen, click on the “Make Payment” button to process the
payment.
•
Approved Payees
Select the one of the letters of the alphabet (take the first letter of the payee name).
Then select a payee from the drop-down list. Once you have selected a payee, the
payee details will get defaulted.
Last Updated: 11/3/2006 1:30 PM
Private and Confidential to BastionZA
Page 32
WebBank 1.6 - Internet Banking User Manual (Individuals)
You will only be required to complete the following fields:
Your Statement Text
Payees Statement Text
Optional Narrative
Amount
Confirmation Type
Confirmation
Address/number
The text that will display on your statement.
The text that will display on the payee’s statement.
Enter any narrative detail. This field is optional.
Enter the payment amount.
If you wish to send a confirmation of this payment
to the payee, then you need to select a
confirmation type from the drop-down list.
Currently only email is available.
If you have selected a confirmation type, then you
need to complete this field. Enter the email
address you wish to send the confirmation to. This
needs to be a valid email address. (Example:
[email protected])
Once you have entered all of the required details, click on the “Make Payment” button to
process the once-off payment.
8.5.2
Step 2: Confirm once-off payment
At this point you have the option to confirm the payment by clicking on the “Confirm Payment”
button, or to cancel the payment by clicking on the “Cancel” button.
Last Updated: 11/3/2006 1:30 PM
Private and Confidential to BastionZA
Page 33
WebBank 1.6 - Internet Banking User Manual (Individuals)
8.5.3
Step 3: Complete once-off payment
If you selected to confirm the payment, the next screen will confirm that the payment has been
processed. You can do another account payment by clicking on the “Another Payment” button.
If you wish to print out this confirmation, click on the “Printer friendly version” link. This will open
up another window with a printable version of the payment confirmation. You can then select to
print the confirmation.
IMPORTANT NOTE: If you have selected to receive confirmation emails, then you will receive
an email stating that a once-off payment has been made on your profile.
8.6
Change Account Description
How to get there: Select a function > Do My Banking
Select an account > Select the account which you’d like to work with
Select an activity > Change Account Description
By changing an account description, you can make the account name more meaningful to
yourself.
Last Updated: 11/3/2006 1:30 PM
Private and Confidential to BastionZA
Page 34
WebBank 1.6 - Internet Banking User Manual (Individuals)
Enter the new account description in the “New” column and click on the “Change Description”
button. The next screen will confirm the description change, showing the previous description in
the “Old” column and the updated description in the “New” column.
IMPORTANT NOTE: This does not change the Account Name of the account held at the bank,
it only changes the account description as seen on Internet Banking.
8.7
Email Statements
How to get there: Select a function > Do My Banking
Select an account > Select the account which you’d like to work with
Select an activity > Email Statements
This activity allows you to request the electronic mailing of statements for an account linked to
your internet banking profile.
One of the following frequencies can be selected:
• Daily
– Every business (bank) day, starting from tomorrow.
• Weekly
– Once a week, starting from tomorrow.
• Monthly
– Once a month, on the first business day of the month.
• Quarterly
– Once every quarter, on the first business day of January, April,
July and October.
• Biannual
– Twice a year, on the first business day of January and July.
• Annual
– Once a year, on the first business day of January.
Last Updated: 11/3/2006 1:30 PM
Private and Confidential to BastionZA
Page 35
WebBank 1.6 - Internet Banking User Manual (Individuals)
The format of the attachment sent with the email (containing your account statement) can be
one of the following:
• CSV
- Comma Separated Values, this is useful for loading into
Excel documents.
• Formatted Text
- A text based, formatted statement.
• HTML
- Hyper-Text Markup Language, an alternate Web formatted
statement.
• TSV
- Tab Separated Values, this is useful for loading into
certain third party applications.
• PDF
- Acrobat document, for a formatted statement.
• XML
- Extensible Markup Language, this is useful for loading into
certain third party applications.
After selecting a frequency and format, click on the “Process Request” button. This will take you
to the following screen which confirms that the request has been processed:
To cancel an existing request, change the frequency to “No Email” and click on the “Process
Request” button:
The next screen will confirm that the email statement request has been cancelled.
8.8
Stop Cheques
How to get there: Select a function > Do My Banking
Select an account > Select the account which you’d like to work with
Select an activity > Stop Cheques
This activity allows you to request that a certain cheque number (or range of cheque numbers)
be stopped. You can optionally add a remark, detailing why this request has been made.
You can opt to enter only one value in the “From” field, or you can enter a range of values by
completing the both the “From” and “to” fields.
Last Updated: 11/3/2006 1:30 PM
Private and Confidential to BastionZA
Page 36
WebBank 1.6 - Internet Banking User Manual (Individuals)
The next screen will confirm that the cheque stop request has been processed:
8.9
Cheque Book Order
How to get there: Select a function > Do My Banking
Select an account > Select the account which you’d like to work with
Select an activity > Cheque Book Order
This activity allows you to place an order for a new cheque book. The cheque book will be
applicable to the currently selected account.
To process the Cheque Book Order, click on the “Order Cheque Book” button. The next screen
will show you for which account the cheque book order has been requested for. To confirm the
order, click on the “Confirm Cheque Book Order” button.
Last Updated: 11/3/2006 1:30 PM
Private and Confidential to BastionZA
Page 37
WebBank 1.6 - Internet Banking User Manual (Individuals)
If you do not wish to continue with the Cheque Book order, then simply click on the “Cancel”
button.
After confirming the cheque book order, the next screen will state whether the order was
successful or not.
9 Session timeout
If your session is inactive for 8 minutes, your session will expire. When trying to continue with
anything you will get the following message:
This is a security feature that aims at preventing fraudulent use of your profile if you forget to log
off after you finish your banking activities.
Last Updated: 11/3/2006 1:30 PM
Private and Confidential to BastionZA
Page 38