1
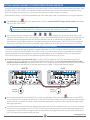
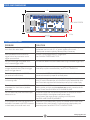
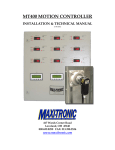
4C-HP
USER’S MANUAL
www.propjamr.com
4C-HP Hardware features
Powerful 32 bit microcontroller
Crystal clear MP3 or WAV line level stereo audio
On board 3W mini amp for small displays
Cool, ultra-efficient DC/DC switching regulator
Power supply reverse polarity protection
Wide operating voltage range 6 - 24 VDC
2 amps per channel output - 8 amps total @ 12VDC
On board inductive flyback voltage protection
32K sequence memory - up to 1M available
Multiple ambient audio track capability
1+ million record cycles - up to 200 year data retention
Optically isolated trigger input
Multiple trigger configurations - dry contact or powered
Separate power and ground terminals for each channel
Mode and output channel activity LEDs
Program multiple units from one master with EZSync
Non-volitile sequence, trigger delay and volume settings
EZMount protective mounting plate included
WELCOME TO PROP JAM’R
Your PROP JAM’R was designed to be a simple, yet powerful, audio and visual programmable controller that can be used in many
different configurations. A flexible feature set, easy push button programming, four high-power solid state DC outputs and
on-board CD quality audio allows you to easily create a stunning visual and audible experience limited only by your imagination.
While designed to directly control DC loads like LEDs, relays and solenoids, you can easily control high powered AC loads by
connecting appropriately sized mechanical or solid state relays directly to the PROP JAM’R. This method will keep dangerous
high voltage wiring phyically isolated from the unit and you. (See TYPICAL PROP JAM’R SETUP for more details.)
Use the on-board 3W mini amp to drive a small speaker directly for a small stand alone display, or feed the line level stereo
output to a monster amplifier and speaker setup that will shake the walls. Your PROP JAM’Rs CD quality stereo audio delivers
amazing sound to your projects.
Please read the following instructions thoroughly to get the most out of your PROP JAM’R. Understanding all of the features
available will allow you to easily configure your unit to control and enhance your specific project.
Visit www.propjamr.com to see instructional operation videos and different configuration examples.
PROP JAM’R POWER SPECIFICATIONS
The following guidelines will detail best practices for successfully powering your unit. Operating outside of these specifications
will result in permanent damage to your controller and is not covered under warranty.
The unit is completely solid state and can be powered by DC power only, meaning you can not use an AC power source.
Typical power sources for the PROP JAM’R include wall power supplies that output clean DC voltage, batteries and switching
power supplies. The operating voltage range is 6 - 24 volts DC. The PROP JAM’R has reverse polarity protection. If you connect
your power supply backwards, the unit will not function, but will not get damaged.
Since your PROP JAM’R supplies power to your connected loads, your power supply current requirements will vary greatly based
on the total current requirements of all the loads combined. When powered by 12 volts, with no loads connected, the unit will
draw from 20mA up to 190mA when driving a speaker using the LOW POWER SPEAKER OUTPUT. When you connect devices to
the outputs, the current requirements will increase accordingly, up to a maximum of 8 amps.
The power for the four high power channel outputs comes directly from the power supply connected to your PROP JAM’R. This
means that your power supply must be able to supply the current requirements of all your loads combined at the correct voltage.
When operating at 12 volts, the maximum current that each individual channel can supply is 2000mA or 2 amps. The total
maximum current the unit can supply with each channel turned on at one time is 8000mA or 8 amps.
INPUT VOLTAGE 12 VDC
INPUT VOLTAGE 24 VDC
CURRENT PER CHANNEL 2000mA (2A) MAX.
CURRENT PER CHANNEL 1000mA (1A) MAX.
Exceeding these limits will result in permanent damage.
1
= 24 WATTS PER CHANNEL - 96 WATTS TOTAL
www.propjamr.com
MAP OF YOUR PROP JAM’R
TRIGGER IN
AUDIO OUT
OUTPUTS 1-4
POWER IN
LOW POWER
SPEAKER OUT
OUTPUT LEDS
TRIGGER
JUMPER
EZSYNC PORT
2G - 32G
MASTER/ SLAVE
SELECT
MODE LED
EZMOUNT
BASE PLATE
RECORD
EDIT MODE
ENTER
CHANNEL 2
VOL. DOWN
10 SECOND
CHANNEL 1
VOL. UP
1 SECOND
CHANNEL 4
TRIGGER
10 MINUTES
CHANNEL 3
TIMER DELAY
1 MINUTE
AUDIO OUT Stereo line level output. Connect to your amplified
CHANNEL 4 Multi-use. Pressing during idle mode will trigger unit.
TRIGGER Channel 4 ON during sequence record mode. Add
10 MINUTES 10 minute delay during delay timer mode.
sound system. Right, left and ground.
TRIGGER IN Trigger input from PIR sensor, dry contact, or
powered trigger source
LOW POWER Low power audio out (3 watt) can power a small
SPEAKER OUT speaker. Useful during stand alone programming or
POWER IN External power source connection. Power in must
for small self contained display.
be DC. AC power will NOT work. Voltage must be
between 6 and 24 volts. If power polarity is reversed,
the unit will not function.
TRIGGER Remove jumper if using powered trigger source.
JUMPER Allows for complete electrical isolation from trigger.
OUTPUTS 1-4 Solid state outputs to your LEDs, relays, solenoids or
MICRO SD Micro SD card from 2G to 32G for storage of
CARD SLOT ambient and trigger sound tracks.
any load that can be powered by DC. The output
voltage will match the POWER IN voltage.
MODE Red LED used to indicate the operational mode of
LED the unit. Pulses once per second during idle mode.
RECORD Multi-use. Pressing during idle mode will begin and
EDIT MODE end button sequence recording. Long press will
ENTER initiate single channel edit mode.
OUTPUT Blue LEDs used to indicate the state of each output.
LEDS Will be illuminated when output is on.
CHANNEL 1 Multi-use. Pressing during idle mode will increase
VOL. UP volume level. Channel 1 ON during sequence record
1 SECOND mode. Add 1 second delay during delay timer mode.
EZSYNC Connection for sequence transfer from a master
PORT unit to a slave unit. Uses included EZSync cable.
CHANNEL 2 Multi-use. Pressing during idle mode will decrease
VOL. DOWN volume level. Channel 2 ON during sequence record
10 SECOND mode. Add 10 seconds delay during delay timer mode.
MASTER/ Used during EZSync process to set each unit as
SLAVE SELECT a master or slave. Master sends data, slave receives.
EZMOUNT Plastic non-conductive base plate used to mount
BASE PLATE unit to display and protects unit from shorting.
CHANNEL 3 Multi-use. Pressing during idle mode will initiate delay
TIMER DELAY timer setting. Channel 3 ON during sequence record
1 MINUTE mode. Add 1 minute delay during delay timer mode.
2
www.propjamr.com
USING AUDIO WITH YOUR PROP JAM’R
Your PROP JAM’R is the perfect tool for synchronizing up to 4 channels of output control to a sound track to create a visual and
audible experience for your project. However, your unit does not have to use sound at all if you just want to have a triggered
sequence. In this case, no micro SD card is needed and you can skip to the step - GET YOUR PROP JAM’R UP AND RUNNING.
The PROP JAM’R can make use of two different MP3 or WAV audio tracks, an “ambient” track and a “trigger” track. The ambient
track is typically considered “background” audio that plays constantly in a loop until interrupted by a trigger. The ambient track
can be as long as you like, limited only by the size of your Micro SD memory card. The trigger track is limited to 6 minutes,
45 seconds (405 seconds) in length, which corresponds to the memory limit of your recorded trigger sequence. The PROP
JAM‘R can be ordered with a larger memory capacity for a longer recorded trigger sequence, however we have found that
typical recorded sequences will easily fit within the memory limits of the stock PROP JAM’R.
Upon power up, the ambient track will begin to play and will continue to play while the unit is waiting for a trigger event. This
is known as IDLE MODE. Once the unit is triggered, the ambient track will immediately stop and the trigger track will begin to
play. When your recorded trigger sequence finishes, the unit will begin to play the ambient track again from its beginning.
An ambient track is not required if you don’t want audio to play while the unit is in IDLE MODE. In this case, use only one audio
track (0001.mp3 or 0001.wav). The unit will automatically recognize that this single MP3 or WAV file will be used only as a
trigger audio track.
There are many sources for ambient and trigger audio tracks on the Internet. Just make sure the files you want to use are in
.mp3 or .wav format. A micro SD card is required to store and use audio tracks with your PROP JAM’R. Most all micro SD cards,
from 2G to 32G in size, are compatible with your unit.
COPY YOUR AUDIO FILES TO THE MICRO SD CARD
1
2
3
4
On your computer, insert and format your micro SD card to clear it of all data.
Copy your trigger and ambient audio tracks to your computers’ desktop. Make sure these are .mp3 or .wav files.
On your desktop, rename your trigger track to 0001.mp3 or 0001.wav and your ambient track to 0002.mp3 or 0002.wav.
Click on the 0001 file and drag it to the micro SD card, then click on the 0002 file and drag it on to the micro SD card.
Copying your audio tracks in numerical order to the micro SD card is critical for proper operation.
If you only want sound during the triggered event and don’t want to have
any ambient sound, only copy the trigger track on to your micro SD card.
5
Safely eject your micro SD card from your computer and insert it into the PROP JAM’R micro SD slot.
USING MORE THAN ONE AMBIENT TRACK
When your PROP JAM’R is triggered, the trigger track will play until your recorded sequence is finished, at which time the
ambient track will begin to play from its beginning. You can use multiple ambient tracks that will play in sequence after each
trigger event. If there is more than one audio track (the trigger track) on the micro SD card, the PROP JAM’R will automatically
assign these files to sequential ambient tracks. These files need to be named and copied to the micro SD card in order from
0002, 0003, 0004, etc. as describe above. The length of your ambient audio tracks is limited only by the size of the micro SD card.
If using multiple ambient tracks, each track will play sequentially from 0002 to the highest numbered track after each trigger
event occurs. In the event that no trigger occured by the time an ambient track finishes playing, the next ambient track will
automatically begin to play. Once the highest numbered ambient track finishes playing, the unit will reset and begin playing
again from track 0002.
Combining multiple ambient tracks, a timer delay (see SETTING A TIMER DELAY) and a looping trigger sequence, one can create
a complex and very extensive visual and audible experience.
3
www.propjamr.com
GET YOUR PROP JAM’R UP AND RUNNING
The easiest minimal configuration using a 9-volt battery and a small speaker, is shown in the diagram below. This set up is
enough to enable you to familiarize yourself with all the functions available on the PROP JAM’R. The polarity of the speaker on
the LOW POWER SPEAKER OUT is not critical, however, the polarity of the battery is. RED is positive, BLACK is negative (GND).
When you first power up the unit and you have an ambient track on the micro SD card, you will hear your ambient track begin
to play and the MODE LED will pulse a “heartbeat” once per second. This heartbeat indicates that the unit is in IDLE MODE.
In IDLE MODE, the unit is waiting for an event to occur while constantly looping the ambient track. An event could be a trigger,
or a button press for changing the mode.
In IDLE MODE, pressing 1 VOL + will increase the volume, and pressing 2 VOL - will decrease the volume. Volume is saved in memory.
RECORDING A TRIGGER SEQUENCE
Your PROP JAM’R has four channels of solid state output that can be programmed to control devices attached to OUTPUTS 1-4.
These devices can be LED’s, solenoids, relays or anything that is compatible with the DC voltage and current limits of the unit.
The outputs are activated by a recorded sequence that you program using the on-board push buttons. These button presses
are recorded at a rate of 20 samples per second. The PROP JAM’R can store up to 6 minutes and 45 seconds of your button
sequence to non-volitile memory. Your recorded sequence will remain in memory until recorded over or edited, even when
power is removed from the unit. (Larger memory is available for even longer sequences).
While the PROP JAM’R is in IDLE MODE (heartbeat pulse), follow these steps to make a sequence recording...
1
Press the RECORD button. The MODE LED will begin to flash steadily. Press the RECORD button a second time to commit to the
recording process. The MODE LED will begin a slower 3 count pattern. We call this pattern “on three” (1, 2, on 3). When the LED
flashes the third time and stays steady, the unit is in RECORD MODE. The trigger sound track will begin to play at this time.
After you press the record button the first time, you can abort from RECORD MODE without recording
anything by pressing any of the other buttons to exit the RECORD MODE and go back to IDLE MODE.
2
Press the four channel buttons, 1 VOL + 2 VOL - 3 TMR 4 TGR in any order, length, or combination that you want. You can
press the buttons in sync with the sounds of the the trigger track if you wish. Each button press will be recorded and the
corresponding output channel will be activated as long as you press its’ channel button. You can continue recording button
presses, even if the trigger audio track is shorter and has finished playing, for up to 6 minutes and 45 seconds (405 seconds).
3
Press the RECORD button once to end your recording and exit the RECORD MODE. The trigger audio track will stop
immediately, even if it didn’t finish playing through its full length. The MODE LED will begin to flash quickly while saving your
sequence to memory. Depending on the lenght of your sequence, this saving process may take a few seconds. Once the unit
is done saving, the ambient track will begin to play and the MODE LED will flash the heartbeat, indicating the unit is back in
IDLE MODE. Your sequence is now stored in non-volitile memory.
4
www.propjamr.com
PLAY BACK YOUR RECORDED TRIGGER SEQUENCE
Once you have recorded a trigger sequence, and the unit is in IDLE MODE (heartbeat pulse), you can have the PROP JAM’R play
back the recorded sequence, along with the trigger audio track, in one of two ways, the on-board trigger button, or a trigger
signal on the TRIGGER IN terminals. (See SETTING UP EXTERNAL TRIGGER SOURCE to configure the TRIGGER IN to your sensor).
Press the
4 TGR
button to trigger the PROP JAM’R to play back your recorded sequence.
You can install a wire jumper from the TRIG terminal to the + terminal on the PROP JAM’R to automatically loop the trigger
sequence over and over. This may not seem like a great idea, unless there was an adjustable timer delay between each trigger...
(See the next section).
Wire Jumper
SETTING A TIMER DELAY
Setting a timer delay allows you to automatically play a trigger sequence over and over with a set time delay between each one.
By installing a trigger jumper as shown in the previous section, the PROP JAM’R will continuously trigger. Once the trigger
sequence plays, the set time delay will begin, the ambient track will play (if you are using one) until the timer delay runs out, at
which time the whole process repeats. A timer delay can also prevent the unit from being repeatedly triggered from an external
trigger source. This may come in handy while using a PIR motion sensor, when there is a lot of activity around the sensor. Once
the PROP JAM’R is triggered, it will not trigger again until the preset delay timer has run out.
Remove the trigger wire jumper, or any trigger source, before trying to set a delay. The trigger jumper wire
will keep the unit in TRIGGER MODE and will not be able to return to IDLE MODE until it is removed.
While the PROP JAM’R is in IDLE MODE (heartbeat pulse), follow these steps to set a timer delay...
1
Press the 3 TMR button. The MODE LED will begin to flash steadily indicating the unit is in TIMER MODE. Pressing any of
the four channel buttons will ADD a certain amount of time to the delay, always starting from 0 seconds.
Pressing 1 VOL + adds 1 second
Pressing
2 VOL -
adds 10 seconds
Pressing
Pressing
4 TGR
adds 10 minutes
3 TMR
adds 1 minute
Continue to press any of the channel buttons until you have added up the total amount of delay you require.
For example, for a delay of 12 minutes 43 seconds, your button press sequence would be...
4 TGR
2
X 1 = 10 min.
3 TMR
X 2 = 2 min.
2 VOL -
X 4 = 40 sec.
1 VOL +
X 3 = 3 sec.
Press the RECORD button to exit TIMER MODE. Your delay is now set and written to memory. The unit will return to
IDLE MODE (heartbeat pulse) . The timer delay can range from 1 second to about 18.2 hours.
To erase any delay, while the unit is in IDLE MODE, simply press the
5
3 TMR
and then the
RECORD
button.
www.propjamr.com
EDITING A SINGLE CHANNEL OF YOUR RECORDED TRIGGER SEQUENCE
Once you have recorded a trigger sequence, you may want to “edit” just one of the channels without effecting the others. When
the PROP JAM’R is in EDIT MODE, you will be able to select one channel to edit, and the other channels will remain intact as
previously recorded. You can do this as many times, to any channel you need, to “tweak” your project.
While the PROP JAM’R is in IDLE MODE (heartbeat pulse), follow these steps to edit a single channel of your trigger sequence...
1
Press AND HOLD the RECORD button for approximately 3 seconds, until the MODE LED begins to flash quickly, then release.
The unit is now in EDIT MODE.
If you want to abort from the EDIT MODE without re-recording one of the channels, simply press the
record button while the MODE LED is flashing. This will return the unit back to IDLE MODE.
2
Press any one of the four channel buttons 1 VOL + 2 VOL - 3 TMR 4 TGR corresponding to the channel you want to edit.
The MODE LED will begin a slower 3 count pattern. (1, 2, on 3). When the led flashes the third time and stays steady, the unit
will begin playing the trigger track and start recording the button presses on the channel you selected to edit only. The
other channels will play back the previously recorded sequence during the edit process. The EDIT MODE will automatically
end based on the length of the previously recorded trigger sequence. Once finished, the unit will go back to IDLE MODE.
USING EZSYNC TO DUPLICATE DATA TO ANOTHER PROP JAM’R
Once you have programmed and perfected your trigger sequence on your PROP JAM’R, you can easily transfer the sequence
data to any number of other PROP JAM’Rs. This comes in handy if you need multiple units to run the exact same sequence,
without the need to manually replicate your sequence for each additional unit. To implement EZSync, your programmed
PROP JAM’R will be set up as a MASTER, and the receiving PROP JAM’R will be set up as a SLAVE.
1
Disconnect the power source from both units. Connect the EZSync cable from one unit to the other using the PORT
connector. The EZSync cable can fit on the PORT connecter in either polarity, however, the polarity of the EZSynch cable
must be the same on both units. Set the MASTER/SLAVE SELECT jumper on the master unit to cover the top two pins labled
“M”. Set the jumper on the slave unit to cover the bottom two pins labled “S”. Refer to the following diagram.
MASTER
SLAVE
Jumper
set to M
Jumper
set to S
2
Re-connect power to both units. The MODE LED on both units will begin to flash. Press the RECORD button on the MASTER
unit to initiate the EZSync transfer. The MODE LED on the MASTER will stay on steady during the transfer and will flash rapidly
once the transfer is complete. This process copies the entire recorded button sequence, volume setting, timer delay setting
and trigger type setting.
3
Disconnect power source from both units. Remove the jumpers and the EZSync cable from both units. Once you re-connect
power, both units will go back to IDLE MODE. The SLAVE unit will now be programmed with the same trigger sequence and
configuration as the MASTER. Don’t forget to copy the same ambient and trigger audio tracks to the micro SD card for both
units if you want them to perform exactly the same.
6
www.propjamr.com
SETTING UP EXTERNAL TRIGGER SOURCE
Your PROP JAM’R can make use of an external trigger source to initiate the programmed trigger sequence and trigger audio
track. The trigger input is optically isolated and is compatible with N.O. (normally open) contact, N.C. (normally closed) contact
and low powered (6 - 24 volt DC) trigger sources. The following diagrams illustrate the available trigger input configurations.
N.O. TRIGGER
Your PROP JAM’R default trigger input is set up for N.O. contacts.
This means the trigger event occurs when the N.O. contact closes
to complete the circuit path between TRIG and +.
The TRIGGER JUMPER must be installed to use N.O. contacts.
N.C. TRIGGER
Your PROP JAM’R must be set up to use N.C. contact trigger. Refer
to “CHANGING TRIGGER INPUT TYPE” below.
With N.C. contact, the trigger event occurs when the N.C. contact
opens to interrupt the circuit path between TRIG and +.
The TRIGGER JUMPER must be installed to use N.O. contacts.
TRIGGER
JUMPER
TRIGGER
JUMPER
POWERED TRIGGER
A powered trigger gives you complete optical isolation between
the trigger source and your PROP JAM’R. The trigger event occurs
when 6 to 24 volts DC is applied between TRIG and -.
POLARITY MUST BE OBSERVED when using this method.
The input can also be set that the trigger event occurs when trigger
power is removed. Refer to “CHANGING TRIGGER INPUT TYPE” below.
The TRIGGER JUMPER must be removed to use a powered trigger.
6 - 24VDC
TRIGGER
JUMPER
-
+
PIR MOTION SENSOR
Your PROP JAM’R can power a PIR motion sensor directly. The
red and black wires are for power. If your PIR is N.O. type, the
TRIGGER
JUMPER
white and green wires are typically a “switch” inside the PIR
that closes when the unit senses activity.
Connect black to -, red and green to +, and white to TRIG.
If your PIR is N.C. type, refer to “CHANGING TRIGGER INPUT TYPE”.
The TRIGGER JUMPER must be installed to use a PIR sensor.
The power source for the PIR sensor is derived directly from the power source connected to your PROP JAM’R.
Make certain that the power requirement for your PIR falls within the output of your power source.
CHANGING INPUT TRIGGER TYPE
Follow these steps to TOGGLE BETWEEN N.O. and N.C. trigger types. This setting is saved to memory.
*Note: If your PROP JAM’R triggers without any connections to the TRIGGER IN, the trigger type is set to N.C.
1
Turn off the power source to the PROP JAM’R.
2
Press and hold the RECORD button while you turn on the power source.
3
Release the
RECORD
button. The mode LED will flash and trigger type will be toggled from N.O. to N.C. or from N.C. to N.O.
7
www.propjamr.com
TYPICAL PROP JAM’R SET UP
Your PROP JAM’R is a very versatile audio and visual controller, capable of being set up in many different configurations specific
to your display. Below is a typical hardware set up used to control many types of props. The combination of output devices,
trigger sources and sequence programming are limited only by your imagination. It is important that you stay within the
voltage and current limitations (see PROP JAM’R POWER SPECIFICATIONS) of the unit and its power supply when designing
your project. If you need to control AC loads, your PROP JAM’R can easily interface to mechanical or solid state relays.
Audio Amplifier
with Speakers
PIR Sensor
Trigger
Power Supply
Pneumatic
Solenoid
Valves
LED Flood Lamp
Solid State Relay
INCORRECT USE OF HIGH VOLTAGE A.C. CAN BE LETHAL. MAKE SURE ALL POWER IS DISCONNECTED WHEN WIRING CIRCUITS!
8
www.propjamr.com
PROP JAM’R DIMENSIONS
5”
1-3/8” HOLE CENTER
2-1/4”
4-1/2”
HOLE CENTER
.2” Dia.
TROUBLESHOOTING
PROBLEM
SOLUTION
The unit has power, but the MODE LED
won’t flash. Unit seems “dead”.
Check that your power source is fuctional using a multimeter. Voltage must
be between 6 and 24 volts DC. AC power supplies will not work.
Check power connection polarity. Reverse polarity if necessary.
When powered, the unit continues to
trigger without any connection to the
trigger input terminals.
The unit is set to trigger with a N.C. trigger input.
See CHANGING TRIGGER INPUT TYPE.
The unit won’t trigger using either a N.O.
or N.C. external trigger switch.
The TRIGGER JUMPER must be installed when using a switched trigger input.
The unit won’t play the trigger audio track
or tigger sequence when I press the trigger
button or trigger the unit.
There is probably a timer delay set preventing the trigger to occur. Wait for the
timer delay to cycle or erase the delay. See SETTING A TIMER DELAY.
The unit has power, but the MODE LED
just continues to flash slowly.
Make sure the MASTER/SLAVE SELECT jumper is not installed. Disconnect
power and remove the jumper. Re-connect power.
Audio tracks are playing, but are playing
in the wrong order.
On top of naming your audio files properly, they must also be copied to the
micro SD card in the order that you want them to play. Delete the files from
the SD card and copy them from the desktop one by one, in order of play.
The unit has power and the MODE LED has
a heartbeat, but I don’t hear my ambient
audio track.
Press and hold the 1 VOL + button to increase the volume level.
Make sure that you have copied more than one correctly named audio file
to the SD card. See USING AUDIO WITH YOUR PROP JAM’R.
The unit resets every time one of the output
devices turns on.
The power supply does not have enough current to drive one or more of
the output devices. Use a higher current power supply.
One or more of the ouput devices is drawing too much power.
See PROP JAM’R POWER REQUIREMENTS.
EZSync jumpers are in the right position and
the cable is connected to the PORT connector
on both boards, but transfer won’t work.
Check the EZSync cable polarity. Polarity must be the same on both boards
for data transfer to work correctly. Disconnect power, check polarity and
reconnect power. See USING EZSYNC TO DUPLICATE DATA.
9
www.propjamr.com