1
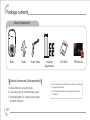
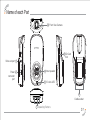
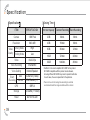
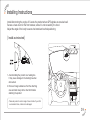
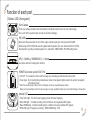
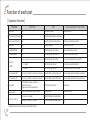
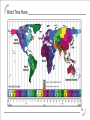
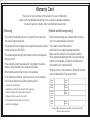
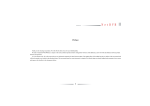
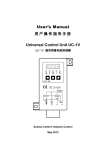
This manual should be read before the product is activated.
For Safety purposes, users are advised to correctly operate
the product according to this manual
CAR Black Box System
M1
User Manual (Ver 1.0 EG)
Contents
Product overview
03
Explanation of player
Notice for safety
04
Package contents
06
Name of each Part
07
• Analysis for G-SENSOR Data
Specification
08
• Conversion of Speedometer
Installing Instructions
09
Function of each part
11
• Button, LED, Voice guide
• Operation Function
• Preparation Recording
• Video Recording and Playing
• Using SD CARD
• Format in the condition of SD Card Error
• Update lnstruction
• Voice Recording Setting
• Manual Event Recording
02
16
• Full screen of player
• play data
• Original Size image
• Link with MAP
• Print and storing of screen, verification of Version
• Setting
Q&A
22
World Time Zone
24
Warranty Card
25
Product overview
This product is auxiliary system which helps to analyze the cause of vehicle accident with video and
voice recording, GPS location information while driving.
│Continuous Recording│
The product constantly stores video and audio data in driving on a SD CARD. When the amount of
recorded data exceeds the capacity of the SD MEMORY, the oldest files get overwritten.
│Event Recording│
If the impluse sensed by the G-sensor exceeds a specific limit or the user presses the emergency recording
button(△),2 minutes video file which is recorded 30 seconds before and after event stored and transferred to
the EVENT folder automatically.
│Voice recording control│
It is possible to set voice recording On/Off for protection of user privacy.
│Video and Voice data Playing and Analyzing│
The User can play recorded video data and information with using the software provided with the product and
analyze velocity, coordinates, time and GPS location easily.
Recorded video file can be played at 640 X 480 (VGA) resolution.
03
Notice for safety
This chapter contains the information on preventing property damage and inconvenience. It should be read
before product activation, and users should be correctly operate the product based on the instructions stated below.
1. Do not use water or volatile chemicals when cleaning the inside of the car or the product.
This increases the risk of product damage, fire, and electric shock.
2. Avoid causing the product severe impact and immersing it in a foreign substance. This increases the risk of
product damage, fire and electric shock.
3. Refer all servicing to qualified service personnel. We take no responsibility for any damage or problems caused
by arbitrarily repairing or modifying the product.
4. Only in normal conditions can the user obtain proper video image. If the user is in a tunnel or is driving
at night video recording cannot work properly. Intense backlights also affect the image quality of the video.
5. Window tinting can also affect video quality. Users should check the recorded imagery before operating
the product, if their cars have tinted windows.
6. Do not relocate the product arbitrarily. This may cause GPS communication error.
04
Notice for safety
7. Do not manipulate or stare at the product while driving. This increases the risk of automobile accidents.
8. Secure clear vision for camera. Contact with foreign materials or covering of the lens may cause abnormal
video recording.
9. Only use the cable provided and automobile electric power, as instructed.
If not, this may cause product damage, fire, and electric shock.
10. Do not cover the product when using other electric devices. This may cause GPS communication failure.
11. When the cable is damaged by an accident, replace the electric power cable with a new one.
When the product malfunctions or smoke is detected, stop using the product immediately and consult service
personnel through the agency.
12. Remove dust in the cigar lighter socket periodically, for it may result in a fire hazard.
Check frequently whether the productis installed firmly.
05
Package contents
Basic Components
This manual should be read before the product is activated.
For Safety purposes, users are advised to correctly operate
the product according to this manual
CAR Black Box System
M1
User Manual (Ver 1.0 EG)
Body
Cradle
Power Cable
│Optional Accessories (Sold separately)│
1. External Monitor connecting cable
2. Connecting cable for constant power supply
3. Subsidiary Battery for constant power supply
(4,000mA, 8000mA)
06
Installing
Supplements
SD CARD
PDF Manual
- Please contact sales representative or dealer for purchasing
the optional accessories.
- The optional accessories can be changed by the situation
of company.
Name of each Part
3 Front View Camera
ObserveR
9 SD Card
Slot
Video out port 1
Power 2
connector
port
4 Inner speaker
5 3 Colors LED
10
Cradle socket
7 Operating Buttons
07
Specification
│Specification│
ITEM
SPECIFICATION
SD Card Capacity
Camera
1.3M Pixel
2GB
90min.
30min.
Resolution
640 x 480
4GB
180min.
60min.
Driving Mode
High
8GB
360min.
120min.
Parking Mode
Low
16GB
720min.
240min.
32GB
1440min.
480min.
Video
Quality
Video
MAX 20fps
Voice Recording
Internal Mic
Voice Guiding
Internal Speaker
Event
Recording
08
│Saving Time│
Auto
Manual
G-Sensor (3 Axis)
EMR Buttion (△)
GPS
SIRF-III
Storage
SD CARD (1~32GB)
Power
DC12V~DC24V
Constant Recording Event Recording
- “SanDisk” is the most compatible SD CARD for the product.
SD CARD compatible with the product can be allowed,
but using different SD CARD may result in product malfuction.
In such cases, the user responsible for the problems
- There can be error of saving time according to external
environmental and the image condition which is stored.
Installing Instructions
Install after turning the engine off. Locate the product where GPS signals are received well.
Secure a clear vision for the front camera, where it is not covered by the hood.
Adjust the angle of the body to secure horizontal and vertical positioning.
│Install as instructed│
1. Avoid installing the product on a heating line.
It may cause damage to the heating line when
demounted.
2. Remove foreign substances from the attaching
area and dust cleary with a dried cloth before
attaching the product
- Please be prudent to control angle of mount cradle. If you inflict
a unresonable force, cradle can be damaged
09
Installing Instructions
1
2
Mounted on holder like
a drawing to the body.
5
3
Remove all foreign materials
on the window where the
product will be attached to.
4
After in order for the holder’s
direction does toward a down,
securely attach the product with
adhering closely to the glass
window.
After connecting the cable to
the body’s right side with the
power cable, pull out the cable
upward.
6
│Check installation│
Power cable to the passenger
(or driver) in the direction of
put cleaned.
10
Connect the power cable plug
to the cigarette lighter socket.
Be sure the power light is ON. When starting
up the eigine. If power light does not light
up, check the connection between parts.
Remove dust or foreign substances near the
cigarette lighter socket.
Function of each part
│Button, LED, Voice guide│
Front Camera
Front view camera should be fixed horizontally. Periodically clean the lens for clear video image.
Use a soft cloth to clean the lens in order to avoid lens damage
SD CARD
Disconnect the power cable or turn off the engine, before inserting or removing the SD CARD.
When using an SD CARD that was not supplied with the product, the user should format it as FAT32,
download and copy the provided program on it, and set the TIME ZONE in PLAYER setting menu
UP(+) / DOWN(-) / EMERGENCY(△) Button
Use these buttons for setting each function.
POWER Connection and A/V OUT Port
- A/V OUT : It is possble to check real time image by connecting product with external monitor.
- Power input : By connecting the provided power cable to the cigarette lighter socket, the product is supplied
with electric power
* When the provided power cable is lost or damaged, do not use unqualified power cables.
Make sure to immediately contact the service agency. Using unqualified cables may cause fatal damage to the product.
Indicate LED
• Violet LED Light : The first Power Supplying, Shut off Power Supplying
• Blue LED Light : Constant recording in the condition of receving stable GPS signals
• Blue LED Blinking : Constant recording in the condition of receving instable GPS signals
• RED LED Light : Emergency recording • RED LED Blinking : Error
11
Function of each part
│Operation Function│
STATUS
POWER ON
BUTTON
Voice Guide (One Tone Guide)
Violet LED Lighting
Starting CAR DVR
Before receiving GPS signal N/A
Blue LED Light Blinking(Recording Mode)
N/A
After receiving GPS signal
N/A
Blue LED Lighting (Recording Mode)
GPS data is succefully transmitted
POWER OFF
N/A
Violet LED Lighting
Stoping the CAR DVR
SD CARD MISSING
N/A
RED LED Lighting->Alert status
Please insert SD memory card
SD CARD ERROR
N/A
RED LED Lighting->Alert status
Unable to read SD memory card
Pressing (△) button for more than 3 seconds when turn on product
RED LED Lighting->Alert status
Do you want to format SD memory card?
-> (-) Button
RED LED Lighting->Reboot
SD memory card will be formatted
-> (+) Button
RED LED Lighting->Reboot
SD memory card will not be formatted
Voice Recording OFF
Pressing a (+) Button for more than 3 seconds
Violet LED Blinking->Recording mode
Voice recording stopped (After beep sound twice)
Voice Recording ON
Pressing a (+) Button for more than 3 seconds
Violet LED Blinking->Recordinf mode
Voice recording started (After beep sound twice)
F/W upgrade
If SD CARD has a New update file
(bsac.bin, mcode.bin)
upgrade is proceeded automatically
RED LED Blinking->Reboot
Update mode
Volume control
UP(+), DOWN(-) Button 3 step (1second)
Recording Mode
(Beep sound once)
N/A( G-sensor working)
RED LED Blinking->Recording Mode
N/A
Pressing (△) Button for 1 second
RED LED Blinking->Recording Mode
N/A
User format
SD CARD
Emergency recording
N/A
LED
- Operation Function can be changed by updated specification
12
Function of each part
│Preparation Recording│
1. If the power cable is connected, after inserting SD CARD in the body, the violet LED lights.
2. Video Recording starts with “Starting CAR DVR” voice guide after connecting the power cable.
3. GPS receiving starts after blue LED Lights ON with “GPS data is successfully transmitted” voice guide.
│Video Recording and Playing│
1. When the amount of recorded data exceeds the capacity of the SD memory during constant and
event recording, the oldest files get overwritten.
2. If the impluse sensed by G-Sensor exceeds a specific limit or the user presses the emergency button(△),
the 2 minutes video file which is recorded 30 seconds before and after event stored and the tranferred to
the EVENT folder.
3. When the user turns off the engine or disconnects the power cable from the cigarette lighter socket, violet LED
lights and product is off. After the Violet LED is out, remove the SD card from the body. Unless the instructions
above are not observed, the problem on storing video image may happen
4.Connect the SD card to a PC, using the memory card reader. The user can then play the stored video file
with the normal muti-media program or exclusive program embedded in the SD card.
The user can check not only image data but find impact and location information through exclusive viewer
program.
- We recommend to use a USB reader that supports SDHC2.0
13
Function of each part
│Using SD CARD│
Do not use the SD CARD supplied with the product for any other purpose. If the SD CARD is used for another purpose
or other files are stored on it, fatal errors may be caused. SD CARDs compatible with the product can be allowed,
but using different SD CARD may result in product malfunction. In such cases, the user is responsible for the problems.
“SanDISK” is the most compatible SD CARD for the product.
1. If SDHC 2.0 is not compatible with the PC, use a separate USB reader that supports SDHC 2.0
2. Periodically format the SD CARD in order to prevent errors and to use it for a ling time.(Recommendation : 1 time per 15days)
3. Configure SD card after formating, or else the initial loading may take a long time, and the time on the stored
video file and the actual time zone may differ.
4. When user turn on the product with pressing (△) button for more than 3 seconds, user can get voice guiding
“Do you want to foramt SD Card ?” In this case.
- Press (-) button : Format SD Card with voice guiding “SD memory card will be formatted”
- Press (+) button : Do not format SD Card with voice guiding “SD Card will not be formatted”
5. In the condition of formatting SD Card, All data which is stored will be deleted. So, Please back up data definately which user need.
│Format in the condition of SD Card Error│
1. When hear voice guiding “Unable to read SD memory card”with RED LED blinking, Format SD Card with
pressing (△) button. After format is completed, rebooting will be occured.
2. Inspection for the SD Card is needed when errors occur even after rebooting.
3. If hear voice guiding “Unable to read SD memory card”, Please check hold key (Lock button) of SD CARD , too.
14
Function of each part
│Update Instructions│
1. Firmware Update
- Store bsac.bin , mcode.bin (New version) at the top-level directory of SD CARD.
After inserting SD CARD and turn on the product, RED LED will be light.
And then, product will reboot after voice guiding “Update mode”and putting out LED light.
2. PC player Update
- Store new version of player (player.exe, config.sys) at the top-level directory of SD CARD. Insert SD CARD
into the product, turn on the product by pressing (+) Button. Update will be proceeded with voice guiding
“update mode” and RED LED light.After finishing Update, product will be reboot with putting out LED light.
- Do not remove the power cable and do not turn the engine Off. Power Off during the update process may cause fatal error.
│Voice Recording Setting│- Default setting is Voice recording OFF mode
1. Voice recording ON : In the condition of Voice recording OFF, Press (+) Button for more than 3 seconds,
Voice recording start with voice guiding after beep sound twice
2. Voice recording OFF : In the condition of Voice recording ON, Press (+) Button for more than 3 seconds,
Voice recording stop with voice guiding after beep sound twice.
│Manual Event Recoding│
If user press EMR buttion for 1 second, the 2 minutes data which is storing will be transfered & stored to the
EVENT folder automatically
15
Explanation of Player
│Full screen of player│
1.Connect SD card with PC using memory card reader.
2.Select the removable disk that is recognized as SD memory.
3.Double click PLAYER.EXE, then the screen below will appear on the monitor screen.
1
2
1 Camera Display
2 GPS MAP
3
4
7
3 Function Icon
4 Volume, Play speed control
5
6
5 File list
6 G-sensor Impulse Graph
7 Speed, Direction
16
Explanation of Player
│Play data│
1. Select the folder by click [Select Dir] button of the middle of player.
Data is stored on Movie folder of applicable SD CARD
2. Double click the file, Image will be played
File Open : Open file which user want to check.
Select Dir : Open folder which user want to check.
Delete All : Delete all files list on the Play List
Type : Type of recorded data.
( N Constant Recording, G Event Recording, B Recorded data by pressing (△) Button,
P Parking Mode Recording)
Date : Indicate Date and Time of recorded data
File Name : File name of recorded data.
ch1_00000_00000000_00000000.avi
│Original Size image│
Double
더블클릭
Click
Division File order
of Data
Year/Month/Date
Hour/Minute/Second
Double click data which is played on Player,
Original Size(640 X 480) will be showed
17
Explanation of Player
│Link with MAP)│
Click
button, MAP will be showed and User can check driving routes with GPS location information.
It is possible to be linked with MAP in the time
of being conntected internet.
It is impossible to be linked with MAP for DATA
which was recorded not getting GPS receiving.
The linking time with MAP can be delayed by
speed of internet condition.
│Analysis for G-SENSOR Data │
G-sensor check 3-Axis data (X,Y,Z axis) and indicate those data as
graphing at Player. It is possible to analyze driving conditions and
habits of driver. The changing of graph curve can be differ by type
of vehicle and situation of the road surface.
[G-sensor Graph]
18
Explanation of Player
│Print and storing of screen, verification of Version│
1. Click
button in the middle of player,
It is possible to print or store screen image.
2. Click
buttion in the middle of player,
It is possible to verify the version of player.
Double
Click
│Conversion of Speedometer│
Double click Speedometer in the down part of right side of player,
two type of speed unit is available.
19
Explanation of Player
│Setting│
Pressing
1
button in the middle of player, User can print or store data which is playing.
3
2
4
5
20
Explanation of Player
1. SD Card Format
- Periodically format the SD CARD in order to prevent errors and to use it for a long time.
(Recommended : 1 time per 15days)
2. Time setting
- Sets the time of user’s nation. (EX> KOREAN TIME : GMT+09:00)
3. User’s Password setting
- Password : 4 digit
- VEHICLE NUMBER : 4 digit
- DRIVER NAME : 15 letters with only English.
4. G-SENSOR setting
- It is possible to control of sensitivity for impacting perception quantity. (X,Y,Z each 7 step )
5. Function setting
- Auto Mirror ON/OFF
- Parking Mode ON/OFF
* 5min : Conversion to the parking Mode after 5 min Vehicle is parked
* 10min : Conversion to the parking Mode after 10 min Vehicle is parked
* 15min : Conversion to the parking Mode after 15 min Vehicle is parked
* Parking Mode ?
- Parking Mode extends the saving time by reducing video quality, When user want to use the product as survillance purpose
during parking.
* It is possilbe to be changed of function according to version of firmware and product tools.
21
Q&A
Q. Is it possible to install product on the any position?
A. We recommend to install product head on where does not become the disruption in range of vision of driver.
Q. Checking method whether the product works properly or not.
A. Starting engine firstly, Please check LED light on and record data for a while.
After then, please confirm recorded data on P/C.
Q. When start engine, there is no LED light on the product.
A. If the power does not light on, Check the connection between parts. Remove dust or foreign substances near
the cigarette lighter socket. When start engine, power voltage can be instable.
Recomment to re-connect power cable to cigarette lighter socket.
Q. Is it possible to see realtime recording video by connecting an Navigation or Vehicle TV ?
A. It is possible to see realtime recording video by connecting with RCA cable through AV-OUT port
on the product(Video cable is optional accessory).
We do not guarantee that video cable can be compatible with all kinds of Navigation or vehicle TV.
Q. Voice recording ON. (Default setting is Voice Recording OFF)
A. It is possble to set voice recording ON by pressing (+) button on the product.
22
Q&A
Q. To delete recorded data
A. It is possble to format data on P/C or product.
Q. When vehicle battery is shut off by accident impacts, Is it possible to store data
A. It is possible to store data for more 5~10 seconds, eventhough vehicle battery is shut off.
Q. SD Card Error
A. We recommend to buy legitimate SD MEMORY CARD of our company.
Q. The product is damaged by accident
A. If the product is damaged by strong shock in accident, Please do not use.
Storing data can be impossible by potential error.
Q. Recorded images are foggy and not clear.
A. Clean the camera lens or remove all foreign materials on the window for clear image
Q. To extend recording times.
A. The product can store data on the SD CARD up to 32GB. We recommend to buy legitimate large storage
SD MEMORY CARD of our company.
23
World Time None
24
Warranty Card
Thank you for your purchase of the product. In case of malfunction,
Users will be compensated according to the company’s damage regulations.
Contact an agency or dealer, when a malfunction has occured
[Warranty]
[Refund and Exchange policy]
* The product is warranted to you for a period of one year from
the date of original purchase.
* Refund and exchange are available within 14 days
since the original date of purchase.
* This warranty does not apply to the equipment beyond company * If you want to refund the product,
control such as the SD CARD.
send it back in its original packaging and box.
Make sure the product is in its original condition.
* This products pass through strict quality control and inspection
If the original packaging and box have been altered,
process is built.
refund is not available. (Except for refunds due to
* If the warranty period has elapsed or it is judged to be some
a fatal defect of the product itself)
service charge needed, these causes cost charge.
* Shipping cost is on the customer. (Except for refunds
* All accessories except main body is consumables.
due to a fatal defect of the product itself)
* In the following conditions, some service fee can be charged
Product
Model
or A/S can be denied even within warranty period.
Name
Name
- Carelessness malfunctions
- Degradation or alteration products for other purposes
- Natural calamities (Fire, Earthquake, Flood etc.)
- Damage or failure caused by the impact
- Not authorized company with our A/S center
- caused by waterlogging
Product
Number
Date of
Purchase
Customer
Name
Customer
Phone
Number
Address
Store
Name
Phone
Number
* Caution : When sales product, please fill in customer name and date
of purchase clause necessarily.