1
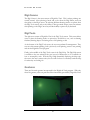
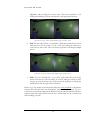
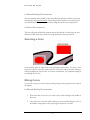
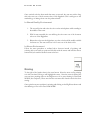
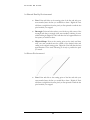
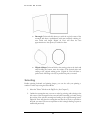
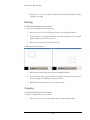
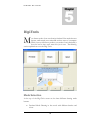
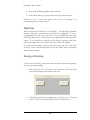
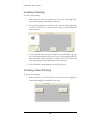
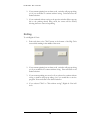
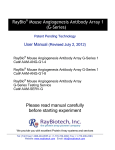
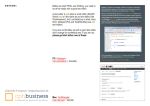
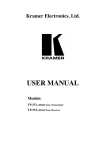
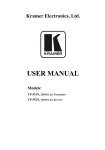
DIGITAL DA VINCI
Published March 2004
UserManual
Table of Contents
CHAPTER
1
CHAPTER
4
Overview
1
Status Bar
Digi-Palette
1
Freehand Drawing
10
Digi-Canvas
2
Shape Drawing
10
Digi-Tools
2
Selecting
12
Gestures
2
Moving
12
Copying
13
Zooming
14
CHAPTER
2
Starting the Program
4
CHAPTER
CHAPTER
9
3
5
Mode Selection
16
Selecting a Brush
5
Digi-Help
17
Selecting a Color
6
Saving a Painting
17
Mixing Colors
6
Loading a Painting
18
Clearing the palette mixture
7
Creating a New Painting
18
Erasing
8
Exiting
19
D I G I T A L
D A
1
Chapter
V I N C I
Introduction
A
re you a traditional artist, uncomfortable with using anything but paint,
brushes and a canvas, but at the same time intrigued by some of the options
that painting software can provide?…Or perhaps you create digital images on
your computer on a regular basis, but are frustrated by being continually
limited to the confines of a mouse and a 15 inch monitor…Or maybe you are just
curious. No matter who you are, Digital da Vinci allows any artist, and anyone desiring
to be an artist, to create masterpieces all while expanding their imagination.
Overview
Digital da Vinci is a painting tool different than what most people are used to. With a
three-walled interface that is interacted with solely by gestures, users are no longer
constrained to the typical method of using painting software. The user can use the
simple gesture interface to quickly perform their necessary tasks with minimal effort.
The three walls of Digital da Vinci – divided into a Digi-Palette, a Digi-Canvas and
Digi-Tools – allows users to easily focus on what is the task at hand. The rest of this
section will give a brief description of what the user can expect from each of the three
Digital da Vinci screens and the gestures incorporated in the interface. IMPORTANT
NOTE: The user’s position relative to the three walls is static and cannot
change at any point during the interaction. It will always be in the center of the
room.
Digi-Palette
The Digi-Palette is the left-most screen of the Digital da Vinci interface. It allows users
to select the brush and colors with which they would like to paint. If they would like,
users can also mix the basic colors and see what interesting shades they can produce.
Any of the non-basic colors created through a mixture of colors, can be saved by the
user for later use.
1
D I G I T A L
D A
V I N C I
Digi-Canvas
The Digi-Canvas is the center screen of Digital da Vinci. This is where paintings are
actually created. After selecting a brush and a color from the Digi -Palette, users can
then paint on the Digi-Canvas. By selecting different drawing modes or options from
the Digi-Tools screen, such as the ability to draw geometric shapes, users can enhance
their painting on the Digi-Canvas beyond their ability to paint only by freehand.
Digi-Tools
The right-most screen of Digital da Vinci is the Digi -Tools screen. This screen allows
users to select the drawing mode or option they would like to use, such as drawing
freehand, drawing shapes or selecting areas of the painting to edit.
At the bottom of the Digi-Tools screen, the user can perform file management. They
can save their current painting, load a previously saved painting, create a new painting
and exit the Digital da Vinci program.
Finally, in the middle of the Digi -Tools screen is the Digi -Help. The Digi-Help screen
is available to the user whenever they are in need of instruction or of a reminder on
how to accomplish a task. With the Digi -Help dynamically displaying the help topic
relevant to the user's current action, the user will not have to constantly search the help
for what they are looking for.
Gestures
There are five main gestures incorporated in the Digital da Vinci program. With only
these five gestures, users can perform all the functionality provided by Digital da Vinci:
2
D I G I T A L
D A
V I N C I
Figure 1: Navigating in the DigiCanvas with a cursor to demonstrate point and select
1. Point and Navigate: The user positions their hand so that it points to a
specific area of the screen but not beyond a static threshold (The select
threshold). The user then returns their hand to their side; this is equivalent to
navigating a mouse through the screen and will be used to move around in the
3 screens.
Figure 2: Drawing in Free Hand MODE to demonstrate point and select
2. Point and Select: The user extends their hand away from their body past the
select threshold and points to the specific location he or she wishes to select.
This is the mouse-equivalent to left-clicking the mouse to select something.
Figure 3 & 4: Selecting a color on the DigiPalette and holding it to drag onto the middle of the Palette to mix colors.
3. Select and Drag: The user will select a location on the screen by extending his
arm and dragging it to a valid location by keeping it extended and moving it on
the screen. The action ends only after the user releases the extension of his
arm. This will be used solely for mixing colors onto the mixing area of the
3
D I G I T A L
D A
V I N C I
DigiPalette and for setting the custom colors. The mouse equivalent is leftclicking and holding the button until released on the appropriate location.
Figure 5 & 6: Zooming in , while in the Select MODE using the “come hither” motion
4. Pull: The user will perform a “come hither” (pull hand towards body) motion
with anyone of the two hands, as if he or she were asking the selection to
come closer to him or her. This is the mouse equivalent to clicking the middle
button.
Figure 7 & 8: Zooming out, while in the Select MODE using the “go yonder” motion
5. Push: The user will perform a “go yonder” (push hand away from body)
motion with anyone of the two hands, as if it were telling the selection of the
screen to go away from him or her. This is the mouse equivalent to clicking the
middle button with the right button held down.
Before we go any further we should clearly define the select threshold as the distance
between the head and body that distinguishes navigation from selection. To get a
rough idea it should be the approximate distance from your head and hand which is no
longer natural and requires effort from the user, which ideally can be considered as
fully extending your arm.
4
D I G I T A L
D A
2
Chapter
V I N C I
Getting Started
U
nlike traditional methods, with Digital da Vinci you cannot easily store your
painting tools in a closet or drawer. On the other hand, all the tools you
need are in one package, making it near impossible to have to search for that
missing brush or that elusive shade of yellow that you need. This section will
describe how to get started with Digital da Vinci.
Starting the Program
To start the program, run the Perl script. It is platform independent so it should run
on any Operating System (Linux, Windows, Unix) with ActivePerl and the Tk module
installed (however, it is optimized for Linux running on a 1024x768 display).
Download ddvMouse.tar.gz and untar it to a specific location. Then go in the
command prompt (Windows) or terminal (UNIX or Linux) to the specific location
and type. NOTE: Windows will open the application immediately after you click the
ddv.pl file.
perl ddv.pl
You should see three screens pop up; these are the DigiPalette, DigiCanvas and
DigiTools. So now you’re ready to go. Once again remember you must be centered in
the room to interact with the system at all times. Although it is only outlined in the first
step of many of the functions, the user is to assume that this is always the case.
5
D I G I T A L
D A
V I N C I
3
Chapter
Digi-Palette
E
very artist must start somewhere. In most cases it starts with selecting a brush
and applying paint to that brush. A painter cannot perform their trade
without the proper tools. The following section will explain how to use the
Digi-Palette.
Selecting a Brush
At the bottom of the Digi -Canvas there are several brush types available. The topmost is the thickest while the bottom brush is the thinnest; they are labeled from size 1
to 4.
6
D I G I T A L
D A
V I N C I
In Shared Reality Environment
The user standing in the middle of the room will point and select (with his or her arm
extended past the select threshold) with his finger on the brush he or she desires. The
user will know which brush was selected by seeing that brush’s buttons pushed in.
In Mouse Environment
The user will point and left-click with the mouse the brush he or she desires, the user
will know which brush was selected by seeing that brush’s buttons pushed in.
Selecting a Color
On the palette there are eight basic colors and eight custom colors. To select a color
from one of the 16 color slots, point and select at the color with your hand. Doing so
will also highlight the chosen color. In a mouse environment, it is performed simply by
left-clicking on the color.
Mixing Colors
You can also create your own colors by mixing existing colors together in the center of
the palette:
In Shared Reality Environment
1. Point and select to the color you want to mix, while standing in the middle of
the room.
2. Once the color is selected, while keeping your arm extended drag the color to
the middle of the palette to the square region and release your arm.
7
D I G I T A L
D A
V I N C I
3. Select another color as in 1.
4. Once again, while keeping your arm extended move the color to square region
in the middle of the palette. Once you release your arm the two colors should
mix.
5. Repeat steps 3 and 4 as necessary, with as many colors as you would like.
6. Select the mixed color by pointing at it with your hand.
In Mouse Environment
Follow the exact same steps except instead of pointing and selecting with your finger,
the user will point and left-click with the mouse, and the user will hold the left mouse
button to drag colors onto the palette.
Clearing the Palette mixture
To clear the palette mixture the user will either point or select with his finger onto the
button labeled “CLEAR PALETTE MIXTURE” if he is in the shared reality
environment or the user will simply point and click if in the mouse environment.
Setting Custom Colors from Palette Mixture
8
D I G I T A L
D A
V I N C I
Once a mixed color has been made that meets your needs, the user may wish to drag
this color onto one of the 8 custom colors of the digipalette. This is analogous to the
methodology of mixing colors onto the palette mixture.
In Shared Reality Environment
1. The user will point and select the color on the mixed palette while standing in
the middle of the room.
2. With his arm extended, the user will drag the color onto one of the 8 custom
colors on of the Digipalette.
3. Release the color onto the digi palette, now the color should be readily available
for future use. The user can access it as if it was one of the basic colors.
In Mouse Environment
Follow the same procedure as outlined above however instead of pointing and
selecting with your hand you point and left-click with the mouse and hold the mouse
button until you reach the desired custom color box.
Erasing
To the right of the brushes there is the erase button. Select the erase tool by pointing
at it with your hand. Doing so will highlight the eraser. Once the eraser is selected, the
user can erase anything done on the DigiCanvas as if we were drawing in Free-Hand
MODE. (See Chapter 4). Please note that the user must click a brush once he has done
erasing.
Once again the mouse equivalent is pointing and clicking on the DigiEraser button and
then drawing as if he was in Free-Hand MODE.
9
D I G I T A L
D A
V I N C I
4
Chapter
Digi-Canvas
T
his is where the art is really created. It is on the Digi-Canvas that an artist or
would-be artist expresses their creativity. The following section explains how
to use the Digi-Canvas.
Status Bar
Before doing anything, you should notice that at the bottom of the Digi -Canvas a
status bar is displayed. This status bar can not be painted on nor are its items
selectable. It is simply there to remind you of what brush and color you are using (see
Chapter 3) and what drawing mode you are currently in (see Chapter 5).
10
D I G I T A L
D A
V I N C I
Freehand Drawing
When in freehand mode (default mode) it is as if you were painting on a canvas. You
have complete freedom to paint what you want and how you want. To paint freehand:
In Shared Reality Environment
1. Select "Freehand Mode" while standing in the middle of the room (Default
Mode) (See Chapter 5)
2. Select a brush size and a paint color. (Default is Size 1 and black) (See Chap. 3)
3. Here you would point and select the starting point of your drawing with your
arm extended.
4. With your arm extended paint as you wish until you are finished and then
release the extension of your arm to tell the system to stop painting.
In Mouse Environment
1. Point and click on “Freehand Mode”. (Default Mode) (See chapter 5)
2. Point and click a brush size and paint color. (Default is Size 1 and black) (See
Chap. 3)
3. Here you would paint point and click on the starting point of your free-hand
drawing and hold the button.
4. Hold the button until the finishing point is reached at which point the user will
release the button.
Shape Drawing
If your painting requires exact lines and shapes and freehand mode is giving you a little
too much freedom, Digital da Vinci allows you to accurately paint shapes:
1. Select "Shape Mode" while standing in the middle of the room (See Chapter
5)
2. Select a brush and a paint color. (See Chapter 3)
3. You can now paint one of the following shapes:
11
D I G I T A L
D A
V I N C I
In Shared Reality Environment
•
Line: Point and Select at the starting point of the line and with your
arm extended, trace the line you would like to draw. Digital da Vinci
will draw a straight line from the pixel you first pointed to until the last
pixel at which you stopped.
•
Rectangle: Point and select where you wish the top left corner of the
rectangle and draw a rectangle (with arm extended) outlining it’s max
width and length. Digital da Vinci will draw the best approximation to
the square you wished to draw.
•
Elliptical Shape: Point at the starting point on the circle and then
with your arm extended trace the outline of the desired circle and
ending at the original starting point. Digital da Vinci will draw the best
approximation of the circle following as closely as possible the path
you traced.
In Mouse Environment
•
Line: Point and click at the starting point of the line and with your
arm extended; trace the line you would like to draw. Digital da Vinci
will draw a straight line from the pixel you first pointed to until the last
pixel at which you stopped.
12
D I G I T A L
D A
V I N C I
•
Rectangle: Point and click where you wish the top left corner of the
rectangle and draw a quadrilateral (with arm extended) outlining it’s
max width and length. Digital da Vinci will draw the best
approximation to the square you wished to draw.
•
Elliptical Shape: Point and click at the starting point on the circle and
while holding the button, trace the outline of the desired circle and
ending at the original starting point. Digital da Vinci will draw a
perfect circle following as closely as possible the path you traced.
Selecting
Besides painting freehand and painting shapes, you can also edit your painting a
number of other ways using the Select Mode:
1. Select the "Select" Mode on the DigiTools. (See Chapter 5)
2. Outline the rectangular area you want to select by pointing and selecting at the
left corner of the rectangular select area and while extending you hand, tracing
the outline of the selection rectangle and ending at the original starting corner.
Digital da Vinci will select the rectangular area that fits as closely as possible to
the path you traced. The mouse equivalent to this is simply drawing a square as
mentioned previously.
13
D I G I T A L
D A
V I N C I
3. Perform one of the three actions explained in more detail below: moving,
copying or zooming.
Moving
In Shared Reality Environment
To move the rectangular area on your canvas:
1. Select the area to move by following the steps for selecting listed above.
2. Point and select on the region and with your arm extended move the selected
region to wherever you wish to move it.
3. Release your hand once you are done moving.
In Mouse Environment
1. Select the area by following the steps for selecting listed above.
2. Point and click on the region and with your finger on the mouse button, move
the selected region to wherever you wish to move it.
3. Release the mouse button once you are done moving.
Copying
In Shared Reality Environment
To copy a rectangular area of your canvas:
1. Select the area to copy by following the steps for selecting listed above.
14
D I G I T A L
D A
V I N C I
2. Point at the area with both your hands, keep one hand pointing at the area to
copy while using the other hand to move the selected region to wherever you
wish to copy it.
3. Stop once the selected area is in its desired location.
In Mouse Environment
1. Select the area to copy by following the steps for selecting listed above.
2. Hold right-click on the mouse and then hold left click, now move the copied
version to wherever you wish on the DigiCanvas.
3. Release both buttons, you now have two copies of the selected region.
Zooming
In Shared Reality Environment
To zoom in on a particular area of the canvas:
1. Select the area to zoom in on by following the steps for selecting listed above.
2. To zoom in, perform the "pulling" motion. (See Chapter 1)
3. Once zoomed in, you can then paint in FREE-HAND only in the zoomed in
area.
4. To zoom out, perform the "pushing" motion. (See Chapter 1)
In Mouse Environment
1. Select the area to zoom in on by following the steps for selecting listed above.
15
D I G I T A L
D A
V I N C I
2. To zoom in, click the middle button on the mouse.
3. Once zoomed in, you can then paint in FREE-HAND only in the zoomed in
area.
4. To zoom out, click and hold the right mouse button while clicking the middle
button on the mouse.
16
D I G I T A L
D A
V I N C I
5
Chapter
Digi-Tools
M
ost famous works of art were done in freehand. But maybe that was
because, until recently, most artists did not have access to a computer.
While you may still want to produce your works of art in freehand, it
does not hurt to have some extra tools just in case. The following
section explains how to use the Digi -Tools.
Mode Selection
At the top of the Digi-Tools screen are the three different drawing mode
buttons:
•
Freehand Mode: Drawing in free mode with different brushes and
colors.
17
D I G I T A L
D A
V I N C I
•
Shapes Mode: Drawing Ellipses, quads and lines
•
Select Mode: Moving, Copying and Zooming into selected regions.
Selection of any of these three modes can be done by pointing at its
corresponding button with your hand.
Digi-Help
Below the three mode buttons is the Digi-Help. The Digi-Help dynamically
displays a help topic to match the current action you are engaged in. If you are
an experienced user and you do not want to view the Digi -Help, point at the
"Hide Digi-Help" button. This will remove the Digi -Help from the Digi-Tools
screen. If you would like to unhide the Digi-Help for viewing, point at the
"Show Digi-Help" button on the Digi-Tools screen and it will reappear.
For the rest of the manual it is fair to assume that “point and select” and “point
and click” can be used interchangeably for both the Shared reality environment
and the mouse interface.
Saving a Painting
At the bottom of the Digi -Tools screen there are buttons for file management.
To save your current painting:
1. Point and select at the "Save" button at the bottom of the Digi-Tools
screen while standing in the middle of the room.
2. A Windows shall pop-up prompting you to verify the save. Point and
select to "YES" to save the painting or "NO" to cancel the save.
18
D I G I T A L
D A
V I N C I
Loading a Painting
To load a saved painting:
1. Point and select at the "Load" button at the bottom of the Digi -Tools
screen while standing in the middle of the room.
2. If your current painting has not been saved, a window will pop-up asking
you if you would like to continue without saving. Point and select the
desired selection.
3. If you continued without saving or the previous window did not pop-up
due to the painting already being saved, a list of saved paintings will load,
with thumbnails, a time-stamp and a numeric ID for each. Point and
select the painting to load by pointing at it with your hand.
4. This will load the selected painting onto the Digi -Canvas.
Creating a New Painting
To create a new painting:
1. Point and select at the "New" button at the bottom of the DigiTools
screen while standing in the middle of the room.
19
D I G I T A L
D A
V I N C I
2. If your current painting has not been saved, a window will pop-up asking
you if you would like to continue without saving. Point and select the
desired selection.
3. If you continued without saving or the previous window did not pop-up
due to the painting already being saved, the canvas will be cleared,
allowing the user to start a new painting.
Exiting
To exit Digital da Vinci:
1. Point and select at the "Exit" button at the bottom of the Digi-Tools
screen while standing in the middle of the room.
2. If your current painting has not been saved, a window will pop-up asking
you if you would like to continue without saving. Point and select to the
desired selection.
3. If your current painting was saved or if you selected to continue without
saving, a window will pop-up asking you if you would like to exit the
program. Point and select to the desired selection.
4. If you selected "Exit" or "Exit without saving", Digital da Vinci will
close.
20