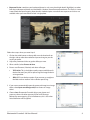
1
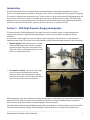
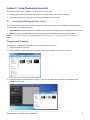
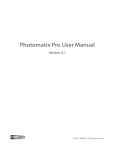
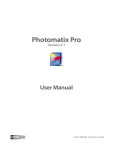
Photomatix Essentials Version 3.0 User Manual © 2011 HDRsoft. All rights reserved. Contents Introduction.................................................................................................................................................. 1 Section 1: HDR (High Dynamic Range photography) .............................................................................. 1 1.1 Taking Photos for HDR ............................................................................................................ 2 1.1.1 Setting Up Your Camera . . ............................................................................................... 2 1.1.2 Taking the Photos. ......................................................................................................... 3 Section 2: Using Photomatix Essentials . . .................................................................................................... 4 2.1 Loading and Managing Photos (Step 1) . . ................................................................................ 4 2.2 Adjusting the Image with Fusion or Tone Mapping (Step 2) . . ................................................. 8 2.2.1 Details Enhancer Settings .............................................................................................. 10 2.2.2 Tone Compressor Settings . . ............................................................................................ 10 2.2.3 Exposure Fusion Settings ............................................................................................... 11 Section 3: Preferences .. .................................................................................................................................. 12 Glossary ....................................................................................................................................................... 13 Photomatix Essentials 3.0 User Manual 1 Taking Photos for HDR Introduction Photomatix multiple bracketed photos into a single image either by a process The shootingEssentials phase is processes essential for gettingexposure good results with Photomatix. known as fusing the exposures together or through a process known as HDR To photograph a high contrast scene, you need to take several exposures in (High Dynamic Range) tone mapping. order to capture information bothmajor the highlights shadows of the description of HDR photography and This manual is organized intoin three areas. Theand firstthe section is a general scene. The exposures taken must properly cover the dynamic range of how to shoot it. The second section is a detailed tutorial on how to usethe Photomatix Essentials. The third section scene, especially thethe shadows. explains how to use Image Alignment, Ghost Removal and Noise Reduction features offered by Photomatix Essentials. Atof the end ofyou theneed manual is a glossary someItof thedepends terms associated with HDR. The number photos depends on theof scene. also on the Exposure Value (EV) spacing separating the photos. If you take them in one-EV steps (e.g., -1, 0, +1 EV), you will need more photos than if you Section 1: HDR (High Dynamic Range) photography take them in two-EV steps (e.g., -2, 0, +2 EV). We recommend shooting in two-EV steps whenever possible. The central premise of HDR photography is that there are very few situations where a single photograph can capture the true dynamic range (the total of light in a scene, from very High contrast scenes can be grouped intorange roughly two types depending on dark to very light) of a scene accurately. their dynamic range: words, today’s digital can’t landscapes properly expose everything at the same time in scenes with even •In other Medium dynamic range camera scene: Most and other types of moderate contrast This results in twoThree mainexposures problems taken (whichinsometime outdoor scenesratios. fall into this category. two-EV happen together in the same photo): steps (i.e. –2, 0 +2 EV), or five exposures taken in one-EV steps, are usu• Blown highlights: When the exposure is raised to ally sufficient this type of make sure thefor foreground or scene. subject is properly • exposed, brighter areas of theAscene suffer. Theyis the interior of a room High dynamic range scene: typical example “blow out” and turn white because they have very with a view outside the window on a sunny day. You need to take at little noexposures usable data in them.steps (or nine exposures in one-EV steps) least or five in two-EV to capture this type of scene, but you may need more. Taking the exposures manually is recommended in these cases. The source photographs for HDR processing can be taken with digital or film-based cameras. The only requirement is that the exposure can be adjusted when taking pictures. If you use a film-based camera, you will need to scan the photographs into your computer before processing them (refer to Section 1.3). • Lost detail in shadows: Conversely, when bright areas of a scene are protected (by lowering there not enough light to register 1.1exposure), Setting upis the Camera details on the camera’s sensor in dark areas of the • scene. Set your camera priority setting) so only the shutter These turntotoAperture shadow and black(A ness. speed varies between the exposures. • Select a low ISO, such as ISO 100 or lower. • Turn off the flash. The flash may try to balance the exposure of all the images, when the goal is a range of exposures. • Mount the camera on a tripod whenever possible. Even though Photomatix Pro offers automatic alignment of hand-held photos, using a tripod is always better. Three exposures of a medium dynamic range scene, taken in twoEV steps Canon Rebel XTi/400D LCD showing AEB with +/-2 increments selected DSLR cameras and some compact digital cameras offer Automatic HDR photography solves these problems by taking enough photos (traditionally 3) to contain the entire exposure Exposure Bracketing (AEB). This enables you to automatically take three range of the scene. With that data in hand, Photomatix Essentials can merge the different photos and process or more exposures in a row; one at the proper exposure, one or more them to rescue details from shadows and keep highlights from blowing out. underexposed, and one or more overexposed. Follow these steps if your Aside from that practical camera offers AEB mode:rationale, HDR photography offers photographers and photo editors a new and powerful tool with which to take and “develop” their photographs and present them in a unique and inspirational way. Photomatix Essentials 3.0 User Manual Photomatix Pro User Guide 1 2 1.1 Taking Photos for HDR Taking photos for HDR is easy. All it takes is a different mindset than traditional photography, which emphasizes taking and editing a single photo, independent from any others. 1.1.1 Setting Up Your Camera HDR photography requires that you set up your camera a bit differently than normal: • Set your camera to Aperture priority (“A” setting) so that only the shutter speed varies between the exposures. • Select a low ISO, such as ISO 100 or lower. • Turn off the flash. The flash may try to balance the exposure of all the images, when the goal is a range of exposures. • Mount the camera on a tripod whenever possible. Even though Photomatix Essentials offers automatic alignment of hand-held photos, using a tripod is always better. Canon Rebel XTi/400D LCD showing AEB with +/-2 increments selected DSLR cameras and some compact digital cameras offer Automatic Exposure Bracketing (AEB). This enables you to automatically take three or more exposures in a row; one at the proper exposure, one or more underexposed, and one or more overexposed. Follow these steps if your camera offers an AEB mode: • Select the Continuous shooting mode on the camera’s drive setting. Consult your camera manual for model-specific instructions for using this setting. • Set the camera to Auto Exposure Bracketing (AEB) • If possible, use the camera’s self-timer setting, a remote control or a cable release to minimize camera shake. • Set the exposure increment to +/- 2 for optimal exposure range. If your camera does not offer +/- 2 exposure increments, select the maximum possible. Consult the camera manual for model-specific instructions for choosing this setting. Photomatix Essentials 3.0 User Manual AEB settings on a Nikon D80 (3 shots with +/- 2EV) 2 1.1.2 Taking the Photos In simplified terms, bracketing allows you to stretch the dynamic range of your camera so it can capture the full range of light in a scene. Mechanically, you accomplish this by taking multiple photos with different exposure settings. Although there is no single method that is better than all others in every circumstance (indeed, cameras vary in their abilities, complicating matters), a good rule of thumb is to shoot three photos, separated by 2.0 EV using AEB. However, not all cameras have the same AEB capabilities. Some limit you to a 1 EV spacing or less. Under-exposure (-2 EV) Well-balanced exposure (0 EV) Over-exposure (+2 EV) You can shoot more or fewer photos separated by more or less EV. The final results may vary greatly, depending on your bracketing strategy. Photomatix Essentials 3.0 User Manual 3 Section 2: Using Photomatix Essentials The Photomatix Essentials workflow is composed of two main steps: 1. Loading your bracketed photos into Photomatix Essentials where you can work with them. 2. Adjusting the combined image to your liking, then processing and saving it. 2.1 Loading and Managing Photos (Step 1) To use Photomatix Essentials, first select the photo or photos you want to use and load them into the program. There are two ways to accomplish this: • Drag and drop: Drag the photos from a folder on your computer and drop them onto Photomatix Essentials. • Browse: Use the Open dialog box to identify and load the source photos into Photomatix Essentials. Note: It is possible to select a single photo if you like. Click on the “Can I use a single photo?” link for more details. Dragging and Dropping To drag one or more photos into Photomatix Essentials, follow these steps: 1. Launch Photomatix Essentials. 2. Open the folder on your computer that contains the photo or photos you want to work with. 3. Arrange the folder and Photomatix Essentials so you can drag files from the folder and drop them onto Photomatix Essentials. Photomatix Essentials 3.0 User Manual 4 4. Select the files as you would normally. 5. Drag and drop the photos to Photomatix Essentials. You can drag and drop file individually or in groups. Browsing To browse to one or more photos using a file selection dialog box, follow these steps: 1. Launch Photomatix Essentials. 2.Click Browse. Photomatix Essentials 3.0 User Manual 5 3. Navigate to the folder on your system where the photo(s) are stored. 4. Select the files as you would normally. 5. Choose Open (Windows) or Select (Macintosh). Regardless of the method you choose, you can go back and add photos. Drag and drop additional photos or choose Browse again to choose more files. You may mix and match these two methods. Photomatix Essentials 3.0 User Manual 6 Managing Photos Once you load your photos into Photomatix Essentials, you should notice a few things in the interface. First, each photo is displayed as a thumbnail. This makes it easy to verify that the photos are of the same subject and see their relative exposure compared to their bracketed companions. Additionally, there is a larger combined thumbnail that shows a preview of the result of processing the photos. Finally, there is a checkbox beside each photo’s thumbnail (this is checked by default unless you loaded only one photo). A checked box signifies that the photo is included in the process. Uncheck a photo to take it out of the process. You’ll see the combined thumbnail update to show the effect. Check the photo to put it back into the mix. Starting Over or Continuing To start over, select Reset & Start Again. You’ll jump back to a clean interface and be ready to select new bracketed photos. To continue with these photos, select Next. Photomatix Essentials 3.0 User Manual 7 2.2 Adjusting the Image with Fusion or Tone Mapping (Step 2) The heart of Photomatix Essentials is Step 2, where you choose a method and settings to process your bracketed photos. The two tone mapping methods you can choose from are: • Details Enhancer Tone Mapping: processes the HDR image merged from your bracketed photos, revealing its details in highlights and shadows. This method excels at creating the so-called ‘HDR look’ — enhanced local contrast and accentuated details. • Tone Compressor Tone Mapping: processes the same HDR image as the Details Enhancer method, but enhances global rather than local contrast, which gives a more “natural” look and avoids enhancing noise at the same time as details. Photomatix Essentials 3.0 User Manual 8 • Exposure Fusion: combines your bracketed photos in such a way that bright details (highlights) are taken from the underexposed photos and dark details (shadows) from the overexposed ones. The result is a more ‘natural’ look than tone mapping. Note that this method requires more than one exposure and is thus not available when you have chosen to load a single photo. Follow these steps when you enter Step 2: 1. Click on the radio button on the top left or on the thumbnails on the right side to select the method and presets that give you the results you prefer. 2. Adjust the parameter sliders to get the effect you want. 3. When satisfied, select Process & Save. 4. Enter a new file name, if desired, and select a file type: • TIFF 16-bit: This is the highest quality output available and is the best format if you plan on processing the image further in an image editor. • JPEG: JPEGs are the best options if you want to go straight to the Web or other medium with no further processing. 5. If you want to automatically open the processed image in an image editor, select Open saved image with, then choose an image editor. 6.Choose Save. Photomatix Essentials aligns your photos and processes them with either exposure fusion or HDR merge followed by tone mapping. If set in Preferences, this is also when Noise Reduction will be applied. Photomatix Essentials 3.0 User Manual 9 2.2.1 Details Enhancer Settings • Strength: Affects the degree to which contrast and detail are enhanced in the image. A value of 100 gives the maximum amount of enhancement. To get a more natural effect, move the slider to the left. The default value is 70. • Color Saturation: Controls the saturation of the RGB color channels. The greater the saturation, the more intense the color. Move the slider right or left to change the setting. A value of 0 produces a grayscale image. The value affects each color channel equally. The default value is 46. • Luminosity: Controls the compression of the tonal range, which has the effect of adjusting the global luminosity level. Move the slider to the right to boost shadow details and brighten the image. Move it to the left to give a more “natural” look to the resulting image. The default value is 0. Details Enhancer – General Settings • Detail Contrast: Controls the amount of contrast applied to detail in the image. Move the slider to the right to increase the contrast of the details and give a sharper look to the image. Note that increasing the contrast also has a darkening effect. Move the slider to the left to decrease the contrast of details and brighten the image. • Lighting Adjustments: Affects the overall ‘look’, controlling the extent to which the image looks natural or surreal. When the Lighting Effects Mode box is unchecked, move the slider to the right to make the image look more natural and to the left to make it look more ‘painterly’ or ‘surreal’. • Lighting Effects Mode: The checkbox lets you switch between two Details Enhancer – Lighting modes for the Lighting Adjustments setting, where each mode produces Adjustment Settings slightly different results. Checking the box tends to produce results with a type of ‘Magic Light’ effect. Note that finer control is not possible in Lighting Effects mode. 2.2.2 Tone Compressor Settings • Brightness: Adjusts the overall brightness of the tone mapped image. The default value is 0. • Compression: Controls the compression of the tonal range. Move the slider to the right to shift both shadows and highlights toward the midtones in the tone mapped image. The default value is 0. • Contrast Adaptation: Adjusts the influence of the average brightness in relation to the intensity of the processed pixel. Move the slider to the right to create more pronounced colors. Move the slider to the left to create a more “natural” look. The default value is 0. • Color Saturation: Adjusts the color saturation of the tone mapped image. The greater the saturation, the more intense the color. The value affects each color channel equally. The default value is 0. • Color Temperature: Adjusts the color temperature of the tone mapped image relative to the temperature of the HDR source image. Move the slider to the right for a warmer, more yellow-orange colored look. Move it to the left for a colder, more bluish look. A value of 0 (default) pre-serves the original color temperature of the HDR source image. Photomatix Essentials 3.0 User Manual Tone Compressor Settings 10 2.2.3 Exposure Fusion Settings • Accentuation: Adjusts the strength of the overall effect. • Blending Point: Adjusts how much weight to give the underexposed or overexposed images. When you move the slider to the right, the overexposed images are favored, which tends to brighten the resulting image. The reverse happens when you move the slider to the left. • Sharpness: Increases the sharpness and contrast of details in the image. Increasing sharpness may have the side-effect of making noise more visible and of creating thin halo effects around strong luminosity edges. A value of zero adds no sharpness. Values close to the maximum tend to give a surreal look to the image. The default value is 2. • Color Saturation: Adjusts the saturation of the color channels. The greater the saturation, the more intense the colors. A value of -10 produces a grayscale image. • Midtones: Increases or decreases contrast in the midtones of the image. Raising it brightens the image but reduces the overall contrast. Lowering it darkens the image while increasing contrast. Photomatix Essentials 3.0 User Manual Exposure Fusion Settings 11 Section 3: Preferences Photomatix Essentials offers Image Alignment, Ghost Removal and Noise Reduction. You can choose whether to use these features and adjust some of their options in Preferences. To access the Preferences dialog, click on the Preferences … button located at bottom left of the window where you load your images in Step 1 of the Photomatix Essentials workflow. Alignment Options Image alignment is an important feature of HDR processing as bracketed photos are always misaligned when taken with a hand-held camera, and may even be slightly mis-aligned when taken with the aid of a tripod. Image alignment is turned on by default, but you can turn it off by selecting No on the Align images option. You can also choose to be prompted whether to align your photos each time by selecting Ask me whether to align. Image alignment is recommended whenever you are processing bracketed photographs, but there are a few cases when it should not be selected. One example of such case is when you have derived different exposures from a single RAW file by adjusting the Exposure setting of your RAW converter. Another example is when you are processing stitched panoramas. There are two methods offered for aligning images: • The By correcting horizontal and vertical shifts method is fast, but only corrects for translation movements. This method is recommended when your bracketed photos were taken on a tripod. • The By matching features corrects for rotation, translation and scaling differences, as well as perspective distortion. The Crop aligned images option removes the unused borders that appear when the images are shifted to correct for mis-registration. Leave this box unchecked if you need the resulting image to have the same width and height as the source images. Ghost Removal Option The Remove ghosts option addresses the problem of artifacts that appear when combining images of a dynamic scene. For example, if the moving subjects are people walking, the people appear multiple times in the combined image as if there were “ghosts”. This is why artifacts arising from movements in the scene are commonly referred to as “ghosting” and the attempt to eliminate them as “deghosting”. After you have loaded bracketed photos and have then clicked Next … , Photomatix Essentials shows by default a prompt asking whether you would like to remove ghosts. If you prefer not to show the prompt, uncheck the Ask me whether to remove box. Photomatix Essentials 3.0 User Manual 12 Noise Reduction Options Noise Reduction is often useful when using the Details Enhancer tone mapping method to process the HDR image, as enhancing local details has the drawback to enhance noise as well. Noise reduction is particularly recommended when processing RAW files directly in Photomatix, or when processing just one photo, especially when this photo is underexposed. You can turn Noise Reduction on or off, or be prompted whether to apply it, by adjusting the Reduce noise option. As reducing noise takes time, you can choose to process only a subset of your source images with noise reduction by adjusting the Apply noise reduction on option. Photomatix Essentials 3.0 User Manual 13 Glossary AEB mode (Automatic Exposure Bracketing). DSLR cameras and some compact digital cameras offer this feature. It enables you to automatically take three or more exposures in a row: one at the proper exposure, one or more underexposed, and one or more overexposed. Aperture priority In Aperture Priority mode, you select the aperture and the camera determines the correct shutter speed for the available light. The shutter speed also depends on ISO sensitivity. This is the right mode for shooting bracketed shots for HDR (refer to Section 1 for more information). Bit Bits represent digital data in computers. Digital Images are made of bits. A bit depth corresponds to 2^(Bit Depth) levels (e.g. 256 for 8-bit). Bit depth The number of bits a file type uses to represent a pixel’s color at a given location in an image. Bracketed images A group of photos taken with the Automatic Exposure Bracketing function of a camera, resulting in photos of the same scene taken with different exposures. dSLR Digital Single Lens Reflex camera. Dynamic range In the context of HDR photography, the total range of light intensity in a scene, from the deepest shadows to the brightest highlights. Exposure The amount of light that enters a camera for the length of time the shutter is open. Exposure depends on aperture and shutter speed, as well as the camera’s sensitivity to light (controlled by the ISO). “Exposure” is also shorthand for a photograph or frame (a frame of film). Exposure fusion Combination of photos of the same scene taken under different exposure settings in such a way that highlight details are taken from the underexposed photos and shadow details from the overexposed ones. EV (Exposure Value) A measure of exposure which is the equivalent of a stop. In the absolute sense, EV is defined as the exposure from a photo taken at 1 second, f/1, and ISO 100. In the relative sense, the correct exposure is normally 0 EV and any deviation is measured in positive or negative EV from that mark. HDR High Dynamic Range. HDR range Strictly speaking, an HDR image is an intermediary image with 32 bits per color channel (96 bits per pixel). An HDR image is the result of merging photos of the same scene taken under different exposure settings and stored in special HDR image format. The 32-bit intermediary HDR image must be processed with tone mapping for proper display on standard monitors and prints. It has become very common to define “HDR image” as the result of processing the 32-bit HDR image with tone mapping, i.e. the tone mapped output, but this is not technically correct. Photomatix Essentials 3.0 User Manual 14 JPEG A common image file format with two primary strengths – a relatively small file size and universal compatibility. JPEGs use a lossy compression scheme and should not be edited and re-saved. Noise Statistical variations inherent in the sensor system cause noise. Noise is always present, but higher sensitivities and smaller sensors usually generate more noise. Pixel Digital pictures consist of pixels, the smallest units. Each pixel has a color that can be represented by 8 or 16 bits or as a floating-point number (32bit HDR). PPI Pixels per Inch. Can be used to describe the actual pixels per inch of a print. Often confused with DPI (Dots per Inch), used by color printers to print an image. RAW file A file containing the raw data from the camera sensor. RAW files do not have a color profile or other stylistic preferences permanently applied. TIFF A comprehensive image format that offers lossless compression schemes for smaller file sizes with higher quality. This format is suitable for editing and printing but not publishing on the Web. Tone mapping Processing a 32-bit HDR image into an image that can be properly viewed on monitors and in prints. Photomatix Essentials 3.0 User Manual 15 Resources You can find more tips, techniques, and regularly updated information in the Photomatix FAQ on the HDRsoft website at http://www.hdrsoft.com/support/faq_photomatix.html. Additionally, the resources page at http://www.hdrsoft.com/resources/ lists Internet tutorials, book and DVDs on the subject of HDR photography that, along with your own experience, will help deepen your understanding of it. Photomatix Essentials 3.0 User Manual 16 www.hdrsoft.com