1
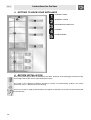
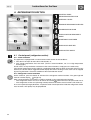
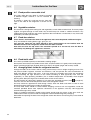
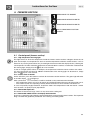
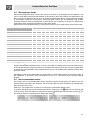
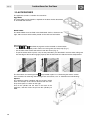
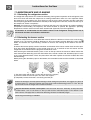
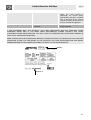
Table of Contents
1. THE ENVIRONMENT - DISPOSAL INSTRUCTIONS ........................................................... 25
2. PRECAUTIONS FOR USE .................................................................................................... 26
3. SAFETY PRECAUTIONS ...................................................................................................... 27
4. INSTALLATION AND CONNECTION ................................................................................... 28
4.1 Positioning and levelling the appliance ......................................................................................................... 28
4.2 Electrical connection ..................................................................................................................................... 28
4.3 Overall dimensions ........................................................................................................................................ 29
5. GETTING TO KNOW YOUR APPLIANCE ............................................................................ 30
6. BEFORE INSTALLATION ..................................................................................................... 30
7. CONTROL PANEL ................................................................................................................ 31
8. REFRIGERATOR SECTION ................................................................................................. 32
8.1 Control panel (refrigerator section) ............................................................................................................... 32
8.2 Internal lights ................................................................................................................................................. 33
8.3 Movable removable shelves .......................................................................................................................... 33
8.4 Condensation drain ....................................................................................................................................... 33
8.5 Fixed-position removable shelf ..................................................................................................................... 34
8.6 Vegetable container ...................................................................................................................................... 34
8.7 Fixed door shelves ........................................................................................................................................ 34
8.8 Fixed bottle shelf ........................................................................................................................................... 34
8.9 Arranging foods inside the refrigerator section. ............................................................................................ 34
9. FREEZER SECTION ............................................................................................................. 35
9.1 Control panel (freezer section) ...................................................................................................................... 35
9.2 Freezing and storing foods ............................................................................................................................ 36
9.4 Thawing frozen foods .................................................................................................................................... 37
9.5 Anti-condensation device .............................................................................................................................. 37
9.3 Storing frozen foods ...................................................................................................................................... 37
10. ACCESSORIES ................................................................................................................... 38
11. MAINTENANCE AND CLEANING ....................................................................................... 39
11.1 Defrosting the refrigerator section ............................................................................................................... 39
11.2 Defrosting the freezer section ..................................................................................................................... 39
11.3 Cleaning the refrigerator ............................................................................................................................. 40
11.4 Switching off the refrigerator ....................................................................................................................... 40
11.5 Practical advice for saving energy .............................................................................................................. 40
11.6 Operating noise ........................................................................................................................................... 40
11.7 Identifying and dealing with possible malfunctions ..................................................................................... 41
12. SOME HINTS FOR SAVING MONEY ................................................................................. 44
INSTRUCTIONS FOR THE USER: these provide recommendations for use, a description of the controls
and the correct procedures for cleaning and maintaining the appliance.
INSTRUCTIONS FOR THE INSTALLER: these are intended for the qualified engineer who is to install,
commission and test the appliance
24
The environment - Disposal instructions
1. THE ENVIRONMENT - DISPOSAL INSTRUCTIONS
OUR REFRIGERATORS ARE ONLY PACKAGED USING NON-POLLUTANT, ENVIRONMENTFRIENDLY, RECYCLABLE MATERIALS. WE URGE YOU TO COOPERATE BY DISPOSING OF THE
PACKAGING PROPERLY. CONTACT YOUR LOCAL DEALER OR THE COMPETENT LOCAL
ORGANISATIONS FOR THE ADDRESSES OF COLLECTION, RECYCLING AND DISPOSAL
FACILITIES.
NEVER LEAVE ALL OR PART OF THE PACKAGING LYING AROUND: PACKAGING PARTS, AND
ESPECIALLY PLASTIC BAGS, MAY REPRESENT A SUFFOCATION HAZARD FOR CHILDREN.
IMPORTANT: YOUR OLD APPLIANCE MUST ALSO BE DISPOSED OF PROPERLY.
DELIVER THE APPLIANCE TO YOUR LOCAL ORGANISATION AUTHORISED TO COLLECT
SCRAPPED APPLIANCES. PROPER DISPOSAL ALLOWS THE INTELLIGENT RECOVERY OF
VALUABLE MATERIALS. REFRIGERATION APPLIANCES CONTAIN GASES WHICH MAY DAMAGE
THE ENVIRONMENT; IT IS IMPORTANT TO ENSURE THAT THE REFRIGERATION CIRCUIT
PIPELINES ARE NOT DAMAGED UNTIL THE COMPETENT SERVICE HAS TAKEN DELIVERY OF
THE APPLIANCE.
BEFORE SCRAPPING YOUR REFRIGERATOR IT IS IMPORTANT TO REMOVE DOORS AND
LEAVE SHELVES IN POSITION AS FOR USE, TO ENSURE THAT CHILDREN CANNOT
ACCIDENTALLY BECOME TRAPPED INSIDE DURING PLAY. ALSO, CUT THE POWER SUPPLY
LEAD AND REMOVE IT AND THE PLUG.
BY LAW, APPLIANCES MUST ONLY BE DISPOSED OF AT SUITABLY EQUIPPED FACILITIES.
25
Precautions for Use
2. PRECAUTIONS FOR USE
ELECTRICAL CONNECTION: SEE INSTALLATION INSTRUCTIONS FOR SAFETY REGULATIONS
FOR ELECTRIC OR GAS APPLIANCES AND FOR VENTILATION FUNCTIONS.
IN YOUR INTEREST AND TO ENSURE YOUR SAFETY, BY LAW ALL ELECTRIC APPLIANCES MUST
ONLY BE INSTALLED AND SERVICED BY QUALIFIED STAFF, IN ACCORDANCE WITH THE
RELEVANT REGULATIONS.
GAS OR ELECTRIC APPLIANCES MUST ALWAYS BE DISCONNECTED BY SUITABLY SKILLED
PEOPLE.
THIS MANUAL CONSTITUTES AN INTEGRAL PART OF THE APPLIANCE: TAKE GOOD CARE OF IT
AND KEEP IT TO HAND THROUGHOUT THE APPLIANCE'S LIFE CYCLE. WE URGE YOU TO READ
THIS MANUAL AND ALL THE INFORMATION IT CONTAINS CAREFULLY BEFORE USING THE
APPLIANCE. INSTALLATION MUST BE CARRIED OUT BY QUALIFIED STAFF IN COMPLIANCE
WITH THE RELEVANT REGULATIONS. THIS APPLIANCE IS INTENDED FOR HOUSEHOLD USE
AND COMPLIES WITH THE EEC DIRECTIVES CURRENTLY IN FORCE. THE APPLIANCE IS BUILT
TO PROVIDE THE FOLLOWING FUNCTION: CHILLING AND FREEZING FOODS; ALL OTHER USES
ARE TO BE CONSIDERED IMPROPER.
THE MANUFACTURER DECLINES ALL LIABILITY FOR USES OTHER THAN THOSE STATED
ABOVE.
NEVER USE THIS APPLIANCE FOR COOLING ROOMS.
ONCE NO LONGER IN USE, THE APPLIANCE MUST BE DELIVERED TO A SEPARATE DISPOSAL
FACILITY.
NEVER LEAVE PACKAGING RESIDUES UNATTENDED IN THE HOME. SEPARATE WASTE
PACKAGING MATERIALS BY TYPE AND CONSIGN THEM TO THE NEAREST SEPARATE DISPOSAL
CENTRE.
NEVER OBSTRUCT THE OPENINGS AND SLITS PROVIDED FOR VENTILATION AND HEAT
DISPERSAL.
SETTING THE THERMOSTATS TOO LOW IN SUMMER CAUSES CONSIDERABLY INCREASED ICE
FORMATION ON THE BACK OF THE APPLIANCE, SIGNIFICANTLY REDUCING ITS EFFICIENCY.
DURING THE SUMMER OR WHENEVER THE WEATHER IS PARTICULARLY HOT AND/OR HUMID,
THE REFRIGERATOR SHOULD BE KEPT AT A FAIRLY HIGH SETTING (6/7/8) TO PREVENT ICE
FROM BUILDING UP IN THE BACK OF THE INTERIOR, CAUSING LOSS OF EFFICIENCY.
DURING OPERATION, THE APPLIANCE'S REAR SURFACE MAY HEAT UP CONSIDERABLY. THIS
IS QUITE NORMAL AND DOES NOT INDICATE A MALFUNCTION.
THE NAMEPLATE WITH THE TECHNICAL DATA, SERIAL NUMBER AND MARK, IS IN THE
BOTTOM LEFT-HAND CORNER OF THE BODY OF THE REFRIGERATOR.
THE NAMEPLATE MUST NEVER BE REMOVED.
IT IS BEST TO OPEN THE DOOR AS LITTLE AS POSSIBLE, PARTICULARLY IN HOT WEATHER.
OPENING THE DOOR OFTEN OR LEAVING IT OPEN WILL CAUSE VARIATIONS IN
TEMPERATURE INSIDE THE APPLIANCE WHICH MIGHT LEAD TO PROBLEMS IN FOOD
STORAGE PERFORMANCE.
The manufacturer declines all responsibility for injury or damage caused by failure to comply with the
above regulations or deriving from tampering with even just one part of the appliance and the use of
non-original spare parts.
26
Safety Precautions
3. SAFETY PRECAUTIONS
INSTRUCTIONS FOR THE INSTALLER: THESE ARE INTENDED FOR THE QUALIFIED ENGINEER
WHO IS TO INSTALL, COMMISSION AND TEST THE APPLIANCE.
THE APPLIANCE MUST BE TRANSPORTED IN ITS PACKAGING BY AT LEAST TWO PEOPLE AND
INSTALLED BY QUALIFIED STAFF TO PREVENT DAMAGE OR INJURY.
THE R600A REFRIGERANT IN THE APPLIANCE'S CIRCUIT IS FLAMMABLE: TAKE CARE NOT TO
DAMAGE THE REFRIGERATION CIRCUIT.
THE REFRIGERANT MAY ALSO DAMAGE THE EYES: LOOK OUT FOR ANY LEAKS FROM THE
REFRIGERATION CIRCUIT.
IN CASE OF A REFRIGERANT SPILL, ELIMINATE ALL POSSIBLE CAUSES OF SPARKS OR NAKED
LIGHTS IN THE VICINITY OF THE APPLIANCE, DISCONNECT THE PLUG FROM ITS SOCKET AND
VENTILATE THE ROOM.
NEVER ATTEMPT TO MOVE THE APPLIANCE BY PULLING ON THE DOOR OR THE HANDLE.
PULL THE BOTTOM PART OF THE HANDLE OUTWARD TO RELEASE THE DOOR.
TAKE CARE THAT THE DOOR DOES NOT CLOSE AGAIN, TRAPPING YOUR FINGERS.
ON INSTALLATION, IF ANY MANUFACTURING DEFECTS OR DAMAGE CAUSED IN TRANSIT ARE
NOTED, CALL YOUR NEAREST SERVICE CENTRE AT ONCE.
FOR INSTALLATION AND CONNECTION, FOLLOW THE INSTRUCTIONS PROVIDED IN THIS
MANUAL ONLY.
IN CASE OF MALFUNCTIONS, DISCONNECT THE APPLIANCE FROM THE POWER SUPPLY BY
REMOVING THE PLUG, WITHOUT PULLING ON THE POWER SUPPLY LEAD.
ALL REPAIRS OR OTHER WORK NOT COVERED BY THIS MANUAL MUST BE CARRIED OUT BY A
QUALIFIED ENGINEER, TO BE FOUND AT AN AUTHORISED SERVICE CENTRE. NEVER
ATTEMPT TO REPAIR THE APPLIANCE.
NEVER STORE SPRAY CANS CONTAINING FLAMMABLE GASES INSIDE THE APPLIANCE. ANY
LEAKS MAY CONSTITUTE A SERIOUS THREAT TO USERS' SAFETY.
HIGH-PROOF ALCOHOLIC BEVERAGES MUST ALWAYS BE STORED UPRIGHT AND MUST BE
WELL SEALED.
THE USE OF ELECTRICAL APPLIANCES (SUCH AS ICE-CREAM MAKERS OR WHISKS) INSIDE
THE APPLIANCE IS FORBIDDEN.
NEVER LEAN ON THE APPLIANCE'S SHELVES AND DRAWERS OR USE THEM AS STEPS.
THE APPLIANCE IS INTENDED FOR USE BY ADULTS. KEEP CHILDREN AT A SAFE DISTANCE
AND NEVER ALLOW THEM TO PLAY WITH IT.
27
Instructions for the Installer
4. INSTALLATION AND CONNECTION
Always place the refrigerator in a dry place with satisfactory ventilation. Never expose it to direct sunlight
or install it outdoors. Depending on its climate class (stated on the nameplate inside the refrigerator
compartment), the appliance can be used in different temperature conditions:
Class
SN (Subnormal)
N (Normal)
ST (Subtropical)
T (Tropical)
Ambient temperature
from + 10° C to + 32° C
from + 16° C to + 32° C
from + 18° C to + 38° C
from + 18° C to + 43° C
Never place the refrigerator close to heat sources unless strictly necessary. If this is unavoidable, a
suitable insulating panel must be used to allow the appliance to function properly. Otherwise, place the
appliance at least 3 cm from electric or gas cookers and at least 30 cm from combustion or radiation
heating systems.
To allow proper cooling of the condenser, the refrigerator must not be placed too close to the wall. Leave
a gap of at least 5 cm between the back of the appliance and the wall. There must be an opening of at
least 200 cm2 behind the refrigerator. If the refrigerator is installed underneath a wall cupboard, the
distance between the two must be at least 5 cm.
Take care not to scratch or damage the floor when installing the appliance on parquet or linoleum.
4.1 Positioning and levelling the appliance
Place the refrigerator on a firm, level surface. To compensate for any unevenness in the floor, the
appliance has two adjustable feet at the front and two adjustable feet at the back. To adjust them, turn
the screw as shown in figure 1 to level the appliance.
Once it has been levelled, the appliance can be fixed in place by turning the screws on the front wheels
as shown in figure 2. The two screws are supplied separately. To fit them, screw them into the hole as
shown in figure 3.
1)
2)
3)
4.2 Electrical connection
Before switching the refrigerator on for the first time, leave it standing upright for about two hours. Then
connect the appliance's power supply lead to a mains socket with earth contact, installed in accordance
with electrical safety regulations. The rated voltage and frequency are stated on the nameplate inside
the refrigerator compartment. The appliance must be connected to the electrical mains and earthed in
compliance with the relevant regulations and requirements. The appliance is able to withstand brief
voltage fluctuations of not more than 15% below or 10% above the rated value. If the power supply lead
has to be replaced, this operation must only be carried out by an authorized Smeg technical service
engineer.
28
Instructions for the Installer
4.3 Overall dimensions
The drawing below shows the product's maximum overall dimensions with the door open.
29
Instructions for the User
5. GETTING TO KNOW YOUR APPLIANCE
CONTROL PANEL
INTERNAL LIGHTS
REFRIGERATOR SECTION
FREEZER
DOOR SHELVES
6. BEFORE INSTALLATION
Never leave packaging residues unattended in the home. Separate waste packaging materials by type
and consign them to the nearest separate disposal centre.
The inside of the appliance should be cleaned to remove all manufacturing residues. For further
information, see "11. Maintenance and cleaning".
On first use or after a lengthy power blackout, the appliance should be run for about 2 hours before food
is placed inside.
30
Instructions for the User
7. CONTROL PANEL
REFRIGERATOR SECTION CONTROLS: THE BUTTONS IN THIS AREA CONTROL THE
REFRIGERATOR SECTION FUNCTIONS ONLY. FOR CORRECT USE, SEE "8.1 CONTROL PANEL
(REFRIGERATOR SECTION)".
DOOR PHOTOCELL (WHERE INSTALLED ONLY): THIS SENSOR WILL ENABLE ALL THE
CONTROLS AND SWITCH ON THE LIGHTS INSIDE THE APPLIANCE WHENEVER THE DOOR IS
OPENED. WHEN THE DOOR IS CLOSED, IT WILL TURN OFF THE LIGHTS AND THE DISPLAYS,
BUT THE FUNCTIONS ENABLED WILL STILL BE ACTIVE.
FREEZER CONTROLS: THE BUTTONS IN THIS AREA CONTROL THE FREEZER FUNCTIONS
ONLY. FOR CORRECT USE, SEE "9.1 CONTROL PANEL (FREEZER SECTION)"
ALARM AND WARNING LIGHT OFF BUTTON: FOR CORRECT USE OF THE BUTTON AND THE
RED LIGHT, SEE “8.1.1 ALARM OFF BUTTON” AND “9.1.1 HIGH TEMPERATURE WARNING LIGHT”
REFRIGERATOR SECTION ON BUTTON AND INDICATOR LIGHT: AT FIRST SWITCH-ON PRESS
THIS BUTTON TO SWITCH THE REFRIGERATOR SECTION ON. THE GREEN PILOT LIGHT WILL
COME ON.
REFRIGERATOR SECTION TEMPERATURE REGULATOR BUTTONS AND DISPLAY: PRESS THE
AND
BUTTONS TO REGULATE THE COOLING POWER SHOWN ON THE DISPLAY. (FOR
CORRECT USE, SEE 8.1.3 TEMPERATURE REGULATOR BUTTONS)
FREEZER TEMPERATURE REGULATOR BUTTONS AND DISPLAY: PRESS THE
AND
BUTTONS TO REGULATE THE COOLING POWER SHOWN ON THE DISPLAY. (FOR CORRECT
USE, SEE "8.1.3 TEMPERATURE REGULATOR BUTTONS")
FREEZER ON BUTTON AND INDICATOR LIGHT: AT FIRST SWITCH-ON OR AFTER A POWER
BLACKOUT, PRESS THIS BUTTON TO SWITCH THE FREEZER ON. THE GREEN PILOT LIGHT
WILL COME ON.
"TURBO-COOL" BUTTON AND INDICATOR LIGHT: PRESS THIS BUTTON TO FREEZE FRESH
FOODS QUICKLY.
31
Instructions for the User
8. REFRIGERATOR SECTION
CONTROL PANEL,
REFRIGERATOR SECTION
INTERNAL LIGHTS
MOVABLE REMOVABLE SHELVES
CONDENSATION DRAIN
FIXED-POSITION REMOVABLE
SHELF
VEGETABLE CONTAINER
FIXED DOOR SHELVES
FIXED BOTTLE SHELF
8.1 Control panel (refrigerator section)
8.1.1 Alarm off button
The appliance is equipped with an alarm buzzer which sounds in two conditions:
1 if the door is left open for more than 120 seconds, or;
2 if the freezer temperature rises too much. (For this second condition, see “9.1.1 High temperature
warning light”).
In both cases, to stop the buzzer and return to the normal functions, simply press the relative key.
If the freezer temperature remains high for a prolonged period and then drops to the normal level in your
absence, the buzzer will be triggered and the display will show a flashing H. This alarm can be stopped
by pressing the button. Check the condition of the food inside the freezer.
8.1.2 Refrigerator section on button
At first switch-on, press this button to activate all the refrigerator section functions. The green light will
come on and the display
will light up.
After a power blackout, the functions set will be retained as they were before the blackout:
- if the refrigerator section was off, it will remain off and the
button will have to be pressed to start it;
- if the refrigerator section was operating normally before the blackout, these functions will still be set.
In case of especially lengthy blackouts, inspect the food: if the temperature inside the refrigerator section
rises too much, their quality may be jeopardised.
32
Instructions for the User
8.1.3 Temperature regulator buttons
These buttons can be used to set the temperature inside the refrigerator section.
The temperature referred to in this section is the MEAN temperature inside the appliance, which can be
set from a maximum of 8°C to a minimum of 2°C.
In normal operation, when the door is opened the display will show the actual temperature inside the
refrigerator section.
To view the temperature, simply press the
or
key once. The preset temperature will flash on the
display for a few seconds. To modify it, press the
or
keys within 5 or 6 seconds to increase or
decrease the temperature. After 5 or 6 seconds the display will stop flashing and will return to the actual
mean temperature inside the refrigerator section.
may appear and flash on the refrigerator display if the temperature inside the refrigerator section has
exceeded the maximum value, or may appear and flash if the temperature has dropped below the
minimum value set. In both cases, simply use the
or
keys to set a new value, which may be higher
or lower depending on the message shown.
For guidance on placing foods inside the refrigerator section, see “8.9 Arranging foods inside the
refrigerator section.”
Important: changes in weather conditions (temperature and humidity) and the frequency with which the
doors of the two separate compartments are opened may affect the refrigerator's operating
temperatures.
8.1.4 Photocell (where installed only)
Whenever the door is opened, this device switches on the internal lights and also reactivates the lighting
of the displays.
These functions are deactivated when the door is closed, although the refrigerator and freezer section
temperature settings are retained unchanged.
8.2 Internal lights
Inside the refrigerator section there are 3 neon lights which come on whenever the door is opened.
If these lights need changing, contact an authorized service centre.
8.3 Movable removable shelves
The refrigerator section has 3 movable removable shelves.
The shelves can be moved to different heights to suit the foods to be stored using the slots provided in
the back of the refrigerator section, as shown below.
1)
2)
3)
Lift the front of the shelf and free the pin underneath (Fig.1).
Lift the back, and extract the retainer incorporated in the frame from the slot (Fig. 2)
Completely remove the shelf from the refrigerator.
The shelves can be removed to allow foods to be arranged inside the appliance to suit their pack heights
and for easier cleaning of the refrigerator section.
For instructions for cleaning the glass, see “11.3 Cleaning the refrigerator”.
8.4 Condensation drain
This opening must never be obstructed since it allows the condensation formed inside to drain from the
refrigerator section to the compressor motor, where it is then evaporated.
The formation of condensation on the inside surfaces of the refrigerator during normal use is
quite normal and does not indicate a malfunction.
33
Instructions for the User
8.5 Fixed-position removable shelf
This shelf, unlike the ones above it, cannot be installed
at different heights; however, it can be removed for
cleaning.
To remove it, simply lift it and free the pins from their
seats in the sides of the refrigerator as shown on the
right.
8.6 Vegetable container
This container is designed for storing fruit and vegetables, or fresh foods of other kinds. To ensure proper
hygiene and good storage of fresh foods, they should always be stored in suitable containers. Any
condensation found inside this part of the appliance does not indicate a malfunction; it may have been
produced by the foods placed inside.
8.7 Fixed door shelves
These shelves are fixed to the door of the appliance and cannot be placed at different heights.
They are suitable for storing butter, eggs, glass jars, etc.
Care must be taken that the foods placed in these compartments do not interfere with the
movable shelves of the refrigerator section once the door is closed.
Also take care over the top shelf: if the containers placed on it are too tall, once the door is
closed they may damage the appliance's structure.
8.8 Fixed bottle shelf
This shelf is provided especially to take bottles standing upright.
Do not place excessively heavy bottles on the shelf, and place bottles on it gently when loading them.
Bottles containing high-proof alcoholic drinks must always be stored upright and securely sealed.
8.9 Arranging foods inside the refrigerator section.
Arrange the foods on the various shelves, taking care that they have an airtight wrapping or cover. This
will preserve foods' fragrance, moisture and freshness, and also prevent the cross-contamination of
foods with different aromas and tastes. It will also prevent the humidity level inside the refrigerator
section becoming too high because of the normal breathing of food (especially fresh fruit and
vegetables). In some operating conditions (rise in ambient temperature and humidity, more frequent
opening of the door) this might cause condensation to form on the shelves.
The best position for storing dairy products is just above the vegetable container (shelf
on page 32),
since this area has the lowest temperature of the entire refrigerator section.
Use only containers approved for food storage. Always allow hot foods and drinks to cool to room
temperature before placing them inside the refrigerator.
The only foods which should be stored without wrapping are fresh fruit and vegetables, inside the
container provided. Never store explosive substances in the appliance and only store high-proof
alcoholic beverages firmly sealed.
Paper or cardboard containers should not be placed straight onto the surface of the glass shelf: the
condensation which may form inside the refrigerator section could damage the packaging.
Remember that opening the door of the refrigerator section too often or for too long may cause foods to
deteriorate.
34
Instructions for the User
9. FREEZER SECTION
REMOVABLE TOP BASKET
REMOVABLE MIDDLE BASKETS
REMOVABLE MIDDLE BASKETS
TIP-UP REMOVABLE BOTTOM
BASKET
9.1 Control panel (freezer section)
9.1.1 High temperature warning light
This light comes on when the temperature inside the freezer section reaches 6 degrees above the set
point. For example, if a temperature of -20 is set and the temperature inside the section reaches -14°C or
above for any reason (power failure etc.), the red light will come on while the display flashes, showing the
set temperature and the maximum temperature reached inside the section, in alternation. To deactivate
the warning light, simply press the
key for a few seconds.
If, due to a lengthy power failure, for example, the temperature inside the freezer section rises above 5°C, then the buzzer will sound in addition to illumination of the warning light. To deactivate it, simply
press the
key for a few seconds.
9.1.2 Freezer zone on button
At first switch-on, press this button to activate all the freezer section functions. The green light will come
on and the display
will light up.
After a power blackout, the functions set will be retained as they were before the blackout:
- if the refrigerator section was off, it will remain off and the
button will have to be pressed to start it;
- if the freezer section was operating normally before the blackout, these functions will still be set.
In case of especially lengthy blackouts, inspect the food: if the temperature inside the freezer section
rises too much, its quality may be jeopardised.
9.1.3 Removable top basket
This basket is ideal for ice-bags, since it is very close to the cooling coil.
9.1.4 Removable middle baskets and tip-up bottom basket
There are no particular rules about the type of food which can be placed in these baskets. The important
thing is to follow the guidelines provided in “9.2 Freezing and storing foods”.
35
Instructions for the User
9.1.5 Temperature variation buttons
These buttons can be used to set the temperature inside the freezer section.
The temperature referred to in this section is the MEAN temperature inside the appliance, which can be
set from a maximum of -15°C to a minimum of -26°C.
In normal operation, when the door is opened the display will show the actual temperature inside the
freezer section.
To view the temperature, simply press the
or
key once. The preset temperature will flash on the
display for a few seconds. To modify it, press the
or
keys within 5 or 6 seconds to increase or
decrease the temperature. After 5 or 6 seconds the display will stop flashing and will return to the actual
mean temperature inside the freezer section.
For guidance on placing foods inside the freezer section, see 9.2 Freezing and storing foods.
9.1.6 Display
The temperature shown on this display is the MEAN temperature inside the freezer section.
This display has several functions:
- In normal operation, it shows the temperature inside the freezer section;
- after an electrical blackout it will show the highest temperature the freezer section has reached,
warning the user that some foods may have been damaged by the excessively high temperature.
- If the display shows a flashing H, the temperature inside the section has risen by too many degrees
and the foods have probably thawed completely.
9.1.7 “Turbo-cool” button
Pressing this button activates the “rapid freezing” function. The orange pilot light will come on. When this
function is set the refrigeration system operates continuously and allows rapid freezing of large amounts
of fresh foods. Small amounts of fresh foods (up to about 2 kg) can be frozen even without activating the
rapid freezing function. To avoid wasting electricity, do not keep this function activated for long periods
unless really necessary. However, there is also a device which limits the duration of this function to a
maximum of 16 hours.
For best results, turn the function on a few hours before placing a large amount of fresh food for freezing
inside the freezer section.
The performance of this function will vary depending on weather conditions (temperature and relative
humidity) and the frequency with which the door is opened.
9.2 Freezing and storing foods
For proper storage and freezing, fruit and vegetables should be packed in portions of not more than 1 kg
and meat and fish up to a max. of 2 kg. Small packages of food freeze more quickly, giving better
conservation of their nutrients and flavour, even after thawing and preparation.
Use only freezer bags, aluminium film, food-approved film and freezer containers.
Do not use paper bags, non food-approved cellophane bags, shopping bags or used freezer
bags. Pack foods in airtight packs and try to expel all the air. If using bags, close the packs with
the elastic bands or plastic-coated wire strips provided.
Always cool hot foods to room temperature before placing them in the freezer and do not allow frozen
foods to touch fresh foods for freezing. Always mark packs with the date of freezing, quantity and type of
food and make sure that foods are fresh and in good condition. The max. amount of fresh foods which
can be frozen in a 24-hour period is marked on the nameplate. Do not exceed the stated amount: this
reduces the freezer's efficiency and its ability to preserve the frozen foods it already contains.
If you are expecting to have to freeze a large amount of food, it is best to turn the “turbo-cool” function on
3 or 4 hours in advance, remove the middle basket number
described in “9. Freezer section”) just
above the bottom tip-up removable basket and arrange the foods, packaged as described, straight on
the cooling coil.
36
Instructions for the User
9.3 Storing frozen foods
When purchasing frozen foods, always take care that the pack is not damaged, that the product is not
past its sell-by date and that the thermometer of the freezer in which the products are displayed for sale
does not show a temperature above -18°C. Also note the temperature advice, storage period and modes
of consumption stated by the producer. Purchased foods should also be protected using suitable
insulated containers during transportation to eliminate the risk of thawing. An increase in temperature
might reduce their storage life and adversely affect their quality.
Do not purchase frozen foods which are carrying too much frost; they might already have been thawed.
FOODS
1
2
3
STORAGE PERIOD (IN MONTHS)
4
5
6
7
8
9
10
+
+
+
+
Vegetables
Fruit
Bread - Confectionery
+
Milk
+
Ready-meals
+
Meat: beef
veal
pork
+
+
+
poultry
game
+
minced meat
+
Smoked sausage
+
Fish: oily
+
lean
+
Offal
+
THE INFORMATION PROVIDED IN THIS TABLE IS PURELY GUIDELINE
+
+
+
+
+
+
+
+
+
11
12
+
+
+
+
9.4 Thawing frozen foods
Partially thawed foods should be eaten as soon as possible. Low temperatures preserve foods but they
do not destroy the micro-organisms which are activated after thawing, which may cause the stored foods
to deteriorate. If thawed foods smell and look normal, they can be cooked and if required re-frozen once
they have cooled.
Depending on their type and intended use, frozen foods can be thawed correctly at room temperature, in
the refrigerator, in an electric oven (conventional or fan), or in a microwave oven using the relevant
function.
9.5 Anti-condensation device
This product has an anti-condensation device activated using the control panel. This device heats the
gasket between the body of the appliance and the freezer door; this heat evaporates the condensation
which may form in this area.
However, if any condensation is noticed it can simply be removed with kitchen paper.
To activate and deactivate the anti-condensation device, simply press the
button for 4-5 seconds with
no alarm active: when the function is activated, the freezer section display will show the message
for
two seconds; when it is deactivated, the display will show
.
37
Instructions for the User
10.ACCESSORIES
The appliance contains a number of accessories:
Egg Holder
The egg holder can be placed as required on the door shelves described
in “8.7 Fixed door shelves”.
Bottle Holder
The bottle holder must be fitted in the fixed bottle shelf as shown on the
right, and ensures that the bottles placed on the shelf are held stable.
Removable baskets
Baskets ,
and
described on page 35 can be removed as shown below.
- Pull the basket out gently until it comes to a halt against the safety stop (Fig. 1).
- Lift the front of the basket and extract it from the runner (Fig. 2).
- To put the basket back in place, carry out the procedures just described in reverse order, taking care
that the edge of the basket engages properly with the fixed runner inside the freezer compartment.
1
The instructions for removing basket
2
are provided in point “11.2 Defrosting the freezer section”
For instructions for removing and cleaning these accessories, see “11. Maintenance and cleaning”.
Spacers
The appliance comes complete with two spacers which
allow it to be kept at the correct distance from the wall.
They fit into place as shown on the right.
First fit the cylinder into the hole in the back of the
appliance, and then insert the pin into the cylinder just
fitted.
38
Instructions for the User
11.MAINTENANCE AND CLEANING
11.1 Defrosting the refrigerator section
The refrigerator compartment has automatic defrosting. During normal operation of the refrigerator, frost
forms on its back wall when the compressor is working and dissolves when it is not in operation. When
the compressor is not working, the frost which has built up on the back wall melts and the water flows
into the opening provided in the bottom of the body of the refrigerator. From here, it flows into the tray on
the compressor, where it evaporates.
Warning: the amount of ice which forms on the back wall may vary with changes in weather conditions
(temperature and humidity), the frequency with which the door is opened, the appliance's operating
temperatures and the amount of fresh foods stored inside (especially fruit and vegetables).
The formation of condensation on the inside surfaces of the refrigerator during normal use is
quite normal and does not indicate a malfunction.
11.2 Defrosting the freezer section
The freezer compartment has to be defrosted manually. When the thickness of frost or ice on the shelves
exceeds 2 cm, the freezer should be defrosted. A few hours before starting defrosting, press the
button and activate the “rapid freezing” function to increase the freezing of the foods in the freezer
section.
To defrost the freezer quickly, both the main door and the door of the freezer section itself must be open.
Then press both the
buttons on the control panel for 3 or 4 seconds to turn the freezer and the
refrigerator off and disconnect the plug from the electrical mains.
After removing the removable basket, place a basin on the top shelf of the freezer to collect most of the
water formed after defrosting and cover the bottom of the freezer section with absorbent paper to soak
up any water deposited there. These two precautions will make it quicker and easier to collect the water
after defrosting.
Before placing the absorbent paper on the bottom, the removable basket most be removed as described
below.
1)
2)
3)
1) Turn the basket until the pin is in line with the slot in the support;
2) push the basket to insert the pin in the slot in the support;
3) completely remove the basket, also freeing the front pin.
During defrosting, the temperature of the foods rises and this may reduce their natural storage time. To
minimise the damage caused by partial thawing of foods during this procedure, we suggest you place all
the frozen foods in a separate container and cover them until the defrosting process is over. This will
keep the foods frozen for longer even outside the freezer.
The freezer section can also be defrosted with the refrigerator section still in operation: simply press the
key on the freezer section control panel and close both the doors. Naturally, all the precautions
described above, such as the basin on the top shelf and the absorbent paper on the bottom of the
freezer section, still apply. Bear in mind that defrosting will take considerably longer.
The use of any mechanical or electronic devices other than those provided by the manufacturer to speed
up defrosting and freezing is forbidden.
39
Instructions for the User
11.3 Cleaning the refrigerator
Before cleaning, disconnect the plug from the electrical mains. Clean the outside using only water and a
gentle liquid detergent or an ordinary detergent for washable surfaces (such as a window-cleaning
product). Never use products containing abrasives or substances which may attack the lacquered or
painted parts, acids or chemical solvents. Use a sponge or a soft cloth.
Do not use steam cleaners to clean the inside; the procedures and products recommended for the
outside should be used.
Remove the shelves as described in “8.3 Movable removable shelves”. Once the shelves have been
removed, the glass shelf can also be removed for more thorough cleaning.
It is also possible to leave the other shelves in place and remove the
glass shelf only.
This operation can be carried out following the instructions provided
below.
Insert your hand between the glass and the steel frame, close to the
retainer, and then press on the glass with your thumb. Once the glass
has been freed from the first retainer, repeat the operation for the second
one. To put the glass back in place, simply press it until it fits flush against
the steel frame.
To remove the door shelves and bottle shelf simply lift them out, taking
care not to apply excessive force when removing.
Never wash removable plastic parts in the dishwasher; use only warm
water and washing-up liquid or water and vinegar. Take care not to wet
the electrical lighting components with water or detergents.
Clean the gaskets with warm water and then dry.
To allow the refrigerator to operate at full efficiency, periodically also clean the condenser on the rear
with a cloth, to prevent excessive dust and dirt from collecting and interfering with its operation.
11.4 Switching off the refrigerator
If the refrigerator is not to be used for a lengthy period, keep the two
buttons on the control panel
pressed for about 3 or 4 seconds. Then empty the compartments, disconnect the appliance from the
electrical mains, and once it has defrosted dry any residual moisture which has collected. Leave the door
ajar to prevent the humidity and trapped air from creating unpleasant smells.
The appliance should not be left unattended for more than 3-4 days. If you are to be away for some time,
it is best to switch off both the refrigerator and the freezer sections.
11.5 Practical advice for saving energy
-
40
Install the refrigerator in a cool, well ventilated place, protected against direct sunlight and well away
from heat sources;
do not place hot foods in the refrigerator or freezer sections. Wait for foods and drinks to cool to room
temperature before placing them on the shelves;
open the door(s) as infrequently and for as short a time as possible to prevent the compartments from
warming up too much;
clean the condenser (rear of the refrigerator) periodically to prevent the appliance from losing
efficiency;
do not leave the turbo-cooling and rapid freezing function activated for longer than absolutely
necessary;
if the refrigerator is to be out of use for a long period, it is best to empty it and switch it off;
thaw frozen foods in the refrigerator section in order to exploit the cold stored in the frozen foods,
which will be transferred to the refrigerator if this procedure is used.
Instructions for the User
11.6 Operating noise
The refrigerator and freezer are cooled by means of a compression system. In order to maintain the
preset temperature inside the refrigerator and freezer sections, the compressor comes into operation in
response to the level of cooling required, and may operate continuously if necessary. When the
compressor starts up a humming sound will be heard, tending to drop in volume after a few minutes.
Other normal refrigerator operating noises are a gurgling and a rustling due to the refrigerant flowing
through the pipes in the circuit. These noises are perfectly normal and do not mean that the appliance is
malfunctioning. If they are over-loud, there may be other causes. In this case, check that:
- the refrigerator is properly levelled on the floor and does not vibrate when the compressor is in
operation: adjust the feet provided as appropriate;
- the drawers, shelves and door boxes are correctly fitted and securely in place: fit correctly;
- bottles and containers on the various shelves are stable and not touching: the vibration due to
operation of the compressor may generate some noise;
- do not place kitchen units or other appliances so that they are touching the refrigerator.
11.7 Identifying and dealing with possible malfunctions
Your new refrigerator has been designed and built to strict quality standards. This section is intended to
enable you to identify the origin of any malfunctions which may occur before contacting your local
authorised After-Sales Service.
PROBLEM
Noisy operation
The compressor starts up too often or operates continuously:
The compressor does not start up:
-
Refrigerator
sufficiently:
section
not
cooled -
Temperature inside freezer section not low enough to freeze foods
properly:
-
-
POSSIBLE CAUSE
compressor
and
cooling inadequate:
condenser -
rise in outside temperature;
doors opened often or for long
periods;
too much fresh food placed in the
appliance:
switches off;
power supply lead not connected
to the electrical mains;
mains socket not supplying
electrical power;
room temperature too high.
Inside temperature set too high
(meaning reduced cooling effect).
-
freeze less food at a time;
-
Press buttons ;
connect the cable to the power
supply;
contact the electricity supplier
-
-
door opened often or for long periods.
inside
temperature
setting thermostat set on too high a
temperature;
door opened often or for long periods;
door not closing with an airtight seal;
too much sugar in foods for
freezing
PROBABLE SOLUTION
see “11.6 Operating noise”
check that the rear of the
appliance is properly ventilated as
explained in point “4. installation
and connection” and that the
condenser is not over-dirty;
-
Adjust the temperature using the
or
keys as described in
points 6.1.3 Temperature regulator
buttons;
open the door less often and for
as short a time as possible
Lower the temperature using the
key as described in points
7.1.2
Temperature
regulator
buttons ;
open the door less often and for
as short a time as possible;
check that the foods are arranged
on the shelves correctly, that the
gasket is sealing properly and is
not damaged, and that the
refrigerator is well levelled on the
floor
some foods can only be
completely frozen at very low
temperatures
(ice-cream,
concentrated fruit-juices)
41
Instructions for the User
Too much condensation forming in refrigerator section
check that the door gaskets are providing an airtight seal on the
refrigerator;
-
door opened often or for long periods;
-
too much fresh food (fruit and vegetables)
placed
on
the
shelves.
Foods not properly covered or stored in airtight containers
inside
temperature
setting thermostat set on too low a
temperature;
Temperature
inside
refrigerator section too cold – fresh foods are
freezing:
Too much ice forming on back wall of refrigerator section (layer of frost
more than 1 cm thick):
inside
temperature
setting thermostat set on too low a
temperature;
-
Too much ice forming in freezer
-
inside
temperature
setting thermostat set on too low a
temperature;
-
Water in bottom
compartment:
42
of
refrigerator -
“Condensation
blocked
drain”
opening -
In case of cracks, try to soften the
gasket by pulling it with one hand
and sliding your closed fingers
along the inside;
open the door less often and for
shorter times, especially when the
appliance is working in warm,
humid conditions;
place less food inside the
refrigerator section;
Cover the containers and seal
foods.
Increase the temperature using
the
key as described in points
6.1.3
Temperature
regulator
buttons ;
cover foods using suitable bags
and containers;
do not place fruit and vegetables
inside when too wet
do not place foods inside touching
the back of the refrigerator.
Increase the temperature using
the
key as described in points
6.1.3
Temperature
regulator
buttons ;
check that the gaskets are
providing an airtight seal;
open the door less often and for
shorter times;
rise in atmospheric temperature
and humidity;
do not place hot food or drinks
inside the refrigerator;
Increase the temperature using
the
key as described in points
7.1.2
Temperature
regulator
buttons ;
check that the gaskets are
providing an airtight seal: If they
are cracked, try to soften the
gasket by pulling it with one hand
and sliding your closed fingers
along the inside;
open the door less often and for
shorter times;
rise in atmospheric temperature
and humidity;
do not place hot food or drinks
inside the freezer;
Clear the drain opening
Instructions for the User
Door hard to open just after closing:
-
if you attempt to open a door
again just after closing it
(especially the freezer door),
considerable strength is required.
This is because of the vacuum
caused by cooling of the warm air
that has entered the appliance.
Doors out of alignment
- The appliance is not properly - check that the refrigerator is
levelled
levelled properly
AFTER-SALES SERVICE - READING THE NAMEPLATE.
IF THE PROBLEMS WITH THE PRODUCT YOU HAVE PURCHASED ARE NOT AMONGST THOSE
DESCRIBED ABOVE AND IF YOU NEED MORE INFORMATION, PLEASE CONTACT THE LOCAL
AUTHORISED AFTER-SALES SERVICE. YOU WILL FIND THE ADDRESS AND TELEPHONE NUMBER IN
YOUR LOCAL TELEPHONE DIRECTORY.
WHEN CONTACTING THE AFTER-SALES SERVICE, PLEASE BE READY TO INFORM OUR CALL SERVICE
OPERATORS CLEARLY OF THE MODEL OF THE PRODUCT YOU HAVE PURCHASED AND THE SERIAL
NUMBER MARKED ON THE NAMEPLATE INSIDE THE BODY OF THE REFRIGERATOR.
MODEL
SERIAL N.
43
Instructions for the User
12.SOME HINTS FOR SAVING MONEY
The following is some simple, practical advice which will allow you to run your refrigerator to best effect,
with peak performance and lower power consumption:
1) Place the refrigerator in the coolest part of the kitchen, well away from the cooker, radiators and the
window, to protect it from variations in temperature.
2) The correct distance from the wall is at least 5 centimetres. This leaves enough room around the
refrigerator for effective ventilation, necessary to prevent overheating and high power consumption.
3) Set the thermostat on intermediate settings. Colder settings increase power consumption by 10/15
per cent. We recommend the following settings: set a value of 5 for the refrigerator section, while the
recommended setting for the freezer is -18.
4) If you open the refrigerator often and always keep it full, set the thermostat on a slightly colder
temperature.
5) Never place food touching the sides of the refrigerator.
6) Do not place foods inside the refrigerator when they are still hot. This would tend to cause ice to
form on the sides.
7) Cooked foods must be sealed in airtight containers, left to cool and then placed on one of the
refrigerator's middle shelves.
8) Foods must be properly protected. Keep milk, butter and packaged cheeses in their original packs.
Clean bottles and cans before placing them in the refrigerator. For other products, use food-approved
paper or bags for vegetables; shop wrappings should not be used.
9) The coldest area is at the bottom; arrange foods depending on their storage requirements. For
example, fish and meat should be placed above the vegetable container and cheese and eggs in the top.
10) Fish must always be cleaned and gutted before storage. Minced meat must be in an airtight
container.
11) Eggs may be infectedwith salmonella, and so they should not be touching other foods. Always keep
the egg holder and the shelf which supports it thoroughly cleaned.
12) Store vegetables intact. Cutting them tends to cause them to deteriorate more quickly, and they
also lose their vitamins and mineral salts. Wash fruit and vegetable to remove any soil, dry thoroughly
and then place in the refrigerator in paper bags to aid breathing and reduce moisture.
13) Bananas turn black if stored at temperatures below 12 degrees. If it is very hot, it is best to put them
in the refrigerator wrapped in food-approved paper.
14) Foods have different storage lives. Eggs will keep for up to a month but cheeses, fruit and
vegetables should be used within a week, cooked foods within three days and meat and fish within twothree days.
15) Take out or insert food quickly. Every time you open the door it costs money. It will take time and
electricity to reduce the temperature to the same level.
16) After disconnecting the power supply, make sure that the condenser and the coil on the back of
the appliance are clean. The layer of dust which forms disperses the low temperature and considerably
increases power consumption.
17) The layer of ice inside must not be more than 5 millimetres thick. If necessary, defrost the
appliance to prevent formation of an insulating layer which would increase power consumption. For the
defrosting procedure, read points “11.1 Defrosting the refrigerator section” and “11.2 Defrosting the
freezer section”.
44