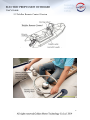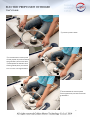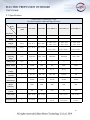
1
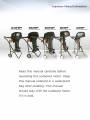
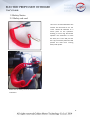
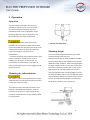
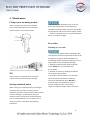
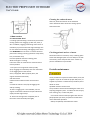
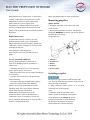
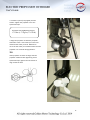
0 1 To the owner Thank you for choosing a ELECTRIC PROPULSION OUTBOARD KIT.This Owner’s Manual contains information needed for proper operation,maintenance and care. A thorough understanding of these simple instructions will help you obtain maximum enjoyment from your new ELECTRIC PROPULSION OUTBOARD KIT.I f you have any question about the operation or maintenance of your electric outboard motor, please consult a ELECTRIC PROPULSION OUTBOARD KIT dealer. In this Owner’Manual particularly important information is distinguished in the following ways. This is the safety alert symbol. It is used to alert you to potential personal injury hazards.Obey all safety messages that follow this symbol to avoid possible injury or death. A WARNING indicates a hazardous situation which, if not avoided, could result in death or serious injury. Concerning this manual, please consult your ELECTRIC PROPULSION OUTBOARD KIT dealer. To ensure long product life, ELECTRIC PROPULSION OUTBOARD KIT recommends that you use the product and perform the specified periodic inspections and maintenance.by correctly following the instructions in the owner’s manual. Any damage resulting from neglect of these instructions is not covered by warranty. Some countries have laws or regulations restricting users from taking the product out of the country where it was purchased, and it may be impossible to register the product in the destination country. Additionally, the warranty may not apply in certain regions. When planning to take the product to another country,consult the dealer where the product was purchased for further information. If the product was purchased used, please consult your closest dealer for customer reregistration, and to be eligible for the specified services. A NOTICE indicates special precautions that must be taken to avoid damage to the electric outboard motor or other property. TIP: A TIP provides key information to make procedures easier or clearer. ELECTRIC PROPULSION OUTBOARD KIT continually seeks advancements in product design and quality. Therefore, while this manual contains the most current Product information available at the time of printing, there may be minor discrepancies between your machine and this manual. If there is any question 2 TABLE OF CONTENTS 1 Safety Information 4 1.1 Outboard motor safety 4 1.2 Boating safety 4 2 Components and Specification 6 2.1 Tiller Control Version 6 2.2 Teleflex Remote Control Version 8 2.3 Specification 10 2.4 Wire Connection 11 2.5 Safety Notice 12 2.51 Safety red cord 12 3 Operation 14 4 Maintenance 16 5 Return and Repairs 20 6 Warranty 20 3 1 Safety Information 1.2 Boating safety 1.1 Outboard motor safety This section includes a few of the many important safety precautions that you should follow when boating. Propeller People can be injured or killed if they come in contact with the propeller. The propeller can keep moving even when the motor is in neutral,and sharp edges of the propeller can cut even when stationary.Stop the motor when a person is in the water near you. Keep people out of reach of the propeller, even when the motor is off. Rotating parts Hands, feet, hair, jewelry, clothing, PFD straps,etc. can become entangled with internal rotating parts of the motor resulting in serious injury or death. Keep the top cowling in place whenever possible. Do not remove or replace the cowling with the motor running. Only operate the motor with the cowling removed according to the specific instructions in the manual. Keep hands, feet, hair, jewelry, clothing,PFD straps, etc. away from any exposed moving parts. Electric shock Do not touch any electrical parts while starting or operating the motor.They can cause shock or electrocution. Modifications Do not attempt to modify this outboard motor.Modifications to your outboard motor may reduce safety and reliability, and render the outboard unsafe or illegal to use. Alcohol and drugs Never operate after drinking alcohol or taking drugs. Intoxication is one of the most common factors contributing to boating fatalities. Personal flotation devices Have an approved personal flotation device (PFD) on board for every occupant. ELECTRIC PROPULSION OUTBOARD recommends that you must wear a PFD whenever boating. At a minimum, children and nonswimmers should always wear PFDs, and everyone should wear PFDs when there are potentially hazardous boating conditions. People in the water Always watch carefully for people in the water,such as swimmers, skiers, or divers, whenever the motor is running. When someone is in the water near the boat, shift into neutral and stop the motor. Stay away from swimming areas.Swimmers can be hard to see. The propeller can keep moving even when the motor is in neutral.Stop the motor when a person is in the water near you. Passengers Consult your boat manufacturer’s instructions for details about appropriate passenger locations in your boat and be sure all passengers are positioned properly before accelerating and when operating above an idle speed. 4 Standing or sitting in non-designated locations may result in being thrown either overboard or within the boat due to waves, wakes, or sudden changes in speed or direction. Even when people are positioned properly, alert your passengers if you must make any unusual maneuver.Always avoid jumping waves or wakes. Overloading Do not overload the boat. Consult the boat capacity plate or boat manufacturer for maximum weight and number of passengers. Be sure that weight is properly distributed according to the boat manufacturers instructions. Overloading or incorrect weight distribution can compromise the boats handling and lead to an accident, capsizing or swamping. make it hard for others to avoid you or Understand where you are going. · Avoid areas with submerged objects or shallow water. · Ride within your limits and avoid aggressive maneuvers to reduce the risk of loss of control, jection, and collision. ·Take early action to avoid collisions. Remember,boats do not have brakes, and stopping the motor or reducing throttle can reduce the ability to steer. If you are not sure that you can stop in time before hitting an obstacle, apply throttle and turn in another direction. Weather Stay informed about the weather. Check weather forecasts before boating. Avoid boating in hazardous weather. Passenger training Avoid collisions Scan constantly for people, objects, and other boats. Be alert for conditions that limit your visibility or block your vision of others. Make sure at least one other passenger is trained to operate the boat in the event of an emergency. Boating safety publications Be informed about boating safety. Additional publications and information can be obtained from many boating organizations. Laws and regulations Operate defensively at safe speeds and keep a safe distance away from people, objects, and other boats. ·Do not follow directly behind other boats or Water skiers. ·Avoid sharp turns or other maneuvers that Know the marine laws and regulations where you will be boating- and obey them. Several sets of rules prevail according to geographic location, but all are basically the same as the International Rules of the Road. 5 2 Components and Specifications 2.1 Tiller Control Version 6 ⑦ ⑤ ⑥ ④ ② ③ ① ①speed display :0-`100% 100% is the max speed. ; ②Twist throttle:you twist it to start the motor and control the speed. ③Battery power cable:when you connect the cable to the battery ,the outboard will have the power . ④ Fuse:When on the normal ship,the fuse will be fit on the boat man's hands.When accidents happens,the boat man will cut off the fuse to stop the boat. WARNING! Attach the “cord “to a secure place on your clothing, or your arm or leg while operating. Do not attach the” cord” to clothing that could tear loose. Do not route the “cord “where it could become entangled, preventing it from functioning. Avoid accidentally pulling the “cord “during normal operation.Loss of motor power means the loss of most steering control. Also, without motor power, the boat could slow rapidly.This could cause people and objects in the boat to be thrown forward. ⑤ Fuse Button:To fit the fuse. ⑥ Reverse Button:When you press it ,you can do reverse. ⑦Power button:when you press it ,the outboard will get power to ship . 7 2.2 Teleflex Remote Control Version 8 ① ①:press the power switch ②:Put forward the remote speed control joystick set,so that the boat will go forward, at the same time , ②: ③:Manipulate the stainless steel steering wheel,when you need to turn a corner or change direction ③ ④: ④:Put backward the remote speed control joystick set,so that the boat will go backward 9 2.3 Specification Golden Motor Technology Co Ltd Electric Propulsion Outboards Specifications (Item Measurement units EPO-03HP EPO-06HP EPO-10HP(L/S) EPO-15HP(L/S) EPO-20HP(L/S) Length mm(in.) 960(37.8) 677 873(34.4) 873(34.4) 873(34.4) Width mm(in.) 450(17.7) 322 332(13.1) 332(13.1) 332(13.1) Height mm(in.) 310(12.2) 1011(39.8) S:1040(40.9) S:1040(40.9) S:1040(40.9) L:1167(45.9) L:1167(45.9) L:1167(45.9) Transom height mm(in.) 417(16.4) 444(17.50) S:444(17.50) S:440(17.30) S:440(17.30) L:571(22.51) L:567(22.30) L:567(22.30) Net Weight (KG) 15KG 24KG S:35; L:40 S:39; L:44.0 r/min 4000-5000 4000~5000 4000-5000 4000-5000 4000~5500 Idling speed r/min 0 0 0 0 0 BLDC Motor W 1500W 3KW 5KW 8KW 10KW V 24~48 24~48 48~72 48~72 72 A 80~50 180~100 180~120 220-150 220 VEC180 VEC240 VEC300 VEC500 VEC500 ≥85% ≥90% ≥90% ≥90% ≥90% Tiller Tiller Tiller Tiller Tiller 2.08(27/13) 2.08(27/13) 3-9×7" or 3-8 3-9 1/4"×8" or 3-9 1/4"×8" or 3-9 3/4"-8" 3-9 1/4"×11" 1/4"×11" NO.) Parameter S:45; L:49.0 Full throttle operating range Battery Voltage Battery Current Controller (Sine Wave) Maximum Motor Efficiency Control system Gear ratio Propeller spec 2.08(27/13) 2.08(27/13) in 3-7 1/4"×6" 3-7 1/7"×7" 10 . 2.4 Wire Connection 11 2.5Safety Notice 2.51Safety red cord The” Fuse” must be attached to the “button “for the motor to run. The “cord” should Be attached to a secure place on the operator’s clothing, or arm or leg. Should the operator fall overboard or leave the helm, the “cord “will pull out the” clip,”cut off the power.This will prevent the boat from running away under power. Make sure the safety red cord is fixed on the red button. 12 2.52 Battery Power Connection Notice That is the power wire,red is “+” and black is “-”,when you get the outboard,what you need to do is to connect this power wires,bear in mind thar you need to connect as per the picture 13 3 Operation Operation The information presented in this section is intended as reference only. It is not possible to provide complete instructions for every possible boat and motor combination. Proper mounting depends in part on experience and the specific boat and motor combination. ·Overpowering a boat could cause severe instability.Do not install an outboard motor with more horsepower than the maximum rating on the capacity plate of the boat. If the boat does not have a capacity plate, consult the boat manufacturer. ·Improper mounting of the outboard motor could result in hazardous conditions such as poor handling, loss of control, or fire hazards. For permanently mounted models, your dealer or other person experienced in proper rigging should mount the motor. Mounting the outboard motor Your dealer or other person experienced in proper outboard motor mounting should show you how to mount your outboard motor. 1. Center line (keel line) Mounting height To run your boat at optimum efficiency, the water resistance (drag) of the boat and Outboard motor must be made as little as possible. The mounting height of the outboard motor greatly affects the water resistance. If the mounting height is too high, cavitation tends to occur,thus reducing the propulsion; and if the propeller tips cut the air, the engine speed will rise abnormally and cause the motor to overheat.If the mounting height is too low, the water resistance will increase and thereby reduce engine efficiency. Mount the outboard motor so that the anti-cavitation plate is between the bottom of the boat and a level 25 mm (1 in below it. The outboard motor should be mounted so that the boat is well balanced. Otherwise, the boat could be hard to steer. For single-engine boats, mount the outboard motor on the centerline (keel line) of the boat. 14 ·Check that the idle hole stays high enough to keep out water getting inside engine even if the boat is in stationary with maximum load. ·Incorrect motor height or obstructions to the smooth flow of water (such as the design or condition of the boat, or accessories such as transom ladders or depth finder transducers) can create airborne water spray while the boat is cruising. If the motor is operated continuously in the presence of airborne water spray, enough water could enter the engine through the intake opening on the cowling to cause severe engine damage. Eliminate the cause of the airborne water Spray. TIP: The optimum mounting height of the outboard motor is affected by the boat and motor combination and the desired use. Test runs at different heights can help determine the optimum mounting height. Consult your dealer or boat manufacturer for further information on determining the proper mounting height. 15 4 Maintenance Clamp screw mounting models When transporting or storing the outboard motor while removed from a boat, keep the outboard motor in the attitude shown. ·Do not place the outboard motor on its side before the cooling water has drained from it completely, otherwise water may enter the cylinder through the exhaust port and cause engine trouble. ·Store the outboard motor in a dry, wellventilated place, not in direct sunlight. Procedure Flushing in a test tank TIP: Place a towel or something similar under the outboard motor to protect it from damage. Storing outboard motor When storing your outboard motor for prolonged periods of time (2 months or longer), several important procedures must be performed to prevent excessive damage. It is advisable to have your outboard motor serviced by an authorized dealer prior to storage.However, you, the owner, with a minimum of tools, can perform the following procedures ·Do not run the engine without supplying it with cooling water. Either the engine water pump will be damaged or the engine will be damaged from overheating. Before starting the engine, be sure to supply water to the cooling water passages. 1. Wash the outboard motor body using fresh water. NOTICE: Do not spray water into the air intake. 2. Remove the motor top cowling and silencer cover. Remove the propeller. 4. Install the outboard motor on the test tank. Fill the tank with fresh water to above the level of the anticavitation plate. NOTICE: If the fresh water level is below the level of the anti-cavitation plate, or if the water supply is insufficient, engine seizure may occur. 16 Cleaning the outboard motor After use, wash the exterior of the outboard motor with fresh water. Flush the cooling system with fresh water. 1. Water surface 2. Lowest water level 5. Cooling system flushing is essential to prevent the cooling system from clogging up with salt, sand, or dirt. In addition, fogging/ lubricating of the motor is mandatory to prevent excessive engine damage due to rust. Perform he flushing and fogging at the same time.WARNING! Do not touch or remove electrical parts when starting or during operation. Keep hands, hair, and clothes away from the flywheel and other rotating parts while the engine is running. 6. Run the motor at a fast idle for a few minutes in neutral position. 7. Just prior to turning off the motor quickly spray “Fogging Oil” alternately into each carburetor or the fogging hole of the silencer cover, if equipped. When properly done, the engine will smoke excessively and almost stall. 8. Remove the outboard motor from the test tank. 9. Install the silencer cover/cap of fogging hole and top cowling. 10. If the “Fogging Oil” is not available, run the engine at a fast idle until the fuel system becomes empty and the engine stops. 11. Drain the cooling water completely out of the motor. Clean the body thoroughly. Checking painted surface of motor Check the motor for scratches, nicks, or flaking paint. Areas with damaged paint are more likely to corrode. If necessary, clean and paint the areas. A touch-up paint is available from your dealer. Periodic maintenance These procedures require mechanical skills, tools,and supplies. If you do not have the proper skills,tools, or supplies to perform a maintenance procedure,have a dealer or other qualified mechanic do the work. The procedures involve disassembling the motor and exposing dangerous parts. To reduce the risk of injury from moving, hot, or electrical parts: ·Turn off the motor and keep engine shut-off cord (lanyard) with you when you perform maintenance unless otherwise specified. ·Always completely reassemble the motor. 17 before Maintenance, replacement, or repair of the emission control devices and systems on models affixed with an emission control label may be performed by any marine engine repair stablishment or individual. All warranty repairs, however, including those to the emission control system, must be performed by an authorized marine dealership. Replacement parts More rapid deterioration of motor components. Removing propeller Spline models 1. Straighten the cotter pin and pull it out using a pair of pliers. 2. Remove the propeller nut, washer, and spacer(if equipped). WARNING! Do not use your and to hold the propeller when loosening the propeller nut. If replacement parts are necessary, use only genuine outboard parts or parts of equivalent design and quality. Any part of inferior quality may malfunction, and the resulting loss of control could endanger the operator and passengers. Outboard genuine parts and accessories are available from your Dealer. Severe operating conditions 1. Cotter pin Severe operating conditions involve one or more of the following types of operation on a regular basis: 2. Propeller nut ·Operating continuously at or near maximum engine speed (rpm) for many hours 5. Thrust washer ·Operating continuously at a low engine speed(rpm) for many hours ·Frequent quick acceleration and deceleration Frequent shifting ·Frequently starting and stopping the engine(s) ·Operation that fluctuates often between light and heavy cargo loads Outboard motors operating under any of these above conditions require more frequent maintenance. Golden Motor recommends that you do this service twice as often as specified in the maintenance chart. For example, if a particular service should be done at 50 hours, do it instead at 25 hours. This will help prevent 3. Washer 4. Propeller Installing propeller Be sure to use a new cotter pin and bend the ends over securely. Otherwise the propeller could come off during operation and be lost. 1. Apply outboard marine grease or a corrosion resistant grease to the propeller shaft. 2. Install the spacer (if equipped), thrust washer, washer (if equipped), and propeller on the propeller shaft. NOTICE: Be sure to install the thrust washer before installing the propeller, otherwise the lower case and propeller boss could be damaged. 18 3. Install the spacer (if equipped) and the washer. Tighten the propeller nut to the specified torque. Propeller nut tightening torque: 17.0 Nm (1.73 kgf-m, 12.5 ft-lb) 4. Align the propeller nut with the propeller shaft hole. Insert a new cotter pin in the hole and bend the cotter pin ends. NOTICE: Do not reuse the cotter pin installed. Other-wise the propeller can come off duringoperation. TIP: If the propeller nut does not align with the propeller shaft hole after tightening to the specified torque, tighten the nut further to align it with the hole. 19 5 Return and Repairs How the warranty does not apply Inadequate maintenance. We offer a flexible 7 day return policy and are happy to accept items back for a refund or exchange if the items are damaged or faulty upon receipt or you simply don't like what you've ordered. If a part is missing or damaged, we will arrange exchange or repair. If there are any issues upon receipt and opening of the package: Unauthorized alteration, modification or misuse. Contact us before you make a return. Repairs by persons other than Golden Motor Authorized Dealers. (If you need local repair and a Golden Motor dealer is not nearby, contact us for assistance in authorizing repair). Goods must be returned within 7 days of receipt. Goods must be in original packaging. Goods must not be fitted or used. The customer is responsible for meeting the return postage costs. The customer is responsible for ensuring that the goods arrive in good condition (we recommend that return shipment be insured). 6 Warranty How the warranty applies As the makers, we warranty against possible material or construction defects, provided the following conditions are satisfied : Proof of purchase. The warranty starts on the date of purchase. Damage through abuse, neglect or accident. Assembly in disregard of instructions in this manual. When the bicycle is used negligently or has damage resulting from a traffic accident. Normal wear and tear. Poor maintenance or modifications that no longer comply with regulations or original specifications. Damage due to external causes. The bicycle is used for rental. The battery pack is used incorrectly or damaged. This also applies to improper charging. Compensatory costs arising from Only the first owner is entitled to the warranty. damages or accidents, or cost incurred by loss of the bicycle’s usage. 2 years for the frame, fork, all mechanical and electrical parts, except normal wear and tear items. This warranty does not cover use for commercial purposes. 1 year for the battery up to 70% depth of discharge from its original rated capacity. This can be verified by the dealer where the bike was purchased. How the warranty works Original defective parts that are sent or returned to the dealer for assessment will be replaced by the same or equal value part. Labor and transportation charges are not included. 20 Unauthorized changes/modification or tampering with any part of this product, or operation in any way other than as detailed in this User Manual, will render manufacturer’s warranty void. Golden Motor Technology Co.,Ltd www.goldenmotor.com [email protected] Mobile:86 519 81004118 21