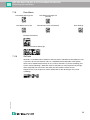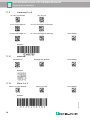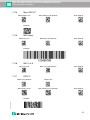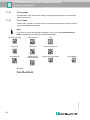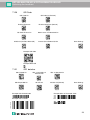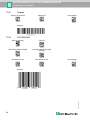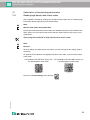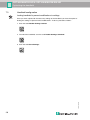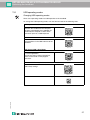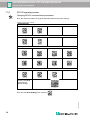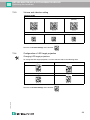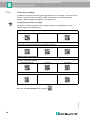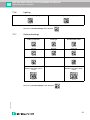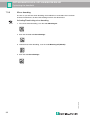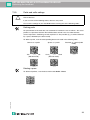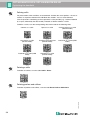
1
FACTORY AUTOMATION
MANUAL
ODT-HH-MAH120-HD &
ODT-HH-MAH120-WH-HD
HANDHELD - HIGH DENSITY
ODT-HH-MAH120-HD & ODT-HH-MAH120-WH-HD
With regard to the supply of products, the current issue of the following document is applicable: The General Terms of Delivery for Products and Services of the Electrical Industry, published by the Central Association of the Electrical Industry (Zentralverband
Elektrotechnik und Elektroindustrie (ZVEI) e.V.) in its most recent version as well as the
supplementary clause: "Expanded reservation of proprietorship"
ODT-HH-MAH120-HD & ODT-HH-MAH120-WH-HD
Contents
1
Introduction ........................................................................................................... 5
2
Declaration of conformity ..................................................................................... 6
3
Safety...................................................................................................................... 7
3.1
Symbols relevant to safety ................................................................................................7
3.2
Intended use .......................................................................................................................7
3.3
General notes on safety.....................................................................................................7
3.4
Disposal ..............................................................................................................................7
4
Product description .............................................................................................. 8
4.1
ODT-HH-MAH120-HD - use and application .....................................................................8
4.2
Field of vision and resolution ...........................................................................................8
4.3
Indicators and control elements .......................................................................................9
4.4 Accessories ......................................................................................................................10
4.4.1 Connecting cable................................................................................................................10
Installation ............................................................................................................11
5.1
Preparation ....................................................................................................................... 11
5.2
5.2.1
5.2.2
5.2.3
Connection........................................................................................................................ 11
Connection via USB ...........................................................................................................12
Connection via RS 232.......................................................................................................13
Connection via PS/2...........................................................................................................14
6
Commissioning ....................................................................................................15
6.1
Positioning and reading techniques ..............................................................................15
204646
5
3
ODT-HH-MAH120-HD & ODT-HH-MAH120-WH-HD
Contents
7
Optimizing the handheld .....................................................................................16
7.1 Programming different code symbologies ....................................................................16
7.1.1 Aztec ..................................................................................................................................16
7.1.2 Codabar .............................................................................................................................16
7.1.3 Codablock F .......................................................................................................................16
7.1.4 Code 11 ..............................................................................................................................17
7.1.5 Code 39..............................................................................................................................17
7.1.6 Code 93..............................................................................................................................18
7.1.7 Code 128............................................................................................................................18
7.1.8 Composite ..........................................................................................................................18
7.1.9 Data Matrix.........................................................................................................................19
7.1.10 GoCode..............................................................................................................................19
7.1.11 Interleaved 2 of 5................................................................................................................20
7.1.12 Maxicode............................................................................................................................20
7.1.13 Matrix 2 of 5 .......................................................................................................................20
7.1.14 Micro PDF417 ....................................................................................................................21
7.1.15 MSI Plessy .........................................................................................................................21
7.1.16 NEC 2 of 5..........................................................................................................................21
7.1.17 PDF417 ..............................................................................................................................21
7.1.18 Pharmacode.......................................................................................................................22
7.1.19 Post Codes.........................................................................................................................22
7.1.20 QR Code ............................................................................................................................23
7.1.21 GS1 data bar......................................................................................................................23
7.1.22 Telepen ..............................................................................................................................24
7.1.23 UPC/EAN/JAN ...................................................................................................................24
7.2 Optimization of the decoding performance ...................................................................25
7.2.1 Reading high-density data matrix codes ............................................................................25
204646
7.3 Handheld configuration ...................................................................................................26
7.3.1 USB operating modes ........................................................................................................27
7.3.2 RS 232 operating modes ...................................................................................................28
7.3.3 Volume and vibration setting ..............................................................................................29
7.3.4 Configuration of LED target projection ...............................................................................29
7.3.5 Continuous reading ............................................................................................................30
7.3.6 Lighting...............................................................................................................................31
7.3.7 Keyboard settings...............................................................................................................31
7.3.8 Mirror decoding ..................................................................................................................32
7.3.9 Prefix and suffix settings.....................................................................................................33
7.3.10Text command function......................................................................................................35
7.3.11OCR A and B .....................................................................................................................35
7.3.12Information on firmware and serial number of the reader ..................................................36
4
ODT-HH-MAH120-HD & ODT-HH-MAH120-WH-HD
Introduction
1
Introduction
Congratulations
You have chosen a device manufactured by Pepperl+Fuchs. Pepperl+Fuchs develops,
produces and distributes electronic sensors and interface modules for the market of
automation technology on a worldwide scale.
The most important instructions can be found in the following chapters:
•
Cable connection:see chapter 5.2
•
Basic operation: see chapter 6
•
Optimization and configuration of handheld: see chapter 7
Symbols used
The following symbols are used in this manual:
Note!
This symbol draws your attention to important information.
Handling instructions
You will find handling instructions beside this symbol
Contact
If you have any questions about the device, its functions, or accessories, please contact us
at:
204646 2010-09
Pepperl+Fuchs GmbH
Lilienthalstraße 200
68307 Mannheim
Telephone: +49 621 776-4411
Fax: +49 621 776-274411
E-Mail: [email protected]
5
ODT-HH-MAH120-HD & ODT-HH-MAH120-WH-HD
Declaration of conformity
2
Declaration of conformity
This product was developed and manufactured under observance of the applicable
European standards and guidelines.
Note!
A Declaration of Conformity can be requested from the manufacturer.
The product manufacturer, Pepperl+Fuchs GmbH, D-68307 Mannheim, has a certified
quality assurance system that conforms to ISO 9001.
204646 2010-09
ISO9001
6
ODT-HH-MAH120-HD & ODT-HH-MAH120-WH-HD
Safety
3
Safety
3.1
Symbols relevant to safety
Danger!
This symbol indicates a warning about a possible danger.
In the event the warning is ignored, the consequences may range from personal injury to
death.
Warning!
This symbol indicates a warning about a possible fault or danger.
In the event the warning is ignored, the consequences may course personal injury or
heaviest property damage.
Caution!
This symbol warns of a possible fault.
Failure to observe the instructions given in this warning may result in the devices and any
connected facilities or systems develop a fault or fail completely.
3.2
Intended use
Always operate the device as described in these instructions to ensure that the device and
connected systems function correctly. The protection of operating personnel and plant is
only guaranteed if the device is operated in accordance with its intended use.
The handheld was designed for identifying 1D and 2D codes and should be used for this
purpose only. The handheld is flexible and can therefore be used to decode codes in many
branches of industry, such as the logistics sector.
3.3
General notes on safety
The operator of the system is responsible in terms of planning, mounting, commissioning,
operating and maintenance.
Installation and commissioning of all devices must be performed by a trained professional
only.
Protection of operating personnel and the system is not ensured if the product is not used
in accordance with its intended purpose.
Only use recommended original accessories.
User modification and or repair are dangerous and will void the warranty and exclude the
manufacturer from any liability. If serious faults occur, stop using the device. Secure the
device against inadvertent operation. In the event of repairs, return the device to your local
Pepperl+Fuchs representative or sales office.
204646 2010-09
When packing the device for storage or transport, use materials that will protect the device
from bumps and impacts and protect against moisture. The original packaging provides the
best protection. Also take into account the permitted ambient conditions.
3.4
Disposal
Devices, packaging material, and possibly contained batteries must be disposed of in
compliance with the applicable laws and guidelines of the corresponding country.
7
ODT-HH-MAH120-HD & ODT-HH-MAH120-WH-HD
Product description
4
Product description
4.1
ODT-HH-MAH120-HD - use and application
The ODT-HH-MAH120-HD is a robust and inexpensive handheld for all standard bar codes
and 2D codes. The Megapixel-CMOS image sensor facilitates in conjunction with the
specially developed optical system an extremely large reading range, relating to both the
reading distance and the image window. Thus the reading range begins already at 2 cm
and ends at approx. 30 cm, depending on the size of the code or the modules. Thanks to
automatic dynamic optimization, the handheld recognizes the most varied codings and
enables you to work efficiently. A target projection distinguished by color in the form of a
sectional image is used as an aid to orientation; this projection helps to support optimum
guidance during visual positioning. Using the handheld under difficult ambient conditions is
made easier by the sturdy design of the MAH120-HD, which can withstand a fall from a
height of 2 m onto a solid floor/ground without its functions being impaired. Confirmation of
a successful reading is effected by optical, acoustic or tactile means (vibration). USB, PS/2
or RS 232 is available as the standard interface, depending on which connecting cable you
choose. You can program the ODT-HH-MAH120-HD handheld using convenient programs
or configuration code. There is also an additional option of creating customer-specific
solutions with a JavaScript editor. Furthermore, the Linux core of the operating system
opens up still further options.
4.2
Field of vision and resolution
Y
150 mm
0.51 mm Data Matrix
0.21 mm Data Matrix
100 mm
0.16 mm Data Matrix
50 mm
Optimal Focus at 58 mm
Wide Optical Field
0.08 mm Code 39
0 mm
50 mm
0.11 mm Code 38
0.2 mm PDF 417
100 mm
0.27 mm RSS-14
0.32 mm UPC
150 mm
X
0 mm
50 mm
100 mm
150 mm
200 mm
250 mm
Note: Smallest symbology that can be read is 0,16 mm Data Matrix
204646 2010-09
Figure 4.1: Field of vision of handheld ODT-HH-MAH120-HD
8
ODT-HH-MAH120-HD & ODT-HH-MAH120-WH-HD
Product description
4.3
Indicators and control elements
1
2
3
4
1
Status LED
2
Camera, lighting LEDs
3
Trigger button
4
8-pin connecting jack
Reading Confirmation from handheld
The following table contains all the confirmation indicatiors which are communicated by the
handheld by means of LED, tactile and acoustic signals.
Action
Tactile/acoustic signal
LED
handheld successfully
switched on
1 signal tone/vibration
Flashes yellow, green,
yellow
-
Reading successful, data
have been sent to the
computer
1 signal tone/vibration
Flashes green
Configuration code
successfully read,
configuration performed
1 signal tone/vibration
Short break
1 signal tone/vibration
Flashes green
Unknown configuration
code, configuration not
performed
1 short signal tone/vibration
Short break
1 short signal tone/vibration
Flashes green
204646 2010-09
Connection using USB
1 signal tone/vibration
connecting cable successful
9
ODT-HH-MAH120-HD & ODT-HH-MAH120-WH-HD
Product description
4.4
Accessories
Various accessories are available.
4.4.1
Connecting cable
The following connecting cables are available as an option:
Description
ODZ-MAH-CAB-B14
Connecting cable USB interface, length approx.
180 cm
ODZ-MAH-CAB-B14-3.7m
Connecting cable USB interface, length approx.
370 cm
ODZ-MAH-CAB-R2
Connecting cable RS 232 interface, length approx.
120 cm
ODZ-MAH-CAB-R6
Connecting cable PS/2 interface, length approx.
120 cm
204646 2010-09
Designation
10
ODT-HH-MAH120-HD & ODT-HH-MAH120-WH-HD
Installation
5
Installation
5.1
Preparation
Unpacking the unit
1. Check that all package contents are present and undamaged.
If anything is damaged, inform the shipper and contact the supplier.
2. Check that all items are present and correct based on your order and the shipping
documents.
If you have any questions, please contact Pepperl+Fuchs.
3. Keep the original packing material in case you need to store or ship the unit at a later
time.
5.2
Connection
You have the opportunity to connect the handheld to the following PC interfaces:
•
USB
•
RS 232
•
PS/2
Attaching the connecting cable to the handheld
1. Slide the protective cap over the 8-pin DIN plug.
2. Align the 8-pin plug so that it fits into the socket on the handheld.
204646 2010-09
3. Press the 8-pin DIN plug and protective cap onto the socket.
11
ODT-HH-MAH120-HD & ODT-HH-MAH120-WH-HD
Installation
4. Use a srewdriver and the screws provided to fasten the protective cap onto the bottom
of the handle.
5.2.1
Connection via USB
Connecting USB connecting cable to computer
1. Insert the USB plug of the connecting cable in a free USB port on your computer. This
can be done during operation.
The handheld turns itself on automatically once you have connected it to the computer.
2. Scan the code USB Keyboard Mode:
3. Scan the code Save Settings:
204646 2010-09
Further USB configuration options, see chapter 7.3.1.
12
ODT-HH-MAH120-HD & ODT-HH-MAH120-WH-HD
Installation
5.2.2
Connection via RS 232
Connecting RS 232 connecting cable to computer
1. Power off the computer.
2. Connect the RS 232 plug of the connecting cable to the RS 232 port of the computer.
3. Connect the low-voltage plug of the power-supply unit to the low-voltage jack of the
RS 232 connecting cable.
4. Connect the mains power plug of the power-supply unit to the mains power supply.
5. Power on the computer.
The handheld turns itself on automatically once you have turned the computer on.
6. Scan the code RS 232 1 Way Mode:
7. Scan the code Save Settings:
The handheld uses the following RS 232 factory settings:
•
RS 232 1 Way Mode
•
57600 baud
•
2 stop bits
•
8 data bits
•
No parity
204646 2010-09
Further RS 232 configuration options, see chapter 7.3.2.
13
ODT-HH-MAH120-HD & ODT-HH-MAH120-WH-HD
Installation
5.2.3
Connection via PS/2
Connecting PS/2 connecting cable to computer
1. Power off the computer.
2. Disconnect the connection to the computer if an external keyboard is connected to the
computer.
3. If you are using a USB keyboard, connect the keyboard with an appropriate adapter to
the PS/2 connecting jack of the connecting cable. If you are using a keyboard with PS/2
plug, connect the plug directly to the PS/2 connecting jack of the connecting cable.
4. Connect the PS/2 plug of the connecting cable to the computer's PS/2 port for
keyboards.
5. Power on the computer.
The handheld turns itself on automatically once you have turn the computer on.
6. Scan the code PS/2 Mode:
204646 2010-09
7. Scan the code Save Settings:
14
ODT-HH-MAH120-HD & ODT-HH-MAH120-WH-HD
Commissioning
6
Commissioning
6.1
Positioning and reading techniques
This handheld uses digital camera technology to record an image of the code to be read.
After an image has been recorded, the handheld uses highly developed evaluation
procedures to evaluate the data contained in the recording.
This handheld supports you with target projections in the form of two squares distinguished
by color when codes are sighted and focused. This projection is realized by one red and
one green LED on the handheld. Precise positioning becomes increasingly important in the
case of small codes or codes with a high information density.
1
2
3
1
Handheld too far away from the code
2
Handheld positioned too close to the code
3
Handheld optimally positioned (optimum distance: 5.8 cm)
Note!
Because of the large detection area of the handheld, we advise to cover the codes you
don't want to scan. Thus you prevent to set a wrong setting inadvertently.
Sighting and reading 1D and 2D codes
1. With the trigger button pressed, aim the red square at the code to be read.
2. Alter the distance between the handheld and the code, depending on the position of the
green square: the code is optimally sighted as soon as the two squares overlap.
204646 2010-09
The code is read automatically. In the event of successful decoding, the acoustic and
tactile signal sounds and the status LED flashes green once (depending on the
configuration of the handheld).
15
ODT-HH-MAH120-HD & ODT-HH-MAH120-WH-HD
Optimizing the handheld
7
Optimizing the handheld
7.1
Programming different code symbologies
Note!
Code Save Settings
Always scan the code Save Settings after reading a configuration code. Thus the
configuration code is saved permanently.
7.1.1
Aztec
Aztec On
Aztec Off (Default)
Save Settings
Codabar Off
Save Settings
Codablock F Off (Default)
Save Settings
Example:
7.1.2
Codabar
Codabar On (Default)
Example:
7.1.3
Codablock F
Codablock F On
204646 2010-09
Example:
16
ODT-HH-MAH120-HD & ODT-HH-MAH120-WH-HD
Optimizing the handheld
7.1.4
Code 11
Code 11 On (Default)
Code 11 Checksum 1
digit
Code 11 Off
Code 11 Checksum 1
digit & Strip from result
Code 11 Checksum 2
digit & Strip from result
Save Settings
Example:
7.1.5
Code 39
Code 39 On (Default)
Code 39 Enable
Checksum
Code 39 Off
Code 39 Enable
Checksum & Strip from
result
Disable Checksum
(Default)
Code 39 Extended Full
ASCII On
Code 39 Extended Full
ASCII Off (Default)
Code 39 Short Margin
On
Code 39 Short Margin
Off (Default)
Code 39 Trioptic On
(Default)
Code 39 Trioptic Off
Save Settings
Example: Code 39
204646 2010-09
Example: Trioptic Code 39
17
ODT-HH-MAH120-HD & ODT-HH-MAH120-WH-HD
Optimizing the handheld
7.1.6
Code 93
Code 39 On (Default)
Code 93 Off
Save Settings
Example:
7.1.7
Code 128
Code 128 On (Default)
Code 128 Off
Code 128 Short Margin On
Code 128 Short Margin Off
(Default)
Save Settings
Composite Off (Default)
Save Settings
Example:
7.1.8
Composite
204646 2010-09
Composite On
18
ODT-HH-MAH120-HD & ODT-HH-MAH120-WH-HD
Optimizing the handheld
7.1.9
Data Matrix
Data Matrix Rectangle On
Data Matrix Rectangle Off
(Default)
Data Matrix Inverse On
Data Matrix Inverse Off (Default)
Save Settings
Example Data Matrix:
Example Data Matrix Rectangle:
7.1.10
GoCode
204646 2010-09
GoCode is a two-dimensional symbol in miniature format. GoCode was developed in such
a way that it fits into one text line and has a multidimensional adaptable matrix pattern
which can be reproduced practically on any surface. GoCode is a private symbology and
can be used by obtaining a fixed-term license. GoCode has many important advantages
when compared with usual linear bar codes and 2D symbols. Please contact
Pepperl+Fuchs if you require any further information on the advantages of a private
symbology.
19
ODT-HH-MAH120-HD & ODT-HH-MAH120-WH-HD
Optimizing the handheld
7.1.11
Interleaved 2 of 5
Int 2 of 5 On (Default)
Int 2 of 5 Off
Int 2 of 5 Two Digits On
Int 2 of 5 Two Digits Off (Default)
Int 2 of 5 Four Digits On
Int 2 of 5 Four Digits Off (Default)
Save Settings
Maxicode Off (Default)
Save Settings
Matrix 2 of 5 Off
Save Settings
Example:
7.1.12
Maxicode
Maxicode On
Example:
7.1.13
Matrix 2 of 5
Matrix 2 of 5 On (Default)
204646 2010-09
Example:
20
ODT-HH-MAH120-HD & ODT-HH-MAH120-WH-HD
Optimizing the handheld
7.1.14
Micro PDF417
Micro PDF417 On
Micro PDF417 Off (Default)
Save Settings
MSI Plessy Off (Default)
Save Settings
NEC 2 of 5 Off (Default)
Save Settings
Example:
7.1.15
MSI Plessy
MSI Plessy On
Example:
7.1.16
NEC 2 of 5
NEC 2 of 5 On
7.1.17
PDF417
PDF417 On (Default)
PDF417 Off
Macro PDF 417 On
Macro PDF 417 Off (Default)
Save Settings
204646 2010-09
Example:
21
ODT-HH-MAH120-HD & ODT-HH-MAH120-WH-HD
Optimizing the handheld
7.1.18
Pharmacode
An explanation of the Pharmacode settings and all programming codes can be obtained
from Pepperl+Fuchs.
7.1.19
Post Codes
All post codes (zipcodes) are deactivated as standard. Scan the following codes to activate
the corresponding post symbology.
Note!
If you wish to change the activated symbologies, first scan the code Disable all Postal
Codes and then the post codes for the desired symbology.
Australian Post On
Japan Post On
KIX
Planet On
Postnet On
Planet & Postnet On
Royal Mail On
4-State CB On
(Intelligent Mail)
Disable all Postal Codes
Save Settings
204646 2010-09
Example:
22
ODT-HH-MAH120-HD & ODT-HH-MAH120-WH-HD
Optimizing the handheld
7.1.20
QR Code
QR Code On
QR Code Off (Default)
Enable Checksum
Disable Checksum (Default)
QR Code Inverse On
Both Inverse and Standard On
All QR On (includes Micro QR)
Inverse QR and Micro QR On
Save Settings
Example QR Code
Example Micro QR
7.1.21
GS1 data bar
GS1 Limited On
GS1 14 and GS1 14
Truncated On
GS1 14 Stacked On
GS1 Expanded On
All GS1 On
All GS1 Off (Default)
Save Settings
Example GS1 14 Truncated Code
Example GS1 14 Code
Example GS1 14 Stacked Code
204646 2010-09
Example GS1 Limited Code
23
ODT-HH-MAH120-HD & ODT-HH-MAH120-WH-HD
Optimizing the handheld
7.1.22
Telepen
Telepen On (Default)
Telepen Off
Save Settings
Example:
7.1.23
UPC/EAN/JAN
UPC On (Default)
UPC Off
UPC Short Margin Enabled
UPC Short Margin Disabled
(Default)
UPC Extension On
UPC Extension Off
Save Settings
204646 2010-09
Example:
24
ODT-HH-MAH120-HD & ODT-HH-MAH120-WH-HD
Optimizing the handheld
7.2
Optimization of the decoding performance
7.2.1
Reading high-density data matrix codes
This handheld is suitable for reading very small data matrix codes with an extremely high
information density (high-density data matrix codes).
Note!
Note the color of the illumination LEDs.
Please note the different data matrix codes for handhelds with white and red illumination
LEDs. Always scan the correct code for the relevant model. Failure to do so may cause
malfunctions.
Optimizing the handheld for high-density data matrix codes
Note!
Data loss
All other settings are deleted when the code is scanned. Change all the settings again if
necessary.
To optimize the handheld to read high-density data matrix codes, scan the relevant data
matrix code:
For handhelds with red LEDs, please use
the following data matrix code:
For handhelds with white LEDs, please use
the following data matrix code:
204646 2010-09
Scan the code Save Settings after selection:
25
ODT-HH-MAH120-HD & ODT-HH-MAH120-WH-HD
Optimizing the handheld
7.3
Handheld configuration
Locking handheld to prevent modifications to settings
Once you have adjusted all the necessary settings of the handheld, you have the option of
locking the settings to prevent further modifications. To do so, proceed as follows:
1. Scan the code Reader Settings Locked:
2. To unlock the handheld, scan the code Reader Settings Unlocked:
204646 2010-09
3. Scan the code Save Settings:
26
ODT-HH-MAH120-HD & ODT-HH-MAH120-WH-HD
Optimizing the handheld
7.3.1
USB operating modes
Changing USB operating modes
There are 3 operating modes for USB operation of the handheld.
To change the USB operating mode, scan the relevant code in the following table.
USB Keyboard Mode
Scan this code to transmit all the scanned
data from the handheld to the computer.
The data transmitted by the handheld are
handled by the computer as data which
have been input via a USB keyboard.
USB Downloader
Scan this code to transmit unformatted,
unpacked data via the USB interface to the
handheld.
USB Virtual COM 1 Way Mode
Scan this code to port USB keyboard data
to a serial application.
You will also need a Virtual Com driver,
which can be found at www.pepperlfuchs.com.
Reset to USB Factory Defaults
Scan this code to reset the handheld to the
USB factory settings.
204646 2010-09
Save Settings:
27
ODT-HH-MAH120-HD & ODT-HH-MAH120-WH-HD
Optimizing the handheld
7.3.2
RS 232 operating modes
Changing RS 232 communication parameters
Scan the respective code to change the individual RS 232 connection settings.
RS 232 communication settings
Setting data bit
7 data bits
8 data bits (default)
Setting stop bit
2 stop bits (default)
1 stop bit
Setting baud rate
1200
2400
4800
9600
19200
38400
57600 (Default)
115200
Odd
None
Setting parity
Even
Scan this code to
reset the handheld
to the RS 232
default settings:
204646 2010-09
Scan the code Save Settings after selection:
28
ODT-HH-MAH120-HD & ODT-HH-MAH120-WH-HD
Optimizing the handheld
7.3.3
Volume and vibration setting
Vibration mode
Vibration & Beep on
Vibration on/Beep off
Vibration off/Beep on
(Default)
Beep low
Beep High (Default)
Volume mode
Beep off
Scan the code Save Settings after selection:
7.3.4
Configuration of LED target projection
Changing LED target projections
To change the LED target projection, scan the relevant code in the following table.
Red target LED on
Red target LED off
Green target LED on
Green target LED off
204646 2010-09
Scan the code Save Settings after selection:
29
ODT-HH-MAH120-HD & ODT-HH-MAH120-WH-HD
Optimizing the handheld
7.3.5
Continuous reading
In addition to the option of pressing the trigger button to start a reading, you also have the
option of using the reader in continuous mode and perform an unlimited number of
readings. Several configuration options are available here.
Configuring continuous reading
To activate continuous operation and configure continuous reading mode, scan the
relevant codes in the following table.
Activating/Deactivating continuous operation
Activating
Deactivating (default)
Reading delay
Defines the time interval between the individual readings.
0 seconds (default)
1 second
3 seconds
Double code reading delay
Defines the time interval during which the codes that were already decoded during a
previous reading are deleted.
0 seconds (default)
1 second
3 seconds
Motion detection scan settings
Activating
Deactivating (Default)
204646 2010-09
Scan the code Save Settings after selection:
30
ODT-HH-MAH120-HD & ODT-HH-MAH120-WH-HD
Optimizing the handheld
7.3.6
Lighting
Activating continuous lighting
Deactivating continuous lighting
Scan the code Save Settings after selection:
7.3.7
Keyboard settings
US English Keyboard - No
leading 0 (Default)
US English Keyboard Leading 0
US English - ctrl+char for
Non-Printable ASCII
French
German
Japanese
Universal Keyboard
Custom Keyboard
Alternative OS enable
(Windows CE / MAC / Unix /
Linux)
Alternative OS disable
(Windows CE / MAC / Unix /
Linux)
204646 2010-09
Scan the code Save Settings: after delection:
31
ODT-HH-MAH120-HD & ODT-HH-MAH120-WH-HD
Optimizing the handheld
7.3.8
Mirror decoding
As soon as you activate mirror decoding, the handheld can read codes that have been
inverted. Furthermore, all other code reading functions are deactivated.
Activating/Deactivating mirror decoding
1. To activate mirror decoding, scan the code Mirroring on:
2. Scan the mirrored code Save Settings:
3. To deactivate mirror decoding, scan the code Mirroring off (Default):
204646 2010-09
4. Scan the code Save Settings:
32
ODT-HH-MAH120-HD & ODT-HH-MAH120-WH-HD
Optimizing the handheld
7.3.9
Prefix and suffix settings
Caution!
Risk of data loss
If you scan one of the following codes, data loss may result
First save the settings on your handheld before scanning one of the following codes.
Defining prefix
For presentation of the read data, we recommend - besides the use of suffixes - the use of
prefixes as separators between the individual data records. You can select between
several separators. Combining several separators is also possible (e.g. a comma followed
by a space, followed by the data record).
To define a prefix, scan the corresponding data matrix code in the following table.
Comma as a prefix
Space as a prefix
Tabulator as a prefix
(RS 232 mode)
Carriage return line feed
(RS 232 mode)
Tabulator as a prefix (USB
mode)
Deleting a prefix
204646 2010-09
To delete all prefixes, scan the data matrix code Prefix - Erase:
33
ODT-HH-MAH120-HD & ODT-HH-MAH120-WH-HD
Optimizing the handheld
Defining suffix
For presentation of the read data, we recommend - besides the use of prefixes - the use of
suffixes as separators between the individual data records. You can select between
several separators. Combining several separators is also possible (e.g. a comma followed
by a space, followed by the data record). Proceed as follows to define a suffix:
To define a suffix, scan the corresponding data matrix code in the following table.
Comma as a suffix
Space as a suffix
Carriage return as a suffix
(RS 232 mode)
Line feed as a suffix
(RS 232 mode)
Carriage return line feed
(RS 232 mode)
Line break as a suffix (USB
mode)
Tabulator as a suffix (USB
mode)
Tabulator as a suffix
(RS 232 mode)
Deleting a suffix
To delete all suffixes, scan the code Suffix - Erase:
Deleting prefixes and suffixes
204646 2010-09
To delete all prefixes and suffixes, scan the code Erase Prefix & Suffix Data:
34
ODT-HH-MAH120-HD & ODT-HH-MAH120-WH-HD
Optimizing the handheld
7.3.10
Text command function
Activating/deactivating text command function
Scan one of the following codes to activate or deactivate the text command function.
Activate text command
Deactivate text command (default)
Scan the code Save Settings after selection:
7.3.11
OCR A and B
The handheld gives you the option of performing optical text identification.
Activating/Deactivating OCR
Scan one of the following codes to activate or deactivate OCR.
Activating OCR
Deactivating OCR (default)
Scan the code Save Settings after selection:
Note!
204646 2010-09
You require an OCR license to use OCR functions. For further information, please contact
Pepperl+Fuchs.
35
ODT-HH-MAH120-HD & ODT-HH-MAH120-WH-HD
Optimizing the handheld
7.3.12
Information on firmware and serial number of the reader
You have the option of displaying information on firmware and the serial number of the
reader.
The information is structured as follows:
Xap/iVVVVWWWWXXXXSSSSSSSSSSPXXX-XX+XXAbbreviation
Character
Meaning
Xap/i
-
Internal ID
VVVV
4
Version number of
application firmware
WWWW
4
Version number of
bootloader firmware
XXXX
4
Version number of
Bluetooth firmware
SSSSSSSSSS
10
Serial number of the reader
P
1
A for application firmware, B
for bootloader firmware
XXX-XX+XX-
-
Internal ID
Reading firmware and serial numbers
To read information on firmware and the serial number of the reader, proceed as follows:
1. Open the text editing program (e.g., Notepad, Microsoft Word, etc.).
2. Scan the code Reader ID and Firmware:
Information on firmware and the serial numbers of the reader is transferred from the
internal reader memory and displayed in the text editing program.
Note!
Current firmware and upgrades
204646 2010-09
Pepperl+Fuchs regularly releases new firmware for readers. Contact Pepperl+Fuchs for
information on current firmware versions or upgrades.
36
FACTORY AUTOMATION –
SENSING YOUR NEEDS
Pepperl+Fuchs sets the standard in quality and innovative technology for the world of automation. Our expertise, dedication, and heritage of innovation have driven us to develop the largest and most versatile line of industrial sensor technologies and interface components in the world. With our global presence, reliable service, and flexible production facilities,
Pepperl+Fuchs delivers complete solutions for your automation requirements – wherever you need us.
Contact
Pepperl+Fuchs GmbH
Lilienthalstraße 200
68307 Mannheim · Germany
Tel. +49 621 776-4411 · Fax +49 621 776-27-4411
E-mail: [email protected]
Worldwide Headquarters
Pepperl+Fuchs GmbH · Mannheim · Germany
E-mail: [email protected]
USA Headquarters
Pepperl+Fuchs Inc. · Twinsburg, OH · USA
E-mail: [email protected]
Asia Pacific Headquarters
Pepperl+Fuchs Pte Ltd · Singapore
Company Registration No. 199003130E
E-mail: [email protected]
www.pepperl-fuchs.com
Subject to reasonable modifications due to technical advances
Copyright Pepperl+Fuchs • Printed in Germany
204646 / TDOCT1391C_ENG
09/2010