1
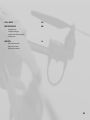
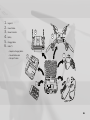
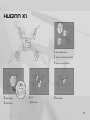
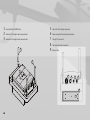
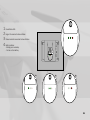
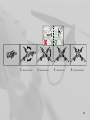
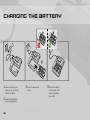
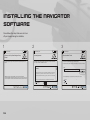
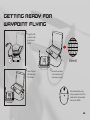
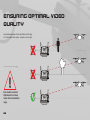
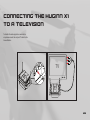
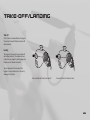
HUGINN X1
User MANUAL
HUGiNN X1 - USER MANUAL
Content
In The Box4
General Information6
Huginn X1
Getting ReaDy10
Charging the Battery
installing the Battery
Installing the navigator Software
Starting up18
Start up procedures
Getting ready for manual flying
Getting ready for way-point flying
Ensuring optimal video quality
Connecting the Huginn X1 to a television
Manual control24
Take-off/landing
Horizontal control
Rotation control
Vertical control
General safety instructions for indoor flying
Navigator Control30
Introduction to navigator
Drag and Drop
Way-point
2
Fail-safe34
MAINTENANCE36
Changing the rotors
Changing the landing gear
Inspection of the battery Compartment
Checking the arm
SAFETY41
General safety instructions
Battery safety intructions
Battery charger instructions
3
In The Box
4
1.
2.
3.
4.
5.
6.
Huginn X1
Ground Station
2
Manual Controller
Battery
1
Charging Station
Cables *3
−− Adapter to Charging Station
−− Ground Station cable
−− Mini jack TV cable
3
5
4
6
5
General
Information
6
Huginn X1
1 Rotor and Rotor mount
2 Antenna - for data communication
3 Motor house and Controller
4 Airframe body
5 On/Off button
6 Arm
7 Battery hatch
8 LED indicator
7
1
2
3
5
6
7
8
9
Ground Station On/Off button
Antenna for X1 Huginn video communicator
Antenna for X1 Huginn X-bee communicator
2
2
3
Power connection for external power device
Mini jack TV connector
One hand Controller connection
Battery hatch
2
2
1
Mini USB slot for laptop connection
1
3
5
6
7
5
8
9
8
6
7
8
9
1
2
3
4
Groud Station LEDs
Huginn X1 connected to Ground Station
Manual controller connected to Ground Station
Battery indicator.
- Blinking red = low battery
- Full red = critical battery
1
2
3
4
9
GETTING
READY
10
1
Fold out front arms
2
Fold out back arms
3
Lift the antenna.
4
Push the start button
11
Charging the Battery
1 Connect the charger to a
power source (10 - 16V DC,
110V AC or 220 AC)
2 Connect the transformer
to the Charging Station
12
3 Slide in the battery until
it clicks
4 Wait until the battery
is fully charged. This is
shown in the display:
Fuel = 100%
INstalling the Battery
1 Press the han-
dles towards the
center to unlock
the Battery hatch
1
2
2 Open the Battery
hatch upwards to
access the Battery
compartment and
slide in the Battery
1 Press the singular
handle towards
the centre to unlock the Battery
hatch
3 It is important to close the
hatch properly.
Press the handles outward
and make sure, that they
are locked ind this position !
3 Slide in the Bat-
tery and close the
hatch
the
2 Open
Battery hatch
to the left to
access the Battery Compartment
13
Installing the Navigator
Software
Please follow all ten steps. Make sure not to turn
off your Computer during the installation.
1
2
Sky-Watch Navigator
3
Sky-Watch Navigator
Sky-Watch Navigator
Welcome to the Sky-Watch Navigator Setup
Wizard
License Agreement
The installer will guide you though the steps required to install Sky-Watch Navigator on your
computer.
Please take a moment to read the license agreement now. If you accept the terms below,
click “I Agree”, then “Next”. Otherwise click “Cancel”.
Select Installation Folder
Folder:
General
WARNING: This computer program protected by copyright law international treaties.
Unauthorized duplication or distribution of this program, or any portion of it, may result in severe
civil or criminal penalties, and will be prosecuted to the maximum extent possible under the law.
14
Back
Next
C:\Program Files (x86)\Sky-Watch\Sky-Watch Navigator\
Browse...
All Sales, deliveries and services performed by Manufacture, Distributor
and/or Reseller are performed on the basis of these General terms and
Conditions. The terms shall also apply for any and all use of the Products.
Disk Cost...
Install Sky-Watch Navigator for yourself, or for anyone who uses this computer:
If there are any discrepancies between the Distributor’s below Terms
I Do Not Agree
Cancel
The installer will install Sky-Watch Navigator to the following folder.
To install in this folder, click “Next”. To install to a different folder, enter it below or clik “Browse”.
Cancel
Everyone
Just me
I Agree
Back
Next
Cancel
Back
Next
4
5
Sky-Watch Navigator
Please wait for the installer to finish.
Sky-Watch Navigator
6
Choose your language
Installer Language
Confirm Installation
Installing Sky-Watch Navigator
The installer is ready to install Sky-Watch Navigator on your computer.
Sky-Watch Navigator is being installed.
Pleace select a language.
Click “Next” to start the installation.
Please wait...
English
OK
Cancel
Back
Next
Cancel
Back
Cancel
Next
15
7
It is important that all Drivers are installed
Cinergy Driver Install
8
9
Cinergy Driver Install
Cinergy Driver Install
The installation of driver version
5.09.1202.00 has finished
Installation Complete
Setup was comleted successfully.
Welcome to the Installation of driver version
5.09.1202.00
Please disconnect and reconnect the device you want to
install.
Copy to C:\Windows\system32\drivers\emAudio64.sys
Copy to C:\windows\system32\drivers\emBDA64.sys
Copy to C:\Windows\system32\drivers\emOEM64.sys
Preinstalling device drivers.
TerraTec Grabby
DRIVER INSTALLATION
DRIVER INSTALLATION
for the following Products
This may take some time to complete. Please wait...
It is recommended that you close all other applications
before starting Setup. Click on next to continue.
Preinstallation was successful. Click Next to continue.
Copyright TerraTec Electronic GmbH
Next
16
Cancel
Back
Next
Cancel
Back
Finish
10
Press “Yes” and complete the installation.
After the instaltion on done remove the
USB wire from the Ground Station and
reconnect it.
After it is reconnected it will automatically
continue installalling the driver.
Cinergy Driver Install
To complete the driver instalation, you need to disconnect and
reconnect your device. Do you want to exit this wizard now and
connect the device later?
Yes
No
17
Start-up
18
Start-Up ProceDures
Manual flight
1. Connect the manual controller to the Ground
Station
Autonomous flight
1. Connect the Ground Station to the computer
2. Press the start button on the Ground Station
2. Push the start button on the Ground Station
and check if it is correct connectly
3. Place the Huginn X1 at a safe distance and
press the start button
3. Place the Huginn X1 at a safe distance and
press the start button
4. Check if the Ground Station is connected to
the Huginn X1 and the Manual Controller by
checking the LED indicatiors on the Ground
Station
4. Check if the Huginn X1 is initiated correctly
5. Ready to take-off
7. Ready to take-off
5. Start the Navigator
6. Connect the Huginn X1 to the Ground Station
19
Getting reaDy for
manual flying
Before you are able to operate the Huginn X1
manually you have to connect the Manual Controller. This is done by plugging in the Controller
to the Ground Station.
20
Getting reaDy for
waypoint flying
1 Plug-in the USB
connector cable
in the Ground
Station
Internet
2 Connect the mini
USB cable to the
PC´s USB port
3 Connect the computer
to the Internet (only if
online map is needed)
If the Ground Station is correctly connected to the PC the middle LED on the Ground Station will turn GREEN
21
ensuring optimal viDeo
Quality
Avoid obstacles between the Ground Station and the Huginn X1 for optimal video quality - depends on line of sight.
!
Extra caution is advised.
Opticales will in all cases
reduce the communication
range.
22
Connecting the Huginn X1
to a television
To transfer the video signal to an external device please connect the mini jack TV cable to the
Ground Station
TV
23
Manual
Control
!
24
READ SAFETY SECTION BEFORE TAKE-OFF
Take-off/LanDinG
Take-off
If the C button is released before the Huginn
X1 reaches its take-off altitude, the take-off
will be aborted.
Landing
The Huginn X1 comes with an auto take-off
and landing function. This enables the user
to land from any height by holding down the
C button on the Manual Controller.
You can always abort the landing if the
Huginn X1 is more than 40 cm in the air by
releasing the C button.
Press and hold the C button to take-off
Press and hold the C button to land
25
Horizontal Control
Forward/Backward
To move the Huginn X1
forwards and backwards
push the Joystick forward
and backward respectively.
When no button is pushed the Joystick
controls the horizontal movements of
the HUGINN X1. When operating the
Drone outside, the GPS will hold the
position if the Joystick on the Manual
Controller is released.
26
Sideways
To move the Huginn X1
sideways push the Joystick
either to the left or to the
right respectively.
Rotation Control
Rotation control also controls the turning of the camera. When using the Manual Controller, the Camera is
turned by holding down the Z button and pushing the
joystick to one side.
It is recommended that you always turn the Drone back
to its original heading to make the manual navigations
easier.
+
27
Vertical Control
Like the rotation control the vertical control is activated by pushing and holding
the Z button on the Manual Contoller.
Press the Z button while moving the
Joystick up and down. This will control
the height of Huginn X1. 28
+
+
General SaFEty Instructions
for inDoor Flying
When you are flying indoor, there is no GPS signal and therefore the following features are NOT functioning:
1.
2.
3.
4.
Come home (In case of lose of communication the system will not come home)
Position hold
Way-Point
Drag and Drop
!
Extra caution is advised
Beware that objects might appear futher aware in the video display
29
Navigator
Control
!
30
READ SAFETY SECTION BEFORE TAKE-OFF
IntroDuction To NAvigator
Connect Drone
Connect Video
Camera
Change Map
Connect
Navigation screen with Drag
and Drop or Way-points
Drone Battery Status
Drag to control relative height
Indicates the Drone’s vertical
movements
Connection Status
Altitude
Click to show warnings
Flight Information
Come home
Stop
Live vidoestream
Flip video and navigation screen
Controls rotation and angle
of the Camera
Take-off and
landing button
31
Drag anD Drop
Drag and Drop is a way to make the
Drone go to a specific point on the map.
To utilize the Drag and Drop functionality you must:
1.
2.
3.
Connect
Click on the Drone icon and hold it
Drag it to desired location
Release the Drone icon
Altitude
32
Way-Point
Way-Point Navigation is used to setup a preassigned path for the Huginn X1 to follow. While
the Huginn X1 is following its path you can
always add new Way-Point or simply drag the
Huginn X1.
Connect
To use Way-Point Navigation:
1.
2.
Click on the destinations which you want the
Huginn X1 to reach
1
A flag indicates a Way-Point
x2
Altitude
33
Fail-Safe
34
Crash Detection
If Huginn X1 comes in
contact with a solid object
or is flipped more than 95
degrees the motors will
automaticcaly shut down
to prevent damage to the
object and the drone itself
Communication fail-safe
procedure
Critical Battery
If Huginn X1 runs critically low on battery it will
go into auto-land mode,
indicated by the back LED
light constantly on.
95
º
20 sec.
1 Huginn X1 stops as soon
as the communication link
is lost
10 m
5 sec.
2 If the connection is not 3 If the connection is still
reestablished, Huginn
X1 will climb 10 meters
from the current height
not reestablished Huginn X1 will return to the
starting location
4 Finnally Huginn X1 will
automatically land at the
same location as it took
off
35
Maintenance
36
Changing The Rotors
The Rotors are exposed to constant wear and therefore
they sometimes need to be replaced. Be aware of any inconsistence on the Rotor as even small changes will affect
the performance as well as safety of the Huginn X1
To replace the Rotors:
1.
2.
3.
4.
5.
6.
Turn the safety lock to release the Rotor
Remove the Rotor
Put in a new Rotor
All Rotorblades have a specified motortack
Make sure Rotor and Motor are paired correctly
Turn the safety lock back
37
Changing The LanDing Gear
The landing gears are exposed to constant wear and
therefore they sometimes need to be replaced. Be aware
of any sign if the landing gears gets loose or damaged.
Counter support the motor house while changing the
landing gear.
To replace the landing gear:
1.
2.
38
Detach the current landing gear (you can use pliers)
Attach the new landing gear
Inspection of the Battery
CompartmenT
In time the Battery compartment can accumulate dust. If
it has been flying in rain, you need to check the Battery
compartment for humidity. To inspect the Battery compartment:
1.
2.
3.
4.
Open the Battery hatch
Remove the Battery
Visually inspect the Compartment
Remove any dust e.g. with a cotton bud and if water
is present, place it in a warm location for 24 hours not
exeeding its maximum heat tolerance described on
page 42.
39
Checking the Arm
You should frequently check if the arms are loose by
twisting the arm gently. If you are in doubt please contact
a Sky-Watch Servicecenter before any flight.
40
41
Safety
42
General Safety
Instructions
Safety distance
Take-off and landing slope tolerance
Temperature tolerance
40 degrees co
5 meters
Avoid contact with
spinning Rotors
0 degrees co
35%
Wind tolerance
Water tolerance
m/s = 0 -10
43
Battery Safety
Instructions
CAUTION: To reduce the risk of fire, do not expose this device to rain or dampness.
1.
Read these instructions.
2.
Keep these instructions.
3.
Pay attention to all warnings.
4.
Follow all instructions.
WARNING. Failure to follow all instructions could cause permanent damage to the
battery and its surroundings, and cause bodily harm.
NEVER open the battery protective casing.
NEVER use anything EXCEPT a Sky-Watch approved battery.
NEVER allow the battery temperature to exceed 140°F (60°C).
NEVER disassemble or modify pack wiring in any way or puncture cells.
NEVER place on combustible materials or leave unattended during charge.
ALWAYS use a Sky-Watch cell balancing charger.
ALWAYS charge in a fireproof location.
ALWAYS KEEP OUT OF REACH OF CHILDREN.
IMPROPER BATTERY USE MAY RESULT IN A FIRE, EXPLOSION OR OTHER HAZARD.
!
44
Battery Charger
Safety Instructions
1.
This charger may not be exposed to dripping or splashing and no object filled with liquid, such as vases, may be placed on the charger.
2.
Read these instructions.
3.
Keep these instructions.
4.
Follow all instructions.
WARNING. Failure to follow all instructions could cause permanent damage to the
battery and its surroundings, and cause bodily harm.
NEVER use this charter near water.
NEVER install near any heat as radiators, heat registers, stoves etc. (including amplifiers) that produce heat.
NEVER use anything EXCEPT a Sky-Watch approved charger.
ALWAYS clean with dry cloth.
ALWAYS use attachments/accessories specified by Sky-Watch.
ALWAYS unplug this charger during lightning storms or when unused for long periods
of time.
!
45
1.
General applicable
1.1.
All sales, deliveries, performances, advice of whatever nature from
performed by ** (“Seller”) in connection with the delivery of products from Sky-watch A/S (Manufacturer”), including the portable
drone HUGINN X1 ** (the “Products”), are performed on the basis
of these general terms (“Terms”). The Terms shall also apply for
any and all use of the Products.
1.2.
1.3.
The use of the Products, including the software embedded in the
Product are only, allowed when the use are conducted in strictly
compliance with the Terms. If the Terms are violated the right to
use the IPR, c.f. section 5.1 will immediately lapse and further use
of the Products shall cease.
3.
Unique ID
3.1.
Due to the special characteristics of the Products and the possibility of use for illegal purposes, all products carry a special and
unique identification number (“ID”). Any attempt to erase or
remove this ID shall automatically terminate the right to use the
IPR without any notice or warning. When the right to use the IPR
(Intellectual Property Rights) has ceased, the Product(s) can no
longer be operated without violating and infringing the rights of
the Manufacturer.
If there are any discrepancies between the Seller’s below Delivery
Terms and the Buyer’s own terms, the Seller’s terms and conditions of shall prevail, unless the divergent terms are accepted in
writing by both parties.
All resellers, distributors and other parties involved in the marketing of the Products are carefully instructed in presenting the
Terms for the Buyer and to make them and explicit part of the
purchase. No Products can be sold without the buyer beeing obliged by the Terms. 2.
Statement of use
2.1.
All buyers of the Products has to be approved by *** and shall
obtain such approval during the period of use.
2.2.
Buyer is solely liable for the legality of the purchase and the intended use. Buyer shall on first demand show any necessary approvals and shall store such carefully throughout the period of use
and for a period of three years following the cease of use.
2.3.
2.5.
The Buyer is required to complete a statement to ensure the purpose of the Products and that the Products mentioned will not be
used for any purpose connected with chemical, biological or nu-
4.
Export Limitations
4.1.
Manufacturers Products can be classified as dual-use products
(9a012a1) and can only be supplied to countries within the EC if no
specific export license is obtained. Furthermore the Products can
be exported and sold supplied to Australia, Canada, Japan, New
Zealand, Norway, Switzerland and the United States with a global
export authorization. Export or re-export to any other location
require an approval from relevant authority.
5.
Rights of use
5.1.
Any and all intellectual property rights related to the Products
such as, but not limited to those vested in or comprised by trademarks, semi-conductors/topography, patents, copyrights, designs
etc. (jointly the “IPR”) belongs to Manufacturer.
5.2.
Upon payment of the purchase price and the fulfilling of all other
conditions required by the Seller, Buyer acquires title to the
clear weapons and/or missiles capable of delivering such weapons.
2.4.
46
Further the Buyer shall warrant that the buyer is not an entity
listed on EU or USA published lists of terror organizations
Product(s). Regarding use of the Product(s) and the IPR Buyer
achieves a non-exclusive and non-transferrable right. The Products
can accordingly not be resold without the express prior written
consent from Seller.
5.3.
The Buyer is not entitled to reverse engineer, disassemble, decompile, or translate any soft- or firmware, or otherwise attempt to
derive the source code of any software connected to or embedded
in the Product(s). Any attempt to do so shall automatically terminate the right to use the IPR without any notice or warning.
6.
User Instructions
6.1.
User Instructions are always delivered with the Products.
6.2.
The Buyer will upon delivery make sure that the User Instructions
have been sent with the delivery in question.
6.3.
If the User Instruction does not follow the delivery in question the
Buyer will immediately contact the Seller in order to obtain the
User Instructions in question.
6.4.
It is the Buyer’s responsibility to make sure that any use of the
Product(s) will be applied according to the User Instructions.
7.
Delivery of The Goods
7.1.
Goods are delivered ex-works according to INCOTERMS 2000.
8.
Delivery time
8.1.
If delivery is not made at the agreed time, the Buyer is entitled
to cancel the agreement if the delivery is not made within a reasonable time period set by the Buyer, and the Buyer has stated
his intention in writing to the Seller that he intends to cancel the
agreement if the delivery does not take place within the reasonable time period. If the Buyer does not cancel the agreement, the
Buyer is not entitled to claim any compensation due to the delay.
If the Buyer cancels the agreement, the Buyer is only entitled to
compensation for direct and reasonable extra costs as may be
imposed on him by reason of his purchase of similar goods. The
Seller is not liable for indirect damages or losses, consequential
damages or losses, losses of business operation or commercial
profits or any other similar losses due to delayed delivery.
9.
Non-Conformity of The Goods
9.1.
The Buyer shall examine the goods as soon as possible after their
arrival at destination and shall immediately notify the Seller in
writing of any lack of conformity of the goods within 8 days from
the date when the Buyer discovers or ought to have discovered
the lack of conformity. Otherwise a lack of conformity is considered not to exist, and the Buyer loses the right to subsequently
enforce the lack of conformity.
9.2.
9.3.
In any case the Buyer shall have no remedy for lack of conformity
if he fails to notify the Seller thereof within 6 months from the
date of arrival of the goods at the agreed destination
Non-conformity of the goods shall not be deemed to exist if the
Buyer has used the supplied goods incorrect or inappropriate,
including violation of Guidelines/User Instructions handed out, or
if Buyer or any third party without the Seller’s prior consent, has
had to make changes or underwent intervention in the delivery.
9.4.
In the event that the Seller cannot detect non-conformity that
the Seller is responsible for, according to this chapter, the Seller
is entitled to compensation for the work and costs that the Seller
has suffered as a result of Buyer’s erroneous claim
9.5.
Goods will be deemed to conform to the Contract despite minor
discrepancies which are usual in the particular trade or through
course of dealing between the parties
9.6.
9.7.
In case of non-conformity in regards to the Buyers use of the
goods for a particular purpose for which the goods would not
ordinarily be used, the goods are only considered to be non-conform if the Buyer prior to the agreement with the Seller in writing
has made this particular purpose aware to the Seller.
Where goods are non-conforming (and provided the Buyer, having
given notice of the lack of conformity in compliance with this
chapliance with this chapter, does not elect in the notice to retain
them), the Seller shall at his option:
(a) replace the goods with contorming goods, without any ad
ditional expense to the Buyer, or
(b) repair the goods, without any additional expense to the Buyer,
or
(c) reimburse to the Buyer the price paid for the non-conforming
goods and thereby terminate the Contract as regards those goods.
9.8.
The above remedies a-c are considered the sole remedies of the
Buyer, and shall in case of non-conformity be given to the Buyer
solely at the discretion of the Seller.
9.9.
When returning goods to the Seller, or to the Suppliers of the Seller, the Buyer bears the risk of transporting the goods.
10.
Force Majeure (Excuse for non-performance)
10.1. he Seller shall be excused from any delay or failure in performance
required hereunder if caused by reason of any occurrence or contingency beyond its reasonable control, including, but not limited
to, acts of God, acts of war, terrorist acts, fire, insurrection, strikes, lock-outs or other serious labor disputes, riots, earthquakes,
floods, explosions or other acts of nature. 10.2. The Seller, in a situation comprised in paragraph 9, has the right to
a reasonable extension of the delivery date, except that the buyer
is entitled to terminate the agreement if the conditions persist for
more than 90 consecutive days.
11.
Mitigation of Harm
11.1. A party who relies on a breach of this contract must take such
measures as are reasonable in the circumstances to mitigate the
loss, including loss of profit, resulting from the breach. If it fails to
take such measures, the party in breach may claim a reduction in
the damages in the amount by which the loss should have been
mitigated.
12.
Product liability
12.1. Claims for damages and tort for personal injury is in any case
limited to the invoice price excl. VAT of the Product.
12.2. For property damage caused by a defect in a delivered product
is the Seller and/or the Manufacturer solely responsible for the
extent it is demonstrated that the harmful defect caused by errors
or omissions from the Seller’s/Manufacturers side or from others
that the Seller/manufacturer bears the responsible for.
12.3. Claims for damages and tort for property damage is in any case
limited to the invoice price excl. VAT of the product.
12.4. Not in any event, regardless of the cause, shall the Seller or the
Manufacturer be liable for defective products for any indirect,
special, incidental, punitive or consequential damages of any
kind, whether arising under breach of this contract, tort (including
negligence), strict liability or otherwise, and whether based on
this agreement or otherwise, even if advised of the possibility of
such damages.
13.
General limitation of liability
13.1. The maximum liability to the Buyer or third parties on any claim
for damages connected with the sale or use of any of the Produ-
47
cts, whether arises in contract, from breach of warranty, in tort or
otherwise, is in any case limited to the invoice price excl. VAT of
the Product.
13.2. Not in any event, regardless of the cause, shall the Seller or the
Manufacturer be liable for any indirect, special, incidental, punitive or consequential damages of any kind, whether arising under
breach of this contract, tort (including negligence), strict liability
or otherwise, and whether based on this agreement or otherwise,
even if advised of the possibility of such damages.
13.3. Neither Manufacturer nor Seller shall have any liability for damages caused by use of the Products
13.4. 12.3.1
in conflict with the User Instruction
13.5. 12.3.2
in situations where precautions is considered, such as bad weather, including lightning, rain, snow, strong winds
13.6. 12.3.3
by children or mentally disabled persons
13.7. 12.3.4
without proper maintenance 14.
Notices
14.1. Any notice under this contract shall be in writing (which may
include e-mail) and may be served by leaving it or sending it to
the address of the other party, as specified in the preamble of this
contract, in a manner that ensures receipt of the notice can be
proved.
15.
Governing Law and venue
15.1. Any disputes between Buyer and Seller shall be governed by the
laws of **.
15.2. Any disputes between Buyer and Manufacturer shall be governed
48
by the laws of the kingdom of Denmark.
15.3. Unless otherwise agreed in writing, any litigation arising out of or
relating to these Terms shall be resolved in the trial courts of the
jurisdiction of the Seller respectively the Manufacturer or at the
jurisdiction of the Buyer, at the Sellers/Manufacturers sole discretion and choice
16.
Severability (Effect of invalid or unenforceable provisions)
16.1. If any provision or provisions of these Terms shall be held to be
invalid, illegal, unenforceable or in conflict with the law of any jurisdiction, the validity, legality and enforceability of the remaining
provisions shall not in any way be affected or impaired thereby.