1
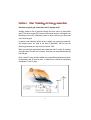
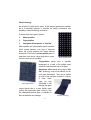
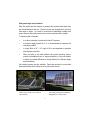
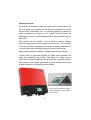
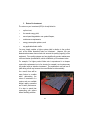
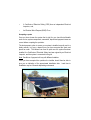
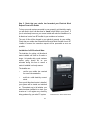
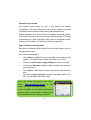
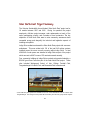
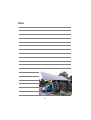
1
Table of Contents
Introduction……………………………………………………………. 3
Glossary……………………………………….……...………… 4
Section 1: Solar Technology & Energy Generation……………. 5
Section 2: Understanding Your Electricity Consumption….… 12
Section 3: Solar PV Installation & Grid Connection…………… 17
Solar North East Project Summary……………………………….. 28
Case Study - Public Hall Wahgunyah School of Arts…………. 29
Helpful Resources…………………………………………………… 30
2
Introduction
Welcome to the Solar Panel Installation Guide
This guide is designed to provide Indigo Shire residents with an understanding
of the process of installing solar to generate electricity. The first section
provides information about solar technology and energy generation. This is
followed by a section aimed to improve understanding of energy consumption
and electricity account data. Section three summarises the installation and grid
connection process, outlining what is required at each step along the way, and
provides some helpful tips to minimise obstacles.
The benefits of going solar
Producing your own renewable energy by installing solar photovoltaic (PV)
panels is a great way to reduce your electricity bills and carbon footprint.
Making an investment in solar may secure your future energy needs and
protect your property from the uncertainty of rising electricity costs over the
long term.
Electricity prices, usage and greenhouse gas emissions
Electricity prices in the North East Victoria SP-AusNet distribution area
increased 40% from 2006 to 2012 according to the Victorian Essential
Services Commission*. Such price rises have placed a strain on budgets and
encouraged people to rethink the way they use and generate electricity.
There are a number of reasons why we are paying more for grid supplied
electricity.
1.
Network costs. Upgrades to the ageing network that delivers electricity
to your property - infrastructure such as substations, poles, wires.
2.
Increase in the wholesale cost of electricity.
3.
Electricity retail profits and cost increases.
*Essential Services Commission, May 2013, http://www.esc.vic.gov.au/getattachment/18cdbfc 4-107b497a-ab59-6cce797957c7/Electricity-Retail-Margins-Discussion-Paper.pdf
3
Installing solar electricity can greatly reduce the demand for grid electricity
and your properties carbon emissions.
Glossary
W
A watt measures the rate of energy conversion or
transfer. 1 watt = 1 joule per second.
kW
1 kilowatt = 1,000 watts. For example, a 3 kilowatt
size solar system = 3,000 watt system.
kWh
Kilowatt hours is a measure of energy usage over
time. 1 kilowatt hour = 1 kilowatt used for an hour. It
is commonly used as a billing unit for energy
delivered to consumers by electricity retailers.
Distributor The business that owns the power infrastructure
(poles, wires and substations) which delivers
electricity from a generator to a consumer.
Distributors fix faults such as black outs and
damaged electricity lines. SP-AusNet is the
distributor across Indigo Shire.
Generator Generators produce electricity from coal or gas and
renewable sources such as solar, hydro, and wind.
Retailer
A retailer buys electricity from a generator and sells it
to a consumer. Retailers set their own prices for
consumers. Changing retailer will not change your
distributor or affect the reliability or quality of your
supply.
4
Section 1: Solar Technology & Energy Generation
How does a typical grid connected solar PV system work?
Sunlight creates a flow of electrons through the solar cells of a photovoltaic
panel. This direct current (DC) travels to the inverter where it is changed to an
alternating current (AC). Alternating current is what is used in your home and
in the electricity grid.
In general, solar electricity will be set up to supply your property’s needs first.
Any surplus power, not used at the time of generation, will flow into the
electricity grid where you may receive a “feed-in” tariff.
When your electricity requirements are greater than the PV output, for instance
overnight when the cells are not active, electricity can be purchased directly
from the grid.
Once a solar PV array is fully installed, they require little maintenance and can
be expected to last 20 years or more. Inverters have a shorter life expectancy
of between 10 and 15 years.
5
Panel technology
Not all solar PV panels are the same. A wide range of products are available
and it is extremely important to scrutinise the quality, performance and
durability of various technology and brands.
There are three main types of panels.
1.
Monocrystalline
2.
Polycrystalline
3.
Amorphous silicon panels or “thin film”
Monocrystalline and polycrystalline panels sandwich
silicon crystals between a top layer of tempered
glass, and a tough ethylene vinyl acetate material
underneath. Each cell of a monocrystalline panel is
made from a thin slice of a large single silicon crystal,
hence the name ‘mono-crystalline’.
Monocrystalline Panel
Polycrystalline panels have a speckled
appearance as a result of the multiple small
crystals that make up each cell on the panel.
Amorphous silicon panels also known as “thin
film” technology, may be less efficient, but do
have some advantages. They can be applied
as a film to low cost glass or plastic in a variety
of sizes. Some
types are less
susceptible to hail
Polycrystalline Panel
damage than glass
covered panels due to a more flexible upper
coating. Also photovoltaic glass, which is a thin
film sandwiched between glass, is available for
direct incorporation into buildings.
Thin Film Technology
6
Solar panel angle and orientation
Solar PV panels have the capacity to generate the greatest power when they
are pointed directly at the sun. Peak sun hours vary throughout the year and
from region to region. As a result, it is important to individually consider each
unique location and install panels so they receive maximum direct sunlight.
To optimise yield in Australia:
•
A northern orientation is preferred for fixed PV systems.
•
A minimum angle of panel tilt of 10° is recommended to maximise self
cleaning by rainfall.
•
In Indigo Shire a 20° - 30° angle of tilt is recommended to maximise
annual power production.
•
When roof pitch is not ideal installers can provide mounting frames,
usually at an additional cost, to improve positioning. (Ask your installer
to advise of possible differences in output efficiency for different angles
and orientations.)
Sun tracking systems are also available. Panels are mounted on a motorised
stand-alone frame which follows the suns path across the sky.
Frames used on a flat roof to correct tilt
and orientation.
Sun tracking 4.3kW system installed at
Wangaratta’s Eco Living Centre.
7
Panel performance tolerance
Solar PV panels are rated at a specific output range, for example 200W, with
a +/- output tolerance. This means that in the case of a 200W panel with an
output tolerance of +/-3%, it is possible that the true panel output could be
194W to 206W, with an average of 200W.
Unfortunately, the average output is not what counts when the panels are
connected or wired in series within an array.
Panels with a greater output do not compensate for those with lower output.
Instead the current from the worst (lowest specific output) panel dictates the
overall current in the array, and hence the output of all panels. This could
mean that a 2.00kW system may in fact only be 1.94kW due to this effect.
For this reason panels with a zero negative (or positive only) output tolerance,
for example -0% +3%, may be more desirable. With a zero negative output
tolerance panel, you can be sure that the watts per panel output rating is the
minimum, and that the full rated output of an array is likely to be more accurate.
Shading on panels
Solar panels should be located
where they will be in full sun for
the greatest proportion of the
day. Shading changes the flow
of electricity through the panel.
Even a small amount of shade,
from objects such as trees, roof
ventilators or antennas, can
significantly affect panel output.
This may impact the entire array
and not just the shaded cells.
Shading of panels from the projecting roof line will
affect the system’s generation capacity.
8
Cleaning your panels
Over time, accumulation of dust and dirt may shade the panels and affect their
output efficiency. Rain will lightly wash the panels but you may wish to clean
your panels occasionally to maintain efficiency, particularly during dry dusty
periods of low rainfall.
How does temperature affect solar panel output?
Solar panels operate best during clear conditions
and at ambient temperatures up to 25°C. As the
ambient temperature increases above this level,
panels can experience varying levels of reduced
efficiency.
Ensure you receive a panel technical specification sheet when you are
provided with a quote. Specifications will provide a temperature co-efficient
that will help you determine the percentage of reduced efficiency per degree
rise in temperature. This will enable you to obtain a clearer picture of the
variation in generating capacity for different types and models of panels. The
lower the number for the temperature coefficient, the better the panel will work
in higher temperatures.
In addition, install panels so they are slightly elevated from the roof surface.
This will allow for air to circulate underneath and keep the panels cooler.
9
Selecting an inverter
The inverter is an expensive component of your solar PV energy system. Just
like solar panels, not all inverters are the same and replacement of a failed
inverter can be a considerable cost. It is extremely important to consider the
quality, performance and longevity of the inverter. Research brands and
manufacturers to source inverter equipment with a strong reputation and low
failure rates.
Micro inverters are also available. They are fitted at numerous locations
across the solar array rather than having one central inverter. The key benefit
of this type of inverter arrangement is that failure or reduced performance of
one panel will not affect the energy production across the entire system.
Ideally inverters should be installed in a shaded position with good air flow.
A home monitor or web based program can obtain power generation and
usage data registered by your inverter. This allows you to easily track the
solar system’s electricity production and the property's consumption pattern.
Such information can highlight opportunities to reduce electricity demand and
promptly respond to any irregularities with the system.
This German made SMA SunnyBoy
inverter (left) includes a Sunny Beam
monitor (above).
10
Battery supported grid connect systems
Grid connected battery storage systems are also available. They allow the
storage and use of surplus energy generated by domestic renewable energy
systems. Batteries can also be charged from the grid during off–peak times
for use during peak tariff periods. These storage systems have the potential to
secure continual supply by providing energy to your home during a grid power
outage. The cost of battery connect systems are becoming more affordable
as technology improves.
Off-grid stand alone systems
For properties that are not connected to the electricity grid network, battery
storage systems are available. Such systems offer significant advantages for
users independent of the electricity grid, however they do require careful
battery management. Ask installers for options suitable to your scenario.
Net Metering
‘Net metering’ applies to grid connected energy systems that feed excess
power back into the grid. This means that energy generated by your solar
installation will be consumed first at the property. Any surplus energy
generated will flow back through your meter where it will be measured as it is
exported to the grid and may be eligible to receive a “feed-in” tariff. The meter
will only record exported kilowatt hours (kWh) if the electricity generation
exceeds your consumption during a particular time interval. Export is
calculated every half hour.
For example: your home consumes 10 kilowatt
hours during a time interval and your solar
installation generates 2 kilowatt hours during that
same period. The meter will advance 8 kilowatt
hours on the total usage register, the difference
between import and home generation.
11
Section 2: Understanding your Electricity Consumption
An important first step before you install solar electricity is understanding what
information is provided on your electricity account and where power is used in
your home.
With this material you can:
1.
Recognise consumption patterns; and
2.
Explore options to reduce demand - using both technology and modified
behaviour.
By improving energy efficiency and using less power you can consider a smaller
sized solar system to meet your needs. This will lower your capital outlay.
Top tips to reduce your electricity demand !
Where possible look for non–electrical means of heating water and
living areas.
If you are using mechanical heating and cooling reduce the area
being targeted and dress appropriately.
Set thermostats between 18-20°C in winter and 25°C or above in summer.
Every degree warmer or cooler can increase energy use by up to 10%.
Increase the insulation in your home and reduce draughts.
Reduce “standby loads” and switch off lights and appliances that are
not in use.
When replacing appliances look at star rating and purchase efficient
models.
Replace light fittings with LED or compact fluorescent equivalents.
12
Monitor your usage
There are a number of ways to examine your electricity use at home. You can
analyse information provided on your energy bills, regularly read and record
you electricity meter, and if you have a smart meter you may be able to
access web portals that provide real-time data on your property’s consumption.
Calculating your average daily power usage from your energy bills
The average daily domestic electricity consumption, measured in kilowatt
hours per day (kWh/day), varies widely from household to household.
Electricity use will normally vary between summer and winter depending on
heating and cooling requirements.
How do I determine my average daily usage in kilowatt hours (kWh)?
Look at your most recent electricity bills, ideally electricity bills that cover a 12
month period - bills are generally issued monthly or quarterly.
1.
Note your average daily use in kWh for each bill. (Each bar for the last
12 months on the bar chart of your most recent bill, OR the average
daily use listed on each bill over a 12 month period - see page 14).
2.
Calculate your average annual daily use in kWh by adding together
the monthly or quarterly figures, then dividing by 12 (monthly) or 4
(quarterly) depending on billing cycle. In the example shown on page
14, starting from Dec ‘10, the annual daily average is calculated as:
9.9 + 8.0 + 13.4 + 16.2 = 11.9 kWh
4
This is the amount of electricity used on site each day, averaged across a
whole year. You will then be able to gauge the likely impacts of any
proposed solar system on your daily consumption.
13
*Electricity bills vary between electricity retailers - some bill quarterly, others monthly.
14
Sizing your solar power system
Once you know how much electricity your property uses, and you have
addressed any opportunities to reduce your power use, you should think about
what you want to achieve from your solar PV system.
A number of factors will affect the impact a solar PV system has on your
electricity account. These include:
♦
Roof design and aspect
♦
Budget
♦
Energy consumption
♦
System size
♦
Time of use
♦
Feed-in tariffs
These elements will influence whether you will be able to offset some, or all of
your electricity needs, and whether exporting excess electricity to the grid is a
viable option.
Installers should indicate the average daily amount of electricity in kilowatt
hours per day (kWh/day) that systems will generate. If they do not offer this
information, ask them to provide it. You can use these daily output figures to
compare against your electricity consumption which will help you choose a
system that best meets your needs.
To assess options, arrange for a number of solar installers to conduct a site
inspection and provide a quote for your project. The representative should
inspect your meter box, roof area, pitch, orientation, and determine any
shading limitations. They should also undertake a billing analysis to determine
your usage and discuss sizing solutions. When this information has been
collected and assessed a quote can be issued for your consideration.
15
IMPORTANT: your electricity bill has a “fixed” component, sometimes listed as a
“Supply Charge”, which you will be charged even if your solar system offsets all
of your electricity use. If you want to obtain a $0 bill or a credit, you will need to
install a system that produces more electricity than your electricity consumption
to cover this supply charge.
Depending on the available feed-in tariff this option may or may not be attractive
and can significantly impact payback periods for your PV investment.
What else can I do?
To obtain further information on simple ways to improve energy
efficiency at your property see Indigo Shires “Better Build Toolkit”
and “The Good Life - A guide to lighter living”.
Available from Council or online at;
www.indigoshire.vic.gov.au/toolkit
You can also visit switchon.vic.gov.au to compare your energy
consumption with the average Victorian household and learn how
to reduce your household energy consumption.
16
Section 3: Solar PV Installation & Grid Connection
Installation & Grid Connection Checklist
Step 1. Accept a quote and pay a deposit. Seek several quotes from
reputable installers. Compare all aspects of each quote thoroughly.
Step 2. Provide access to install the PV system. Two documents should
be left with you or in your meter box by your installer;
i. Certificate of Electrical Safety
ii. Electrical Work Request Form
In addition, there are two extra forms which you will need to sign:
iii. SP-AusNet - Solar Interconnection Agreement Form.
iv. Small-scale Technology Certificate’s (STCs). This form will
assign the units certificates to your chosen installer (should you
wish to do so) in return for a discount.
Step 3. Provide access to an Electrical Inspector to check the system is
installed correctly and sign the Certificate of Electrical Safety.
Step 4. Check that your installer has submitted the SP-AusNet - Solar
Interconnection Agreement Form, Certificate of Electrical Safety and
Electrical Work Request Form to your retailer.
Step 5. Check that your retailer has forwarded your Electrical Work
Request Form to SP-AusNet to connect your system to the grid and install
a bi-directional meter if required.
Step 6. Negotiate a rate with your chosen retailer. Once your system is
connected to the grid, compare rates offered by energy retailers.
Step 7. Confirm panels are covered by your Home Insurance Policy.
17
Step 1.
Accept a quote and pay a deposit
There are many solar installers in the marketplace with widely varying
products, price ranges, system quality, warranty terms and conditions,
payment options and levels of customer service. It is important that you
shop around and do your research so you are as informed as possible to
compare all aspects of each quote.
Be sure to obtain a number of quotes from reputable installers to compare
against each other. Check that the installer has Clean Energy Council
Accreditation and that the sales representative that visits your home is an
Accredited Designer.
When comparing quotes from different installers
consider the following:
i.
System Yield:
ii.
Return On Investment:
iii.
Product & Installation Warranties:
iv.
Installer Customer Support:
i. System Yield
The annual electricity yield that a PV system can produce under normal ‘real
world’ operating conditions is called the system yield. It is one of the most
important characteristics to consider for return on investment. Yield is
measured in kWh (kilowatt hours) which is the same unit used by your
retailer to measure electricity consumption at your house or business and is
shown on your power bill. A system with a low up-front cost which performs
relatively poorly can be a worse investment than a more expensive system
with a higher yield. The effect is amplified when you multiply the yield
difference over the life of the equipment (typically 25 years or more).
18
ii. Return On Investment
The return on your investment (ROI) is closely linked to:
•
up-front cost,
•
the annual energy yield,
•
annual panel degradation over system lifespan,
•
maintenance requirements,
•
energy consumption patterns, and
•
any applicable feed-in tariffs.
You may simply consider a higher system yield in relation to the up-front
cost, as the better theoretical return on investment. However, this one
dimensional measure does not take into account the quality (longevity) of the
equipment. Poor quality systems can have significantly greater maintenance
costs and shorter operational life, which will diminish your investment value.
For example, if a higher product failure rate is experienced in a cheaper
system (the replacement cost of an inverter for example), such systems may
not present such an attractive investment. The replacement cost and loss of
yield during a fault may increase the overall lifetime cost dramatically.
As a result, there will be
many factors to consider
when determining the
return of investment of a
system such as available
budget, quality, warranties
and overall performance.
It is wise to spend time
researching your options
before finalising selection.
Photo courtesy of ZEN Home Energy Systems
19
iii. Production & Installation Warranties
Find out who is responsible for servicing the warranty – the installer or the
system component manufacturer, and what exactly is covered by the
warranty? Are these people easy to contact and close by if something goes
wrong with your system?
Look for an installer who will service the warranties themselves, and who
operates nearby for prompt servicing. Not only does this support local
businesses, it also gives you some security in having a local contact should a
problem arise. You may even like to find out how long the installer has been
in business in your area, and their financial capacity and stability. This may
help you to assess whether they are likely to remain in business through the
duration of your warranty period, in case you need to make a claim. Check if
the inverter, panels and installation workmanship are all covered under the
warranty.
•
Does the warranty cover replacement of faulty components?
•
How long are the warranties for each of the components?
Inverter warranties are typically around 5 years, often with an option to pay
extra to extend the warranty period.
iv. Installer Customer Support
A good installer should provide clear communication and support during the
entire installation and grid connection process. Check that your chosen
installer will provide trouble-shooting assistance and complete the required
forms and certificates for your. They can advocate on your behalf with your
retailer and power distributor during the installation and connection process to
ensure the appropriate paper work has been received and actioned by the
various parties.
This includes:
•
A Solar Interconnection Agreement Form to be sent to your distributor
(SP-AusNet),
20
•
A Certificate of Electrical Safety (CES) from an independent Electrical
Inspector; and,
•
An Electrical Work Request (EWR) Form.
Accepting a quote
Once you have chosen the system that is right for you, check that all details
such as size, system components, warranties, deposit and payment terms are
correct before accepting the quotation.
The best payment option to ensure your system is installed correctly and in a
timely manner, is to pay a deposit once you have accepted the quote and
placed an order. The balance can then be paid once the system has been
installed, the Certificate of Electrical Safety has been signed by an Electrical
Inspector, and the system is connected to the grid.
Note: Conditions of payment will vary with different installers.
Once you have accepted the quotation the installer should then be able to
give you an indication of the approximate installation date. Lead time to
installation may be 6-8 weeks depending on demand.
21
For more information when comparing quotes and selecting solar
electricity products refer to:
Clean Energy Council’s “Consumer
guide to buying household solar
panels”,
www.indigoshire.vic.gov.au/solarguide
The Alternative Technology Association’s
“Solar panel buyers guide”,
www.indigoshire.vic.gov.au/panelguide
Step 2. Provide access to the property to install the PV system
The installation of an average sized domestic solar power system will usually
take place during one working day.
Two documents should be left with you or in your meter box by the installer
which are crucial to the connection of your system:
•
Certificate of Electrical Safety (CES)
•
Electrical Work Request Form (EWR)
In addition, there are two forms which you will need to sign:
•
SP-AusNet - Solar Interconnection Agreement Form
•
Any applicable forms to take advantage of relevant rebates or incentive
schemes. For example, Small-scale Technology Certificate’s (STC’s) .
22
Certificate of Electrical Safety (CES)
Electrical Work Request (EWR)
Step 3. Provide access to an Electrical Inspector
Once the installation is complete, an Electrical Inspector will need to check
the system is installed correctly and sign the Certificate of Electrical Safety.
Step 4. Check that your installer has sent all the appropriate forms to
your current retailer
Once your system has been installed and inspected your installer should
send both the Certificate of Electrical Safety and the Electrical Work Request
to your retailer (eg. TRU Energy, Red, Energy, AGL) by email or post.
This will trigger your retailer to request SP-AusNet to come and connect your
solar power system to the grid.
It is important to chose an installer with a strong customer service policy
with regard to document completion, submission and follow up. This may
save time and ensure that the entire connection process flows smoothly.
23
Step 5. Check that your retailer has forwarded your Electrical Work
Request Form to SP-AusNet
To have your solar system connected to your property’s grid electricity supply
you will need to have a bi-directional or “smart” meter fitted to your house. If
you do not already have one, your current retailer will order the installation of a
bi-directional meter from SP-AusNet for your residence or business.
The cost of this will be charged to your electricity account by your retailer.
Check that your retailer has forwarded the Electrical Work Request form to SP
-AusNet to ensure the connection request will be processed as soon as
possible.
Installation of a Bi-Directional Meter
The lead-time for getting a bi-directional
meter installed can often be 8 weeks or
longer. An installer with a good customer
service policy should act as your
advocate during this time to ensure a
meter is installed in a timely manner.
The installer can:
•
confirm your retailer has received
the correct documentation,
•
and that a valid electricity account
exists.
Once your bi-directional meter is installed,
your system will be tested and switched
on. The easiest way to tell whether your
meter has been installed is to check your
inverter as it will register any electricity
being produced by your solar PV system.
24
Bi-directional or “Smart” meter Panel
Operation of your System
Your installer should supply you with a user manual and warranty
documentation. They should also instruct you on how to operate your system
to maximise returns and offer trouble shooting and maintenance tips.
Network distributors also advise owners of embedded generating systems,
such as solar electricity, to check and maintain systems regularly. SP-AusNet
recommends that a basic “anti-island” safety check be conducted annually.
Contact your PV installer or SP-AusNet if you have any questions.
Step 6. Choosing an energy retailer
Shop around to determine which retailer offers the best solar rates to suit your
expected pattern of use.
Have a clear understanding of:
•
What tariffs are available for those connected to solar and how they
operate? For example, peak, off peak, fixed, time of use (TOU)?
•
What are the service fees or supply charges (per month or per day)?
•
Are there any discounts available or fees to be paid when entering or
exiting a contract?
•
What “feed-in” tariff is paid for surplus solar electricity exported into the
grid?
•
How will any surplus electricity exported to the grid be applied to my
bill? Can it be claimed as credit or cash?
Refer to the Victorian Government’s “Your Choice”
website www.yourchoice.vic.gov.au to help
compare the various retail offers available.
As with all websites, this information should only be
used as a guide. Contact retailers to verify rates, and
terms and conditions before making any decision.
25
IMPORTANT TIP: The process of changing retailers can take a long time.
If you are thinking about CHANGING RETAILERS to take advantage of a
particular offer, it is wise to:
•
wait until after your system is connected to the grid by SP-AusNet,
OR
•
change well before you install your solar PV system
The connection of your system to the grid requires a flow of paper work
between your retailer and SP-AusNet. Introducing another retailer can
confuse the process and cause considerable delays.
Feed-in Tariffs
Additional electricity that is not consumed by the property at the time of
generation can be fed back to the grid where it may be eligible for a “feed–in”
tariff. These tariffs can offer a financial return for surplus renewable energy.
Feed-in tariff delivery and pricing should be fully understood in order to
maximise return on your investment.
A variety of “feed-in” tariffs have been available over time. The structure of
these tariffs often influences the way people choose to size their system and
consume energy at the home .
In general, if a feed–in tariff:
•
EXCEEDS the price you are paying for electricity it is an advantage to
export as much solar power as possible to the grid,
Alternatively, if the feed-in tariff is,
•
LESS than the price of the electricity you purchase from the grid, it is
wise to consume your solar electricity at home as it is being generated
rather than paying the higher import rate from the grid.
26
Existing solar customers subscribed to the “Transitional” Feed-in Tariff (closed
to new applicants on 31 December 2012) and the “Premium” Feed-in Tariff
(closed to new applicants on 29 December 2011) are reminded that any
additional panels added to their systems after the relevant scheme closure
dates will forfeit eligibility to the respective scheme. Additionally, if you are
considering a change of retailer, before swapping, clarify if the new retailer will
offer the same feed-in tariff or will a new rate apply.
How do I claim credits from my excess energy?
It is important to understand how any surplus renewable
electricity exported to the grid will affect your account.
Different retailers have their own specific terms and
conditions for feed-in tariffs and methods for crediting you
for excess energy exported to the grid. Some will pay your
credits automatically if you are in credit at the end of the
year, while others will only pay you credits if you request them to do so.
Some retailers will extinguish unclaimed or unused credits if you do not use
them on your power bills, or redeem credits within a given time frame. Others
only allow credits to go towards your electricity usage and will not transfer to
cash.
For further information on feed in-tariffs visit:
www.indigoshire.vic.gov.au/tariff
Once you have a contract with your retailer and a smart meter installed, you
will be generating electricity and offsetting part or all of your usage. You’ll also
be part of a growing group of households and businesses who are generating
renewable energy - Welcome to Energy Independence!
Step 7. Add your solar system to your home insurance policy
Ensure you call your insurer to have your new PV system included on your
homes insurance policy.
27
Solar North East Project Summary
The Victorian Sustainability Accord-funded “Solar North East” project ran for
18 months between 2010 and 2012. During its operation the project
employed a full-time project manager, solar ambassadors at each of the
seven participating councils, and a number of local contractors. The key
objectives of Solar North East were to raise community awareness about
renewable energy and demystify the technical and legislative aspects of
installing solar panels.
Indigo Shire residents embraced the Solar North East project with enormous
enthusiasm. This was evident with 133 of the total 345 rooftop systems
installed across the seven councils occurring within Indigo Shire. In total
459.61kW of solar power was installed in Indigo Shire as part of the project
which amounts to 868.7 tonnes of CO2 emissions saved annually .
Four community buildings in Indigo Shire received solar panels funded by a
$50,000 grant from Council as part of the Solar North East project. These
sites included Wahgunyah School of Arts, Chiltern Football Club,
Tangambalanga’s Coulston Park, and Baarmutha Park in Beechworth.
A 4.94 kW solar panel system was installed on the roof of the Kiewa Bowls Club at Coulston Park,
Tangambalanga. The saving from the system will be shared by all of the user groups at the complex.
28
Case Study — Public Hall Wahgunyah School of Arts
System Size: 4.2 kilowatt peak (kW)
Annual Production: approx. 6,439 kilowatt hours (1,533 kWh/kW)
CO2 Emissions saved: 4.5 tons per annum
Panels used: ET Solar ET-M572190
Communication technology: Sunny Webbox mit Bluetooth
Inverter: Sunny Boy 4000TL-20
The Wahgunyah School of Arts
Public Hall had a 4.5 kW
system installed as part of the
Solar North East Community
Hub Program in 2012. It was
jointly funded by the Committee
of Management for the hall and
Indigo Shire Council.
The system was installed and connected during the period when the
Transitional Feed-in Tariff was offered, and being under 5kW in size, it was
considered eligible for the tariff. The Committee of Management receives 25
cents per kilowatt hour for excess electricity fed back into the grid. The annual
cost savings are estimated to be $1,378. On top of this an estimated annual
credit of $551 will be accumulated on their electricity bill from excess energy
exported to the grid. The majority of the Hall’s electricity usage occurs in the
evenings. This allows a large percentage of the solar electricity generated
during the day to be exported to the grid to collect the feed-in tariff.
The average electricity usage at the Hall was found to be
approximately 12.3 kilowatt hours per day. The 4.5 kilowatt
system is expected to produce approximately 18.5 kilowatt
hours per day, or 151% of the Hall’s power consumption.
29
Helpful Resources
Information in this guide is derived from the following sources which can be
visited for more detailed information and advice.
Clean Energy Council’s “Consumer guide to buying household solar panels”:
www.cleanenergycouncil.org.au/cec/resourcecentre/Consumer-Info/
solarPV-guide.html
Compare electricity retailers at the Victorian Government’s “Your Choice”
website:
www.yourchoice.vic.gov.au
Compare your energy usage to other households at “Switch On”:
www.switchon.vic.gov.au
Australian Government 2010 “Your Home: Design for Lifestyle and the future —
Technical Manual”:
www.yourhome.gov.au/technical/index.html
Victorian Government, Department of Environment and Primary Industries
2013, Energy webpage:
www.dpi.vic.gov.au/energy
Alternative Technology Association’s “Solar panel buyers guide”:
www.ata.org.au/wp-content/renew/101_solar_panel_buyers_guide.pdf
Solar electricity and renewable energy is a dynamic field that is constantly
evolving. Review new technologies, relevant government legislation, and best
practice thoroughly before making any decision.
Indigo Shire Council would like to thank Zen Home Energy and Indigo Shire residents who
supplied photos and assisted in the development of this document.
Disclaimer: Indigo Shire Council has attempted to ensure that information in this guide is as accurate
and up-to-date as possible at the time of publication. The authors have no control over the contents of
websites listed which may change over time. While every effort has been made to produce a useful
publication it may not be error free and appropriate for all purposes.
30
Notes
Where to next?
31
Thinking about installing solar electricity?
•
Installing a solar power system is a long term investment.
When choosing your system devote time researching options - it
could pay off in the long run!
•
Determine your daily energy usage.
Consider ways of reducing power use and calculate the impact
solar electricity can have on your typical consumption.
•
Look for a Clean Energy Council accredited installer.
•
Compare quotes from a number of solar PV installers to be
sure you are getting the best value for money, power output,
system longevity and warranties available for your budget.
•
Refer to the Clean Energy Council’s “Consumer Guide to
buying household solar panels” to help with the decision
making process.
•
Check if your electricity meter will need to be upgraded to
receive a feed-in tariff for any excess energy fed to the grid.
•
Shop around for an electricity retailer that offers the feed-in
tariff and electricity rates that best suit your needs.
To keep your installation and the connection process on track,
understand the steps outlined on page 17 of this guide.
Printed on 100% recycled paper
July 2013
32


![Handbuch (deutsch) [PDF ]](http://vs1.manualzilla.com/store/data/006804687_1-349a3aed475e4eaa9b965dce892f30c9-150x150.png)