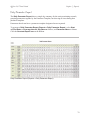
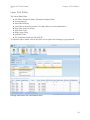
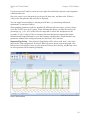
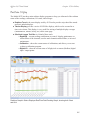
1
AV-Trend Produced by Agilaire LLC 2904-B Tazewell Pike, Suite A Knoxville, TN 37918 www.agilairecorp.com [email protected] Support: 865-927-9440 [email protected] May 2014 Agilaire AV-Trend Manual Table of Contents Chapter 1 Installing AV-Trend ___________________________ 5 Installing Microsoft .NET Framework _____________________ 5 Installing SQL Server _________________________________ 5 Installing the AV-Trend Database ________________________ 6 First-time Installation of the AV-Trend Database __________ 6 Installing AV-Trend ___________________________________ 7 Logging In to AV-Trend ________________________________ 8 Accessing Profiles After Logging In ___________________ 9 Chapter 2 Configuring AV-Trend _________________________ 10 Configuring System Preferences ________________________ 11 Site and Parameter Setup _____________________________ 12 Adding a Site _____________________________________ 13 Adding Parameters ________________________________ 16 Adding Loggers to Sites in Logger Channels _______________ 20 Adding an Instrument ______________________________ 21 Adding Channels to Data Loggers _______________________ 22 Adding Communication Routes _________________________ 26 Adding TCP/IP Routes ______________________________ 26 Adding Serial Routes for Direct Communication __________ 28 Configuring Communication Routes ___________________ 29 Testing Your Connection--Linking to Logger________________ 30 Downloading Channel Configurations ____________________ 31 Setting Up Calibrations _______________________________ 32 Calibration Expected Values Editor ____________________ 33 Configuring Automatic Calibrations ___________________ 34 Configuring Phases ________________________________ 35 Externally Initiated Calibration________________________ 36 Configuring Instrument Controlled Calibrations __________ 38 Configuring Interactive (Menu) Calibrations _____________ 39 2 Agilaire AV-Trend Manual Table of Contents Configuring User-Initiated Calibrations _________________ 40 Configuring Input/Output Lines for Digital Events ___________ 41 Configuring Digital Timed Events _____________________ 41 Configuring Digital Triggered Events___________________ 42 Scheduling Tasks ____________________________________ 45 Task Scheduler ___________________________________ 45 Schedule Task Wizard ______________________________ 53 Favorites Editor _____________________________________ 56 Creating a Favorite ________________________________ 56 Favorite Detail Tab ________________________________ 56 Favorite Query Tab _______________________________ 56 GSI Driver Editor ____________________________________ 58 Configuring Security __________________________________ 59 User Editor _______________________________________ 59 My User Settings __________________________________ 60 Group Permissions ________________________________ 61 Chapter 3 Reports ______________________________________ 62 Criteria Pane _____________________________________ 63 Filters _________________________________________ 64 Additional Fields for Specific Reports __________________ 66 Annotations Report ________________________________ 67 Calibration Results ________________________________ 68 Calibration Trend Graph ____________________________ 69 Configuration Reports: Calibration Configuration Report ___ 72 Channel Configuration Report ________________________ 73 Parameter Configuration Report ______________________ 74 Scheduled Tasks Report ____________________________ 75 Site Configuration Report ___________________________ 76 3 Agilaire AV-Trend Manual Table of Contents Daily Parameter Report _____________________________ 77 Daily Summary Report ______________________________ 78 Internal Reports ___________________________________ 79 Journal Message Log_______________________________ 79 Software Version Report ____________________________ 80 LogBook Report __________________________________ 81 Logger Reports ___________________________________ 82 Alarm Journal ____________________________________ 82 Input Line Status Report ____________________________ 83 Power Failure Report _______________________________ 84 Monthly Report ___________________________________ 85 Favorites __________________________________________ 87 Chapter 4 Data Editors _________________________________ 89 Average Data Editor __________________________________ 89 Linear Data Editor _________________________________ 91 Cell Color Codes _________________________________ 92 Right-Click Options _______________________________ 92 Cross-Tab Data Editor ______________________________ 93 Matrix Data Editor _________________________________ 94 Time Series Graph _________________________________ 95 Scatter Plot Graph _________________________________ 99 Histogram _______________________________________ 100 LogBook Entry Editor _________________________________ 101 Realtime Display ____________________________________ 102 Tabular Display ___________________________________ 103 Realtime Trend ______________________________________ 107 Right Click Data ___________________________________ 111 4 Chapter 1 Installing AV-Trend AV-Trend can be installed on XP Pro / Server 2003 or better (through Windows 7/8 or Server 2008R2). 4GB of RAM is recommended. Before AV-Trend can be installed, the following software must be installed on your computer: SQL Express 2008 with all available service packs, as well as .NET Framework version 3.5 AND 4.0. SQL will request that the Windows Component Internet Information Services (IIS) be added, but IIS is NOT necessary for AV-Trend and does not have to be enabled. Installing Microsoft .NET Framework If you don’t already have the latest version .NET Framework installed on your computer, you can download it from the Microsoft website. Follow the instructions in the installation wizard. Installing SQL Server Before SQL Server can be installed, .NET Framework version 3.5 must be installed. To install SQL Server Express, insert the CD or DVD and follow the instructions in the wizard. In the first screen check the box to accept the license agreement and click Next. The default features are sufficient in the Feature Selection screen, but you can select the program features you want installed. The most important feature to install is Client Tools. Click Next. Agilaire recommends Windows Authentication Mode. The purpose of Authentication Mode is to specify the security used when connecting to SQL Server. If you select Windows Authentication Mode a password is not required. If you select Mixed Mode (a combination of Windows Authentication and SQL Server Authentication) you must enter and confirm a password for the System Administrator (logon user name “sa”). Click Next to continue. 5 Agilaire AV-Trend Manual Chapter 1 Installation The remaining setup screens are self-explanatory. Follow the directions and click Finish in the Completing Microsoft SQL Server Setup screen. Note: If you set up SQL in Windows Authentication mode, you must must log in to SQL with Windows Authentication, not SQL Server Authentication, or the AV-Trend Service won’t start. Installing the AV-Trend Database After you have installed SQL Server: 1. From the Windows Start menu, select All Programs > SQL Server Management Studio. 2. Right-click the Databases folder and select New Database. For the Database name, enter AVData and click OK. 3. Click to select the database you just created (AVData) First-time Installation of the AV-Trend Database 1. If you are installing AV-Trend for the first time, insert the installation CD and browse to open the folder AV Database_Freshinstall (double-click to open My Computer, then right-click the CD drive and select Open). Within the folder Database_Freshinstall double-click AVReleaseCreator.sql. The script should open in the AVData folder in SQL. 2. Click ! Execute to run the query. The query will install the SQL tables needed to run AV-Trend. The bottom of the query screen will display the results of the query. Any error messages will be listed by line number. Be sure to save any error messages in case you need to call Agilaire Support for help. 6 Agilaire AV-Trend Manual Chapter 1 Installation Installing AV-Trend Note: If you are upgrading AV-Trend from version 2.1 or higher, you no longer need to uninstall the old version before you run the new installation. 1. If the AV-Trend installation does not open automatically after you insert the installation CD, double-click to open My Computer, then right-click the CD drive and select Open. Double-click the Setup icon to begin. 2. Accept the license agreement and click Next. 3. Enter your User Name, Company Name (optional), and the unique Product ID (required) supplied by Agilaire. Click Next. 4. Click Next to accept the default destination directory (C:\Program Files\Agilaire LLC\ Server) or browse to change the directory and then click Next. 5. The final screen will say AV-Trend has been successfully installed. Click Finish. 7 Agilaire AV-Trend Manual Chapter 1 Installation Logging In to AV-Trend The AV-Trend Installer automatically creates a login profile for “local host.” If that profile doesn’t work,e click the square button to open the Profiles screen. In the Profiles screen, click the Add Profile button and enter the name of your executive (computer where the AirVision server is installed) for the Profile Name. (If you don’t know the computer name, right-click the My Computer icon from the Windows Start menu on the computer where the AirVision server is installed. Select Properties and open the Computer Name tab.) AV-Trend Login Enter admin as the Username, click Set Password and enter Agilaire. Click the Test Connection button to see if AV-Trend is communicating with the database. AV-Trend Profiles 8 Agilaire AV-Trend Manual Chapter 1 Installation Accessing Profiles After Logging In After you are logged into AirVision, you can access the Profiles screen by clicking the AirVision icon in the upper left corner of the screen (beside the Save icon). From this Profiles screen you can: Save Capture the AirVision screen Print Close the Profiles screen. You can also open AirVision Options, which brings up the same Profiles screen you saw when you logged in. You can close AirVision altogether by selecting the Exit button. AV-Trend Profiles seen by clicking the AirVison icon in the upper left corner of the AirVision screen after you have logged in 9 Chapter 2 Configuring AV-Trend AV-Trend provides nearly unlimited flexibility in setting up systems and configuring servers. This chapter explains how to set up the following parts of AV-Trend: Configuring System Preferences ConfigurationEditors>ParameterSettings Configuring Server Preferences ConfigurationEditors>PCConfiguration Setting up Sites and Parameters ConfigurationEditors>ParameterSettings Parameter Templates ConfigurationEditors>ParameterTemplate Editor Adding Loggers to Sites ConfigurationEditors>PCConfiguration Adding Configuring Channels to Data Loggers ConfigurationEditors>LoggerChannels Adding Communication Routes ConfigurationEditors>PCConfiguration Associating a Logger to a Logger Driver ConfigurationEditors>PCConfiguration Testing Your Connection Utilities>LinktoLogger Downloading Channel Configurations Utilities>LoggerDownload Setting up Calibrations ConfigurationEditors>LoggerChannels Scheduling Tasks ConfigurationEditors>TaskScheduler Adding Users ConfigurationEditors>Security>UserEditor Adding Favorites ConfigurationEditors>FavoritesEditor For information about starting the AV-Trend Service and logging in to AV-Trend, see “Chapter 1 Installation.” 10 Agilaire AV-Trend Manual Chapter 2 Configuration Configuring System Preferences To set up system preferences, open Parameter Settings from Configuration Editors and double-click the System icon. The System is the agency or area, such as Knox County or State of Tennessee. Typically, each agency setup will only have one System (a second system could be used to help separate, for example, air toxics or water quality data from the other quality data), but it is possible to set up more than one by clicking the Add System button on the ribbon. Verify that the Time Zone is correct. The other fields (listed below) are optional, and typically used only if your license includes full Ambient reporting: System Name County Code Agency Code (provided by EPA) Click the Save button. System Configuration from Parameter Settings Editor 11 Agilaire AV-Trend Manual Chapter 2 Configuration Site and Parameter Setup The Parameter Settings Editor from the Configuration Editors menu allows administrators to add, edit, and delete sites and parameters. In AV-Trend, a Site is not necessarily a single data logger as it was in E-DAS. A Site is a logical organization of a physical monitoring area and can contain data from several sources, such as data loggers, PM samplers, and directly polled analyzers. Site Configuration from Parameter Settings in Configuration Editors 12 Agilaire AV-Trend Manual Chapter 2 Configuration Adding a Site To add a site, single-click Configuration Editors/Parameter Settings. In the Parameter Settings screen, highlight your System in the tree diagram and click the Add Site button. Required fields are Name and Time Zone. Enter the name of your Site and select a Time Zone from the drop-down list. Select the Enabled box and click the Save icon. To edit a site, double-click the Site name in the Parameter Settings tree diagram, make changes, and click the Save icon. 13 Agilaire AV-Trend Manual Chapter 2 Configuration The Site Editor contains the following fields for information about the site: Name (Required) Alphanumeric characters to refer to the site, e.g., NKnox Description Brief description of the site, e.g., North Knoxville (optional) Abbreviation This field is used for special formats only. (File Import is not available in AV-Trend.) Time Zone (Required) Select from drop-down list. Enabled (Required for polling) Check the box to enable the site. If this box is not selected the site will not be polled or appear in report/editor selections. Latitude To comply with EPA standards, enter latitude in decimal format. For example, 75 degrees, 15 minutes, and 0 seconds would be entered as 75.250000. Enter up to 2 places and a minus sign if needed to the left of the decimal and up to 6 places to the right of the decimal. Longitude To comply with EPA standards, enter longitude in decimal format. For example, 75 degrees, 15 minutes, and 0 seconds would be entered as 75.250000. Enter up to 2 places and a minus sign if needed to the left of the decimal and up to 6 places to the right of the decimal EPA Site Two-character site code provided by EPA AIRNow Mnemonic Optional reference for internal use only--not used by EPA Surrogate Slope Used to calculate a projected (forward rolling) eight-hour average for ozone if needed, computed with the slope/intercept formula required by EPA Surrogate Offset Used to calculate a projected (forward rolling) eight hour average for ozone if needed, computed with the slope/intercept formula required by EPA 14 Agilaire AV-Trend Manual Chapter 2 Configuration File Import Code Single character used for file import templates in special cases only. (File Import is not available in AV-Trend.) EPA County or Tribal Code County or Tribal code provided by EPA Address Physical address of the Site Additional Information You can add notes at the bottom of the Site Editor by clicking on the asterisk at the bottom of the screen. Enter a Name, for example “Distance to tree line,” and a Value, for example “70 feet.” When you have completed your entry press the Enter key on your computer keyboard. Your entry will be moved to the next row in the Additional Information section. 15 Agilaire AV-Trend Manual Chapter 2 Configuration Adding Parameters To add a parameter configuration, highlight a Site from the Parameter Settings tree diagram and click the Add Parameter button near the top of the AV-Trend screen. To edit a parameter select a Site and then double-click a Parameter. Parameter Configuration from Parameter Settings in Configuration Editors 16 Agilaire AV-Trend Manual Chapter 2 Configuration The Parameter screen displays the following fields. Some of the EPA Code fields are used only if your license supports full Ambient Reporting. Site The Site you selected in the Parameter Settings tree diagram will automatically be displayed. Parameter Alphanumeric characters to identify the Parameter Parent Parameter A Parent Parameter can be designated to form relationships that can be used for drill-down in the Data Editor. For example, a primary analyzer pollutant such as NOx could be a parent and designated diagnostic parameters such as sample flow or box temperature could be children. Another example would be to assign particulate parameters as parents and metals for XRF (X-ray fluorescence) analysis as children. If the parameter has a parent parameter, select it from the drop-down list. Parameter Template Parameter information can be filled in automatically by selecting a Parameter Template, which will set up EPA codes and units. Basic Parameter Templates are provided in AV-Trend. If you want to automatically fill in parameter information using a template, select a parameter template from the drop-down list and click Apply. If you have converted your data from E-DAS and the information is already filled in, you can still select a template but if you click Apply or it will be overwritten. Enabled Check the box to enable the parameter. Enable AIRNow Reporting Not used in AV-Trend Filter from Web Site Check the box to filter data from website Parameter Data Type Select a data type: Average (Continuous), Composite Sample, or Particulate Sample (for manually entered, non-continuous data). Description Enter a brief description of the parameter (optional). EPA POC Enter an EPA Parameter Occurrence Code if needed. POC is used for different monitors measuring the same parameter at one site. EPA Method EPA sampling Method Code 17 Agilaire AV-Trend Manual Chapter 2 Configuration EPA Units Select EPA Units (including the EPA unit code) from the drop-down list (e.g., 007-parts per million, 015-degrees Fahrenheit). EPA Parameter Select a parameter (including EPA parameter codes) from the drop-down list (e.g., 44201 - Ozone). Reported Digits Total number of digits, including decimal places, that will be reported to the EPA. Precision Number of decimal places for reporting precision.X’s and Y’s to the right of the reporting precision field illustrate the format of the digits/precision, e.g., XX.YY indicates a total of four Reported Digits with a Reporting Precision of two. Truncate/Round Rule Determines whether data in reports will be rounded or truncated Reported Units Units that will be used for reports e.g., PPM Analyzer Units If the analyzer units are different from the primary parameter, select analyzer units from the drop-down list. Graph Minimum Lower y-axis limit for graph display Graph Maximum Upper y-axis limit to for graph display Calibration Span This field is determined by the instrument. Enter the configured calibration span value for the parameter to determine the parameter’s calibration error (at the data logger). Instrument (DL) Detection Limit Limit of Quantization (LOQ) Minimum concentration of an analyte that can be measured by an instrument. The DL is an estimate of concentrations at where you can be fairly certain that the compound is present. Concentrations below this limit may not be detected. Used for air toxics measurements only (can be blank if not needed). A minimum criterion or region for quantization that should be clearly above the detection limit. The lowest concentration of an analyte in a sample that can be determined (quantitated) with acceptable precision and accuracy under the stated operational conditions of the method. Traditionally, this is approximated as 10 times the signal-to-noise (S/N) ratio. 18 Agilaire AV-Trend Manual Chapter 2 Configuration Minimum Detectable Limit (MDL) EPA defines the MDL as the minimum concentration of a substance that can be measured and reported with a 99% chance that the analyte concentration is greater than zero. Practical Quantization Limit (PQL) The lowest concentration of an analyte that can be reliably measured within specified limits of precision and accuracy during routine laboratory operating conditions. Parameter Report Order Parameters in reports are printed in the same order that they are shown under each site. Select Parameter Report Order to change the order parameters appear in reports. Report Order only applies to Daily Summary and Monthly Reports. Totalize in Reports If this option is selected, Monthly Reports will show a total of data rather than an average. Totalize in Reports is most commonly used for rainfall. Minimum in Reports If this option is selected, Monthly Reports will show a minimum of data rather than a Maximum. Minimum in Reports is most commonly used for temperature. Additional Information You can add notes at the bottom of the Parameter Editor by clicking on the asterisk at the bottom of the screen. Enter a Name, for example “Data Last Certified,” and a Value, for example “9/1/2008.” To add another row when you have completed your entry, press the Tab key on your computer keyboard. A blank row will be displayed. 19 Agilaire AV-Trend Manual Chapter 2 Configuration Adding Loggers to Sites in Logger Channels The next step, after configuring sites and parameters, is to add Loggers to sites. Note: Data loggers must be added to sites BEFORE channels are configured. Channels are added to loggers after the loggers are set up. Still in the Configuration Editor, single-click Logger Channels, highlight a Site, click the Add button and select Logger. enter a Source Name, e.g., 01Logger, enter the Logger ID e.g., 01 (This field is required), select a Logger Type from the drop down list, e.g., 8832, and click Enabled. optionally, you can enter a Description and select Debounce Digital Inputs. Click the Save button. Logger Configuration from Logger Channels in Configuration Editors 20 Agilaire AV-Trend Manual Chapter 2 Configuration Adding an Instrument If AV-Trend is licensed to poll and instrument directly (without using a data logger), select Configuration Editors/Logger Channels and highlight the site name in the Logger Channels configuration tree diagram. Click the Add button and select Instrument. The Instrument Type (ID) field is required and can be selected from the drop-down list. Enter a Source Name, an Instrument Identifier and Instrument Password, and click the Enabled box. Click the Save icon. Instrument Configuration from Logger Channels in Configuration Editors 21 Agilaire AV-Trend Manual Chapter 2 Configuration Adding Channels to Data Loggers Still in the Configuration Editor, Logger Channels, select a Logger that has already been added to a Site (see “Adding Loggers to Sites”) click the Add button. select Add Channels, select a Channel Type, e.g., Standard Averaging, GSI, VWS, etc. select a Channel Number (a channel number will automatically be added in order but it can be changed) select a Parameter. When you select a parameter, the Channel Name will automatically be changed to match the Parameter name. For the remainder of the prompts on the form, consult the ESC Model 8816/8832 User Manual. select an Average Interval and Storage for the Base Average, Extended Average 1, and Extended Average 2. Click the Save button Follow the same procedure to add calibrations, average alarms, and digital event triggers. Adding channels to loggers in the Data Source Configuration from Configuration Editors 22 Agilaire AV-Trend Manual Chapter 2 Configuration Two channel types are handled differently in AV-Trend than in previous systems; both improve on digital data acquisition integration. The first channel type, the GSI (Generic Serial Interface) channel, is used for RS-232 based instruments. AV-Trend includes GSI drivers for a wide variety of instruments. Choose the instrument, the parameter, and designate which serial port is connected. Using a dongle can be designated if the instrument connection requires a hardware dongle (e.g., C-Series Analyzers in a daisy-chain configuration, or Ecotech analyzers). GSI channel configuration 23 Agilaire AV-Trend Manual Chapter 2 Configuration The second channel type (a better approach for digital data acquisition) is the Modbus channel. Designate an Instrument that has been previously configured in the Logger Channels editor, and select a Parameter. Modbus channel configuration Like the GSI channel, AV-Trend simplifies the configuration process by automatically creating and downloading the data logger’s server configuration file in the background. Since Modbus instruments have additional networking information that needs to be known, you must create an instance of the Modbus instrument in the Logger Channels editor before creating the Modbus channels for that instrument (This procedure prevents the need to repeat entry of the networking information for each channel). 24 Agilaire AV-Trend Manual Chapter 2 Configuration To create the instrument, go to the Logger Channels editor, select the data logger in the tree diagram, and select Add > Logger Modbus Instrument. Modbus Instrument Details in Logger Channels Enter the following fields: Instrument Name--a user-defined label for the instrument Driver Type--select from picklist of known analyzers Modbus Code--also known as the Modbus Device ID, this ID is set in the analyzer, and is some value from 1-255 Modbus Command Type--defines which Modbus command is used to read data from the analyzer (3 for TECO, 4 for API, consult instrument documentation for other brands) Poll Interval- how often data should be requested from the instrument, in tenth of a second increments. Generally, a rate of 20-30 seconds is recommended. TCP Address--IP address of the instrument, as viewed from the logger’s perspective TCP Port--Port used by the instrument for Modbus requests, usually “502”. Timeout (MS)--Designates the time the logger will wait on an instrument for a Modbus response. Typical values are 250-750 MS Misc tab in Add Modbus 25 Once the instrument is configured and saved, you can then select Add> Add Channel > Modbus in the Logger Channels editor. Under the Misc tab, select the Modbus Instrument and Driver from the picklists. If you need a parameter that is not in the picklist, contact Agilaire Support ([email protected]) and we will add it to your system. Modbus channels in the 8872 will use the Modbus Scaling Factor to convert floating point data from the instrument before using it in averages, calibrations, etc. This can be used to convert an analyzer that only provides PPB data on the Modbus link to PPM data, or similar conversions. This approach is preferred over Analyzer Units in the logger, since the Analyzer Units conversion only takes place on averages and calibration data, but causes inconsistency with other logger configuration settings (alarm limits, calibration expected values, etc). 26 Agilaire AV-Trend Manual Chapter 2 Configuration Adding Communication Routes The next step is to identify to the AV-Trend Server how to communicate with each logger by Communication Routes. Typically, for AV-Trend Systems, this would be a TCP/IP or a direct Serial Connection. After you configure the Source (data logger or instrument): Go to Configuration Editors>Logger Channels and double-click the Logger icon Click the Communication tab to configure a Communication Route for each logger. If your logger doesn't appear in the drop-down list, click the Device Route button in the bottom of the screen of the Communication tab to select one of the communication routes described below: Normally, AV-Trend uses only TCP or Serial Routes. Adding TCP/IP Routes TCP/IP connections are easier and faster than modems. For sites with a TCP/IP connection, in the TCP Connection Details section of the screen Click the Device Route button in the Communication tab and select TCP Enter a Route Name, e.g., Agilaire, Enter a Network Address, e.g., 172.16.1 The defaults are set for 8832 defaults, but can be changed based on your network/route definitions: Polling Port at 9881 Emulation Port at 9887. In the Advanced section of the screen Select Read Timeout from the drop-down list, if directed by Agilaire Support Select Write Timeout from the drop-down list, if directed by Agilaire Support Select Disconnect After from the drop-down list, if directed by Agilaire Support. Select Inter-byte Delay (ms) to slow the inter-character transmission speed. Click the Save button. Note: 27 Agilaire AV-Trend Manual Chapter 2 Configuration Adding a TCP Route in Configuration Editors > Logger Channels 28 Agilaire AV-Trend Manual Chapter 2 Configuration Adding Serial Routes for Direct Communication After you configure the Source (data logger or instrument): Go to Configuration Editors>Logger Channels and double-click the Logger icon Click the Communication tab to configure a Communication Route for each logger. Click the Create New Route button in the Communication tab to select Serial route. In the Serial Connection Details section of the screen Enter a Route Name, e.g., Agilaire, Enter a Comm Port Select a Baud Rate. from the drop-down list. The default is 9600. Select Data Bits from the drop-down list. The default is 8 Select Stop Bits from the drop-down list. The default is 1 Select Parity from the drop-down list. The default is None In the Advanced section of the screen Select Read Timeout from the drop-down lis, if directed by Agilaire Support Select Write Timeout from the drop-down list, if directed by Agilaire Support Select Disconnect After from the drop-down list, if directed by Agilaire Support. Inter-byte Delay (ms) can be used to slow the inter character transmission speed. Click the Save button. Note: Communication Routes can also be added in Configuration Editors > PC Configuration by highlighting the Server icon and clicking one of the Add buttons. Adding a Serial Route in Configuration Editors > Logger Channels 29 Agilaire AV-Trend Manual Chapter 2 Configuration Configuring Communication Routes Important: Communication routes must be added AFTER TCP or Serial Routes are configured in Configuration Editors>PC Configuration. To add a Communication Route, open Configuration Editors/Logger Channels, double-click the Source (data logger or instrument) in the tree diagram, and click the Communication tab. Highlight the first empty row Click the arrow in the first column to select a Route. If no routes are in the drop-down list, click the Add Device Route button and the logger should be in the drop-down list. Assign a Priority number Select Polling and/or Emulation if applicable Optionally, enter an Initialization Command and and a Final Command Click the Save button. Associating Data Logger with TCP/IP connection to Driver in Configuration Editors > Logger Channels > Communication tab 30 Agilaire AV-Trend Manual Chapter 2 Configuration Testing Your Connection--Linking to Logger To test your connection, select Link to Logger from the Utilities menu. Select a logger from the drop-down list and click Connect. Linking to the logger means that you connection is good but does not ensure that you will be able to download or poll. Important:: Some configuration changes require you to restart the the AV-Trend System. If a System Restart is necessary, you will be prompted by AV-Trend when you click Save. If you click Yes at the prompt, AV-Trend will restart the system automatically. If a required system restart is not done, you will not be able to link to logger.. (Two system restarts may be necessary to synchronize the network for IP-based connections.) Note: If you need to restart the system manually, open the Utilities menu and select System Restart. Select an Executive in the System Restart screen, then click the Restart Executive Service icon in the upper left corner. Testing your connection from Utilities > Link to Logger 31 Agilaire AV-Trend Manual Chapter 2 Configuration Downloading Channel Configurations To download channel configurations: open Utilities > Logger Download. Configuring channels was explained in the section “Adding Channels to Data Loggers.” select the Site/Source Name and Channels for the Download Type click Download. The Log Viewer will display details of the download in the bottom section of the screen. Note: The Log Viewer can also be accessed directly from the Utilities menu. Note: Multiple loggers can be downloaded at the same time without a cold start. Channel Download in Utilities > Channel Download 32 Agilaire AV-Trend Manual Chapter 2 Configuration Setting Up Calibrations To configure calibrations: open Configuration Editors > Logger Channels highlight the Logger in the tree diagram click the small arrow under the Add button select Calibrations from the drop-down list select one of the following calibration types: Automatic Externally Initiated Instrument Controlled Interactive (Menu) User Initiated For details about the remaining prompts, Consult the ESC Model 8816/8832 Data Logger Manual. Note: Configuration information must be downloaded to the data logger before a new sequence can be initiated. Adding calibrations in Configuration Editors > Logger Channels 33 Agilaire AV-Trend Manual Chapter 2 Configuration Calibration Expected Values Editor This mimics the “Quick Expected Values” editor in the Model 8832 data logger that allows the user to quickly update target values for the calibration without sorting through the Calibration configuration editor. The system shows all configured calibrations as expandable/collapsible boxes. Once opened, columns headers can be clicked to sort by phase name, expected value, etc. for easier data entry. When values are saved, a pop-up window will prompt you to download changes to the data logger (8816 and 8832 only). Clicking OK will take you to the Logger Download form, where you can select the checkbox to only download the expected values. 34 Agilaire AV-Trend Manual Chapter 2 Configuration Configuring Automatic Calibrations If you configure Automatic Calibrations, the cal you enable will be automatically initiated by the data logger’s internal clock. The Automatic Cal Sequence configuration screen has the following fields : Type will be already filled in (Automatic_A). Name is required to identify the cal program. Check Enabled if the calibration is to run. Number of Calibration Records determines how many cals the data logger will store Calibration Calibration before overwriting. Recovery Time specifies the time required to purge cal gas after phases. Repeated Interval determines how often cal sequence will repeat. Start Time determines what time cal sequence will start. Affected Channels determines which channels will be taken off-line during cal. Select from a list of previously configured parameters. Automatic Calibration configuration in Configuration Editors > Logger Channels 35 Agilaire AV-Trend Manual Chapter 2 Configuration Configuring Phases To set up Phases: click the Phase(s) tab behind the Sequence Cal tab. To enter a phase name, click the click the Add (above the tabs) and select Phase from the drop-down list. Enter a Phase Name, Phase Number, Duration Type, Response Time, and click to check the box in the Enabled column. To configure a Status Pattern, click in the Status Pattern column and a check list of Output Control Patterns will come up. After the Phase table is configured, click Add again and select Phase Channels. Select a Channel from a drop-down list, and optionally enter an Expected Value, Expected Value from Constant, Warning Drift Limit, EV for Auto Correct (click to enable), Store Cal Results (click to enable), Write Result to Constant, Error Method, Write Expected Value to Constant, and Out of Control Limit. Configuring calibration phases in Configuration Editors > Logger Channels 36 Agilaire AV-Trend Manual Chapter 2 Configuration Externally Initiated Calibration Externally initiated calibration is identical to an automatic calibration except for the way it is initiated. The sequence is started when a specified pattern of input control lines is met. To configure the Start Pattern (Line Status Pattern), click the Start Pattern button. Individual phases are then initiated sequentially. As with an automatic calibration, the duration of each phase in the sequence can be specified. Configuring Externally Initiated Calibrations in Configuration Editors > Logger Channels 37 Agilaire AV-Trend Manual Chapter 2 Configuration When you click the Start Pattern button in the Externally Initiation Calibration screen, you will see a Line Status Pattern screen. Check the Select box to select an Input Line and select a Status of On or Off. The Externally Initiated Cal will begin when the Start Pattern is met. Configuring Start Pattern (Line Status Pattern) in Externally Initiated Calibrations in Configuration Editors > Logger Channels 38 Agilaire AV-Trend Manual Chapter 2 Configuration Configuring Instrument Controlled Calibrations If you configure Instrument Controlled Calibrations, enabled calibrations will be initiated by the data logger when it detects a specified digital input pattern. Each phase will continue until the input line pattern changes. The Instrument Controlled Cal screen has the following fields: Type will be already filled in (InstrumentControlled_I). Name is required to identify the cal program. Check Enabled if the calibration is to run. Number of Calibration Records determines how many cals the data logger will store Calibration Calibration before overwriting. Recovery Time specifies the time required to purge cal gas after phases Affected Channels determines which channels will be taken off-line during cal. Select from a list of previously configured parameters. Configuring Instrument Controlled Calibrations from Configuration Editors > Logger Channels 39 Agilaire AV-Trend Manual Chapter 2 Configuration Configuring Interactive (Menu) Calibrations If you configure Interactive Calibrations, enabled cals will be controlled by a user via a menu interface. Interactive cals are often used for highly manual procedures, such as testing opacity instruments against standard filter. Interactive Cal configuration screen has the following fields : Type will be already filled in (Interactive_M) Name is required to identify the cal program. Check Enabled if the calibration is to run Number of Calibration Records determines how many cals the data logger will store Calibration Calibration before overwriting. Recovery Time specifies the time required to purge cal gas after phases Affected Channels determines which channels will be taken off-line during cal. Select from a list of previously configured parameters. Configuring Interactive (Menu) Calibrations 40 Agilaire AV-Trend Manual Chapter 2 Configuration Configuring User-Initiated Calibrations Suer-initiated calibrations are started manually by linking to the data logger. When the cal sequence is started, each phase will be initiated in order. The duration of each phase is configured with the same fields as automatic cals. The User-Initiated Cal configuration screen has the following fields : Type will be already filled in (UserInitiated_U). Calibration Name is required to identify the cal program. Check Enabled if the calibration is to run. Number of Calibration Records determines how many cals the data logger will store Calibration before overwriting. Recovery Time specifies the time required to purge cal gas after phases. Affected Channels determines which channels will be taken off-line during cal. Select from a list of previously configured parameters. Configuring User-Initiated Calibrations 41 Agilaire AV-Trend Manual Chapter 2 Configuration Configuring Input/Output Lines for Digital Events The purpose of digital event programs is to control processes from 8816 or 8832 Data Loggers. Digitally Timed Events will turn on specified Output Lines for the configured Starting Time, Duration, and Repeat Interval. Digitally Triggered Events are initiated by a digital input pattern that will turn on one or more digital output lines. The output lines will remain active for the specified duration; at the end of this time, the output lines will be turned off unless the triggering digital input pattern still matches. Configuring Digital Timed Events 1. Highlight the Data Logger in Configuration Editors > Logger Channels tree menu. 2. Click the green Add button in the ribbon and select Add Digital Events > Timed Event. 3. Enter a Digital Event Program Name, a Starting Time, Output Durations, Repeat Interval, and check Enabled. 4. If the Digitally Timed Even is for a calibration, select a Calibration Name from the drop-down list. 5. Click the Output Lines button to bring up the Line Status Pattern screen and select a Line Number. Click OK. Configuring Digitally Timed Events 42 Agilaire AV-Trend Manual Chapter 2 Configuration Line Status Pattern for Output Lines Configuring Digital Triggered Events 1. Highlight the Data Logger in Configuration Editors > Logger Channels tree menu. 2. Click the green Add button in the ribbon and select Add Digital Events > Triggered Event. 3. Enter a Triggered Digital Event Program Name, an Output Duration and check Enabled. After the output duration time period, the program will check the digital input pattern to see if it still matches. If not, the output control lines will be switched off. If the pattern still matches, the output relays will remain on, and the duration time will begin again. 4. If the Digitally Triggered Event is for a calibration, select a Calibration Name from the drop-down list. 5. Click the Output Lines button to bring up the output Line Status Pattern screen and select which Output Line or Lines will be switched on when the triggered digital input pattern occurs. Click OK.. 43 Agilaire AV-Trend Manual Chapter 2 Configuration 6. Click the Trigger Digital Event Pattern button to bring up the Line Status Pattern screen for Trigger Digital Input Pattern and select which Input Line.or Lines turned On or Off will trigger the event and switch on the specified Output Line(s).. 7. In the lower left corner of the screen, select And or Or. If you select And (the default), the digital event program will be triggered only if ALL the specified conditions occur. If you select Or, the digital event program will be triggered if ANY of the specified conditions occur. Click OK. Trigger Digital Input Line Status Pattern with OR/AND selection 44 Agilaire AV-Trend Manual Chapter 2 Configuration Note: AV-Trend (version 2.1 and up) supports download of logger I/O labels with a different number of inputs and of outputs.. If the number of input and output cards on your data logger are not equal, you may encounter some download errors when downloading the labels. If this happens, define the actual number of physical inputs and outputs using the IO Labels tab. If you are using pseudo inputs/outputs, do NOT accept allowing the system to change the number of labels. Different number of Inputs and Outputs Configuration Editors > Logger Channels > double-click Logger in tree menu > I/O Labels tab 45 Agilaire AV-Trend Manual Chapter 2 Configuration Configuring DI-Triggered GSI Events These events are used to send GSI strings based on the transition of a digital input (or of a pseudo DI-DO pair in the logger). Commonly, these are used to control RS-232 based calibrators or other devices. For this device, a digital input pattern is defined. When the logger sees the digital input transition to match this pattern, the GSI string is sent out the designated serial port (just once). The string is not resent until the logger goes to a non-matching input state, and then back to the matching state. Triggered GSI Event Digital Event details 46 Agilaire AV-Trend Manual Chapter 2 Configuration Scheduling Tasks All automatic actions in AV-Trend are managed by the Task Manager, which runs as part of the background AV-Trend service. The Task Manager has three user interfaces: Scheduler (Configuration Editors > Task Scheduler) allows you to add, review, and edit individual and grouped task events. Task Wizard (Configuration Editors > Task Scheduler >Run Schedule Wizard button in ribbon at top of screen) allows you to create grouped polling events as well as events triggered by polling. Note: This Wizard is ONLY used for setting a Model 8872 to poll another device, like an instrument or another Model 8816 / 8832 data logger. It is not related to another server polling the 8872 itself. Task Display (Utilities > Scheduled Task Status) is a constantly updating display of all tasks within the system, including the last time run, next execution time, and errors experienced during the last run. Task The following tasks can be configured in the Task Scheduler, depending on your licensed options: Alarm Processing Task Average Data Purge Task Average Rollup Task Database Sync Task Fill Average Data Gaps Task Instrument Poll Task Journal Message Purge Task Logger Poll Task Scheduled Command Line Task Scheduled Report Task SQL Execution Task New Task Group Task Scheduler The Task Scheduler screen has three sections: Task Schedule displays all scheduled tasks and cannot be edited. Task Schedule Details section is where you select an Executive, and Start Time, and a Repeat Interval. Enabled must be checked in this section before you can select Enabled in the Scheduled Task Selection section. An Advanced tab is provided next to the repeat interval to allow the user to specify if the task is only to run on certain days of the week, or only in a ‘window’ of certain hours of the day. This is especially useful for polling tasks. 47 Agilaire AV-Trend Manual Chapter 2 Configuration Task Scheduler showing a Logger Poll Task (Configuration Editors > Task Scheduler) The General Tab in the Task Details section is where you enter a Task Name and a Task Description. Task Enabled must be checked in this section before you can select Enabled in the Scheduled Task Selection section. The Advanced Options tab in the Task Details section defines the Number of Retries, the Interval between Retries, and whether to Log Status Messages as Off, Information, Verbose (for a problematic task), or Debug. The Notifications part of the Advanced tab allows configuration of Notification Type (All Exceptions and Errors; All Exceptions, Errors, and Warnings; All Exceptions; First Error and RTN (Return to Normal); or Each Time it Runs) followed by a Description of each Notification Type. 48 Agilaire AV-Trend Manual Chapter 2 Configuration To configure an individual task in the Task Scheduler (Configuration Editors > Task Scheduler), click the Add button in the ribbon at the top of the screen and select one of the following categories: Alarm Processing Task reviews alarm Triggers for matches, creates alerts, and tells AV-Trend when to process a particular alarm rule. If you use task groups and designate tasks to run in sequence, you can designate alarms to processed immediately after a data poll. (Alarm Processing is not used in AV-Trend.) Average Data Purge Task purges or archives old data from the database. Eventually, the AV-Trend database becomes so big that it takes a long time to back it up, so it is helpful to remove and/or save old data, in particular minute data. You can choose any average interval to be scheduled for Purge or Archive. Purged data will be permanently deleted from the database. Archived data is copied to an external file before purging. Archived data is stored with all flags and annotations and can be re-imported later. AV-Trend uses specialized data keys so sites and channels can be renamed or renumbered and archived data can still be correctly imported. Select the age of the data to purge: Purge Data Older Than a specified number of seconds, minutes, hours, days, weeks, or years. We recommend purging 1-minute data older than 1 year to keep the database within allowable size. Note: Average Data can be purged manually via the Utilities menu>Purge Average Data. A checkbox option allows you to retain data during calibrations. If selected, any data flagged with the C flag will not be purged. This allows you to retain minute data from calibrations (e.g., for use in the Calibration Trend Graph’s Response Plot) while still removing old minute data. Purge or archive data in Configuration Editors > Task Scheduler 49 Agilaire AV-Trend Manual Chapter 2 Configuration Average Data Gaps Task prepopulates Average Data Records to make them continuous where data is missing. This task inserts top of the day blank records in the database to improve reporting and data query performance. Filling average data gaps is critical for optimizing the performance of AV-Trend reporting, and should be configured to run every day after midnight in every system.Each system needs only one of these tasks. The screen defaults to a repeat interval of one day and a time to run of 00:00:00 (midnight). Journal Message Purge Task removes Event Log journal messages (internal error logs) that are older than a specified age in seconds, minutes, hours, days, weeks, or years. The purge occurs at a specified Repeat Interval. An option is available to Archive Data Before Purging. Agilaire recommends purging entries older than 2 weeks. Logger Poll Task polls a data logger at a specified Repeat Interval in seconds, minutes, hours, or days. The Task must be named and a data logger must be selected. Select a Logger Command from the following drop-down list: Fill 56 46 IJ LL DD 23 NP BB JK KK EF Average Data Calibration Results Instantaneous Readings Poll Current Time Poll Input Status Lind Poll Current Digital Input Poll Alarm Journal Entries Synchronize Logger Time Poll Long Central Messages Poll Chart Memos Power Failure Log 50 Agilaire AV-Trend Manual Note: Chapter 2 Configuration The logger also can be polled manually via Utilities>Manual Poll. Scheduled Command Line Task allows you to automatically execute any DOS command line, such as a batch file or .exe file (e.g., NTbackup.exe). Scheduled Report Task automatically sends scheduled reports to a designated printer, emails reports to configured recipients, or saves them to a file. Click the green Add button and select Scheduled Report Task In the Task Schedule Details section, select Executive, Start Time, and Repeat Interval. In the Task Details section, enter a Task Name and enter an optional Task Description, and click to select Enabled. In the Report Task Options section, select a Report from the drop-down list. Click the Configure Report Query button to select Date Range, Average Interval, and Parameter(s). The Query String will be displayed near the bottom of the screen. Click OK to save the configuration. In the Output Options section, click the Printing Options tab if the report will be printed. Select Enable Printing and designate the Printer Path. If the report will be emailed, select the Notifications Options tab, check Enable Notifications, and enter a Notification Publication Description. (Users and/or User Groups must be designated in Configuration Editors > Security before Notifications will be sent.) If the report will be saved to a file, open the File Output Options tab and select an Output File Type (comma separated, Excel, image, text, HTML, PDF, or rich text) from the drop-down list. This option can be used to write the scheduled report to a local or network drive, and/or to FTP the file to a particular FTP serve. Enter a File Output Base Name. (Windows does not allow “/” or “:” characters in file names.) The File Extension will be filled in automatically from the Output File Type selected. To have the scheduled task append the current date/time to the file name, select Append Date to Name and a Date Format, for example, Daily_ Sum201106271900. Selecting this option ensures that new files do not overwrite existing files in the directory. If this option not selected, the task will overwrite the file each time the task runs. To Save the file, check Save Report to File Enabled and browse to a File Output Path. To Upload File Via FTP Options, select FTP Upload Enabled and select an FTP Transfer Program from the drop-down list of configured FTP programs. 51 Agilaire AV-Trend Manual Chapter 2 Configuration Schedule Report Task (Configuration Editors > Task Scheduler > Add Scheduled Report Task) 52 Agilaire AV-Trend Manual SQL Execution Task Chapter 2 Configuration To add a SQL Execution Task, click the green Add button on the ribbon and select SQL Execution Task. Select the Executive, Start Time, and Repeat Interval. Name the SQL task or use the default name. Enter the SQL Command Text. Click the Save button. New Task Group Task Groups allow multiple tasks to be grouped together in one polling process instead of multiple individual tasks. A Task Group consists of Sub Tasks. Tasks can be defined to run groups in parallel, sequentially, or as sub tasks of other task groups to allow mixing of parallel and sequential operations. To create a Task Group, click the green Add button on the Ribbon in the Task Scheduler and select New Task Group. In the Task Schedule Details section of the Task Scheduler, select an Executive, Start Time, and Repeat Interval. In the Task Details section of the screen, enter a Task Name. The Task Description will be filled in automatically, but it can be modified. Check Enabled if you want the Task Group to be activated when you save it. In the Group Options section, check the box if you want to Execute the Tasks in Parallel; otherwise, they will be executed sequentially or as sub tasks of other task groups. If the sub tasks are to be run sequentially, leave the Execute the Tasks in Parallel box unselected and enter a number in the Execution Order column in the Sub Tasks section. To create the Task Group, add a Sub Task to the Task Group. Click the green Add Sub Task button in the Task Details section and select a task from the drop-down list. (The Sub Task drop-down list has the same options as the Add task button at the top of the Task Scheduler.) When you select a Sub Task from the list, a new screen will pop up for the Sub Task you selected. Fields in the pop-up screen vary according to which sub task is selected. Advanced Options in the pop up screens (not required) allow configuration of Number of Retries and the Interval between Retries. When you configure the Sub Task and click OK in the pop-up screen the new Task Name will be added in the Sub Tasks section. The Task Name can be modified. 53 Agilaire AV-Trend Manual Chapter 2 Configuration Select the Fail Group on Error column in the Sub Tasks section if you want the whole Task Group to stop running if an error occurs. Task Type in the Sub Tasks section indicates the sub tasks that are part of one group task. Click in the Edit Task field to make changes in the same pop-up window that came up when the Add Sub Task button was clicked. To remove a task from the Task Group select the task in the Sub Task section and click the Delete Selected Sub Task button. Task Group (Configuration Editors > Task Scheduler > Add > New Task Group) 54 Agilaire AV-Trend Manual Chapter 2 Configuration Schedule Task Wizard The Task Wizard can be used to manage dozens of polling tasks running in a single system. To set up task groups: Open the Task Wizard (Configuration Editors > Task Scheduler > Run Schedule Wizard button on ribbon at top of screen) and click Next Select Site and Source (including Source Type Description) and click Next. Selecting Site and Source Name in Task Scheduler Wizard (Configuration Editors > Task Scheduler > Run Schedule Wizard) 55 Agilaire AV-Trend Manual Chapter 2 Configuration Select Poll Types (types of data to poll) from the following checklist Sync time, Averages, Calibrations, Input line changes, Alarm journal, Power failures, Chart memos, Central messages. Click Next. Poll Types in Task Scheduler Wizard (Configuration Editors > Task Scheduler > Run Schedule Wizard) 56 Agilaire AV-Trend Manual Chapter 2 Configuration Select the following configurations from drop-down lists: when the task will start, how often it will be repeated, and which server will execute the task. The next screen will ask you to Confirm Task Creation. Click Next to save new task to database. The last screen will say you have successfully completed the wizard. Click Finish. Task Schedule in Task Scheduler Wizard (Configuration Editors > Task Scheduler > Run Schedule Wizard) 57 Agilaire AV-Trend Manual Chapter 2 Configuration Favorites Editor AV-Trend simplifies regular tasks with a list of userdefined Favorites, which function like Favorites in Internet browsers. Favorites can be created for most menu items, including reports, editors, configurations, journals, calibration functions, security settings, logger functions, emails, and task scheduling. Favorites can be saved for different sites, parameters, average intervals, and date ranges. They can be saved for all users or for one user. Creating a Favorite Favorites menu To create a favorite, open Configuration Editors > Favorites Editors. Click the red Add Favorite button on the left side of the ribbon. Note: Favorites can also be created inside Reports by selecting the Favorites tab and clicking the Save as Favorites icon. Favorite Detail Tab Under the Favorite Detail tab of the Favorites Editor: select a Menu Item from the drop-down list, enter a Favorite Name, enter a Favorite Description (optional), select a Favorite Scope from the dropdown list (User or All Users) and Add a Favorite screen select from the following options: Launch Run on Application Startup to run the Favorite upon logging in to AV-Trend Query on Launch to execute data retrieval when the Favorite is selected. Favorite Query Tab Next, open the Favorite Query tab if it is available. Note: The Favorite Query tab will only be in the Favorites Editor after a Menu Item is selected that requires a time range, interval, and parameter(s), such as the Average Data Report and the Average Data Editor. 58 Agilaire AV-Trend Manual Chapter 2 Configuration Select a Date Range, choose an Average Interval and select a Parameter. To select more than one parameter, drag the arrow in the blue left column or hold down the Ctrl key while you select parameters. To save a favorite when you’re in any data editor or report, complete a query, and select Favorites from the top menu. The ribbon bar will change to show the favorites menu. Select Save as Favorite to bring up the Add a Favorite screen. You can also configure the Favorite by selecting the Favorite Query tab after you select Save as Favorite. From this screen you can adjust the site/parameter list, date range, or average interval. These values can also be adjusted later in the Favorites Editor in the Configuration menu. To return to the ribbon controlling the current application, select the top menu function (above the ribbon), for example, Average Data Editor. To use an existing Favorite, select Favorites from the top menu (above the ribbon bar), select User Favorite or Global Favorites, and the saved Favorite. A copy button on the ribbon allows you to copy an existing favorite for slight modification, if needed. Favorite Query tab from Add a Favorite 59 Agilaire AV-Trend Manual Chapter 2 Configuration GSI Driver Editor The purpose of the GSI Driver Editor (Editors>GSI Driver Editor)is to provide a way to add, delete, or modify GSI driver entries in an editor similar to the Parameter Template editor for GSI entries and GSI instruments. The GSI Driver Editor consists of an alphabetized pick-list of existing GSI entries for modification. Two editors are provided, one for instruments and one for entries, or two sections/ tabs of the forms. Fields in the GSI Driver Entry tab include: GSI Entry Associated GSI Instrument and GSI Entry (pick-list of configured instruments) Send Name (string) Parse Name (string, up to 8 char) AutoSend String (string up to 8 char) Autosend Repeat Interval (1..60 seconds) Parse Sync String Modbus Register Fixed or Delimited Parsing Fixed: Number of Chars to Data (int, up to 3 digits) Data Field Width (int, up to 2 digits) Number of Chars in string (int, up to 3 digits) Delimited: Number of Delimiter Chars (string) Number of Delimiters of Delimiters to Data (int, up to 3 digits) Number of Delimiters In String (int, up to 3 digits) Data Field Type (pick-list- Hex, Binary, Float) In the GSI Driver Instrument tab: GSI Instrument Name Default TCP Port (integer, up to 6 digits) Default Modbus Code (integer, 0-255) Default Modbus Command Type.(3 or 4) Consult the Model 8816/8832 Data Logger Manual for details on the use of these fields. 60 Agilaire AV-Trend Manual Chapter 2 Configuration Configuring Security User security in AV-Trend is set up by administrative personnel and is similar to Microsoft Windows: Each system user has an identity, including a username and password A User may be a member of one or more User Groups Access and rights are assigned to User Groups User Groups in AV-Trend are usually assigned by job responsibility (e.g., Data QA, Site Technicians, System Administrators). A group can optionally have its access limited to only certain monitoring sites. Users can be members of more than one Group, and each site can have a different access group. User Editor Administrators can add or delete users: open Configuration Editors > Security > User Editor and click Add User (or Delete User) button. Enter an Email address (optional). Click Save. User Editor from Configuration Editors > Security > User Editor 61 Agilaire AV-Trend Manual Chapter 2 Configuration My User Settings Non-administrative personnel can change their own Password, Email, and Name, but not their User Name in the My User Info screen in Configuration Editors > Security. If a User Name needs to be changed (for example, if a name is misspelled), an Administrator would have to delete the original User Name and add a new one. My User iNFO screen in Configuration Editors > Security 62 Agilaire AV-Trend Manual Chapter 2 Configuration Group Permissions Finally, define the permissions for each User Group using the Configuration Editors > Security > Group Permissions Editor. Select a Group in the drop-down list. The list of configured users is displayed (and users can be added here as well). The right panel shows the various rights available in the system, and the status for the current group: Grayed = access disabled Black, underlined = access enabled Black, italic = access enabled by inheriting from another granted access. In this example, access has been granted to certain Security permissions (Groups, Users, and User Groups, but not Edit Tasks). Access is granted to all configuration items at the topmost level, and all sub-tasks are permitted by inheritance. For example, to turn off Edit ADVP Rules, first remove the overall Edit Configurations permission and then add the individual permissions. Expand and Collapse the tree diagram using the buttons on the ribbon. To define a group as having site-specific access, uncheck the Apply to All Sites in the lower left panel, and then add sites using the list form below. Group Permissions from Configuration Editors > Security > Group Permissions Editor 63 Chapter 3 Reports After data has been polled, either by a scheduled task (Configuration Editor>Task Scheduler) or manually (Utilities>Manual Poll) AV-Trend can run the following reports after the Criteria Pane has been configured: Annotations Report Calibration Results Calibration Trend Graph Configuration Calibration Configuration Report Channel Configuration Report Parameter Configuration Report Scheduled Tasks Report Site Configuration Report Internal Reports Journal Message Log Software Version Report LogBook Report Logger Reports Alarm Journal Input Line Status Report Power Failure Report Monthly Report 64 Agilaire AV-Trend Manual Chapter 3 Reports Criteria Pane All reports use a Criteria Pane to select a time range and list of pollutants for the report. Report Criteria pane in Reports > Daily Summary Report You can select the Date Range any of the following ways: Manually type in a month, day, year, and time. Click in a date field (the month, date, year, hour, minute) and click the small up or down arrow keys to raise or lower that field (month, day, year, hour, minute). (It isn’t necessary to highlight the field, just put the cursor in it.) Use the bigger down arrow control to bring up a Calendar. You can click the arrows to change the month, or click the name of the month or year to bring up a list. Use the Star button to select from a pre-defined date range: Current Day Yesterday Current Week Last Week Current Month Last Month Current Quarter Last Quarter Current Year Number of days back from current day 65 Agilaire AV-Trend Manual Chapter 3 Reports In addition, the time criteria (e.g., the star icon button) allows you to choose “shift forward one day” or “shift backward one day.” If you select one of these and hit apply, it acts similar to the “Data Forward” or “Data Backward” buttons, except always shifting by 24 hours, rather than the size of the data window. This is useful for reviewing calibration minute data for several days, where the calibration falls on the same time each day. Scroll to select an Average Interval (most reports only support one average interval at a time). Click to select a site and parameter; use standard Windows Shift-Click and Control-Click conventions to select multiple parameters. Filters Filter fields are available in the top row of each column. Click in the row to use the filter to list a single site, parameter, or parameter template. Click the down-arrow to the right of each filter field to select a particular entry in the column. Choices in the drop-down list will be Custom, Blanks, Non-blanks, plus each entry in the column (site name, parameter names, or parameter templates) To write your own criteria, select Custom and configure the screen that pops up. Filter fields in Reports criteria pane Custom filter criteria screen 66 Agilaire AV-Trend Manual Chapter 3 Reports Click the box with the letter A in the left side of each filter field to change the filter field from the default of Starts With to one of the following: Equals Does not equal Less than Less than or equal to Greater than or equal to Like Matches Regular Expression Starts with Contains Ends with Does not start with Does not contain Does not end with Does not match Not like For example, if you imported E-DAS data and used the option to put the channel number in front of the channel name, you might end up with some ozone channels that were “01_OZONE” while others were “03_OZONE” and “04_OZONE”. Using the boxed “A” filter, you could search for all parameters names that contain ““Ozone” and more easily select them from a large list of parameters. Using a filter makes it easy to see Using a filter to determine which parameters a Parameter Template for was not set for don’t have a template 3_AMB_TEO_AMB_TEMP. 67 Agilaire AV-Trend Manual Chapter 3 Reports Additional Fields for Specific Reports For some reports, the Criteria Panel is expanded with additional fields. For the Maximum Hourly Averages report, additional information is needed on how the data in the report should be filtered and calculated: Rolling hours, and time-tagging type Report highest average only for any day Allow report of overlapping maximums (for multiple hour rolling averages) Number of maximum averages to report Additional Report Criteria required for Maximum Hourly Values report Other reports with additional criteria include: Wind / Pollution Rose requires you to designate which Wind Rose report profile to use. AQS/XML Report requires you to choose which kinds of records to be assembled. Concentration Distribution, Frequency Distribution, Monthly Reports all allow you to designate an N-hour rolling average as an option. 68 Agilaire AV-Trend Manual Chapter 3 Reports Annotations Report The Annotations report may be run on any list of parameters, for any time range. It provides a summary of all annotations it finds. To see a report of annotations made in the Average Data Editor, open the Reports menu and select Annotations Report. Make the usual query selections of Start/End Date, Average Interval, and Parameter(s). Click the Generate Report icon on the ribbon. Annotations Report 69 Agilaire AV-Trend Manual Chapter 3 Reports Calibration Results Calibration Results show the calibration event and results for any zero/span, precision check, or other calibration program. Calibration Report 70 Agilaire AV-Trend Manual Chapter 3 Reports Calibration Trend Graph Calibration Trend Graphs provide a long-term view of calibration zero/span results over a user-defined period of time (month, quarter, etc). Select a Start and End Date and a Parameter. Click the Generate Report icon on the ribbon. If you select Raw Data Graph from the ribbon at the top of the screen, you can view calibration data in a text table. Raw Data Calibration Display 71 Agilaire AV-Trend Manual Chapter 3 Reports If you select Historical Graph from the Ribbon, you can view data in a graph. Each color represents a different phase, as shown in the legend. You can change the color scheme by selecting a Graph Theme from the drop down list at the bottom of the screen. Historical Calibration Trend Graph 72 Agilaire AV-Trend Manual Chapter 3 Reports If you select Response Graph from the Ribbon at the top of the screen, you can review fine-resolution data during each calibration cycle to see instrument response. Each cal can be cycled through using the Forward/Back button. You can change the color scheme by selecting a Graph Theme from the drop down list at the bottom of the screen. Calibration Trend Response Graph 73 Agilaire AV-Trend Manual Chapter 3 Reports Configuration Reports Configuration reports consist of the following: Calibration Channel Configuration Report Configuration Report Parameter Configuration Report Scheduled Tasks Reports Calibration Report Site Configuration Report Calibration Configuration Report To run a Calibration Configuration Report (Reports > Configuration folder > Calibration Configuration Report), select a site or sites and click the Generate Report icon on the Ribbon. Calibration Configuration Report (Reports > Configuration folder > Calibration Configuration Report) 74 Agilaire AV-Trend Manual Chapter 3 Reports Channel Configuration Report To run a Channel Configuration Report (Reports > Configuration folder > Channel Configuration Report), select a Site or Sites and a Parameter Name or Parameter Names. Click the Generate Report icon on the Ribbon. Channel Configuration Report (Reports > Configuration folder > Channel Configuration Report) 75 Agilaire AV-Trend Manual Chapter 3 Reports Parameter Configuration Report To run a Parameter Configuration Report, (Reports > Configuration folder > Parameter Configuration Report), select a Site or Sites and a Parameter Name or Parameters Names. Click the Generate Report icon on the Ribbon. Parameter Configuration Report, (Reports > Configuration folder > Parameter Configuration Report) 76 Agilaire AV-Trend Manual Chapter 3 Reports Scheduled Tasks Report To run a Scheduled Tasks Report, open Reports > Configuration folder > Scheduled Tasks Report and the report will be displayed automatically. No query is necessary. Scheduled Task Report (Reports > Configuration folder > Scheduled Tasks Report) 77 Agilaire AV-Trend Manual Chapter 3 Reports Site Configuration Report To run a Site Configuration Report, (Reports > Configuration folder > Site Configuration Report), select a Site or Sites and click the Generate Report icon on the Ribbon. Site Configuration Report, (Reports > Configuration folder > Site Configuration Report) 78 Agilaire AV-Trend Manual Chapter 3 Reports Daily Parameter Report The Daily Parameter Report shows a single day summary for the entire monitoring network, grouping parameters together by the Parameter Template, but showing all sites sharing that parameter template. Parameters that do not have a parameter template designated are not reported. To generate a Daily Parameter Report (Reports > Daily Parameter Report), select Start and End Dates, an Average Interval, Site Name or Names, and Parameter Name or Names. Click the Generate Report icon on the Ribbon. Daily Parameter Report (Reports > Daily Parameter Report) 79 Agilaire AV-Trend Manual Chapter 3 Reports Daily Summary Report The Daily Summary Report is usually used for the daily summary of hourly data for all parameters at a site or sites, but it can also be used to report any time range or average interval. Statistics (Average, Maximum, Minimum, and Count) are at the bottom of each column. To generate a Daily Summary Report (Reports > Daily Summary Report), select Start and End Dates, an Average Interval, Site Name or Names, and Parameter Name or Names. Click the Generate Report icon on the Ribbon. Daily Summary Report 80 Agilaire AV-Trend Manual Chapter 3 Reports Internal Reports The Internal Reports folder contains the Journal Message Log and the Software Version Report. Journal Message Log The Journal Message Log (Reports > Internal Reports > Journal Message Log) displays messages about selected Logging Types. Logging Types are displayed in a drop-down check list when you click the arrow in the Logging Type field. Type selections are: Fatal, Exception, Error, Warning, Startup, Shutdown, Information, Communication, Verbose, Debug, Timed Event, or Select all. Note: To log detailed information about a specific (problematic) Logging Type or Types, select that Logging Type in addition to Verbose from the drop-down menu before you generate the Journal Message Report. Journal Message Log (Reports > Internal Reports > Journal Message Log) 81 Agilaire AV-Trend Manual Chapter 3 Reports Software Version Report The Software Version Report (Reports>Internal Reports >Software Version Report) displays Timestamps for Database Schema and Software Builds, Version IDs, and Software Version. The Software Version REport is primarily used for troubleshooting in the event of unusual software behavior. Software Version Report (Reports>Internal Reports) 82 Agilaire AV-Trend Manual Chapter 3 Reports LogBook Report The LogBook Report generates reports of logbook entries that were made in the LogBook Entries Editor. To query a LogBook Report select LogBook Report from the Reports menu. Select Start and End Dates and a Site Name from the top section of the screen and click the Generate Report icon in the upper left section of the screen. The user may also choose one or all Logbook Categories as a filter for the report. The logbook report will be displayed in the lower section of the screen LogBook Report 83 Agilaire AV-Trend Manual Chapter 3 Reports Logger Reports The Logger Reports folder in the Reports menu contains the following reports: Alarm Input Journal Line Status Report Power Failure Report Alarm Journal The Alarm Journal displays the Site Name, Channel Number, Channel Name, Alarm Program Name, Alarm Start/End Time, Reason Code, and Triggering Flag. To run an Alarm Journal, select Reports > Logger Reports > Alarm Journal. In the Report Criteria screen, select a Start/End Date and a Site/ Source Name. Click the Generate Report icon. A Logger Alarm Journal Report will be displayed in the bottom section of the screen. Logger Alarm Journal Report 84 Agilaire AV-Trend Manual Chapter 3 Reports Input Line Status Report The Input Line Status Report displays Site and Logger Name, Logger ID, Line Number Line Name, Line State, Time of Change, and Line Description. To run an Input Line Status Report, select Reports > Logger Reports > Input Line Status Report. In the Report Criteria screen, select a Start/End Date and a Site/ Source Name. Click the Generate Report icon. An Input Line Status Report will be displayed in the bottom section of the screen.Each site/logger is shown in a separate page. Input Line Report 85 Agilaire AV-Trend Manual Chapter 3 Reports Power Failure Report The Power Failure Report displays Site and Logger Name, Logger ID, Failure Time and Restored Time. To run a Power Failure Report, select Reports > Logger Reports > Power Failure Report. In the Report Criteria screen, select a Start/End Date and a Site/ Source Name. Click the Generate Report icon. A Power Failure Report will be displayed in the bottom section of the screen.Each site/logger is shown in a separate page. Power Failure Report 86 Agilaire AV-Trend Manual Chapter 3 Reports Monthly Report Monthly reports provide a matrix view of a single parameter, showing values for the entire month. Invalid or flagged data is shown with a color background or font change defining the data condition. Statistics are provided for each row (day) and column (hour). To run a Monthly Report:: 1. Select Reports > Monthly Report. 2. Select a Start and End date 3. Select number of Hours for Rolling Average 4. Select a Rolling Type (Backward or Forward) 5. Select the Parameters that will be displayed in the report 6. If you want the Flags Legend to be shown in the report, click to select Flags. (You may have to scroll down to see the Flags option. 7. Click the Generate Report button on the Ribbon. Note: If Totalize in Reports was selected in Configuration Editors > Parameter Settings, Monthly Reports will show a total of data rather than an average. If Minimum in Reports was this option was selected in Configuration Editors > Parameter Settings, Monthly Reports will show a minimum of data rather than an average or a total. Totalize in Reports and Minimum in Reports are most commonly used for rainfall. Monthly Report Query 87 Agilaire AV-Trend Manual Chapter 3 Reports Monthly Report with Parameter Code If AQS Null Codes have been set for invalidated data, they are displayed in the Monthly Report. If Site Codes, and/or Parameter codes have been selected in the Configuration Menu they will be included in the Header. Options are provided to show null codes or flags when an invalid hour is shown on the report. These options are also available in the Scheduled Task (options). Agilaire AV-Trend Manual Chapter 3 Reports Monthly Report Flags Legend in Monthly Report 89 Agilaire AV-Trend Manual Chapter 3 Reports Favorites AV-Trend simplifies regular tasks with a list of userdefined Favorites, which function like Favorites in Internet browsers, such as Internet Explorer. You can save a selection of sites, parameters, average intervals, and date ranges for the Average Data Editor or any Data Report. Favorites can be saved as a global favorite for all users, or as a favorite for an individual user. To create a favorite, go into any data editor or report, complete a query, and select Favorites from the top menu. The ribbon bar will change to show the favorites menu. Favorites menu Select Save as Favorite to bring up the Add a Favorite screen. Give the favorite a name, a description (optional), and select User or All Users (global) and select from the following options: Launch on Application Startup to run the Favorite upon logging in to AV-Trend Run Query on Launch to execute data retrieval when the Favorite is selected. Add a Favorite screen 90 Agilaire AV-Trend Manual Chapter 3 Reports You can also configure the Favorite by selecting the Favorite Query tab after you select Save as Favorite. From this screen you can adjust the site/parameter list, date range, or average interval. These values can also be adjusted later in the Favorites Editor in the Configuration menu. To return to the ribbon controlling the current application, select the top menu function (above the ribbon), for example, Average Data Editor. To use an existing Favorite, select Favorites from the top menu (above the ribbon bar), select User Favorite or Global Favorites, and the saved Favorite. Favorite Query tab from Add a Favorite 91 Chapter 4 Data Editors Average Data Editor The AV-Trend Average Data Editor (Data Editors > Average Data Editor) combines multiple functions into a single tool: Editing data point details Batch editing Comparison of current data with historical minimum, maximum, and mean. Analyze/Exported In addition, you can toggle between the following six formats by clicking buttons in the ribbon at the top of the screen: Linear Table (the default display) Cross-Tab Table Matrix Table Time Series Graph (can be used for single or multiple parameters, but the historical comparison tools in this X-Y scatter plot only appear in single-parameter queries) Scatter Plot graph (requires queries of two or more parameters) Histogram (for single parameter queries) 92 Agilaire AV-Trend Manual Chapter 4 Data Editors Ribbon bar to toggle between Data Editor displays To edit data in the Average Data Editor (Data Editors > Average Data Editor), enter Start and End Date (type dates or use arrow keys to select) Average Interval (for example, 001h Hourly average of 60 minutes) Parameter Selection (for example, Site Name NKNOX, Parameter Name NO2, Parameter Template NO2) Click the Retrieve Data button in the ribbon at the top of the screen The Average Data Editor will open the Linear Data Editor by default. Click buttons in the ribbon to change formats. 93 Agilaire AV-Trend Manual Chapter 4 Data Editors Linear Data Editor The Linear Data Editor Site Name, Parameter Name, Parameter Template Name Average Interval Start and End Dates Value (Hover the mouse pointer over data values to see any annotations.) Raw Value (can’t be edited) AQS Null Codes Data Logger Flags Qualifier Codes AV-Trend Data Grade (used by ADVP). To edit data values, double-click in the Value cell or right-click to bring up a pop-up menu. Average Data Editor from Data Editors menu 94 Agilaire AV-Trend Manual Chapter 4 Data Editors Cell Color Codes All data is color-coded based on the flag-to-color mappings listed in the Flags Editor. AV-Trend is loaded with some default mappings, but you can customize this for your system. The color mappings are global to all users for consistency. In addition, AV-Trend uses two font changes to represent data in the data editor: Bold values represent data that does not match the raw database (edited values) values represent data that has an annotation. Hover the mouse pointer over data values to see details of annotations. Italics Right-Click Options Each of the three non-graphical data editors support select, shift-select, CTRL-select, click-drag selection capabilities, and a right-click menu options. Right-click a data point in the Value column to bring up the following menu: Restore from Raw copies value from the raw database to the final Value and resets flags Set to Minimum Detectable Limit sets data value to MDL configured in Parameter Editor Set AQS Code brings up a pick list to apply new AQS null codes Set Qualifier Code brings up a selection box for AQS qualifier (exception) codes View All Flags (for single data points only) shows all data logger and system flags and allows you to change or clear flags. Multiple flags can be displayed in each cell. Set Annotations brings up an annotation screen so you can add an annotation Edit allows you to scale two or more selected data values as mX+b ( Original Value Batch times a Multiplier plus a Constant Value), for example, divide by 10 and clear the suspect flag. First, you must select Enabled.You have the option to combine scaling with one or more of the following: Update Values, Set Annotations, Set AQS Code, Set Qualifier Code, and Set Flags. If you select Set Flags, you will have the option to Update Children Flags. Show Children brings up another instance of the Data Editor with the selected parameters and time range for the Child parameter(s) of the selected parameter. This function requires that Parent-Child Parameter relationships are configured in Configuration Editors > Parameter Settings. Drill Down Interval allows you to drill down to minute averages from hourly averages. Export to Excel exports the selected data range to an Excel document, including color, font, and layout details. This right-click option is different from the Export to Excel button in the ribbon at the top of the screen because the button on the ribbon exports the entire data set in the data editor and the right-click option exports only selected data. Click a column heading to sort data by a different heading, for example to group data according to flags. Default is to sort by date. Click-hold-drag columns to change the order of columns or to drag a column heading to the Drag a column header here to group by that column area. 95 Agilaire AV-Trend Manual Chapter 4 Data Editors Cross-Tab Data Editor The Cross-Tab Data Editor shows Parameters as columns and sequences rows by date/time in ascending order and provides the same right-click menu as the Linear Data Editor. Cross-Tab Data Editor from Data Editors menu Note: You can sort data by any column by clicking on a column header You can find all flagged data easily, for example data grouped by data logger flag. Each group can then be expanded and individually sorted. When you change editor modes, the groupings are not kept. Also, you can click-hold-and-drag columns to change the order, and click-drag columns to the Drag a column header here to group area to group data. If you do this accidentally or change your mind, you can drag it back. 96 Agilaire AV-Trend Manual Chapter 4 Data Editors Matrix Data Editor The Matrix Data Editor presents data in a format similar to the monthly report. If you select multiple parameters, they are grouped with a plus (+) symbol for expansion. Matrix Data Editor from Data Editors menu 97 Agilaire AV-Trend Manual Chapter 4 Data Editors Time Series Graph You can generate the Time Series Graph in two modes, for one or more parameters. In multi-parameter mode, you can group different parameters together for any time period. With the tools at the bottom or the screen, you can change the color scheme, remove or restore the legend, and print the graph. The minus (-) sign in the upper left corner of the screen minimizes the selection criteria to make more room for the graph. Time Series from Data Editors menu with multiple parameters selected 98 Agilaire AV-Trend Manual Chapter 4 Data Editors Use the mouse scroll wheel to zoom in or out; right-click and hold to drag the zoomed graph to a different data area. Hover the cursor over a data point to see the specific date, time, and data value. If there is a flag on the data point the flag will also be displayed. You can toggle between hiding or showing invalid data (e.g., data during calibration, maintenance, or analyzer failures). When graphing parameters with two dramatically different full scale ranges, you may choose to use the "Dual Y-Axis Scale" option. When choosing this option, you must also choose the percentage (e.g., 10%, 20%) of the full scale range that is used as the 'breakpoint' for the secondary Y-axis. A value of 20% is common. Note that this function requires that Graph Maximum and Graph Minimum be set in the Parameter configuration. Graphs that have any parameters without limits configured cannot use the Dual Y-Axis function. Suppress Flag Colors - If not selected, flagged data will be shown with “dots” with colors based on the Flag configuration. If selected, data will just be shown as the trend graph color. In both cases, hovering the cursor over the point will always show the flag, and the flag colors are still represented in the tabular/grid display. Dual Y-Axis function 99 Agilaire AV-Trend Manual Chapter 4 Data Editors For one parameter, you can choose previous intervals to be other than one year by selecting Show History from the options above the graph.If you bring up the Time Series Graph in single parameter mode, you get additional options at the top of the graph: Show History displays N previous years of data alongside main graph Show Statistics displays cumulative statistics of N previous years--min, max, avg Number of Years +/- Days allows rolling average of additional days in historical statistics Refresh Time Series Graph with a single parameter selected and hover over displaying date, time data value, and flag 100 Agilaire AV-Trend Manual Chapter 4 Data Editors If the database contains data from previous years for the same parameter, those previous years can be graphed in the Time Series Graph alongside the current data by selecting Show History and the number of years you want to graph. Each previous year is graphed individually. Select Refresh to update the graph. Time Series Graph with a single parameter and Show History option and hover over displaying date, and time data value The “+/- Days” selector can be used to compile nearby days for the same hour into the comparison statistics. An example of how this is applied would be: Current Data = 1/15/09,. Number of Years = 3, +/- Days = 1 1/5/09 data at hour 00 would be compared against statistics using the following points: 1/4/06, hour 00 1/5/06, hour 00 1/6/06, hour 00 1/4/07, hour 00 1/5/07, hour 00 1/6/07, hour 00 1/4/08, hour 00 1/5/08, hour 00 1/6/08, hour 00 Obviously, selection of a large data set with a long look back period and large skews can be very processor intensive for the client and the SQL server for large data sets. Agilaire recommends this tool be used for data sets of roughly a week or less. 101 Agilaire AV-Trend Manual Chapter 4 Data Editors Scatter Plot Graph The Scatter Plot Graph allows any two parameters in the existing chart to be plotted in an X-Y chart. The Y axis parameter is the primary parameter and all data points are color coded according to the Data Flags color mappings to help distinguish outliers that have already been flagged. Scatter Plot Graph from Data Editors menu with hover over displaying date, time and data value 102 Agilaire AV-Trend Manual Chapter 4 Data Editors Histogram The Histogram provides a graph of the distribution of values for the entire data set, but it is designed to display only one parameter at a time, so be careful not to use multiple parameters. The default graph uses the graph maximum/minimum from Configuration Editors > Parameter Settings, but you can check Override to set a custom max/min specifically for the X axis of this graph. Histogram from Data Editors menu with hover over displaying date, time and data value 103 Agilaire AV-Trend Manual Chapter 4 Data Editors LogBook Entry Editor The LogBook Entry Editor allows you to make entries in a logbook that can then be seen in LogBook Reports. To make a logbook entry, open LogBook Entry Editor from the Editors menu. Click the New Log Entry button in the upper left corner of the screen In the bottom section of the screen enter a Log Entry Time, User Entry Time, select a Category from the drop-down list or select New Category and enter a different category, select a User and a Site from the drop-down lists Enter the LogBook message in the Entry Text box and click Save. The new entry information will be displayed in a row in the top section of the screen. Adding LogBook entries in the LogBook Entry Editor from the Editors menu By default, the logbook entries do not accept changes or addendums after the record has been saved. A system option is available to allow addendums to be made. To enable this, contact [email protected]. 104 Agilaire AV-Trend Manual Chapter 4 Data Editors Realtime Display The Model 8872 has three main realtime display programs to keep you informed of the realtime status of the readings, calibrations, I/O status, and averages: Trend is the same display used by AV-Trend to provide strip-chart likes trends and basic tabular displays. Tabular Display provides a series of LED-like displays, which can be zoomed in to time-series charts. This display is very useful for mixing of multiple display averages (instantaneous, minute, hourly, etc) on the same page. Site Node Logger Tool Box is a blend of three tools: Readings – current readings, and buttons to control / display maintenance or offline status of the channels; used to mark channels online/offline, or in/out of maintenance. Calibration – shows the current status of calibrations, and allows you to start or abort a calibration program. Realtime Digital I/O – show the current status of all physical or remote (Modbus) digital input / output points. Realtime Graph in Status Displays>RealTime DataTrending Graph, showing both Chart and Grid 105 Agilaire AV-Trend Manual Chapter 4 Data Editors Tabular Display The Tabular Display provides a series of LED-like displays, which can be zoomed in to time-series charts. The chart display is very useful for mixing multiple display averages (instantaneous, minute, hourly, etc) on the same page. Boxes can be dragged to create a custom layout, and the layout can be saved for future recall. Because of the complexity of the elements in the layout, they are stored separately than the regular Favorites system. Create a new layout by clicking the Select Display Elements icon from the ribbon 106 Agilaire AV-Trend Manual You can use the filter fields to narrow parameter names and, more importantly, average intervals, if needed. The form supports standard Windows drag-select, shift-select, and CTRL-select actions. Note that the display will support multiple average intervals, so it is possible to mix minute and hourly data (e.g., analyzers and BAMs) on the same screen. Instantaneous data panels are selected on the next page. Chapter 4 Data Editors Realtime Element Selection Wizard--Average Data Parameter / Interval Selection Realtime Element Selection Wizard--Instantaneous Data Parameter Selection 107 Agilaire AV-Trend Manual Chapter 4 Data Editors Finally, the Wizard asks if you want to view the realtime status of any digital input status lines. Select lines by clicking the left-side check boxes. Realtime Element Selection Wizard--Digital Input Line Selection Once the wizard is finished, the display will start and begin updating. Panels can be dragged into any desired order/arrangement by click-drag (click and drag from the title bar area at the top, above the large-font name). Panels can be eliminated by clicking the X box in the upper right. To zoom into a particular reading, click the expand box to the left of the X. Updating Display with movable Panels 108 Agilaire AV-Trend Manual Chapter 4 Data Editors The other panels will minimize, and the selected parameters will expand into a trend chart, with an LED panel, still updating the current reading / average. For instantaneous data, the duration of the display can be modified if needed. Instantaneous readings default to show the previous 5 minutes, while charts of averages are longer. Instantaneous readings also have an option to show a trendline of the general direction of the newest readings. A grid of previous averages for averaged data. To return the display to its previous mode, click the resize button (two stacked windows) next to the X close box. 109 Agilaire AV-Trend Manual Chapter 4 Data Editors Realtime Trend The Realtime Trend provides a time-series view of data that continuously updates. Any number of Realtime Trend tabs may be opened, and they can graph any average interval available in the system (most commonly 10 second and 1-minute trends). Because Favorites can be used to store Realtime Trend settings, and can be set to automatically open on startup, it is simple to define some screens to open automatically on the client launch (and by putting the Client in the startup folder and storing the login username and password), the PC can be set to start up the client and the default trends on PC reboot. Note: To create a new trend, select Status Displays>Real Time Trending in the menu. To query a report, select parameters and averaging interval. Select Automatic Refresh from the menu for a continuously updating trend. By default, the screen will show both a time-series plot and a grid list of data points on the right side. By using the Show Grid and Show Chart ribbon buttons, you can define whether you want a chart (a list of numeric readings, good for a large number of parameters), or both a chart and grid. Realtime Graph in Status Displays>Real Time Trending Graph showing both Chart and Grid 110 Agilaire AV-Trend Manual Chapter 4 Data Editors Realtime Graph in Status Displays>Real Time Trending Graph showing Chart only 111 Agilaire AV-Trend Manual Chapter 4 Data Editors Hover the mouse pointer over a data point on the graph to see details of exact time and value. Realtime Graph in Status Displays>Real Time Trending Graph with mouse hover on data point Additional Ribbon functions: Print or Export the Chart or the Grid (HTML, CSV, XLS, BMP, JPG, etc) Select a range of data in the grid and open that data in the Data Editor. Adding Annotations To add an annotation to the realitme graph, first make sure Show Grid is enabled, then right-click to select a range of data and add your comment. 112 Agilaire AV-Trend Manual Chapter 4 Data Editors In the graph criteria, the user may select several customizations: Number of Hours in Lookback - This allows the user to dynamically define the width of the graph. After changing, the user should select “Manual Refresh” from the ribbon to take effect. This preference is stored with any Favorite created. Use Dynamic Scaling - If selected, the data graph min/max is set based on the range of data, rather than the graph min/max configured in the Parameter settings editor. Suppress Flag Colors - If not selected, flagged data will be shown with “dots” with colors based on the Flag configuration. If selected, data will just be shown as the trend graph color. In both cases, hovering the cursor over the point will always show the flag, and the flag colors are still represented in the tabular/grid display. 113 Agilaire AV-Trend Manual Chapter 4 Data Editors Right Click Data Within the Real-Time Trend, the user may drag-select and right-click a list of data points. The user is then presented with two options: Annotate Selected - this will allow the user to add a text annotation to the data, which will appear in future use of the Data Editor, or can be recalled in the Annotations Report. Analyze Selected - this will bring up a box, allowing the user to see an average, or other statistics of only the selected data points. This is commonly used to average calibration or test “runs” of data. The results can also be printed or saved using the “Print/Export Grid” button. Right Click example 114