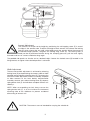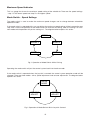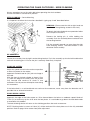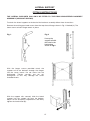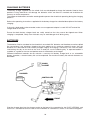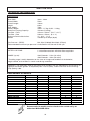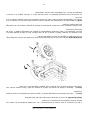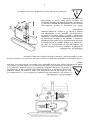
1
®
Yes,you can.
Spectra
Spec Plus
User Manual
CONTENTS
Forward - Advisory Safety Notice . . . . . . . . . . . . . . . . . . . . . . . . . . . . . . . . . . . . . . . . . . . . . . . . . . 1
Getting Acquainted With The Powerchair . . . . . . . . . . . . . . . . . . . . . . . . . . . . . . . . . . . . . . . . . . . . 2
Features - Joystick Control Knob Option . . . . . . . . . . . . . . . . . . . . . . . . . . . . . . . . . . . . . . . . . . . . .3
Seat and Backrest Adjustment . . . . . . . . . . . . . . . . . . . . . . . . . . . . . . . . . . . . . . . . . . . . . . . . . . . . . 4
Armrest Adjustment . . . . . . . . . . . . . . . . . . . . . . . . . . . . . . . . . . . . . . . . . . . . . . . . . . . . . . . . . . . . 5
Tension Adjustable Backrest . . . . . . . . . . . . . . . . . . . . . . . . . . . . . . . . . . . . . . . . . . . . . . . . . . . . . . 6
Manual Tilt-in-Space . . . . . . . . . . . . . . . . . . . . . . . . . . . . . . . . . . . . . . . . . . . . . . . . . . . . . . . . . . . .6
Controllers - PILOT Integral . . . . . . . . . . . . . . . . . . . . . . . . . . . . . . . . . . . . . . . . . . . . . . . . . . . . . .7
Controllers - Dynamic DL . . . . . . . . . . . . . . . . . . . . . . . . . . . . . . . . . . . . . . . . . . . . . . . . . . . . . . . .8
DX-REMG80I Master Remote . . . . . . . . . . . . . . . . . . . . . . . . . . . . . . . . . . . . . . . . . . . . . . . . . . 9-11
Controllers - PILOT+ . . . . . . . . . . . . . . . . . . . . . . . . . . . . . . . . . . . . . . . . . . . . . . . . . . . . . . . . 12-16
Controllers - Options - Chin/Dual Attendant . . . . . . . . . . . . . . . . . . . . . . . . . . . . . . . . . . . . . . . . . 17
Transfers - Getting in and out of the Chair . . . . . . . . . . . . . . . . . . . . . . . . . . . . . . . . . . . . . . . . . . .18
Footrests - Elevating Legrests . . . . . . . . . . . . . . . . . . . . . . . . . . . . . . . . . . . . . . . . . . . . . . . . . . . . 19
Freewheel Mode - Motor Dis-engage . . . . . . . . . . . . . . . . . . . . . . . . . . . . . . . . . . . . . . . . . . . . . . . 20
Kerb Climbing . . . . . . . . . . . . . . . . . . . . . . . . . . . . . . . . . . . . . . . . . . . . . . . . . . . . . . . . . . . . . . . . 21
Disassembly - For Transportation . . . . . . . . . . . . . . . . . . . . . . . . . . . . . . . . . . . . . . . . . . . . . . . . . 22
Detachable Motors . . . . . . . . . . . . . . . . . . . . . . . . . . . . . . . . . . . . . . . . . . . . . . . . . . . . . . . . . . . . 23
Drive Wheel Removal . . . . . . . . . . . . . . . . . . . . . . . . . . . . . . . . . . . . . . . . . . . . . . . . . . . . . . . . . . 24
Manual Brakes - Drive Wheel-Locks . . . . . . . . . . . . . . . . . . . . . . . . . . . . . . . . . . . . . . . . . . . . . . . 24
Transportation - Restraint Methods . . . . . . . . . . . . . . . . . . . . . . . . . . . . . . . . . . . . . . . . . . . . . . . . 25
Tray - Fitting & Operation . . . . . . . . . . . . . . . . . . . . . . . . . . . . . . . . . . . . . . . . . . . . . . . . . . . . . . . 26
Lateral Supports - Fitting & Operation . . . . . . . . . . . . . . . . . . . . . . . . . . . . . . . . . . . . . . . . . . . . .27
Charging the Batteries . . . . . . . . . . . . . . . . . . . . . . . . . . . . . . . . . . . . . . . . . . . . . . . . . . . . . . . . . . 28
Battery Connections . . . . . . . . . . . . . . . . . . . . . . . . . . . . . . . . . . . . . . . . . . . . . . . . . . . . . . . . . . . 29
Maintenance & Care . . . . . . . . . . . . . . . . . . . . . . . . . . . . . . . . . . . . . . . . . . . . . . . . . . . . . . . . . . . 30
Fault Finding . . . . . . . . . . . . . . . . . . . . . . . . . . . . . . . . . . . . . . . . . . . . . . . . . . . . . . . . . . . . . . . . . .31
Technical Information . . . . . . . . . . . . . . . . . . . . . . . . . . . . . . . . . . . . . . . . . . . . . . . . . . . . . . . . . . 32
Approved Accessories . . . . . . . . . . . . . . . . . . . . . . . . . . . . . . . . . . . . . . . . . . . . . . . . . . . . . . . . . . 33
Product Description
The power chair supplied as standard, features rear wheel drive, Gel batteries, standard height backrest,
detachable, width and height adjustable armrests, detachable, adjustable height footrests and a joystick controller
mounted for either right or left hand control.
Without the use of tools the drive motor units are detachable and together with detachable battery box units and
disassembled frame, allow the power chair to be stowed for transportation in a suitable vehicle.
It may be used to transport a user in a moving vehicle provided the separate recommended guidelines are followed
(Refer to page 23).
The product should be serviced as recommended by an authorised INVACARE dealer to ensure continual,
safe
and reliable operation.
For details and additional special options for users with greater dependency, refer to your Healthcare
Professional/Prescriber or authorised INVACARE dealer.
FOREWORD
Important safety operating and maintenance instructions are contained in this user
manual. We urge you to read and understand it before operating your power chair and
refer to it as often as needed to help maintain safe use and all-round performance.
!
All procedures involved should be practiced until you are familiar with them. However, if used
improperly, it is possible for the wheelchair to become unstable. You should learn the individual
characteristics and capabilities, as well as limitations, of your own powered wheelchair.
Basic safety procedures in this user manual are to be used as a guide only. You may find it necessary to
develop your own methods for safely solving encountered problems. Never hesitate to ask for assistance.
Your powered wheelchair should receive maintenance on a regular schedule. It is recommended that the
periods between services should be 12 months. The maximum period between safety checks for the
manual wheel - lock adjustment and the electronic brake function should be 6 months.
PURPOSE OF THE POWER CHAIR
Standard power chairs are suitable for persons who require independent mobility combined with comfort,
manoeuvrability, reliability and minimal maintenance.
The intended user should possess some degree of ability with at least one hand and arm, reasonable
eyesight and a degree of spatial awareness and have received training in the use of the product,
preferably in their normal environment. Their maximum weight can be found at the rear of this manual.
It is suitable for use indoors and outdoors on dry, reasonably smooth level surfaces. It climbs slopes up to
20% (1 in 5) and kerbs up to 10cm high (an optional device may be required). It should not be used in heavy
rain or snow, loose slippery surfaces and slopes, on wet grass, etc. Passengers must NOT be carried.
Excess baggage outside of the seating area can affect stability.
ADVISORY SAFETY NOTICE
Power chairs are designed to operate in appropriate environments.
However, radio wave sources such as radio and TV broadcasting stations,
amateur radio transmitters and portable telephones can affect powered
wheelchairs.
Portable communication equipment such as citizen band radios and
portable telephones should be switched OFF whilst operating the
wheelchair.
If unintentional movement or brake release occurs, turn the wheelchair
OFF as soon as it is safe to do so.
Unauthorised modifications or the use of non-Invacare approved replacement parts may change the
structure of the wheelchair and could create a hazardous condition. Invacare will not be liable for any
unauthorised changes and modifications from the specifications of the power chair supplied.
All information and specifications in this manual are current at the time of printing, However, because of
Invacare’s policy of continual product improvement, we reserve the right to make changes at any time
without notice.
1
GETTING ACQUAINTED WITH YOUR NEW POWER CHAIR
Please ensure your dealer returns the WARRANTY REGISTRATION CARD. This will ensure your vehicle
is covered for the relevant warranty periods against failures due to defects in manufacturing or materials.
Please see the Owner’s Warranty Card supplied for full details.
TRAINED
RECOMMENDED ADJUSTMENTS TO BE CARRIED OUT BY A TRAINED AUTHORISED
INVACARE DEALER ARE IDENTIFIED WITH THIS SYMBOL.
SAFETY PRECAUTIONS
utions:Before using your power chair, read and understand the following safety precautions:-*
mechanical
• Keep your powered wheelchair in good working order. As with all electro-mechanical
intervals.
vehicles, it will benefit from regular service inspections at the recommendedd intervals.
!
n, manual
manual
• We recommend that at 6 monthly intervals to check electronic brake function,
wheel - lock adjustment and the motor disengage operation.
• Always remember to use a safety belt when operating the wheelchair outdoors.
20% gradient).
• Take care when using your powerchair on slopes of up to 1 in 5.
avoid steep
steep slopes.
slopes.
Do this only where the surface is firm, straight and dry, in other conditions, avoid
• Take special care in bad weather. Braking and tyre grip may be affected on
wet or icy surfaces, take care on slopes and uneven surfaces.
Do not attempt to drive across slopes, which may make the vehicle
unstable, increasing the possibility of an accident and possible personal
injury.
• When climbing hills or slopes it is important to travel up in one motion.
Starting a forward movement from stationary on a slope requires extra care
to avoid tipping backwards. Start slowly and accelerate cautiously.
• When travelling down an incline, select a low speed, stop periodically if the
wheelchair moves faster than anticipated. Push the joystick forward slowly
to continue the descent. Do not lean forward.
• Avoid parking on the edge of rivers, ponds, lakes, sea, etc.
• Adjustments should only be carried out by your authorised INVACARE®
dealer to ensure correct operation and safe use.
Representative models of Invacare powered wheelchairs are tested for use in
a moving motor vehicle using recommended restraint systems. For further
information refer to page 22 or contact your authorised
INVACARE dealer. It is the responsibility of the person or authority transporting the wheelchair with an
occupant seated, to ensure the safety of the occupant and other passengers.
2
FEATURES
Motor speed and direction are regulated by the joystick control unit. With practice, automatic control of
acceleration, braking and change of direction will ensure a smooth, jerk-free ride. The variable speed
selector gives you total control in any environment.
The power chair cannot be driven when the batteries are being charged. Controller circuits are designed
to prevent operation during the charging process.
CHARGING
• The battery gauge (Refer to page 7). will indicate that your batteries are low.
Charging is straightforward, (Refer to page 25 and enclosed booklet).
BATTERIES
• The batteries fitted as standard are completely sealed and therefore cannot be
spilled like conventional ‘wet’ cells. Total performance and reliable operation is
dependent on the care and understanding of batteries and battery charging.
Please refer to the appropriate section and separate booklet supplied. Sealed Gel
batteries are classed as non hazardous by all air transport and travel authorities.
Mobility vehicles fitted with these batteries can be safely taken onto aeroplanes,
ships, buses, ambulances or trains without having to remove the batteries from
the equipment.
TYRES
• Pneumatic drive wheels and castors are fitted as standard. Puncture proof wheels
will alleviate the need to maintain pressures and give a smooth but slightly harder
ride. These are available as options.
UPHOLSTERY * The upholstery complies with the requirements for resistance to cigarette and
match ignition ISO7176:16. Refer to section on cleaning and care of upholstery
materials. Prolonged exposure to ultra-violet light will reduce the life of the
upholstery, protect against sunlight.
OPTIONAL
JOYSTICK
CONTROL
KNOBS
* The knob fitted to your joystick is supplied as standard and is suitable for most
applications. If you find this unsuitable for your operation there is a range of
alternatives available. Please contact your wheelchair distributor for advice. Do
not replace the joystick knob with any unauthorised device - it may cause
hazardous operation.
3
SEAT AND BACKREST ADJUSTMENT
Warning: It should be noted that under certain conditions, and configurations of the
wheelchair, ie. for users with limited / no lateral body control, and with the backrest in the
!
Creclined position, there is the potential to create a body trap between the armrest / side-
panel and the backrest.
Suitable accessories are available from Invacare (lateral trunk supports_ to eliminate this risk.
Before sitting in the chair, make sure it is NOT switched ON. If it is ON, the battery condition indicator (10
Bar display) will be illuminated, (see page 7 to 14).
SEAT DEPTH ADJUSTMENT - 35mm depth adjustment
The individual fitting of the seating allows the seat depth to be adjusted by 35mm (1•“). The adjustment,
which is usually only done once, is carried out as follows. You will need a large cross-headed screwdriver
and a 13mm spanner.
1. Prise off plastic cap at point A, unscrew and remove the screw and nut, repeat each side.
2. Move the backrest mounting bracket backwards to the extended position. Replace the nut and screw
into the selected hole and firmly fasten, replace plastic cap, repeat each side.
BACKREST ANGLE ADJUSTMENT
The backrest angle can be adjusted from 90˚rearwards through 12˚ The adjustment, which is normally
only required to be done once, is carried out in the
following sequence (see diagram) with the aid of the
13mm spanner and the cross-headed screwdriver. Do
the same adjustment for both sides.
1. Release the lock nut B located on the cross-headed
screw.
2. Screw the locking hand-wheel C partially out.
3. Screw the cross-headed screw in or out to give the
desired position. Adjust position of hand-wheel as
necessary.
4. Position the lock nut B up to the mounting bracket
and fully tighten.
5. Re-tighten the hand-wheel C fully; ensure backrest
assembly is secure.
Please note: Each backrest tube must be positioned in the same plane or the backrest will be twisted.
The backrest can be either folded down or detached from the chair base.
Follow these additional instructions: 1. Unscrew the hand-wheel C approximately five full turns. Lift the backrest upwards and then fold
forwards onto the seat. Adjust armrest width to accommodate if required.
2. To detach, unscrew the hand-wheel an additional three to four turns. Do not loosen the cross-headed screw.
3. Push the backrest slightly forward and lift upwards.
4. To re-locate the backrest assembly, ensure the pins are correctly aligned into the slots of the mounting
bracket, fully re-tighten the hand-wheel on both sides.
4
Armrest Adjustment
The armrest can be pre-set for height by
by positioning
positioning the
the self-tapping
self-tappingscrew
screw(F)
(F) in
in one
one of
of
the
holes in
in the
the armrest
armrest tube.
tube. To
To adjust
adjust the
the height
height of
ofeach
eacharmrest,
armrest, first
firstrelease
release the
the locking
locking
the holes
lever
while holding
holding onto
onto the
the armrest.
armrest. Move
Move the
the armrest
armrest to
to
lever (E)
(E) which
which clamps
clamps the
the arm
arm tube,
tube, while
the
desired height
height position,
position, re-tighten
re-tighten the
the locking
locking wing
wingscrew
screw(E).
(E). The
The locking
locking lever
lever (if(if
the desired
fitted) can be re-positioned without losing the clamping pressure, pull the lever slightly
fitted) can be re-positioned without losing the clamping pressure, pull the lever slightly
outwards and turn to a more suitable locating angle.
outwards and turn to a more suitable locating angle.
The padded side panel can also be set to a desired height. Loosen the slotted screw (D) located in the
The padded side panel can also be set to a desired height. Loosen the slotted screw (D) located in the
fixing bracket, re-tighten when desired position is achieved.
fixing bracket, re-tighten when desired position is achieved.
Width Adjustment
Width Adjustment
The transverse width adjustment is achieved by releasing
The transverse width adjustment is achieved by releasing
locking lever (G) and positioning the armrest tube to width
locking lever (G) and positioning the armrest tube to width
required and re-tightening locking lever (G). To remove the
required and re-tightening locking lever (G). To remove the
transverse width adjustment armrest assembly complete
transverse width adjustment armrest assembly complete
to allow removal of the front battery box/controller
to allow removal of the front battery box/controller
assembly: remove seat, release locking lever (G), depress
assembly: remove seat, release locking lever (G), depress
spring button lock (F) and withdraw complete armrest unit
spring button lock (F) and withdraw complete armrest unit
sideways.
sideways.
NOTE: When re-assembling to chair always ensure the
NOTE: When re-assembling to chair always ensure the
spring button lock (F) is on the inside of the horizontal
spring button lock (F) is on the inside of the horizontal
mounting tube of the sideframe to prevent accidental
mounting tube of the sideframe to prevent accidental
dismantling of armrest unit.
dismantling of armrest unit.
!
CAUTION: The armrests are not intended for carrying the wheelchair.
CAUTION: The armrests are not intended for carrying the wheelchair.
5
TENSION
ADJUSTABLE
BACKREST
TENSION
ADJUSTABLE
BACKREST
The backrest upholstery tension can
can be
be adjusted
adjusted to
to achieve
achieve the
the
comfort for
for individual
individual user
user requirements.
requirements.
desired comfort
To achieve this,
this, lift
lift the
the backrest
backrest upholstery
upholstery cover
cover by
by peeling
peeling the
the
Velcro fastening
clear. Adjust
individual tension
Velcro
fastening and
and fold
fold clear.
Adjust the individual
tension
straps to
to the
the occupant’s
occupant’scomfort.
comfort.
Ensure the
are correctly
correctly positioned
Ensure
the straps
straps are
positioned and
and replace
replace the
the
attaching securely
securely by
by the
the Velcro
Velcro fastening.
fastening.
backrest cover, attaching
MANUAL TILT-IN-SPACE
TILT-IN-SPACE
MANUAL
Tooperate
operatethe
themanual
manualtilt-in-space
tilt-in-spacetotoallow
allowthe
thecomplete
complete seat/backrest
seat/backrest to
to tilt
tilt backwards,
backwards, turn
turn the
the large
large
To
hand-wheel
hand-wheel AAuntil
until the
the desired
desiredsitting
sitting position
position isis achieved.
achieved. Rotating
Rotating the
the hand-wheel
hand-wheel inin the
the opposite
opposite
direction
directionwill
willlower
lowerthe
theseat/backrest
seat/backrestsection.
section.
CARE:WHEN
WHEN DRIVING
DRIVING THE
THE POWER
POWER CHAIR
CHAIR WITH
WITH THE
THE TILT-IN-SPACE
OUTDOORS, THE
THE
TAKECARE:
TILT-IN-SPACE OUTDOORS,
TAKE
SEAT
NORMAL LOWERED
LOWERED POSITION
POSITION BEFORE
BEFORE ATTEMPTING
ATTEMPTING
SEATTILT
TILTMUST
MUST BE
BE RETURNED
RETURNED TO
TO THE NORMAL
KERB
KERB CLIMBING
CLIMBING OR
OR ASCENDING
ASCENDING AND
AND DESCENDING
DESCENDING SLOPES.
SLOPES. THIS
THIS ALSO
ALSO APPLIES
APPLIES TO
TO THE
THE
OPTIONAL
TILT-IN-SPACE
OROR
POWERED
RECLINING
BACKREST.
OPTIONALPOWERED
POWERED
TILT-IN-SPACE
POWERED
RECLINING
BACKREST.
6
HANDLING AND OPERATION - CONTROLLERS
Your wheelchair is fitted with a programmable electronic controller that is very simple to operate. There
are a selection of options, PILOT INTEGRAL, PILOT+ and the DYNAMIC DL. Whichever is selected will
be most appropriate for your individual needs. The appearance varies, the function and driving
characteristics are basically similar. The PILOT INTEGRAL is fitted as standard.
The following instructions cover all types and available controller options.
PILOT INTEGRAL
Before you sit in the chair, make sure it is not switched ON. If it is switched ON the battery gauge indicator
will be illuminated. Once you are sitting comfortably, press the on/off switch. The joystick controls the
speed and direction of the wheelchair. The further you push the joystick from the centre position the faster
the wheelchair will move. When you release the joystick the brakes are applied automatically. DO NOT use
the on/off switch to stop the chair unless there is an emergency. If the emergency stop is applied, the
chair will slow down and stop very quickly. This is called ‘SOFT STOP’. If the controller detects a
malfunction, either in its circuits, or in the wheelchair’s electrical system, it may
halt the chair depending on the severity of the problem.
The 10 segment battery gauge display will indicate the fault type by rapidly flashing the number of bars to
indicate the possible area of the fault. See the Fault Diagnostics section relevant to the type of controller.
The speed control sets the maximum speed of the wheelchair, turn clockwise to increase, anti-clockwise
to decrease.
You may charge the batteries through the charge socket at the front of the control unit. Refer to section
on batteries and battery charging. This socket may also be used for re-programming the controller should
this be necessary (consult your dealer).
The controller units are sophisticated electronic components, and must be handled with care. Always
clean your controller by wiping with a damp cloth only if it becomes contaminated with food or drink. Make
sure the controller is securely fixed to your wheelchair.
TruCharge Battery Gauge
This is a 10 segment illuminated display which indicates if the controller is turned on and also gives the
status of the battery, the controller and the wheelchair electrical system.
Red, yellow and green bars lit: Battery charged; controller and electrical system OK.
Red and yellow bars lit: Charge battery if possible; controller and electrical system OK.
Red bars only lit or slow flash: Charge battery as soon as possible, controller and electrical system OK.
Rapid flash of bars: Indicates a fault in the controller or electrical system. See below for fault diagnostics.
Ripple up and down of bars: Joystick displaced at turn on.
Joystick
Battery Gauge
On/Off Indicator
Status Readout
Speed
Control
Fault Type
The number of flashing
bars indicate the
possible area of fault.
G
R
E
E
N
Y
E
L
L
O
W
On/Off Push
Button
R
E
D
Motor/Battery
Connector
7
Description
High battery voltage
Solenoid brake fault
Possible controller fault
Possible joystick fault
Charger Connected
Right motor wiring fault
Right motor disconnected
Left motor wiring fault
Left motor disconnected
Low battery voltage
DYNAMIC DL CONTROLLER
When the ON/OFF button is pressed, a bleep tone can
be heard from the controller and the battery charge
indicator will light up confirming that power is switched on
and the wheelchair is ready to move.
The Speed Control Knob on the rear of the Controller
enables you to reduce the maximum speed at which the
wheelchair can travel when the joystick is fully deflected
in any direction. The more you turn this knob
anticlockwise, the lower will be the maximum speed, no
matter how far you push or pull the joystick.
The Battery Charge Indicator (Fig. 2) lights up when the
ON/OFF button is pressed into ON. It gives you updated
information as to how much charge approximately is left
in the batteries, so that you can estimate how much
further you can drive before you have to recharge the
batteries. The reading will drop while the wheelchair is
being driven, and increase after the wheelchair has been
at a standstill for a few seconds. This is quite normal, and
it is best to check the indicator while the wheelchair is
stationary.
The battery charge indicator also informs you of any fault
condition when one or several of its lamps begin to flash.
Display flashing slowly: the wheelchairs moves slowly,
but with sluggish response and reduced speed indicates
the batteries are discharged below the critical level or possible controller or motor fault.
Display flashing rapidly: (twice per second) and the wheelchair not moving also indicates the batteries
are discharged below the critical level or a possible controller fault.
In both cases it is advisable to check and re-charge the batteries, if the fault indication persists, contact
the authorised INVACARE dealer.
On the rear face of the controller you find the Battery Charging Socket. Underneath is a special socket for
the connection of Programming Instruments if and when the response characteristics of the wheelchair
(acceleration, deceleration, damping etc.) are to be further adjusted to your needs (Consult your
authorised INVACARE dealer).
8
DX-REMG80I MASTER REMOTE
Please read these instructions carefully before using the DX-REMG80I, and keep this leaflet safe for future
reference.
For Information: My Local wheelchair services representative is: ......................................................................
Based at ............................................ Telephone no:................................ Department: ..................................
1) IMPORTANT INFORMATION FOR YOUR SAFETY
The information in this manual is a supplement to the user manual issued by Invacare. Do not operate this
equipment without reading, understanding and following the proper instructions and manuals, otherwise injury
or damage may result.
2) INTRODUCTION
The DX-REMG80I Remote is a primary DX Remote containing a battery gauge, magnetic key and a horn. Up
to five individual Drive Programs or profiles are available. The DX-REMG80I also features two jack sockets
allowing the connection of two external switches to duplicate the functions of the On/Off and Drive Program
select buttons.
3) HANDLING AND TRANSPORTATION
To avoid any unnecessary damage to your control system whilst driving, avoid hitting obstacles with the
controller or joystick. This also applies when transporting your chair. Avoid dropping the control system & be
wary of possible damage to cables. (i.e. Being Trapped).
DX-REMG80I Remote fitting, testing and programming must be carried out by professionals
of the health care field or persons fully conversant with this process and the driver’s
capabilities. The control system should be demonstrated to the user when the chair is
supplied. Incorrect settings could cause injury to the driver or bystanders, or damage to the
wheelchair or surrounding property.
4) DRIVING THE WHEELCHAIR
The G80I Keypad
Once you are seated in your wheelchair. Switch on DX-REMG80I by gently pressing and
releasing the on/off switch located on top of the controller at the front. The system status
light will light up to show power on. (If the status light flashes rapidly it indicates that the
joystick knob was not in its central position when the controller was switched on. Simply
allow the knob to return to the central position. If this condition persists for more than 5
seconds a latched fault will occur and the 7-segment display will begin to flash. If this
happens simply turn the remote on and off to clear the fault.
Drive Programs are selected using the Drive program selection switch. The selected drive
program or profile is displayed in the 7-Segment display. Drive programs or profiles may be
setup to change speed and/or select remote joysticks actuators, or lights. Appendix A
explains the operation of lighting and actuator functions.
Move the joystick a little in the direction you wish to travel. The further you move the joystick
knob, from the central rest position, the faster the chair will move. Small gentle movements
of the joystick give fine control.
9
Releasing the joystick and allowing it to return to the center position will bring the chair to a
controlled stop. When you have finished driving, switch off by pressing and releasing the on/off
switch.
The fuel gauge on the top surface of the DX-REMG80I will have all 6 lights on, if your batteries
are fully charged. As you use up the power by driving, the green lights and then the amber lights
will go out. When only the red lights are left on, it is time to re-charge your batteries. The red
light will flash as a further reminder.
A socket is provided at the front of the G80I to allow a battery charger to be connected. Follow the instructions for
charging your batteries in the wheelchair manual. CAUTION – Only use the charger supplied by the wheelchair
manufacturer. If in doubt contact your Wheelchair Services representative.
5) MAINTENANCE
1. The DX System should be regularly checked for integrity. Loose, damaged or corroded connectors or terminals,
or damaged cabling should be replaced.
2. All switchable functions on the DX System should be regularly tested to ensure they function correctly.
3. All DX system components should be kept free of dust, dirt and liquids. If necessary wipe with a cloth dampened
with warm water or alcohol. Do not use solvents or abrasive cleaners.
4. Where any doubt exists, consult your nearest Service Center or Agent.
5. There are no user-serviceable parts in any DX System component - do not attempt to open any case.
Warning: If any DX component is damaged in anyway, or if internal damage may have occurred (for example by
being dropped), have it checked by qualified personnel before operating.
6) FAULT DIAGNOSTICS
In the event of a fault indicator flashing while driving (battery gauge and/or Status LED), the user must ensure that
the system is behaving normally. If not, the system must be turned off and a service agent contacted. If a fault is
detected the System Status LED will flash a certain number of times followed by a pause. Count the number of
flashes and refer to this table:
1) DX Module Fault
Please contact your wheelchair representative
2) DX Accessory Fault
If fitted, check seat raise is in lowered position. If fault persists
please contact your wheelchair representative
3) Left Motor
There may be a fault or a loose connection **CHECK
4) Right Motor
There may be a fault or a loose connection **CHECK
5) Left Park Brake
There may be a fault or a loose connection **CHECK
6) Right Park Brake Fault
There may be a fault or a loose connection **CHECK
7) Low Battery fault
You may need to charge your batteries
8) Over Voltage Fault
Please contact your wheelchair representative
9 or 10) Data transfer fault between modules Please contact your wheelchair representative
11) Stall Timeout Fault
Please turn the controller off then switch it back on again
12) Module Mismatch
Please contact your wheelchair representative Contact
If you are in any doubt, please contact your Wheelchair Services representative.
7) SAFETY AND MISUSE WARNINGS
Do not operate the DX System if it behaves erratically, shows abnormal response, heating, smoke or arcing. Turn
the system off at once and consult your Service Agent.
Do not operate your DX System if the battery is nearly flat as a dangerous situation may result due to loss of power
in an inopportune place.
Ensure the controller is turned off when not in use.
No connector pins should be touched, as contamination or damage due to electrostatic discharge may result.
Radio Frequency Interference (RFI) influences most electronic equipment. Caution should be exercised with regard
to the use of portable communications equipment in the area around such equipment. While the manufacturer has
made every effort to ensure that RFI does not cause problems, very strong signals could still cause a problem. If
RFI causes erratic behavior, shut the wheelchair off immediately. Leave off while transmission is in progress.
Report any malfunctions immediately to your Service Agent.
PLEASE DO NOT MODIFY THE CONTROL SYSTEM IN ANY WAY. ANY UNAUTHORISED MODIFICATIONS
INCLUDING THE FITMENT OF UNAPPROVED SPARES OR ACCESSORIES MAY RENDER THE CONTROL
SYSTEM UNSAFE AND WILL INVALIDATE ANY SAFETY/APPROVAL MARKS AND THE WARRANTY.
WHEELCHAIR SERVICE REPRESENTATIVES MAY OBTAIN FURTHER INFORMATION ON THE DX SYSTEM FROM
DYNAMIC EUROPE LTD.
10
APPENDIX A
CONTROLLING ACTUATORS (SEAT CONTROLS) OR LIGHTS USING THE JOYSTICK
If your chair is fitted with Actuators (Seat Controls) or Lights they may be operated using the G80I’s joystick.
To control actuators or lights using the joystick:
Ensure the chair is stationary.
Press the mode/speed selection button repeatedly until one of the non-driving mode symbols, shown
below, appears on the 7 Segment Display.
Mode/Speed Selection
7 Segment Display
Actuator & Lighting
Non-Drive Mode Symbols
Tilt in
Space
Back
Rest
Left Leg
Right
Rest
Leg-Rest
Seat
Height
Lights
Move the joystick from left to right to select the symbol for the function that you wish to control.
If you have selected an Actuator (Seat Control) Mode move the joystick forward, beyond the point of half
travel, to lift the actuator or pull back, beyond the point of half travel, to lower the actuator. Release the
joystick to stop the actuator.
If you have selected Lighting Mode , momentarily push the joystick forwards, beyond the point of half
travel, to toggle the Side Lights on or off or pull back, beyond the point half travel, to toggle the Hazard
Lights on or off. Repeat the process to turn the relevant lighting off. Hazard operation will be indicated on
the G80I by the flashing of the Left and Right Indicator Displays shown in the section below.
CONTROLLING LIGHTING FUNCTIONS USING THE KEYPAD
If lights are fitted to the wheelchair they may also be activated using the lighting controls on the G80I’s
Keypad.
left Indicator and
Side Light Switch
Right Indicator and
Hazard Switch
Left Indicator
Display
Right Indicator
Display
Left and Right Indicators
A single short press (less than 1 second) of the Left or Right Indicator switch will toggle the Left or Right
Indicators, respectively, on or off. The associated Indicator Display will flash to show when the indicators
are activated.
Side Lights
A single long press (greater than 1 second) of the Side Light (or left indicator) Switch will toggle the Side
Lights on and off. There is no Display feedback on the keypad when the side lights are active.
Hazard Lights
A single long press (greater than 1 second) of the Hazard (or right indicator) Switch will toggle the Hazard
Lights on or off. Both Left and Right Indicator Displays will flash when the Hazard Lights are active.
11
PILOT+
The PILOT+ control system comprises of two or three modules - Joystick Module, Power Module and
Actuator and Lighting Module (ALM). The ALM is only required if the optional Tilt-in-space or Powered
Reclining Backrest are fitted.
On/Off Switch and Battery Gauge
The on/off switch applies power to the control system electronics, which in turn supply power to the
wheelchair’s motors. Do not use the on/off power switch to stop the wheelchair unless there is an
emergency. (If you do, you may shorten the life of the wheelchair drive components).
The battery gauge shows you that the wheelchair is switched on. It also indicates the operating status of
the wheelchair. Details are given in the PILOT INTEGRAL controller section.
Security Key
The security key can be used to lock the wheelchair to prevent unauthorised use. To lock the wheelchair
it must be switched on, the key should then be inserted into and withdrawn from the battery charging
socket, the wheelchair will now be locked.
To unlock the wheelchair, firstly switch it on. The maximum speed indicator will ripple up and down but
driving will not be possible. The key should now be inserted into and withdrawn from the battery charging
socket, the wheelchair can now be driven.
12
JOYSTICK MODULE DETAILS
JOYSTICK
BATTERY CHARGING/
PROGRAMMING SOCKET
COMMUNICATIONS CONNECTOR
TO POWER MODULE
Joystick Module without Lighting
Joystick Module with Lighting
CONTROLS
ON/OFF SWITCH
LIGHTS SWITCH AND LED
BATTERY GAUGE
LEFT TURN INDICATOR SWITCH AND LED
MAXIMUM SPEED INDICATOR
RIGHT TURN INDICATOR SWITCH AND LED
MODE SWITCH
HORN SWITCH
HAZARD WARNING SWITCH AND LED
ACTUATOR INDICATOR
13
Horn Switch
The horn will sound whilst this switch is depressed.
Lights Switch and LED
To turn on the wheelchair’s lights operate this switch, the associated LED will illuminate.
Left Turn Indicator Switch and LED
To turn on the wheelchair’s left turn indicator operate this switch, the associated LED will flash at the same
rate. If the LED flashes rapidly, one of the left turn indicator bulbs is defective, contact your authorised
INVACARE dealer.
Right Turn Indicator Switch and LED
To turn on the wheelchair’s right turn indicator operate this switch, the associated LED will flash at the
same rate. If the LED flashes rapidly, one of the right turn indicator bulbs is defective, contact your
authorised INVACARE dealer.
Hazard Warning Switch and LED
To turn on the wheelchair’s hazard warning lamps operate this switch, the associated LED will flash at the
same rate. The left and right turn indicator LED’s will also flash.
Getting Ready to Drive
Operate the on/off switch. The battery gauge will blink then turn on after a second.
Check that the maximum speed control is set to a level which suits you.
Push the joystick to control the speed and direction of the wheelchair.
Please note that if you push the joystick before or just after you switch the control system on, the battery
gauge will ripple up and down and the wheelchair will not be allowed to move. You must release the
joystick to resume normal operation. If you do not release the joystick within five seconds the wheelchair
will not be able to move, even if you release the joystick and push it again. The battery gauge will then
flash rapidly. You can reset this condition by switching the control system off and on again.
If you do not push the joystick as you switch the wheelchair on and the battery gauge flashes rapidly, then
there may be a fault.
14
Maximum Speed Indicator
This is a gauge that shows the maximum speed setting of the wheelchair. There are five speed settings:
- step 1 is the lowest speed and step 5 is the highest speed
Mode Switch - Speed Settings
The mode switch is used to make the maximum speed changes and to change between wheelchair
operation modes.
If the mode switch is operated whilst you are driving the maximum speed setting will be increased by one
step. Each successive operation of the mode switch will increase the setting, when the setting is at 5 the
next mode switch operation will put the setting to 1. The diagram below explains this action.
SPEED 1
SPEED 5
SPEED 2
SPEED 4
SPEED 3
Fig.
Fig. 1 Operation of Mode
Mode Switch
Switch Whilst
Whilst Driving
Driving
Operating the mode switch will put
put the
the control
control system
system back
back into
into the
the drive
drive mode.
mode.
If the mode switch is operated when the joystick
joystick is
is centred,
centred, the
the control
control system
system operation
operation mode
mode will
will be
be
are three
three modes
modes -- drive, speed adjustment and actuator
changed. There are
actuator adjustment.
adjustment. The
The diagram
diagram below
below
explains this action.
DRIVE
MODE
SPEED
ADJUST
ACTUATOR
ADJUST
Fig. 2 Operation of Mode Switch Whilst Joystick Centred
15
Speed Adjustment Mode
When the control system is in this mode the maximum speed indicator will flash. The maximum speed can
be adjusted by left or right movements of the joystick. Left will decrease the speed setting, right will
increase it. Forward or reverse movements of the joystick will take you back into drive mode.
FORWARD
DECREASE
SETTING
INCREASE
SETTING
REVERSE
Fig. 3 Joystick Operation in Speed Adjustment Mode
Operating the mode switch will put the control system back into drive mode or, if seat adjustment actuators
are fitted, actuator adjustment mode.
Actuator Adjustment Mode
When the control system is in this mode the actuator indicator will be illuminated. The section of the
wheelchair symbol that is illuminated shows the actuator that is selected for adjustment. To change the
selected actuator move the joystick left or right. To make an actuator adjustment move the joystick
forwards or backwards.
UP
SELECT
SELECT
DOWN
Fig. 4 Operation of Joystick in Actuator Adjustment Mode
16
CONTROLLER OPTIONS
The optional Attendant, Chin and Centre are fitted with the PILOT+ Control System.
The display function is the same for each joystick module.
DUAL/ATTENDANT CONTROL
CAUTION: ATTENDANT, Before switching from Occupant Control to Attendant control, it is of the utmost
importance that the speed control is checked and a safe manageable speed is selected before activating
the joystick.
Failure to do so may cause the chair to move uncontrollably, causing injury to the occupant or other
people.
CHIN CONTROL
ATTENDANT CONTROL
CIRCUIT BREAKERS - 30 AMP
The circuit breakers are located at the front of the front battery box and at the front of the rear battery
box between the two battery boxes. They are fitted to operate if a current overload should occur. If one
of the breakers operate, it will ‘pop’ out. To re-set, push the knob in after a few minutes. If the circuit
breaker continually fails, consult your authorised INVACARE dealer.
Under certain circumstances, particularly indoor use, care must be taken to ensure safe continual
operation of the motor units. If an obstacle is encountered or, with slow manoeuvring of the castor
wheels from the forward to rear position, continual full operation of the joystick control will result in motor
overload and eventual failure.
To prevent this occurrence, increase the speed to maximum, control the manoeuvre by the joystick
control, always move away from the obstacle, do not continue to drive against it.
17
TRANSFERS
Learning how to get in and out of a wheelchair safely and without injury is most important. Transferring to
and from your powerchair may require practice and a good sense of balance. It is recommended that
whenever possible you have assistance when transferring to and from your powerchair. It is recognised,
however, that situations may occur when assistance is not available. It is desirable to learn and practice
different techniques to accomplish a safe transfer.
Many experienced wheelchair users have developed and mastered their own method of transferring to
and from the chair, resulting in great independence and self-care. Such ability depends largely on the
strength of the individual, their capabilities and the type of chair. No single technique would be practical,
or possible, for all wheelchair users. Safety is the primary consideration in all techniques.
To carry out the transfer confidently and to eliminate the possibility of personal injury, check the following:• Be sure the power is turned off.
• Be sure that the brakes are on and the drive engaged.
• Tip the footplates up or remove footrest assemblies completely to reduce the risk of leg or foot injury.
• Avoid standing or putting your weight on the footplates. This may cause the chair to tip.
• Remove armrest assemblies completely for side transfers.
Attendant assistance is recommended and the following advice is relevant:• The attendant lifting the occupant should take special precautions to avoid tipping or injuries from
lifting, supporting, turning and lowering the patient.
• The attendant is responsible for stabilising the wheelchair and must take precautions to prevent the
wheelchair moving or sliding during the transfer, ie apply brakes and ensure chair is not in free wheel.
• Be sure that the seat which is being transferred to is stable and will not create a possible hazard by
moving or tipping when the occupant is raised or lowered.
If in doubt, ask for assistance or use a device that will ensure safe transfer, ie patient lifter or
transfer board.
18
FOOTRESTS
REMOVAL - Standard
Release winged screw A and slide the complete assembly from the seat frame. Ensure the winged screw
is fully tightened when the footrest assembly is replaced.
REMOVAL - Swing - Away
Release the locking lever, swing footrest to the side, or lift up and off. Do this before sitting in the chair.
!
CAUTION:
CAUTION: ItIt isisrecommended
recommended that
that both
both footrests
footrests are
are firmly
firmly locked
locked in place
place when
when
seated
chair(particularly
(particularly
when
driving
chair).
NEVER
the footseated in
in the chair
when
driving
the the
chair).
NEVER
standstand
on theon
foot-plates.
plates.
the weight
of the
body
is placed
thefoot-plates,
foot-plates,damage
damagemay
may occur
occur and
If the Ifweight
of the
body
is placed
onon
the
the
tip forward.
forward.
thechair
chair may tip
ADJUSTMENT
To extend the footrest
footrest laterally,
laterally,release
release
the winged screw A, pull the footrest
footrest
forward, re-tighten when
when the
the desired
desired
position is achieved.
It is not necessary
necessary to
to release
release the
the grub
grub
screw B. This
This should
should remain
remain
permanently in position.
To adjust the footrest
footrest length,
length, loosen
loosen
the hex nut C on the
the extension
extension tube,
tube,
use a twisting motion when
when sliding
sliding the
the
telescopic tube in and out.
out. Be
Be sure
sure to
to
re-tighten the nuts
nuts securely
securely when
when the
the
desired height is achieved.
achieved.
THE
LOWEST PART
PART OF
OF THE
THE
THE LOWEST
FOOTREST
BE AT
AT LEAST
LEAST
FOOTREST MUST BE
6cm
(2•“) FROM
THE GROUND
GROUND
6cm (2½”)
FROM THE
FOR
FOR CLEARANCE.
CLEARANCE.
ELEVATING LEGRESTS
To raise or lower, release the lock by moving
the lever forward as shown.
When lowering the legrest, support the
weight of user’s leg then release the lock,
keep it from dropping too quickly. Keep in
mind that the lowest part of the footplate must
be 6cm (2”) from the ground.
LOCKING LEVER
19
PUSHING THE CHAIR - FREEWHEEL MODE
The power chair supplied is fitted with the lever dis-engage type motors. To dis-engage the drive to allow
the chair to be pushed the following instructions should be followed carefully.
To dis-engage the drive, operate the levers to the position A shown in the diagram.
LEVERS POINTING OUTWARDS.
To re-engage the drive, operate
LEVERS POINTING REARWARDS.
the
levers
to
position
B
shown
in
the
diagram.
Push the chair slightly forwards to ensure that both motors are fully locked in the drive position.
!
CAUTION
CAUTION
When
Whenthe
thedrive
driveisisdis-engaged
dis-engaged there
there are
are no
no brakes,
brakes, unless
unless the
the wheel-locks
wheel-locks are
are applied.
applied.
Before
Beforeentering
enteringororleaving
leaving the
thechair
chairalways
always re-engage
re-engage the
the drive
drive on
on both
both sides.
sides. On
On no
no
account
accountdis-engage
dis-engagethe
thedrive
drivewhen
whenthe
the chair
chair isis occupied,
occupied, unless
unless being
being pushed
pushed by
by an
an
attendant.
attendant.
!
WARNING
WARNING - -Emergency
Emergencyfreewheel
freewheeldevice.
device.
Always
freewheel
Always re-engage
re-engage the
the emergency
emergency freewheel
device
to do
do so
so may
mayresult
result
device after
after use.
use. Failure
Failure to
injury. !
inininjury.
20
OPERATING THE CHAIR OUTDOORS - KERB CLIMBING
Always remember to use the safety belt when operating the chair outdoors.
Ensure the footrests are locked in position.
KERB CLIMBING - Centre Mounting
It is important to follow the instructions detailed in ‘going up a kerb’ described below.
(Please
notethat
thatleft
leftororright
righthand
handare
are
REMOVAL:
(Please
note
REMOVAL:
identified
as though
being
seated
in the
chair).
identified
as though
being
seated
in the
chair).
detach
kerbclimber
climberfor
fortransportation
transportation follow
follow
To To
detach
thethe
kerb
these
simple
instructions;
these
simple
instructions;
Remove
Removethethelocking
lockingpinpinA,A, while
while holding
holding the
the
assembly.
Push
thethe
assembly
assembly.
Push
assemblydown
downtotorelease
releasefrom
from
the the
locating
bracket.
locating
bracket.
PullPull
thethe
assembly
towards
you
assembly
towards
youaway
awayfrom
fromthe
the right
right
hand
retaining
socket.
hand
retaining
socket.The
Thekerb
kerbclimber
climber isis now
now
detached.
Stow
carefully.
detached.
Stow
carefully.
RE-ASSEMBLY:
RE-ASSEMBLY:
Locate the assembly into the right hand retaining bracket.
bracket. Push
Push the assembly up into
into the
the left
left hand
hand bracket
bracket
and refit the locking pin A. Ensure
Ensure the
the pin
pin is
is correctly
correctly fitted
fitted firmly into place.
KERB:
GOING UP A KERB:
speed control
control to
to the
the maximum
maximumposition
position
Adjust the speed
to allow full power to
to the
the motors.
motors.
Approach the kerb head-on (90º),
(90º), do
do not
not charge
chargeat
at
the kerb.
With the front
front of
of the
the kerb
kerb climber
climber at
at about
about 2.5cm
2.5cm
(1“)
(1”) from
from the
the edge
edge of
of the
the kerb,
kerb, push
push the
the joystick
joystick
fully forward and
and continue
continue to
to climb
climb in
in one
one
movement. Do
Do not
not pause
pause or
orattempt
attempt to
to steer
steerduring
during
this movement.
If the kerb climb is un-achievable do not continue the manoeuvre, move away from the obstacle and if
possible find an alternative location.
GOING DOWN A KERB:
Approach the edge of the kerb square on. Drive forward down the kerb at a moderate speed. Kerbs of
7.5cm (3“) or more may tip the chair onto the foot plates. It is advisable to go down the kerb backwards
to overcome this problem.
The kerb climbing device will return to the climbing position after each manoeuvre.
NOTE: Climbing kerbs in excess of 10cm (4“) will be restricted if the foot plates are in the fully extended
position. Refer to page 16 for correct foot plate adjustment.
21
DIS-ASSEMBLY
To enable the chair to be carried in the boot of most cars, follow these instructions:
Step 1: Disconnect the Motor/Battery connector from the control box and remove the armrests. Release
the locking lever as shown on page 5.
Step 2: Remove the calf strap from the footrests. This is simply attached by Velcro fastening. Remove
the footrests completely by releasing the cam latch situated on the inside of the footrest frame hanger,
refer to page 16.
CAUTION: Do not drive the chair with the footrests in the unlatched position.
Step 3: Remove the kerb climber assembly (if fitted) as described on page 18.
Step 4: Detach the seat and backrest assembly as previously shown. When replacing the seat
assembly, ensure the brackets are located correctly on the seat frame tube.
Step 5: Disconnect the motor leads and the connecting cables from the battery boxes. Carefully lift the
battery boxes clear of the frame by the straps provided. Remove the battery tray. When refitting the battery
tray it is important that it is correctly located on the support pins.
Step 6: Remove the detachable motors as described on page 20.
The disassembled chair is now ready to be loaded safely in a suitable vehicle. Reversing the procedure
will allow the chair to be reassembled at your destination.
SPECIAL NOTE: Care must be taken when stowing the detached parts for transportation to ensure that
no damage occurs, particularly to the motor assemblies and controller units.
Due to the weight of the battery boxes, consideration must be given to their secure positioning in the event
of emergency braking.
EXTREME CARE MUST BE TAKEN WHEN LIFTING THE HEAVIEST COMPONENTS I.E. BATTERY
BOXES, FRAME AND MOTOR UNITS. ASSUME THE CORRECT LIFTING POSITION. SEEK
ASSISTANCE IF IN DOUBT.
22
DETACHABLE MOTORS
For practical purposes and ease of operation, it is advisable to detach the motors as the last component
of the chair to be dismantled and to re-attach first.
PLEASE NOTE: Assistance may be required while this operation is carried out.
Step 1: Unscrew the knurled locking knob A. This can be unscrewed completely and still be retained in
position.
Step 2: Release the side retaining pin B by turning it 180˚.
Step 3: Unbolt clamp C on the vertical frame member.
Step 4: Support the weight of the chair on the side the motor is being detached. Pull the motor assembly
towards the back of the chair, take care to hold the motor assembly when it becomes detached. Repeat
operation for both sides.
SPECIAL NOTE: Care must be taken when stowing the detached parts for transportation to ensure that
no damage occurs, particularly to the brake housing and gearbox unit.
To re-attach the motor assemblies, align the bottom tube rail with the tube of the motor assembly and push
firmly home. Re-tighten fully the knurled locking knob A. Do the same for both sides.
For ease of operation, it is advisable to re-attach the motor assemblies as the first operation in the
reassembly of the wheelchair after transportation.
NOTE: The disassembly and reassembly of the motor assemblies can be handled and attached easier if
the chair is carefully tipped onto the front, taking into account that the leg rests are not attached.
The chair can be transported disassembled safely in a suitable vehicle. Reversing the above procedures
will make your chair ready at your destination.
23
DRIVE WHEEL REMOVAL
To remove the rear drive wheels for puncture repairs carefully follow these instructions.
Release the four bolts shown as A in the diagram. Check the tyres for wear, if excessive, replacement is
recommended.
The wheel is a split rim. It is important that the bolts securing the rims together are NOT released if the
tyre is pneumatic and INFLATED.
Upon reassembly tighten the fixing bolts securely. The wheel is alloy, do not over-tighten as this may
damage the wheel rim.
If the tyre is being inflated with the wheel on the chair, ensure the wheel is off the ground during inflation.
Inflate the tyre slowly to recommended pressure, ensuring an even fit around the rim.
DRIVE WHEEL-LOCKS (MANUAL BRAKES)
When transferring to and from the chair ensure the
wheel locks are firmly ON and the motor drive is in the
engaged position. See page 17.
When transporting the complete chair in a vehicle, it is
important that motor drive is engaged and the wheel
locks are firmly ON. This will aid the use of the chair
restraints and protect the motor/gearbox from possible
damage.
24
TRANSPORTATION OF WHEELCHAIRS IN VEHICLES
RECOMMENDED RESTRAINT METHODS
For additional information, consult your authorised Supplier.
For transportation purposes other than disassembly, the Spectra Plus may be used in vehicles which
have been modified specifically for the purpose. The power chair must be secure using these
recommended restraint methods.
•
•
•
•
The power chairs are not designed or manufactured to be replacements for purpose built vehicle
seating.
The occupant must be secured to the vehicle separately in addition to any wheelchair restraints.
See Fig. No. 2.
Manually operated drive wheel locks (refer to page 21) must be used whilst the power chair is being
transported.
Fig. No. 1. shows the route of the battery restraint strap and the position of the Velcro fastening.
The restraint strap
must be tight and the
Velcro firmly
fastened.
Fig. No.1
The
tested to
to
The Power chair was tested
ISO
7176-19 using
using Unwins
Unwins
ISO 7176-19
Webbing
Restraints
with
Webbing Restraints
with
Tongue
Straps. The
The
Tongue and Buckle Straps.
system
comprises of front
front
system comprises
adjustable straps complete
complete with
with
quick release
release buckles
buckles and
and rear
rear
adjustable straps complete
complete with
with
karabiners
karabiners and
andbraided
braidedstraps.
straps.
The
secured at
at the
the
The straps are secured
specified
shown in
in Fig.
Fig.
specified points shown
No.2.
Both positions
positions are
are
No.2. Both
labelled „TIE
“TIE DOWN
DOWN POINT“.
POINT”.
Fig. No.2
THREE POINT
DOUBLE INERTIA
REEL HARNESS
FRONT
HEADREST MUST
BE FITTED
FRONT
ADJUSTABLE
STRAPS
COMPLETE WITH
QUICK RELEASE
BUCKLES
BATTERY STRAP
ASSY
REAR ADJUSTABLE
STRAPS
COMPLETE WITH
KARABINERS AND
BRAIDED STRAPS
The
(Fig. No.2)
No.2) shows
shows
The diagram (Fig.
the
headrest arrangement,
arrangement,
the headrest
which must be fitted,
fitted, and
and the
the
occupant’s
inertia seat
seat belt
belt
occupant’s inertia
which also must be used.
used.
Recommended alternative headrests may be used without affecting the CE marketing of the
power chair, provided a full risk assessment has been carried out by those who have
recommended the headrest to be safe for use with the power chair.
25
TRAY ASSEMBLY
FITTING - OPERATION INSTRUCTIONS
IMPORTANT: ENSURE THAT THE JOYSTICK CONTROL UNIT IS SWITCHED OFF BEFORE
FITTING, REMOVING OR ADJUSTING THE TRAY ASSEMBLY.
The tray assembly comes ready assembled and is designed to fit to either the left or right hand side of
the wheelchair.
The cut-out section is to accommodate the Joystick Control unit and determines which side the tray is
fitted i.e. Joystick Control fitted to the right hand side, therefore the tray fixings will be fitted to the left
hand side, and vice-versa.
Follow these simple instructions to fit:1.
2.
3.
4.
5.
6.
Remove the two screws A holding the arm pad to armrest support tube B.
Fit the slide mounting tube C beneath the armrest support tube using the existing screws, (see
diagram). Tighten the screws securely, (do not over tighten as this will damage the T-nut inserts
within the arm pad).
Loosen the wing screw D and slide the tray support tube extension into the slide mounting tube C.
With the occupant seated in the chair, adjust the tray to a comfortable working position, tighten
wing screw D.
Side to side lateral adjustment can be achieved by loosening the 4 screws E and sliding the tray
surface to the required position.
Ensure the tray is firmly positioned, level and central to the occupant’s requirements.
OPERATION
OPERATION -- REMOVAL
REMOVAL (Switch
(Switch OFF
OFF the
the Controller)
Controller)
The Tray can be placed to the side or removed completely to allow the occupant to get in and out of the
chair safely.
To do this, loosen the wing screw D, lift the tray and place to the side of the chair or remove completely
by pulling the tray assembly forward.
Do not attempt to drive the chair with the tray placed to the side as this may be hazardous to the
occupant and other people.
26
LATERAL SUPPORT
FITTING INSTRUCTIONS
THE LATERAL SUPPORTS CAN ONLY BE FITTED TO THE FIRM UPHOLSTERED BACKREST
ASSEMBLY (VISCOUNT SEATING).
To attach the lateral supports to the back of the backrest assembly follow these instructions.
Remove the existing pan-head screws from the top of each flange shown in Fig 1. Marked (A). The
lower screws of each flange remain in place.
Fig 1.
Fig 2.
Line up the
support rail with
the holes in the
backrest as
shown in Fig 2
With the
With
the longer
longer screws
screws provided
provided attach
attach the
the
support rail
rail to
to the
the backrest
backrestthrough
throughthe
theflanges
flanges
into the
into
the screw
screw inserts.
inserts. Do
Do not
not screw
screw into
intothe
the
backboard. Tighten
backboard.
Tighten securely,
securely, but do
do not
not
overtighten as
as this
overtighten
this may
may damage
damagethe
thescrewscrew
threaded inserts.
With the support
support rails
rails secured,
secured, slide
slidethe
thelateral
lateral
support into the
support
the support
support rail
rail from
from the
thebottom.
bottom.
Adjust to
to the
the occupant’s
occupant’srequirements
requirementsand
andfirmly
firmly
tighten the hand wheel (B).
(B).
27
CHARGING BATTERIES
The battery charger supplied with the wheel chair was developed to charge the batteries fitted to these
products. Using alternatives will damage the batteries which are fitted as standard and invalidate the
warranty on these components.
The charger and electronic controller are designed to prevent the wheelchair operating during the charging
process.
Refer to the operating instructions supplied with the battery charger for a detailed description of the battery
charging.
If the mains lead needs to be extended, make sure an approved adaptor is used. DO NOT extend the
charger lead to the chair.
Ensure that both battery charger leads are safely routed so that they cannot be tripped over. When
charging is completed, safely stow the leads away to avoid danger when driving away.
BATTERIES
The batteries fitted as standard to the wheelchair are sealed ‘Gel’ batteries and therefore cannot be spilled
like conventional ‘wet’ batteries. Keeping the chair working to its maximum potential means that the
batteries must be cared for and correctly charged. Nightly re-charging is necessary if the chair has been
used during the day to ensure that the chair is ready for use the following day. A separate booklet is
supplied as a guide to the care and performance of the batteries and charger.
Powered wheelchair batteries do not maintain a constant full battery charge level as an automobile
battery; therefore, a shorter battery life can be expected. For maximum battery life maintain batteries as
described.
MAINS
SOCKET
CHARGER
CONTROLLER
FRONT
Plug the charger plug into the charger socket at the front of the controller for the PILOT INTEGRAL and
the PILOT+ controller and into the rear of the DYNAMIC DL controller as shown in the relevant diagrams.
28
BATTERY CONNECTIONS
The chair is fitted with two maintenance free „Gel“ batteries. For battery replacement we recommend to
contact your authorised INVACARE dealer in order to ensure that replacement batteries are of the correct
type and specifications, and that they are correctly installed and connected.
A diagram showing the correct wiring connection is available on the inside of the front and rear battery box
lid. It is of the utmost importance that the battery connections are wired as shown in these diagrams. Pay
attention to ensuring all connections are tightened correctly.
Pollution from improper disposal
Have your batteries installed by a properly trained powerchair technician. Used batteries must NOT be
disposed of by means of a Domestic Refuse Disposal Unit (Dustbin) etc. All used batteries should be
recycled through an approved source. Please contact your authorised INVACARE dealer for correct
advice.
29
KEEPING YOUR CHAIR IN GOOD CONDITION
Your powerchair will benefit from periodic inspection, adjustment and replacement of worn parts. Regular
maintenance will enhance:•
•
•
•
•
Reliable performance.
Safety.
Extended battery life.
Confidence in operation.
Low operating costs.
You can help keep your chair in good condition by following a simple guide to home maintenance.
CHROME/PAINTWORK
This should be dried after contact with moisture. Clean once a month with a good quality auto-wax. Do not
use abrasive cleaners such as chrome cleaner or scouring cleaners as these will scratch the finish.
Do not store your chair in damp conditions.
UPHOLSTERY
The upholstery on the powerchair is vinyl or „Plush“ cloth material. Occasionally wipe with a damp cloth
moistened with soapy water. DO NOT use abrasive or chemical cleaners as this may damage the fabric
or vinyl coating.
Vinyl upholstery will become hard and prone to cracking if the special coating, which is applied to maintain
flexibility is removed by the abrasive, chemical cleaners or solvents.
Ultra-violet light can also reduce the life of the upholstery coating. This is a normal ageing process,
necessary precautions should be taken to guard against periods of long-term exposure to sunlight.
The result of these conditions cannot be covered by the specified warranty period.
BATTERIES
Keep your batteries well charged (see ‘advice on batteries and battery charging’ booklet). Keep batteries
in a dry, frost-proof place. Be sure battery terminals remain tight and not corroded.
FOOTRESTS
Footrests are easily adjusted for height, clamp nuts must be securely tightened. Do not stand on the
footplates.
CABLES AND CONNECTIONS
On a weekly basis, inspect all plug connections to be sure they are securely attached. A visual inspection
is usually adequate.
Ensure locking safety catch operates correctly and secures motor plugs.
Inspect all wires for worn insulation. If any are found they should be replaced immediately. Make sure
cables and wires are secured, and that they are routed away from any moving parts.
TYRES
Check the tread on your tyres regularly. Tyre pressure - inflate to recommended pressure as indicated in
the technical information section. Do not exceed the maximum air pressure indicated on the tyre.
Moulded tyres do not require pneumatic pressure, check periodically for wear.
30
CONTROLLER AND CHARGER
Servicing of the controller and charger should only be carried out by your local approved
dealer.
Do not attempt to open the units. Broken seals will invalidate the warranty.
BRAKES
WE STRONGLY RECOMMEND EVERY 6 MONTHS TO CHECK THE FUNCTION OF THE
ELECTRONIC BRAKES AND WHEEL - LOCKS ADJUSTMENT. ( THIS SERVICE MAY
NOT BE FREE OF CHARGE ).
MOTORS
The motors are fitted with long life brushes. These should be inspected for wear at twelve
months or more frequently if you use the chair daily for long periods. The brushes should
be replaced when they have worn down to 8mm in length.
NOT OVER
OVERLOAD THE MOTORS IN PROLONGED STALL CONDITIONS. If the chair is used
DO NOT
continuously
continuously for
for long periods, pause periodically to allow the motors to ‘cool down’.
WHEELS
DRIVE WHEEL
The dis-engage facility is simple to operate following the recommended instructions on Page 17.
Recommended correct use will maintain safety and ease of operation.
FAULT FINDING
Remember that most power drive problems are battery related. Sometimes expensive components are
when in fact the problem was batteries.
unnecessarily replaced
re
If an electrical problem exists, always check the batteries first, also check cable
connections for good contact. The electronics involved in the controller and lift and recline
modules are quite sophisticated:- electronic repairs should be carried out by trained
personnel.
IF YOUR CHAIR WILL NOT START
*•
*•
*•
*•
CheckChe
that the control box is switched ‘on’, the display will be illuminated and remain
stationary.
statio
CheckChe
that both motors are engaged.
CheckChe
that the main controller cable is firmly pushed ‘home’.
Do notDo
move
n the joystick until the display is illuminated.
IF THE WHEEL
WHEELCHAIR PULLS TO ONE SIDE
*•
*•
*•
*•
CheckChe
that the motors are fully engaged.
CheckChe
that pneumatic tyres are inflated to correct pressure.
CheckChe
that the castors move freely, and there is no free play at castor stem.
CheckChe
joystick drive function is in line with the left and right response. One motor may be
unplugged.
unpl
If your chair still has a problem after making these checks, please contact your authorised
INVACARE dealer.
31
SPECTRA PLUS
TECHNICAL INFORMATION
DIMENSIONS:
Seat Width:
Overall Width:
Overall Length:
Height:
Total Weight:
Battery Weight:
Maximum Carrying Capacity:
Tyre Size - Front
Tyre Size - Rear
Maximum Permissible Incline:
Speed:
38cm - 46cm
55cm
100cm
89cm
70kg
30AH - 11.7kg 40 AH - 14.8kg
18stone (114.3kg)
312mm x 50mm - (12%” x 2%”)
200mm x 50mm - (8“ x 2“)
12 - 20% - 1 in 5
Variable up to 4mph (6kph)
Tyre Pressure - (REAR)
Min 35psi (238kpa) Max 40psi (272kpa)
Recommended maximum tyre pressure is indicated on the side wall of the tyre.
BATTERY OPTIONS:
2 x 30ah Sonnenschein A512/30 Gel or equivalent
2 x 40ah Sonnenschein A512/40 Gel or equivalent
RANGE: (up to)*
30ah Batteries - 21km (13 miles)
40ah Batteries - 32km (20 miles)
* Travelling range it totally dependant on the state of charge and condition of the batteries,
weight carried, and variations in terrain and driving conditions.
Upholstery: The upholstery fitted to the Power Chair complies with the requirements for resistance to
Cigarette and Match ignition as required by ISO 7176:16 (1997), and the Furniture and Furnishings
(Fire) (Safety) 1988.
MAINTENANCE SCHEDULE
DAILY
BATTERY CAPACITY
BATTERY TERMINALS
JOYSTICK OPERATION
JOYSTICK LOCATION
SEAT BELT CONDITION
TYRES AND PRESSURE
FOOTREST LOCATION
ARMREST LOCATION
FRONT CASTORS
PLUGS AND SOCKETS
UPHOLSTERY CONDITION
BRAKE FUNCTION
MOTOR BRUSHES
MOTOR DISENGAGE
FRAME CONDITION
★
★
★
★
★
★
WEEKLY
MONTHLY
★
★
★
★
★
★
★
★
★
6 MONTHLY
YEARLY
★
★
★
★
★
★
★
★
★
★
★
★
★
★
★
★
★
★
★
★
Recommended 6 monthly service checks to be carried out by an
authorised INVACARE dealer.
29
32
APPROVED ACCESSORIES AVAILABLE
Puncture Proof Tyres
Tray
Detachable, powered reclining backrest
Elevating Legrests
Joystick knob options, See page 3.
PLEASE KEEP A NOTE OF THE DATE OF PURCHASE AND SERIAL NUMBER OF YOUR POWER CHAIR.
PLEASE QUOTE THIS NUMBER IN ALL CORRESPONDENCE AND SERVICE REQUESTS.
SERIAL NO.
DATE OF PURCHASE:
As with all powered motor vehicles we recommend that you take out maintenance
insurance cover for out of warranty service requirements. Contact your authorised
INVACARE dealer for advice and suitable options available.
The power chairs shown and described in this user manual may not be exactly the same in every detail
as your own model. However, all instructions are still entirely relevant, irrespective of detail differences.
The manufacturers reserve the right to alter without notice any weights, measurements, or other technical
data shown in this publication.
All figures, measurements and capacities shown in this user manual are approximate and do not constitute
specifications.
33
®
WARRANTY STATEMENT
GENERAL CONDITIONS OF LIMITED WARRANTY
POWERED PRODUCTS
MODELS COVERED: SPECTRA PLUS
Invacare will repair or replace, at our option, to the original purchaser, free of charge, any part found upon receipt
and examination by an authorised representative of Invacare to be defective in material and/or workmanship.
36 MONTHS WARRANTY - Items covered for thirty six months from the date of purchase.
Structural steel frame components including, side-frame, cross brace, footrest, back post and frame joints. (Excluding
hand grips).
18 MONTHS WARRANTY - Items covered for eighteen months from the date of purchase.
MOTORS - including Motor Brake for electrical function.
Eighteen months warranty with the exception of damage occurring to the commutator of the motor as a result of not
replacing motor brushes after heavy wear. Motor brushes and motor brake pads are wear items and will not be war
ranted.
CONTROLLERS/CHARGERS:
Eighteen months warranty for electrical function with the exclusion of rubber gaiters and related wiring looms.
BATTERIES:
Warranty is covered by the battery manufacturer for a period of twelve months. Only batteries which have been
tested, using approved battery manufacturer test equipment e.g. Battest 12202 or Astratec, and confirmed to be defective
will be replaced. Reduced performance will be assessed as to the possible cause and the feasibility of a warranty claim.
Only batteries supplied by Invacare are covered by the above conditions.
This warranty also excludes the following:
1.
Upholstery materials are wear and tear items and are only warranted against genuine manufacturing and
material defects.
2.
Tyres, including in-filled types, and tubes are wear and tear items and are not warranted.
3.
Damage caused by battery fluid spillage or leakage.
4.
Damage caused by:
a. Abuse, misuse, accident or negligence.
b. Improper operation, maintenance or storage.
c. Commercial use or use other than normal.
d. Repairs and/or modifications made to any part without specific consent from Invacare.
e. Circumstances beyond the control of Invacare.
5.
Labour, service calls and other charges incurred in the repair of the product unless specifically authorised by
Invacare.
The foregoing warranty is exclusive and in lieu of all other express warranties, implied warranties, including but not
limited to the implied warranties of merchantability and fitness for a particular purpose, and shall not extend beyond
the duration of the express warranty provided herein. Invacare shall not be liable for any consequential or incidental
damages whatsoever.
This warranty does not detract from but is in addition to your legal rights.
Warranty service can only be performed by an Invacare Authorised Dealer/Approved repairer.
Issue Date: 03/07/2000
®
INVACARE®INTERNATIONAL:
Belgium & Luxemburg: Autobaan 14 · B-8210 Loppem
Danmark: Sdr. Ringvej 39 · DK-2605 Brøndby
Deutschland, Österreich, Switzerland & Eastern Europe:
Kleiststraße 49 · D-32457 Porta Westfalica
España: c/ Areny · s/n - Polígon Industrial de Celrà · E-17460 Celrà (Girona)
France: Route de St Roch · F-37230 Fondettes
Italia: Via dei Pini, 62 ·I-36016 Thiene (VI)
Nederland: Celsiusstraat 46 · NL-6716 BZ Ede
Norge: Grensesvingen 9 · N-0603 Oslo
Portugal: Rua Senhora de Campanhã 105 · P-4369-001 Porto
Sverige & Suomi: Fagerstagatan 9 · P.O. Box 66 · S-163 91 Spånga
United Kingdom & Eire:
South Road · Bridgend Industrial Estate · Bridgend CF31 3PY · UK
SPECTRA PLUS
Part No. 02001018
®
GARANTIE
CONDITIONS GENERALES DES PRODUITS ELECTRIQUES A
GARANTIE LIMITEE
MODELE COUVERT : SPECTRA PLUS
GARANTIE DE 12 MOIS — Articles couverts pendant douze mois :
El ments du ch ssis en acier incluant les montants lat raux, croisillon, repose-pied, montant ext rieur du dossier et
joints du ch ssis. ( l exclusion des poign es). Moteurs, l exception de tout dommage du commutateur du moteur pour
ne pas avoir remplac les balais de moteur apr s une usure importante. Les balais de moteur et les plaquettes de frein
moteur sont des articles soumis usure et ne sont pas garantis.
COMMANDES/CHARGEURS :
Douze mois de garantie du fonctionnement lectrique l exclusion des gaines caoutchouc et de leurs faisceaux de c bles.
Les frais de main d ˇuvre, les appels de service et autres charges encourues lors de la r paration du produit
sauf en cas d autorisation de Invacare¤.
5.
Tout dommage provoqu par :
a. Des abus, une mauvaise utilisation, un accident ou par n gligence.
b. Un fonctionnement, une maintenance ou un stockage inad quats.
c. Une utilisation commerciale ou une utilisation anormale.
d. Des r parations et/ou modifications effectu es sur une pi ce sans l autorisation sp cifique de Invacare¤.
e. Des circonstances ind pendantes de la volont de Invacare¤.
4.
Tout dommage provoqu par une fuite de batterie.
3.
Les pneus, y compris les pneus pleins ainsi que les chambres air sont des articles soumis usure et ne sont
pas garantis.
2.
Les mat riaux de garniture sont des articles soumis
fabrication et de mat riau.
1.
usure et ne sont garantis que pour de r els d fauts de
Issue Date: 03/07/2000
ACCESSOIRES DISPONIBLES EN OPTION.
Puncture Proof Tyres
Tablette
Dossier inclinable électrique
Repose jambes
Manipulateurs différent., See page 3.
VEUILLEZ CONSERVER UNE NOTE AVEC LA DATE D’ACHAT ET LE NUMERO DE SERIE DE VOTRE FAUTEUIL
ET INDIQUER CE NUMERO DANS TOUTE CORRESPONDANCE ET DEMANDES DE SERVICE.
N° DE SERIE
DATE D’ACHAT :
Comme pour tous les véhicules électriques, nous vous recommandons de prendre une
assurance maintenance pour les exigences d’entretien non couvertes par la garantie.
Prenez contact avec votre distributeur Invacare® agréé pour obtenir des conseils et avis
sur les options disponibles.
Les fauteuils électriques représentés et décrits dans ce manuel d’utilisation peuvent ne pas être
exactement similaires à votre propre modèle. Cependant, toutes les instructions restent appropriées,
malgré les différences de détail.
Les fabricants se réservent le droit de modifier sans préavis les poids, mesures ou autres données
techniques figurant dans cette publication.
Tous les chiffres, mesures et capacités indiqués dans ce manuel d’utilisation sont approximatifs et non
contractuels.
22
SPECTRA PLUS
INFORMATIONS TECHNIQUES
DIMENSIONS:
Largeur d’assise :
Largeur hors-tout :
Longueur hors-tout :
Hauteur :
Poids total :
Poids de la batterie :
Capacité de charge maximale :
Dimension pneu - avant
Dimension pneu - arrière
Inclinaison admissible maximale :
Vitesse :
33 cm – 43 cm
min 58 cm
min 108 cm
89 cm
70 kg
40 AH – 14,8 kg
114.3kg
312 mm x 50 mm - (12%” x 2%”)
200 mm x 50 mm - (8” x 2”)
12 - 20 % - 1/5
ariable jusqu’à 6 km/h
Pression des pneus (ARRIERE) Min. 35 psi (238kpa) Max. 40 psi (272kpa)
La pression maximale recommandée pour les pneus est indiquée sur le flanc du pneu.
Batteries 40ah – 21Km
DISTANCE :
2 x 40ah Sonnenschein A512/40 sèches ou équivalent
OPTIONS BATTERIE :
* La distance de déplacement dépend entièrement du niveau de charge et de l’état des batteries, du
poids transporté et des variations de terrains et conditions de conduite.
Garniture : La garniture équipant le fauteuil électrique est conforme aux exigences de résistance à
l’inflammation par cigarettes et allumettes selon la norme ISO 7176:16 (1997), et mobilier et
aménagement (Incendie) (Sécurité) 1988.
PROGRAMME DE MAINTENANCE
QUOTIDIEN
DAILY
CAPACITE DE
LA BATTERIE
BATTERY
CAPACITY
BORNES DE TERMINALS
LA BATTERIE
BATTERY
FONCTIONNEMENT
DU JOYSTICK
JOYSTICK
OPERATION
EMPLACEMENT
DU JOYSTICK
JOYSTICK
LOCATION
ETAT DEBELT
LA CEINTURE
DE SECURITE
SEAT
CONDITION
PNEUS ET
PRESSION
TYRES
AND
PRESSURE
EMPLACEMENTLOCATION
DU REPOSE-PIED
FOOTREST
EMPLACEMENT
DE L’ACCOUDOIR
ARMREST
LOCATION
ROULETTES
AVANT
FRONT
CASTORS
FICHES ET
PRISES
PLUGS
AND
SOCKETS
ETAT DE LA GARNITURE
UPHOLSTERY
CONDITION
FONCTIONNEMENT
DES FREINS
BRAKE
FUNCTION
BALAIS DEBRUSHES
MOTEUR
MOTOR
DEBRAYAGE
MOTEUR
MOTOR
DISENGAGE
ETAT DU CHASSIS
FRAME
CONDITION
HEBDOMADAIRE
WEEKLY
★
MENSUEL
MONTHLY
TOUS
LES SIX MOIS
6 MONTHLY
★
★
★
★
★
★
★
★
★
★
★
★
★
★
★
★
★
★
★
★
★
★
★
ANNUEL
YEARLY
★
★
★
★
★
★
★
★
★
★
★
Nous
recommandons
des contrôles
tous les
effectués
Recommended
6 monthly
service checks
to 6bemois
carried
out bypar
an
un
distributeur
Invacare®
agréé.
authorised
INVACARE
dealer.
29
21
COMMANDE ET CHARGEUR
L’entretien de la commande et du chargeur ne doit être effectué que par votre distributeur
local agréé.
N’essayez pas de les ouvrir. La rupture du scellement invalidera la garantie.
FREINS
NOUS VOUS RECOMMANDONS VIVEMENT DE CONTROLER LE FONCTIONNEMENT
DES FREINS ELECTRONIQUES ET LE REGLAGE DES BLOCAGES DE ROUES TOUS LES
6 MOIS. ( CE SERVICE PEUT NE PAS ETRE GRATUIT).
MOTEURS
Les moteurs sont équipés de balais de grande longévité. Ceux-ci doivent être contrôlés
tous les douze mois ou plus fréquemment si vous utilisez le fauteuil chaque jour et assez
longtemps. Les balais doivent être remplacés lorsqu’ils ne font plus que 8 mm de longueur.
NE SURCHARGEZ
DO
NOT OVER PAS LES MOTEURS EN LES LAISSANT TOURNER TROP LONGTEMPS A L’ARRET.
Si le fauteuil for
est utilisé en continu pendant de longues périodes, faites des pauses régulièrement pour
continuously
laisser les moteurs refroidir.
DRIVE WHEEL
ROUES MOTRICES
The dis-engage
Le dispositif de débrayage est facile à utiliser en suivant les recommandations de la page 17.
Recommended
L’utilisation correcte selon les recommandations assurera un fonctionnement sûr et facile.
REPERAGE DES DEFAILLANCES
N’oubliez pas
que la plupart des problèmes de commande électrique sont dus aux batteries. Parfois des
Remember
that
éléments coûteux
unnecessarily
re sont inutilement remplacés alors qu’il s’agit simplement de problème de batterie.
En cas de problème électrique, commencez toujours par contrôler les batteries, vérifiez
également le bon contact des câbles de raccordement. Le système électronique de la
commande et les modules pour soulever et incliner sont très sophistiqués : les réparations
électroniques doivent être effectuées par du personnel formé.
SI YOUR
VOTRECHAIR
FAUTEUIL NE DEMARRE PAS
IF
*•
•
*•
*•
*
Vérifiez
Che que la boîte de commande est bien en marche, l’affichage doit s’éclairer et rester fixe.
Vérifiez
statioque les deux moteurs sont bien embrayés.
Vérifiez
Che que le câble de la commande principale est bien enfoncé.
Ne bougez
pas le joystick jusqu’à ce que l’affichage s’éclaire.
Che
Do n
SI LE FAUTEUIL TIRE D’UN COTE
IF THE WHEEL
•
Vérifiez que les moteurs sont bien embrayés.
Contrôlez
*•
Che que les pneus sont gonflés à la pression correcte.
Contrôlez
*•
Che que les roulettes bougent librement et qu’il n’y a pas de jeu au niveau de la tige de roulette.
Contrôlez
*•
Che le bon fonctionnement de la commande gauche / droite du joystick. Un seul moteur
peutChe
être débranché.
*
unpl
Si votre fauteuil présente encore un problème après ces contrôles, veuillez prendre
contact avec votre distributeur Invacare® agréé.
20
MAINTENIR VOTRE FAUTEUIL EN BON ETAT
Il est bénéfique pour votre fauteuil de lui offrir un contrôle périodique, un réglage et le remplacement des
pièces usagées. Une maintenance régulière assurera :
•
•
•
•
•
Une performance fiable.
La sécurité.
Une plus grande longévité de la batterie.
La confiance dans le fonctionnement.
De faibles coûts d’exploitation.
Vous pouvez maintenir votre fauteuil en bon état en suivant un simple guide de maintenance à la maison.
CHROME/PEINTURE
Il faut essuyer le fauteuil après tout contact avec l’humidité. Nettoyez-le une fois par mois avec une cire
pour voiture de bonne qualité. N’utilisez pas de produits abrasifs comme les produits pour chrome ou
produits de décapage car vous rayeriez la finition.
Ne stockez pas votre fauteuil à l’humidité.
GARNITURE
La garniture sur le fauteuil est en vinyle ou en velours. Lavez-la de temps en temps avec un chiffon
humidifié à l’eau savonneuse. N’utilisez pas de produits abrasifs ou chimiques car cela pourrait
endommager le tissu ou le revêtement vinyle.
La garniture en vinyle durcira et aura tendance à se craqueler si le revêtement spécial appliqué pour
conserver la souplesse est décapé par des abrasifs, produits chimiques ou solvants.
Les rayons ultraviolets peuvent également réduire la durée de vie du revêtement de la garniture. C’est un
processus de vieillissement normal, des précautions nécessaires doivent être prises pour le protéger des
longues expositions au soleil. Le résultat de cet état de fait ne peut pas être couvert par la garantie
spécifiée.
BATTERIES
Maintenez vos batteries bien chargées (voyez le livret ‘conseils sur les batteries et la charge’). Conservez
les batteries au sec et à l’abri du gel. Assurez-vous que les bornes de la batterie restent étanches et non
corrodées.
REPOSE-PIED
Les repose-pied peuvent être facilement réglés en hauteur, les écrous de serrage doivent être bien serrés.
Ne vous mettez pas debout sur les palettes.
PNEUS
Contrôlez régulièrement la bande de roulement de vos pneus.
Pression des pneus : gonflez à la pression recommandée indiquée dans la partie informations techniques.
Ne dépassez pas la pression d’air maximale indiquée sur le pneu.
Les pneus moulés n’ont pas besoin d’une pression pneumatique, contrôlez périodiquement leur usure.
19
RACCORDEMENTS DE LA BATTERIE
Le fauteuil est équipé de deux batteries sèches sans entretien. Pour le remplacement des batteries, nous
vous recommandons de prendre contact avec votre distributeur Invacare® pour être sûr que les batteries
de rechange sont correctes du point de vue du type et des spécifications, et qu’elles sont correctement
installées et connectées.
Un schéma indiquant le bon raccordement de câblage se trouve à l’intérieur du couvercle du boîtier de
batterie avant et arrière. Il est très important que les raccordements de batterie soient faits selon ces
schémas. Assurez-vous que tous les raccordements sont corrects.
Pollution par évacuation impropre
Faites installer vos batteries par un technicien formé. Les batteries usagées ne doivent PAS être évacuées
dans des unités d’évacuation d’ordures ménagères (poubelle) etc. Toutes les batteries usagées doivent
être recyclées par une source approuvée. Veuillez prendre contact avec votre distributeur Invacare® agréé
pour tout renseignement.
18
CHARGER LES BATTERIES
Le chargeur de batterie fourni avec le fauteuil a été mis au point pour charger les batteries adaptées à ces
produits. L’utilisation d’autres batteries endommagera les batteries montées sur le modèle de base et
annulera la garantie de ces éléments.
Le chargeur et la commande électronique sont conçus pour éviter le fonctionnement du fauteuil pendant
le processus de charge.
Se référer aux instructions d’utilisation fournies avec le chargeur de batterie pour une description détaillée
de la charge de batterie.
Si le cordon électrique doit être rallongé, utilisez un adaptateur homologué. NE tirez PAS le fil du chargeur
jusqu’au fauteuil.
Assurez-vous que les fils du chargeur passent dans un endroit sûr et qu’ils ne fassent pas trébucher
quelqu’un. A la fin de la charge, rangez bien les fils pour éviter tout danger en repartant.
BATTERIES
Les batteries montées sur le modèle standard du fauteuil sont des batteries sèches sans entretien et ne
peuvent donc pas fuir comme des batteries liquides traditionnelles. Maintenir le fauteuil à son potentiel
maximal signifie que les batteries doivent être entretenues et chargées correctement. Recharger les
batteries la nuit est nécessaire si le fauteuil a été utilisé pendant la journée pour être sûr qu’il soit prêt à
être utilisé le lendemain.
Les batteries des fauteuils électriques n’assurent pas un niveau de charge constant comme une batterie
de voiture ; on peut donc s’attendre à une moins grande longévité. Pour leur assurer une durée de vie
maximale, entretenez les batteries comme suit.
PRISE DE
MAINS
COURANT
SOCKET
CHARGEUR
CHARGER
MANIPULATEUR
CONTROLLER
AVANT
FRONT
17
INSTRUCTIONS DE POSE
DU CALE-TRONC
LES CALE-TRONCS NE PEUVENT ETRE MONTES QUE SUR UN DOSSIER A GARNITURE FERME
(ASSISE CONFORT).
Pour fixer les cale-troncs à l’arrière du dossier, suivez ces instructions:
Retirez les vis existantes à tête cylindrique large du haut de chaque bride représentée sur la Fig 1. marquée
(A). Les vis inférieures de chaque bride restent en place.
Fig 1.
Fig 2.
Alignez
rail du
Line uplethe
support
les
supportavec
rail with
trous
du dossier
the holes
in the
comme
backrest as
représenté
sur 2
la
shown in Fig
Fig 2
Avec
plus longues
fournies,
fixezattach
le rail de
support
With les
thevislonger
screws
provided
the
au
dossier
dansthrough
les inserts
Ne vissez
support
railpar
toles
thebrides
backrest
theà vis.
flanges
pas
dans
le panneau
into the
screw
inserts. arrière.
Do notSerrez
screwbien
into mais
the sans
excès
car celaTighten
pourrait endommager
les inserts
filetés.
backboard.
securely, but
do not
overtighten as this may damage the screwthreaded inserts.
Les rails de support étant fixés, faites coulisser le caletronc
dans
le rails
rail secured,
de support
le bas.
With the
support
slide depuis
the lateral
Ajustez
l’occupant
serrez bien le
supportselon
into les
the besoins
supportderail
from theetbottom.
volant
(B).
Adjust àtomain
the occupant’s
requirements and firmly
tighten the hand wheel (B).
16
POSE DE L’ENSEMBLE
TABLETTE - INSTRUCTIONS DE FONCTIONNEMENT
IMPORTANT: S’ASSURER QUE LA COMMANDE A JOYSTICK EST ETEINTE AVANT D’INSTALLER,
DE RETIRER OU D’AJUSTER L’ENSEMBLE TABLETTE.
L’ensemble tablette est monté d’avance et est conçu pour la gauche ou la droite du fauteuil.
La partie découpée est prévue pour loger la commande à joystick et détermine le côté de la pose de la
tablette, à savoir que si la commande à joystick est fixée à droite, les fixations de la tablette seront à
gauche et vice-versa.
Veuillez suivre ces instructions simples de pose :
1.
2.
3.
4.
5.
6.
Retirez les deux vis A maintenant l’appui-bras au tube support de l’accoudoir B.
Fixez le tube de montage coulissant C sous le tube de support de l’accoudoir en utilisant les vis
existantes, (voir schéma). Serrez bien les vis, (ne les serrez toutefois pas trop pour qu’elles
n’endommagent pas les inserts à écrou à T dans l’appui-bras).
Desserrez la vis papillon D et faites coulisser la rallonge du tube de support de la tablette dans le
tube de montage C.
L’occupant installé dans le fauteuil, ajustez la tablette à une position confortable, serrez la vis
papillon D.
Le réglage latéral côte à côte peut être exécuté en serrant les 4 vis E et en faisant coulisser la
surface de la tablette jusqu’à la position requise.
Assurez-vous que la tablette est bien positionnée, qu’elle est à niveau et au centre selon les
exigences de l’occupant.
OPERATION - REMOVAL (Switch OFF the Controller)
FONCTIONNEMENT - RETRAIT (Arrêt de la commande)
La tablette peut être placée sur le côté ou retirée entièrement pour permettre à l’occupant de s’installer
dans le fauteuil et d’en sortir en toute sécurité.
Pour ce faire, desserrez la vis papillon D, soulevez la tablette et placez-la à côté du fauteuil ou retirez-la
complètement en tirant l’ensemble tablette vers l’avant.
Ne tentez pas de conduire le fauteuil avec la tablette positionnée sur le côté, ceci pourrait être dangereux
pour l’occupant et d’autres personnes.
15
METHODES DE RETENUE RECOMMANDEES POUR LE TRANSPORT DE
FAUTEUILS ROULANTS DANS UN VEHICULE
Pour obtenir des informations complémentaires, consultez votre fournisseur agréé.
A des fins de transport autres que le démontage, le Spectra Plus peut être utilisé dans des véhicules ayant
été spécifiquement modifiés à cet effet. Le fauteuil roulant doit être fixé par les méthodes de retenue
recommandées.
•
•
•
•
Les fauteuils électriques ne sont pas conçus ni fabriqués pour remplacer des sièges de véhicule.
L’occupant doit être attaché au véhicule séparément en plus des dispositifs de retenue du fauteuil. Voir
Fig. n° 2.
Les dispositifs de blocage de roue manuels (voir page 21) doivent être utilisés lors du transport du fauteuil.
La fig. n° 1 représente le passage de la courroie de retenue de la batterie et la position de la fixation par Velcro.
Fig. No.1
The Power chair was tested to
ISO 7176-19 using Unwins
Webbing Restraints with
Tongue and Buckle Straps. The
system comprises of front
adjustable straps complete with
quick release buckles and rear
adjustable straps complete with
karabiners and braided straps.
The straps are secured at the
specified points shown in Fig.
No.2. Both positions are
labelled “TIE DOWN POINT”.
Larestraint
sangle de
The
strap
retenue
doitand
être
must
be tight
the
Velcro
firmly
serrée
et le
Velcro
fastened.
être
bien fixé.
Fig. No.2
FRONT
COURROIES
FRONT
REGLABLES A
ADJUSTABLE
L’AVANT
STRAPS AVEC
COMPLETES
COMPLETE
BOUCLES
A WITH
QUICK RELEASE
DEBLOCAGE
RAPIDE
BUCKLES
The diagram (Fig. No.2) shows
the headrest arrangement,
which must be fitted, and the
occupant’s inertia seat belt
which also must be used.
ENROULEUR
A
THREE
POINT
INERTIE TROIS
DOUBLE
INERTIA
POINTSHARNESS
REEL
UN APPUI-TETE
DOIT
HEADREST
MUST
ETRE
MONTE
BE
FITTED
BATTERY
SANGLE
DE STRAP
BATTERIE
ASSY
COURROIES
REGLABLES
REAR ADJUSTABLE
A L’ARRIERE
STRAPS
COMPLETES AVEC
COMPLETE WITH
MOUSQUETONS
ET
KARABINERS
AND
COURROIES
TRESSEES
BRAIDED STRAPS
14
RETRAIT DES ROUES MOTRICES
Pour retirer les roues arrières pour réparation en cas de crevaison, suivez ces instructions de près.
Desserrez les quatre boulons représentés par A sur le schéma. Contrôlez l’usure des pneus, si celle-ci est
excessive, nous vous recommandons de les remplacer.
La roue est une jante en deux parties. Il est important que les boulons fixant les jantes ensemble ne soient
PAS desserrés si le pneu est GONFLE.
Lors du remontage, serrez bien les boulons de fixation. La roue est en alliage, ne serrez pas trop car cela pourrait
endommager la jante.
Si le pneu est gonflé, la roue étant sur le fauteuil, faites en sorte qu’elle ne repose pas sur le sol lors du gonflage.
Gonflez le pneu lentement jusqu’à la pression recommandée, en assurant une répartition régulière autour
de la jante.
BLOCAGES DES ROUES MOTRICES (FREINS MANUELS)
Lors des transferts pour s’installer et sortir du
fauteuil, assurez-vous que les blocages de roue sont
bien en place et que l’entraînement du moteur est en
position embrayée. Voir page 17.
Lors du transport du fauteuil complet dans un
véhicule, il est important que l’entraînement du
moteur soit embrayé et que les blocages de roues
soient bien mis. Ceci viendra s’ajouter aux systèmes
de retenue du fauteuil et protégera le moteur / la
boîte de vitesse d’éventuels dommages.
13
MOTEURS AMOVIBLES
A des fins pratiques et pour faciliter le fonctionnement, il est souhaitable de démonter les moteurs en
dernier et de les repositionner en premier sur le fauteuil.
VEUILLEZ NOTER: qu’une assistance peut être requise lors de cette opération.
Etape 1:
Dévissez le bouton de verrouillage moleté A. Il peut être dévissé entièrement et rester toutefois
en position.
Etape 2:
Soutenez le poids du fauteuil du côté où le moteur est retiré. Tirez le groupe moteur vers
l’arrière du fauteuil en prenant soin de bien le tenir. Répétez l’opération de l’autre côté.
NOTE SPECIALE: Rangez avec soin les éléments démontés pour le transport afin d’éviter tout dommage,
en particulier pour le logement de frein et la boîte de vitesses.
Pour remonter les groupes moteurs, alignez le rail du tube inférieur avec le tube du groupe moteur et
poussez fermement et à fond. Resserrez complètement le bouton de verrouillage moleté A. Faites de
même de l’autre côté.
Pour faciliter l’opération, nous conseillons de remettre en premier les groupes moteurs lors du remontage
du fauteuil après transport.
NOTE: Le démontage et le remontage des groupes moteurs pourront être exécutés plus facilement si le
fauteuil est soigneusement basculé vers l’avant, en tenant compte du fait que les repose-jambes ne sont
pas fixés.
Le fauteuil peut être transporté démonté, en toute sécurité, dans un véhicule adapté. En inversant la
procédure ci-dessus, vous préparerez votre fauteuil à destination.
12
DEMONTAGE
Pour que le fauteuil puisse être transporté dans la plupart des coffres de voitures, suivez ces instructions :
Etape 1: Débranchez le connecteur du moteur / de la batterie de la boîte de commande et retirez les
accoudoirs. Relâchez le levier de verrouillage comme indiqué page 5.
Etape 2: Retirez la sangle appui-mollet des palettes. Elle est simplement fixée par velcros. Retirez
entièrement le repose-pied en desserrant le verrou à came situé à l’intérieur de la potence, voir page 16.
ATTENTION : Ne roulez pas avec les palettes en position déverrouillée.
Etape 3: Retirez le dispositif monte-trottoir (le cas échéant) selon description de la page 18.
Etape 4: Retirez l’ensemble siège et dossier comme indiqué précédemment. Lorsque vous les
positionnerez de nouveau, assurez-vous que les supports sont bien placés sur le tube du cadre d’assise.
Etape 5: Déconnectez les conducteurs du moteur et les câbles de raccordement des boîtiers de
batterie. Soulevez soigneusement les boîtiers de batterie du châssis à l’aide des courroies prévues à cet
effet. Retirez le support de batterie, lorsque vous le replacerez, veillez à bien le remettre sur les goupilles
de support.
Etape 6: Retirez les moteurs amovibles selon la description de la page 20.
Le fauteuil démonté est maintenant prêt à être chargé en toute sécurité dans un véhicule adapté. Inverser
la procédure permet de remonter le fauteuil à votre destination.
NOTE SPECIALE : Prenez soin de bien placer les éléments détachés pour le transport afin d’éviter tout
dommage, en particulier pour les ensembles moteur et unités de commande.
Du fait du poids des boîtiers de batterie, ceux-ci doivent être bien positionnés pour éviter tout problème
en cas de freinage d’urgence.
UN SOIN EXTREME DOIT ETRE PRIS POUR SOULEVER LES ELEMENTS LES PLUS LOURDS
COMME PAR EXEMPLE LES BOITIERS DE BATTERIE, LE CHASSIS ET LES MOTEURS. PRENEZ LA
BONNE POSITION DE LEVAGE. DEMANDEZ DE L’AIDE EN CAS DE
11
UTILISATION DU FAUTEUIL A L’EXTERIEUR – MONTER LES TROTTOIRS
N’oubliez jamais de mettre la ceinture de sécurité pour utiliser le fauteuil à l’extérieur.
Assurez-vous que les palettes sont verrouillées en position.
MONTER LES TROTTOIRS – Montage au centre
Il est important de suivre les instructions détaillées dans ‘monter un trottoir’ décrites ci-dessous.
(Veuillez
noternote
que that
la gauche
la droite
RETRAIT:
(Please
left orou
right
hand sont
are
REMOVAL:
identifiées
comme
si l’onbeing
était seated
assis dans
le fauteuil).
identified
as though
in the
chair). Pour
retirer le monte-trottoir pour transport, suivez ces
instructions
: climber for transportation follow
To detachsimples
the kerb
these simple instructions;
Retirez la goupille de verrouillage A, tout en maintenant
l’ensemble. Poussez l’ensemble vers le bas pour le
Remove
the locking
pin A, while holding the
dégager
du support
de positionnement.
assembly. Push the assembly down to release from
thel’ensemble
locating bracket.
Tirez
vers vous à partir de la prise de retenue
droite. Le monte-trottoir est ainsi retiré. Rangez-le
soigneusement.
Pull the assembly towards you away from the right
hand retaining socket. The kerb climber is now
detached. Stow carefully.
REMONTAGE:
RE-ASSEMBLY:
Placez
l’ensemble
le support
deretaining
retenue bracket.
droit. Poussez
dans
support
gauche
et
Locate the
assemblydans
into the
right hand
Push thel’ensemble
assembly up
intolethe
left hand
bracket
replacez
la goupille
A. Assurez-vous
que lafitted
goupille
bien
en place.
and refit the
locking de
pinblocage
A. Ensure
the pin is correctly
firmlyest
into
place.
MONTER UN TROTTOIR :
GOING UP A KERB:
Ajustez la commande de vitesse à la position maximale
pour
la puissance
Adjustmettre
the speed
control maximale.
to the maximum position
Approchez-vous
du trottoir de face (90º) et en
to allow full powerdutobord
the motors.
douceur.
Approach the kerb head-on (90º), do not charge at
Avec
l’avant du monte-trottoir à environ 2.5 cm (1”) du
the kerb.
bord
du trottoir,
joystick
With the
front of poussez
the kerb leclimber
at complètement
about 2.5cm en
avant
et montez
le trottoir
en unpush
seul mouvement.
(1”) from
the edge
of the kerb,
the joystick Ne
vous
ne continue
tentez pas to
de climb
manœuvrer
lors de
fully arrêtez
forwardpas,
and
in one
ce
mouvement
. pause or attempt to steer during
movement.
Do not
Si
ne parvenez pas à monter le trottoir, ne
thisvous
movement.
persistez pas, éloignez-vous de l’obstacle et si possible
trouvez une alternative.
If the kerb climb is un-achievable do not continue the manoeuvre, move away from the obstacle and if
possible find an alternative location.
DESCENDRE UN TROTTOIR :
Approchez du bord du trottoir de face. Descendez le trottoir à une vitesse modérée. Des trottoirs de 7,5
cm (3”) ou plus peuvent faire basculer le fauteuil sur les palettes. Nous recommandons de descendre les
trottoirs vers l’arrière pour résoudre ce problème.
Le monte-trottoir reprend sa position initiale après chaque manœuvre.
10
POUSSER LE FAUTEUIL – MODE ROUE LIBRE
Le fauteuil livré est équipé de moteurs de type à levier de débrayage. Pour débrayer le moteur afin qu’une
personne puisse pousser le fauteuil, suivez de près les instructions suivantes. Pour débrayer le moteur,
mettez les leviers en position A comme indiqué sur le schéma.
LEVIERS DIRIGES VERS L’EXTERIEUR.
Pour réembrayer le moteur, mettez les leviers en position B comme indiqué sur le schéma.
LEVIERS DIRIGES VERS L’ARRIERE.
Poussez légèrement le fauteuil vers l’avant pour être sûr que les deux moteurs sont bien bloqués en
position d’entraînement.
!
ATTENTION
CAUTION
est débrayé,
n’ybrakes,
a pas unless
de freins,
si les dispositifs
de
When Lorsque
the drive le
is moteur
dis-engaged
there areIl no
the sauf
wheel-locks
are applied.
roues sont
utilisés.
Avantre-engage
de vous installer
ouon
deboth
quitter
le fauteuil,
Beforeblocage
enteringdes
or leaving
the chair
always
the drive
sides.
On no
réembrayez
le moteur
deschair
deux iscôtés.
Ne débrayez
jamais pushed
le moteur
account
dis-engagetoujours
the drive
when the
occupied,
unless being
bysianle
fauteuil est occupé, sauf s’il est poussé par un assistant.
attendant.
!
WARNING
- Emergency
freewheel
device.
AVERTISSEMENT
– Dispositif
de roue
libre
de secours.
Réembrayez
toujours
le
Always
re-engage
the emergency
freewheel
dispositif
roue
libre to
dedosecours
device
afterdeuse.
Failure
so mayaprès
result
inutilisation
injury. afin d’éviter tout dommage.
9
REPOSE-PIEDS
RETRAIT - Standard
Desserrez la vis papillon A et faites glisser tout l’ensemble hors du châssis du siège. Assurez-vous que la
vis papillon est bien serrée après avoir replacé l’ensemble repose-pied.
RETRAIT - Basculement
Desserrez le levier de verrouillage, basculez le repose-pied sur le côté, ou soulevez-le et sortez-le. Faitesle avant de vous installer dans le fauteuil.
!
ATTENTION : Nous recommandons de bien verrouiller les deux palettes en place avant de
vous installer dans le fauteuil (en particulier pour conduire le fauteuil). Ne vous mettez
JAMAIS debout sur les palettes. Si le poids du corps repose sur les palettes, cela pourrait
entraîner des dommages et le fauteuil pourrait basculer vers l’avant.
REGLAGE
Pour étendre le repose-pied latéralement,
desserrez la vis papillon A, tirez le reposepied vers l’avant, revissez lorsque la
position souhaitée est obtenue. Il n’est
pas nécessaire de desserrer la vis sans
tête B. Elle doit rester en permanence en
position.
Pour ajuster la longueur du repose-pied,
desserrez l’écrou hexagonal C sur le tube
de rallonge, exercez un mouvement de
torsion pour faire coulisser le tube
télescopique. Resserrez-bien les écrous
une fois la hauteur désirée obtenue.
LA PARTIE INFERIEURE DU REPOSEPIED DOIT ETRE A AU MOINS 6 cm DU
SOL.
REPOSE-JAMBES RELEVABLES
Pour les lever ou les abaisser, desserrez le
verrouillage en déplaçant le levier vers l’avant
comme indiqué. En abaissant le reposejambes, soutenez le poids de la jambe de
l’utilisateur puis relâcher le verrouillage, ne le
laissez pas tomber trop rapidement. N’oubliez
pas que la partie inférieure du repose-pied
doit être à au moins 6 cm du sol.
LEVIER DE
VERROUILLAGE
LOCKING
LEVER
8
TRANSFERTS
Apprendre à s’installer et à sortir d’un fauteuil en toute sécurité et sans se blesser est ce qu’il y a de plus
important. Les transferts nécessitent de la pratique et un bon sens de l’équilibre. Nous vous
recommandons, lorsque cela est possible, de vous faire assister lorsque vous vous installez ou que vous
sortez de votre fauteuil. Nous savons toutefois que l’assistance n’est pas toujours possible. Il est
souhaitable d’apprendre et de pratiquer différentes techniques pour réaliser ces transferts en toute
sécurité. De nombreux utilisateurs expérimentés ont mis au point leur propre technique de transfert et la
maîtrise, ce qui leur confère une grande indépendance et une grande autonomie. Cette capacité dépend
beaucoup de la force de la personne, de ses capacités et du type du fauteuil. Il n’y a pas une seule
technique pour tous les utilisateurs de fauteuil roulant. La sécurité est la considération numéro un de toutes
les techniques. Pour réaliser le transfert en toute confiance et pour éliminer le risque de blessure, contrôlez
ce qui suit :
• Assurez-vous que le fauteuil est éteint.
• Assurez-vous que les freins sont mis et que le moteur est embrayé.
• Basculez les palettes vers le haut ou retirez-les entièrement pour réduire le risque de se blesser à la
jambe ou au pied.
• Evitez de vous mettre debout ou de faire porter le poids de votre corps sur les palettes. Ceci pourrait
faire basculer le fauteuil.
• Retirez entièrement les ensembles accoudoir pour les transferts latéraux.
Nous conseillons l’assistance d’une tierce personne et faisons la recommandation suivante :
• La personne soulevant le patient doit prendre des précautions particulières pour éviter le basculement
ou des blessures en levant, soutenant, tournant et installant le patient.
• L’assistant doit stabiliser le fauteuil et doit prendre des précautions pour que le fauteuil ne bouge ni ne glisse
pendant le transfert, à savoir mettre les freins et s’assurer que le fauteuil n’est pas en roue libre.
• Assurez-vous que le siège faisant l’objet du transfert est stable et ne va pas créer un risque en bougeant
ou en basculant lorsque l’occupant sera soulevé ou installé.
En cas de doute, demandez de l’aide ou utilisez un appareil de transfert sûr, à savoir un lève-malade ou
une plaque de transfert.
7
TENSION
ADJUSTABLE
BACKREST
DOSSIER
REGLABLE EN
TENSION
The
backrestdeupholstery
tension
can be peut
adjusted
achievepour
the
La tension
la garniture
du dossier
être toajustée
obtenir le
confortfor
désiré
par chaque
utilisateur en fonction de ses
desired
comfort
individual
user requirements.
besoins.
To achieve this, lift the backrest upholstery cover by peeling the
Pour cefastening
faire, soulevez
la housse
de la garniture
du dossier
en
Velcro
and fold
clear. Adjust
the individual
tension
retirant les fixations par Velcro et rabattez-la. Ajustez chaque
straps
to the occupant’s comfort.
sangle de tension pour le confort de l’occupant.
Ensure
the straps
correctly
positioned
and replace
the
Assurez-vous
que lesare
sangles
sont bien
positionnées
et replacez
backrest
attaching
by the
Velcro
fastening.
la houssecover,
du dossier
en lasecurely
fixant bien
à l’aide
des
velcros.
MANUAL TILT-IN-SPACE
To operate the manual tilt-in-space to allow the complete seat/backrest to tilt backwards, turn the large
hand-wheel A until the desired sitting position is achieved. Rotating the hand-wheel in the opposite
direction will lower the seat/backrest section.
TAKE CARE: WHEN DRIVING THE POWER CHAIR WITH THE TILT-IN-SPACE OUTDOORS, THE
SEAT TILT MUST BE RETURNED TO THE NORMAL LOWERED POSITION BEFORE ATTEMPTING
KERB CLIMBING OR ASCENDING AND DESCENDING SLOPES. THIS ALSO APPLIES TO THE
OPTIONAL POWERED TILT-IN-SPACE OR POWERED RECLINING BACKREST.
6
Armrest Adjustment
AREGLAGE
DE L’ACCOUDOIR
La
l’accoudoir
être préréglée
en positionnant
la visscrew
autotaraudeuse
(F)
Thehauteur
armrestde
can
be pre-setpeut
for height
by positioning
the self-tapping
(F) in one of
dans
l’un indes
du tube.
tube To
d’accoudoir.
Pour régler
hauteurfirst
de release
chaquethe
accoudoir,
the holes
thetrous
armrest
adjust the height
of eachlaarmrest,
locking
commencez
parclamps
relâcher
le arm
levier
de verrouillage
(E)onto
qui bloque
le tube
de l’accoudoir
lever (E) which
the
tube,
while holding
the armrest.
Move
the armresttout
to
en
l’accoudoir.
hauteur
resserrez
les vis
the maintenant
desired height
position,Déplacez
re-tightenl’accoudoir
the lockingà la
wing
screwsouhaitée,
(E). The locking
lever
(if
papillon de verrouillage (E). Le levier de verrouillage (s’il est monté) peut être replacé sans
fitted) can be re-positioned without losing the clamping pressure, pull the lever slightly
perdre la pression de serrage, tirez le levier légèrement vers l’extérieur et tournez-le dans un angle plus
outwards
adapté. and turn to a more suitable locating angle.
The
padded
side panel
also be être
set to
a desired
height.souhaitée.
Loosen the
slotted screw
located
in the
Le côté
rembourré
peutcan
également
réglé
à la hauteur
Desserrez
la vis (D)
fendue
(D) placée
fixing
bracket,
re-tighten
when
desired position
dans le
support
de fixation,
resserrez-la
lorsqueislaachieved.
position souhaitée est obtenue.
Width Adjustment
REGLAGE
DE
LA
LARGEUR
The
transverse
adjustment
achieved
by releasing
Le réglage
de width
la largeur
se faitisen
relâchant
le levier
locking
lever (G) and
the armrest le
tube
to width
de verrouillage
(G)positioning
en positionnant
tube
de
required
and re-tightening
lever
remove the
l’accoudoir
à la largeurlocking
requise
et (G).
en To
resserrant
le
transverse
width adjustment
armrest
assembly
complete
levier de verrouillage
(G). Pour
retirer
tout l’ensemble
to
allow removal
of the
batterytransversale
box/controller
accoudoir
à réglage
de front
la largeur
et
assembly: remove seat, release locking lever (G), depress
pouvoir
retirer
le
boîtier
de
batterie
avant
/
l’ensemble
spring
button :lock
(F) and
completelearmrest
commande
retirez
le withdraw
siège, relâchez
levier unit
de
sideways.
verrouillage (G), appuyez sur le verrouillage par
bouton à ressort (F) et retirez l’accoudoir complet
NOTE:
When re-assembling to chair always ensure the
latéralement.
spring button lock (F) is on the inside of the horizontal
mounting
tuberemontant
of the sideframe
to prevent
accidental
NOTE: En
le fauteuil,
assurez-vous
dismantling
of armrest
unit.
toujours que
le verrouillage
par bouton à ressort (F)
se trouve à l’intérieur du tube de montage horizontal
du montant latéral pour éviter le démontage
accidentel de l’accoudoir.
!
CAUTION: The armrests are not intended for carrying the wheelchair.
CAUTION: The armrests are not intended for carrying the wheelchair.
5
!
ASSISE ET DOSSIER RÉGLABLE
Avertissement : Il devrait être noté que sous les certaines conditions, et les configurations du
fauteuil roulant, ie. pour les utilisateurs avec limité/aucun contrôle de corps latéral, et avec le
dossier dans la position reposée, il y a le potentiel pour créer un piège de corps entre
l'accoudoir/le côté-panneau et le dossier.
Les accessoires convenables sont disponibles de Invacare (le tronc latéral soutient) éliminer
ce risque.
Avant de s'asseoir dans la chaise, s'assurer qu'il n'est pas allumé. Si c'est SUR, l'indicateur de condition
de pile (10 exposition de Barre) sera illuminé, (voir la page 7 à 14).
REGLAGE DE LA PROFONDEUR DU SIEGE
Le montage individuel de l’assise permet de régler la profondeur du siège de 35mm (1_”). Le réglage se
fait habituellement en une fois et comme suit. Il vous faudra un grand tournevis cruciforme et une clé de
13 mm.
1. Retirez l’embout plastique au point A, dévissez et retirez la vis et l’écrou, répétez l’opération de l’autre côté.
2. Déplacez le support de montage du dossier vers l’arrière en position étendue. Replacez l’écrou et la vis
dans le trou choisi et resserrez les bien, replacez l’embout plastique et répétez l’opération de l’autre côté.
REGLAGE DE L’INCLINAISON DU DOSSIER
L’inclinaison du dossier peut être réglée vers l’arrière de
90 à 12°. Le réglage qui ne doit normalement être fait
qu’une fois se fait selon la séquence suivante (voir
schéma) à l’aide d’une clé de 13 mm et du tournevis
cruciforme. Faites le même réglage des deux côtés.
1. Desserrez le contre-écrou B placé sur la vis
cruciforme.
2. Dévissez partiellement le volant à main de blocage C.
3. Vissez ou dévissez la vis cruciforme pour obtenir la
position souhaitée. Ajustez la position du volant à
main dans la mesure du nécessaire.
4. Placez le contre-écrou B sur le support de montage
et serrez le bien.
5. Resserrez complètement le volant à main C; assurez
vous que l’ensemble dossier est bien fixé.
Veuillez noter que chaque tube de dossier doit être placé sur le même plan sinon le dossier sera en torsion.
Le dossier doit être soit replié vers le bas soit retiré de la base du fauteuil.
Suivez ces instructions supplémentaires :
1. Dévissez le volant à main C d’environ cinq tours complets. Tirez le dossier vers le haut et rabattez-le
vers l’avant sur le siège. Réglez la largeur de l’accoudoir si nécessaire.
2. Pour le retirer, dévissez le volant à main de trois à quatre tours supplémentaires. Ne desserrez pas la
vis cruciforme.
3. Poussez le dossier légèrement vers l’avant et tirez-le vers le haut.
4. Pour replacer l’ensemble dossier, assurez-vous que les goupilles sont bien alignées dans les fentes du
support de montage, resserrez-bien le volant à main des deux côtés.
4
CARACTÉRISTIQUES
La vitesse et la direction du moteur sont régulées par la commande à joystick. Avec de la pratique, le contrôle
automatique de l’accélération, le freinage et le changement de direction vous permettront de circuler sans
secousses. Le sélecteur de vitesse variable vous assure un contrôle total dans tout environnement.
• Les batteries montées sur le modèle de base sont entièrement étanches et ne
peuvent donc pas fuir comme les piles ‘liquides’ traditionnelles. La performance et
le fonctionnement fiable dépendent du soin apporté aux batteries et à leur charge.
Veuillez vous référer au paragraphe approprié et au livret fourni. Les batteries
sèches sans entretien sont classées comme n’étant pas dangereuses par toutes les
autorités de transport par avion et de transport en général.
Les véhicules de mobilité équipés de ces batteries peuvent être transportés en toute
sécurité dans des avions, bateaux, bus, ambulances ou train sans qu’il soit
nécessaire de retirer les batteries.
BATTERIES
• Le fauteuil roulant ne peut pas fonctionner lorsque les batteries sont en charge. Des
circuits de commande sont conçus pour empêcher le fonctionnement pendant le
processus de charge.
CHARGE
PNEUMATIQUES • Des roues motrices pneumatiques et des roulettes sont montées sur les modèles
standard. Les roues anti-crevaison n’obligent pas à maintenir les pressions et
procurent une conduite sans à-coups mais légèrement plus dure. Elles sont
proposées en option.
• Le bouton monté sur votre joystick est fourni sur le modèle standard et convient à la
plupart des applications. S’il ne vous convient pas, il existe toute une gamme
d’alternatives. Prenez contact avec votre distributeur de fauteuils pour avoir des
conseils. Ne remplacez pas le bouton du joystick par un dispositif non autorisé, cela
pourrait être dangereux.
OPTIONAL
• La garniture respecte les exigences de résistance à l’inflammation par cigarettes et
allumettes ISO7176/16. Se référer à la partie sur le nettoyage et l’entretien des
matériaux de garniture. Une exposition prolongée aux rayons ultraviolets diminue la
durée de vie de la garniture, elle doit être protégée des rayons du soleil.
TOILES
JOYSTICK
CONTROL
KNOBS
3
FAMILIARISEZ-VOUS AVEC VOTRE NOUVEAU FAUTEUIL ELECTRIQUE
Assurez-vous que votre distributeur retourne bien la CARTE D’ENREGISTREMENT DE LA GARANTIE
afin que votre véhicule soit couvert pendant les périodes de garantie concernées contre les vices de
fabrication ou de matériaux.
Vous pouvez vous référer à la carte de garantie de l’utilisateur pour de plus amples informations.
LES AJUSTEMENTS RECOMMANDES QUI DOIVENT ETRE EFFECTUESTRAINED
PAR UN
DISTRIBUTEUR FORME ET AGREE PAR Invavcare® SONT IDENTIFIES PAR CE SYMBOLE.
MESURES DE SECURITE
utions:Avant d’utiliser votre fauteuil roulant électrique, il est nécessaire de lire et de comprendre
les mesures de sécurité suivantes :
mechanical
• Maintenez votre fauteuil roulant en bon état de marche. Comme avec tous lesdvéhicules
intervals.
électromécaniques, des contrôles réguliers aux fréquences recommandées
luiseront bénéfiques.
n, manual
!
• N’oubliez jamais de mettre la ceinture de sécurité pour utiliser le fauteuil à l’extérieur.
outdoors.
• Soyez prudent lorsque vous utilisez votre fauteuil sur des pentes de 1/5.
20% gradient).
• Engagez-vous uniquement si le revêtement de la surface est ferme, régulieravoid
et sec,
sinon
évitez toute
steep
slopes.
pente raide.
Soyez particulièrement prudent par mauvais temps. Le freinage et
l’accrochage des pneus peuvent être réduits sur surfaces mouillées ou
verglacées. Soyez prudent sur les pentes et les surfaces irrégulières.
Ne tentez pas de prendre des pentes de biais, le fauteuil pourrait s’en
trouver déstabilisé, multipliant ainsi le risque d’accident et de dommages
corporels éventuels.
• Lorsque vous montez des côtes, il est important que vous le fassiez en une
fois. Commencer à avancer à partir d’une position à l’arrêt sur une pente
nécessite une attention supplémentaire pour ne pas faire basculer le
fauteuil vers l’arrière. Démarrez doucement et accélérez avec prudence.
• Lorsque vous descendez une pente, sélectionnez une vitesse lente,
arrêtez-vous de temps en temps si le fauteuil avance plus vite que vous ne
le souhaitez. Poussez le joystick doucement vers l’avant pour poursuivre la
descente. Ne vous penchez pas en avant.
• Evitez de stationner au bord de rivières, étangs, lacs, mer etc.
• Les réglages ne doivent être effectués que par votre distributeur Invacare®
agréé, afin d’assurer un fonctionnement correct et une utilisation en
toute sécurité.
• Assurez-vous que le fauteuil est sur ARRET et que l’entraînement à moteur est en prise lorsque vous
vous installez et que vous sortez du véhicule.
2
AVANT-PROPOS
Ce manuel comprend d’importantes instructions pour une maintenance et un
fonctionnement en toute sécurité. Nous vous invitons à le lire et à le comprendre avant
d’utiliser votre fauteuil et à vous y référer aussi souvent que nécessaire pour assurer
une utilisation en toute sécurité et une performance optimale.
!
Vous devrez vous familiariser avec toutes les procédures impliquées. S’il est mal utilisé, le fauteuil peut
devenir instable. Il vous faudra donc apprendre chaque caractéristique et capacité de votre fauteuil ainsi
que ses limites.
Les procédures de sécurité de base de ce manuel d’utilisation ne sont données qu’à titre indicatif. Il
vous sera peut-être nécessaire de développer vos propres méthodes afin de résoudre en toute sécurité
les problèmes rencontrés. N’hésitez jamais à demander de l’aide.
OBJECTIF DU FAUTEUIL ELECTRIQUE
Les fauteuils électriques standard conviennent aux personnes qui souhaitent acquérir une certaine mobilité,
en toute indépendance, associée au confort, à la manœuvrabilité, à la fiabilité et à une maintenance
minimale. L’utilisateur doit avoir un certain niveau de capacité, au minimum une main et un bras, un niveau
de vision raisonnable et une certaine notion de l’espace. Il doit avoir été formé à l’utilisation du produit, de
préférence dans son environnement habituel. Son poids maximum est indiqué au dos de ce manuel. Le
fauteuil convient à une utilisation à l’intérieur et à l’extérieur sur des surfaces sèches, raisonnablement lisses.
Il ne doit pas être utilisé par fortes pluies ou en cas de neige, sur des surfaces et pentes glissantes, sur
l’herbe mouillée, etc.
Il ne doit PAS transporter de personnes supplémentaires. Un excédent de bagage en dehors de l’assise
peut affecter sa stabilité.
CONSEILS DE SECURITE
Les fauteuils électriques sont conçus pour fonctionner dans des environnements appropriés.Cependant,
l’interférence électromagnétique provenant de sources telles que les stations radio et TV, les émetteurs
récepteurs radio amateur et les téléphones portables peut affecter les
fauteuils roulants électriques.
Les modifications non autorisées ou l’utilisation de pièces de rechange
non approuvées par Invacare peuvent modifier la structure du fauteuil et
créer une situation dangereuse. Invacare® ne sera pas tenu responsable
de modifications non autorisées dans les spécifications du fauteuil
électrique fourni. Toutes les informations et spécifications figurant dans
ce manuel sont valables au moment de l’impression. Cependant, étant
donné la politique d’amélioration continue des produits de Invacare, nous
nous réservons le droit de faire des modifications, à tout moment, sans
préavis.
1
SOMMAIRE
Avant-propos — Conseils de s curit . . . . . . . . . . . . . . . . . . . . . . . . . . . . . . . . . . . . . . . . . . . . . . . . 1
Familiarisez-vous avec le fauteuil lectrique. . . . . . . . . . . . . . . . . . . . . . . . . . . . . . . . . . . . . . . . .. . .2
R glage si ge, dossier, accoudoir . . . . . . . . . . . . . . . . . . . . . . . . . . . . . . . . . . . . . . . . . . . . . . . . . .3
Dossier r glable en tension . . . . . . . . . . . . . . . . . . . . . . . . . . . . . . . . . . . . . . . . . . . . . . . . . . . . . . . 4
Transferts — S installer dans le fauteuil et en sortir . . . . . . . . . . . . . . . . . . . . . . . . . . . . . . . . . . . . . .5
Repose-pieds, Repose-jambes relevables. . . . . . . . . . . . . . . . . . . . . . . . . . . . . . . . . . . . . . . . . . . . . 6
Mode roue libre — D brayage moteur . . . . . . . . . . . . . . . . . . . . . . . . . . . . . . . . . . . . . . . . . . . . . . . .7
Monter les trottoirs . . . . . . . . . . . . . . . . . . . . . . . . . . . . . . . . . . . . . . . . . . . . . . . . . . . . . . . . . . . . . 8
D montage — Pour le transport . . . . . . . . . . . . . . . . . . . . . . . . . . . . . . . . . . . . . . . . . . . . . . . . . . . . 9
Moteurs amovibles . . . . . . . . . . . . . . . . . . . . . . . . . . . . . . . . . . . . . . . . . . . . . . . . . . . . . . . . . . . . .10
Retrait de la roue motrice, Freins manuels . . . . . . . . . . . . . . . . . . . . . . . . . . . . . . . . . . . . . . . . . . . 11
Transport — M thodes de retenue . . . . . . . . . . . . . . . . . . . . . . . . . . . . . . . . . . . . . . . . . . . . . . . . . . 12
Tablette - Montage & fonctionnement . . . . . . . . . . . . . . . . . . . . . . . . . . . . . . . . . . . . . . . . . . . . . . . 13
Cale-troncs — Montage & Fonctionnement . . . . . . . . . . . . . . . . . . . . . . . . . . . . . . . . . . . . . . . . . . . 14
Batteries . . . . . . . . . . . . . . . . . . . . . . . . . . . . . . . . . . . . . . . . . . . . . . . . . . . . . . . . . . . . . . . . . . 15-17
Maintenance et entretien . . . . . . . . . . . . . . . . . . . . . . . . . . . . . . . . . . . . . . . . . . . . . . . . . . . . . . . . . 18
Rep rage des d faillances . . . . . . . . . . . . . . . . . . . . . . . . . . . . . . . . . . . . . . . . . . . . . . . . . . . . . . . . 19
Informations techniques . . . . . . . . . . . . . . . . . . . . . . . . . . . . . . . . . . . . . . . . . . . . . . . . . . . . . . . . . 20
Garantie . . . . . . . . . . . . . . . . . . . . . . . . . . . . . . . . . . . . . . . . . . . . . . . . . . . . . . . . . . . . . . . . . . . . . 21
Description du produit
Le fauteuil lectrique standard fourni dispose d une propulsion arri re, de batteries s ches sans entretien, d un
dossier hauteur standard, amovible, d accoudoirs r glables en largeur et en hauteur, amovibles, de repose-pied
r glables en hauteur et d une commande joystick mont e pour commande droite ou gauche.
Sans l aide d outils, les l ments du moteur de commande peuvent tre retir s ainsi que les bo tiers de batteries
amovibles et le ch ssis d mont , le fauteuil peut tre transport dans un v hicule adapt .
Il peut tre utilis pour transporter l usager dans un v hicule
recommand es.
condition de bien respecter les directives
La maintenance du produit doit tre assur e selon les recommandations par un distributeur agr
pour un fonctionnement continu, s r et fiable.
Invacare¤
®
Yes,you can.
Spectra
Spec Plus
Manuel d’utilisation