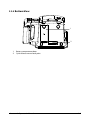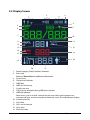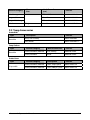
1
Vital Signs Monitor Operator’s Manual © Copyright 2013-2014 Shenzhen Mindray Bio-Medical Electronics Co., Ltd. All rights reserved. For this Operator’s Manual, the issue date is October 2014. Accutorr 3 Operator's Manual I Intellectual Property Statement SHENZHEN MINDRAY BIO-MEDICAL ELECTRONICS CO., LTD. (hereinafter called Mindray) owns the intellectual property rights to this Mindray product and this manual. This manual may refer to information protected by copyrights or patents and does not convey any license under the patent rights of Mindray, nor the rights of others. Mindray intends to maintain the contents of this manual as confidential information. Disclosure of the information in this manual in any manner whatsoever without the written permission of Mindray is strictly forbidden. Release, amendment, reproduction, distribution, rental, adaption and translation of this manual in any manner whatsoever without the written permission of Mindray is strictly forbidden. , , and are the registered trademarks or trademarks owned by Mindray in China and other countries. All other trademarks that appear in this manual are used only for editorial purposes without the intention of improperly using them. They are the property of their respective owners. Manufacturer 's Responsibility Contents of this manual are subject to changes without prior notice. All information contained in this manual is believed to be correct. Mindray is not liable for errors contained herein nor for incidental or consequential damages in connection with the furnishing, performance, or use of this manual. Mindray is responsible for the effects on safety, reliability and performance of this product, only if: all installation operations, expansions, changes, modifications and repairs of this product are conducted by Mindray authorized personnel; the electrical installation of the relevant room complies with the applicable national and local requirements; the product is used in accordance with the instructions for use. WARNING II Only skilled/trained clinical professionals should operate this equipment. It is important for the hospital or organization that uses this equipment to perform a reasonable service/maintenance plan. Neglecting this may result in machine breakdown or personal injury. Accutorr 3 Operator's Manual Warranty Mindray warrants that components within its products will be free from defects in workmanship and materials for a period of three years from the date of purchase except that disposable or one-time use products are warranted to be free from defects in workmanship and materials up to a date one year from the date of purchase or the date of first use, whichever is sooner. This warranty does not cover consumable items such as, but not limited to, batteries, external cables, and sensors. Mindray shall not be liable for any incidental, special, or consequential loss, damage, or expense directly or indirectly arising from the use of its products. Liability under this warranty and the buyer’s exclusive remedy under this warranty is limited to servicing or replacing the affected products, at Mindray’s option, at the factory or at an authorized distributor, for any product which shall under normal use and service appear to Mindray to have been defective in material or workmanship. Recommended preventative maintenance, as prescribed in the service manual, is the responsibility of the user and is not covered by this warranty. No agent, employee, or representative of Mindray has any authority to bind Mindray to any affirmation, representation, or warranty concerning its products, and any affirmation, representation or warranty made by any agent, employee, or representative shall not be enforceable by buyer or user. THIS WARRANTY IS EXPRESSLY IN LIEU OF, AND MINDRAY EXPRESSLY DISCLAIMS, ANY OTHER EXPRESS OR IMPLIED WARRANTIES, INCLUDING ANY IMPLIED WARRANTY OF MERCHANTABILITY, NON-INFRINGEMENT, OR FITNESS FOR A PARTICULAR PURPOSE, AND OF ANY OTHER OBLIGATION ON THE PART OF MINDRAY. Damage to any product or parts through misuse, neglect, accident, or by affixing any non-standard accessory attachments, or by any customer modification voids this warranty. Mindray makes no warranty whatsoever in regard to trade accessories, such being subject to the warranty of their respective manufacturers. A condition of this warranty is that the equipment or accessories which are claimed to be defective be returned when authorized, freight prepaid to Mindray DS USA, Inc., Mahwah, New Jersey 07430 or its authorized representative. Mindray shall not have any responsibility in the event of loss or damage in transit. Exemptions Mindray's obligation or liability under this warranty does not include any transportation or other charges or liability for direct, indirect or consequential damages or delay resulting from the improper use or application of the product or the use of parts or accessories not approved by Mindray or repairs by people other than Mindray authorized personnel. This warranty does not extend to: Malfunction or damage caused by improper use or man-made failure. Accutorr 3 Operator's Manual III Malfunction or damage caused by unstable or out-of-range power input. Malfunction or damage caused by force majeure events, such as (i) flood, fire and earthquake or other similar elements of nature or acts of God; (ii) riots, war, civil disorders, rebellions, or revolutions in any country; or (iii) any other cause beyond the reasonable control of Mindray. Malfunction or damage caused by improper operation or repair by unqualified or unauthorized service people. Malfunction of the instrument or part whose serial number is not legible. Others not caused by instrument or part itself. Company Contact IV Manufacturer: Shenzhen Mindray Bio-Medical Electronics Co., Ltd. Address Mindray Building, Keji 12th Road South, Hi-tech industrial park, Nanshan, Shenzhen 518057, P.R.China Website www.mindray.com E-mail Address: [email protected] Tel: +86 755 81888998 Fax: +86 755 26582680 Distributor: Mindray DS USA, Inc. Address: 800 MacArthur Boulevard Mahwah, New Jersey 07430 USA Tel: 1.800.288.2121, 1.201.995.8000 Website: www.mindray.com EC-Representative: Shanghai International Holding Corp. GmbH (Europe) Address: Eiffestraβe 80, 20537 Hamburg, Germany Tel: Fax: 0049-40-2513175 0049-40-255726 Accutorr 3 Operator's Manual Preface Manual Purpose This manual contains the instructions necessary to operate the product safely and in accordance with its function and intended use. Observance of this manual is a prerequisite for proper product performance and correct operation and ensures patient and operator safety. This manual is based on the maximum configuration and therefore some contents may not apply to your product. If you have any questions, please contact Mindray. This manual is an integral part of the product. It should always be kept close to the equipment so that it can be conveniently obtained when needed. Intended Audience This manual is intended for clinical professionals who are expected to have a corresponding working knowledge of medical procedures, practices and terminology as required for the monitoring of patients. Illustrations All illustrations in this manual serve as examples only. They may not necessarily reflect the setup or data displayed on your equipment. Manual Conventions Italic text is used to quote the referenced chapters or sections. [ ] is used to enclose screen text. → is used to indicate operational procedures. Accutorr 3 Operator's Manual V FOR YOUR NOTES VI Accutorr 3 Operator's Manual Contents 1 Safety................................................................................................................................ 1-1 1.1 Safety Information............................................................................................................................... 1-1 1.1.1 Warnings .................................................................................................................................... 1-2 1.1.2 Cautions ..................................................................................................................................... 1-3 1.1.3 Notes ........................................................................................................................................... 1-4 1.2 Equipment Symbols ........................................................................................................................... 1-5 2 The Basics ......................................................................................................................... 2-1 2.1 Intended Use ......................................................................................................................................... 2-1 2.2 Applied Parts ......................................................................................................................................... 2-1 2.3 Main unit ................................................................................................................................................. 2-2 2.3.1 Front View ................................................................................................................................. 2-2 2.3.2 Side View ................................................................................................................................... 2-3 2.3.3 Rear View ................................................................................................................................... 2-4 2.3.4 Bottom View ............................................................................................................................. 2-5 2.4 Display Screen....................................................................................................................................... 2-6 3 Basic Operation................................................................................................................ 3-1 3.1 Installation.............................................................................................................................................. 3-1 3.1.1 Unpacking and Checking .................................................................................................... 3-1 3.1.2 Environmental Requirements............................................................................................ 3-2 3.2 General Operation............................................................................................................................... 3-3 3.2.1 Connection to AC Power ..................................................................................................... 3-3 3.2.2 Using a Battery ........................................................................................................................ 3-3 3.2.3 Connecting Accessories ....................................................................................................... 3-3 3.3 Turning On/Off Power ........................................................................................................................ 3-4 3.3.1 Turning Power On .................................................................................................................. 3-4 3.3.2 Turning off the Monitor........................................................................................................ 3-5 3.4 Standby ................................................................................................................................................... 3-5 3.4.1 Entering Standby Mode ....................................................................................................... 3-5 3.4.2 Exiting Standby Mode .......................................................................................................... 3-6 3.5 Using Keys .............................................................................................................................................. 3-6 3.6 Parameter Setup Mode ..................................................................................................................... 3-8 3.7 Maintenance Mode ............................................................................................................................. 3-8 3.7.1 Selecting NIBP Unit of Measure ........................................................................................ 3-8 3.7.2 Selecting Temp Unit of Measure....................................................................................... 3-9 3.7.3 Setting System Time.............................................................................................................. 3-9 3.7.4 Viewing Software Version.................................................................................................. 3-10 3.7.5 Loading Factory Default Configuration ....................................................................... 3-10 3.7.6 Viewing Operated Time ..................................................................................................... 3-11 Accutorr 3 Operator's Manual 1 3.7.7 Adjusting the Screen Brightness .................................................................................... 3-12 3.7.8 DIAP Communication Setup ............................................................................................ 3-13 4 Monitoring SpO2 ............................................................................................................. 4-1 4.1 Overview ................................................................................................................................................. 4-1 4.2 Safety ........................................................................................................................................................ 4-2 4.3 Identifying SpO2 Module .................................................................................................................. 4-2 4.4 Applying the Sensor ........................................................................................................................... 4-3 4.5 Switching Pulse Tone On/Off .......................................................................................................... 4-3 4.6 Measurement Limitations ................................................................................................................ 4-4 4.7 Masimo Information ........................................................................................................................... 4-5 4.8 Nellcor Information............................................................................................................................. 4-5 5 Monitoring NIBP .............................................................................................................. 5-1 5.1 Overview ................................................................................................................................................. 5-1 5.2 Safety ........................................................................................................................................................ 5-1 5.3 Measurement Limitations ................................................................................................................ 5-2 5.4 Measuring NIBP .................................................................................................................................... 5-2 5.4.1 Preparing the Patient ............................................................................................................ 5-2 5.4.2 Preparing to Measure NIBP ................................................................................................. 5-3 5.4.3 Starting and Stopping Measurements ........................................................................... 5-4 5.4.4 Correcting the Measurement when Cuff is not at Heart Level ............................. 5-4 5.5 Understanding the NIBP Numerics ............................................................................................... 5-4 5.6 Care and Cleaning of Reusable Cuffs ........................................................................................... 5-5 5.6.1 Reusable Cuffs with Bladders ............................................................................................ 5-5 5.6.2 Reusable Bladderless Cuffs ................................................................................................. 5-6 6 Monitoring Temp ............................................................................................................. 6-1 6.1 Overview ................................................................................................................................................. 6-1 6.2 Selecting Measurement Site ........................................................................................................... 6-2 6.3 Taking a Temperature ......................................................................................................................... 6-3 6.3.1 Entering Predictive Mode and Monitor Mode ............................................................ 6-3 6.3.2 Taking a Temperature in the Predictive Mode............................................................. 6-3 6.3.3 Taking a Temperature in Monitor Mode ........................................................................ 6-4 6.4 Disinfecting Temperature Probe .................................................................................................... 6-5 7 Battery .............................................................................................................................. 7-1 7.1 Overview ................................................................................................................................................. 7-1 7.2 Charging a Battery .............................................................................................................................. 7-1 7.3 Replacing a Battery ............................................................................................................................. 7-2 7.4 Battery Guidelines ............................................................................................................................... 7-2 7.5 Battery Maintenance .......................................................................................................................... 7-3 7.5.1 Conditioning a Battery ......................................................................................................... 7-3 7.5.2 Checking a Battery ................................................................................................................. 7-3 2 Accutorr 3 Operator's Manual 7.6 Recycling a Battery.............................................................................................................................. 7-4 8 Care and Maintenance..................................................................................................... 8-1 8.1 Cleaning and Disinfection ................................................................................................................ 8-1 8.1.1 Cleaning ..................................................................................................................................... 8-2 8.1.2 Disinfecting .............................................................................................................................. 8-2 8.2 General Inspection .............................................................................................................................. 8-3 8.3 Maintenance and Testing Schedule ............................................................................................. 8-3 8.4 Checking Monitor Information....................................................................................................... 8-4 8.5 Visual Inspection .................................................................................................................................. 8-4 8.6 Power-on Test........................................................................................................................................ 8-4 8.7 Battery Check ........................................................................................................................................ 8-4 9 Accessories ....................................................................................................................... 9-1 9.1 SpO2 Accessories .................................................................................................................................. 9-1 9.2 NIBP Accessories .................................................................................................................................. 9-2 9.3 Temp Accessories................................................................................................................................. 9-3 9.4 Others ...................................................................................................................................................... 9-4 A Product Specifications .................................................................................................... A-1 A.1 Classifications ...................................................................................................................................... A-1 A.2 Environmental Specifications ........................................................................................................ A-1 A.3 Power Supply Specifications .......................................................................................................... A-2 A.4 Physical Specifications ..................................................................................................................... A-2 A.5 Hardware Specifications .................................................................................................................. A-2 A.6 Measurement Specifications.......................................................................................................... A-3 B EMC ................................................................................................................................... B-1 C Error Codes....................................................................................................................... C-1 D Symbols and Abbreviations ...........................................................................................D-1 D.1 Symbols ................................................................................................................................................ D-1 D.2 Abbreviations ..................................................................................................................................... D-2 Accutorr 3 Operator's Manual 3 FOR YOUR NOTES 4 Accutorr 3 Operator's Manual 1 Safety 1.1 Safety Information WARNING Indicates a potential hazard situation or unsafe practice that, if not avoided, could result in death or serious injury. CAUTION Indicates a potential hazard or unsafe practice that, if not avoided, could result in minor personal injury or product/property damage. NOTE Provides application tips or other useful information to ensure that you get the most from your product. Accutorr 3 Operator's Manual 1-1 1.1.1 Warnings WARNING 1-2 The monitor does not provide any alarms. It only provides error codes and is not intended for continuous monitoring. Keep the patient under close surveillance when using this monitor. This equipment is restricted to one patient at a time. Before putting the system into operation, the operator must verify that the equipment, connecting cables and accessories are in working order and operating condition. To avoid risk of electric shock, this equipment must only be connected to a properly grounded power outlet. If a properly grounded power outlet is not available, operate the monitor on battery power. To avoid an explosion hazard, do not use the equipment in the presence of oxygen–rich atmospheres, flammable anesthetics, or other flammable agents (such as gasoline). Do not open the equipment housings. All servicing or upgrades must be carried out by Mindray trained and authorized personnel. Do not come into contact with patients during defibrillation. Otherwise serious injury or death could result. Do not touch the equipment’s metal parts or connectors when in contact with the patient; otherwise patient injury may result. The physiological data and prompt information displayed on the equipment is not intended to be directly used for diagnostic interpretation and replace the competent judgment of a clinician. To avoid inadvertent disconnection, route all cables to prevent a stumbling hazard. Wrap and secure excess cabling to reduce risk of entanglement by patients or personnel. When disposing of the packaging material, be sure to observe the applicable waste control regulations and keep it out of children’s reach. When no battery is installed, make sure that the power supply is continuous. A power interruption will result in data loss. Put the equipment in a location where you can easily see the screen, access the operating controls, and disconnect the equipment from AC power. The equipment uses a mains plug as isolation means to the mains power supply. Please do not position the equipment in a place difficult to access the mains plug. The equipment is not intended to be used within the magnetic resonance (MR) environment. Accutorr 3 Operator's Manual 1.1.2 Cautions CAUTION Only use parts and accessories specified in this manual. Remove the battery before shipping the monitor or if it will not be used for an extended period of time. Carefully route patient cabling to reduce the possibility of patient entanglement. Disposable accessories are not designed to be reused. Reuse may cause a risk of contamination and affect the measurement accuracy. At the end of its service life, the equipment, and accessories, must be disposed of in compliance with the guidelines regulating the disposal of such products. If you have any questions concerning disposal of the equipment, please contact Mindray. Magnetic and electrical fields are capable of interfering with the proper performance of the equipment. For this reason, make sure that all external devices operated in the vicinity of the equipment comply with the relevant EMC requirements. Mobile phones, and X-ray equipment are a possible source of interference as they may emit higher levels of electromagnetic radiation. Before connecting the equipment to the power line, check that the voltage and frequency ratings of the power line are compatible those indicated on the equipment’s label or in this manual. Always install or carry the equipment properly to avoid damage caused by a drop, impact, strong vibration or other mechanical force. If you spill liquid on the equipment or accessories, contact Mindray or your service personnel. Accutorr 3 Operator's Manual 1-3 1.1.3 Notes NOTE 1-4 The equipment is intended to be used for immediate, supervised, point of care monitoring, and not for continuous monitoring. The equipment cannot be configured to obtain periodic physiological measurements at set intervals; rather, it is used by a healthcare provider to obtain an immediate measurement. Keep this manual in the vicinity of the equipment so that it can be easily located when needed. The software was developed in compliance with IEC60601-1- 4. The possibility of hazards arising from software errors is minimized. This manual describes all the equipment features and options. Your equipment may not have all of them. Only connect the specified device into an RS-232 connector. During normal use, the operator is expected to face the front of the equipment. Accutorr 3 Operator's Manual 1.2 Equipment Symbols Some symbols may not appear on your equipment. Caution Neonate ON/OFF for a part of equipment Pediatric Clear key Adult Alternating current Equipotentiality Battery indicator Input/Output DEFIBRILLATION –PROOF TYPE CF APPLIED PART DATE OF MANUAFACTURE NIBP Start/Stop key MANUFACTURER Protection against fluid ingress Insertion Direction Serial number Alarm inhibit Refer to instruction manual/ booklet Atmospheric pressure limitation Temperature limit Humidity limitation Interference may occur in the vicinity of equipment marked with this symbol CATALOGUE NUMBER AUTHORISED REPRESENTATIVE IN THE EUROPEAN COMMUNITY The product bears CE mark indicating its conformity with the provisions of the Council Directive 93/42/EEC concerning medical devices and fulfills the essential requirements of Annex I of this directive. Accutorr 3 Operator's Manual 1-5 The following definition of the WEEE label applies to EU member states only. This symbol indicates that this product should not be treated as household waste. By ensuring that this product is disposed of correctly, you will help prevent bringing potential negative consequences to the environment and human health. For more detailed information with regard to returning and recycling this product, please consult the distributor from whom you purchased it. * For system products, this label may be attached to the main unit only. The presence of this label indicates the machine was certified by ETL with the statement: Conforms to AAMI Std. ES 60601-1, IEC Std. 60601-1-6, IEC Std. 80601-2-30, ISO Std. 80601-2-56, ISO Std. 80601-2-61. Certified to CSA Std. C22.2 NO. 60601-1, NO. 60601-1-6, NO. 80601-2-30, NO. 80601-2-56, NO. 80601-2-61. 1-6 Accutorr 3 Operator's Manual 2 The Basics 2.1 Intended Use The monitor is intended for spot-check monitoring physiologic parameters, including Pulse Oximetry (SpO2), Pulse Rate (PR), Non Invasive Blood Pressure (NIBP) and Temperature (TEMP), on adult, pediatric, and neonatal patients in healthcare facilities by physicians or appropriate medical staff under the direction of physicians. This monitor is intended for use only by clinical professionals or under their guidance. It must only be used by persons who have received adequate training in its use. 2.2 Applied Parts The applied parts of the monitor are SpO2 sensor and cable, NIBP tubing and cuff, and Temp probes and cable. Accutorr 3 Operator's Manual 2-1 2.3 Main unit 2.3.1 Front View 10 9 1 8 2 3 4 1. 2. 3. 2-2 5 6 7 Display screen AC power indicator On: indicates that the monitor is connected to the AC power. Off: indicates that the monitor is not connected to the AC power. Power ON/OFF switch Press this key to turn the monitor on. If no parameter is being measured, press this key to enter Standby mode. When the monitor is on, press and hold this key for more than 2 seconds to turn the monitor off. An indicator is built into this switch. It turns green when the monitor is on, turns yellow when the monitor enters Standby mode, and turns off when the monitor is off. Accutorr 3 Operator's Manual 4. Battery indicator On: indicates that the battery is installed and the AC power is connected. Off: indicates that no battery is installed when AC power is connected, or indicates that the battery is installed, but no AC power is connected when the monitor is powered off. Flashing: indicates that the monitor is powered by battery. 5. Clear key In Measurement mode, press this key to clear currently displayed measurements and error code. In Measurement mode, press and hold this key for more than 2 seconds to access the Parameter Setup mode. When the monitor is starting up and a beep is heard, press and hold this key immediately (within 10 seconds after the beep) to access the Maintenance mode. 6. Patient Category key In Measurement mode, press this key to toggle among adult, pediatric and neonate. 7. NIBP Start/Stop key In Measurement mode, press this key to start or stop an NIBP measurement. 8. Probe cover pack holder 9. Temperature probe well 10. Handle 2.3.2 Side View P NIB 2 SpO 1 1. 2. 2 Connector for SpO2 cable Connector for NIBP cuff Accutorr 3 Operator's Manual 2-3 2.3.3 Rear View 1 2 4 3 5 6 1. 2. 3. 4. 5 6. Handle Temperature probe well Connector for temperature probe Input/Output connector (RS-232 connector) This connector can be used for software upgrade and DIAP (Datascope Improved ASCII Protocol) communication. AC power input Equipotential grounding terminal NOTE 2-4 When using the equipment with other devices, their equipotential grounding terminals should be connected together to eliminate a possible difference in ground potential. Accutorr 3 Operator's Manual 2.3.4 Bottom View 1 2 1. 2. Battery compartment door Quick release mount latch point Accutorr 3 Operator's Manual 2-5 2.4 Display Screen 2 1 3 4 8 5 9 6 7 10 14 11 12 15 13 16 18 17 22 19 20 1. 2. 3. 4. 5. 6. 7. 8. 9. 10. 11 12. 13. 14. 2-6 21 Patient category (Adult, Pediatric, Neonate) Error code Refer to C Error Codes for additional information. System time Charge level indicator NIBP label NIBP unit of measure Systolic pressure Cuff pressure: displayed during NIBP measurement. NIBP cuff indicator When errors such as air leak, incorrect air pressure, weak signal, overpressure, incorrect cuff type, or excessive patient motion etc. occur, the cuff indicator displays. Diastolic pressure SpO2 label SpO2 unit of measure SpO2 value Perfusion index Accutorr 3 Operator's Manual 15. SpO2 sensor indicator: Flashes for 5 seconds: indicates the SpO2 sensor is off. Persistently flashes: indicates a weak SpO2 signal, no pulse or too much light. On: indicates SpO2 sensor error or no sensor. 16. 17. 18. 19. PR label PR unit of measure PR value Temperature unit of measure (°F, °C) and measurement mode (M or P: M for Monitor, P for Predictive) 20. Temperature label 21. Temperature value 22. Temperature measurement site (Oral, Axillary, Rectal) Accutorr 3 Operator's Manual 2-7 FOR YOUR NOTES 2-8 Accutorr 3 Operator's Manual 3 Basic Operation 3.1 Installation WARNING The equipment should be installed by authorized Mindray personnel. Do not open the equipment housings. All servicing and upgrades must be carried out by Mindray trained and authorized personnel. The software copyright of the equipment is solely owned by us. No organization or individual shall resort to altering, copying, or exchanging it or to any other infringement on it in any form or by any means without due permission. Connect only approved devices to this equipment. Devices connected to the equipment must meet the requirements of the applicable IEC standards (e.g. IEC 60950 safety standards for information technology equipment and IEC 60601-1 safety standards for medical electrical equipment). The system configuration must meet the requirements of the IEC 60601-1 medical electrical systems standard. Any personnel who connects devices to the equipment’s signal input/output port is responsible for providing evidence that the safety certification of the devices has been performed in accordance to the IEC 60601-1. If you have any questions, please contact Mindray. If it is not evident from the equipment specifications whether a particular combination with other devices is hazardous, for example, due to summation of leakage currents, please consult the manufacturers or else an expert in the field, to ensure the necessary safety of patients and all devices concerned will not be impaired by the proposed combination. Put the equipment in a location where you can easily see the screen, access the operating controls, and disconnect the equipment from AC power. 3.1.1 Unpacking and Checking Before unpacking, examine the packing case carefully for signs of damage. If any damage is detected, contact the carrier or Mindray. If the packing case is intact, open the package and remove the equipment and accessories carefully. Check all materials against the packing list and check for any mechanical damage. Contact Mindray in case of any problem. WARNING When disposing of the packaging material, be sure to observe the applicable waste control regulations and keep it out of children’s reach. Before use, please verify whether the packages are intact, especially the packages of single use accessories. In case of any damage, do not apply it to patients. Accutorr 3 Operator's Manual 3-1 NOTE Save the packing case and packaging material as they can be used if the equipment must be reshipped. 3.1.2 Environmental Requirements The equipment operating environment must meet the requirements specified in this manual. The equipment operating environment should be reasonably free from noise, vibration, dust, corrosive, flammable and explosive substances. To maintain good ventilation, the equipment should be at least 2 inches (5 cm) away from surrounding objects. When the equipment is moved from one place to another, condensation may occur as a result of temperature or humidity difference. In this case, never start the system before the condensation disappears. WARNING 3-2 Make sure that the equipment operating environment meets the specifications. Otherwise unexpected consequences, e.g. damage to the equipment, could result. Accutorr 3 Operator's Manual 3.2 General Operation Read this operator's manual carefully before using this monitor. Familiarize yourself with the equipment's function and operation, and observe the warnings and cautions included in the manual. 3.2.1 Connection to AC Power This monitor can be powered by AC power or battery. Connect the power cord to the AC input on the back of the monitor, and connect the other end of the power cord to the power outlet. WARNING Always use the accompanying power cord with the monitor. The battery is to be used if the integrity of the protective earth conductor or the protective earthing system in the installation is in doubt. 3.2.2 Using a Battery This monitor can be equipped with a rechargeable lithium-ion battery. If a battery is installed, the monitor system automatically switches to the battery for power if AC power is interrupted. Installing a Battery The battery compartment cover is on the bottom of the monitor. Refer to 7.3 Replacing a Battery for additional information regarding battery installation. NOTE When a battery has been stored for a long time, or the battery is depleted, recharge the battery at once. Otherwise, the low battery may not be sufficient to power the monitor if AC power is unavailable. Charging a Battery The battery is charged whenever the monitor is connected to an AC power source regardless of whether the monitor is turned on or not. When the battery is charging, the battery indicator is On. The battery charge icon on the screen dynamically displays the charging status when the monitor is powered on. 3.2.3 Connecting Accessories Insert the hose part of NIBP cuff to the connector provided on the side of monitor; insert the SpO2 cable into the SpO2 cable connector on the side of the monitor; insert the temperature probe cable into the TEMP probe connector on the back of the monitor. Accutorr 3 Operator's Manual 3-3 3.3 Turning On/Off Power 3.3.1 Turning Power On Once the monitor is installed, before beginning measurements. 1. Check the monitor for any mechanical damage, and make sure that all external cables, plug-ins and accessories are properly connected. 2. Check the power supply specification is met if mains power is used. Only use a power outlet that is properly grounded. 3. Plug the power cord into the AC power source. If you run the monitor on battery power, ensure that the battery is sufficiently charged. 4. Press the power on/off switch on the monitor’s front panel. After pressing the power button, all contents on the display are shown (refer to the figure in section 2.4 Display Screen), and then the system sounds a beep after the self-test finishes. Then, the monitor enters the normal monitoring screen. WARNING Do not use the monitor on a patient if you suspect it is not working properly, or if it is mechanically damaged. Contact your service personnel or Mindray. NOTE 3-4 Carefully check if the system performs the self-test as described above. Contact your service personnel or Mindray if the self-test is abnormal. If the displayed contents are not clearly seen during the system self-test, they can be checked in the brightness adjustment screen. Refer to 3.7.7 Adjusting the Screen Brightness. Accutorr 3 Operator's Manual 3.3.2 Turning off the Monitor Before turning off the monitor: 1. Ensure that monitoring of the patient has been completed. 2. Disconnect cables and sensors from the patient. Then press and hold the power on/off switch for more than 2 seconds to turn off the monitor. CAUTION Press and hold the power on/off switch for 10 seconds to forcibly shut down the monitor when it could not be shut down normally or under some special situations. This may cause loss of patient data. When a power failure occurs, the monitor restores the last configuration after it restarts. NOTE To completely disconnect the power supply, unplug the power cord. 3.4 Standby 3.4.1 Entering Standby Mode If no parameter is being measured, you can press the power on/off switch to enter Standby mode. The monitor automatically enters the Standby mode if there is no key operation and no parameter measurement for 10 minutes. NOTE When the monitor enters Standby mode, all the previous messages and measurements clear. In Standby mode, the display automatically shuts down and the built-in indicator on the power switch turns yellow. When the monitor exits Standby mode, the display brightness is restored to the level it was at prior to entering Standby mode. Accutorr 3 Operator's Manual 3-5 3.4.2 Exiting Standby Mode To exit Standby mode, you can use any of the following: Press any hardkey on the front panel. Connect the SpO2 sensor, and let the monitor receive SpO2 signals for more than 5 seconds. Remove the temperature probe from the probe well. NOTE A low battery (when Standby mode. displays) causes the monitor to automatically exit 3.5 Using Keys In different modes, the key functions vary: Mode Keys and Functions : Continue pressing this key to cyclically change the patient category to adult, pediatric, or neonatal. : Start/stop NIBP measurements. Measurement Mode : Press to: Clear the parameter value displayed on the screen (such as NIBP, Temp value). Clear the error code. Clear NIBP cuff indicator. Clear the flashing SpO2 sensor indicator. Stop the flashing parameter label due to a module failure. Remove the low battery reminder tone. : Press and hold for more than 2 seconds to enter Parameter Setup mode. Parameter Setup Mode (Refer to section 3.6 Parameter Setup Mode) : Press and hold for more than 2 seconds to return to Measurement mode. Press to toggle among the parameters. : Switch on/off pulse tone; toggle among Temp measurement sites. Maintenance Mode (Refer to section 3.7 Maintenance Mode) 3-6 : Press to toggle among maintenance items. Accutorr 3 Operator's Manual Mode Keys and Functions NIBP Unit of Measure Setup : Toggle between mmHg and kPa. Temp Unit of Measure Setup : Toggle between °C and °F. : Toggle among hour and minute digits. System Time Setup Maintenance Items : Add one number based on current value. NIBP Leak Test (PR parameter area displays “550”) : Start/Stop leak test. NIBP Accuracy Test (PR parameter area displays “555”) : Start/Stop accuracy test. NIBP Cuff Overpressure test (PR parameter area displays “520”) : Start NIBP cuff overpressure test. Software Version : View the software version of each module. Factory Default Configuration (PR parameter area displays “000”) Operated Time : Toggle between ON and OFF: ON: Restore the factory default configuration OFF: Keep current configuration Check the total operated time of the monitor. Brightness Setup : Decrease screen brightness. : Increase screen brightness. DIAP Communication Setup (PR parameter area displays “001”) Accutorr 3 Operator's Manual : Toggle between 9600 and 19200 bps. 3-7 3.6 Parameter Setup Mode 1. In Measurement mode, press and hold the to enter Parameter Setup mode. hardkey for more than 2 seconds 2. hardkey to toggle between the Temp measurement site setup Press the screen and pulse tone setup screen. 3. Press the hardkey to set up the installed parameters. Only installed parameters will be available for setup. Select the measurement site in the Temp measurement site setup screen. Turn on/off the pulse tone in the pulse tone setup screen. 3. Press and hold the Measurement mode. hardkey for more than 2 seconds to return to 3.7 Maintenance Mode 1. Start the monitor. Within 10 seconds after you hear a beep, press and hold the hardkey to enter Maintenance mode. 2. 3. hardkey to switch among maintenance items. Press the Turn off the monitor. The settings take effect after the monitor restarts. 3.7.1 Selecting NIBP Unit of Measure 3-8 1. Enter Maintenance mode. 2. hardkey to switch to the NIBP unit of measure setup screen. The Press the following is the setup screen. 3. Press the hardkey to toggle between mmHg and kPa. Accutorr 3 Operator's Manual 3.7.2 Selecting Temp Unit of Measure If the Temp module is installed, set up the Temp unit of measure by following: 1. Enter Maintenance mode. 2. hardkey to switch to the Temp unit of measure setup screen. The Press the following is the setup screen. 3. Press the hardkey to toggle between °C and °F. 3.7.3 Setting System Time 1. Enter Maintenance mode. 2. Press the hardkey to switch to the time setup screen. The system time format is “00 : 00”. 3. Press the flashes. hardkey to switch to the digit to be modified. The selected digit 4. Press the hardkey to modify the value. Accutorr 3 Operator's Manual 3-9 5. After all the digits are properly set, press the hardkey to exit time setup. 3.7.4 Viewing Software Version 1. Enter Maintenance mode. 2. Press the hardkey to switch to the system software version screen. 3. Press the hardkey to view each module software version. The monitor displays the system software version, NIBP module version, SpO2 module version, Temp module version and power management software version. If some parameter module is not installed, its software version does not display. 3.7.5 Loading Factory Default Configuration 3-10 1. Enter Maintenance mode. 2. hardkey to switch to the default factory setup screen. The PR Press the parameter area displays “000”. Accutorr 3 Operator's Manual 3. Press the hardkey to toggle between On and Off. Select factory default configurations. Select to load the to retain the current configurations. You cannot change factory default configurations. You can choose to load the factory default configurations if necessary. The factory default configurations are: NIBP unit of measure setup: mmHg Temp unit of measure setup: °C Patient Category: Adult Pulse tone: On Temp measurement site: Oral Brightness: 5 3.7.6 Viewing Operated Time 1. Enter Maintenance mode. 2. Press the hardkey to switch to the operated time screen. The system time area displays the monitor’s total operated days. For example, “00 10” represents that the monitor worked a total of 10 days (or 240 hours). Accutorr 3 Operator's Manual 3-11 3.7.7 Adjusting the Screen Brightness 1. Enter Maintenance mode. 2. hardkey to switch to the brightness setup screen. Press the In brightness setup, all the fields and icons are shown. The error code area displays the current brightness level. Brightness level 3. hardkey to decrease screen brightness, or the Press the increase screen brightness. hardkey to The screen brightness range is 1~10. The default brightness is 5. The brightness setting takes effect immediately. 3-12 Accutorr 3 Operator's Manual 3.7.8 DIAP Communication Setup The monitor provides an Input/Output connector (RS-232 connector) to communicate with the external devices using DIAP. To set up the communication, use the serial cable (P/N: 0012-00-1275-01) to connect the external device to the Intput/Output connector of the monitor and then follow this procedure: 1. Enter Maintenance mode. 2. hardkey to switch to the default factory setup screen. The PR Press the parameter area displays “001”. 3. Press the hardkey to toggle between 9600 bps and 19200 bps. NOTE Refer to the DIAP Communications Protocol Service Manual (P/N 0070-00-0307) for additional information. Accutorr 3 Operator's Manual 3-13 FOR YOUR NOTES 3-14 Accutorr 3 Operator's Manual 4 Monitoring SpO2 4.1 Overview SpO2 monitoring is a non-invasive technique used to measure the amount of oxygenated hemoglobin by measuring the absorption of selected wavelengths of light. The light generated in the probe passes through the tissue and is converted into electrical signals by the photodetector in the probe. The SpO2 module processes the electrical signal and displays digital values for SpO2 and pulse rate. This device is calibrated to display functional oxygen saturation. It provides the following. 2 1 3 4 1. 2. 3. 4. Oxygen saturation of arterial blood (SpO2): percentage of oxygenated hemoglobin in relation to the sum of oxyhemoglobin and deoxyhemoglobin. Perfusion index (PI): PI is available for Masimo SpO2 module. PI gives the numerical value for the pulsatile portion of the measured signal caused by arterial pulsation. PI is an indicator of the pulsatile strength. You can also use it to assess the quality of the SpO2 measurement. Above 1 is optimal, between 0.3 and 1 is acceptable. Below 0.3 indicates low perfusion; reposition the SpO2 sensor or find a better site. If low perfusion persists, choose another method to measure oxygen saturation if possible. PI Indicator: Graphic Indication of arterial pulse signal strength. Pulse rate (PR): detected pulsations per minute. Obtain PR through the SpO2 or NIBP measurement. When simultaneously measuring NIBP and SpO2, the PR source is from SpO2. NOTE A functional tester or SpO2 simulator can be used to verify the sensor functions. A functional tester or SpO2 simulator can be used to determine the pulse rate accuracy. A functional tester or SpO2 simulator cannot be used to assess the accuracy of an SpO2 module or an SpO2 sensor. Accutorr 3 Operator's Manual 4-1 4.2 Safety WARNING Only use SpO2 sensors specified in this manual. Follow the SpO2 sensor’s instructions for use and adhere to all warnings and cautions. When a trend toward patient deoxygenation is indicated, blood samples should be analyzed by a laboratory co-oximeter to completely understand the patient’s condition. Prolonged monitoring may increase the risk of undesirable changes in skin characteristics, such as irritation, reddening, blistering or burns. Inspect the sensor site every two hours and move the sensor if the skin quality changes. Change the application site every four hours. For neonates, or patients with poor peripheral blood circulation or sensitive skin, inspect the sensor site more frequently. NOTE Do not perform SpO2 monitoring and NIBP measurements simultaneously on the same limb. Obstruction of blood flow during NIBP measurements may adversely affect the SpO2 reading. 4.3 Identifying SpO2 Module To identify which SpO2 module is installed into your monitor, see the company logo located at the side panel. The cable connector color corresponds to the company as shown below: Masimo SpO2 module: a purple connector with the Masimo SET logo Nellcor SpO2 module: a grey connector with the Nellcor logo . . The SpO2 sensor connectors are mutually exclusive. 4-2 Accutorr 3 Operator's Manual 4.4 Applying the Sensor NOTE 1. 2. 3. 4. 5. Place the SpO2 sensor so that the light source is against the application site. Check if the sensor is in normal condition before monitoring. Do not use the SpO2 sensor once the package or the sensor is found damaged. Do not apply the sensor on a limb with an intravenous infusion or arterial catheter in place. Select an appropriate sensor according to the module type, patient category and weight. Clean the application site. For example, remove colored nail polish. Apply the sensor to the patient. Select an appropriate adapter cable according to the connector type and plug this cable into the SpO2 connector. Connect the sensor cable to the adapter cable. 4.5 Switching Pulse Tone On/Off To switch pulse tone on/off: hardkey for more than 2 seconds 1. In Measurement mode, press and hold the to enter Parameter Setup mode. 2. Press the hardkey to switch to pulse tone setup. 3. Press the hardkey to switch the pulse tone on/off. When PR parameter area displays off. , it indicates that pulse tone is switched 4. When PR parameter area displays , it indicates that pulse tone is switched on. The settings take effect after you exit Parameter Setup mode. NOTE If pulse tone is set to , the monitor sounds a beep at each pulsation during the SpO2 measurement. Accutorr 3 Operator's Manual 4-3 4.6 Measurement Limitations If the SpO2 measurement seems out of range or inaccurate, check the patient's vital signs. Then check the equipment and SpO2 sensor. The following factors may influence the accuracy of measurement: Ambient light Physical movement Low perfusion Electromagnetic interference, such as MRI environment Electrosurgical units Dysfunctional hemoglobin, such as carboxyhemoglobin (COHb) and methemoglobin (MetHb) Presence of certain dyes, such as methylene and indigo carmine Inappropriate positioning of the SpO2 sensor, or use of incorrect SpO2 sensor Drop of arterial blood flow to immeasurable levels caused by shock, anemia, low temperature or vasoconstrictor. 4-4 Accutorr 3 Operator's Manual 4.7 Masimo Information Masimo Patents This device is covered under one or more the following U.S.A. patents: 5,758,644, 6,011,986, 6,699,194, 7,215,986, 7,254,433, 7,530,955 and other applicable patents listed at: www.masimo.com/patents.htm. No Implied License Possession or purchase of this device does not convey any express or implied license to use the device with unauthorized sensors or cables which would, alone, or in combination with this device, fall within the scope of one or more of the patents relating to this device. 4.8 Nellcor Information Nellcor Patents This device may be covered by one or more of the following US patents and foreign equivalents: 5,485,847, 5,676,141, 5,743,263, 6,035,223, 6,226,539, 6,411,833, 6,463,310, 6,591,123, 6,708,049, 7,016,715, 7,039,538, 7,120,479, 7,120,480, 7,142,142, 7,162,288, 7,190,985, 7,194,293, 7,209,774, 7,212,847, 7,400,919. No Implied License Possession or purchase of this device does not convey any express or implied license to use the device with unauthorized replacement parts which would, alone, or in combination with this device, fall within the scope of one or more of the patents relating to this device. Accutorr 3 Operator's Manual 4-5 FOR YOUR NOTES 4-6 Accutorr 3 Operator's Manual 5 Monitoring NIBP 5.1 Overview The monitor uses the oscillometric method to measure non-invasive blood pressure (NIBP). This measurement can be used for adult, pediatric, and neonatal patients. To understand how this method works, we will compare it to the auscultative method. With auscultation, clinicians listen to the Korotkoff sounds to determine blood pressure when using the auscultatory method. Since the monitor cannot hear the Korotkoff sounds to determine the blood pressure, it measures cuff pressure oscillation amplitudes. Oscillations are caused by blood pressure pulses against the cuff. This is the most accurate parameter measured by the oscillometric method. The auscultation determines systolic and diastolic pressures. The oscillometric method calculates the systolic and diastolic pressures. As specified by IEC 80601-2-30, NIBP measurements can be performed during electro-surgery and discharge of defibrillator. NIBP diagnostic significance must be decided by the clinician who performs the measurement. Blood pressure measurements determined with this device are equivalent to those obtained by a trained observer using the cuff/stethoscope auscultatory method or an intra-arterial blood pressure measurement device, within the limits prescribed by the American National Standard, Manual, electronic, automated sphygmomanometers, or standards of IEC80601-2-30, EN1060-1, EN1060-3, EN1060-4 and SP10. 5.2 Safety WARNING During NIBP measurement, the inflated cuff applies pressure on the application site. The clinician determines if NIBP measurement is suitable for the patient. Be sure to select the correct patient category setting for your patient before measurement. Incorrect patient category selection may present a safety hazard. Do not measure NIBP on patients with sickle-cell disease or on the limb where skin damage has occurred or is expected. Do not use the NIBP cuff on a limb with an intravenous infusion or arterial catheter in place. This could cause tissue damage around the catheter when the infusion is slowed or blocked during cuff inflation. NIBP measurements can be affected by the measurement site, the position of the patient, patient movement, or the patient's physiologic condition. If the NIBP measurement seems out of range or inaccurate, determine the patient’s Accutorr 3 Operator's Manual 5-1 WARNING vital signs by alternative means and then verify that the monitor is working correctly. Make sure the hose connecting the NIBP cuff and the monitor is not blocked, twisted, or tangled. Do not apply the cuff on the arm on the side of a mastectomy. 5.3 Measurement Limitations The equipment cannot measure blood pressure when the patient's heart rate is below 40 bpm or above 240 bpm, or if the patient is on a heart-lung machine. The equipment may fail to measure or produce inaccurate blood pressure measurements under the following conditions: If arterial pressure pulses are hard to detect In the presence of excessive and continuous patient movement such as shivering or convulsions During certain cardiac arrhythmias Rapid blood pressure changes Severe shock or hypothermia that reduces blood flow to the peripheries Obesity, where a thick layer of fat surrounding a limb dampens the oscillations emanating from the artery 5.4 Measuring NIBP 5.4.1 Preparing the Patient In order to minimize NIBP measurement errors, whenever possible check that the patient: Is comfortably seated ; Has legs uncrossed ; Has feet flat on the floor ; Has back and arm supported; and, The middle of the cuff is at the level of the right atrium of the heart. NOTE 5-2 It is recommended that the patient relax as much as possible before the NIBP measurement is performed and that the patient does not talk during measurement. It is recommended that the patient sit still for 5 min before the first measurement is taken. The operator should not touch the cuff and tubing during the NIBP measurement. Accutorr 3 Operator's Manual 5.4.2 Preparing to Measure NIBP 1 Power on the monitor. 2. Verify that the patient category is correct. If not, continue pressing the hardkey to cyclically change the patient category. . Connect the NIBP hose to the monitor Select the appropriate sized cuff by referring to the limb circumference marked on the cuff. The width of the cuff should be 40% (50% for neonates) of the limb circumference, or 2/3 of the upper arm’s length. The inflatable part of the cuff should be long enough to encircle at least 50% to 80% of the limb. Apply the cuff to the patient's upper arm or thigh and make sure the Φ marking on the cuff is aligned with the artery. Do not wrap the cuff too tightly around the limb. This could cause discoloration, and ischemia of the extremities. Make sure that the edge of cuff is within the marked range. If it is not, use a cuff that fits properly. Connect the cuff to the NIBP hose. Avoid compression or restriction of NIBP hose. Air must pass unrestricted through the tubing. 3. 4. 5. 6. WARNING Sustained cuff pressure due to a kinked hose may interfere with blood flow and could lead to patient injury. NOTE The use of the equipment is restricted to one patient at a time. Accutorr 3 Operator's Manual 5-3 5.4.3 Starting and Stopping Measurements Press the measurement. hardkey on the monitor’s front panel to start or stop an NIBP WARNING Long-term non-invasive blood pressure measurements may cause purpura, ischemia and neuropathy in the limb with the cuff. Periodically examine the limb under the cuff to ensure skin color and integrity. If anything abnormal is seen, move the cuff to another site or stop the non-invasive blood pressure measurements immediately. 5.4.4 Correcting the Measurement when Cuff is not at Heart Level Apply the cuff to a limb at the same level as the patient's heart. If the cuff is not at the heart level, do the following to the displayed value: Add 0.75 mmHg (0.10 kPa) for each centimetre higher, or Deduct 0.75 mmHg (0.10 kPa) for each centimeter lower. 5.5 Understanding the NIBP Numerics The NIBP display generally shows numerics as shown below. Your display may be configured to look slightly different. 1 2 4 3 1. 2. 5-4 Unit of pressure: mmHg or kPa. Refer to 3.7.1 Selecting NIBP Unit of Measure of Measure to set the unit of measure to [mmHg] or [kPa]. Systolic pressure Accutorr 3 Operator's Manual 3. 4. Pulse rate (PR): detected pulsations per minute. PR can be obtained through SpO2 or NIBP measurement. The PR source is SpO2 if SpO2 and NIBP are measured simultaneously. Diastolic pressure 5.6 Care and Cleaning of Reusable Cuffs NOTE Accuracy of cuff-pressure transducers/indicators is to be verified at intervals specified by the manufacturer. 5.6.1 Reusable Cuffs with Bladders Take out the bladder before cleaning and disinfecting the cuff. 5.6.1.1 Cleaning Hand or machine washes the cuff in warm water or with mild detergent. Clean the bladder with a damp cloth. Air dry the cuff thoroughly after washing. NOTE Machine washing may shorten the service life of the cuff. 5.6.1.2 Disinfection Disinfect the cuff with a cloth dampened in 70% isopropanol or with ultraviolet. Also clean the bladder with ultraviolet. NOTE Prolonged use of disinfectant may cause discoloration of the cuff. Replace the bladder after cleaning and disinfecting the cuff: 1. Place the bladder on the top of the cuff, as shown below. 2. Roll the bladder lengthwise and insert it into the large opening. 3. Hold the hose and the cuff and shake the complete cuff until the bladder is in position. Accutorr 3 Operator's Manual 5-5 4. Thread the hose from inside the cuff, and out through the small hole under the internal flap. 5.6.2 Reusable Bladderless Cuffs Clean cuffs with warm water and a mild detergent. Do not use a detergent containing hand conditioners, softeners, or fragrances. Antimicrobial Definition Bladderless cuffs are treated with an antimicrobial coating. Antimicrobial technology effectively controls a broad spectrum of bacteria, fungi, algae and yeasts on a wide variety of treated substrates. 5-6 Accutorr 3 Operator's Manual 6 Monitoring Temp 6.1 Overview The SmarTemp™ Temp module is intended for monitoring oral, axillary and rectal temperature of adult and pediatric patients and axillary temperature of neonatal patients. Temperature can be measured in either Predictive mode or Monitor mode. The default is Predictive mode. WARNING Do not take oral temperature on an infant (0-3 years). Do not take rectal temperature on a neonate (0-28 days). Use only the specified temperature probe and probe cover. Using another probe or probe cover, or not using probe cover may cause damage to the monitor or failure to meet the declared specifications in this manual. The temperature probe cover is disposable. Re-use of probe cover may result in patient cross-contamination. Use disposable probe covers for temperature measurement. Failure to use a probe cover can cause inaccurate temperature measurements, and patient cross-contamination. Check the disposable probe cover for damage before using. Never use any probe cover for temperature measurement if damaged or contaminated. Be careful to avoid damaging the temperature probe. Place the temperature probe in the probe well when not in use. Prior to taking a temperature, instruct the patient not to bite down on the probe, as patient injury and damage to the probe may result. Ensure that the probe covers are disposed of according to local regulations or hospital's requirements. Accuracy verification of the temperature module is required every two years or according to your hospital’s policy. Please contact Mindray if accuracy verification is needed. Accutorr 3 Operator's Manual 6-1 NOTE Patient actions may interfere with oral temperature measurements. Ingesting hot or cold liquids, eating food, chewing gum, brushing teeth, smoking, or performing strenuous activities may affect temperature measurements for up to 20 minutes after ending the activity. In the axillary mode, the probe should directly contact the patient’s skin. Measuring through patient’s clothes or long-term exposure of the patient’s armpit to the air may result in inaccurate temperature readings. Choose appropriate probe according to measurement site. Using the incorrect probe may cause patient's discomfort and inaccurate measurements. Improper use of probe may also cause patient's discomfort and inaccurate measurements. In the rectal mode, incorrect probe placement may result in bowel perforation. Hospital staff should wash their hands after the patient’s temperature measurement is taken. This will significantly reduce the risk of cross contamination and nosocomial contamination. 6.2 Selecting Measurement Site NOTE You can only select the measurement site when the probe is in the probe well. The temperature module can be configured with 2 types of temperature probes: oral/axillary probe (blue), or rectal probe (red) Use the blue oral/axillary probe with the blue probe well, and use the red rectal probe with the red well. Be sure to select the correct probe according to the measurement site. Oral/Axillary probe: this probe type is intended for taking oral or axillary temperature of adult and pediatric patients, or axillary temperature for neonatal patients. Rectal probe: this probe type is intended for taking rectal temperature for adult and pediatric patients. 1. In Measurement mode, press and hold the to enter Parameter Setup mode. hardkey for more than 2 seconds Oral Axillary Rectal 6-2 Accutorr 3 Operator's Manual 2. Press the hardkey to switch to the Temp parameter setup. 3. Press the hardkey to toggle between measurement sites. 4. hardkey for more than 2 seconds to return to Press and hold the Measurement mode and make the settings take effect. hardkey for more than 2 seconds to shut down the Or, press and hold the monitor. The settings take effect once the monitor is restarted. 6.3 Taking a Temperature 6.3.1 Entering Predictive Mode and Monitor Mode After turning on the monitor, it automatically enters Predictive mode. The monitor switches from Predictive mode to Monitor mode when either no measurement is taken or the probe is not replaced in the probe well within 60 seconds after it has been withdrawn. Place the probe in the well to restore the Predictive mode. 6.3.2 Taking a Temperature in the Predictive Mode In Predictive mode, after obtaining a temperature value, the value always displays on the screen. 1. Make sure that the probe is placed in the probe well. 2. Make sure that the temperature measurement site setting is correct. 3. Remove the probe from the probe well and insert it into a cover in the probe cover pack. Press the probe handle down firmly until the cover engages with the probe. The temperature module starts to warm up when the probe is taken out of the probe well. The warming up time is about 2 seconds at room temperature. The monitor sounds two beeps and the Temp parameter area displays “- -“ when the warm-up is complete. Then you can place the probe at the measurement site. 4. Place the probe at the measurement site and wait until the measurement stabilizes. When the segment moves clockwise, it indicates that the monitor is taking the measurement. When taking an oral temperature, apply the probe under the patient’s tongue from either side of the mouth. Make sure that the probe reaches the rear sublingual pocket. Have the patient close his/her lips to hold the probe. Use your hand to hold the probe in place. Make sure that the probe contacts with the patient’s oral tissue throughout the measurement. When taking an axillary temperature, lift the patient’s arm to expose the entire armpit. Apply the probe as high as possible in the armpit. Check that the probe tip is completely surrounded by the axillary tissue. Lower the patient’s arm so that it is tightly placed at the patient’s side. Keep the patient’s arm and the probe in place throughout the measurement. When taking a rectal temperature, separate the patient's buttocks with one hand, and gently glide the probe 0.6 inch (1.5 cm) inside the rectum with the other hand. For pediatric patients, the depth of insertion is less. Lubricant can be used in rectal mode. Accutorr 3 Operator's Manual 6-3 5. The monitor sounds a beep when the temperature measurement is complete. Withdraw the probe. Firmly press the ejection button on the top of the probe to eject the probe cover. Replace the probe into the probe well. NOTE In Predictive mode, place the temperature probe at the measurement site as soon as probe warmup is complete; otherwise, an inaccurate temperature reading may result. In Predictive mode, if the probe temperature is high due to the environmental temperature or other causes, cool the probe and then measure the patient's temperature. The temperature reading displays continuously until the probe is again removed from the probe well. 6.3.3 Taking a Temperature in Monitor Mode To measure a temperature in Monitor mode: 1. Make sure that the temperature measurement site setting is correct. 2. Remove the probe from the probe well and hold it for 60 seconds until the monitor automatically enters Monitor mode. 3. Insert the probe into a cover in the probe cover pack. Press the probe handle down firmly until the cover engages with the probe. 4. Place the probe at the measurement site and the monitor measures the site temperature. Refer to Step 4 in 6.3.2 Taking a Temperature in the Predictive Mode for how to place a probe. 5. Withdraw the probe. Firmly press the ejection button on the top of the probe to eject the probe cover. Replace the probe into the probe well. NOTE 6-4 In Monitor mode, record the measured value prior to taking the probe away from the measurement site. The monitor automatically stops measuring temperature after 10 minutes from the start of the measurement. Accutorr 3 Operator's Manual 6.4 Disinfecting Temperature Probe The recommended disinfectants include: ethanol 70%, isopropanol 70%, glutaraldehyde-type 2% liquid disinfectants. To disinfect the temperature probe: 1. Disconnect the temperature probe from Temp connector. 2. Disinfect the probe with a soft cloth dampened with the recommended disinfectant. 3. Wipe off all the remaining disinfectants from the probe with a soft cloth dampened with water. 4. Dry the probe in a cool place. WARNING Properly dispose of the used soft cloth. Accutorr 3 Operator's Manual 6-5 FOR YOUR NOTES 6-6 Accutorr 3 Operator's Manual 7 Battery 7.1 Overview The monitor is designed to operate from battery power when AC power is not available. In case of power failure, the equipment automatically runs from the battery. The battery is to be used if the integrity of the protective earth conductor or the protective earthing system in the installation is in doubt. NOTE It is recommended to always keep a fully charged battery in the monitor to ensure normal monitoring in case of accidental power failure. The on-screen battery symbol indicates the battery status as follows: Indicates that the battery is fully charged. The solid portion represents the current charge level of the battery in proportion to its maximum charge level. Indicates that the battery has low charge level and needs to be charged. Indicates that the battery is almost depleted and needs to be charged immediately. Otherwise, the monitor automatically shuts down. symbol The capacity of the internal battery is limited. When the battery is low, the persistently flashes, and the monitor sounds a beep every 10 seconds to remind you to charge the battery. Press the hardkey to switch off the reminder tone. flashes, and the monitor sounds a beep If the battery is depleted, the battery symbol every 5 seconds to remind you to charge the battery. The reminder tone cannot be switched off. 7.2 Charging a Battery The battery is charged whenever the monitor is connected to an AC power source regardless of whether or not the monitor is turned on. When the battery is charging, the AC power indicator and battery indicator are both on. If the monitor is powered on, the battery status symbol on the monitor screen displays Accutorr 3 Operator's Manual when the charging is complete. 7-1 7.3 Replacing a Battery 1. 2. 3. 4. 5. Turn off the monitor. Open the battery compartment door. Push aside the battery latch and remove the battery. Place a new battery into the slot with its contact point inward. Close the battery compartment door. 7.4 Battery Guidelines Life expectancy of a battery depends on how frequently and how long it is used. For a properly maintained and stored lithium- ion battery, its life expectancy is about 3 years. For more aggressive use models, life expectancy can be less. We recommend replacing lithium- ion batteries after 500 full charge/discharge cycles or 3 years from first use, whichever occurs first. To get the most out of the battery, observe the following guidelines: The battery performance test must be performed once a year, before monitor repairs, or whenever the battery performance is suspect. Condition the batteries every three months, or when their run time becomes noticeably shorter. Remove the battery before shipping the monitor or if it will not be used for an extended period of time. Remove the battery from the monitor if it is not being used regularly (Leaving the battery in a monitor that is not in regular use will shorten the battery life). When storing batteries, make sure that the battery terminals do not come into contact with metallic objects. If batteries are stored for an extended period of time, they should be placed in a cool place with a partial charge of 40% to 60% capacity. Storing batteries at a high temperature for an extended period of time will significantly shorten the life expectancy of a battery. Do not store the battery at a temperature beyond -20°C - 60°C (-4°F - 140°F). WARNING 7-2 Keep the battery out of children’s reach. Use only specified batteries. If the battery shows signs of damage or signs of leakage, replace it immediately. Do not use a faulty battery in the monitor. The Lithium-ion batteries have a service life of 3 years. Please replace your battery when it reaches the end of its service life. Failure to replace the battery may cause serious damage to your device from battery overheating. Accutorr 3 Operator's Manual 7.5 Battery Maintenance 7.5.1 Conditioning a Battery A battery should be conditioned before it is used for the first time. A battery conditioning cycle is one complete, uninterrupted charge of the battery, followed by an uninterrupted battery discharge and charge. The battery should be conditioned regularly to maintain its useful life. To condition a battery: 1. Disconnect the monitor from the patient and stop all monitoring or measuring. 2. Turn off the monitor. Disconnect the monitor from the AC power. 3. Insert the battery in need of conditioning in the battery slot of the monitor. 4. Connect the monitor to the AC power. Allow the battery to be charged uninterrupted for 6.5 hours until the battery is full. 5. Remove the AC power and allow the monitor to run from the battery until the battery is completely depleted and the monitor automatically shuts off. 6. Again connect the monitor to the AC power. Fully charge the battery again for use or charge it to 40 – 60% for storage. NOTE The battery charge level indicator does not indicate the capacity or operating time of the battery. It only indicates the current battery charge level. The actual battery capacity decreases over time with the use of the battery. For an old battery, its capacity and operating time may not fulfill battery specifications even if the battery charge level indicates the battery is fully charged. Please replace the battery if its operating time is significantly lower than the specified time. 7.5.2 Checking a Battery The performance of a rechargeable battery will deteriorate over time. The battery performance test must be performed once a year, before monitor repairs, or whenever the battery performance is suspect. To check battery performance: 1. Disconnect the monitor from the patient and stop all monitoring or measuring. 2. Turn off the monitor. Disconnect the monitor from the AC power. 3. Install the battery. 4. Connect the monitor to AC power. Allow the battery to be charged uninterrupted for 6.5 hours until the battery is full. 5. Note the time. Remove AC power and allow the monitor to run from the battery until it shuts off. Note the time again. Calculate the run time by subtracting the start time from the end time. The operating time of a battery directly reflects its performance. If the operating time of a battery is noticeably shorter than that stated in the specifications, contact your Mindray service personnel. Accutorr 3 Operator's Manual 7-3 NOTE The battery may be damaged or may have malfunctioned if it only operates for a short time after being fully charged. The operating time depends on the configuration and operation. For example, measuring NIBP more frequently also shortens the operating time. Replace a battery that has visual signs of damage or no longer holds a charge. Remove the old battery from the monitor and recycle it according to local laws. 7.6 Recycling a Battery Remove the old battery from the monitor and recycle it properly. Follow local laws for proper battery disposal. WARNING 7-4 Do not disassemble batteries, dispose of them in fire, or cause them to short circuit. They may ignite, explode, leak or heat up, causing personal injury. Accutorr 3 Operator's Manual 8 Care and Maintenance The monitor should be maintained and cleaned on a regular basis. This chapter describes the basic cleaning, disinfection and test method. WARNING Failure of the responsible individual, hospital or institution using this equipment to implement a satisfactory maintenance schedule may cause undue equipment failure and possible health hazards. The safety checks or maintenance involving any disassembly of the equipment should be performed by professional servicing personnel. Otherwise, undue equipment failure and possible health hazards could result. If you discover a problem with any of the equipment, contact your service personnel or Mindray. The responsible hospital or institution should carry out all cleaning and disinfection procedure specified in this chapter. Do not open the equipment housings. All servicing or upgrades must be carried out by Mindray trained and authorized personnel. No modification of this equipment is allowed. 8.1 Cleaning and Disinfection This section describes cleaning and disinfection procedure for the monitor only. For the cleaning and disinfection of other reusable accessories, refer to instructions for use of corresponding accessories. Keep the equipment and accessories clean. To avoid damage to the equipment, follow these guidelines: Always dilute cleaners and disinfectants according the manufacturer’s instructions or use lowest possible concentration. Do not immerse any part of the equipment into liquid. Do not pour liquid onto the equipment or accessories. Do not allow liquid to enter the case. Never use abrasive materials, or corrosive cleaners (such as acetone or acetone-based cleaners). WARNING Be sure to turn off the monitor and disconnect all power cables from the outlets before cleaning the equipment. Use only Mindray approved cleaners and disinfectants and methods listed in this chapter to clean or disinfect your equipment. Warranty does not cover damage caused by unapproved substances or methods. Accutorr 3 Operator's Manual 8-1 WARNING We make no claims regarding the efficacy of the listed chemicals or methods as a means for controlling infection. For infection control methods, consult your hospital’s Infection Control Officer or Epidemiologist. CAUTION If you spill liquid on the equipment or accessories, contact Mindray or your service personnel. 8.1.1 Cleaning Clean your equipment on a regular basis. Consult your hospital's regulations before cleaning the equipment. The recommendedd cleaning agents include: Sodium hypochlorite bleach (10%) Isopropanol (70%) To clean your equipment: 1. Shut down the monitor and disconnect it from AC power. 2. Clean the display screen using a soft, clean cloth dampened with a cleaning agent. 3. Clean the exterior surface of the equipment using a soft cloth dampened with a cleaning agent. 4. Wipe off all the cleaning solution with a dry cloth after cleaning if necessary. 5. Dry your equipment in a ventilated, cool place. 8.1.2 Disinfecting If disinfecting is required because of hospital policy, cleaning the equipment before disinfecting is recommended. The recommended disinfectants include: Ethanol (70%) Isopropanol (70%) Perform® classic concentrate OXY 8-2 Accutorr 3 Operator's Manual 8.2 General Inspection Before first use, follow these guidelines when inspecting the equipment: Make sure that the environment and power supply meet the specifications. Inspect the equipment and its accessories for mechanical damage. Inspect all power cords for damage, and make sure that their insulation is in good condition. Make sure that only specified accessories are applied. Make sure that the battery meets the performance requirements. Make sure that the monitor is in good working condition. In case of any damage or abnormality, do not use the equipment. Contact the hospital’s biomedical engineers or your service personnel immediately. 8.3 Maintenance and Testing Schedule The following maintenance and tests, except for visual inspection, power on test, and battery check, should be carried out by the service personnel only. Ensure the monitor is safety and performance tested by qualified service personnel before initial installation, after repair or upgrade or during regularly scheduled maintenance. Contact your service personnel if any maintenance is required. Make sure to clean and disinfect (if required) the equipment before any test and maintenance. CAUTION Service personnel should acquaint themselves with the test tools and make sure that test tools and cables are applicable. Check/Maintenance Item Recommended Frequency Visual inspection When first installed or after reinstalled. Power on test 1. When first installed or after reinstalled. 2. Following any maintenance or the replacement of any main unit parts. Functionality test 1. 2. Performance test Once a year or if the battery run time reduced significantly. Pressure check Temp test 1. If the user suspects that the measurement is incorrect. 2. Following any repairs or replacement of the module. 3. Once a year for NIBP tests. 4. Once every two years for SpO2 test and Temp test. Electrical safety tests Once every two years, or as required. Battery check NIBP tests Leakage test SpO2 test Accutorr 3 Operator's Manual When first installed. Whenever a battery is replaced. 8-3 8.4 Checking Monitor Information 1. Enter Maintenance mode. Refer to 3.7 Maintenance Mode. 2. hardkey to switch to system software version screen. Refer to 3.7.4 Press the Viewing Software Version. 3. Press the hardkey to display the version of each module. 8.5 Visual Inspection Perform an overall inspection on the appearance of the equipment. The test is passed if the equipment has no obvious signs of damage. Follow these guidelines when inspecting the equipment: Carefully inspect the case, display screen, buttons, and knob for obvious signs of damage. Inspect all external connections for loose connectors, bent pins or frayed cables. Inspect all connectors on the equipment for loose connectors or bent pins. Make sure that safety labels and data plates on the equipment are clearly legible. 8.6 Power-on Test This test is to verify that the equipment can power up correctly. This test is passed if the equipment starts up by following this procedure: 1. Insert the battery in the battery compartment, and connect the equipment to the AC mains. The AC mains indicator and battery indicator light up. 2. 3. 4. button on the front panel to turn on the equipment. The work status Press the indicator lights up inside the Power button. The screen lights up. The main interface is displayed. Now the equipment is correctly started. 8.7 Battery Check Refer to 7.5.2 Checking a Battery for battery check instructions. 8-4 Accutorr 3 Operator's Manual 9 Accessories The material that patients will come into contact with has passed the bio-compatibility test and is verified to be in compliance with ISO 10993-1. WARNING Only use accessories specified in this chapter. Using other accessories may cause damage to the equipment or not meet the claimed specifications. Disposable accessories are not designed to be reused. Reuse may cause a risk of contamination and affect the measurement accuracy. Check the accessories and their packages for any sign of damage. Do not use them if any damage is detected. Dispose of accessories according to your hospital's regulations. Use the accessories before the expiration date if their expiration date is indicated. For more details about the accessories, refer to the instructions for use of corresponding accessories. 9.1 SpO2 Accessories Extension Cable Module Type Remarks Part No. Masimo SpO2 Module 8 pins, 2.1 m 115-020768-00 Nellcor SpO2 Module 8 pins, 2.5 m 0010-20-42712 SpO2 Sensors Masimo SpO2 module Type Model LNCS Pdtx Disposable Reusable Patient Category Part No. Pediatric 0600-00-0122 LNCS Adtx Adult 0600-00-0121 LNCS NeoPt Neonate (<1 kg) 0600-00-0156 LNCS Neo Adult and Pediatric (>40 Kg) neonate(<3 Kg) 0600-00-0157 LNCS Inf Pediatric and Neonate (3 to 20 Kg) 0600-00-0158 LNCS DCI Adult (Finger) 0600-00-0126 LNCS DCIP Pediatric (Finger) 0600-00-0127 Accutorr 3 Operator's Manual 9-1 LNCS NeoPt-L, LNCS Neo-L, LNCS Pdtx, LNCS Adtx, LNCS DCI, LNCS DCIP, and LNCS YI: red light: 660 nm, infrared light: 940 nm. Nellcor MAX-A, MAX-P, MAX-I, MAX-N, DS-100A, OXI-P/I, OXI-A/N, and D-YS: red light: 660 nm, infrared light: 890 nm. The maximum photic output consumption of the sensor is less than 18 mW. The information about the wavelength range and maximum photic output consumption can be especially useful to clinicians, for example, clinicians performing photodynamic therapy. 9.2 NIBP Accessories Tubing Type Reusable Patient Category Part No. Adult, Small Adult, Child 6200-30-09688 Neonate 6200-30-11560 Reusable Cuff Patient Category Measurement Site Limb Circumference (cm) Part No. Child 10 to 19 0683-15-0001-01 Small Adult 18 to 26 0683-15-0002-01 Adult 24 to 35 0683-15-0003-01 27.5 to 36.5 0683-15-0006-01 Large Adult 33 to 47 0683-15-0004-01 Large Adult Long 35.5 to 46 0683-15-0007-01 44 to 66 0683-15-0005-01 Adult Long Adult Arm Thigh Disposable Cuff Patient Category Measurement Site Neonate Limb Circumference (cm) Part No. 3.1 to 5.7 001B-30-70692 4.3 to 8.0 001B-30-70693 5.8 to 10.9 001B-30-70694 7.1 to 13.1 001B-30-70695 Child 10 to 19 0683-14-0001-01 Small Adult 18 to 26 0683-14-0002-01 Adult 24 to 35 0683-14-0003-01 Arm 9-2 Accutorr 3 Operator's Manual Patient Category Measurement Site Adult Long Limb Circumference (cm) 27.5 to 36.5 Part No. 0683-14-0006-01 Large adult 33 to 47 0683-14-0004-01 Large Adult Long 35.5 to 46 0683-14-0007-01 46 to 66 0683-14-0005-01 Adult Thigh 9.3 Temp Accessories Probe Well Type Reusable Temp Probes Type Reusable Probe Cover Type Disposable Description Part No. Blue, Oral /Axillary M09A-20-62062 Red, Rectal M09A-20-62062-51 Patient Category Measurement Site Part No. Adult, Pediatric, Neonate Oral/ Axillary 6006-30-39598 Adult, Pediatric Rectal 6006-30-39599 Patient Category Description Part No. Adult, Pediatric, Neonate Cover, 20 pcs/pack M09A-20-62124 Adult, Pediatric, Neonate Cover,2000 pcs/pack M09A-30-62128 Accutorr 3 Operator's Manual 9-3 9.4 Others Material Part No. Welch Allyn SureTemp Plus Probe Covers 0198-00-0044 Welch Allyn SureTemp Plus Thermometer Module 0992-00-0198 Welch Allyn SureTemp Plus Oral Probe 0992-00-0213-02 Quick Release Mounting Bracket for Rolling Stand 045-001054-00 Quick Release Mounting Bracket for Wall Mount 045-001055-00 Rolling Stand with Quick Release Mount 045-001057-00 Wall Mount Bracket 045-001059-00 Serial Cable Assembly 0012-00-1275-01 U.S. Power Cord 0012-25-0001 Accessories Kit Component Part No. Accutorr 3 Welch Allyn Temp Support Kit (115-025042-00) Accutorr 3 Welch Allyn Temp Support Assembly 115-022900-00 Accutorr 3 Welch Allyn Temp Support Installation Guide 046-006015-00 Li-ion Battery Kit (115-018012-00) Li-ion Battery 11.1V 4500mAh 022-000008-00 9-4 Accutorr 3 Operator's Manual A Product Specifications A.1 Classifications The equipment is classified, according to IEC60601-1: Type of protection against CLASS I EQUIPMENT, equipment energized from an external electrical shock and internal electrical power source. Degree of protection against electrical shock DEFIBRILLATION-PROOF TYPE CF APPLIED PART for SpO2, NIBP, and TEMP Mode of operation Continuous Degree of protection against harmful ingress of water IPX1 (protection against vertically falling water drops) Degree of safety of application in the presence of a FLAMMABLE ANAESTHETIC MIXTURE WITH AIR or WITH OXYGEN OR NITROUS OXIDE EQUIPMENT not suitable for use in the presence of a FLAMMABLE ANAESTHETIC MIXTURE WITH AIR or WITH OXYGEN OR NITROUS OXIDE Degree of mobility Portable A.2 Environmental Specifications Main Unit Item Operating conditions Storage conditions Temperature (°C) 0 to 40 (without Temp module) 5 to 40 (with Temp module) -20 to 60 Relative humidity (noncondensing) 15% to 95% 10% to 95% Barometric (kPa) 57.0 to 107.4 16.0 to 107.4 WARNING The equipment may not meet the performance specifications given here if stored or used outside the specified temperature and humidity ranges. NOTE The environmental specifications of parameter modules are the same as those of the main unit. Accutorr 3 Operator's Manual A-1 A.3 Power Supply Specifications AC Power Line voltage 100 to 240 VAC ~ (±10%) Current 0.9 to 0.5A Frequency 50/60 Hz (±3Hz) Fuse T2AL-250V Battery Battery Type Rechargeable lithium-ion, LI23S002A Voltage 11.1 VDC Capacity 4500 mAh Run time At least 22 hours when powered by a new fully-charged battery at 25°C±5°C (77°F±41°F) with SpO2 cable connected, and auto NIBP measurements at an interval of 15 minutes. Charge time Monitor power off: less than 5.5 hours to 90%; less than 6.5 hours to 100%. Monitor power on: less than 10.5 hours to 90%; less than 11.5 hours to 100%. Shutdown delay At least 20 minutes (after a low battery prompt first occurs) A.4 Physical Specifications Size 134mm × 120mm × 243mm Weight ≤1.9 kg (with SpO2 module, NIBP module and a battery) ≤1.7 kg (with NIBP module and a battery) A.5 Hardware Specifications A.5.1 Display Screen type Segment display Screen Size 90mm × 99mm A.5.2 LEDs Power on LED 1 (two color: yellow/green) AC power LED 1 (green) Battery LED 1 (green) A-2 Accutorr 3 Operator's Manual A.5.3 Audio Indicator Buzzer Give pulse tone, power-on self check tone. A.5.4 Monitor Interface Specifications Power 1 AC power input connector RS 232 connector 1 Equipotential Grounding Terminal 1 A.6 Measurement Specifications A.6.1 SpO2 Masimo SpO2 Module Standards Meet standards of ISO 9919, ISO 80601-2-61 SpO2 Measurement range** 1 to 100% PI measurement range 0.02% to 20% SpO2 Resolution 1% 70 to 100%: ±2% (measured without motion in adult/pediatric mode) Accuracy1, ** 70 to 100%: ±3% (measured without motion in neonate mode) 70 to 100%: ±3% (measured with motion) 1% to 69%: Not specified. Refreshing rate 1s Low perfusion conditions Pulse amplitude: >0.02% Light penetration: >5% Low perfusion SpO2 accuracy2 ±2% 1 The Masimo pulse oximeter with sensors has been validated for no motion accuracy in human blood studies on healthy adult volunteers in induced hypoxia studies in the range of 70% to 100% SpO2 against a laboratory co-oximeter and ECG monitor. This variation equals plus or minus one standard deviation. Plus or minus one standard deviation encompasses 68% of the population. The Masimo pulse oximeter with sensors has been validated for motion accuracy in human blood studies on healthy adult volunteers in induced hypoxia studies while performing rubbing and tapping motions at 2 to 4 Hz. At an amplitude of 1 to 2 cm and non-repetitive motion between 1 to 5 Hz. At an amplitude of 2 to 3 cm in induced hypoxia studies in the range of 70% to 100% SpO2 against a laboratory co-oximeter and ECG monitor. This variation Accutorr 3 Operator's Manual A-3 equals plus or minus one standard deviation. Plus or minus one standard deviation encompasses 68% of the population. 2 The Masimo pulse oximeter has been validated for low perfusion accuracy in bench top testing against a Biotek Index 2 simulator and Masimo's simulator with signal strengths of greater than 0.02% and a % transmission of greater than 5% for saturations ranging from 70 to 100%. This variation equals plus or minus one standard deviation. Plus or minus one standard deviation encompasses 68% of the population. ** indicates the essential performance. Nellcor SpO2 Module Standards Meet standards of ISO 9919, ISO 80601-2-61 Measurement range** 0 to 100% Resolution 1% 70 to 100%: ±2% (adult/pediatric) Accuracy** 70 to 100%: ±3% (neonate) 0% to 69%: Not specified. Refreshing rate 1s *: When the SpO2 sensor is applied for neonatal patients as indicated, the specified accuracy range is increased by ±1%, to compensate for the theoretical effect on oximeter measurements of fetal hemoglobin in neonatal blood. ** indicates the essential performance. A.6.2 PR PR from Masimo SpO2 Module Measurement range** 25 to 240 bpm Resolution Accuracy** Refreshing rate 1 bpm ±3 bpm (without motion) ±5 bpm (with motion) 1s ** indicates the essential performance. PR from Nellcor SpO2 Module Measurement range** 20 to 300 bpm Resolution 1 bpm Accuracy** 20 to 250 bpm: ±3 bpm 251 to 300 bpm, not specified Refreshing rate 1s ** indicates the essential performance. A-4 Accutorr 3 Operator's Manual PR from NIBP Module Measurement range** 40 to 240 bpm Resolution 1 bpm Accuracy** ±3 bpm or ±3%, whichever is greater ** indicates the essential performance. A.6.3 NIBP Standards Meet standards of IEC80601-2-30, EN1060-1, EN1060-3, EN1060-4 and SP10 Technique Oscillometry Max measurement time** Adult, pediatric: 180 s Neonate: 90 s Adult Measurement ranges (mmHg) ** Pediatric Neonate Systolic: 40 to 270 40 to 200 40 to 135 Diastolic: 10 to 210 10 to 150 10 to 100 Accuracy** Max mean error: 5 mmHg Max standard deviation: 8 mmHg Static pressure measurement range** 0 mmHg to 300 mmHg Static pressure measurement accuracy** 3 mmHg Resolution 1 mmHg Default initial cuff inflation pressure (mmHg) Adult: Pediatric: Neonate: 160 140 90 Adult: Pediatric: Neonate: 297±3 mmHg Software overpressure protection** 240±3 mmHg 147±3 mmHg Adult: ≤330 mmHg Pediatric: ≤330 mmHg Neonate: ≤165 mmHg * Measurement accuracy verification: In adult and pediatric modes, the blood pressure measurements measured with this device are in compliance with the American National Standard for Electronic or Automated Sphymomanometers (ANSI/AAMI SP10) in terms of mean error and standard deviation by comparing with intra-arterial or auscultatory measurements (depending on the configuration) in a typical patient population. For auscultatory reference, the 5th Korotkoff sound was used to determine the diastolic pressure. Hardware overpressure protection** Accutorr 3 Operator's Manual A-5 In neonatal mode, the blood pressure measurements measured with this device are in compliance with the American National Standard for Electronic or Automated Sphymomanometers (ANSI/AAMI SP10) in terms of mean error and standard deviation by comparing with intra-arterial measurements (depending on the configuration) in a typical patient population. ** indicates the essential performance. A.6.4 Temp Standards Meets standards of ASTM E1112, ASTM E1104, ISO 80601-2-56 Technique Thermal resistance (use thermistor to measure temperature ) Measurement range** Monitor mode: 25°C to 44°C (77°F to 111.2°F) Predictive mode: 35°C to 43°C (95°F to 109.4°F) Accuracy (Monitor mode) ** 25°C to 32°C (not include 32°C): ± 0.2°C 32°C to 44°C (include 32°C): ±0.1°C or 77°F to 89.6°F (not include 89.6°F): ± 0.4°F 89.6°F to 111.2°F (include 89.6°F): ± 0.2°F Resolution ±0.1°C Response Time Monitor mode: < 60 s Predictive mode: < 20 s (typical test: < 12 s ) ** indicates the essential performance. A-6 Accutorr 3 Operator's Manual B EMC The device meets the requirements of IEC 60601-1-2. All the accessories listed in Chapter 9 also meet the requirements of IEC 60601-1-2 when in use with this device. NOTE Using accessories, transducers and cables other than those specified may result in increased electromagnetic emission or decreased electromagnetic immunity of the equipment. The device or its components should not be used adjacent to or stacked with other equipment. If adjacent or stacked use is necessary, the device or its components should be observed to verify normal operation in the configuration in which it will be used. The device needs special precautions regarding EMC and needs to be installed and put into service according to the EMC information provided below. Other devices may interfere with this device even though they meet the requirements of CISPR. When the input signal is below the minimum amplitude provided in technical specifications, erroneous measurements could result. Portable and mobile communication equipment may affect the performance of this device. Other devices that have RF transmitter or source may affect this device (e.g. cell phones, PDAs, and PCs with wireless function). Guidance and Declaration - Electromagnetic Emissions The device is intended for use in the electromagnetic environment specified below. The customer or the user of the device should assure that it is used in such an environment. Emission tests Compliance Electromagnetic environment - guidance Group 1 The device uses RF energy only for its internal function. Therefore, its RF emissions are very low and are not likely to cause any interference in nearby electronic equipment. RF emissions CISPR 11 Class A Harmonic emissions IEC61000-3-2 Class A Voltage Fluctuations/Flicker Emissions IEC 61000-3-3 Complies The device is suitable for use in all establishments other than domestic and those directly connected to the public low-voltage power supply network that supplies buildings used for domestic purposes Radio frequency (RF) emissions CISPR 11 Accutorr 3 Operator's Manual B-1 WARNING This equipment/system is intended for use by healthcare professionals only. This equipment/ system may cause radio interference or may disrupt the operation of nearby equipment. It may be necessary to take mitigation measures, such as re-orienting or relocating the [ME EQUIPMENT or ME SYSTEM] or shielding the location. Guidance and Declaration - Electromagnetic Immunity The device is intended for use in the electromagnetic environment specified below. The customer or the user of the device should assure that it is used in such an environment. Immunity test IEC60601 test level Compliance level Electrostatic discharge (ESD) IEC 61000-4-2 ±6 kV contact ±6 kV contact ±8 kV air ±8 kV air Electrical fast transient/burst IEC 61000-4-4 ±2 kV for power supply lines ±2 kV for power supply lines ±1 kV for input/output lines ±1 kV for input/output lines Surge IEC 61000-4-5 ±1 kV line(s) to line(s) ±1 kV line(s) to line(s) ±2 kV line(s) to earth Electromagnetic environment guidance Floors should be wood, concrete or ceramic tile. If floors are covered with synthetic material, the relative humidity should be at least 30%. Mains power quality should be that of a typical commercial or hospital environment. ±2 kV line(s) to earth Voltage dips, short interruptions and voltage variations on power supply input lines IEC 61000-4-11 B-2 <5 % UT (>95 % dip in UT) for 0.5 cycle <5 % UT (>95 % dip in UT) for 0.5 cycle 40 % UT (60 % dip in UT) for 5 cycles 40 % UT (60 % dip in UT) for 5 cycles 70 % UT (30 % dip in UT) for 25 cycles 70 % UT (30 % dip in UT) for 25 cycles <5 % UT (>95 % dip in UT) for 5 s <5 % UT (>95 % dip in UT) for 5 s Mains power quality should be that of a typical commercial or hospital environment. If the user of our product requires continued operation during power mains interruptions, it is recommended that our product be powered from an uninterruptible power supply or a battery. Accutorr 3 Operator's Manual Power frequency (50/60 HZ) magnetic field IEC 61000-4-8 3 A/m 3 A/m Power frequency magnetic fields should be at levels characteristic of a typical location in a typical commercial or hospital environment. Note: UT is the AC mains voltage prior to application of the test level. Guidance and Declaration - Electromagnetic Immunity The device is intended for use in the specified electromagnetic environment. The customer or the user of the device should assure that it is used in such an environment as described below. Immunity test IEC60601 test level Conduced RF IEC61000-4-6 3 Vrms 150 kHz to 80 MHz Compliance level 3Vrms Electromagnetic environment guidance Portable and mobile RF communications equipment should be used no closer to any part of the system, including cables, than the recommended separation distance calculated from the equation appropriate for the frequency of the transmitter. Recommended separation distances: d 1 .2 Radiated RF IEC61000-4-3 3V/m 80MHz to 2.5GHz 3V/m P Recommended separation distances: 80 MHz - 800 MHz d 1 .2 P 800MHz-2.5GHz d 2 .3 P Where, P is the maximum output power rating of the transmitter in watts (W) according to the transmitter manufacturer and d is the recommended separation distance in meters (m).b Field strengths from fixed RF transmitters, as determined by an electromagnetic site survey a, should be less than the compliance level in each frequency range b. Interference may occur in the vicinity of equipment marked with the following symbol: Accutorr 3 Operator's Manual B-3 Note 1: At 80 MHz to 800 MHz, the separation distance for the higher frequency range applies. Note 2: These guidelines may not apply in all situations. Electromagnetic propagation is affected by absorption and reflection from structures, objects and people. Note 3: The device that intentionally receives RF electromagnetic energy at the exclusion band (2395.825MHz-2487.645MHz) is exempt from the essential performance requirements, but remains safe. a Field strengths from fixed transmitters, such as base stations for radio (cellular/cordless) telephones and land mobile radios, amateur radio, AM and FM radio broadcast and TV broadcast cannot be predicted theoretically with accuracy. To assess the electromagnetic environment due to fixed RF transmitters, an electromagnetic site survey should be considered. If the measured field strength in the location in which the [ME EQUIPMENT or ME SYSTEM] is used exceeds the applicable RF compliance level above, the [ME EQUIPMENT or ME SYSTEM] should be observed to verify normal operation. If abnormal performance is observed, additional measures may be necessary, such as re-orienting or relocating the [ME EQUIPMENT or ME SYSTEM]. b Over the frequency range 150 kHz to 80 MHz, field strengths should be less than3V/m. Recommended separation distances between portable and mobile RF communications equipment and the device The device is intended for use in an electromagnetic environment in which radiated RF disturbances are controlled. The customer or the user of the device can help prevent electromagnetic interference by maintaining a minimum distance between portable and mobile RF communications equipment (transmitters) and the device as recommended below, according to the maximum output power of the communications equipment. Rated maximum output power of transmitter (W) Separation distance in meters (m) according to frequency of the transmitter 150 kHz - 80 MHz 80 MHz - 800 MHz 800 MHz - 2.5 GHz d 1 .2 P d 1 .2 P d 2 .3 P 0.01 0.12 0.12 0.23 0.1 0.38 0.38 0.73 1 1.20 1.20 2.30 10 3.80 3.80 7.30 100 12.00 12.00 23.00 For transmitters rated at a maximum output power not listed above, the recommended separation distance d in metres (m) can be estimated using the equation applicable to the frequency of the transmitter, where P is the maximum output power rating of the transmitter in watts (W) according to the transmitter manufacturer. Note 1: At 80 MHz and 800 MHz, the separation distance for the higher frequency range applies. Note 2: These guidelines may not apply in all situations. Electromagnetic propagation is affected by absorption and reflection from structures, objects and people. B-4 Accutorr 3 Operator's Manual C Error Codes This chapter lists all the error codes that may appear on your monitor. In the “Solution” column, corresponding solutions are given instructing you to troubleshoot problems. If the problem persists, contact your service personnel. When an error occurs, the Error Code area on the screen displays the code. If the error is related with parameter module, the corresponding parameter label also flashes. Some error codes can be cleared, but some cannot. In Measurement mode, you can press the hardkey to remove the clearable code in the Error Code area and stop the parameter label from flashing. When multiple errors occur, the error codes scroll. Error Code 01 Description NIBP module error 03 NIBP communication error 05 Causes Solution Yes The measured NIBP value Contact Mindray or exceeds the measurement your service personnel. range. No 1. Self-test failure. 2. NIBP module error, or communication error between NIBP and main unit. 3. System error. After startup, pump, A/D sampling or pressure transducer error, or pointer error during software running. No NIBP module error, or communication error between NIBP and main unit. No The NIBP airway may be occluded, or the cuff is squeezed during deflation. Check the air pressure. Restart the monitor and retry. If the error remains, contact Mindray or your service personnel. Yes The patient’s pulse is weak or the cuff is loose. Check the patient’s condition and change the cuff application site. If the error persists, replace the cuff. NIBP overrange 02 04 Clearable? (Yes/No) NIBP air pressure error NIBP weak signal Accutorr 3 Operator's Manual Restart the monitor. If the error remains, contact Mindray or your service personnel. C-1 Error Code Description 06 NIBP excessive motion 07 NIBP cuff overpressure 08 NIBP illegally reset 09 NIBP timeout 10 NIBP cuff type wrong Clearable? (Yes/No) Causes Solution Yes Patient’s arm moves too much. Check the patient’s condition and reduce the patient’s motion. Yes The NIBP airway may be occluded. Check the airway and measure again. Yes An illegal reset occurred during NIBP measurement. Check if the airway is occluded. Yes Maximum measurement duration exceeded. In Adult/Pediatric mode, the maximum measurement duration is > 120 seconds; in neonate mode, the maximum measurement duration is > 90 seconds. Check the patient’s condition and NIBP connections, or replace the cuff. Yes The cuff type applied does not match the patient category. Verify the patient category and either change the category or replace the cuff. Yes The cuff is not properly applied or connected, or the airway leaks air. Correctly apply and use the cuff. If the problem still exists, contact Mindray or your service personnel. No There is a problem with the SpO2 measurement board. Do not use the module and contact Mindray or your service personnel. No SpO2 module error or communication error between SpO2 module and main unit. Restart the monitor. If the error remains, contact Mindray or your service personnel. 11 NIBP air leak 17 SpO2 board fault (Masimo) 18 SpO2 module error 19 PR overrange (SpO2/NIBP) No (SpO2) Yes (NIBP) The measured PR value Contact Mindray or exceeds the measurement your service personnel. range. SpO2 low perfusion (Masimo, Nellcor) No 20 The SpO2 signal is too weak. Move the sensor to a site with better perfusion. No Temp module initialization error, or communication error between Temp module and main unit; too high or too low power voltage; no Restart the monitor. If the error remains, contact Mindray or your service personnel. 26 C-2 Temp module error Accutorr 3 Operator's Manual Error Code Description Clearable? (Yes/No) Causes Solution Temp module or Temp module error. No Temp probe cannot work; or the probe is not, or incorrectly, inserted into the probe well Verify that the probe is in the probe well, or cool the probe and re-insert into the probe well. No The environmental temperature is out of range of the monitor's measurement. Change the environment and retry. No The measured Temp value Contact Mindray or exceeds the measurement your service personnel. range. No No data from the power Restart the monitor. If module has been received the problem still exists, for 10 seconds. contact Mindray or your service personnel. Accutorr 3 Operator's Manual C-3 27 Temp probe error 28 Ambient temp overrange 29 Temp overrange 40 Power board communication error FOR YOUR NOTES C-4 Accutorr 3 Operator's Manual D Symbols and Abbreviations D.1 Symbols µA microampere µV microvolt µs microsecond A ampere Ah ampere hour bpm beat per minute bps bit per second ºC centigrade cm centimeter dB decibel DS dyne second ºF fahrenheit g gram GHz gigahertz h hour Hz hertz in inch k kilo kg kilogram kPa kilopascal L litre lb pound m meter mAh milliampere hour Mb mega byte mg milligram min minute ml milliliter mm millimeter mmHg millimeters of mercury Accutorr 3 Operator's Manual D-1 ms millisecond mV millivolt mW milliwatt MΩ megaohm nm nanometer rpm breaths per minute s second V volt VA volt ampere Ω ohm W watt - minus – negative % percent / per; divide; or ~ to + plus = equal to < less than > greater than ≤ less than or equal to ≥ greater than or equal to ± plus or minus × multiply © copyright D.2 Abbreviations AC alternating current CE Conformité Européenne DC direct current DIAP Datascope Improved ASCII Protocol EMC electromagnetic compatibility Err error D-2 Accutorr 3 Operator's Manual IEC International Electrotechnical Commission ISO International organization for standardization M Monitoring MDD Medical Device Directive MRI magnetic resonance imaging NIBP noninvasive blood pressure P power P Predictive PR pulse rate SpO2 arterial oxygen saturation from pulse oximetry TEMP temperature Accutorr 3 Operator's Manual D-3 FOR YOUR NOTES D-4 Accutorr 3 Operator's Manual P/N: 046-005275-00 (2.0) SW Version: 03.01.00