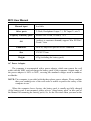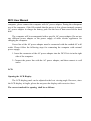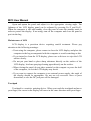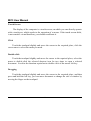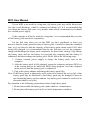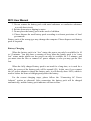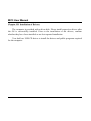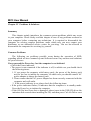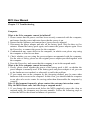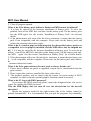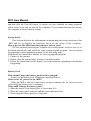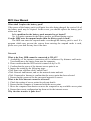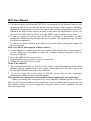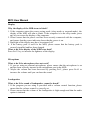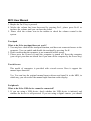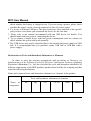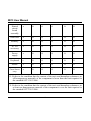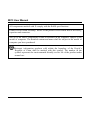
1
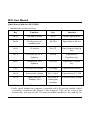
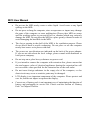
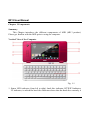
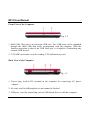
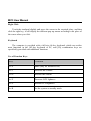
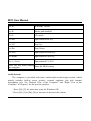
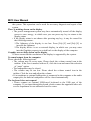
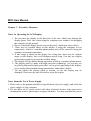
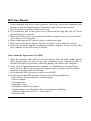
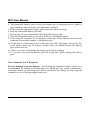
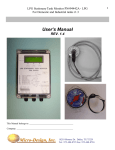
MI13 User Manual DECLARATION Please read the Manual carefully prior to using the computer. The Company will only be responsible for repair and servicing of the computer discovered with inherent problems. The Company will hold no responsibility for any loss of, deletion of or modification to the data stored in the computer due to the misoperation of or unauthorized repair by the user or by any other abnormal condition, or any other unfavorable results thus caused. The Manual will be subject to periodic change without prior notice. Its content is for reference only, and the Company and distributors will not be liable for any loss caused by incorrect description herein or by misuse of the Manual. Graphics contained herein, which may vary slightly from the material object, are only the general representatives. Please subject to the model you have purchased. The Company enjoys and reserves all proprietary and exclusive rights to the Manual according to the Copyright Law of the People’s Republic of China. Without written consent of the Company, no addition, deletion, adaptation, copying or duplication to the Manual is allowed. Please firstly read the Quick Start Guide to use the computer quickly and conveniently. 1 MI13 User Manual CONTENTS QUICK START GUIDE FOR MI13-MID ...............................................................5 PREFACE................................................................................................................8 HUMAN ENGINEERING CONSIDERATIONS PRIOR TO USE .........................9 NOTES...................................................................................................................10 OPENING THE PACKING BOX..........................................................................10 SAFETY AND MAINTENANCE ..........................................................................10 CHAPTER I COMPONENTS.........................................................................13 SUMMARY ...........................................................................................................13 VERTICAL VIEW OF THE COMPUTER ...........................................................13 FRONT VIEW OF THE COMPUTER..................................................................15 BACK VIEW OF THE COMPUTER ....................................................................15 LEFT VIEW OF THE COMPUTER .....................................................................16 RIGHT VIEW OF THE COMPUTER ..................................................................16 BOTTOM VIEW OF THE COMPUTER ..............................................................17 CHAPTER II BASIC OPERATION .....................................................................18 SUMMARY ...........................................................................................................18 OUTLINE OF THE BASIC FUNCTIONS ............................................................18 AC POWER ADAPTER ........................................................................................20 LCD .......................................................................................................................21 OPENING THE LCD DISPLAY ...........................................................................21 MAINTENANCE OF LCD ....................................................................................22 TOUCHPAD ..........................................................................................................22 TOUCH SCREEN..................................................................................................23 CLICK ...................................................................................................................23 DOUBLE-CLICK ..................................................................................................23 DRAGGING ..........................................................................................................23 RIGHT CLICK......................................................................................................24 KEYBOARD..........................................................................................................24 2 MI13 User Manual USE OF FUNCTION KEYS ..................................................................................24 AUDIO SYSTEM...................................................................................................25 PHONE (OPTIONAL)...........................................................................................26 MANUAL INPUT ..................................................................................................26 3G-BASED INTERNET ACCESS .........................................................................26 INSTALLATION OF 3G NETWORK CARD.......................................................26 T-FLASH ...............................................................................................................27 WIFI WIRELESS NETWORK ACCESS & BLUETOOTH .................................27 BATTERY PACK ..................................................................................................27 BATTERY CHARGING........................................................................................29 CHAPTER III INSTALLATION OF DRIVERS ..................................................30 CHAPTER IV PROBLEMS & SOLUTIONS .......................................................31 SUMMARY ...........................................................................................................31 COMMON PROBLEMS .......................................................................................31 CHAPTER V PREVENTIVE MEASURES ..........................................................33 NOTES FOR OPERATING THE LCD DISPLAY ................................................33 NOTES ABOUT THE USE OF POWER SUPPLY ...............................................33 NOTES ABOUT THE OPERATION OF THE MID .............................................34 NOTES ABOUT THE USE OF CHARGEABLE BATTERY PACK ....................35 NOTES ABOUT THE USE OF EARPHONE........................................................36 CHAPTER VI TROUBLESHOOTING ................................................................37 COMPUTER..........................................................................................................37 SYSTEM SAFETY ................................................................................................39 BATTERY PACK ..................................................................................................39 NETWORK ...........................................................................................................40 DISPLAY ...............................................................................................................42 MICROPHONE.....................................................................................................42 LOUDSPEAKER ...................................................................................................42 TOUCHPAD ..........................................................................................................43 TOUCH SCREEN..................................................................................................43 PERIPHERALS.....................................................................................................43 3 MI13 User Manual DECLARATION ON TOXIC AND HAZARDOUS SUBSTANCES OR ELEME NTS ........................................................................................................................44 4 MI13 User Manual Quick Start Guide for MI13-MID 1. Introduction to Function Keys Key Function Key Function Fn+W WIFI&BT switch Fn+K Mouse pad disabled Fn+R Set the system as standby mode Fn+Del Equivalent to Ins key Fn+G 3G switch Fn+UP Equivalent to PageUp key Fn+Y Decrease the LCD lightness Fn+Dn Equivalent to PageDown key Fn+U Increase the LCD lightness Fn+Left Equivalent to Home key Fn+I Decrease the volume Fn+Right Equivalent to End key Fn+O Increase the volume Fn+1~Fn+0 Equivalent to F1~F10 Fn+P Mute (only for Windows OS) Press Del at starting the computer Enter the BIOS setting 2. Installation and use of 3G network card • Firstly, check whether the computer is installed with a 3G network module, which is normally installed at the bottom of the computer. Take off the cover at the bottom side, you may see the 3G network module installed or not, and the 3G 5 MI13 User Manual network module number, the network access identifier posted on the computer. Different 3G network cards will be supported by different types of 3G network modules. Please confirm and check the 3G network module installed in the computer and purchase the compatible and right 3G network card. • After confirming the installation of 3G network modules in the computer and the 3G network card type compatible, turn off the computer, remove the module cover at the bottom, then insert the 3G network card by the direction shown in the SIM card slot, place the card until the SIM card is rightly locked in the slot. If you wish to remove the SIM card, press the card inward and it will pop up, then take off the card. • After completing the above two steps correctly, turn on the computer and enter the OS. At starting the computer, 3G switch is off by default, you may turn on the 3G switch by pressing Fn+G keys. The 3G indicator will light up after 3G switch is on, and will be off if you press Fn+G again. If you wish to have access to internet through 3G wireless network card, turn on 3G switch and initiate the corresponding client software in Windows OS, you may see the 3G signals searched by the software, and click for connection, you may have access to internet if the connection is successful. 3. WIFI wireless internet access • If the wireless network is not accessible through WIFI, please ensure that WIFI is on, namely, the WIFI indicator in the top left side is on. Open and close WIFI by Fn+W keys. • Ensure the WIFI is on, and click the wireless network icon at the bottom right, a dialogue box will pop up, select “Refreshing Network List” to search wireless network, then gain access to internet through wireless network usable or with the best signal. If the wireless network is encrypted, you should input the correct code for connecting to internet through WIFI. 4. Use of Mini USB • The Mini USB of the computer is an extension USB hub which can connect with the MID with our supporting Mini USB data cable by expanding two USB2.0 high speed devices, such as U disk and mobile hard disk. It functions as the USB Host 6 MI13 User Manual port of the computer. 5. How to realize the audio chat and voice communications. • The computer is provided with a built-in Mic (see “Front View of the Computer”). Through the Mic, you may talk with others by QQ or network audio chat tool, you also may talk with your friends or family members through Skype or web phone by using our supporting earphone. • Voice communications – Voice communications (through 3G network) is available through the computer, yet you should have standard 3G modules and 3G SIM card for the function, and you should ensure that client software can realize the dialing function. • During the audio chat or voice communications, if the sound is too low you may adjust the volume of speaker and Mic by the mini audio manager at the bottom of the right side in the taskbar of the computer. 7 MI13 User Manual PREFACE Thanks for selecting the MI13-MID product. It’s our great honor to have you as our customer. In order to enable you to use the MI13-MID product quickly, we have prepared the detailed user's manual as follows. We have tried our best to arrange the manual in a complete and easy-tounderstand manner and we believe that the content contained herein is reliable and correct, and we have made efforts to avoid artificial error; however, there may be certain error not discovered before printing or any unavoidable omission, for which we need your understanding. “The Computer” or “MID”, as may be mentioned in the Manual, shall refer to the MI13 product. 8 MI13 User Manual Human Engineering Considerations Prior to Use ▪ Please consider the following human engineering factors from time to time: 1. Secure working surface – please use the secure working surface large enough to support the computer and its peripherals. 2. Positioning your MID – place the MID right in front of you: (1) your forearm shall be in a horizontal place when using keyboard, pointing device or externally connected mouse; (2) place the wrist in a relaxing and comfortable position; (3) drop the forearm naturally to the side of the body, and take a rest after a period of use. Overuse of the computer may cause muscle or tendon fatigue. 3. Chair and sitting position – please sit on chair with sound back support. Adjust the height of chair to ensure that the feet can be placed on the ground. Footstool may be more comfortable for you. Please sit on the chair in an upright position, and do not bend forward or lean back too much. 4. Viewing angle of display – adjust the angle of inclination of the display to the proper position, which may reduce the eyes and muscle strain. Please set the lightness of the display as well. 5. Lighting – please select the position where the windows and lighting fixture will not generate dazzling or reflection of light. Appropriate lighting will enhance the comfortableness and efficiency of work. 6. Ventilation – please ensure to leave certain space around the air vent of the computer. There shall be certain height between the bottom of the 9 MI13 User Manual computer and the working surface to improve the MID heat radiation efficiency. NOTES Please follow the various precautions listed herein, which will help you to work safely and efficiently, and protect your MID. Opening the Packing Box Inspect whether the items listed in the packing list are completely contained in the packing box. Safety and Maintenance Please consider the following factors when setting the computer, in order to ensure that the MID can be used for a long time without degeneration: · Please read the Manual carefully, and follow the warnings and instructions listed in the auxiliary directions of the OS. · For the first use of the computer, please read the Chapter I “Basic Operation” in the Manual, and calibrate the battery pack to ensure the performance of the battery pack. · Do not use power adapter not accompanied with the computer. Incorrect power adapter used may damage the MID. 10 MI13 User Manual · Do not use the MID nearby water or other liquid. Avoid water or any liquid spilling on the MID. · Do not press or bang the computer, since overpressure or impact may damage the parts of the computer or cause malfunction. Please place MID on secure and flat working surface to prevent fall-off or vibration which may seriously damage the MID. Do not place the MID in a place greatly vibrated in order to avoid damaging the hard disk in the MID. · The slot or opening in the shell of the MID is for ventilation purpose. Please do not block them to avoid overheating. Do not place or use the computer nearby heat source or in places with dust. · The power use specifications are indicated on the back of the power adapter. If you are not sure about the local voltage, please consult with distributor or local power company. · Do not step on or place heavy substance on power cord. · If you intend to connect the computer with extension line, please ensure that the total ampere value of electrical appliances sharing the extension line will not exceed the value specified for the extension line or the wall outlet. · Do not insert foreign substance in the empty slot of the computer, or else short circuit may occur or sensitive parts may be damaged. · LCD display is an important component of the computer. Please protect and care for, and do not impact or squeeze the display. · Correct use of battery pack is an important way of maintaining the function of battery and prolonging its service life. Please read the Section of “Battery Pack” in Chapter II herein. 11 MI13 User Manual · It is common for the surface of power adapter to generate heat when the adapter is working. Do not place the power adapter on material which is not heat resistant, or else the material may be damaged. · Ensure to turn off the computer before cleaning. Please pull the plug out and take off the battery pack, and clean the computer with clean and soft cloth. Do not use spraying agent, solvent or strong cleaning agent. · Prior to moving the MID, please ensure that all disc operations have been stopped, that the power is off, the display is closed and that the power adapter is cut off. Please ensure that the backpack for the computer is secure and solid before putting the computer and accessories inside. 12 MI13 User Manual Chapter I Components Summary This Chapter introduces the different components of MID (MI13 product). Please get familiar with the MID prior to using the computer. Vertical View of the Computer Fig. 1-1 1. Status LED indicator (from left to right): hard disc indicator, BT/WIFI indicator, 3G indicator; in which the hard disc indicator shows that the hard disc currently is 13 MI13 User Manual in writing; the BT/WIFI indicator shows Bluetooth and WIFI are on; and the 3G indicator shows that the 3G function is on. 2. Status LED indicator (from left to right): power indicator, battery indicator, CAPS switch indicator, which respectively show the current power status, the battery use information, and capitalization of letters. 3. Camera: built-in high definition camera available for video chat. 4/5. Mouse left/right keys: equivalent to the left/right keys of external PS/2 or the external mouse for USB. 6. Display: screen display area, being a touch screen. 7. Resolution key: used to switch screen resolution to make the current web wage or window can be completely displayed under the current resolution. 8. Power key: When the computer is off, press the key to turn on the computer, and vice versa; when the computer is in standby mode, press the key to get the computer into normal working mode. 9. Keyboard: used for data input with built-in numeric key for standby use and function keys. 10. Touchpad: a built-in pointing device with the function similar with a mouse pointer. 14 MI13 User Manual Front View of the Computer Fig. 1-2 1. Mini USB: This port is an extension USB port. Two USB ports can be expanded through the Mini USB data cable accompanied with the company. With the function equivalent to that of the USB Host port, it is capable of connecting any external USB devices. 2. T-FLASH card reader: used for reading T-FLASH memory card. Back View of the Computer Fig. 1-3 1. Power plug: built-in DC terminal in the computer for connecting AC power adapter. 2. Air vent: used for diffusing hot air and cannot be blocked. 3. USB port: used for connecting various USB-based devices with the computer. 15 MI13 User Manual Left View of the Computer Fig. 1-4 1. Touch pen: used for clicking the display for manual input. Right View of the Computer Fig. 1-5 1. Stereo earphone jack: used for connecting earphone or external voice box. 2. Air vent: used for diffusing hot air and cannot be blocked. 3. Mic: Built-in microphone, used for recording and voice chat with friends. 16 MI13 User Manual Bottom View of the Computer Fig. 1-6 1. Loudspeaker: built-in loudspeaker sounding when playing songs and movies. 2. Back cover of 3G module: The 3G module slot is visible after removing this back cover. 3. Battery pack cover: The battery slot is visible after removing the battery pack cover. Please install the battery pack in the right direction. 17 MI13 User Manual Chapter II Basic Operation Summary This chapter describes some basic operations, including the method for using different components. Outline of the Basic Functions Basic parameters Product information Type of processor Intel Atom Z510/Z515 (Optional) Maximum dominant frequency of processor L2 Cache Chipset of motherboard 1.10GHz/1.20GHz 512KB Intel US15W Memory capacity On-board 512MB/1024MB Type of memory DDR2 533HZ, maximum 1G Type of hard disk ZIF SSD 1.8’ solid state disk 18 MI13 User Manual Capacity of hard disk Display resolution ratio Type of display Graphics card chip SSD 16G/32G(configured according to customer demand) 5’, WVGA800*480 Touchpad Intel GMA 500 Audio system Realtek HD Audio Loudspeaker Built-in loudspeaker Memory size Dynamic sharing of system memory Wireless communications Telephone PC-Camera 802.11 b/g, bluetooth 2.0+EDR Optional (the 3G module communications function) supports 0.3M USB USB 2.0*1 Mini usb*1 Key Full keyboard, power key, mouse left/right keys Touch PAD Available 19 voice MI13 User Manual Manual input Other ports Capacity of battery pack OS Endurance Size Weight Available T-Flash, Headphone Output * 1, DC Input*1, mic*1 Double-core Li-ion, 1850mA, 7.4V (subject to customer demand) support Win XP/Win7 /Linux/ Vista 3h or so, subject to specific service condition 175*85*27mm 455g (including the battery pack) AC Power Adapter The computer is accompanied with a power adapter, which can connect the wall outlet with the MID, and can charge the battery pack of the computer. Output range of the power adapter is 100V to 240V, covering the standard voltages used in countries worldwide. NOTE: The computer is provided with the three-phase power adapter. Please confirm that your earthing wire of the wall outlet is usable to protect the safety of the computer in use. When the computer leaves factory, the battery pack is usually not fully charged (if the battery pack is not mounted, please refer to “using battery pack” in later part of the Manual for mounting the battery pack). So, for the first time when you turn on the 20 MI13 User Manual computer, please connect the computer with AC power adapter. During the subsequent use of the computer, if the OS reminds that the power is low, please instantly connect AC power adapter to charge the battery pack lest the loss of data stored in the hard disk. The computer will be accompanied with a specific AC power adapter. Do not use any different power adapter or the power supply of other electric appliances for charging the computer. Power line of the AC power adapter must be connected with the earthed AC wall outlet. Please follow the following steps for connecting the computer with external power supply: 1. Insert the connector of the AC power adapter into the DC-IN tie-in in the right side of the computer. 2. Connect the power line with the AC power adapter, and then connect to wall outlet. LCD Opening the LCD Display The LCD display panel can be adjusted to the best viewing angle. However, since the LCD display is fragile, please do not press the display with excessive force. The correct method for opening shall be as follows: 21 MI13 User Manual Open and upturn the panel and adjust it to the appropriate viewing angle. The lightness of the LCD display panel can be adjusted by pressing Fn+Y and Fn+U. When the computer is idle and standby, close the panel to enter the standby mode in order to protect the display. If not using, turn off the computer and close the panel to put it in the bag. Maintenance of LCD LCD display is a precision device requiring careful treatment. Please pay attention to the following warnings: • If not using the computer, please ensure to close the LCD display and place the computer in the bag accompanied with the computer to avoid scratching or dirt. • If you intend to clean the LCD display, please use soft tissue to wipe the LCD surface slowly. • Do not put your hand or place sharp substance directly on the surface of the LCD display, let alone spraying cleaning agent directly on the surface. • When closing the panel, do not place material on the compute or press the shell of the computer, or else the LCD display may break. • If you want to connect the computer to an external power supply, the angle of the display should be appropriate. Do not use too excessive force to press downward, or else the DC jack port will be damaged. Touchpad Touchpad is a sensitive pointing device. When you touch the touchpad and move your finger, the cursor in the display will move in the same direction with your finger. 22 MI13 User Manual Touch Screen The display of the computer is a touch screen, on which you can directly operate with a touch pen, which equals to the operation of a mouse. If the touch screen drifts, is not sensitive or malfunctions, you should recalibrate it. Click Touch the touchpad slightly and move the cursor to the required place, click the screen once to select the menu you need. Double-click Touch the touchpad slightly and move the cursor to the required place, select the menu to double-click the selected shortcut icon for two times to open a selected document. It realize the function equivalent to double-click of the mouse left key. Dragging Touch the touchpad slightly and move the cursor to the required place, and then press and hold the left key, you can move document or change the size of window by moving the finger on the touchpad. 23 MI13 User Manual Right Click Touch the touchpad slightly and move the cursor to the required place, and then click the right key, it will display the different pop-up menus according to the place of the cursor when you click. Keyboard The computer is provided with a full-size 64-key keyboard, which can realize most functions in the 102-key keyboard of PC, and [Fn] combination keys are specifically provided with additional functions. Use of Function Keys Key Function Fn+P Mute (only for Windows OS) Fn+I Decrease the volume Fn+O Increase the volume Fn+Y Decrease LCD lightness Fn+U Increase LCD lightness Fn+R Set the system as standby mode 24 MI13 User Manual Fn+W WIFI&BT switch Fn+K Mouse pad disabled Fn+G 3G switch Fn+Del Equivalent to Ins key Fn+UP Page Up Fn+Dn Page Down Fn+Left Equivalent to Home key Fn+Right Equivalent to END key Fn+1~~Fn+0 Equivalent to F1~F10 Press Del key when starting Enter the BIOS setting the computer Audio System The computer is provided with stereo multi-media sound output system, which mainly includes built-in stereo speaker, external earphone jack and external microphone jack. See “Bottom View of the Computer” and “Right View of the Computer” in Chapter I for the specific position. ◇Press [Fn]+[P] for mute state (only for Windows OS) ◇Press [Fn]+[I] or [Fn]+[O] to increase or decrease the volume. 25 MI13 User Manual Phone (optional) The 3G module you use shall support voice communications function. Manual Input The computer supports touch screen operation, and you may also install manual input software for manual input. 3G-based Internet Access Fn+G key is the key for 3G internet access. If you wish to gain internet access by 3G wireless connection, press Fn+G key to turn on the switch of 3G module, operate relevant client software to realize 3G connection for internet access and SMS. The maximum speed may be realized by 3G internet access is dependent upon the internet module mounted in the computer and the 3G network coverage in the area you’re located. Installation of 3G Network Card Turn off the computer, and remove the 3G module cover at the back of the computer. Mount the SIM card in the correct direction in the SIM card slot. If you insert the card with excessive force or improperly, the SIM card may get scratched or the slot may be damaged. Prior to mounting SIM card, please ensure that the computer is turned off, or else the SIM card cannot be detected by the computer. After the SIM card is properly mounted, open the 3G client software, which will automatically detect SIM card and 26 MI13 User Manual search the 3G network signal. If no signal is searched, please check whether the SIM card is correctly mounted and that whether wireless signal is available in the area, or you may take off the SIM card and mount it again. T-FLASH The computer is provided with T-FLASH slot, based on which you may expand the storage space (only standard T-FLASH memory card can be used). WIFI Wireless Network Access & Bluetooth If you intend to use the WIFI wireless network access and the Bluetooth function, you shall firstly turn on the WIFI & Bluetooth switch (Fn+W). After the WIFI & Bluetooth switch is turned on, it will search the nearby access points, and after the WIFI signals are searched, you can select to have access to the internet. For wireless network encrypted, you have to get a right code to do so. Battery Pack The battery pack will be used for powering the computer if no AC power supply is connected with the computer. The service life of the battery pack may vary according to the power consumption of system devices and the management features of the system power. There would be self-discharging condition no matter the battery pack is mounted in the computer or not. 27 MI13 User Manual If your MID is not used for a long time, the battery pack may suffer from power loss due to self-discharge, which is common for lithium cell. It is recommended that you charge the battery pack once every month, under which circumstances you should use external power supply. If the computer will not be used for a long time, it is recommended that you take off the battery pack and store it separately. For the first time when you use the MID you have purchased, or when you discover that the actual operation time of battery pack is much less than the estimated time, or if you discover that the capacity of the battery pack cannot reach 100% after being fully charged, it is recommended that for the first time you use the computer, charge and discharge the battery pack completely for three times, namely, fully charge the battery pack, and use the battery for powering the computer until the battery is exhausted, and then recharge the battery pack. Please follow the following steps: 1. Connect external power supply to charge the battery pack, turn on the computer. 2. After the battery pack is fully charged, restart the computer and press DEL key at the starting process to enable the BIOS Setup program, leave the computer in the process until the battery pack is exhausted. 3. Plug in the power adapter and charge the battery pack fully. Note: If the battery pack is improperly used, replaced or treated, the service life of the battery pack may be shortened or the battery pack may be damaged. Please do not discard the battery pack at random. Any battery pack cannot be used or to be discarded shall be recycled. Pay attention to the following requirements when using battery pack: 1. Do not disassemble the battery pack under whatever circumstances. 2. Do not place the battery pack in fire or in hot temperature condition. 28 MI13 User Manual 3. Do not contact the battery pack with metal substance or conductive substance to avoid short circuit. 4. Refrain from rain or dipping in water. 5. Do not place the battery pack in the reach of children. 6. Please dispose the used battery pack according to relevant provisions of local government. Battery pack of the wrong type may damage the computer. Please dispose used battery pack as required. Battery Charging When the battery pack is in “low” status, the power can only be available for 10 to 15 minutes. You may hear a warning of beep when the battery pack is in “extra low” status, under which case the power can only be available for 1-2 minutes, and you must store the files or connect AC power adapter, or else you may get the files lost. When the fully charged battery pack is not used for a long time, or is used for a while, the power of the battery pack will be around 95%. In this case if you connect the AC power adapter to charge the battery pack, it will directly show 100%, which is used to reduce the times of charging and protect the battery. For the correct charging steps, please follow the “Connecting AC Power Adapter” section as aforesaid. After connection, the battery pack will be charged automatically, and the battery pack indicator will turn to blue. 29 MI13 User Manual Chapter III Installation of Drivers The computer is provided with a driver disk. Please install respective drivers after the OS is successfully installed. Prior to the installation of the drivers, confirm whether they have been installed or not lest repeated installation. You shall use USB CD driver to install the drivers and public programs required for the computer. 30 MI13 User Manual Chapter IV Problems & Solutions Summary This chapter mainly introduces the common system problems which may occur to your computer. Please firstly read this chapter in case of any problems occurred to your computer before contacting our technicians. It is required to disassemble the computer for solving complex problems, under which case you may contact your distributor or our authorized service center for servicing. You are not allowed to disassemble the computer for servicing by yourself. Common Problems The following are problems possibly occur during the operation of MID, regarding which we have summed up and collected some easy answers and solutions for your reference. I have pressed the Power key, but the computer is not initiated. • Check the Power indicator. • The power is not connected if the indicator is off, in which case you should check the following items: 1. If you power the computer with battery pack, the power of the battery pack may be too low to initiate the computer, in which case you should connect AC power adapter to charge the battery pack. 2. Please ensure that the AC power adapter has been correctly connected with the computer and wall outlet. 3. If the power indicator is on, please check the following items: • If the power indicator flashes, it indicates that the computer is in standby mode. Press the Power key to initiate the computer. • If the OS files have been lost or damaged, please insert in the USB CD driver the initiation disk created when installing the OS, and then press Ctrl-Alt-Del to reset 31 MI13 User Manual the system. This operation can be used for necessary diagnosis and repair of the system. There is nothing shown on the display • The power management system may have automatically turned off the display power to save energy, in which case you can press any key to return to the display status. • If the display status is not shown after pressing any key, it may be caused for the following reasons: 1.The lightness of the display is too low. Press [Fn]+[Y] and [Fn]+[U] to increase the lightness. 2.The display device is set as external display, in which case you may enter into the Graphics property to switch back to the display of the computer. Graphics are not fully shown on the display • Please ensure that the resolution of the display is supported by the system. No sound output from the computer Please check the following items: • The volume may be set as mute. Please check the volume control icon in the taskbar. If the icon is marked with an X, click the icon and cancel the selection of “mute” option. • The loudspeaker may be closed. • The volume may be too low. Please check the volume control icon in the taskbar. Click the icon and adjust the volume. • If an earphone or external loudspeaker is connected to the computer at the audio output port, the built-in loudspeaker will be closed automatically. The keyboard does not respond • Please connect an external USB-based keyboard to the USB port of the computer. If you input through keyboard, please contact the appointed after sale service department or our authorized service center. 32 MI13 User Manual Chapter V Preventive Measures Notes for Operating the LCD Display 1. Do not place the display to the direction of the sun, which may damage the display panel. Take care when using the computer near window lest dropping the computer on the ground. 2. Do not scratch the display panel or press the panel, which may cause defect. 3. There may be residual image on the display if using the computer in low temperature, which is a common phenomenon and will be restored if using the computer in normal temperature. 4. If one image is shown on the display for a long time, there may be residual image on the display, but it will disappear before long. You may use display protection program to prevent the residual image. 5. The display will get heated during operation, which is a common phenomenon. 6. The display panel is made with high precision technology, yet you may see tiny black point and/or light point (blue, red or green) appearing on the display. It is a normal phenomenon during manufacture rather than a defect. 7. Do not subject the display panel to friction, or else the display may be damaged. Please use dry and soft cloth to wipe the display. Notes about the Use of Power Supply 1. Please refer to the printed schedule on specifications of power supply, and check the power supply of your computer. 2. Do not share an AC power socket with other electrical devices with great power consumption (such as photocopier or paper shredder). You may purchase the power 33 MI13 User Manual socket equipped with over-voltage protector, which may prevent the computer from damage caused by abrupt frequency fluctuation (such as in stormy weather). 3. Do not place heavy articles on the power cord. 4. If you intend to pull off the power cord, please hold the plug and pull off. Never pull off the power cord only. 5. Please pull off the power cord connected with the computer from AC power socket if not using it for a long time. 6. Please ensure that the AC power socket is within your reach. 7. Please pull off the power adapter from the AC power socket when not using it. 8. Please use the power adapter accompanied with the computer. Do not use any other power adapter or else defect may be caused. Notes about the Operation of the MID 1. Wipe the computer shell with dry and soft cloth or with soft cloth slightly dipped with cleaning agent. Do not use any type of grinding sheet, scouring powder, or solvents like spirit or petroleum, which may damage the finish of the computer. 2. If any solid or liquid drops into the computer, you should turn it off and pull the power cord off. Before you operate the computer again, you may need to send the computer to professionals for checking. 3. Never drop the MID or put heavy articles on the MID. 4. Do not position the MID in places subject to the following influences: • Heat source, such as radiator or ventilating pipe • Direct sunshine • Too much dust • Humidity or rain • Mechanical vibration or impact • Strong magnet or loudspeaker subject to no magnetic shielding • Ambient temperature over 35◇ or less than 5◇ • High humidity 34 MI13 User Manual • Do not place electronic device nearby the computer, or else the magnetic field of the device may cause trouble to the computer. • Provide proper air ventilation to prevent internal heat accumulation. Do not place the computer on loose and porous surface, such as blanket or carpet, and do not place the computer nearby curtain or drapery which may block the air vent. 5. The computer uses the hi-frequency wireless signal, which may cause disturbance to the reception of broadcast or TV signals. In this case, please move the computer to the place far from the radio or TV set. 6. Ensure to use the designated peripherals and connection cables, or else adverse conditions may occur. 7. Do not use cut-off or damaged cable. 8. If you directly move the computer from cold place to warm place, water vapor in the computer may condense, in which case, you should connect power for the computer one hour later. In case of any problem under the case, pull off the power cord and contact our customer interaction center. 9. Ensure to pull off the power cord before cleaning the computer. 10. Please backup your data periodically to avoid losing data when the MID is damaged. Notes about the Use of Chargeable Battery Pack 1. Do not place the chargeable battery pack in area with the temperature over 60◇, such as in car exposed to direct sunshine or in place exposed to direct sunshine. 2. The service life of the battery pack will shorten under chilly atmosphere, which is caused by the reduced battery efficiency under low temperature. 3. Please charge the battery pack under the temperature of 10◇ to 30◇. It may require longer time to fully charge the battery pack under lower temperature. Note: For the sake of safety, the computer can only be compatible with the origin al battery pack specifically designed for the model. 35 MI13 User Manual 4. The chargeable battery pack will get heat during use or charging process, which is quite common. You need not worry about this condition. 5. Please keep the chargeable battery pack away from all heat sources. 6. Keep the chargeable battery pack dry. 7. Do not open or try to disassembly the chargeable battery pack. 8. Keep the chargeable battery pack away from any mechanical impact. 9. If not using the computer for a long time, please take off the battery pack from the computer to avoid any damage to the battery pack. 10. If the power of the battery pack is still quite low after full charge, the service life of the battery pack may be expired. In this event, you should replace the battery pack with a new one. 11. There is no need to discharge the battery pack before charging. 12. If you have not used the battery pack for a long time, please charge the battery pack. Notes about the Use of Earphone Prevent hearing from any damage – avoid using the earphone at high volume. It is recommended by experts on hearing that you should not play music continuously, with high volume or with long time. Please turn down the volume or stop using the earphone in case of feeling ringing in the ears. 36 MI13 User Manual Chapter VI Troubleshooting Computer What to do if the computer cannot be initiated? 1. Please ensure that the power cord has been securely connected with the computer, and ensure that the power indicator shows that the power is on. 2. Ensure that the lightness and contrast have been correctly adjusted. 3. Disconnect the power adapter and take off the battery pack. Wait for three to five minutes. Mount the battery pack again, and connect the power adapter again. Press the Power key to connect the power for the computer. 4. Condensation may cause defect to the computer, in which event please stop using the computer at least for one hour. 5. Check whether you are using the power adapter accompanied with the computer. For the sake of safety, please use the original power adapter provided together with the computer. 6. Press the Power key and ensure that the computer is not in the suspend mode. What to do if the computer cannot be turned on? 1. Firstly, please check whether the power of the battery pack is full, or whether the power adapter is normally used. If the battery pack and power adapter is ok, you can try the hardware reset method, as aforesaid, to tackle the problem. 2. If you cannot turn on the computer by the foregoing method, may be some other hardware defect occurs to the computer. In this event, you should send the computer to our after sale service center for serving rather than disassemble the computer by yourself. Note: If this happens frequently, please contact the customer interaction center. Why the MID cannot enter into the sleep or suspend mode? 1. If you change the operation mode before the MID completely enters the sleep or suspend mode, the computer may become unstable. Follow the following steps to restore the MID to the normal steadiness of operation: 37 MI13 User Manual 2. Close all program opened. What to do if the battery pack indicator flashes and MID cannot be initiated? 1. It is may be caused by the incorrect installation of battery pack. To solve the problem, turn off the MID first, and take out the battery pack. Put the battery pack into the MID again. See the section “Installation of Battery Pack” for relevant details. 2. If the phenomenon still exists after the above treatment, it means that the battery pack is not compatible with the computer. Please take out the battery pack and contact the customer interaction center. What to do if a window pops out indicating that the chargeable battery pack is no t compatible or is not properly installed, and the MID enters into the suspend mo de? 1. It is may be caused by the incorrect installation of battery pack. To solve the pr oblem, turn off the MID first, and take out the battery pack. Put the battery pack into the MID again. See the section “Installation of Battery Pack” for relevant details. 2. If the phenomenon still exists after the above treatment, it means that the battery pac k is not compatible with the computer. Please take out the battery pack and contact t he customer interaction center. What to do if the game software does not work or always breaks out? 1. Please check whether the patch or upgraded version can be downloaded from the game website. 2. Please ensure that you have installed the latest video driver. 3. The graphics memory will be shared with the system in certain model of MI13 computer, in which event the optimal graphics function cannot be assured. What to do if I forgot the BIOS password? If you forgot the BIOS password, please contact the designated after sale service center for clearing the BIOS password. Why the MID display does not turn off over the selected time for the turn-off operation? Maybe the program loaded in the right bottom side of the taskbar cannot be quitted automatically. It is recommended that you quit the programs first manually, 38 MI13 User Manual and then click the Turn-Off button. Or maybe you have installed too many programs which cause it too slow to turn off the computer. It is recommended that you restore the computer to factory-default setting. System Safety This Section describes the information for maintaining the steady operation of the MID and for preventing the potential threat on the safety of the computer. How to protect the MID from safety threats, such as virus? The best method protecting the computer from safety threats (such as virus) is to download periodically and install the latest system upgrade program. You can obtain the important system upgrading program by the following steps: MID should be connected to internet for receiving upgrade program: 1. Connect to the internet. 2. Double click the system safety warning icon in the taskbar 3. Follow the instructions on the display, set up the automatic upgrading or the planne d upgrading. Battery Pack How should I know the battery pack has been charged? Please see the Battery Pack Charging as mentioned above. When to use AC power for the MID? When the MID is directly connected to the power adapter, the AC power is used, even though the battery pack is mounted. When shall I charge the battery pack? 1. When the power of the battery pack is lower than 10%. 2. When the battery pack indicator and the power indicator flash. 3. If not using the battery pack for a long time. 39 MI13 User Manual When shall I replace the battery pack? If the power of the battery pack is still quite low after being charged, the service life of the battery pack may be expired. In this event, you should replace the battery pack with a new one. Is it a problem for the battery pack mounted to get heated? No. It is quite common for the battery pack to get heated during service. Can the MID enter the suspend mode when the battery pack is used? The MID can enter the suspend mode even though the battery pack is used. If a program which may prevent the system from entering the suspend mode is used, please save your data lest any loss to the data. Network What to do if my MID cannot be connected to WLAN? 1. Availability of the internet connection will be influenced by distance and barrier. You should move the barrier from near the computer. 2. Please confirm that the WIFI switch is turned on by Fn+W. 3. Confirm that the power of the internet access point is on. 4. Inspect the setting by the following steps: •Click Start icon, and then click Control Panel •Click Network and Internet, and see the network status and task •Click Connected to Internet to confirm that the access point has been selected 5. Ensure that the password for the encrypted network is correct. What to do if the internet cannot be accessed? 1. Check the setting of access points for relevant details. 2. Ensure that the computer is connected with the access point. 3. Move the computer from barrier or move the computer to any available access point. 4. Ensure that correct configuration has been set for the internet access. Why the data transfer is quite slow? 40 MI13 User Manual 1. The data transfer speed through WLAN is constrained by the distance between the equipment and access point and by the barrier existed. Other factors, including equipment configuration, electric wave status and software compatibility, may also influence the data transfer speed. In order to maximize the data transfer speed, you can move the MID from barrier or move the MID to any available access point. 2. If you are using the access points of WLAN, according to the number of other equipment communicating through the access points, the equipment may become overloaded temporarily. 3. If your access point conflicts with other access point, please change the channel of the access point. How to avoid the interruption of data transfer? 1. If the computer is connected to the access point, data transfer may be interrupted if you are using large documents or place the computer nearby microwave oven or wireless telephone. 2. Move the MID close to access point. 3. Ensure that the access point is correctly connected. 4. Change the channel of access point. What is the channel? 1. The telecommunications in WLAN occurs in the separated frequency band called channel, and the channel of the access point of third party WLAN can be preset as the channel different from that of the computer. 2. If you are using the access point of WLAN, please refer to the connection information contained in the attached manual. Why the internet connection is interrupted when changing the encryption key? When you change the encryption key, two computers containing built-in WLAN may lose the point-to-point network connection. You can change the encryption key to the original setting, or you can input the encryption again in two computers for the network connection. 41 MI13 User Manual Display Why the display of the MID turns to blank? 1. If the computer enters the power-saving mode (sleep mode or suspend mode), the display of the MID will turn to blank. If the computer is in the sleep mode, press any key to restore the display of the computer. 2. Please ensure that the power cord has been securely connected with the computer, and ensure that the power indicator shows that the power is on. 3. Backlight of the display may have been turned off. 4. If the battery pack is used for the MID, please ensure that the battery pack is correctly installed and has been charged. What to do if the display of the MID is too dark? Press Fn+U key to increase the lightness of the display. Microphone What to do if the microphone does not work? 1. If you are using an external microphone, please ensure that the microphone is on and has been correctly inserted in the microphone port in the MID. 2. Maybe the volume has been decreased by pressing Fn+I, please press Fn+O to increase the volume until you can hear the sound. Loudspeaker What to do if the sound of loudspeaker cannot be heard? 1. If the program you are using is provided with a volume control function, please ensure that the volume control is correctly set. 2. Please ensure that the volume of the loudspeaker is high enough and that the audio option is initiated. 42 MI13 User Manual 3. Maybe the Fn+P key is pressed. 4. Maybe the volume has been decreased by pressing Fn+I, please press Fn+O to increase the volume until you can hear the sound. 5. Please click the volume icon in the taskbar to check the volume control in the system. Touchpad What to do if the touchpad does not work? 1. You may have disabled the touchpad function, and have not connected mouse to the computer. You can enable and disable the touchpad by pressing Fn+K. 2. Please confirm that the computer is not connected with a mouse. 3. Please press the Power key until the computer is turned off. Reset the computer (you can get your data not stored lost if you turn off the computer by the Power key). Touch Screen This model of computers is provided with a touch screen. Does it support the manual input function? Yes. You can buy the original manual input software and install it to the MID, in which way you can realize the manual input function on the display. Peripherals What to do if the USB device cannot be connected? 1. If you are using a USB device, check whether the USB device is initiated, and whether the device is self-powered. If you are using a digital camera, you should 43 MI13 User Manual check whether the battery is charged or not. If you are using a printer, please check whether the power cord is correctly connected to the AC power socket. 2. Try to use a different USB port. The driver may have been installed to the specific port you have used when you connected the device for the first time. 3. Please refer to the manual accompanied with the USB device for details. You should install software prior to connecting the device. 4. Try to connect a simple device with low power consumption (such as a mouse) to check whether the port would work normally. 5. The USB device may not be identified due to the insufficient power supply to USB hub. It is recommended that you purchase steady USB hub or USB hub with a power supply. Declaration on Toxic and Hazardous Substances or Elements In order to meet the relevant requirements and provisions of Measures for Administration of the Pollution Control of Electronic Information Products, Qingbang Electronics (Shenzhen) Co., Ltd. has classified the toxic and hazardous substances by different components of the MID products produced and sold by the company and has made the following declaration: Name and content of toxic and hazardous substances or elements in the product Toxic and hazardous substances or elements Name of component Pb Hg Cd 44 Cr(VI) PBB PBDE MI13 User Manual Printed circuit board assembly x O O O O O Hard disk x O O O O O Memory x O O O O O PC I/O accessory x O O O O O Power supply x O O O O O Keyboard x O O O O O Mouse x O O O O O Case/Acces sory x O O O O O O: Refers to the condition that the content of the toxic and hazardous substances in all homogeneous materials of the component is lower than the limit required in the standard SJ/T11363-2006. X: Refers to the condition that the content of the toxic and hazardous substances in at least one homogeneous material of the component is over the limit required in the standard SJ/T11363-2006. 45 MI13 User Manual All components marked with X comply with the RoHS specifications. Printed circuit board assembly: Refers to the printed circuit board and its accessory, capacitor and connector. Not all of the above components would be included in the computer, subject to the model of computer. The detailed content and name shall be subject to the model of computer you have purchased. Electronic information products sold within the boundary of the People’s Republic of China shall be marked with this symbol. The number in the symbol represents the environmental-friendly service life of the product under normal use. 46