1
Mooses
Version 3
User’s Manual
Introduction ........................................................................................................................................................1
New Features for Version 3............................................................................................................................1
Installing and Using Mooses ..............................................................................................................................2
System Requirements .....................................................................................................................................2
Installation ......................................................................................................................................................2
Using Mooses .................................................................................................................................................2
Steps to getting started (Experience = Wisdom) ............................................................................................2
Configuration Settings........................................................................................................................................3
General Settings..............................................................................................................................................3
Helper Files ....................................................................................................................................................4
Collection Settings..........................................................................................................................................5
Defining Your Code Set .....................................................................................................................................6
Inter-observer Agreement Issues ....................................................................................................................6
Code File Editor .............................................................................................................................................6
Collecting Data...................................................................................................................................................7
Using Mooses for Windows to Collect Data ..................................................................................................7
Using Mini-Moose for Windows Mobile to Collect Data ..............................................................................8
File Management ..............................................................................................................................................11
File Types .....................................................................................................................................................11
File Editor.....................................................................................................................................................12
List Editor.....................................................................................................................................................13
Analysis Options ..............................................................................................................................................14
Analyses in General......................................................................................................................................14
Data File Checker .........................................................................................................................................14
Recoding Data ..............................................................................................................................................15
Mooses File Merger......................................................................................................................................16
Compare 2 Sequential Dependencies ...........................................................................................................17
Frequency and Duration ...............................................................................................................................17
Interobserver Agreement ..............................................................................................................................17
Multilevel Analysis ......................................................................................................................................19
Sequential Analysis ......................................................................................................................................20
Technical Support.............................................................................................................................................22
Hints and Tips...............................................................................................................................................22
Appendix A. Data File Formats........................................................................................................................23
Event File Format .........................................................................................................................................23
Code File Format..........................................................................................................................................23
Other files .....................................................................................................................................................23
Appendix B. Sample Code Files.......................................................................................................................24
Appendix C. Using ProcoderDV Data..............................................................................................................25
Appendix D. Bibliography ...............................................................................................................................26
Introduction
Mooses is a software system for computers running Microsoft Windows that allows for collection and
analysis of data obtained from observing processes and/or subjects. The system collects event data where
events and related times are entered into a data stream. Code sets for individual projects or research
questions are defined in a code file by the user of the program. Data can be collected within the program
using a desktop or laptop or by using the “Minimoose” program for PocketPC handheld devices.
Mooses stands for multiple option observation system for experimental studies. The name was inspired by
our friend Bullwinkle J. Moose and our continued fascination with the prolific and sometimes nauseating
use of acronyms for absolutely everything in the fields of Special Education and Psychology. This program
was created based on the experience of the author in creating software for various research projects over
several years. Our intention is to provide powerful analysis techniques to researchers in a user-friendly
environment. We have attempted to create a system that is versatile enough to meet the needs of any
project that uses real time observation to gather data. We feel that observation studies are hard enough
without the software getting in the way and we hope that Mooses will make things a bit easier. We also
hope that the system will help people to use observation data more efficiently and effectively in answering
research questions. Observation data is often underutilized due to the difficult nature of it’s management.
New Features for Version 3
Version 3 represents a major upgrade and solves several problems that we have encountered with earlier
versions. Toggles and interval codes have been dropped because their functionality can now be replaced by
regular event codes and the need to manage different files per session was overcomplicated. The code file
format has been changed to be simpler and the no longer needed code type field that was there to describe
the type of code has been dropped. Older version code files will need to be re-made in the new format.
The code file format is now the same at the code file format for ProcoderDV. See the section on code files
in this manual for a complete description.
The concept of a ‘level’ for codes in the code file, is redefined in terminology to the word ‘group’. In
Mooses when we say ‘group’, we are referring to a set of codes that are mutually exclusive and exhaustive
within the same group. Several groups can be defined in a code set. Codes identified as group 0 are
frequency only codes and codes in other groups are defined as a mutually exclusive exhaustive code set for
each group. You can now have up to 40 code groups. Event files (but not lists and code files) are
compatible with the older versions of Mooses. Since version 3 is significantly different, if you have an
older version of Mooses, you may want to keep it around while you get used to the new one.
The list file editor now supports drag and drop. You can drop files from Windows into the list editor and
they are entered into a list automatically. The paths settings that were a hold over from the DOS version
are now gone. You simply pick files to analyze with standard windows dialog boxes now.
1
Installing and Using Mooses
System Requirements
Mooses will run on systems with Windows 95 or higher operating system. Windows XP is currently the
recommended operating system. The minimum requirements list for the operating system that you have is
sufficient to run Mooses.
Installation
To install Mooses, Download the current demo version of the program for http://www.getMooses.com Run
the demo version EXE file and follow the setup instructions. A folder will be created on your start menu
with a shortcut link to run the program. The demo version has some features disabled but will let you use
the program enough to be sure it will meet your needs. When you purchase a license, you will be given a
code that will activate the program on your computer and enable the demo version to become fully
functional. The activation code can be entered using the preferences menu in Mooses.
Using Mooses
Using Mooses involves interacting with standard pull down menus and dialog boxes. While the system is
fully functional using the keyboard, using a mouse makes the system much easier and more intuitive.
Keyboard
With the keyboard, the Alt key activates the menus and the arrow keys and then highlighted keys can be
used to select menu options. In dialog boxes, the Alt key along with the highlighted letter in each item
selects that item. In addition, the tab key moves around between items in dialog boxes with tab moving
forward/down and shift + tab moving backwards/up. Arrow keys, delete, and backspace work in edit fields
to move the cursor and delete characters.
Mouse
Using the mouse just amounts to pointing to the item that you wish to change or select and clicking the left
button. The left button is the only button used in Mooses. The right button does nothing. In edit fields, the
mouse can be dragged across the part of the text to highlight areas that you want to change; typing anything
will replace the highlighted text with your keystrokes. Many of the dialog boxes support drag and drop
methods. For example, to add files to a list in the list editor, you may simply click the file name and hold
the mouse down while dragging the name over the list area and then letting go of the button (dropping the
file into the list). In general, where there are add buttons, you can use drag and drop to accomplish the
same thing as highlighting items and then selecting add.
Steps to getting started (Experience = Wisdom)
Accept the wisdom of our experience. Follow this sequence to become a happier Mooses user.
1. Evaluated the demo version then install the program
2. Define your code set (see the defining your code set chapter)
3. Get your observers agreeing reliably (see the inter-observer agreement section)
4. Collect your data
5. Analyze your data
Hints: Don’t do step 4 before you do step 3! Step 3 often leads to changes in step 2. Problems in step 3 are
almost always related to step 2. Spend the most time on step 3 since step 5 minus step 3 = unusable
garbage and wasted time. Don’t collect too many variables! Just get the data you need to answer your
research question. Trying to get too much stuff because ‘it would be nice’ always contributes to problems
with step 3. The truth sometimes hurts?
2
Configuration Settings
Mooses allows users to customize the system for their particular needs. All settings are saved in the
windows registry. The settings are accessed and changed using the Mooses Options selection on the
Preferences menu. Changeable settings fall into three general categories: General Options, Helper Files,
and Collection Setting. Each of these categories are described below.
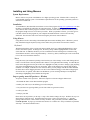
General Settings
These settings allow you to choose some general Mooses options and the file type that is being used.
Display Startup Box
This check box allows you to turn on and off the display of the startup message that is displayed when
Mooses if first executed.
Read From the X’th Digit Y Characters
This option allows you to change the digits that are read into the program when Mooses reads event files.
This allows you to create hierarchical coding schemes and analyze each level of your hierarchy separately
if desired. Be advised that the code file must contain the codes as they are read inform the file. You may
need to create different code files for each level of your hierarchy. For example, if you have a code that is
‘abcd’ in your event file, and you enter 2 for X and 2 for Y in the preference boxes, you will be reading in
the code ‘bc’ and the code ‘bc’ must be defined in your code file. This option does not work with
ProcoderDV files.
Inter-Observer Agreement Window Size
This value sets the window time for the frequency/time windows type of inter-observer agreement report.
The number here is added to and subtracted from one observer’s event to setup a time window for potential
agreements. The result is that the entire time window is double the values entered here. The window size
should be in the time units represented by your data. If your times are in seconds, the window size should
be in seconds; if the times are in frames, the window size should be in frames and so on. For more
information about the inter-observer agreement methods used see the inter-observer agreement section of
this manual.
3
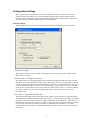
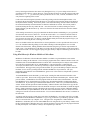
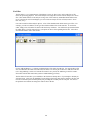
File Type
You also use this tab to tell the program what type of data files you are using. Mooses can read the type of
data files shown above. If you are using ProcoderDV files, you have the choice of rounding your event
times to the nearest second. If you do not round to the nearest second, frames will be used if the times are
in frames or hundredths of seconds will be used if the times are in decimal seconds. The data are sorted
into time sequence before the rounding is done so that order precision is not lost. See the appendix on
using ProcoderDV files for more information on ProcoderDV settings.
ProcoderDV is a collection system available from the Vanderbilt Kennedy Center that allows you to control
a digital media file with the computer and code events in ‘frame time’ as opposed to real time. It is a very
nice system. If you are coding or can code from videos, contact the author for more information or see
www.procoderdv.com. The addresses and phone numbers are provided in the technical support section of
this manual.
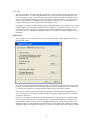
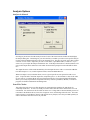
Helper Files
These settings allow you to choose the code file that is being used and the helper applications that will be
used to display results.
The code file is always loaded when the program loads. If no code file is defined or if the code file cannot
be found, you will be asked to pick one when the program loads. You can change the current code file here
by using the browse button or by picking a different code file in the code file editor window.
Every version of windows comes with notepad.exe which is the default text editor for displaying result
files. You can choose any text editor (i.e. Microsoft Word) to display results by picking the .exe file that
starts the text editor here.
Since there is no default spreadsheet editor included with windows, you must choose a spreadsheet editor
here if you want output files sent to a spreadsheet editor. The editor should be able to read files in CSV
format (comma separated values). Select the spreadsheet editor here by using the browse button. Your
spreadsheet editor’s exe file should be in a location similar to the one shown in the graphic above. While a
spreadsheet editor is not required to use Mooses, it is certainly very helpful to have one to manage the data.
4
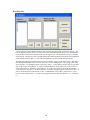
Collection Settings
Settings in this dialog box effect the way data is collected with the desktop Mooses program. Each option
is described here.
Fixed Digit Entry Method
If this option is off, Mooses will wait for a return key to be hit before entering a code in the time stream. If
your codes can be made the same number of digits each, this option will allow you to save a keystroke by
automatically entering the code and returning to the next line when a fixed number of digits is entered.
Once this option is checked you can then enter the number of digits that you need in the edit field below.
Session Duration
This setting tells the system when to display the “time is up” message in the collection window at the end
of a session. It is always given in seconds.
Times in Tenths
Check this box to have the collection program enter times in tenths of seconds instead of seconds allowing
for greater precision if needed.
5
Defining Your Code Set
The word ‘your’ is underlined to emphasize the point that you should design your codes to answer your
own research question. Using a pre-designed coding scheme in reality saves little or no time in using
Mooses or getting good data. The only way that it would save you significant time is if your observers are
already trained and reliable on the borrowed system. Roger Bakeman in his book Observing Interactions
states that ‘using someone else’s coding scheme is like wearing someone else’s underwear’, and we
wholeheartedly agree.
Observing should be thought of as a data entry task. The goal is to accurately record as nearly as possible
what really happens in the real world. You should make every effort to eliminate opinion from the
observer’s thinking. What we are after here are facts, hard data, not opinions. Observers should be taught
to think of themselves as intelligent recording machines. Make errors on the conservative side; if you’re
not sure, don’t enter it instead of vice versa. This leads to findings that you can really get excited about.
Inter-observer Agreement Issues
As mentioned earlier collecting too many variables at the cost of inter-observer agreement is a common
tendency. We feel that you should design the coding scheme in a manner that fits your research question.
The coding scheme should be designed with the end in mind instead of “just getting everything that
happens since we are out there observing”. You may miss some significant findings from the data, but you
may also end up with a pile of unreliable junk data. If your data is not reliable between observers, you
cannot draw any conclusions from it. If observers disagree, then how can you say who was correct?
Code File Editor
The following text describes how to set up your coding scheme in Mooses.
To start the code file editor, hit F3 while in Mooses or select the code file editor from the file menu. You
will then see a dialog box called the code file editor. The file menu in the code file editor will give you
selections used to deal with code files. Select New from the File menu to start a new code file. Hovering
the mouse over each of the buttons displays a description for each one. Use the add button to add a new
code to the end of the list or the insert button to insert a new code. Select save from the file menu to save
your codes into the code file. Select Exit from the File menu when you are done editing your code set.
6
Warning: The code file is automatically saved if the code file editor is closed. If you want to revert to the
saved version on disk, pick revert from the file menu before you close the code file editor.
Other options on the file menu allow you to open another code file, save the current code file with a
different name, print out the code file, or exit the code file editor. Important: The code file that was last
loaded remains the current code file in Mooses. You can also change the current code file in using the
Mooses Options selection on the Preferences menu.
Defining Codes
A code entry consists of three items per code: 1) the code itself that is in the data file, 2) a description of the
code that tells what it is, and 3) a group designator. All codes in group 0 are treated as frequency only
codes. These codes are seen by Mooses as having a duration of only one time unit. The frequency and
duration analysis only provides frequencies for codes in group 0. The other codes should be arranged into
groups where duration is important and codes within a group should make up a mutually exclusive (they
don’t mean the same thing) and exhaustive (they cover the whole session time) set.
For example, consider the case that you are interested in aggressive acts when a teacher is present versus
when a teacher is not present, and you do not care about the duration of aggressive acts. To observe this,
you would set up a code for aggressive act and assign it to group 0. Then set up two codes about the
teacher: one meaning teacher is present; the other meaning the teacher is absent. You would assign the
teacher codes to group 1 or any non zero group. If you did care about the duration of aggression, you could
add a code that meant no aggression and assign the aggression codes to group 2, etc.
As stated earlier, it is important to define your coding scheme to answer your questions and to get the
definitions and coding agreed upon by observers before you collect major amounts of data for analysis.
This will give the best results at the end of your study when you are compiling your results.
Collecting Data
Using Mooses for Windows to Collect Data
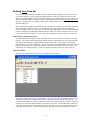
Selecting collect data from the file menu opens the data collection window. The collection program then
reads the currently loaded code file to load the current code set into the drop down boxes. Select new from
the file menu and you will be prompted for a file name and the desired header information for the header
line that is used to label printouts. By default, the current data and time from the computer clock is entered
on the header line. The header line does not affect any of the analyses in Mooses but is simply used to
label printouts on the printable reports and/or rows in the spreadsheet outputs.
Once you have opened a file and entered the header information as you want it, you need to use the drop
down boxes on the right to set the current state of affairs in the scene you are observing. Start the session
7
time by choosing start from the timer menu or by hitting the F3 key. If you are doing an inter-observer
agreement session with two or more observers, you need to have all observers start the sessions at the same
time (count 3… 2… 1… go). Each entry will be put into the file as a code, a comma, and then the time of
entry from the beginning of the session.
Codes can be entered using the keyboard or entered by picking codes from the dropdown menus. The
keyboard is the preferred method so that the observer is not missing action and can simply keep hands on
the keyboard while watching. If fixed entry mode is selected in the settings, the time will be entered into
the stream automatically when the numbers of characters indicated are entered. If fixed entry mode is
turned off, hitting the enter key marks the time. Once the time limit is reached, a dialog box will be
displayed telling you that the time is up. Select save from the file menu and close the collection window
when finished.
A file naming convention for your project should be decided in advance and should give you a good idea
from the name what session is in the file. You do not need to add a ‘.eve’ extension to the files name as
that will be done automatically. Be careful to come up with a file naming convention that doesn’t allow
any two names to be the same. If a name is entered that has already been used, the program will give you
the option of overwriting the file or entering a new name.
Observers should be allowed to edit their files to clean up mistakes as soon as possible after the session is
over. We considered allowing editing of codes while collecting but decided against it since it would
distract from observations. Editing should be allowed and encouraged to give the best representation of
actual events. You should invent a code that is not in the code file to help mark places in the stream where
edits need to be made. We also suggest keeping note paper nearby to help in remembering what edits are to
be made.
Using Mini-Moose for Windows Mobile to Collect Data
MiniMoose for Windows CE AKA Windows Mobile is available to registered Mooses users and the
website for running on the PocketPC. The ActiveSync program that comes with the PocketPC needs to be
installed in order for the handheld PocketPC to transfer files to the desktop PC for analysis and to transfer
new code files to the PocketPC for use with MiniMoose. Once the PocketPC is connected with
ActiveSync, the Mobile Device will show up in the My Computer Folder and can be opened like it is a
removable disk. We suggest that you sign in the PocketPC as a guest to the desktop computer unless the
PocketPC is to be used to sync things like the calendar and addresses for personal use. The sync
partnership is not needed for use with MiniMoose; guest access is fine and is less complicated if you have
multiple handhelds.
To install MiniMoose on the PocketPC, get ActiveSync working first and connect the PocketPC to the
cradle or sync Cable. Then run the setup program from the download on the desktop PC. After the install
process finishes, run MiniMoose from the programs folder in the start menu on the PocketPC. The first
time MiniMoose is run, the PocketPC may prompt you to download and install a needed support library
from Microsoft. If you cannot get to that link on the Microsoft site, a link to it is provided on the Mooses
website. Follow the links provided to install the library with the PocketPC still connected or copy the file
that is downloaded from the Mooses link to the PocketPC and open it on the PocketPC to install the support
library. Simply running the program will add it to the start menu on recent versions of Windows Mobile.
On older PocketPCs, to place MiniMoose on the start menu on the PocketPC, there is a menus icon in the
settings area from the start menu on the PocketPC. You can check MiniMoose there to have it available on
the start menu.
A separate code file must be created using a text editor for MiniMoose. An example code file is provided
and installed with the MiniMoose installation. To get a copy of that file to your desktop, open the ‘mobile
device’ icon inside of the ‘my computer’ icon. Navigate to the “Program Files” folder and then to
MiniMoose. Inside that, there is a file named MMCodes.cod. Drag that file to your desktop. Double click
the file on the desktop. If Windows asks you to pick the program to open it with, pick the program from the
list and pick notepad. Tell windows to always use notepad to open .cod files.
8
The contents of MMCodes.Cod is explained here as an example. Use this file and save as to change the
name to make a code file for your application of minimoose. When you want to load a new code file onto
the handheld, copy the code file you have made to the “\\My Device\Program Files\MiniMoose” folder by
dragging it to that folder within the mobile device. On the mobile device, run Minimoose and change the
code file name in the tools, settings menu. Then pick file and then exit and then run Minimoose again to
see the new code setup.
Codes are laid out on the screen in up to 5 columns of 20 codes. The width and height of each code button
may be customized in the settings of the Minimoose program. If you have fewer codes, you can make
larger buttons on the screen. If you have many codes to fit, you can make smaller buttons. The default
settings are set at a good compromise for a moderate number of codes. The order of the codes in the code
file determines the screen placement in these columns.
Each code line consists of 3 items separated by commas: 1) the code that goes into the time stream when
that button is pressed, 2) the text that is displayed on the screen button, and 3) the code type.
MiniMoose Code Types
0
Frequency only/counter
code
This type of code will have a counter displayed
next to it when the button is tapped.
x (where x is any number)
Group duration code
Codes with the same number are seen as a
mutually exclusive/exhaustive group. Selecting
one in the group turns the others off. The
button that is selected when the clock is started
is put in at time 0.
-1
On/Off Code
This type of code is a single on/off code. The
code that goes into the stream is the given code
with an ‘f’ appended to it when the code is
turned off. The current state of the code is
stored at time 0 when the clock is started.
To leave blank areas you need to leave blank lines as in this example. The text in {} marks is explanation
and should not go into the code file itself.
Example code file: MMCodes.cod
100 {this is the max number of codes that this version can handle}
a,Freq1,0
{first code: a = code, Freq1 = screen label, 0 = type }
b,Freq2,0
{ and so on… }
c,Freq3,0
d,Freq4,0
e,Freq5,0
f,Freq6,0
g,Freq7,0
,,
{this inserts a blank area }
h,Setting1,1 {first code in group 1}
i,Setting2,1 {second and only other in group 1)
,,
{this inserts a blank area up until the next column}
,,
,,
,,
,,
,,
,,
,,
9
,,
,,
Act1,Activity1,2
Act2,Activity2,2
Act3,Activity3,2
Act4,Activity4,2
Act5,Activity5,2
,,
Code1,Dur Code1,-1
Code2,Dur Code2,-1
Code3,Dur Code3,-1
Code4,Dur Code4,-1
,,
,,
,,
,,
,,
,,
,,
,,
,,
,,
,,
,,
,,
,,
,,
,,
,,
Code5,Dur Code5,-1
Code6,Dur Code6,-1
Code7,Dur Code7,-1
,,
{first code in group 2}
{last code in group 2}
{first on/off code; Code1f will be put in when turned off}
{on/off code; Code2f will be put in when turned off}
{and so on…}
{blank lines until halfway down the next (3rd) column}
{on/of codes in the 3rd column}
{the rest of the file is blank codes}
To collect data with the handheld, run the Minimoose program and open a new file. Set the codes on the
screen to the current state that you want stored and start the clock. If you are calculating interobserver
agreement, it is very important that the observers all start the clock at the same time (say 3, 2, 1, go).
Although you can stop the clock using the buttons provided, it is not recommended. Durations and
sequential relationships are no longer correct if you stop the clock. Every attempt should be made to do a
complete session even if you need to start over. The program will tell you when the time is up and then
save the data. At that point you can start a new file. If you need to stop early, you can stop the clock and
save the file manually from the menu and then exit or start a new file.
10
File Management
File Types
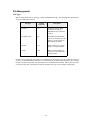
Mooses creates and/or uses several types of files to hold data and codes. The following table describes the
file types and default extensions.
File Type
Default
Extension
Description
Event File
.eve
Standard event file, holds
event data recorded by
MiniMoose or the collection
window.
ProcoderDV Files
.pdv
Files Made by ProcoderDV
can now be read directly with
Mooses. See the section on
ProcoderDV for details.
Code File
.cod
Holds a code set for a given
project or analysis method.
List File
.LST
Holds a list of filenames of
one type for use with the list
analysis feature
In older versions of Mooses, the extension was mandatory for the program to be able to look up its files; in
version 2, we abandoned that requirement. To avoid confusion, we still feel that is helpful to stick with the
naming conventions if possible. All files in Mooses are in standard ASCII format. Mooses does not create
or read any binary files. Detailed file formats for all Mooses file types are provided in the appendix.
11
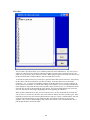
File Editor
The file editor is provided to allow you to edit Mooses data files from within Mooses. You can, however,
edit the file with any ASCII or plain text editor like Windows Notepad. Most word processors have the
ability to save files in text only or ASCII text format. When using word processors make sure that you save
the files in TEXT ONLY format or Mooses will not read the files correctly.
To start the file editor, hit the F5 key in Mooses or pick Data File Editor from the file menu. After starting
the file editor, click the open button to open files for editing. In the drop down list box, the default
extension is ‘.eve’. If you have used another extension, set the drop down box to ‘all files’ to display all
the files in the selected folder. As with the other dialog boxes in Mooses, you can accomplish all the tasks
in this dialog box using either the mouse, the keyboard’s tab key and arrow keys, or a combination of both.
Select the file you wish to edit and click the ‘open’ button. You can also simply double click on the file
you want; this does the same thing as highlighting the file and pushing the edit button.
When you have loaded the file to edit, you can use the arrow keys to move around the file and make the
edits you need. You must leave the file in the correct format for Mooses to be able to read it again. Most
important are the first few lines in the file that tell Mooses what type of file it is reading and the -500 code
on the last line that tells Mooses to stop reading the data. File formats for Mooses are given in the
appendix. Once you have finished editing a file, push the Save button to save it and edit another file or
push the Quit button to exit the file editor.
12
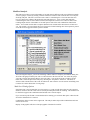
List Editor
The list editor is a very important part of the Mooses system. It allows you to easily make lists of file
names for processing purposes. You can do analysis on a single file at a time or do an analysis on a list of
files. This enables Mooses to do analyses on large sets of files relatively unattended which makes better
use of your time In version 2 and higher, you can even do an analysis on a list of lists (but not a “list of
lists” list, sorry). .
Lists can be used for all the analysis options. A list of files should contain all the same type of files. For
example, you can’t mix Mooses event type files with ProcoderDV files in the same list. To use the list
editor, simply select it from the file menu or hit the F4 key in Mooses. You will then be presented with the
list editor dialog. The file menu will give you options to choose from regarding the list files. Select New
from the File menu to start a new list file.
Use the Add and Remove (+/-) buttons to add and remove file names from the list. You can also drag a file
files from Windows file folder lists and release the mouse over the list part of the box to add files to the list
(a.k.a. drag and drop). Select save from the file menu to save your list file and then give the file a name.
Select Exit from the File menu when you have finished editing your list(s).
The list editor will not allow you to add files to the list that are already there. If you attempt to do that you
will hear a beep. Also, keep in mind that if you are doing a list for the inter-observer analysis, the files will
need to be selected in pairs with the primary file preceding the secondary file for each pair. You can use
the up/down arrow buttons to arrange the order of files in the list.
13
Analysis Options
Analyses in General
Selecting any menu item from the Analysis menu of some of the items from the Utilities menus displays
the analysis dialog box. This dialog lets you select the file(s) on which you wish to run a specific analysis.
Use the Select File Button and select a file to run the analysis on. The file type can be set to either a single
event file or a list of files. Output may be sent to a text editor, a spreadsheet editor, or disk file. If you
select a list, you can pick the Skip to Pooled check box. If the Skip to Pooled box is checked, Mooses will
only present output that is summed over the whole list and will skip output for each individual file in the
list.
The output file name will be made automatically from the input file name with a .txt extension added for
text editor output or a .csv (comma separated values) extension added otherwise.
When text output is used, codes that do not occur in a given input file are not reported in order to save
space. To provide more consistent output files, output that goes to .csv files includes a value for all codes
in your code set, even those that do not occur in that particular file. The comma-separated field format
allows you to easily import Mooses output data into many common spreadsheet, database, or statistical
programs for further consideration and management.
Data File Checker
This utility allows the user to run files through a test read routine that reads the file and checks for
commonly found errors. If errors are found, you will be told in what file and on what line the error was
encountered. You can then use the file editor to fix the error. Things that are checked include presence of
read codes in the defined code set, times-out-of-sequence errors, and missing-end-code errors. This same
check sequence is run by Mooses when it reads the file for any analysis, but is also provided separately in
order to streamline correction of errors in your data.
14
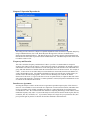
Recoding Data
Use this option to recode individual codes or code sequences into other codes or sequences of codes. The
code set appears in the list on the left of the screen. The Add and Del buttons allow you to add and delete
selected codes to the From (on the left) and To (on the right) boxes. The original files are not overwritten
in this process. Instead, a new file is opened with the same name and an R is inserted into the last character
of the existing extension. Thus .eve files will be recoded into .evr files with the same base names.
The Individual and Group selections allow the user to select the way the recode option works. This choice
tells the program that the From box is to be treated as a list of individual codes or as a group of codes that
form a sequence. For example, suppose you have the codes 1, 2, and 3 in the From box (the left one) and 4
and 6 in the To box (the right one). If you have the Individual box checked, then each 1 will become a 4,
each 2 will become a 5, and each 3 will become a 6. If you have the Group box checked, the sequence 1, 2,
3 will become the sequence 4, 6 in the recoded file. For another example, suppose you have the codes 1, 2,
and 3 in the From box and 4 alone in the To box. If Individual is selected, then 1 will become 4, 2 will
become 4, and 3 will become 4. If you have the Group box checked, then the sequence 1, 2, 3 will become
4.
15
Mooses File Merger
Use the file merger to combine two or more event files into a single event file. In this utility, an output file
is created which includes the data merged from the event files. In the example above, the “Demo New.eve”
file will be created by merging the demo1.eve and demo2.eve files when the ‘Do it’ button is pressed. The
file merger works by reading the input files, putting the data together into memory and then sorting the data
by time.
16
Compare 2 Sequential Dependencies
This utility provides a means to compare 2 sequential dependencies that result from a sequential analysis by
using a randomization test (See Yoder, Short-Meyerson & Tapp in the references for details and a
discussion of the method used here). The data for the two by two matrices must be entered manually and
then the ReCalc Stats button is pressed to run the randomization test. The Make Report button can be used
to send the results to a file.
Frequency and Duration
This choice calculates frequency and duration of codes in your files. No duration data are output for
frequency only codes (codes in group 0). Codes in the same group are considered to be mutually exclusive
and exhaustive. In other words, codes that are in the same group start and end other codes within that same
group, and each duration level should contain the total amount of time for the total session. For example, if
codes 1, 2, and 3 are level one codes and your session duration is 300 seconds, then the total duration of 1,
2 and 3 should add up to 300. You should set the duration codes to the current state of affairs before you
start the clock in the collection programs. See the section on Defining Your Code Set for another
discussion of code levels. If a given code does not occur in a particular file, no output for that code will be
sent to the textual output file. If output to a comma separated is selected, frequencies and durations of zero
are written for the codes that do not occur.
Interobserver Agreement
Selecting this analysis results in an inter-observer agreement report that compares pairs of files from two
observers. Two methods are used: one based on a comparison of each second in each file, and another that
involves generating a time window around the first observer’s codes and looking for agreements in the
second observer’s file. We recommend the first method for comparing duration type codes and the second
method for frequency-only codes. If you run this analysis on lists, the lists must be made in pairs (first file,
second file, first file, second file, etc.). If you run this analysis on a single file your pick the first file, then
press pick file again to pick the second file. Each of these methods is described below.
17
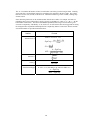
Second-by-Second Comparisons
This analysis is done for each mutually exclusive level. It compares each second in the time stream and
creates a matrix within which every second is tallied into the proper cell to indicate what code was in effect
for each observer. The following matrix provides an illustration.
111
222
333
Total
111
56
4
0
60
222
12
43
5
60
333
0
3
57
60
68
50
63
180
Total
The matrix above sets up the codes for the first observer across the top and the second observer down the
side. For each second, a sum is tallied for the entire 180-second session. Look at code 111: both observers
coded a 111 for 56 seconds; observer one coded 111 for 12 seconds, while observer 2 coded 222; observer
two coded 111 for 4 seconds, while observer one coded 222, and so on. Note that the sums representing
seconds that agree are listed along the diagonal of the matrix, where both observers coded the same code.
Mooses calculates Cohen’s Kappa (Cohen, 1960) and an agreement ratio (agreements divided by total
seconds) for the above matrix. The program also calculates agreement ratios and Kappa for each code. As
you can see, the two observers agreed that the code 111 occurred for 56 of the 180 seconds, but they
disagreed for 16 of the 180 seconds. Also observe that they agreed that code 111 did not occur for the
remaining 108 seconds. Kappa for each individual code is obtained by summing the matrix into a simple 2
x 2 matrix (e.g., 111 versus not 111) and calculating Kappa on the smaller matrix.
Time Window Analysis
This analysis examines each code in the first observer’s file and searches in the user selected time window
in the second observer’s file for a code that matches. If a match is found, then an agreement for that code is
tallied. Codes that are not matched are tallied as disagreements. An agreement ratio is then reported for
each code (agreements divided by the sum of agreements plus disagreements).
This method should be used for codes in your data set for which frequency, not duration, is a concern. The
method is described in more detail in a paper by MacLean, Tapp, and Johnson (1985). Note that Kappa
cannot be calculated from frequencies obtained using this method. Kappa requires using the marginal sums
(i.e., the total of columns and rows in the matrix above) in its formula. Since the cell that represents
agreement on nonoccurrence is not attainable with this method, the marginal sums cannot be computed.
Rules of Thumb
You should have reliability sessions for at least 20% of the sessions you are using for other analyses. For
agreement ratios, 80% is the generally acceptable standard. Kappa is a statistic that indicates the degree of
the agreement in the data minus agreement that can be attributed to chance. A value of .6 to .7 is the
generally acceptable standard for Kappa; it is not interpreted as a percentage. As mentioned earlier, you
should get the numbers provided by this analysis as close as possible to these standards BEFORE
beginning data collection.
18
Multilevel Analysis
This analysis provides a report on the number of seconds spent in different codes across different mutually
exclusive groups. It works by forming a file that contains a record for each second of time covered by the
file being analyzed. This file is referred to as the “matrix” in the dialog box. The code entered at each
level is written to the column of the matrix that represents that level. A new code is then formed by
concatenating the codes in each column of interest, and frequencies of these new codes are tallied. The
resulting output consists of the number of seconds spent in each of the code combinations found in the
matrix. You can then use this data to compare duration levels encountered in states that are of interest to
you. For example, you can compare the levels of aggressive behavior during time when a parent is present
versus the levels of aggression when a parent is absent.
After selecting this analysis, you will be interacting with the multilevel frequency and duration dialog box.
All of the code groups found in your code set will be shown in the list to the left. You select the groups
you want to look at using the checkboxes next to the codes. You can also keep the second-by-second
matrix that is formed as part of the analysis by checking the “keep matrix” check box. The matrix is
written to disk with the name of the event file followed a .mat extension. See the section on Defining Your
Code Set for a further discussion of code groups.
Multi-Level Dialog Options
Sometimes time is not accounted for in a given groups (e.g. group 0 codes where there are only onsets no
duration). In these cases the word ‘none’ is used to provide a place holder for counting. The checkbox can
be checked to suppress the combinations that include ‘none’ from the output.
If you want to keep the file that is created and used for counting, you can check that option. Otherwise the
file will be deleted after it is counted.
Combinations with no counts can be suppressed. The analysis makes all possible combinations and some
of them do not occur.
Display visual graphics will show a time plot graphic of the data for each file.
19
If you do not want to see the multi-level report and just want to see the graphic, you can suppress the report
of the counts.
You can filter the output to only the codes that are checked. If any combination contains a checked code,
that combination will be sent to output. This is slower since the output has to be checked against the code
set as it is being output.
In the case that code is in the same group happen in the same second (or time unit) the program has to make
a choice of which code to count for that second so it chooses the code that was present last in the stream.
The program warns you when this happens and those warnings can be suppressed.
Sequential Analysis
This analysis allows users to examine sequential relationships in his or her data. It can look at sequential
relationships that are based on event sequences or time windows. Antecedent and consequent codes are
selected by the user using the sequential analysis dialog box. Options that can be set include: the number
of event lags or the number of seconds of interest, the direction of counting (forward or backward), and
whether or not antecedents are considered as single codes or as a class of codes. Several standard statistics
are computed for the resulting sequential frequency tables.
The sequential analysis dialog box allows the user to select which codes are considered as antecedent codes
and which codes are considered as consequent codes. The codes in your currently defined code set are
displayed in a list box to the left. The user then adds or removes codes to the antecedent and consequent
lists by using the Add or Del buttons or by using the drag and drop method with the mouse.
Several check boxes are provided to select the way the analysis should be done. A standard menu allows
users to save code set-ups for later use or load previously saved code sets. Changing the counting method
to event- or time-based counting changes the way a 2 x 2 contingency table is tallied. Each of these
methods is described in more detail below. Checking the “antecedents as class” check box causes the
antecedent codes to be considered as a class of codes, whereas unchecking this option causes each of the
antecedent codes to be considered one at a time. Consequent codes are always considered as a class.
Checking “backwards search” causes the counting to proceed backwards from the end of the session(s) and
look for consequence codes preceding antecedent codes. Note that the temporal definitions of the words
antecedent and consequent are reversed for backwards counting. This terminology replaces the words
target and given in previous versions of Mooses in an effort to make the analysis easier to understand.
When talking about sequential counting, we use the word given to mean “antecedent” and “target” to mean
“consequent.”
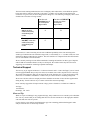
The event-based method counts the number of times codes follow other codes at discrete event steps or
lags. Consider the following 2 x 2 contingency table for lag 1 forward:
The next code was
one of the
consequent/target
codes
Code was one of the
antecedent/given
codes or was the
given code
Code was NOT one of
the antecedent/given
codes or the given
The next code was
NOT one of the
consequent/target
codes
A
B
C
D
20
The “A” cell contains the number of times in which there was both a given and a target found. Counting
starts at the first event and tallies frequencies according to the questions in the above table. The counter
then moves to the next (second) event and so on. When the N-minus-lag code is reached, counting stops
for that session.
Some interesting inferences can be made about data from the above table. For example, the observed
probability that a given is followed by a target is given by A divided by T, where T = A + B + C + D (the
total number in the matrix). The observed conditional probability that a target occurred when a given
occurred is computed by A divided by A + B, and so on. Several statistics have been suggested for testing
the strength of these sequential relationships and are computed by Mooses. Each of the statistics and the
associated formulas are provided in the table below.
Statistic
Allison Liker's Z
Formula
Total = A + B + C + D
( A + B)(C + D)
ExpFreq =
Total
A+ B
P1 =
Total
A − ExpFreq
ALZ =
ExpFreq(1 − P1)
ALZ 2
Total
AD − BC
AD + BC
Pearson's r
Yule's Q
Transformed Kappa
IF A+B < A+C, then MIN=A+B, otherwise MIN=A+C
A − ExpFreq
MIN − ExpFreq
21
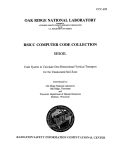
The time-based counting method uses the same contingency table and statistics, with a different question
being answered for each time unit of the event stream. A window of X seconds is formed from each
occurrence of a given event (X can be changed in the dialog box). The following contingency table is then
formed where time units are being counted:
The time unit
contained one of
the consequent/
target codes
The current time unit
was in the time
window formed by
antecedent/given
codes
The current time unit
was NOT in the time
window formed by
antecedent/given
codes
The time unit DID NOT
contain one of the
consequent/
target codes
A
B
C
D
In this matrix, it is more interesting to look at the conditional probability of the time unit being in the
window given that the time unit contained a target code, or A divided by A + C. In other words, how often
did the target happen within the time window? The same statistics are computed for the time-based matrix
as were used with the event-based matrix.
We are currently working on some different methods of counting and statistics for these types of inquiries
and will add new methods to Mooses as they are developed. We would welcome any ideas from users
suggesting new methods for examining sequential relationships.
Technical Support
The best way to get support for Mooses is via internet electronic mail. Contact Jon Tapp if you are in need
at [email protected] you may also call (615) 322-8086 (Jon’s Office) anytime to leave a message.
We provide email support to help you get started as part of the purchase price. If you need extensive help,
some of us are available as consultants. Contact Jon if you want to discuss a consulting arrangement.
We are not a full time software company and clients should be aware that we have full time appointments
during the day. Email is the best way to contact us and will be answered promptly.
Please send any suggestions for improvements or bugs you have found to us via Email or US Mail at:
Jon Tapp
103 Hal Drive
Hermitage, TN 37076
Hints and Tips
While we expect to find bugs in any program this large, many common errors are caused by mis-edited data
files. Be very careful when you are editing data files to be sure that commas are in the right place and that
end codes and start codes are present.
Use the checker to test read lists and eliminate the ugly time consuming problems that happen in other
analyses when the files are messed up somehow.
22
Appendix A. Data File Formats
Event File Format
Event files are in ASCII standard text format. Event files can be edited with the Mooses data file editor or
a text only editor such as windows notepad. The first line in the file should be the word “Events” the
second line is the header line used only to label the printouts and label data rows that are output. The data
follows with lines consisting of a code, a comma, and the time from the start that the code happened. The
last line in the file contains a -500 and then the end of session time. The -500 tells Mooses to stop reading
data because the end has been found.
Code File Format
Code file can and should be edited using the code file editorin Mooses. In some circumstances users may
want to make their own code files. Code files are also ASCII text files. The first line of the code file is the
number of codes that are in the code file. Then for that number of codes there are lines consisting of a code,
a comma, a description of the code, a comma, and then the group number the code is in. Group 0 are
frequency only codes. Codes in any other groups are considered as having a duration and make up a
mutually exclusive, exhaustive set.
Other files
MiniMoose code files are different and are described in detail in the section on using MiniMoose.
ProcoderDV files are also comma separated value ASCII files but should be edited using the latest version
of ProcoderDV to insure compatibility with Mooses.
23
Appendix B. Sample Code Files
This is a sample code file for desktop Mooses that matches the MMcodes.cod file for MiniMooses:
28
a,Freq1,0
b,Freq2,0
c,Freq3,0
d,Freq4,0
e,Freq5,0
f,Freq6,0
g,Freq7,0
h,Setting1,1
i,Setting2,1
Act1,Activity1,2
Act2,Activity2,2
Act3,Activity3,2
Act4,Activity4,2
Act5,Activity5,2
Code1,Dur Code1,-1
Code2,Dur Code2,-1
Code3,Dur Code3,-1
Code4,Dur Code4,-1
Code5,Dur Code5,-1
Code6,Dur Code6,-1
Code7,Dur Code7,-1
Code1f,Dur Code1 Off,-1
Code2f,Dur Code2 Off,-1
Code3f,Dur Code3 Off,-1
Code4f,Dur Code4 Off,-1
Code5f,Dur Code5 Off,-1
Code6f,Dur Code6 Off,-1
Code7f,Dur Code7 Off,-1
This is the sample code file provided with the install:
7
"a","A Frequency Code","0"
"b","B Frequency Code","0"
"c","C Frequency Code","0"
"1","1 Group One Code","1"
"2","2 Group One Code","1"
"3","3 Group Two Code","2"
"4","4 Group Two Code","2"
"Frequency Codes"
"Group One"
"Group Two"
24
Appendix C. Using ProcoderDV Data
To use PROCODER data in Mooses you need to change the data type setting in the analysis settings dialog
box (see General Settings). You will also have to setup a Mooses code file using the directions in the
defining your code set section of this manual. ProcoderDV codes files will work with Mooses now if they
fit your needs. In some cases the Mooses code files will need to be different (i.e. if you combine codes).
ProcoderDV data is translated into Mooses event files internally to be run. The options about ProcoderDV
provide a setting that allows you to export these files as standard event files for examination or later use.
The ProcoderDV settings window allows you to select how ProcoderDV files will be treated. You can
combine columns into a single code and/or ignore columns completely. You can select where the starting
and ending time are obtained in the ProcoderDV file. The start time is used as time 0 in Mooses and the
files are sorted then justified to that time. Any values in the ProcoderDV file that match either the code
(can be combined) or the description (can be combined) will be inserted into the Mooses time stream as
that code. Other strings found will be sent to the output as a warning.
25
Appendix D. Bibliography
The following list contains reference to methods used in Mooses as well as articles with data that was
collected and analyzed with Mooses.
Bakeman, R., & Gottman, J. (1986). Observing interaction: An introduction to sequential analysis.
Cambridge University Press.
Cohen, J. (1960). A coefficient of agreement for nominal scales. Educational and Psychological
Measurement, 20, 37-46.
Denny, D., & Fox, J. (1989). Collecting and analyzing continuous behavioral data with the TRS-80
model 100/102 portable laptop computer. Journal of Special Education Technology, 9(4), 183-189.
Farrell, A. D. (1991). Computers and behavioral assessment: Current applications, future
possibilities, and obstacles to routine use. Behavioral Assessment, 13, 159-179.
Hetrick, W. P., Isenhart, R. C., Taylor, D. V., & Sandman, C. A. (1991). ODAP: A stand-alone
program for observational data acquisition. Behavior, Research Methods, Instruments, and Computers, 23,
66-71.
MacLean, W. E., Tapp, J. T., & Johnson, W. L. (1985). Alternative methods and software for
calculating interobserver agreement for continuous observation data. Journal of Psychopathology and
Behavioral Assessment, 7, 65-73.
McEvoy, M. A., Nordquist, V. M, Twardosaz, S., Heckaman, H. A., Wehby, J. H., & Denny, K.
(1988). Promoting autistic children’s peer interaction in an integrated early childhood setting using
affection activities. Journal of Applied Behavior Analysis, 21, 193-200.
Noldus, L. P. J. J. (1991). The Observer: A software system for collection and anlysis of
observational data. Behavior, Research Methods, Instruments, and Computers, 23, 415-429.
Odom, S. L,. & Ogawa, I. (1992). Direct observation of young children’s social interactions with
peers: A review of methodology. Unpublished manuscript, Vanderbilt University, Nashville, TN.
Reith, H., Haus, G. J., & Bahr, C. M. (1989). The use of portable microcomputers to collect student
and teacher behavior data. Journal of Special Education Technology, 9 (4), 190-199.
Repp, A. C., Karsh, K. G., Van Acker, R., Felce, D., & Harman, M. (1989). A computer-based
system for collecting and analyzing observational data. Journal of Special Education Technology, 9 (4),
207-217.
Sackett, G. P. (1978). Measurement in observational research. In G. P. Sackett (Ed.), Observing
behavior: Volume 2: Data collection and analysis methods. Baltimore: University Park Press.
Shores, R. E., Jack, S. L., Gunter, P. L., Ellis, D. N., DeBreiere, T. J., & Wehby, J. H. (1993).
Classroom interactions of children with behavior disorders. Journal of Emotional and Behavioral
Disorders, 1(1), 27-39.
Strain, P. S., & Shores, R. E. (1977). Social reciprocity: Review of research and educational
implications. Exceptional Children, 43, 526-531.
Strain, P. S., & Timm, M. A. (1974). An experimental analysis of social interaction between a
behaviorally disordered preschool child and her classroom peers. Journal of Applied Behavior Analysis, 7,
583-590.
Tapp, J. T., & Walden, T. A. (1993). ProcoderDV: A professional tape control, coding and analysis
system for behavioral research using video tape. Behavior Research Methods, Instruments, & Computers,
25(1), 53-56.
26
Tapp, J. T., Wehby J. H. & Ellis D. (in press). Mooses: A multi-Option Observation System for
Experimental Studies. Behavior Research Methods, Instruments, & Computers.
Taylor, D. V., Hetrick, W. P., Touchette, N. P., Barron, J. L., & Sandman, C. A. (1991). Effect of
naltrexone upon self-injurious behavior, learning and activity: A case study. Pharmacology, Biochemistry,
and Behavior, 40, 79-82.
Yoder, P. J., & Tapp, J. T. (1990). SATS: Sequential Analysis of Transcripts System. Behavior
Research Methods, Instruments, & Computers, 22(3), 339-343.
27