1
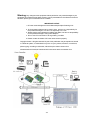
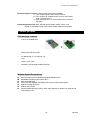
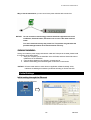
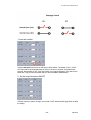
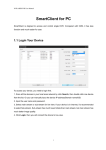
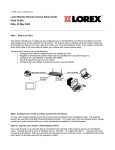
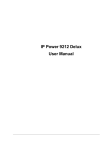
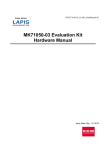
IP POWER 9202
Internet Power Controller
USER MANUAL
IP POWER 9202 USER MANUAL
User Manual
IP POWER 9202
Version: V1.06
2006. 02
-1-
VER. X.XX
Warning: any changes to this equipment without permission may cause damages to your
equipment! This equipment has been proved to can be prevented from the influence of harmful
electronic jamming in normal business use condition.
IMPORTANT NOTICE
1. IP Power 9202 is deigned on the fundamental principle of learning in kit.
2. IP Power 9202 is deigned to be used in-door, we have no responsibility for
the possible damage in out-door use especially in the rain.
3. Please use the power adaptor provided by the dealer, we have no responsibility
for the possible damage in using other adaptors.
4. Do not use IP Power 9202 in strong shaking condition
5. Please contact the dealer If IP Power 9202 works improperly.
Copyright © 2004 . All rights reserved. No part of this publication may be reproduced, stored
in a retrieval system, or transmitted in any form or by any means, electronic, mechanical,
photocopying, recording or otherwise, without the prior written consent of us
All trademarks and products mentioned in this document are the properties of us.
-2-
IP POWER 9202 USER MANUAL
Table of Content
1. INTRODUCTION .......................................................................................................... 4
FEATURES .........................................................................................................................
2.GETTING STARTED .................................................................................................... 5
PACKAGE CONTENTS ........................................................................................................
MINIMUM SYSTEM REQUIREMENTS....................................................................................
3.INTERFACE DESCRIPTION ....................................................................................... 6
4.HARDWARE & SOFTWARE INSTALLATION.......................................................... 7
HARDWARE INSTALLATION .................................................................................................
HARDWARE CONNECT(RECOMMEND) ………………………………………………………
SOFTWARE INSTALLATION .................................................................................................
5. INITIALIZATION........................................................................................................... 9
BASIC SETTING THROUGH ETHERNET .................................................................................
6. SETTING AND CONTROL THROUTH THE INTERNET ....................................... 12
CONTROL SETTINGS FOR 9202 ..........................................................................................
PASSWORD SETINGS FRO 9202 .........................................................................................
IP SETTINGS FOR 9202 ......................................................................................................
SPECIAL INTER-CONTROL ………………………………………………………………..
SMTP FOR E-MAIL : INFORM IP ADDRESS ………………………….. ………….…….….
GPRS FOR CELL PHONE : SUPPORT WAP……………………………………………….
SOFTWARE ONLINE UPDATE ..............................................................................................
7. SETING 9202E THROUGH THE INTERNET .......................................................... 20
8. APPLICATION ASSOCIATED TO OTHER IP RPODUCTS.................................. 21
9. FAQ ............................................................................................................................. 21
10. Control and setup by HTTP command ……………………………………………22
-3-
VER. X.XX
1. Introduction
Try to imaging that your home is cool in summer or worm in winter when you get home if only you
set it through the Internet few hours before you go home. When you are overseas, you can turn
on the lights or sound box through the Internet to scare away the thieves.
Browsing on Internet has already becomes a daily habit of the modern people. Now you can
control the household appliances, entrance guard and lights of you home through the network
anyplace in the world. Do you want to remote control the switch through the Internet? This set of
power control module through the Internet is an economic solution to satisfy your needs, no need
specific Software for computer system, even no need to open the case of computer. If only you
have a computer connected to network (Internet or Ethernet), you can operate the power switch.
It has 4 sets of delay switcher, two sets are normal open, and two sets are normal close. It can be
used in controlling electrical equipments, such as a small automatic factory in your home. You
can do it through the network and no longer need to rush from one place to the other, saving a lot
of time and money for you.
Feature
1. Built in web server, can be used through the Ethernet network or Internet network without
computer.
2. Built in network browser interface, no need any other software you can receive the signal
and operate the switch online anywhere in the world
3. It can control four power switches or even more using the plug board.
4. Two sets of normal open switches and two sets of normal close switches for
different applications.
5. Appointed control—appoint a time to turn on or off the power automatically
6. Supported HTTP, fixed IP in Internet network, DHCP, and virtual IP in Ethernet.
7. Security passwords identify & manual reset to default settings.
8. Easily installed and can be updated online
9. Separated LED indicates the state of each switch.
10. Safely designed for high voltage resistance and protection for leakage of electrical currency,
using nonflammable material.
11. Polarity protective—no damage to your equipment even connects the circuit reversely.
12. Universal Power voltage supported within 90-240 Volt
13. Embedded “ WATCH DOG “
14. It can be used separated or associated with other products of OUR such as IP Kamera, IP
Video and IP Sensor 9201 in all-directional network security monitoring, control and
detection.
15. Support GPRS – setting by for online Cell phone ( item limit) .
16. Support SMTP : Send IP address by E-mail as log in
Specification: 1. DC5V (AC90-240 input) 2. D-SUB Out port. 3. RJ45
Application field: can be associated with any kind of electrical equipments, no matter household
appliances or security equipment. It can manage the power supply through the web page; make
it be safer for the security equipment and more convenience for digital control at the far end.
-4-
IP POWER 9202 USER MANUAL
Electrical equipment control: entrance guard, light and air conditioner
1-1 Turn on/off the lights—scare away the thieves
1-2 Turn on/off the air conditioner-have a cool or worm feeling
when you back to home.
1-3 Open /close the door—no more trouble when you lost the
key again.
Industrial application field: bank, financial security system, jewels, casino, cash
register in supermarket, park, traffic control, military equipment and airport.
2. Before you start
9202 package contents
A set of IP POWER 9202
+
Network wire with RJ 45 port
An adaptor with 1A, 110~220 volt AC
input
D-Sub 15 Pin cable
Install disc (include rapid instillation manual)。
Minimum System Requirements
Minimum Intel Pentium II 300MHz/compatible AMD processor
WINDOWS operating system (IE5.0+SP1)
Minimum 64MB RAM
VGA Card: with capability of displaying full-Colors and DirectDraw support
Network card with RJ45 port
Ethernet Hub / Router
Internet network (Ethernet, xDSL or other ways, depends on whether you need far end
control ability or not)
-5-
VER. X.XX
3. Interface Description
3-1. IP Power 9202 has two modules, 9200 is the network module, and the followed picture
shows its interface:
Note: The black D-SUB is no function in IP Power 9202.
3-2 9202 is the output module and figure below shows its interface:
* For different request of normal state of electric equipment, 9202 offers: two sets of normal
close switcher-- Out 1 & Out 2 and two sets of normal open switches- Out 3 & Out
* IP Power 9202 offers two sets of normal close switches Out 1 & Out 3 and two sets of normal
open switches Out2 & Out 4.
-6-
IP POWER 9202 USER MANUAL
Maximum Rated Voltage: 240V/AC, 60V/DC
Maximum Rated Currency: 12A AC/DC
Maximum rated voltage for Single relay : 24V/ 10A , 120V/ 10A , 250/ 7A
Maximum Switch time: Max 10ms
Environment Temperature: -30°C~ + 55°C
4. Hardware & Software installation
Before you star to use IP Power 9202, please follow the steps below:
Check the package to make sure the contents is complete.
prepare one Ethernet HUB, or Router
Check the voltage of the power supply to make sure it is AC 110-240 volt.
Hardware Installation: Connect RJ45 first then POWER jack
1
Connect the 9200 to HUB through network wire.
2
Connect the 9200 to 9202 through VEG cable.
3
Connect the HUB to the Internet (May through ADSL/XDSL modem).
4
Connect the power adapter to the 9200.
Power on your computer and the power adapter of IP Power 9202..
Hardware connection (recommend):
NOTICE: The following operations in this section should be operated by professional,
the common user DO NOT try it!
Way 1 : For example—Light
1. Use the electrical wire of its own
Step 1 : cut off either sect of the electrical wire
-7-
VER. X.XX
NOTICE: this method must cut off the electrical wire of the household appliance. Please make
the decision after reading connection 2 & 3.
Use a test pen or screw driver with voltage tester to identify the live wire among the two wires of
electrical wire. Cut off the live wire and connect to the port of IP Power 9202. Use the test pen or
screw driver with voltage tester again to make sure the connection is correct.
NOTICE: BE CAREFUL IN THIS OPERATION AND DO NOT TOUCH THE WIRE UNDER
VOLTAGE WITH ANY PART OF YOUR BODY, ESPECIALLY WITH YOUR HANDS
Way 2: . Use additional electrical wire: you can buy some electrical wire and outlet in the
electrical shop to cooperate with IP Power 9202, avoid cutting off the electrical wire of the
equipment and can be used flexible in all kind of electrical equipment.
NOTICE: Use a test pen or screw driver with voltage tester to identify the live wire
among the two wires of electrical wire and make sure of connecting the live
wire to the port of IP Power 9202.
-8-
IP POWER 9202 USER MANUAL
Way 3. Use the extend wire: you can control more power switches at the same time.
NOTICE: Do not connect too much energy intensive electrical equipment such as air
conditioner, electrical heater, microwave over or over in the same electrical
outlet.
Too much electrical currency may cause fire. This product not guaranties the
possible damage because of too much electrical currency.
Software installation
Having connected the power supply and network cable with RJ45 port to the 9200, please install
the software as the follow steps:
1. Start your computer, put the install disc in the CD-ROM, and then find the file named
ipEditv3.exe in the install disc.
2. Copy the file to desktop or any directory you want save to.
3. Start the initial setting process following the construction in next section.
NOTICE: IP Power 9202 needs no other drivers or application software basically. All its
interfaces are building the hardware. Ipedit3.exe will help you find the virtual IP.
5. Initial Settings
Initial setting through the Ethernet
1. Double click the EditV3.exe
-9-
VER. X.XX
2. All the IP 9200 series, IP Kamera 9000 series/IP Video 9100 series in the same subnet of the
Ethernet will be found and be display in the window by the software. The default name of IP
Sensor 9202 is IP Power.
IPEditV3 can adjust Name / Gateway / IP / Netmask / HTTP Port1)
.
2- 1 : Change Name : MAXIMUM 10 DIGIT
2-2 : After Change Gateway , IP, Netmask (xxx.xxx.xxx.0 ~ xxx.xxx.xxx.254) or
Port1(1~32767) , the device will turn off DHCP 。
2-3 : Click the IP in Lists will open the webpage ,please type the IP Address if using Netscape
3. Click the equipment‘s name that you want to edit in the left of the window; it will turn fuscous,
the equipment’s name and IP will display in the windows, you can rename (use numbers and
letters). After that, click the update button and the new setting will be work in 20 seconds.
4. Double click the name of the equipment you want to control, the IE browser window will open
and connected to this equipment in that Ethernet automatically. You also can type the IP address
of the 9202E in the IE browser to open the web page of 9000. We suggest you to update the IE to
version 6.0 with SP1 or higher if your IE notices you the security level is too low to open that web
page.
NOTICE:
1. Make sure the RJ45 network wire have been connected correctly and the 9200 are power on.
2. When execute “ ipedit3.exe “ , as ISP support DHCP, you can find the dynamic IP address .
click the IP address , you can get in the webpage. If not support DHCP, after connect few
second , the setting will change to FIX DYMANIUC IP address .
3. If can not get in the 92XX web page , please set the segment of IP 9060(A) to be same as your
PC.
- 10 -
IP POWER 9202 USER MANUAL
* You can get your PC network information – IP Addres, Subnet Mask and Default
Gateway by step: start execute key “cmd” in dialog
key “ipconfig” in MS-DOS
mode
The last digit of IP address can be any number between 1~254, but can not be same as
your PC. If using in any PC, just use HUB and type the 192.168.0.100 in Browser or use
“ipedit.exe “ then you can get in the webpage.
* Same SEGMENT : The first 3 number of IP address is same - XXX.XXX.XXX.abc. The part
of XXX is same. Fro Example : IP address is 192.168.1.100 , then another IP address
192.168.1.123 is the IP in same segment .
4. The default username and password of IP Power 9202 are:
Username: admin
Password: 12345678
If forget the new password , you can key in superuser in username , and hardware reset the
device to set the default setting Password : 12345678 。( for security concern) ).
5. Please note the program “ ipEditV3.exe “ is for easily find dynamic IP address and change
the device Name only.
- 11 -
VER. X.XX
6. Control and settings through the Internet
Type the new IP address of IP Power 9202 in the address field and you can enter the login web
page. Input the default password 12345678 (you can change the password as you wish), click
the OK and then you can enter the Web Control page.
1)Maximum 8 digit for Password 。
Control the IP Power 9202
IP Power 9202 now can control 4 outputs at the same time.
Out1 & Out2 are NORMAL CLOSE normal close switches. When it is on, the corresponding
LED lights up, the circuit between the two connects is turnoff. When it is off, the corresponding
LED light off, the circuit between the two connects is turn on.
Out3 & Out4 are NORMAL OPEN switches. When it is on, the corresponding LED lights up, the
circuit between the two connects is turn on. When it is off, the corresponding LED light off, the
circuit between the two connects is turn off.
- 12 -
IP POWER 9202 USER MANUAL
1. Auto test function
Click the test-itself button and you will see the figure above. The states of OUT1, OUT2,
OUT3 and OUT4 will separately keep in ON for 1 second, 3 seconds, 6 seconds and 8
seconds, then all back to OFF. After one period, four outputs will keep in OFF state for the
same time. This process will repeat until you click the reset or cancel button.
2. Set the output’s state to ON/OFF
Click the output you want to change, set it to ON or OFF state and click apply button to finish
the setting.
- 13 -
VER. X.XX
3. Set one output be in ON/OFF state at the appointed time
You can set the state when one output starts, either ON or OFF. You can also set the delay time
and the action when the delay time is up. Then click apply button to confirm it.
The example shows in the figure above means the OUT3 will be in ON state when it starts and
will changes the state to OFF after 30 seconds.
4. Reset the ON/OFF settings
Click the reset button you can cancel the previously output settings.
Setting the password for IP Power 9202
Click the change password option at the left window and you can enter the change password
page. Follow the instructions, fill in the old password and new password, then click the apply
button to confirm.
Setting the IP address for IP Power 9202
1. Setting a fixed IP address for IP Power 9202.
Click the setup option in the left side of the window and you can enter the setting web page.
Then follow the instructions fill in the new IP address, mask, and gateway for IP Sensor 9201,
forbidden the DHCP service, click the submit button to confirm.
- 14 -
IP POWER 9202 USER MANUAL
Notice:
1)The format of IP Address : xxx.xxx.xxx.xxx: yyyyy,the port range of yyyyy is 1~32767。
2) The range of Subnet Mask is xxx.xxx.xxx.0 ~ xxx.xxx.xxx.254。
3) If disable DHCP , you can set TCP Port and Default Gateway;the default port of DHCP
Enable is xxx.xxx.xxx.xxx:80,and the Default Gateway is supply by server 。
4) If use the port other than 80 , you need to key full address http://xxx.xxx.xxx.xxx:yyyyy in IE/
Netscape ,or use the attached program IPEditV3.exe to login.。
5) When setup the setting please confirm the IP Address & Controlled IP Address is
same address.
Special Hardware Inter-Control - 92XX series : Use 9201 / 9212 ( DI part) to
control ( IP Power 9212 & 9202 / IP Sensor 9201 / IP Motor 9203 )
- 15 -
VER. X.XX
1. 92XX series Inter-Control function : Use DI (Digital Input ) sensor device as main controller
A ( Like 9212 or 9201 ) to controlled device B ( like 9212 / 9202 / 9203).
Correspondence connectors :
Main
Controller
9212
Controlled
device
9202
9212
9203
Main
Controller
9201
Controlled
device
9202
9212
9203
IN 1
IN 1
IN 1
Keep turn
left
IN 1
IN 1
IN 1
Keep turn
left
IN 3
IN 6
IN 8
IN 3 + IN 6
IN 2
IN 3
Turn
left-1step
IN 3
IN 6
Turn left-1step
IN 4
IN 8
Keep turn left
X
X
STOP
IN 2
IN 3
IN 4
IN 1 + IN 3
IN 2
IN 3
Turn
left-1step
IN 3
IN 6
Turn
left-1step
IN 4
IN 8
Keep turn left
X
X
STOP
2. Connect Client setup :
A. Divide : this device word separately and do not use Inter-Control
B. Light : This device can control 9202 / 9212 (IP Power) - by change the default setting
of : Normal close or normal open
C. Motor : This device can control 9203(IP Motor) –control the direction of turning..
3. Controlled IP Address: Setting the Ip Address of controlled device .
In Inter - control mode when transfer , . the Out Light(P6.1/P6.2) will always on ,if the main
controller freeze the Out Light P6.1 is always on ,if the controlled device freeze , the light of
P6.2 is always on.。
2-1 For example : Control IP 9202 by DI board of IP Power 9212
Step 1 : Go to SETUP , change Connect Client and set as Light ,
Step 2 : key in the IP address of controlled device (IP Motor)
- 16 -
IP POWER 9202 USER MANUAL
Step 3 : Click Submit to confirm setting , when the count windows is off , the new login
windows jump out as following pictures.
SMTP for E-Mail : receive IP address
As setting up the receiver e-mail address, IP Power will send its IP Address to receiver .
Setting Sample :
Receiver: [email protected] [email protected]
Sender: [email protected]
Mail Server: 168.com
Mail Password: ●●●●●●
Warning MSG: Alert
After type in all the information please click “apply” first to save the change and then “send ” to
send mail.
There is status bar next to at the clock : There are four possible situation for sending e-mail.
- 17 -
VER. X.XX
a. Mail send OK : Receiver should receive mail in short time.
b. User or password error : After change the username and password please click “apply
“To save setting and click send to
c . Mail ahead sending , please send later : Mail server was block as lots mail
d. Connect time out , mail to be dropped : please login again
1 )Receiver : can be 2 receiver e-mail address ,please use space between two e-mail address.
After setup, ever time you login , IP Power 9212 will send receiver the IP address.
2)Mail Server : must be a mail server which can supply e-mail transfer and support SMTP
function .
3) Warning MSG: the title of the e-mail.
4)The maximum digits of each item:
a)Receiver : 0x200(512 bytes)
b)Sender : 0x30 (48 bytes)
c) Server: 0x30 (48 bytes)
d) Password: 0x30 (48 bytes)
e) Warning MSG(text) : 0x50 (80 bytes) –can be empty
5) Mail contents include : ”From:”, “To:”, “Subject”, “IP Family Address”
GPRS for Cell Phone : Support WAP.
IP POWER 9212 support GPRS function , you can use cell phone ( with online function )
To setup the online device ( real IP address) as operate in browser .:
1) Address setting : add “ /wap” after your online IP address .
For example : http://65.59.37.123/wap
or appointed port http://61.59.32.147[:8080]/wap
the interface is same as in IE(Internet Explore) .
2) The IP Address must be real ip address and can be work on Internet..
3) The name of IP device must be English , or will be encode in wap.
4) Before using WAP control, please check if your cell phone support GPRS and if your
number had apply online service.
We support : Motorola V878 , Sony Ericsson T630 and Siemens.
- 18 -
IP POWER 9202 USER MANUAL
Software online update :
For wild application in different filed , IP POWER 9212 support online update .It safe time
and money as developing your product .
Step 1 . Login the webpage
Step 2 . Click Firmware Update and click update
Step 3 Click browser to use latest Firmware then click Upgrade to update Firmware
Step 4 after finish update please wait some second and then re-log In
ps : If use DHCP please enable DHCP.
Note: :
1)If the Port is 80 then you can directly update。
2) If update fail ,you can manual reset the device and update again .
- 19 -
VER. X.XX
7. Setting the IP Power 9202 E through the Internet
After you have setting the Ethernet and router, you can access the IP Sensor 9201 from the
Internet. It will bring you all kinds of convenience.
8. APPLICATION ASSOCIATED TO OTHER IP RPODUCTS
You can associate the IP Power 9202 with other IP network product of OUR in your home
Ethernet, such as IP Kamera 9000 network camera, IP Video 9100 network video server
and IP Sensor 9201, to monitor the equipments or sensors installed in the doors or windows.
This is an economic solution to achieve the network monitor, detection and control.
- 20 -
IP POWER 9202 USER MANUAL
9. FAQ
Q1: I forgot the password and can not enter the administration page now, what can I do?
A1: Turn on the power normally, and then click the ipedit.exe program to enter the web page.
Type in the username “superuser” then press OK to confirm and then press the reset button
in 9200; it will be back to the default settings and enter the administration page.
Q2: I cannot open the IE web page, why?
A2: Please update your IE or use the up-to-date version of Netscape browser.
Q3: Why the on/off operation can work immediately?
A3: if you operate the IP Sensor 9201 in Ethernet, the operation will work immediately. If you
operate it through the Internet, the response speed depends on the situation of the network.
Normally the delay is not obvious because the date need to be transported during operating the
IP Sensor 9201 is very little.
- 21 -
VER. X.XX
10. Control and setup by HTTP command
User can control IP Power 9212 through HTTP command ,command format as follow:
http://admin:[email protected]/SetIO?para1=*+para2=*+para3=*……
Command format part explanation :
username:default setting “admin”
password:default setting “12345678”
XXX.XXX.XXX.XXX : IP address of IP Power 9212
SetIO:output command
para1-para3 parameter setting
Example 1:control I/O Output with username and password:
http://admin:[email protected]/SetIO?p61=1+p62=1+p63=1+p64=1+p65=0+p66=0+p
67=0+p68=0
We use above command to control IP Power 9212 at 192.168.0.105,username is admin,
password is 12345678.
Turn on PORT1(p61),PORT2(p62),PORT3(p63)and PORT4(p64).
Tunr off PORT5(p65),PORT6(p66),PORT7(p67)and PORT8(p68)。
After send out above command , IP Power 9212 will get following message :
<html> P61=1,P62=1,P63=1,P64=1,P65=0,P66=0,P67=0,P68=0 </html>
Notice : pxx must be lower case , the command of SetIO must be same of the style
Example 2:no need to key in the username and password in command
http://192.168.0.105/SetIO?p61=1+p62=1+p63=1+p64=1+p65=0+p66=0+p67=0+p68=0
after type in above command , the following command jump:
after key in the username and password,9212will return following message :
<html> P61=1,P62=1,P63=1,P64=1,P65=0,P66=0,P67=0,P68=0 </html>
Example 3:Read I/O Output of 9212 :
- 22 -
IP POWER 9202 USER MANUAL
http://192.168.100.61/GetP6?
no need to key in the username and password in command,
after key in the username and password,9212will return following message :
<html> P61=1,P62=1,P63=1,P64=1,P65=0,P66=0,P67=0,P68=0 </html>
Output status as follow:
On: PORT1(p61),PORT2(p62),PORT3(p63),PORT4(p64).
Off : PORT5 p65),PORT6(p66),PORT7(p67),PORT8(p68).
Sample 4:Read 9212的I/O Input:
http://192.168.100.61/GetP5?
no need to key in the username and password in command,
after key in the username and password,9212will return following message :
<html> P51=1,P52=1,P53=1,P54=1,P55=0,P56=0,P57=0,P58=0 </html>
Output status as follow:
* With Input : PORT1(p51),PORT2(p52),PORT3(p53),PORT4(p54).
* No Input : PORT5(p55),PORT6(p56),PORT7(p57),PORT8(p58).
- 23 -
VER. X.XX