1
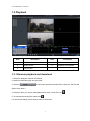
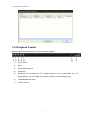
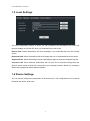
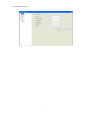
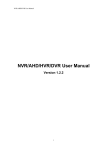
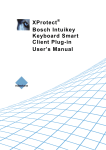
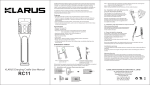
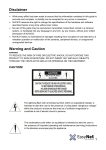
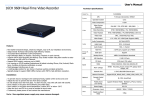
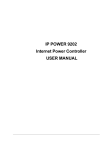
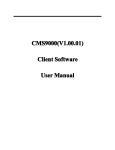
NVR/AHD/DVR User Manual
SmartClient for PC
SmartClient is deigned to access and control single DVR. Compared with CMS, it has less
function and much easier for user.
1.1 Login Your Device
To access your device, you need to login first.
1. Scan all the devices in your local area network by click Search, then double click one device
from the list. Or you can manually input the device IP address/Domain name/UID.
2. Input the user name and password.
3. Select main stream or sub-stream for live view. If your device is in internet, it’s recommended
to select Sub-stream. Sub-stream has much lower bitrate than main stream, but main stream has
much better image quality.
4. Click Login, then you will connect the device to live-view.
1
NVR/AHD/DVR User Manual
1.2 Live View
Preview: The screen layout emulates the multi-channel live view screen of the DVR, showing
you images coming directly from your cameras in near real-time (some delay is caused by the
network/Internet connection you’re using to access the device). You can select a single camera,
or multi-channel viewing by using the Viewing Mode buttons in the lower right corner.
Playback: Opens the Playback interface, which operates in much the same way as the playback
interface on the NVR itself.
Local Settings: Defines how SmartClient will manage and save footage and still images to your
local PC.
Device Settings: Allows access to the device’s settings. The configurable options are very
similar to those you’ll find in the device local menus.
Main Viewing Area: Where images from your camera will be shown. Select Preview to return to
this view from the Playback interface or the configuration menus.
Image Controls: You can alter the brightness, contrast, saturation and hue of your images here.
They operate in the same way as those in the device’s local menu.
Viewing Modes: Choose between single camera viewing, four channels at once (2 x 2) or all
eight channels at once (3 x 3).
Volume Control: Alters how loud the audio output from the device will be.
CPU Loading: How hard your computer is working to decode and display images as they arrive
from the device.
2
NVR/AHD/DVR User Manual
1.3 Playback
Area
Description
Area
Description
1
Device list
2
Search condition
3
Search result
4
Playback control panel
5
Play window
1.3.1 Remote playback and download
1. Select the playback channel and window.
2. Select recorded files type and query time.
3. Click key
to search the matched recorded files, if there are, the files will
shows in the area 3.
4. Select the time you want to start playback from area 3, and click icon
5. To download recording file, please click
.
6. In the file list dialog, select what you want to download.
3
.
NVR/AHD/DVR User Manual
1.3.2 Playback Control
When playback has succeeded, you can control the playback:
1)
Play / Pause.
2)
Stop.
3)
Single frame forward.
4)
Snap shot.
5)
Download the recording file. The default directory for the downloaded file is C:\
DownloadFile. You can modify the directory in Setup -> Local Settings page.
6)
enable/disable the audio
7)
Volume control.
4
NVR/AHD/DVR User Manual
1.3 Local Settings
The local configuration screen is where you can customize how SmartClient will store and
process footage on the local PC when you download it from the device.
Record Path: Where SmartClient will save recordings if you select Record from the Preview
screen.
Download Path: Where SmartClient will save footage that you’ve downloaded from the device.
Snapshot Path: Where SmartClient will save still images captured using the snapshot function.
Convert to AVI: When selected, SmartClient will use your PC to transcode footage from the
device’s native format (H.264) into a format that your computer (indeed, almost any computer)
will be able to playback without special software.
1.4 Device Settings
You can remote configure the parameters of the device here. The configuration menu is almost
the same with device local menu.
5
NVR/AHD/DVR User Manual
6