1
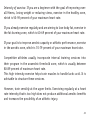
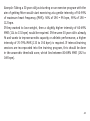
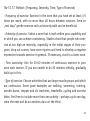
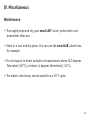
Pulse watch with integrated calorie counter D40400-08-01-02_R0_125/09/2009 User Manual Please read this manual thoroughly before first using this device HMM Diagnostics GmbH D-69221 Dossenheim, Germany www.hmm.info Contents I. Introduction Important notice Putting on the elastic transmitter II. Your smartLAB®runner Display & functions Product description Specifications III. Setup & functions Quick start: Heart rate monitoring Setting up your smartLAB®runner Entering the setting loop Setting time and the calendar Setting daily alarm Setting the heart rate zone Setting the count down timer Setting heart rate recovery (HRR) 5 6 8 10 11 12 13 14 14 16 16 18 19 Setting the calorie counter Setting heart rate Alarm settings Using the stopwatch Using the countdown timer Using the SCAN function Using Time in Zone Using the calorie counter Quick set: Calorie counter / Ambient Heart Rate (AHR) Training with your smartLAB®runner pulse watch IV. Miscellaneous Maintenance Troubleshooting Warranty 21 23 24 25 26 27 28 29 29 30 34 35 37 4 I. Introduction Thank you for using the smartLAB®runner pulse watch with integrated calorie counter. This watch will help you monitoring your personal fitness program and keep track of your measured values. Before starting with your work-out, you should first have your health status and physical capacity checked by a doctor. Together with him or her you can work out an individual training schedule. Important notice • Before your smartLAB®runner pulse watch is able to display your heart rate, you have to push the MODE-button in any main menu for a few seconds. • If you enter the setup menu accidentally, press MODE to get back to the main menu. By continuously pressing the MODE button, you can switch through all main menu screens. • To obtain proper heart rate readings, it is essential that there is sufficient moisture (water) between the electrodes on the transmitter and your skin. Insufficient moisture can cause no reading, frozen readings or erratic readings. 5 • When using a wireless heart rate monitor near computers, electric motors, high voltage power lines, televisions, other heart rate monitors and mobile phones, erratic readings may occur. • You can wear your smartLAB®runner pulse watch when swimming, but do not push any of the buttons while the receiver (watch) is underwater. Putting on the elastic transmitter Your smartLAB®runner pulse watch has an elastic chest strap with integrated transmitter, that can easily be worn during your exercises. To apply the belt, carry out the following steps: • Attach one end of the adjustable elastic strap to the transmitter. 6 • Moisten the rubber electrodes of the belt with either water or saliva, as shown. • Position the transmitter on the chest, just below the breastbone with the smartLAB®runner logo the right way up. • Press the elastic strap around your chest and attach it to the other end of the transmitter. • Adjust the strap to give a close but comfortable fit. 7 II. Your smartLAB®runner Display & functions SELECT - selecting menu items ST./FWD - increase unit MODE - main menu selection SCAN/REV - display Interlock Code - decrease unit - analysis functions 8 Set contents 1 smartLAB®runner pulse watch 1 elastic fabric chest strap with transmitter 1 User manual 1 smartLAB® plastic box 1 CR 2025 battery 1 CR 2025 + 1 CR 2032 battery 9 Product description To deliver reliably coded heart rate information, your smartLAB®runner pulse watch utilizes a safe 122 kHz low frequency. So, all you have to concentrate on is getting the most from your exercise. Each time you put on your chest transmitter and then press the MODE key until the heart symbol appears, a code is randomly selected and transmitted to the smartLAB®runner watch receiver. Thereafter the watch will lock on to this code plus the transmission interval to create an interlock. The code combined with the precise transmission interval results in the unique interlocking pairing between the chest transmitter and the watch. The interlock code can be displayed by pressing and holding down the SCAN/REV key until the word CODE and a number appears on the screen. During the interlock process you should be at least 6 feet (1,8 meters) away from other heart rate monitors. If the interlock is lost for any reason, the watch will beep once to alert you and the heart rate will go to zero. In this case you should repeat the interlock process. 10 Once the interlock is established, you can exercise in close proximity with other heart rate monitors, safe in the knowledge that your smartLAB®runner pulse watch will display only your own heart rate, and not the heart rate of those around you. Specifications 1. Type: smartLAB runner 2. Heart rate accuracy: ± 1 bpm 3. Heart rate range: 30-240 beats per minute 4. Stopwatch resolution: 0,1 sec 5. Maximum stopwatch time: 9 hrs. 59 min. 59,9 sec. 6. Heart zone high limit value: 80 - 240 bpm in 1 bpm increments 7. Heart zone low limit value: 30 to high limit ® value minus 5 bpm in 1 bpm increments 8. Heart rate recovery range: 30 - 200 bpm in 1 beat increments 9. Ambient heart rate range: 30 - 120 bpm 1 beat increments 10. Transmitter - emitted frequency: 122 kHz ± 10% 11. Battery life: approx. 2 years when used 60 min/day 12. Range: up to 31,5 inches (80 cm) to monitor 11 III. Setup & functions Quick start: Heart rate monitoring Your smartLAB®runner pulse watch has a variety of features. To set these up, you will need to read the instructions. However, if you just want to see how the heart rate feature works, follow these steps: • Put on the transmitter. • Attach the monitor to your wrist. • Press and hold the MODE key until the heart symbol appears. • After a few seconds the heart symbol will start flashing and your heart rate will appear. 12 Setting up your smartLAB®runner Your smartLAB®runner has one setting loop, which is entered from the „Time of Day (ToD)“ screen. Once you enter this screen, press and release of SELECT takes you to the next setting in the loop and returns to the „Time of Day“ screen. The following settings can be adjusted: Seconds, hours, minutes, day of week, month, date, alarm mode, daily alarm hour, daily alarm minute, heart zone high limit, heart zone low limit, countdown timer single or auto-repeat, countdown timer hours, minutes, seconds, heart rate recovery high, heart rate recovery low, ambient heart rate, weight, age. (after that, you come back to the „Time of Day“ screen) 13 Entering the setting loop In the „Time of Day“ screen, press and hold SELECT until the seconds flash and the select icon “SET“ appears on the display. Note: Pressing the MODE button at any stage in the setting loop takes you back to the main screen for that setting. Setting time and the calendar Press and release ST./FWD or SCAN to reset seconds to zero. Press SELECT to move to hours. Press ST./FWD to increase, SCAN to decrease the hours Note: Pressing and holding ST./FWD will „fast forward“ or SCAN will „fast reverse“ the number. 14 Press SELECT to move to minutes. Press ST./FWD to increase, SCAN to decrease the minutes. Press SELECT to move to day of the week. Press ST./FWD to advance, SCAN to move back the day of the week. The day of the week is indicated by its character in the lower display section. Press SELECT to move to month. Press ST./FWD to increase, SCAN to decrease the month. Press SELECT to move to date. Press ST./FWD to increase, SCAN to decrease the date. 15 Setting daily alarm Press SELECT to move to daily/hourly alarm. Press and release ST./FWD to select the alarm from either hourly chime only ; daily alarm only ; both on; both off. Press SELECT to move to daily alarm hours. Press and release ST./FWD to increase, SCAN to decrease the hours. Press SELECT to move to daily alarm minutes. The setting follows the same principle: ST./FWD to increase, SCAN to decrease. Setting the heart rate zone Your smartLAB®runner pulse watch has a programmable target zone, making it easier to control the intensity of your workout. Please refer to „Training with your smartLAB®runner pulse watch“ in this manual for your suggested zone selection. 16 The default heart zone settings are not intended as suggested or recommended upper or lower zone values. These values should be carefully adjusted according to your personal fitness level. Press SELECT to move to the heart zone high setting. This is indicated by a heart symbol and the arrow up symbol. Press and release ST./FWD to increase or SCAN to decrease the required value. Press SELECT to move to the heart zone low setting. This is indicated by a heart symbol and the arrow down symbol. Press and release ST./FWD to increase or SCAN to decrease the required value. Note: There is always a 5 beat per minute difference between the high and low limit. 17 Setting the count down timer Press SELECT to move to the count down timer. The repeat icon (2 arrows as a circle) will be flashing around „TMR“. The countdown timer counts down from up to 10 hours. You can now set it, so that it automatically resets and continues counting down repeatedly, or times a single event. Press ST./FWD or SCAN to select repeat (both the repeat and TMR icon will be displayed). Press ST./FWD or SCAN to select single countdown (just the TMR icon will be displayed) Note: The maximum countdown time that can be set is 9 hours, 59 minutes, 59 seconds. 18 Press SELECT to move to countdown timer hours. Press and release ST./FWD to increase, SCAN to decrease the hours. Press SELECT to move to the minutes (setting as explained before) and again SELECT to finally set the countdown timer seconds (setting as explained before). A further press of SELECT takes you back to the „Time of Day“ screen. Setting heart rate recovery (HRR) Note: Your smartLAB®runner pulse watch automatically measures your heart-rate-recovery (HRR). HRR refers to the time it takes for your heart rate to drop from the preset high to the preset low recovery limit after you have finished your workout. In general, as your recovery time decreases, your fitness level is improving. However, it is recommended that you experiment with values that will make the recovery time a useful number for your application. It is only a comparative value with your earlier efforts, and not a meaningful number itself. 19 Press SELECT to move to HRR high (displayed by „HRR“ and the heart with arrow up symbol). Press and release ST./FWD to increase or SCAN to decrease the required value. Note: It is suggested that this be set 5 bpm below the heart zone high limit. Press SELECT to move to HRR low (displayed by „HRR“ and the heart with arrow down symbol). Press and release ST./FWD to increase or SCAN to decrease the required value. Note: As a guideline, note what your heart rate drops to at the end of your workout after 2 minutes (using the stopwatch). This can be used as your HRR low setting. 20 Setting the calorie counter The calorie counter shows the number of calories burnt during exercise, using heart rate intensity. You need to enter • your Ambient Heart Rate (AHR) value - this is your typical heart rate at rest before starting exercise. • your weight and age Note: You can also use the Quick Set feature in the main calorie screen to set AHR (see Operating the Calorie Counter) Press SELECT to move to ambient heart rate. Once set, calorie expenditure will be calculated from 5 beats per minute above this figure. 21 Press ST./FWD to increase (120 bpm maximum) or SCAN to decrease the ambient heart rate (30 bpm minimum). Press SELECT to move to set weight. The kilogram value will be flashing. The weight range is from 20 - 150 kg (44 -330 lbs). Press and release SCAN/ FWD to increase or SCAN to decrease the weight. Note: Kg and lbs are displayed and changed at the same time. Press SELECT to move to set age. Press and release ST./FWD to increase or SCAN to decrease the age setting. A further pressing of SELECT takes you back to the „Time of Day“ screen. 22 Setting heart rate Your smartLAB®runner pulse watch has 5 main screens: 1. Time of Day 2. Stopwatch 3. Countdown Timer 4. Time in Zone 5. Calorie Counter By pressing and holding MODE in any main screen will turn on and display your heart rate. The heart icon and a zero heart rate value will appear in the lower row of the display. After a few seconds (provided you are wearing the chest transmitter), the heart icon will begin to flash, followed by your current heart rate being displayed. An arrow up displayed to the left of the heart icon means you are above your zone. A down arrow means you are below your zone. 23 A double arrow means you are within your zone. To switch off the heart rate display, press and hold MODE in any main screen. When your smartLAB®runner pulse watch does not receive a signal for 2 minutes, it automatically powers off. Alarm settings Hourly alarm: Your smartLAB®runner pulse watch will give 2 beeps on the hour. Daily alarm: Press MODE to move to the „Time of Day“ screen. To view the current alarm setting (displayed for 2 seconds) press and release ST./FWD. The alarm sounds for 30 seconds. To silence the alarm, press any button. The button you press will then not perform its usual function but silence the alarm. Out-of-Zone alarm: The out-of-zone alarm will sound in rhythm with your heart rate when you go above or below the zone limits. 24 Note: To turn on this alarm, heart rate must be on. Press and hold SELECT. An alarm icon will appear. To turn off the alarm press and hold SELECT until the icon disappears. Heart-rate-recovery alarm: Your smartLAB®runner pulse watch automatically records the amount of time it takes your heart to drop from a pre-set upper limit to a pre-set lower limit. Timing begins automatically when your heart rate passes through the upper limit and continues until your heart rate drops below the lower limit. When timing stops, the Heart-rate-recovery alarm gives four continuous beeps whenever a heart rate recovery is completed. This alarm cannot be switched off. Note: To view the heart rate recovery time, move to the „Time in zone“ main screen and press ST./FWD. Using the stopwatch The stopwatch of your smartLAB®runner can be used with or without heart rate activated and is operated in the same way for either modus. 25 To start the stopwatch, press and release ST./FWD. To stop the stopwatch, press and release ST./FWD. To reset the stopwatch, press and hold ST./FWD when the stopwatch is not running. Note: Maximum stopwatch time is 9 hours, 59 minutes, 59,9 seconds. Using the countdown timer The countdown timer of your smartLAB®runner pulse watch can be used with or without heart rate activated. When the time has counted down to zero, an audible alarm sounds for 10 seconds. To start the countdown timer, press and release ST./FWD. To stop the countdown timer, press and release ST./FWD. To reset the countdown, press and hold ST./FWD when the timer is not running. 26 Note: Maximum stopwatch time is 9 hours, 59 minutes, 59,9 seconds. Using the SCAN function Your smartLAB®runner pulse watch has a variety of different scan modi that help you analyzing the measured values. You can choose between the following SCAN modi: Current session scan: When heart rate is on, press and release SCAN in any main screen. This will start a scan through the maximum, average and minimum heart rates (3 seconds for each) since heart rate was switched on. By pressing SCAN during the scan, you get back to the main screen you were in. Previous session scan: In any main screen, a press and release of SCAN starts a single scan through maximum, average and minimum heart rate for the previous session. This is stored in memory and cleared automatically when heart rate is next switched on. 27 Using Time in Zone With the Time-in-Zone function you can control how long you were in the optimal heart rate range (see also the chapter “Setting heart range” in this manual). Typically, exercise programs comprise a warm-up, workout for a specified time (in a zone) and cool down. The TiZ feature can be used to show the time in your zone as you actually workout. If you go above or below your zone, the timer will stop until you are back in your zone. To activate the Time-in-zone function, press MODE until the TiZ icon appears. 28 Using the calorie counter Press MODE until the „Cal“ icon appears. The calorie counter starts automatically once heart rate is turned on. To reset calories to zero, press and hold ST./FWD until the display shows zero. Note: If you just want the calories for your actual workout, reset just as you begin the session Quick set: Calorie counter / Ambient Heart Rate (AHR) Your smartLAB®runner pulse watch has a quick set feature, allowing you to set your AHR quickly just before you begin your workout. Calories will be counted from 5 bpm above this value. You need to be wearing the transmitter and monitor, and have heart rate switched on. Move to the “Cal“ main screen. Press and hold SCAN to set the current displayed heart rate as your AHR. 29 Note: If your heart rate is above 120 bpm, your smartLAB®runner will default to the setting already stored. Training with your smartLAB®runner pulse watch Exercising at the right heart rate intensity, is key to meeting your fitness and performance goals. The first step is to find out your maximum heart rate (MHR). Using a formula based on age or taking a sport-specific exercise assessment does this. The formulas: • Sedentary individuals use 220 minus your age to calculate your approximate maximum. • If you exercise/train aerobically 3 or more times a week, use 205 minus half your age. Example: (30-year old person) 220-30 = 190. His/her maximum heart rate would be 190 beats per minute. 30 Intensity of exercise: If you are a beginner with the goal of improving overall fitness, losing weight or reducing stress, exercise in the healthy zone, which is 50-59 percent of your maximum heart rate. If you already exercise regularly and are aiming to lose body fat, exercise in the fat burning zone, which is 60-69 percent of your maximum heart rate. If your goal is to improve aerobic capacity or athletic performance, exercise in the aerobic zone, which is 70-79 percent of your maximum heart rate. Competitive athletes usually incorporate interval training sessions into their program in the anaerobic threshold zone, which is usually between 80-89 percent of maximum heart rate. This high intensity exercise helps train muscles to handle lactic acid. It is advisable to structure these sessions. However, train sensibly at the upper limits. Exercising regularly at a heart rate intensity that is too high does not produce additional aerobic benefits and increases the possibility of an athletic injury. 31 Example: Taking a 30 year old just starting on an exercise program with the aim of getting fitter would start exercising at a gentle intensity of 50-59% of maximum heart frequency (MHR): 50% of 190 = 95 bpm, 59% of 190 = 112 bpm. If they wanted to lose weight, then a slightly higher intensity of 60-69% MHR (114 to 131 bpm) would be required. If the same 30 year old is already fit and wants to improve aerobic capacity or athletic performance, a higher intensity of 70-79% MHR (133 to 150 bpm) is required. If interval training sessions are incorporated into the training program, this should be done in the anaerobic threshold zone, which lies between 80-89% MHR (152 to 169 bpm). 32 The F.I.T.T. Method: (Frequency, Intensity, Time, Type of Exercise) - Frequency of exercise: Exercise in the zone that you have set at least 3-5 times per week, with no more than 48 hours between sessions. Even on „rest days“ gentle exercise such as leisurely walk can be beneficial. - Intensity of exercise: Select a zone that is both within your capability and in which you can achieve consistency. Studies show that people who exercise at too high an intensity, especially in the initial stages of their program, drop out sooner, have more injuries and tend to develop a negative impression towards exercise in general. If necessary, start in a lower zone. - Time exercising: Aim for 20-60 minutes of continuous exercise in your zone each session. If you are unable to do 20 minutes initially, gradually build up to this. - Type of exercise: Choose activities that use large muscle groups and which are continuous. Some good examples are walking, swimming, running, aerobic dance, stepper and ski machines, treadmills, cycling and exercise bikes. Feel free to include more than one activity - perhaps cycle one day, swim the next and do an aerobics class on the third. 33 IV. Miscellaneous Maintenance • Thoroughly wipe and dry your smartLAB®runner pulse watch and transmitter after use • Store in a cool and dry place. You can use the smartLAB® plastic box, for example. • Do not expose to direct sunlight or temperatures above 122 degrees Fahrenheit (50°C) or below 14 degrees Fahrenheit (-10°C). • The elastic chest strap can be washed on a 30°C cycle. 34 Troubleshooting • What if the heart rate reading is erratic or totally absent 1- Make sure that the chest transmitter is sufficiently tight. The transmitter should be positioned and the elastic strap tightened so that the electrodes are flat against your skin. Adjust the transmitter side to side or slightly up or down until it is positioned correctly, and the electrodes make good contact with your skin 2- Make sure the transmitter electrodes are sufficiently moist. Moisten the electrodes with water, salvia or electrode gel. Accumulated sweat or dirt on the electrodes may impair electrical contact, so make sure they are kept clean. 3- Make sure you have heart rate switched on, with a long press and hold of MODE in any main screen. 35 • What if the heart rate reading becomes extremely high? Electromagnetic signals from outside sources may cause abnormally high heart rate readings. Common sources of electromagnetic signals are high voltage power lines, electric motors and mobile phones. Your heart rate should return to normal once you move away from the source. Watch, batteries and chest strap must be disposed of according to local regulations. 36 Warranty HMM Diagnostics GmbH products need to fulfill high quality requirements. Because of this reason, HMM Diagnostics GmbH gives a 2-year warranty by purchasing this smartLAB® product. You can even extend the warranty from 2 to 5 years without extra pay when you register your product. Please use the warranty card included in your product set. Wear parts, batteries etc. are excluded from warranty. 37 Manufacturer: HMM Diagnostics GmbH Friedrichstr. 89 D-69221 Dossenheim, Germany mail: [email protected] www.hmm.info Weitere Informationen zu den smartLAB® Produkten / More information on our smartLAB® products: www.smartlab.org