1
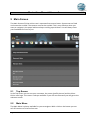
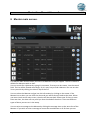
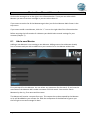
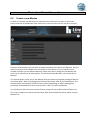
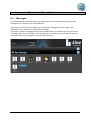
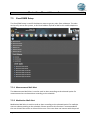
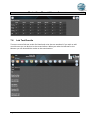
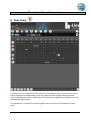
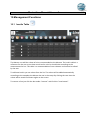
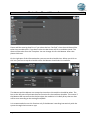
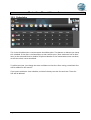
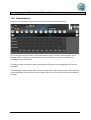
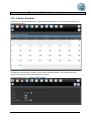
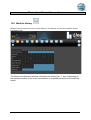
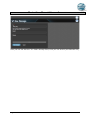
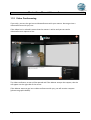
Mentor User Manual hLine-online.com Mentor User Manual hLine-online.com HMM Diagnostics GmbH Friedrichstr. 89 69221 Dossenheim (Germany) www.hmm.info Page 1 out of 38 Mentor User Manual hLine-online.com Contents Page 1 2 3 4 5 Introduction ...................................................................................................................... 3 Legends ............................................................................................................................. 3 Registration ....................................................................................................................... 7 Logging into the portal .................................................................................................... 10 Main Screen .................................................................................................................... 11 5.1 Top Screen ................................................................................................................ 11 5.2 Main Menu ............................................................................................................... 11 5.3 Information Bar ........................................................................................................ 12 5.4 Content Screen. ........................................................................................................ 12 5.5 Bottom Bar. .............................................................................................................. 12 6 Mentor main screen. ...................................................................................................... 13 6.1 Add a new Mentee ................................................................................................... 14 6.2 Create a new Mentee ............................................................................................... 15 6.3 Messages .................................................................................................................. 16 7 Setup ............................................................................................................................... 17 7.1 Profile ....................................................................................................................... 17 7.2 Device Management ................................................................................................ 18 7.2.1 Adding a device or gateway. ............................................................................. 18 7.2.2 Displaying Device Information .......................................................................... 19 7.2.3 Deleting a device. .............................................................................................. 19 7.3 Email/SMS Setup ...................................................................................................... 20 7.3.1 Measurement Mail Alert ................................................................................... 20 7.3.2 Medication Mail Alert ....................................................................................... 20 7.3.3 Limit Alerts ........................................................................................................ 21 7.4 Information .............................................................................................................. 21 7.5 Medication setup ..................................................................................................... 21 7.6 Lab Test Results ........................................................................................................ 23 8 Daily Diary ....................................................................................................................... 24 9 Vital Values ..................................................................................................................... 26 10 Management Functions .................................................................................................. 27 10.1 Insulin Table .......................................................................................................... 27 10.2 Medication ............................................................................................................ 28 10.3 Schedules .............................................................................................................. 30 10.4 Examinations ........................................................................................................ 31 10.5 Contact Schedule. ................................................................................................. 32 10.6 Medical History ..................................................................................................... 33 10.7 Medical Data ......................................................................................................... 35 11 Communication ............................................................................................................... 36 11.1 Sending a message. .............................................................................................. 36 11.2 Video Conferencing .............................................................................................. 38 Page 2 out of 38 Mentor User Manual hLine-online.com 1 Introduction Thank you for using the hLine-‐Online.com Portal for managing wellness data. This manual will lead you step by step through the whole portal. As a Mentor you have several functions the Mentee does not have. We will describe these functions only in this manual. For user functions please refer to the user manual. For any assistance please contact our support team under [email protected] 2 Legends In the following all the legends and icons used in the hLine-‐Online.com will be described. Legend/Icon Description Avatar This is the picture of you. You can upload your own picture or any picture you wish. Username This is the username you have chosen on the portal. Other persons will see this name (not your first and last name). S/N Serial number of a device IMEI IMEI is the serial number of mobile devices. DOT DOT is an icon that has 3 colors: Green, Orange and Red. It is used to indicate a status. The status can be different from the function. Daily Diary Blood Glucose Blood Pressure Weight Body Fat Body Water Bone Mass Body Muscle Page 3 out of 38 Mentor User Manual hLine-online.com Steps Setup Profile Medical History Page 4 out of 38 Medical Data Device Management Program Information Save Payment Return Forward Backwards Print Add Delete Insulin Examination Contacts Schedule Measurement Schedule Mentor User Manual hLine-online.com Graphic/Table Values from the last 7 days Values from the last 30 days Date Selection Video Chat Chat Alerts Setting Message Medicine Medicine Schedule Medicine Addition Carbons Input Status Status Good Status Normal Status Not Good Page 5 out of 38 Mentor User Manual hLine-online.com Status Unstable Status Stress Status Strong Hypo Status Light Hypo Status Tired Status Menstruation Status Sick Status Fiber Activity Fasting After Wake Up Before Breakfast After Breakfast Before Lunch After Lunch Before Dinner After Dinner Before Sleep Page 6 out of 38 Mentor User Manual hLine-online.com 3 Registration In order to register in the hLIne-‐Online.com portal there are several ways to do that. Page 7 out of 38 Mentor User Manual hLine-online.com 1-‐ Registration as manual user: A manual user can enter his values manually. First the username and email address need to be entered. Then the manual account needs to be clicked. The button “create account” should now be clicked. A message will appear that an email has been sent to the address you have entered. In this email the user will get two ways of logging in. Either the user logs in with the credentials that are in the email or the user can click the link, which will lead him directly to the portal. 2-‐ Registration with a device: If a user buys a device with wireless technology from smartLAB® he can register with the serial number of the device. One serial number can be used for just one registration. First the username and e-‐mail address need to be entered. Then the serial number of the device will be entered and the account with device will be selected. It does not matter which device the user chooses. The button “create account” should be clicked. A message will appear that an e-‐mail has been sent to the entered address. In this email the user will get two ways of logging in. Either the user logs in with the credentials that are in the email or the user can click the link, which will lead him directly to the portal. 3-‐ Registration of a Mentor for relatives or other: This registration as a Mentor enables the Mentor to create accounts for his Mentees. For the registration the Mentor only need the serial number of a device of a person who he wants to add as a Mentee. First the username and email address need to be entered. Then the serial number of the device of a Mentee will be entered and the Mentor account will be selected. It does not matter which device is chosen. The button “create account” will be clicked. A message will appear that an e-‐mail is been sent. In this e-‐mail the user will get 2 ways of logging in. Either the user logs in with the credentials that are in the email or the user can click the link, which will lead him directly to the portal. After the Mentor has logged in, he can add Mentees. 4-‐ License Key: For all registrations there will be a possibility to enter a license key. The license key means that the subscription has already been paid. Page 8 out of 38 Mentor User Manual hLine-online.com First the username and email address need to be entered. Then the license code will be entered and selected. The button “create account” will be clicked. A message will appear that an email has been sent. In this email the user will get two ways of logging in. Either the user logs in with the credentials that are in the email or the user can click the link, which will lead him directly to the portal. After registration there will be default values for the profile setting. In order to give the user the chance to see what possibilities he has, all functions should be enabled, as seen in the screen below. All except the insulin. Page 9 out of 38 Mentor User Manual hLine-online.com 4 Logging into the portal To log in to the portal you need to click on the Entry Screen the login button. Enter your username and Password. Then you will enter the welcome screen. In the welcome screen you will see all your Mentees that you support. Page 10 out of 38 Mentor User Manual hLine-online.com 5 Main Screen The Main Screen of hLine-‐online.com is separated into several areas. Some areas are fixed and cannot be scrolled. The content area can be scrolled. This is very effective when you want to navigate in the portal without always scrolling up and down. You will always have your Dashboard in front of you. 5.1 Top Screen In the Top Screen you can see your username, the avatar (profile picture) and the hLine-‐ Online.com Logo. This screen is always available. If you click on the avatar you will get to the welcome screen. 5.2 Main Menu The Main Menu is always available for you to navigate. With a click on the button you can call all functions of hLine-‐online.com. Page 11 out of 38 Mentor User Manual hLine-online.com 5.3 Information Bar Below the Main Menu you have a bar that always shows you in which function or page you are at the moment. This is also fixed and does not move when you scroll the screen. On the left part you have the information where you are. On the right part there will be some icons that you can click for more functions in that part of the portal. 5.4 Content Screen. This is the screen where you can see the content of the function that you have clicked on. This can be scrolled up and down. Please refer to the function for more information of the content. 5.5 Bottom Bar. To be able to navigate the content there is a fixed bar that you can use to select certain data that you require. Page 12 out of 38 Mentor User Manual hLine-online.com 6 Mentor main screen. The Mentor Main Screen shows you the list of Mentees that you support. The list is sorted in default for Mentees with an alert. You can search for a Mentee by typing his username, first name or last name, into the search field. The list will be filtered accordingly. So it is very easy to find a Mentee. You can sort the list as you wish by clicking the title on top of the list. You can select the Mentee and get into his information by clicking on the avatar. If the Mentee has an alert you can click the alert and you will be directly lead to that alert. When you return back to the main screen, the alert will be canceled. Please note: If there is more than one alert, the alert will stay until you have checked all the alerts. There are different types of alerts you can set in the setup. You can write a message to the Mentee by clicking the message icon on the same line of the Mentee. If you wish to write a message to more than one Mentee or all of them you can Page 13 out of 38 Mentor User Manual hLine-online.com click on the message icon to the right in the information bar. There you can select which Mentee you want to write a message or you can select them all. If you want to see the list of the Mentees again then just click on Mentor Main Screen in the top screen. If you want to add a new Mentee, click the “+” icon on the right side of the information bar. Before entering the information of a Mentee you should make several settings for your account (Chapter 7). 6.1 Add a new Mentee Adding a new Mentee is not creating a new Mentee. Adding means that a Mentee already has an account and you wish to add him to your contact list or the Mentee wishes that. First you search for the Mentee. You can select any parameter for the search. If you have the username of the Mentee add it under username and click search. You can also search Mentees by the city, first name and last name. The Mentee will receive a request from you. This request has to be accepted by the Mentee so he will be added to your contact list. With the acceptance of the Mentee he grants you the full right to see and manage his data. Page 14 out of 38 Mentor User Manual hLine-online.com 6.2 Create a new Mentee In Order to create a new Mentee you should put the information as seen in the screen. Please note that if the Mentee does not have an email account you can use yours instead. There are 2 parameters that you have to add to complete the creation of a Mentee. The first option is to use a serial number of a smartLAB® or hFon device. You can add this serial number and then you can add the Mentee. Please note that in doing this the Mentee will have only 3 months free of subscription. This has to be extended then in the setup of the Mentee. The second option is that you or the Mentee have purchased a complete package of devices and subscription. With this package you will have the license code for the subscription. The duration of the subscription with this license code is depending on which package was purchased. Please add the license code and click “add” to create the Mentee. You will directly enter the user account. Please create the user profile to have all data in it. This is very important to finish the procedure. After that the Mentee will be shown on your Mentee list. Page 15 out of 38 Mentor User Manual hLine-online.com 6.3 Messages As mentioned above you can write a message to each of your Mentees by clicking on the message icon in the same line of the Mentee. If you want to see all your messages you can click the message icon to the right in the information bar. You will here see all your messages. If you wish to write a message to more than one Mentee or all of them you can click on the “message plus” icon to the right in the information bar. There you can select which Mentee you want to write a message to or you can select them all. Page 16 out of 38 Mentor User Manual hLine-online.com 7 Setup To configure hLine-‐online.com to fit your needs there are some settings that have to be done. 7.1 Profile This is your own Profile. These information can only be seen by your Mentees. In the screens below you can see the profile with several fields. Some fields such as name and address are self-‐described. Page 17 out of 38 Mentor User Manual hLine-online.com 7.2 Device Management The hLine System is an “Open & Run” system. This means that the user does not have to setup the devices with the related gateways manually. The only thing, which needs to be done, is to register the devices under device management and all gateways and devices used will be set automatically. Date and time plus any user information such as height, gender, age, step length will be transferred automatically to the devices. For a Mentor account you can register the devices that you have in your office. You can measure a Mentee that is in your office. It is important that you select the Mentee first and make the measurement. Otherwise the data will not be saved there. 7.2.1 Adding a device or gateway. To add a device or gateway you have to select a device from the list. Then enter the S/N or IMEI number. Some devices are used by more than one person. The system will ask you to select the user for that device. This is very important to relate the data to the right user. Page 18 out of 38 Mentor User Manual hLine-online.com Press “add” to add the device to the list. If the S/N is already used by another user, it will not be accepted. You can enter a device with more than one user by selecting another user with the same S/N. Gateways can be added to several users. 7.2.2 Displaying Device Information The added devices will be shown in a list. The list contains the last time the device was connected to hLine-‐online.com. If the DOT is green the device is connected and in range of the gateways. If the DOT is orange the device has not sent data for a while or it is out of range. If the DOT is red the device has never connected to hLine-‐online.com. 7.2.3 Deleting a device. To delete a device click the “X” icon. You will be asked again if you really want to delete the device. Page 19 out of 38 Mentor User Manual hLine-online.com 7.3 Email/SMS Setup The Email/SMS setup is used if the Mentor wants to get any alert from a Mentee. The alert can be only sent to the system, to his Email address or/and as SMS to his mobile telephone number. 7.3.1 Measurement Mail Alert The Measurement Mail Alert is used to send an alert according to the selected option if a measurement has not been done according to the schedule. 7.3.2 Medication Mail Alert Medication Mail Alert is used to send an alert according to the selected option if a medicine was not taken according to the schedule. Please note that this function is recommended if the user himself has access to hLine-‐Online.com. If the user does not interact with the portal Page 20 out of 38 Mentor User Manual hLine-online.com and does not add the medicine all the time, alerts will be sent all the time and this could be annoying. 7.3.3 Limit Alerts Limit Alerts are used to send an alert according to the selected option if a measured value is above the maximum value or below the minimum value. You can select here if you want to send the alerts Limit Types are used to differentiate between maximum and minimum values. Some users want to be alerted when a measured value was below the minimum value. You can set up these types for Blood Glucose and Blood Pressure. 7.4 Information Here you can find the information about hLine-‐online.com and the revision of the software. 7.5 Medication setup The Mentor has the possibility to put in all the medication that he generally prescribes in a list. Later when the Mentor gives recommendations for a medicine to the Mentee he can choose from that list and there is no need to enter the medicine every time. There are two types of medicine that the Mentor can add. One is normal medicine and the other is insulin. Page 21 out of 38 Mentor User Manual hLine-online.com To add a new medicine, please enter the information required and select if it is insulin or not. If it is insulin please click on KH-‐Factor if you wish to have it in the insulin table. After saving you will see the medicine in a list. If you wish to give a doses as a template you can click edit/add and you will get to this screen for normal medicine This is a template that you can use for all Mentees. You can however change that for an individual Mentee. You can add the doses for different times of the day. And for the insulin you can add the recommended units according to the time or date and to the measurement the Mentee has. Page 22 out of 38 Mentor User Manual hLine-online.com 7.6 Lab Test Results There are several lab test results for blood and urine that are standard. If you wish to add new lab tests you can do that in the screen bellow. When you make the lab test for the Mentee you can also add the results to the examinations. Page 23 out of 38 Mentor User Manual hLine-online.com 8 Daily Diary The Daily Diary is an essential tool for each user to manage his day. All values in the system will be displayed here depending on the time. Measurements of Blood Glucose, Blood Pressure and Weight can be transferred from the devices or added manually. Steps can only be added through a device. For the Mentor it is important to have a good view on the status of the Mentee on daily bases. Page 24 out of 38 Mentor User Manual hLine-online.com If you click on a measured value you can add your comments to that measurement. You can also add more information about activities, status, medicine, nutrition input or insulin input. All these data will be related to the measurement you have clicked. It will have the same time stamp as the measurement itself. Page 25 out of 38 Mentor User Manual hLine-online.com 9 Vital Values Depending on the disease pattern of your Mentee following Vital Values can be measured and documented in the system: -‐ Blood Glucose Values -‐ Blood Pressure Values -‐ Body-‐Analyse-‐ Values such as Weight, Body Fat, Muscle Mass, Bone Mass and Hydration -‐ Steps These values are showen either as graphic or in table form. The last 20 measured values regardless of the date are shown. You can click the buttons in the bottom bar for the last 7 and 30 days or you can click the date range button to select the date range that you desire. When you go over a measurement with the mouse a small circle will show up in which you can see the value. If you click on the value you will enter a screen in which you can add more information and comments to this measurement. After you have added this information you will be lead to the Daily Diary of that day related to the clicked measurement. You can find more information, screenshots and instructions in the User Manual. Page 26 out of 38 Mentor User Manual hLine-online.com 10 Management Functions 10.1 Insulin Table The Mentor can add the values of units recommended to the Mentee. The insulin table is a reference for the user to see how much insulin units he should take according to the measurement he has. This table is a recommendation from a Mentor and cannot be edited by the user. To add new insulin you can select from the list. The values will be added automatically according to the template the Mentor has set in the setup. By clicking the save icon the values will be saved and shown again on the screen. To remove a line just click the box under “remove” and click the “save button”. Page 27 out of 38 Mentor User Manual hLine-online.com 10.2 Medication The Mentor will advise the Mentee which medicine he should take and what doses for which time of the day. The Mentee should follow this advice. This is not a prescription for the medicine. The Mentor can add a new medicine from his own list by clicking the “+” icon. The doses will be added automatically. This screen also shows the history of medicine for that Mentee. This will help the Mentor with his decisions. If the Mentor wants to change the doses of that medicine he can click on the last doses and he will enter a screen where he can change the doses and also the period this medicine should be taken. Page 28 out of 38 Mentor User Manual hLine-online.com Please add the starting date first. If you select the box “Set End”, then the end date will be taken into consideration. If you don’t select the box there will be no end date saved. The doses will be taken from the Template. You can change this for this Mentee. After that please click save. On the right part of the information bar you can see the schedule icon. When you click on this icon you can set up the schedule when the Mentee should take his medicine. The Mentee and the Mentor can setup the time when this medicine should be taken. The box on the left part will activate the alert function for the medicine schedule. This means if the Mentee did not confirm that he has taken the medicine in his Daily Diary then an alert will be sent according to the setting Email/SMS. It is recommended to use this function only if the Mentee is working interactively with the system through the Internet or app. Page 29 out of 38 Mentor User Manual hLine-online.com 10.3 Schedules This is the schedule when a measurement should be taken. The Mentor or Mentee can setup this schedule. If the alert is activated then an alert will be sent ( after maximum half an hour later) to the selected Email or Mobile Telephone Number if the measurement was not taken at the time when it was scheduled. To add a new time, just change the time and dates on that line. After saving a new blank line will be added for new entries. If you want to delete a time schedule, unclick all the days on that line and save. Then this line will be deleted. Page 30 out of 38 Mentor User Manual hLine-online.com 10.4 Examinations A Mentor can record all examination he has accomplished with the Mentee. The screen will show the history of the examination which has been accomplished. If the Mentor wants to set up a new examination he can click the “+” button and add a new examination from the screen. The Mentor does not have to add all examinations if they are not conducted. Only one can be added. After adding the examination will be shown on the screen, while the X shows in which period it was conducted. If the Mentor clicks on that X then he can see all the examinations done at that day. Page 31 out of 38 Mentor User Manual hLine-online.com 10.5 Contact Schedule. A Mentor can record the contacts he has done with the Mentee. These are not messages but a record of contact. The Mentor can also plan a contact in the future with the Mentee. If the Mentor selects a notification then he will be reminded of this contact. To add a contact the “+” button should be clickt. Page 32 out of 38 Mentor User Manual hLine-online.com 10.6 Medical History Medical History shows the history of the Mentee. The Mentor can see what medical history the Mentee has. The Mentor can add more medical information by clicking the “+” sign. Depending on the medical occasion it will be as a momentum or as period starting from the selected month. Page 33 out of 38 Mentor User Manual hLine-online.com The Mentor can choose the period during which the medical occasion happened and click the field. The following screen will appear to choose the month and write some notes. Page 34 out of 38 Mentor User Manual hLine-online.com 10.7 Medical Data Medical Data is a summary of the most important data of the Mentee. The information is gathered from all the data that has been transmitted or entered by the Mentor and Mentee. The selection is in months. On the top of the medical data there is a field for notes. Here the Mentor notes for that months that have been added by the Mentor will be shown. The Mentor can add more notes that will be related to that month. Page 35 out of 38 Mentor User Manual hLine-online.com 11 Communication The Mentor can send messages, chat or even video conference with the Mentee. 11.1 Sending a message. The Mentee can send a message to the Mentor. Click the message button and you will be able to see all the messages with the Mentor. If you click on subject or more then you can see the complete message. You can also reply to this message. If you want to add a new message with a different subject, you need to click the “+” button on the right side of the information bar. Page 36 out of 38 Mentor User Manual hLine-online.com Here you can see that the “To” field is already filled, since you can send to your Mentee only. Page 37 out of 38 Mentor User Manual hLine-online.com 11.2 Video Conferencing If you wish, you can also get into a videoconference with your mentor. He can get into a videoconference with you, too. If the video icon is colored it means that the mentor is online and you can send a videoconference request to him. The video conference screen will be opened and if the Mentor accepts the request, then he will appear on the right side of the screen. If the Mentor wants to get into a video conference with you, you will receive a request (please see graphic below). Page 38 out of 38