1
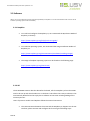
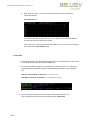
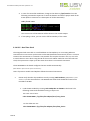
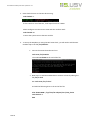
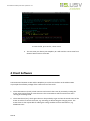
User Manual S.USV pi solutions Compatible with S.USV pi basic and S.USV pi advanced Revision 1.2 | Date 03.11.2015 User Manual S.USV pi solutions / Revision 1.2 Table of Contents 1 Functions ................................................................................................................................. 3 2 Technical Specification ........................................................................................................... 4 2.1 Overview........................................................................................................................... 5 2.2 Performance ..................................................................................................................... 6 2.3 Lighting Indicators ............................................................................................................ 6 3 Installation Guide ................................................................................................................... 7 3.1 Hardware ......................................................................................................................... 7 3.1.1 Commissioning S.USV ................................................................................................ 7 3.1.2 Connecting the battery ............................................................................................. 8 3.1.3 Connecting the external power supply ..................................................................... 8 3.1.4 Using the buttons ...................................................................................................... 9 3.1.5 GPIO – Port ................................................................................................................ 9 3.2 Software ......................................................................................................................... 10 3.2.1 Raspbian .................................................................................................................. 10 3.2.2 I2C ............................................................................................................................ 10 3.2.3 S.USV ....................................................................................................................... 13 3.2.4 RTC – Real Time Clock ............................................................................................. 14 4 Client Software ..................................................................................................................... 16 4.1 S.USV – Daemon ............................................................................................................ 17 4.1.1 Daemon Configuration ............................................................................................ 17 4.1.2 Daemon Controlling ................................................................................................ 19 4.2 S.USV – Client................................................................................................................. 19 4.2.1 Client Options .......................................................................................................... 19 Site 2 User Manual S.USV pi solutions / Revision 1.2 1 Functions The S.USV pi solutions is an advanced power supply additional module for Raspberry Pi, with the main focus on the uninterruptible power supply of the single-board computer. The module also provides additional functions in order to optimize the operation of the Raspberry Pi by the user. The S.USV pi solutions is a fully functional plug & play solution. The power supply occurs directly through the J8 connector on the Raspberry Pi and therefore uses a common voltage source, thus no additional cabling or power supply needed. In addition, the module is equipped with a LiPo battery. An integrated boost switching power converter covers the necessary voltage range, thereby the Raspberry Pi shut down safely in case of misconduct and prevent data loss. The “advanced” version also provides a power input for the extended voltage range of 7 – 24 volts (solar cells, automotive applications, etc.). Site 3 HAT compliant UPS Module Compatible with Pi 2 B, Pi A+, Pi B+ Adapter solution for Pi Model A and B Uninterruptible power supply Plug & Play (Power via Raspberry Pi) Monitoring – System Intelligent software solution including mobile application Built-in LiPo battery (300mAh) with intelligent charging function Battery Management Controller Battery Monitoring System Software simulated Real Time Clock with Battery Back-Up Time-controlled on and off switching of the Raspberry Pi Raspberry Pi Supply Switch (Power on and off buttons / File safe shutdown) LED – Status display Bootloader for Live – Firmware updates Power input with extended voltage range of 7-24 volts User Manual S.USV pi solutions / Revision 1.2 2 Technical Specification Site 4 User Manual S.USV pi solutions / Revision 1.2 2.1 Overview GPIO Connection Power Off Reboot Power On Battery Connection Extern Connection Lighting Indicators Site 5 User Manual S.USV pi solutions / Revision 1.2 2.2 Performance Battery Connection: Connector for connecting the supplied LiPo battery. Battery Connector: (Würth Elektronik 620 002 113 322) Extern Connection: Connector for connecting extended voltage range (7-24V). GPIO PORT: GPIO Connection to the Raspberry Pi. Power Off / Reboot: Press for reboot or hold at least 3 seconds for shutdown. Power On: Press for booting the Raspberry Pi. Lighting Indicators: LED status indicator for the S.USV / Raspberry Pi. 2.3 Lighting Indicators LED Indication PSU GREEN (Blinking) Startup - initialization of the S.USV firmware PSU GREEN RPi Power Supply Unit is online (Voltage present) PSU RED RPi Power Supply Unit is offline (Voltage loss) – Battery Powering is online BAT YELLOW Charging Circuit Online – Battery is charging BAT GREEN Charging Circuit Online – Battery is fully charged BAT RED Charging Circuit Offline – Battery is missing or corrupt BAT RED (Blinking) Charging Circuit Offline – Remaining battery capacity in the critical area Site 6 User Manual S.USV pi solutions / Revision 1.2 3 Installation Guide 3.1 Hardware In initial operation we recommend to fully charge the supplied battery to ensure full functionality. Furthermore, we recommend a PSU with at least 2 amps to operate the Raspberry Pi. In the following steps the commissioning of the S.USV will be described again in detail: 3.1.1 Commissioning S.USV Site 7 The primary power supply of the S.USV occurs via the GPIO port - Pin 2 (+5V) of the Raspberry Pi. Please now connect the board as shown on the RPi to establish the necessary connection and secure it with the included mounting kit. User Manual S.USV pi solutions / Revision 1.2 3.1.2 Connecting the battery For initial operation please make sure that the included LiPo-battery is plugged into the provided JST connector on the front side of the board. 3.1.3 Connecting the external power supply Site 8 For usage of the wide-range input the shown terminal block is located on the front side of the board. Please note here the +/- marking on the board in order to avoid a short circuit. User Manual S.USV pi solutions / Revision 1.2 3.1.4 Using the buttons For Power on, Power off and restart of the Raspberry Pi, the following buttons are available: - S1 : Power Off / Reboot - S2 : Power On Both buttons have corresponding vias, thus they can be performed at any point of a housing. S2 S1 3.1.5 GPIO – Port Site 9 For the power supply and data transmission of the S.USV following GPIO - Pins in use: - Pin #02: DC Power +5V – Power supply - Pin #03: GPIO 02 (SDA1, I²C) – I²C data line - Pin #05: GPIO 03 (SCL1, I²C) – I²C clock line - Pin #13: GPIO 27 (GPIO_GEN2) – Monitoring S.USV - Pin #27: ID_SD (I²C ID EEPROM) – ID data line - Pin #28: ID_SC (I²C ID EEPROM) – ID clock line User Manual S.USV pi solutions / Revision 1.2 3.2 Software (Note: The current software has been optimized specifically for Raspbian. In the next few weeks further versions for all common operating systems will be available.) 3.2.1 Raspbian To install and configure the Raspberry Pi, we recommend the Quick Start Guide of Raspberry Pi directly: https://www.raspberrypi.org/help/quick-start-guide/ To install the operating system, we recommend the Image Installation Guides of Raspberry Pi: https://www.raspberrypi.org/documentation/installation/installing-images/ The Image of Raspbian operating system can be found on the following page: https://www.raspberrypi.org/downloads/ 3.2.2 I2C The ID EEPROM contains data that identifies the board, tells the Raspberry Pi how the GPIOs need to be set up and what hardware is on the board. This allows the S.USV pi solutions to be automatically identified and set up by the Pi software at boot time including loading all the necessary drivers. Users of previous models A and B please follow the manual instructions: Site 10 The communication between the S.USV and the Raspberry Pi happens via the I2C interface, please activate and configure this first using the following steps: User Manual S.USV pi solutions / Revision 1.2 1. First you have to install the relevant I2C-Tools to be able to see which devices are connected to your Raspberry Pi. To do this, you have to enter the following commands in the Terminal to install the i2c-tools utility: sudo apt-get install python-smbus sudo ap-get install i2c-tools 2. Next you will need to open LXTerminal or console or SSH and enter the following command: sudo nano /etc/modules and add these two lines to the end of the file i2c-bcm2708 i2c-dev Then save the file with Control-X Y <return> 3. Depending on your Distribution, you may also have a file called /etc/modprobe.d/raspi-blacklist.conf If you do not have this file, then there is nothing to do, however, if you have this file, you have to edit and comment out the lines below by putting a # in front of them: blacklist spi-bcm2708 blacklist i2c-bcm2708 Site 11 User Manual S.USV pi solutions / Revision 1.2 Open an Editor on the file by typing: sudo nano /etc/modprobe.d/raspi-blacklist.conf then edit the file as described above and then save and exit the file using Control-X Y <return> 4. If you are running a recent Raspberry Pi (3.18 kernel or higher) you will also need to update the /boot/config.txt file. Edit it with sudo nano /boot/config.txt and add the following lines to the bottom of the file: dtparam=i2c1=on dtparam=i2c_arm=on 5. Once, the steps above are done, reboot the system by using the command sudo reboot Site 12 User Manual S.USV pi solutions / Revision 1.2 6. Now, when you log in, you can use the following command to see all the connected devices: sudo i2cdetect -y 1 This shows, that two I2C-Adresses are in use – 0x0F for the S.USV and 0x68 for the Real Time Clock located on the S.USV. Note, that if you are using one of the first Raspberry Pis, you will have to change the command to sudo i2cdetect -y 0 3.2.3 S.USV 1. Please download the provided debian package from our download section and save it to any local memory address on your Raspberry Pi. 2. To install the Debian package on your Raspberry Pi switch to directory in which the debian package is located and perform the following commands in the command line. sudo tar -xvzf susvd-en-x.x-all.tar.gz ( to unzip the tar file ) sudo dpkg -i susvd-en-x.x-all.deb ( to install the debian package ) 3. The S.USV Client and Daemon are now fully installed and ready for use. (The installed files are located in the following path: /opt/susvd) Site 13 User Manual S.USV pi solutions / Revision 1.2 4. In case of a successful installation, change to the directory /opt/susvd and run the following command as superuser to start the daemon and ensure proper work of the S.USV (Refer to section 4 for a description of all the commands): sudo ./susvd –start The correct start of the Daemon will be shown in the console output. 5. If everything is done, you can use the full functionality of the S.USV. 3.2.4 RTC – Real Time Clock The integrated real-time clock is a useful addition to the Raspberry Pi. For existing Ethernet connection the current time synchronizes via the NTP (Network Time Protocol) service. In various scenarios the connection to a network is not possible. This may be the case in the car, at a solar or wind turbine or even when using the RPi in the control cabinet. With the use of the real time clock, the system time is kept up to date even when there is no network connection. The ID EEPROM on the board configures the RTC module automatically. (Note: Refer to point 2 to set up the current time.) Users of previous models A and B please follow the manual instructions: Please verify that the chip module is seen by running sudo i2cdetect -y 1 (i2cdetect -y 0 for old Rev. 1 Pi) at the command line. The DS1307 Real Time Clock should be located at the I2C address ID #68. 1. Load the RTC module by running sudo modprobe rtc-ds1307 in the kernel. The following commands should be running as super user. For a Rev. 2 Pi or later: echo ds1307 0x68 > /sys/class/i2c-adapter/i2c-1/new_device For the older Rev.1 Pi: echo ds1307 0x68 > /sys/class/i2c-adapter/i2c-0/new_device Site 14 User Manual S.USV pi solutions / Revision 1.2 2. Now check the time on the RTC device using: sudo hwclock –r If this is the first use of the RTC, it will report back Jan 1 2000. Please configure now the current time and then conform with: sudo hwclock -w to write the system time to the RTC module. 3. To set up the Raspberry Pi using the Real Time Clock, you will need to add the RTC module chip to the file /etc/modules. Go into the terminal window and run: sudo nano /etc/modules Then add rtc-ds1307 at the end of the file. Next step is to add the DS1307 device creation at boot by editing the file /etc/rc.local Run sudo nano /etc/rc.local and add the following lines to the end of the file: echo ds1307 0x68 > /sys/class/i2c-adapter/i2c-1/new_device sudo hwclock -s date Site 15 User Manual S.USV pi solutions / Revision 1.2 To save the file, press Ctrl+X, Y then return. 4. The next time you reboot your Raspberry Pi it will read the current time from the Real Time Clock on the S.USV. 4 Client Software Communication between S.USV and the Raspberry Pi via the I2C interface at the address 0x0F. In principle the software package of the S.USV consist of two tools: 1. The S.USV Daemon (susvd), which monitors and controls the S.USV by constantly reading the S.USV status and reacting on several events. The S.USV Daemon will be started once and is running in the background. 2. The S.USV Client (susv), which gives the user the possibility to get and see the actual status of the S.USV as well as to control the S.USV, e.g. activating or deactivating the charging circuit. The S.USV-Client is also responsible for editing the config-variables of the S.USV Daemon, eg. Shutdown timer. Site 16 User Manual S.USV pi solutions / Revision 1.2 4.1 S.USV – Daemon The S.USV daemon is responsible for monitoring and controlling the S.USV in conjunction with the Raspberry Pi. The S.USV daemon creates a log in the file: /var/log/susvd.log The following sections will be shown the individual options. 4.1.1 Daemon Configuration To configure the S.USV Daemon change to the directory /opt/susvd and execute the following commands as superuser: sudo ./susv -timer <time in seconds> (Default Wert = 10) This value indicates how long the system continues to run before the filesafe shutdown will be initiated by the S.USV after the voltage supply is switched to battery. Values “>=0” are possible. This function can be disabled by the value “-1”. In this case, the Raspberry Pi remains running, until the Battery Capacity reaches 10%. From that point on, the S.USV will automatically perform a filesafe shutdown in order to prevent the battery from getting damaged. Site 17 User Manual S.USV pi solutions / Revision 1.2 sudo ./susv -auto <0/1> (Default Wert = 1) This value determines the starting behavior of the S.USV Daemon. The value "1" activates the autostart, the value "0" disables the autostart. If the autostart is disabled, please notice that you have to start the S.USV-Daemon manually in order for the S.USV to work correctly. sudo ./susv -sleep <time in seconds> (Default Wert = 1) This value determines the repetition in which the S.USV Daemon monitors and controls the voltage output of the S.USV. Values “>=0” are possible. Site 18 User Manual S.USV pi solutions / Revision 1.2 4.1.2 Daemon Controlling To control the S.USV Daemon change to the directory /opt/susvd and execute the following commands as superuser: sudo ./susvd -start Starts the S.USV Daemon Service and its configuration. sudo ./susvd -stop Stops the S.USV Daemon Service. sudo ./susvd -restart Restarts the S.USV Daemon Service. 4.2 S.USV – Client The S.USV Client allows the user state monitoring and function control of the S.USV. The following sections will be shown the individual options. 4.2.1 Client Options To control the S.USV Client change to the directory /opt/susvd and execute the following commands: ./susv -help This command shows all possible options. Site 19 User Manual S.USV pi solutions / Revision 1.2 ./susv -chrgon Switch charging circuit on. Allows the manual switching of the battery’s charging circuit. (Note: The configuration of the charging circuit is stored in EEPROM and reloaded at system startup.) ./susv -chrgoff Switch charging circuit off. Allows the manual shutdown of the battery’s charging circuit. (Note: The configuration of the charging circuit is stored in EEPROM and reloaded at system startup.) Site 20 User Manual S.USV pi solutions / Revision 1.2 ./susv -vin Read input voltage. With this command it is possible to check the current input voltage. ./susv -pwrext Read the external power consumption. With supply via the external voltage input, the current external power consumption can be checked by this command. Site 21 User Manual S.USV pi solutions / Revision 1.2 ./susv -pwrbat Read the battery power consumption. With supply via battery, the current battery power consumption can be checked by this command. ./susv -capbat Read battery capacity. This command allows to read the current battery voltage and the remaining battery capacity. (Note: A remaining capacity of <25% is indicated by the LED BATRD. At a remaining capacity of <10% the Raspberry Pi will automatically shut down.) Site 22 User Manual S.USV pi solutions / Revision 1.2 sudo ./susv -chrgpwr <300/500/1000> (Please use this command as superuser) Change the charge current for the battery. Use this command to change the active charge current for the battery. In order to minimize the charging time following current strengths are available. 300mA 500mA 1000mA (Note: The configured charging current is stored in EEPROM and reloaded at startup.) ./susv -flash <path to HEX file> Upgrade the firmware. Use this command to upgrade the actual firmware. Site 23 User Manual S.USV pi solutions / Revision 1.2 sudo ./susv -chgadd <0x..> (Default Adresse = 0x0f) (Please use this command as superuser) Change the I2C address of the S.USV. To avoid potential compatibility issues, use this command to change the I2C address of the S.USV. Verify the address by typing i2cdetect -y 1 in the terminal. (Note: The configured I2C address is stored in EEPROM and reloaded at startup.) Site 24 User Manual S.USV pi solutions / Revision 1.2 ./susv -status Read S.USV status. This command allows to read the S.USV status. Here of all available modes are indicated as well as the current powering source and its power consumption. Site 25 User Manual S.USV pi solutions / Revision 1.2 Site 26