1
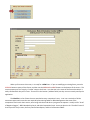
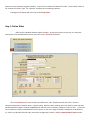
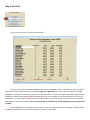
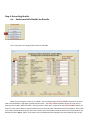
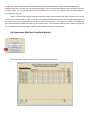
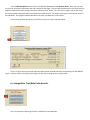
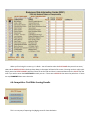
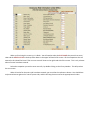
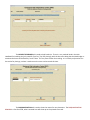
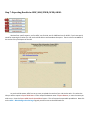
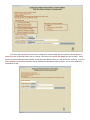
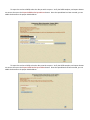
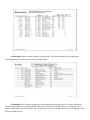
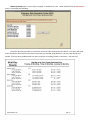
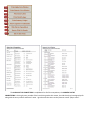
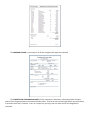
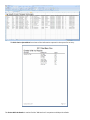
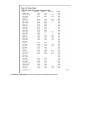
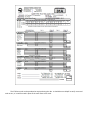
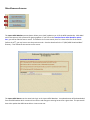
Endurance Ride Information Center(ERIC)
When I started to manage the Big South Fork Endurance Ride, the previous managers (Karen and Tommy Isaacs)
handed me a spreadsheet, which contained all the people who had attended the ride over the last several years. They
also were kind enough to give me a spreadsheet with the budget / actual expenses for the last few years. As far as I
know, they did not have anything “automated” which could be used to actually track the entries of the ride and produce
a usable set of results. I went to AERC and downloaded the EasyCare application, and tried to go through it, but I found
it a little awkward to use. No problem, I’ll just tweak it a little. Nothing doing, it was written in FoxPro (I think) and
other than identifying the database elements, I could not make any headway. I ask about having the changes made,
“Sure, but you will have to pay for them”. I, having worked with databases, as a developer, data modeler and system
designer for most of my IT career, should $PAY$ someone to make a simple change to a database program? Never!
Bottom line, I thought this would be a fun way to spend a few afternoons. HA!!!
This is the fourth FIFTH S I X T H (I quit counting!) year of my little project, and it is still not done. Now
admittedly, I will only pick it up as time gets near for the BSF ride, and do a little tweak here and a little tweak there,
working with a database application (M$Access) that I know nothing about, and then as soon as my results are filed with
the sanctioning bodies, set the application away, until next year. So headway has been slow, and usually because of a
major problem with the existing system. I still have a ways to go. I have been working with Mike Maul and Russ at AERC
to make it easier for RM’s to obtain and maintain an accurate set of current AERC members and horses. This has now
been accomplished. AERC publishes an update of the AERC Membership / Horses monthly, and this application uses it
to update the internal database.
Now, for how the system works. I learned very early in my IT career that the best place to find and correct
mistakes is when they are initially made. So, this system attempts to use a current list of AERC Members and AERC
Horses. If you are creating an entry and you enter the rider’s AERC number THAT is the time to find out if they are
current with their dues, and that the number matches the name. *NOT* when the ride is complete, everyone has gone
home, and you are up at mid-night trying to enter the ride results into AERC. The same goes for the horse. The second
area that I have had many problems with is tracking the adding and scratching on riders and horses. All that paper and
confusion needed to be simplified and organized. The last area that needed to be conquered was the reporting of
results and awards. Usually by the third day of the BSF ride, I am way too tired to read hand writing, so nice, big type
was a must!
What you are receiving is a modified copy of the application – I am calling it Version 1, of what I use for the rides
that I have managed. It has also been used for The AHA and AERC National Championship events. I have made many
changes based on what I knew I wanted the system to do so that I might have at least something polished enough for
others to try. Please look this over, “Kick the tires” and make suggestions. Let me know if you find problems -- just
laugh quietly. Over the next few pages I will try to go screen by screen and explain what each panel, does and what is
expected. When you click on the ERIC ICON you should get the following screen:
This is known as the Main Menu screen. Every basic task of the program starts here. Each time you start the
application, you will need to select the appropriate Event Name that you wish to work with. Starting in the Setup / One
Time Processes column the user will set up the basis for the Event, and then the information needed to manage each
Ride within the Event. The column titled Process Entries is used to manage the entries and record the results of the
Rides. The Reports column contains a collection of reports that will assist with timers, results, and some of the financial
items. When the Event is complete, the user will return to the Setup / One Time Processes column and create and send
the Results to the sanctioning organizations.
Pressing the EXIT button will exit you from the application.
Below are the individual steps needed to setup and process a ride. Just a note, any item whose label is RED
should be considered “mandatory” and an item whose label is BLACK is “probably” optional information.
Step 1: Describe the Event
Events are the term we use to describe the overall “ride”. Rides are defined as a “Day – Distance”. For example,
the Event is the Big South Fork Pioneer Endurance Ride. It consists of a Thursday 30 Mile Ride, a Thursday 50 Mile Ride,
a Friday 30 Mile Ride --- you get the point. Some Events will only have one ride, but others, will have many rides. Either
way you need to define an Event first then the Ride(s) that make up that Event. From the Main Menu Screen, press the
Create / Modify Events button.
When you first enter this screen, in is ready for a NEW Event. If you are modifying an existing Event, press the
REFRESH button to query all the Events, and then use the PREVIOUS or NEXT buttons on the bottom of the screen. The
most important part is to supply a “unique” name to the Event. I use the Year in the name of the Event otherwise it is
easily confused with last year’s Event. You can fill in the location / address fields, but they are not currently used by the
application.
The Checklist is a list of items that are attached to every competitor’s entry. I use it as a reminder of all the
extraneous paper work items that are required by Sanctioning bodies or Ride Management that some of the
competitors send in with their entries, some bring with them and others just ignore the request. I usually ask for “Proof
of Negative Coggins”, AERC Membership Cards, and AHA Competition Cards. Items you place in the “Checklist” box will
show up on the entry screen, the Entry Confirmation Report, and the Confirmation eMAIL.
Starting with Version 1.7.0, when you press the DELETE button, the process will delete not only the Event record,
but all records (Results, Entries, Competitors, etc.) associated with the Event. Now you can get rid of your test Events and
the Events that come with the application.
You only have to come to this screen once. After you have defined the Event, you will select that Event when
you enter the application on the Main Menu screen.
Pressing the EXIT button will return you to the MAIN MENU.
Step 2: Define Fees
Fees are anything that you wish to track that have a monetary value. From the Main Menu Screen, press the
Create / Modify Fees button.
The Create / Modify Fees screen is just a list of all the possible fees that might be charged. I include a fee for all the Ride
mileages, both SR and JR Divisions. The “Day Member Fee”, a separate fee for each day’s meal (helps give me a count).
Discounts can be entered as negative numbers. I also have a fee called “Fee Waived” for 0.00. I use this when I waive a
fee, it keeps the “books” right. The “optional” checkbox has no meaning at present.
Pressing the EXIT button will return you to the MAIN MENU.
Step 3: Define Rides
Rides are the individual distances ridden each day. An Event may have only one ride, or it may have
several rides. From the Main Menu Screen, press the Create / Modify Rides button.
The Create Modify Rides screen is where you define each “ride” (Day distance) of your event. Here the
important information is the Ride Name – make it simple. Ride Start Date and Ride Start Time (used in result ride time
and BC calculations), date is entered as MM/DD/YYYY and start time is entered in “Military or 24 hour time”. Total Hold
Time In Minutes is used to calculate Ride Time for reports. If you use a range of numbers to designate a ride distance
(i.e. 1-99 is LD, 100-199 is 50 mile rides), then enter the beginning number in ENTRY NUMBER RANGE FROM and the
ending number in THROUGH. If you use a number “prefix” to designate a ride distance (i.e. “L” for LD and blank for 50)
then enter the prefix in the ENTRY NUMBER PREFIX. These are independent so you can use both. If you do not wish
for the system to create numbers for you, enter a “0” in both fields. You always have the option to change the number
generated on the entry screen.
For the RIDE FEES, you can enter as many as you wish, but you should at least enter one SR, one JR and one
Non-Member fee (even if they are the same fee amount). When you create an entry for this ride, the program tries to
add the correct entry fees on the Entry Form. If a fee does not have a JR, SR or Day Member indication, then the fee will
be applied to all entries. Notice the Fee End Date. It will at some point in the future be used to set a “discount” up to a
certain date, and then start a different charge. Only enter the fees you wish to have added when the entry is created.
Fees such as meals and camping can be added on the Competitors Fees / Payments screen.
Parent Ride is a new concept. If for instance you are holding an AERC 50-mile Open Ride and an FEI ride
simultaneously, then the AERC ride is the Parent Ride. You will still need to enter the individuals in both rides on the
entry screen, but when you record the results of the Open AERC Ride, the application will give you the chance to
“Replicate Results”. This process will take the Results from the Parent Ride, and replicate them to the entries in the
“Children” Rides, making the placing adjustments as required. I added this feature after observing an AERC NC, when I
realized that there were actually five of six rides going on, but they only needed the results of one ride actually recorded,
and the other ride results could be derived from them!
Pressing the EXIT button will return you to the MAIN MENU.
Step 4: The Entry
The Entries screen is divided into five (5) tabs or sub-steps. The first tab describes the Competitor (or rider).
(NOTE: I find it much easier to use the CHECK IN screen as the method to enter new competitors and to locate existing
entries).
If your entry gives you an AERC Number, then enter that number in the AERC Number field. When you tab out
of that field, the members name, and other information including AERC Expiration Date should all fill in. If it doesn’t,
and you believe them to be an AERC member, simply double click in the AERC Number box and a screen will appear that
will allow you to add them to the AERC Members table or perform a search for a correct ID. If the entry is not an AERC
member, then skip the AERC Number field and simply enter the information for the competitor (Remember to put in the
full address because the AERC office needs it later). When you have completed filling in the information on the
Competitors tab, select the Entries tab.
NOTE: If the data in the application is old or the member has not renewed, then the AERC EXPIRATION DATE will show
in RED and the day member fee will be attached to the entry fees. You can either correct the AERC information (as
described above) or you can simply change the AERC EXPIRATION DATE on this screen – it will change it FOR THIS EVENT
ONLY –
The three FIND boxes in the bottom of the screen are to locate an already entered competitor that you need to
make changes to. The NEW button will give you a blank record to start a new entry on. The DELETE button will delete a
competitor and all their information, unless the competitor has had results entered for them.
When you have completed the competitor information, then select the ENTRIES tab.
Pressing the EXIT button will return you to the MAIN MENU.
Select the Ride Name from the drop down, tab to the AERC Horse Number, same as AERC Member, if not in list
then Double click and add, if the horse has no AERC number, then just skip it. If this is an AERC horse, then the horse
name, breed and registration number will fill in (if available the member has added it to the AERC horse data base).
After a Horse Name has been entered, an entry number will appear. If the horse has already been assigned a number
(spouse riding the same horse already entered) then that number will appear. If not then the next number in sequence
will appear. If you do not like this number you can overtype the number. You can specify ranges and prefixes in the
Create/Modify Rides screen. When you tab out of the row, then the program will add “fees” based on what you set up
in the Ride Fees screen. If the rider is entering more than one ride, just add a second line/row in the entry box. The
SCRATCH button will remove an entry for a ride. It will also remove any fees that were “automatically” added when the
ride was originally entered. There is a “pop-up” screen which reminds you to double check the entry fees screen if you
scratch an entry.
The three FIND boxes in the bottom of the screen are to locate an already entered competitor that you need to
make changes to. The NEW button will give you a blank record to start a new entry on. The DELETE button will delete a
competitor and all their information, unless the competitor has had results entered for them.
When you have completed the entry information, then select the FEES/PAYMENTS tab.
Pressing the EXIT button will return you to the MAIN MENU.
Check it for accuracy and either add or delete fees as needed, notice the TOTAL in the upper right hand corner.
If you have additional fees to add to this competitor (camping or extra meals for example), select the fee from the FEES
box and press the ADD FEE button, and if you wish to remove a fee, highlight the row and press the DELETE FEE button.
Now switch to the PAYMENTS box. Enter the AMOUNT PAID and the check number or the word CASH if they paid in
cash in the CHECK / PAYMENT INFORMATION field. I usually write the “Entry numbers” on the checks as a further cross
reference, and copy all the checks prior to deposit. Note the TOTAL PAID and BALANCE DUE boxes. If the competitor
pays with multiple payments, then just make multiple entries in the payments box. I also try to make notes when
multiple competitors pay with a single check. I use the correct amount in the amount paid, but put the real check
amount along with the check number and the names of the other competitors in the CHECK / PAYMENT INFORMATION
box. (NOTE: Sometimes the “Total” fields do not recalculate in a timely manner. When this happens, change (retype)
something on one of the Payments and the recalculationshould occur.)
Lastly, when I write “Refund” checks, I put them in here as a negative Amount.
The three FIND boxes in the bottom of the screen are to locate an already entered competitor that you need to
make changes to. The NEW button will give you a blank record to start a new entry on. The DELETE button will delete a
competitor and all their information, unless the competitor has had results entered for them.
When you have completed the fees and payment information, then select the CHECKLIST tab.
Pressing the EXIT button will return you to the MAIN MENU.
Check the ones they have, and delete any that might not be applicable. The items that do not have a check
mark, show up on the confirmation eMAIL and all of them show up on the printed confirmation report.
The three FIND boxes in the bottom of the screen are to locate an already entered competitor that you need to
make changes to. The NEW button will give you a blank record to start a new entry on. The DELETE button will delete a
competitor and all their information, unless the competitor has had results entered for them.
When you have completed the checklist information, then select the NOTES / COMMENTS tab.
Pressing the EXIT button will return you to the MAIN MENU.
This is a screen where you can write any notes or comments that you wish to track on this person. I have used it
for notes about entry changes (helpful later when trying to sort out a messy entry), and reasons for no-shows, and JR’s
looking for sponsors. The information entered here only displays on the two entry confirmations.
You have now successfully created an entry. You have a couple of optional things you can do. You can print the
“Entry Confirmation” sheet after each entry is entered, or mass print them at a later time. The Entry Confirmation
contains all the information from the previous five tabs. I put one in the competitor’s packet so they can double check
their information somewhere besides standing in line. I also re-print them when changes are made, during the ride.
You can also now (assuming that you have M$Outlook or M$OutlookExpress loaded on your computer – this
may work with other eMAIL packages as well, I just have no way of trying – ) you can press the CONFIRMATION eMAIL
button. This will create a simple eMAIL version of the Entry Confirmation page and give you the option of sending the
eMAIL out as is, or modifying it with a personal note.
The three FIND boxes in the bottom of the screen are to locate an already entered competitor that you
need to make changes to. The NEW button will give you a blank record to start a new entry on. The DELETE button will
delete a competitor and all their information, unless the competitor has had results entered for them.
Pressing the EXIT button will return you to the MAIN MENU.
Step 5: Check In
At the ride, the process of “picking up their packet”.
This screen lists all the competitors alphabetically. When a competitor checks in, find them on the list, by either
using the PREVIOUS / NEXT buttons, or pressing the Page Up / Page Down keys. If there are no changes to be made,
highlight the competitors name and simply press the CHECK IN button. If there are changes to be made Double Click the
competitor’s name and the ENTRY SCREEN (described above) for the competitor will come up and you can then make
the changes. In this case when you EXIT the ENTRY SCREEN it will return to this screen. The only place the Checked In
data appears is on the Timers Sheets. This screen also makes an excellent way to find competitors when changes need
to made!
I have added a button at the bottom of this screen, so you can now easily add new competitors. When pressed
the NEW COMPETITOR button opens the Competitors screen in “new” mode.
Step 6: Recording Results
6a: Endurance Ride Finish Line Results
This is the process of recording Finish Times for the Rides.
When you first bring this screen up, it is blank. You will need to select the RIDE NAME that you wish to enter /
view in the drop down in the upper right hand of the screen. The SORT ORDER dropdown causes the rows you are
entering to be sorted in different orders. Entering results is really quick. Simply enter the ENTRY NUMBER, which will
then fill out the rider and horse’s name and then enter the time the rider crossed the finish line (in Military Time). Ride
time is then calculated based on the ride’s start time and the total number of hold minutes that you entered when you
defined the ride in Step 2. (NOTE: IF the start rime or the hold times have changed since you created the ride, just go
change them. RIDE TIME is always CALCULATED based on the current values in the Ride.) Select the appropriate
COMPLETION CODE. To break ties, just change the seconds. They are used to calculate the results placings, but are not
tracked by AERC. You can press the CALCULATE PLACINGS button at any time, the placings will be calculated based on
the information entered.
If this is a “Parent Ride” and you have entered all the results, press the REPLICATE RESULTS button to create the
results for any “Children Rides” of this Parent. Once you have replicated a set of results, you can make changes to any of
the results, and it will only change the result that you made the correction to. This allows you to have a tie in AERC, then
go change the Results for AHA to break the tie in the AHA results. If by chance you need to make a massive change, then
you can delete all the Children Results, modify the Parent Results and then replicate again.
6b: Endurance Ride Best Condition Results
This is the process allows for a quick entry of BC results with no Math!!!
In the C:\ERIC\Templates directory there is a M$Excel Spreadsheet titled BC Score Sheet. Have your vet write
his scores on that sheet, and also put the rider’s weight on the sheet. This form will automatically list the riders who are
eligible to stand for BC (after placings have been created for 1-10th place). Fill in the rider’s weight, and the Vet scores,
the time is already calculated based on the Results that were entered. The weight results get re-calculated as you fill in
the individuals. If an eligible individual decides not to stand, just leave their record alone.
If you want to preview the entirety of the BC score you can use the selection below.
There is a report that you can print when the data has been entered that looks almost exactly like the AERC BC
report. It will list the BC scores from low to high, with the winner being the last record printed.
6c: Competitive Trail Ride Pulse Results
This is an easy way of capturing the pulse card data for later tabulation.
When you first bring this screen up, it is blank. You will need to select the RIDE NAME that you wish to enter /
view and the OBSERVATION in the drop down boxes in the upper left hand of the screen. Entering results is really quick.
Simply enter the ENTRY NUMBER, which will then fill out the rider and horse’s name and then enter the PULSE from the
card. If you wish to enter the PULSE TAKER’s initials you can. If there was a RECHECK then enter the pulse here. If there
are any COMMENTS then enter them also.
6d: Competitive Trail Ride Scoring Results
This is an easy way of capturing the judging scores for later tabulation.
When you first bring this screen up, it is blank. You will need to select the RIDE NAME that you wish to enter /
view and the OBSERVATION in the drop down boxes in the upper left hand of the screen. All the competitors who are
entered in this ride will be listed. Their current score will show on the right hand side of the screen. This is only relevant
when all scores have been entered.
Select the competitor you wish to enter score for, by double-clicking on their Entry Number. This will produce
the next screen.
When all results for the entire ride have been entered; you can utilize the replicate re button. You should have
only entered scores against the “overall” parent ride, and this will copy those scores to the appropriate sub-rides.
The first time you select a Competitor and Observation combination, you will get a pop-up screen that
states “Score card observation has been built” prior to seeing this screen. This is to let you know that it has set up a
default score for all the entries for this person and this observation. If the score card reads all Zeros, then you can
return to the next person. There are tabs across the top of the screen for each section of the score card, except for the
last two, they function identically. The CATEGORY is already entered, all you have to do is enter the SCORE if you wish
to enter the JUDGE’s initials then you can, and if there is a COMMENT you should enter it also. Enter all scores as
positive numbers; the program does the correct math. The last two tabs are for special situations:
The JUDGES TIE BREAKER tab is used to help break ties. There is a very method listed in the AHA
Handbook for breaking ties (only need for Top Five / Top Ten placings), with the last resort being that the Head Judge reexamines the horses and effectively “ranks” them. This is a place to enter that ranking. It is currently only used to sort
the results for placings, as there is nowhere on the score card to record this item.
The DISQUALIFICATION tab is used to show the reason for non-placement. The DISQUALIFICATION
REASON is a free form field, what is entered here will show up on the printed score card.
Step 7: Exporting Results to AERC/AHA/PNER/OCER/eMAIL
We have four specific exports, one for AERC, one for AHA, one for PNER and one for OCER. If you have special
needs for reporting the results of a ride, we should be able to accommodate the export. There is also a mass eMAIL of
the results to the participants of the ride.
As you should be aware, AERC has set up a way to upload the results of your ride via the web. First select the
ride you wish to export in Export Ride Name. Either accept the dataset name in Export Dataset, or enter the name you
wish to use. Press the Export AERC Results Spreadsheet button. This will create the exportable spreadsheet. Now click
on the AERC – Ride Managers Results Page tag and you will be sent to the AERC web site.
First select the AHA RIDE TYPE and if this is a Regional or National AHA ride, then select the AHA Regional or
National Division of AHA ride results you are creating. Next select the EXPORT RIDE NAME you wish to export. Verify
that the correct template has been selected. Accept the export dataset name, or create one of your choosing. Press the
Export AHA Results Spreadsheet button, and the AHA Results spreadsheet will be created. You can then eMAIL that
spreadsheet to AHA.
To export the results to PNER, select the ride you wish to export. Verify the PNER template, and export dataset
are correct then press the Export PNER Results Spreadsheet button. Once the spreadsheet has been created, you can
eMAIL the dataset to the proper eMAIL address.
To export the results to OCER, select the ride you wish to export. Verify the OCER template, and export dataset
are correct then press the Export OCER Results Spreadsheet button. Once the spreadsheet has been created, you can
eMAIL the dataset to the proper eMAIL address.
You can eMAIL the results of a ride to RideCamp, the AERCMembersForum, or to the competitors who
participated in the ride. First select the ride you wish to eMAIL. Then select one or more of the destinations. If you
select the Riders, we create an eMAIL for ten riders at a time (this gets the eMAIL past most SPAM filters) and
automatically sends them. If you select RideCamp and / or AERCMembersForum, the eMAIL is put in “edit” mode so you
can add to the eMAIL or the addressees.
The Reports – By Ride
The first section of reports produces data “by ride”. Before selecting any of these reports you must first select a
specific ride to report on.
The Timer Ride Entries is meant as an aid for the ride timers. It lists by ride the entry number, a checkbox
indicating whether the rider has checked in, the rider’s name and the horse’s name. There are also a series of short lines
for the timer to use for their own purposes.
The Ride Results report is simply a listing of the rides results. This report could be used to send to other
sanctioning bodies that do not have a specific requested format.
The AWARDS report is almost everything you need to do awards at the end of the ride. It gives you Starters,
Finishers and completion rate. Placing, ride time, riders name, horse’s name, weight division, and calculates, First in
division, middle of the pack, first JR, Turtle, Top Ten and First to Finish are al noted on the side so you do not have to do
those last minute choices!
BEST CONDITION report mimics the AERC form. It lists the BC scores for all the eligible BC riders. Those who did
not stand have now been eliminated from the report with the winner being the right most entry on the last page. I
have also added a “HIGH VET SCORE” at the top of the page. At this particular ride, it was a tie…
Multi-Day Awards report is new, and not as good as I would like it to be. When selected from the MAIN MENU
screen, it will display the following:
Select the rides that you want to include from the list of rides and press the Print button. The report will show
all the competitors who rode the same horse in the rides you selected, along with their ride time, both by ride and
totaled. There are some problems with this report, and I plan on making it better in the future – use with care.
The CTR Awards report is a simple listing of the results of a CTR. Listing the highest score first.
The Event Reports
The ALPHA LIST OF COMPETITORS is a alphabetic list of all the competitors, the NUMERIC LIST OF
COMPETITORS is a listing by entry number of the horse listing under their names, the rides that they have signed up for
along with the entry number and horse’s name. I give these to the timers so they have an overall “player roster”.
PRINT ENTRY LABELS is a holdover from when I printed five line labels with entry info that I put on the rider
packet. I no longer do this, so this report has not been used in a few years and might need work. If anyone wants labels,
I am more than willing to revive the report.
The DETAIL LEDGER is a listing by rider that lists their fees then listing their payments and showing a balance.
The SUMMARY LEDGER is a summary list of all fees charged and all payments collected.
The COMPETITORS CONFIRMATION SHEET lists the competitor’s information, information about the riders
entered, fees charged, payments received and checklist items. They can be mass printed (right before you stuff packets,
or printed as each entry is entered. I use it as a receipt also, printing a new one when entries are changed and I
remember.
The Ride Entries Spreadsheet lists almost all the information captured in the system for an entry.
The Entries With No Results is used to find the “Did Not Start” competitor and help with refunds.
The Due To / Due From lists all the competitors and show their balance.
The CTR Score card can be produced at anytime during the ride. It should be most helpful to verify score card
math errors, or it could be used in place of the multi-form score cards.
Miscellaneous Screens
The Import AERC Members process button allows you to load / update any or all of the AERC membership. Mike Maul
and I have come up with a protocol for getting updates. If you click on the Download latest AERC Members update
here, you will be asked to enter a month. The default is the current month, but if it is close to the first of the month
(before the 10th), you may have to use the previous month. Save the download in the “C:\ERIC\AERC Download Base”
directory. Then follow the instructions on the screen.
The Import AERC Horses uses the same basic logic as the Import AERC Members. An update dataset will be downloaded
from the AERC website which contains all new horses and changes to existing horses since a given date. This process will
then either update the AERC Horse table or insert a new row.
The Create Modify AERC Horses is used to help lookup horses where the owner has not communicated the horses name
or number correctly (you cannot read their hand-writing and you want to see if something is “close” ;-})
Create Modify AERC Members serves the same purpose as the Create Modify AERC Horses.
Are you an M$Access programmer? Want to take a shot at a new report / process??? I will be happy to send
you the complete DB and code; you just have to share with the rest of us, when you are done.
Have an idea for an improvement? Just send me a note describing what could be improved or added, and we
can start looking at it – no promises except that it will not cost you anything.