1
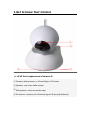
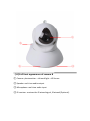
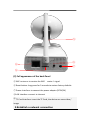
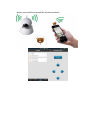
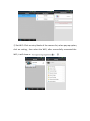
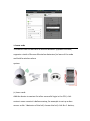
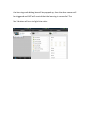
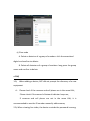
Intelligent Network Pan & Tilt Camera Quick Operation Guide 1.Get to know Your Camera ① ② ④ (1.1)Full front appearance of camera A ① Camera: photoresistor + infrared light + HD lenses ② Speaker: real-time audio output ③ Microphone: real-time audio input ④ IR receiver: receives the IR wizard signal, IR wizard( Optional). ③ ① ② ④ (1.2)Full front appearance of camera B ① Camera: photoresistor + infrared light + HD lenses ② Speaker: real-time audio output ③ Microphone: real-time audio input ④ IR receiver: receives the IR wizard signal, IR wizard( Optional). ③ ⑤ ⑧ ⑨ (2) Full appearance of the back Panel ⑤ WiFi antenna: to receive the WiFi router ‘s signal ⑥ Reset button: long press for 3 seconds to restore factory defaults ⑦ Power Interface: to connect the power adapter (DC5V/2A) ⑧LAN Interface: connect to internet ⑨ TF Card Interface: insert the TF Card, the device can save video / image 2.Establish a network connection ⑥ ⑦ To Connect LAN After power on the camera, connect one end of the network cable to the camera network interface, and the other end connected to the router LAN interface (make sure the router DHCP function is on), after successfully connected, the yellow lights on, the green light flashes. To Connect WiFi After power on the camera, according to mobile phone type Apple APP Store or Android Google Play store to search , download and install the APP "2CU", follow the prompts to complete the registration and log in of 2cu. Description: After finished the “2CU” installation, go to Settings> Check for new updates, it will work after “2CU” being updated to the latest version. Solution I: Setting WiFi Via IR Wizard Insert IR Wizard to the phone's headphone jack, keep the IR wizard proper position of the camera’s receiver. Open 2CU> Tools> IR remote control, click the up and down directional buttons, if the camera is shaking heads, the IR Wizard is working , then click on “Settings WiFi “button, select WiFi access, enter WiFi and device password (factory default password is blank, no need to press any, just confirm), click Settings, when you hear "ding", indicating that the device successfully accessed the wireless network. Solution II: Setting WiFi connection by adding a camera ①AddCamera:Enter the camera name and password, you can input any name you want, but the default password is 123, please change the defa ult password after you log in for your security.After connected the camera to LAN successfully, make sure the phone and the camera is in the same local area network; open 2CU> Contacts list, APP will prompt out to remind you the discovery of new equipment, Click to add the new device, follow the tips, name and setting the remoter access password of the device, click Save to complete the addition. For the first time setting will require a password when adding camera.) ② Set WiFi: Click on entry blanks of the camera list, when pop-up option, click on setting , then select the WIFI, after successfully connected the WiFi, it will show as 3. Learn code The camera can be used with a wireless detector (optional 433MHz, supports a total of 8 zones 64 wireless detectors) to learn of the code and build a wireless alarm system. (1) Learn code Add the device to contact list after successful login in the 2CU, click contact name->control->defense setup; for example to set up a door sensor as No. 1 detector of the hall, choose the hall, click No. 1 button, the learning code dialog box will be popped up, then the door sensor will be triggered and APP will remind that the learning is successful. The No.1 button will turn to light blue color. (2) Clear code A. Delete a detector of a group of numbers: click the associated digital and confirm to delete.. B. Delete all detectors of a group of numbers: long press the group name and confirm to delete. 4. FAQ 1.Q: When adding a device, APP did not prompt the discovery of a new equipment A: Please check if the cameras and cell phone are in the same LAN; Please check if the camera's Network indicator keeps on; If cameras and cell phone are not in the same LAN, it is recommended to use the ID number manually add cameras; 2.Q: When viewing live video, the device reminds the password is wrong A: Please check if the remote access password which being set when add the device is right or not. If not, please select edit to re-set it from the list of entries in the camera. If you forget your remote access password of the camera, suggest you to press the reset button to restore the device to factory defaults (The factory default, the device’s password is empty, the first time add camera, need to create a new password. Otherwise, remote access will not be accepted) 3. Q: “Device list” reminds the device is offline, A: Please check whether the network of the cameras is normal, and network indicator of device is on; Please check whether the router network is normal; 4. Q: Remote Control Wizard cannot control the camera rotation A: Please check if the Remote Wizard is connected with the Cell phone's headphone normally; Please adjust the direction of the Remote Control Wizard, aimed at the camera IR receiver. Some phones need to adjust the volume keys to maximum; 5. Q: Unable to search the video files during playback; A: Please check if the SD card is damaged; Please check the retrieval time of the video file, the System Time of the camera.