1
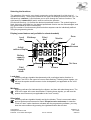
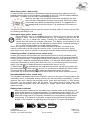
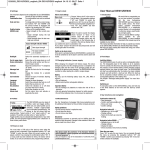
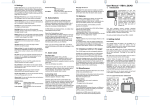
Operating Instructions
Swissphone Analog Pager
Contents
Introduction............................................................................................................. 2
Commissioning ....................................................................................................... 2
Power supply .......................................................................................................... 2
Inserting the battery................................................................................................ 4
Automatic switch-on ............................................................................................... 4
Switching off ........................................................................................................... 4
Switching on / keys................................................................................................. 4
Selecting the functions ........................................................................................... 5
Display (some features only avilable in selected models) ...................................... 5
Loud alert ............................................................................................................... 5
Minibeep ................................................................................................................. 5
Silent alert .............................................................................................................. 5
Monitor (voice and memo only) .............................................................................. 6
Scan (Multi Channel only) ...................................................................................... 6
Volume (not for tone, eco)...................................................................................... 6
New message......................................................................................................... 6
Recording a Voice Call (memo only) ...................................................................... 6
Cancelling an alarm while still receving the announcement(voice, memo only) ..... 6
Address display (voice, memo only) ....................................................................... 7
Call retrieval............................................................................................................ 7
Message Overview (voice, memo only) .................................................................. 7
Acknowledging Calls .............................................................................................. 7
Retriving acknowledged calls (memo only) ............................................................ 7
Call signalling ......................................................................................................... 7
Field strength alarm (voice, memo only)................................................................. 7
Alarm timer (voice, memo only).............................................................................. 8
Setting the clock (voice, memo only) ...................................................................... 8
Choosing profiles / channels (voice, memo only) ................................................... 8
Secondary Menu (voice, memo only) ..................................................................... 8
Battery status indicator ........................................................................................... 8
Battery / rechargeable battery recognition.............................................................. 9
General Information................................................................................................ 9
Battery life .............................................................................................................. 9
Battery low.............................................................................................................. 9
Illumination ............................................................................................................. 9
Interface Port.......................................................................................................... 9
Accessory devices.................................................................................................. 9
Customer Service ................................................................................................... 9
Copyrights by
Swissphone Telecom AG
Fälmisstr. 21 CH-8833 Samstagern
Art. Nr. 0343134
Release 2.11
18.11.2006
Seite 1/9
Introduction
We would like to congratulate you on your new receiver. In purchasing the new Swissphone
Analog Pager you have decided on a class leading device combining an attractive design,
ease of operation and the highest quality.
These operating instructions provide you with information on how to get the most from your
device. Always keep them readily to hand. A current revision of this manual may be found
on www.swissphone.com. Documentation for some functions is only provided in the
Programming Manual which is also available from our website.
The Swissphone Analog Pager is available in different versions and can be configured for
your particular application. For this reason, it is possible that features described in
these operating instructions may not be available on your device. We hope you will
enjoy reading through these operating instructions and using your Swissphone pager.
Legend:
((i)) Special information on additional and useful functions.
((!)) WARNING / IMPORTANT INFORMATION
- Do not operate this product in hazardous atmosphere or explosion risk areas!
- Do not open device or remove labels!
This device complies with Part 15 of the FCC Rules.
Operation is subject to the following two conditions:
1) This device may not cause harmful interference, and
2) This device must accept any interference received, including interference that may cause
undesired operation.
((!)) WARNING - Changes or modifications not expressly approved by the party
responsible for compliance could void the user's authority to operate the equipment.
Commissioning
Power supply
The following power sources of the size AA, L6 or AM3 (Mignon) can be used:
- Alkaline: leak-proof alkaline-dry batteries.
((!)) WARNING: Alkaline batteries should not be charged or re-charged. Danger of explosion!
- Re-chargeable batteries, either nickel cadmium or nickel metal hydride. For safety reasons,
to re-charge use a charger from the original Swissphone range of accessories.
((!)) WARNING: Do not dispose of batteries and re-chargeable batteries in fire. Risk of
explosion!
((!)) WARNING: Keep batteries out of reach of children under 3 years.
The Swissphone Analog receiver is automatically switched on when the battery is inserted
Copyrights by
Swissphone Telecom AG
Fälmisstr. 21 CH-8833 Samstagern
Art. Nr. 0343134
Release 2.11
18.11.2006
Seite 2/9
A test is done whilst all loads in the device are activated temporarily. The device then is
ready to receive messages.
((i)) NB:
For optimal indication of the battery or re-chargeable battery levels, the type of rechargeable battery installed has to be set using the operation in the device (see chapter:"
Selecting the type of re-chargeable battery"). The indication will be shown correctly after at
least one full charge-/re-charge cycle.
Copyrights by
Swissphone Telecom AG
Fälmisstr. 21 CH-8833 Samstagern
Art. Nr. 0343134
Release 2.11
18.11.2006
Seite 3/9
Inserting the battery
To insert the battery, proceed as follows:
1) Open the battery compartment by pressing down the tongue into the rear panel and
pulling out the battery cover sideways. If necessary, use a coin as a tool.
2) When inserting the battery, please observe the correct polarity and the marking of the
cells. Insert the supply source with the negative pole (-) leading, so that the spiral spring is
slightly compressed, and then simply lay the battery into the battery compartment.
3) Replace the battery cover and push it in until the tongue latches into the rear panel of the
housing.
Automatic switch-on
After inserting the battery in the battery compartment, the receiver switches on automatically.
A self-test of the LED, the display and the vibrator is started, and is completed by a control
sound (beep).
The receiver is switched on and its operational status can be read from the display.
The battery status indicator shows the approximate energy level of the power source.
((i)) If a self-test does not take place, check the polarity of the power source, or place the
pager into a charger. Various charging units are available (LG Standard, ALG Standard,
LGRA Professional, ALGRA Professional).
Switching off
Switch off your receiver by simultaneously pressing the keys SELECT(1) and EXECUTE(2) for
about 4 seconds. In the display the frame of the battery symbol flashes and an clicking
sound can be heard until the Display is cleared. The pager is now switched off.
Select (1)
Execute (2)
Switching on / keys
If the receiver is switched off, you can switch on the pager operation by simultaneously
pressing both operating keys SELECT(1) and EXECUTE(2).
A self-test takes place every time the unit is switched on as described in chapter "automatic
switch-on".
Copyrights by
Swissphone Telecom AG
Fälmisstr. 21 CH-8833 Samstagern
Art. Nr. 0343134
Release 2.11
18.11.2006
Seite 4/9
Selecting the functions
The operation of the unit is very simple, ergonomic and is designed for a high level of
operational security. The keys are located in the upper left and right corners of the unit. The
left-hand key is SELECT(1) and it allows you to move through the various functions. The
right-hand key is EXECUTE(2) and is used to confirm the selection.
Use the left-hand key (1) to select the desired operational function. The symbol begins to
flash. Using the right-hand key, the desired operational function can be acknowledged, and
the symbol ceases to flash in the display.
((i)) The number of functions and symbol selection sequence can be individually defined
using the programming device.
Display (some features only avilable in selected models)
Loud
alert
Minibeep
Silent
alert
Monitor
Scan
Call
addresses
4-digit
address display
Battery
capacity
display
Set time
Field
strength
alarm
Calls
Volume
Loud alert
Incoming calls are signalled simultaneously with a call signal and a vibration. In
addition, the LED in the upper left corner starts flashing. Following these signals, you
will hear the spoken announcement via the loudspeaker (not applicable to the "tone"
model).
Minibeep
Incoming calls are first indicated by the vibrator, and then with short beep tones. The
LED in the upper left corner also flashes. Following these signals, you will hear the
spoken announcement (not applicable to the "tone" model).
Silent alert
Incoming calls are signalled visually and by the vibrator. There is no acoustic alarm,
and no spoken announcement is heard. Exception voice and memo: In case the
"Push to Listen" option has been activated with the programming software, you may
hear the announcement by pressing the righthand button after an alert.
Copyrights by
Swissphone Telecom AG
Fälmisstr. 21 CH-8833 Samstagern
Art. Nr. 0343134
Release 2.11
18.11.2006
Seite 5/9
Monitor (not for tone, eco)
In this operational mode, you can hear everything that is spoken over the set radio
channel. Calls addressed to you will be signalled "acoustically". If you wish to switch
off the continuous monitoring / listening operation, select one of the acoustic symbols
with key (1), and confirm this with key (2).
Scan (Multi Channel only)
When set to "scan" the receiver will change the programmed channels automatically.
To make sure no Alarm is being missed, you have to ensure one of the following is
the case for each call: The first tone of any address hast to be of sufficient length, the
carrier has to be pre-keyed or a preamble tone has to be sent. This "pre emission"
needs to be at least 125ms per scanned channel. You may enable the scan option in
addition to any of the main modes of operation Loud alert, Minibeep, Silent alert and
Monitor.
Volume (not for tone, eco)
The volume for voice messages can be set to one of 4 levels. The volume of the
call signal is not affected by this parameter. With key (1), select the volume symbol.
Using key (2), you can now select the desired level 1, 2, 3 or 4, which you can then
acknowledge with key (1). Level 1 is the quietest and Level 4 the loudest. Level 3
corresponds to the nominal volume.
New message
Apart form the selected acoustical alert, all receiver models may signal a call with a flashing
red LED in the top left-hand corner. Each address can be assigned to any of the four group
arrows in the display. memo and voice models will show you the name of the active call while
alerting. In addition these models will start the alarm timer. When the alarm timer is stopped
with the right hand button, the Call retrieval is initiated.
Recording a Voice Call (memo only)
Devices with voice storage will record the message following an alert if the corresponding
address is configured accordingly. While recording the "REC" sign in the
display is flashing. This is true for all four operational modes. You may
either assign a fixed number of message blocks to an address, or leave
them as dynamically shared. The duration of these blocks can be
selected from the following range: 8x30, 6x40, 4x60, 3x80 or 2x120
seconds. Further details may be found in the programming software
manual. A Message heard in monitor mode which did not "alert" the pager will be not
recorded. During recording you may operate the receiver (e.g. switching operation modes). If
you'd like to interrupt a recording, simply press the right-hand button for 2 seconds.
Cancelling an alarm while still receving the announcement(voice, memo only)
Usually when you press the EXECUTE(2) button while an alert is being signalled (alert pattern
active) both the pattern will stop and you will not hear the announcement. If you would like to
be able to cancel the alert pattern but still get the announcement, enable the following
option:
Options Tab -> Settings -> Miscellaneous -> "Alert ack, voice on". For 5-tone receivers this
behaviour is in effect, when Delayed message is used.
Copyrights by
Swissphone Telecom AG
Fälmisstr. 21 CH-8833 Samstagern
Art. Nr. 0343134
Release 2.11
18.11.2006
Seite 6/9
Address display (voice, memo only)
This 4-digit, 7-segment display serves as a display for addresses as well as for other
purposes. These freely programmable address designators can be assigned
to the addresses of the pager. The designators will appear during the
alerting of the address and during retrieval of the call. They also show the
active profile's name when the recievers goes into idle state (if programmed).
Call retrieval
Press the EXECUTE key (2) to switch into call retrieval mode. The group arrow of the last
received alert starts to flash. Voice and memo models will show the mark (name) of the
address alternating with the time the alert was received (timestamp). Pagers with voice
memory will start playing back the most recently stored message. If more than one message
have been received, they will be displayed (and played back) in succession. You will always
get the more recent ones before the older ones. If you only press key (2) once, the
messages are not acknowledged and the group arrows will stay in the display. The call
reminder is not reset, as there are unacknowledged calls. You will get reminder beeps in the
programmed interval until you acknowledge the calls.
Message Overview (voice, memo only)
When activated, this gives you a graphical overview of the received messages. When call
retrieval is started you will get a 2 seconds delay during which the overview is shown. In the
seven segments display a dash in the first column means that one message in group A was
received. (Top group arrow). Two dashes are for two messages in a group and three for
three or more messages. This also applies to the columns 2 to 4, where column 2
corresponds to group B, column 3 to group C and column 4 to group A.
Acknowledging Calls
Calls may be acknoledged during call retrieval. Simply press button (2) while the address
name is being displayed. Repeat for multiple unacknowledged calls. You will always be able
to retrieve the last call by simply pressing (2) as long as you don't power down your receiver.
Retriving acknowledged calls (memo only)
Press button (1) until you reach the envelope Symbol: Press (2) and you can hear the
last 8 recorded messages. To skip a message simply press (2)
Call signalling
Each one of the call addresses can have its own distinguishing signal pattern. You can
define the pattern yourself through the programming software and it can last up to a
maximum of 30 seconds.
Field strength alarm (voice, memo only)
Only for radio networks with cyclical transmission (carrier keying)
This function can be run in two versions, programmable in the programming Software:
Either the symbol appears after the programmed time if no field is detected any more,
or in the other programmed case the symbol is disappearing if no field is detected any
more. You have the option to switch the acoustic field strength alarm off completely (if
programmed with the programming software). Select the menu symbol Field Strength
using key (1). The symbol starts to flash and the current state (
or
) is displayed.
To change the state, press the EXECUTE key (2).
Copyrights by
Swissphone Telecom AG
Fälmisstr. 21 CH-8833 Samstagern
Art. Nr. 0343134
Release 2.11
18.11.2006
Seite 7/9
Alarm timer (voice, memo only)
In case the alarm timer function is activated through the programming software, the time
passed since reception of the last alarm is displayed on the LCD. The LED and the address
arrow flash. The alarm timer is reset by acknowledging the alarm.
While the two right most 7-segment characters are flashing, the time
since the alert is displayed in minutes and seconds. When 59 minutes
59 seconds are elapsed, all characters will flash. The elapsed time is
now displayed as hours and minutes. The arrow and LED continue to
flash.
The time is not displayed anymore once the counter overflows (after 12 hours), only the LED
for incoming calls flashes now.
Setting the clock (voice, memo only)
Use the SELECT key (1) to navigate to the menu "Setting the clock" (the time symbol
begins to flash). Use the CONFIRMATION key (2) to select hours and use the
SELECT key (1) to adjust the setting. Pressing the CONFIRMATION key (2) a
second time will make the changes permanent. The display now switches into the
minute display mode which can be adjusted as shown above. Continual pressing of
key (1) effects a fast-forward for quicker setting changes.
When your receiver is configured to use multiple channels or profiles, the name of the
channel / profile will be shown while the receiver is idle. To see the current time, simply
press key(1) once. When no profiles / channels are used the watch is shown permanently.
Choosing profiles / channels (voice, memo only)
In case your receiver offers profiles, the currently active profile is shown constantly in the
display. One profile may contain multiple addresses and one of up to 50 receiving channels
for the multi channel units. To change the active profile (channel), push the SELECT key (1)
until the 4-digit, 7-segment character display flashes. You may now switch between the preset profiles (channels) by pushing the EXECUTE (2) key. If your desired profile (channel) is
shown, your selection is made permanent by pressing the SELECT key (1).
If "Extra Profile" ( ) was enabled with the programming software, you will see a dash ( ) or
the aforementioned . With EXECUTE key (2) you can activate or disable the "Extra Profile".
The extra profile is activated when is shown and deactivated when is shown.
In idle state, the receiver always displays the active profile or the active reception channel.
Secondary Menu (voice, memo only)
The programming software allows you to split the menu into two parts. Everything above the
"secondary menu" is accessible directly (pressing the left hand button repeatedly). To reach
functions that are in (below) the secondary menu, press and hold button (1). After leaving
the menu, only the primary menu will be active. This option allows to have often used
functions easily accessible, while still allowing to change lesser used settings, such as
setting the clock.
Battery status indicator
When the pager is switched on, the battery icon is always visible on the display and
indicates the amount of energy still available. The operating period is approx. 65 - 180
hours, depending on the programmed operating mode and the power supply source.
When the energy source is completely exhausted, the empty battery symbol flashes
continuously. If "Loud alert" is activated, a regular clicking sound is simultaneously
audible. In this condition, an operating time of at least 3 - 5 hours is still available.
100%-80%
80%-33%
Copyrights by
Swissphone Telecom AG
Fälmisstr. 21 CH-8833 Samstagern
33%-13%
13%-0%
Art. Nr. 0343134
Release 2.11
18.11.2006
Seite 8/9
Battery / rechargeable battery recognition
After a new energy source is inserted, the pager always detects whether it is a rechargeable
battery or a dry cell battery. This switch-on procedure with self-test is only possible if the
voltage of the battery or rechargeable battery is higher than 1.24 V. The information relating
to battery or rechargeable battery detection is then saved in the pager. When operated with a
rechargeable battery, the LC display indicates the type of rechargeable battery (
,
).
If a dry cell battery is detected, then
is displayed.
To prevent charging of a battery in the charging unit (CU), the receiver displays
for 3
seconds.
((i)) Note:
If the newly inserted energy source (dry cell battery or rechargeable battery) is discharged, the
recognition will first be carried out after charging for 10 minutes. If a rechargeable battery is
detected, then charging is continued. If a dry cell battery is detected, then charging is stopped
immediately.
General Information
Battery life
65 - 180 hours depending on the battery type and the programmed operating mode.
Battery low
A weak dry cell battery/rechargeable battery can be recognised by the empty battery symbol.
It should be replaced/charged as soon as possible.
((i)) Note: Please only use batteries recommended by the manufacturer.
Illumination
Background illumination for the LCD, which is switched on with every key switch, enables
you to read the operational status of your unit in the dark.
Interface Port
For the connection of various accessory devices, e.g battery charger, programming kit.
Accessory devices
LG Standard charging unit:
ALG Standard charging unit:
LGRA Professional:
ALGRA Professional:
SGA Professional:
Economical, intelligent charging unit
Economical, intelligent charging unit for use in 12V vehicle
electrical systems
Rugged, intelligent charging unit with aerial connection and
relay output
Rugged, intelligent charging unit with aerial connection and
relay output for use in 12V vehicle electrical systems.
Programming attachment
Customer Service
With this device purchase, you have acquired a high-quality product. If, however, despite
adherence to these instructions, an operational problem arises, please contact your
specialist dealer directly or send the device back to us in its original packaging.
Copyrights by
Swissphone Telecom AG
Fälmisstr. 21 CH-8833 Samstagern
Art. Nr. 0343134
Release 2.11
18.11.2006
Seite 9/9