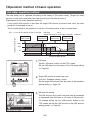
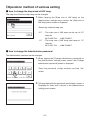
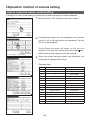
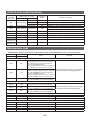
1
USER’S MANUAL
ORIGINAL INSTRUCTIONS
MITSUBISHI HEAVY INDUSTRIES, LTD.
Natural refrigerant CO2
Heat Pump Water Heater ESA30E series
Thank you very much for your purchasing the heat pump water heater for commercial use.
This user’s manual describes cautions for safety. Please read this manual carefully before use in order to
operate the unit properly.
Keep this manual, after reading, at a safe place where you can consult it whenever it is necessary.
When the ownership of the unit is changed, please be sure to transfer this manual and the “Installation
Manual” to a new owner.
It is not recommended for a user to install or move the unit by the user’s own discretion. (Safety or functions
may not be assured.)
The emission sound pressure level from the heat pump unit is under 70dB (A).
PJZ012A093A
−2−
Contents
Before use ……………………………
2
Safety precaution ………………………………
Component replacement guide for maintenance
check and preventive maintenance ……………
Water quality criteria……………………………
General description of CO2 heat pump water heater …
Description of functions and contents of CO2 heat pump water heater …
Names and functions of sections on the R/C …
Screen flow………………………………………
2
10
11
12
14
16
18
Operation method of basic operation …… 20
Note
● In order to protect the heat pump unit,
be sure to turn the power on at least 6
hours before starting operation. (Supply
the power to the crankcase heater and
warm up the compressor) And do not
turn the power off when stopping.
(During stopping of compressor, the
crankcase heater is kept energized for
the compressor to be kept warm in
order to prevent compressor from
breakdown due to the migration of liquid
refrigerant in the compressor.)
● If the ambient air temperature becomes
below 0°C, the water pipe may freeze.
It may cause break of the water pipe
and the heat pump unit.
Please consult with the dealer and take
proper measure for anti-freezing water.
If water may freeze, be sure to keep the
power turning on during Pause as well.
This unit has a function to start anti-freeze
operation during Pause, when water
may freeze.
● If do not use hot water for one month or
more, be sure to shut off the main power
and drain off the water in the heat
pump unit and the unvented cylinders.
When power failure happens and the
water may freeze, be sure to drain off
immediately.
Regarding the way to drain off, please
consult with the installer or the dealer.
Hot water operation method …………………
How to Run/Pause ……………………………
Setting of HW temp for the operation to top up ……
Schedule setting ………………………………
How to set operation pattern …………………
How to set day off ………………………………
How to set peak-cut ……………………………
How to check operation pattern ………………
How to do the [Operation to fill up]……………
How to set to increase or decrease the
hot water amount uniformly……………………
Display usage of hot water amount …………
Display of operation mode ……………………
20
21
22
23
24
27
29
32
33
34
35
35
Operation method of menu manipulation …… 36
Limited items for sub remote control …………
How to operate on the menu screen …………
How to operate on the menu screen …………
Notabilia for each setting screen ……………
36
37
38
38
Operation method of various settings …… 39
How to set [Initial settings] ……………………
How to set Administrator settings ……………
How to check the remote control setting ……
39
42
49
For maintenance …………………… 50
Maintenance of remote control,
heat pump unit and hot water storage unit …
Measure for anti-freeze water in winter ………
When stopping the unit for long period ………
When power failure occurs ……………………
When error happens …………………
Notice of next service date …………
When the [Periodical check]
is displayed ……………………………
After-sales Service……………………
Specifications …………………………
EC DECLARATION OF CONFORMITY……
−1−
50
51
51
51
52
56
57
57
58
59
■ Before use
Safety Precautions
●Please read the precautions written here carefully to operate the
unit properly. You are required to observe these fully because
every item of these instructions is important for safety.
Failure to follow these instructions may result in
WARNING serious consequences such as death, severe
injury, etc.
Failure to follow these instructions may cause
CAUTION injury, property damage or, serious consequences
depending on.
●The following pictograms are used in the text.
Never do.
Always follow the
instructions given.
Be sure to ground the unit.
Absolutely keep wet hands
away.
Absolutely keep water
away.
●Keep this manual at a safe place where you can consult with
whenever necessary. Show this manual to installers when moving
or repairing the unit. When the ownership of the unit is transferred,
this manual and the “Installation Manual” should be given to a new
owner.
●Electrical wiring work must be implemented only by qualified
specialists.
■ Precautions for installation
WARNING
Consult your dealer or a professional contractor to install
the unit.
Be sure to use the genuine optional parts specified by
MHI.
Improper installation made on your own may cause electric
shocks, fire or dropping of the unit.
−2−
WARNING
Consider measures not to exceed the critical concentration
of refrigerant in the event of leakage especially when the
unit is installed in a small room. Regarding the measure not
to exceed the critical concentration, please consult with our
dealer.
If the refrigerant leaks and exceeds the critical concentration,
it may cause oxygen deficiency accident.
Take care to protect terminal connections from external
forces or stress caused by wiring.
Improper connection or fixing could cause heat generation,
smoke or fire.
The maximum voltage connectable to the remote control
is DC 18 V. Do not connect to AC220~240V or 380/415V.
It could cause breakage, ignition or fire.
Do not operate HP unit or remote control whose panel or
cover is kept opened.
Operation with the electric live part kept opened may cause
electric shocks, fire.
The unit should not be used in inappropriate environment.
Using the unit at the following places could deteriorate its
performance significantly or cause electic shocks, breakdown, smoke or fire as a result of corrosion.
· Where air contains dense oil mist, steam, organic solvent
vapor, corrosive gas (ammonium, sulfuric compound, acid
etc)
· Where acidic or alkaline solution, cosmetics, special spray,
etc. are used frequently
· Where oil mist generates
· Where dense cigarette smoke exists
· Where dust floats in air
· Where water vapor generates or heavily humid area
· Where inflammable gas may generate, flow in. accumulate
or leak
· Where cosmetics or special spray is used.
−3−
WARNING
Grounding work shall be done securely.
Do not connect the grounding wire to a gas pipe, a water
pipe, a lightening rod or a earth wire of telephone
Improper grounding may cause, malfunction or electric
shocks at electric leak.
The earth leakage breaker should be installed
If the earth leakage breaker is not installed, it may cause
electric shocks.
Please ask the dealer where you purchased it or the
qualified specialist who installed it.
The remote control should not be installed where it is
exposed to direct sunlight or the ambient temperarures
become higher than 40°C or lower than 0°C.
It could cause deformation, discoloration or break-down.
CAUTION
The drain pipe work shall be done in order for the drain
water to drain off without fail.
Improper drain pipe work may cause getting the household
goods wet in flooded water or failure of heat pump unit due
to blockage of drain water.
Install the remote control on a place which can endure its
weight sufficiently.
In sufficient strength or improper installation could cause the
remote control to drop off.
−4−
■ Precautions for usage
WARNING
Avoid using combustible substances (hair spray,
insecticide, etc) near the unit.
Do not use benzene or paint thinner to clean the unit.
It could cause cracks, electric shocks or fire.
Stop operation under abnormal situation.
If continued, it could result in break-down, electric shocks,
fire, etc.
If any abnormal condition (burnt odor etc.) occurs, stop
operation, turn off the power switch and consult your dealer.
Stop operation when any anomaly is detected.
If operation is continued, it could cause fire or break-down.
Consult you dealer.
Do not use any liquid except clean water.
It may cause fire or explosion.
Do not touch the hot water pipe with bare hands in order
to check the hot water temperature.
It may cause a scald.
Do not change setting or cancel the protection device.
Change setting or cancelation of protection device may cause
fire, electric shocks or injury.
When using the unit together with combustion appliance,
be sure to ventilate frequently.
Insufficient ventilation may cause oxygen deficiency accident.
Do not insert your fingers or any sticks into the air outlet
port of the fan.
Since the fan rotates at high speed inside, it may cause injuries.
Even if the fan is stopping, it may suddenly start operation.
CAUTION
Do not use or let use the unit or remote control as play
equipment.
Improper operations could cause ill health or health disorder.
Never disassemble the remote control.
If you touch internal parts accidentally, you could get electric
shocks or cause trouble.
Consult your dealer when it is necessary to inspect its interior.
−5−
CAUTION
Do not wash the remote control with water or liquid.
It could cause electric shocks, fire or break-down.
Do not touch electric parts or operate buttons or screens
with wet hands.
It could cause electric shocks, fire or break-down.
Be sure to stop operation and shut down the circuit
breaker before starting maintenance work.
It could cause electric shocks or injury.
The cleaning of the inside of cylinder shall not be done
by yourself. Please consult with the dealer where you
purchased it
Cleaning with improper selection of detergent or improper usage
way may cause damage of the section coated with resin or
leakage. And if the detergent splashes on the electric part or
motor, it may cause failure, smoke or fire.
Do not use the base frame for installing unit which is
corroded or damaged after long term use.
If leaving it corroded or damaged, it may cause a fall of the unit
or injury.
Do not ride on the unit or put something on the unit.
It may cause falling or turnover.
Do not put anything which will be troubled by getting wet
under or near the unit.
If dew condenses on the unit, refrigerant pipe or water pipe or
drain water sticks depending on the operation state, it may
be damaged by dropping water.
Do not put anything such as a vase filled with water on
the unit.
It may cause electric shocks, ignition or malfunction of the
unit.
Do not put anything or not pile up fallen leaves around
the unit.
If there are fallen leaves, insects may intrude in the unit. And
if they touch the electrical components inside of the unit, it
may cause malfunction of the unit, ignition or smoke.
−6−
CAUTION
Do not touch the aluminum fin of the heat exchanger with
bare hands
If touching, it may cause injury.
Do not use benzene, paint thinner, wipes etc. to clean the
remote control.
It could discolor or break-down the remote control. Wipe it
with a piece of cloth which is squeezed tightly after wetting
with diluted neutral detergent. Finish up the cleaning by
wiping with a piece of dry cloth.
Do not pull or twist the cable of the remote control.
It could cause break-down.
Do not use the unit for special use such as preservation
of foods, animals, plants, precision apparatuses and art
objects.
It may cause deterioration in quality of stores.
Be sure to use only the fuse with proper capacity.
If steel wire or copper wire is used, it may cause malfunction
of the unit or fire.
Do not make the unit run or stopped with power switch.
It may cause fire or water leak. And if the auto-restart
function is set [Valid], it may cause injury by sudden rotation
of the fan.
Do not use the water for drinking
It may affect the health.
Do not leave the water piping filled with water, when stopping
the unit for long period.
It may cause deterioration of the water quality or malfunction
of the unit due to freezing water.
Please shut off the power of the unit and drain off.
Do not shut off the power.
It may cause malfunction of the unit due to freezing water.
If shutting off the power of the unit, please drain off.
If water could freeze due to power failure, shut off the power
immediately and drain off.
−7−
CAUTION
Use clean water conform to the water quality criteria. (Refer
to the criteria in page 7)
Deterioration of water quality may cause malfunction of the
unit and water leak.
If a solid body, discolored water, impurity or unusual order is
found, please ask inspection.
This appliance can be used by children aged from 8 years
and above and persons with reduced physical, sensory or
mental capabilities or lack of experience and knowledge if
they have been given supervision or instruction concerning
use of the appliance in a safe way and understand the
hazards involved. Children shall not play with the appliance.
Cleaning and user maintenance shall not be made by
children without supervision.
−8−
■ Precautions for relocation or maintenance
WARNING
Consult your dealer when moving, disassembling or
repairing the unit.
Never modify the unit.
Improper handling may result in injury, electric shocks, fire,
etc.
If the unit is submerged due to the natural disaster such
as flooding or typhoon, please consult with the dealer
where you purchased.
If starting operation of the unit, it may cause malfunction,
electric shocks and fire.
Do not use any refrigerant other than the specified
refrigerant (CO2).
The maximum high pressure is 14MPa.
If using the refrigerant which is not specified, it may cause fire
or explosion.
When repairing or inspecting the unit, be sure to stop the unit
and shut off the breaker
If the power breaker is not shut off, it may cause electric
shocks or injury by operating fan.
When repairing the unit, no one other than the service man must
not approach to the unit.
It may cause an unexpected risk involving danger.
−9−
■ Before use
Please implement a periodical maintenance check and a component replacement from a view point of preventive maintenance
In order to maintain the safety and the function of the product, we would like to ask all customers owing this product to have
a periodical maintenance and to replace components by our authorized servicing company.
This list shows the contents and the interval of periodical maintenance under the general usage conditions and the rough
indication of the time to replace components.
Especially, regarding the timing of component replacement, the actual time for replacement should be decided in
consideration of the usage conditions such as water quality, air quality, setting of hot water operating hours and etc.
Concerning the concrete plan of maintenance check, please consult with our dealer.
Since we are preparing some plans of service contract, we would like to recommend you to conclude such service contract.
● The list is base on the condition to operate the unit for 10hours per day with applying night tariff.
Component
Components of
refrigeration
circuit
Compressor
Heat exchanger
(Evaporator)
Gas cooler (water heat
exchanger)
Solenoid valve
EEV (Electronic
expansionvalve)
Strainer
Components of
electrical circuit
Outdoor fan
Components of
water circuit
Capillary tube
Refrigerant pipe
Relay
Coil, solenoid
(SolenoidValve & EEV)
Crank case heater
Anti-freezing heater
(Drain pan, Water piping)
Fuse
PCB (for Control,
Inverterand Water pump)
High pressure switch (63H1)
Pressure sensors
Terminal block
Wiring and connector
Capacitor
Cooling fan
Magnet contactor (52C)
Fan propeller
Fan motor
Water pump (DC)
Flow regulating valve
(CWFV1)
Motor valve (CWFV2 to
CWFV5)
Decompression valve
Check valve
Strainer
Check point
High pressure, intermediate pressure, low pressure (Is there any
big pressure deviation from standard operation data?) Vibration,
sound, insulation resistance, loose connection of terminal
High pressure, intermediate pressure, low
pressure, cleanness of fin
High pressure, intermediate pressure, low pressure (Is there any big
deviation from standard operation data?)
Pressure loss of water (Is the pressure loss of heat pump unit excessive?)
Discharge pipe temperature (Is the discharge pipe temp. protection control
activated frequently?)
Behavior, leak, clogging (Is the defrost operation activated
frequently?, Is the hot water supplying capacity reduced?)
Behavior, leak, clogging (Are LP and/or HP protection control
activated frequently?, Is the hot water supplying capacity reduced?)
Temp. difference between inlet and outlet ports of strainer
(Is there any temperature drop at outlet port of strainer?)
Contact wear, vibration
Contact wear, vibration
Behavior, contact resistance at contact point, insulation resistance
Insulation resistance
Insulation resistance (Is any whitening or carbonizing found?)
Insulation resistance (Is any whitening or
carbonizing found?)
Apparent condition
Apparent condition
Contact resistance at contact point
Is any rubbing on the capillary tube found?
Loose connection of terminal
Disconnection, looseness, deterioration, rubbing
Leakage of electrolysis solution,deformation
Insulation resistance, anomalous sound
Contact resistance at contact point, behavior
Balance, crack
Insulation resistance, anomalous sound, vibration
Behavior, vibration, anomalous sound,
insulation resistance, water leakage
Behavior, vibration, anomalous sound,
insulation resistance, water leakage
Behavior, vibration, anomalous
sound,insulation resistance, water leakage
Behavior, anomalous sound, water pressure, water leakage
Behavior, anomalous sound, water pressure, water leakage
Clogging, water leakage
Inspection cycle
(Time/Year)
Estimated time
for replacement
1
40,000 hours
1
10 years
1 (*)
10 years (*)
1
10 years
1
10 years
1
At heavy service
1
1
1
10 years
10 years
10 years
1
10 years
1
20,000 hours
1
20,000 hours
1
5 years
1
10 years
1
10 years
1
1
1
1
1
1
1
10 years
10 years
25,000 hours
10 years
25,000 hours
10 years
20,000 hours
1(*)
5 years (*)
1(*)
5 years (*)
1(*)
5 years (*)
1(*)
1(*)
5 years (*)
5 years (*)
Cleaning
2times/year (*)
1(*)
* The inspection interval and component replacement interval marked (*) are greatly influenced depending
on the water quality to be used. Please consult with our dealer where you purchased for detail.
−10−
Water Quality Criteria
Makeup water and cyclic water shall be the water within the range of water quality criteria
mentioned below.
If water quality is out of the range of criteria, it may cause a trouble such as scale adhesion and
corrosion.
Cyclic water
Item
Standard items
Reference items
(60°C< ≦90°C)
Makeup water
pH (25°C)
−
7.0−8.0
7.0−8.0
Electric conductivity (25°C)
mS/m
≦30
≦30
Chloride ion
mgCL−/L
≦30
≦30
Sulphate ion
mgSO /L
≦30
≦30
Acid consumption (pH4.8)
mgCaCO3/L
≦50
≦50
Sulphate ion/Acid consumption
−
≦0.5
≦0.5
Total hardness
mgCaCO3/L
≦70
≦70
Calcium hardness
mgCaCO3/L
≦50
≦50
Ionic silica
mgSiO2/L
≦30
≦30
Iron
mgFe/L
≦1.0
≦0.3
Copper
mgCu/L
≦1.0
≦0.1
2−
4
2−
Sulphide ion
mgS /L
Not detected
Not detected
Ammonium ion
mgNH4 /L
≦0.1
≦0.1
Residual chlorine
mgCl/L
≦0.1
≦0.3
Free carbon
mgCO2/L
≦0.4
≦4.0
−
−
+
Stability index
−11−
■ Before use
General description of CO2 heat pump water heater
1. Composition of CO2 heat pump water heater
This heat pump water heater for commercial use is a heat pump water hater that is composed of
a heat pump unit with natural refrigerant such as CO2 which can produce hot sanitary water with
heat pump technology and a hot water storage unit which can store hot water.
A touch panel type remote control is applied to this heat pump water heater for commercial use
and various function settings can be done with simle oeration.
It is available to operate up to 16 units of heat pump units simultaneously with one remote
control.
2. Mechanism of CO2 heat pump water heater
The way to produce hot water with this heat pump water heater is that the heat energy retrieved
from the outdoor air heats up the refrigerant and such refrigerant circulated in the system
increases the water temperature.
Therefore, the heating amount to be given to the hot water as heating energy is “[The power
consumption of heat pump unit] + [the heat retrieved from the air]”.
Accordingly, the consumed energy efficiency becomes more than 1 (one). In other words so that
this system allows very high efficiency operation.
Merit of CO2 refrigerant
·The global warming potential (GWP) is [ 1 ] and it is environment-friendly.
·Since high temperature water can be produced efficiently, it is possible to adjust the heat
reserving volume by controlling the hot water temperature and to use the hot water for hightemperature cleaning.
Gas cooler
(for heating
water)
Compressor
Retrieve
heat from
the air
Heat exchanger
(cooled by air)
Supply
hot water
CO2
ref.
cycle
Expansion
valve
Feed
water
Water Circulation
pump
Hot water storage unit
Heat pump unit
−12−
3. Operation pattern of CO2 heat pump water heater
This heat pump water heater is operated with the target hot water amount set at each set time
The typical operation pattern and setting items are explained with following figure.
③ In Pause by
peak-cut timer
② Set hot water amount at each time
Set hot water amount
Actual hot water amount
100%
50%
0%
22:00
8:00
Operation
14:00
Operation
Store hot water during the night time
applied cheaper tariff.
22:00
Operation
If the hot water amount becomes lower than
the set value, hot water storing operation starts.
Setting of hot water storage operation (Refer to the setting method in Page 20)
① Hot water temp
Store hot water in the hot water storage unit at the hot water temp set with remote control.
The heat reserving volume of the hot water storage unit can be increased or decreased by
increasing or decreasing the hot water temp.
If multiple heat pump units are connected to one remote control, it is available to set the hot
water temp individually.
② Hot water amount at each set time
Hot water amount can be set at each set time with remote control.
Set the hot water amount to meet the state of hot water usage.
③ Peak-cut timer
It is available to prohibit or save operation of the heat pump unit at the designated time.
The contract amount of power can be reduced by applying peak-cut operation of heat pump
unit according to the power demand.
④ Hot water amount setting
The hot water amount at each set time can be increased or decreased uniformly on the day
of a week basis.
In case that the usage amount of hot water may vary depending on the season or the day
of a week, please use this function.
Ex. 1 In summer: More
In winter: Less
Ex. 2 From Monday to Thursday: Less
Friday, Saturday: More
Sunday: Normal
⑤ Setting [Pause]
If it is a day off and no hot water is required to store, it can make hot water storage
operation prohibited.
−13−
■ Before use
Description of functions and contents of CO2 heat pump water heater
The following settings can be done with this remote control.
Regarding the detailed setting methods, please check each function mentioning in reference page.
Setting and display item
Contents
The heat pump unit can be started operation.
The heat pump unit is operated according to the set operation
pattern.
Pause
The heat pump unit can be paused operation.
The set operation pattern becomes invalid and the heat pump
unit does not start hot water storage operation.
∗ Protection operation of heat pump unit (Anti-freeze protection
operation) may start.
Schedule setting Setting of weekly
Set the operation pattern on the day of a week.
operation pattern
■ Maximum 8 patterns in a day can be set.
Setting of day off
On the day that the hot water storage operation is no necessary
such as holiday and day off, it can be set [Day off].
① Every week
① Set the day in every week [Day off].
② Specific period of ② Set the [Start day] and the [End day], and set [Day off]
through this period.
time
③ Set the specific day, and set it [Day off].
③ Specific day
Peak-cut timer
Set the [Start time] and [End time] of the operation to limit the
capacity and saving rate of capacity.
■ Maximum 4 patterns in a day can be set.
■ From 0% to 80% (at 20% intervals) of the saving rate of
capacity can be selected.
* The clock setting is required.
Checking of operation The current operation pattern can be checked.
pattern
Operation to fill up
The heat pump unit is operated until the hot water storage
unit is filled with hot water up to 100%.
Setting of hot water temp
Hot water temp can be set.
Setting of hot water amount
Hot water storage amount can be increased or decreased
uniformly.
Display usage of hot water amount
The usage of hot water amount for the selected heat pump
unit is displayed.
■ The hot water amount on the last previous day and the
present day is displayed. (for maximum 48 hours)
Display of
Display contents on RC
operation mode
· Now stopping
The heat pump unit is stopping
The heat pump unit does not start operation
· It makes a Pause by The heat pump unit is stopping by operating [Run/Pause]
switch Run/Pause, switch or by the “Day off” setting.
·P
aused by “Day
The heat pump unit does not start operation but it may start
OFF” setting
protection operation.
· It is in operation by Since the current hot water amount exceeds the target amount,
standby
it makes the heat pump unit standby.
· It is in operation to The heat pump unit is in operation to top up.
top up
· It is in operation to The heat pump unit is in operation to fill up.
fill up
· In operation for anti- In order to prevent water in the pipe from freezing, the water
freezing
pump is operating.
Reference page
Run
−14−
Page 21
Page 21
Page 24
Page 27
Page 29
Page 32
Page 33
Page 22
Page 34
Page 35
Page 35
Setting and display item
Display of
operation mode
Initial settings
Administrator
settings
· In operation for
defrosting
· In operation for
peak-cut
· Standby
Clock setting
Date and time display
Contrast
Backlight
Controller sound
Enable/Disable setting
Night tariff setting
HP unit selection
RC display setting
Step size of HW temp
Contents
Reference page
The defrost operation is ongoing.
Peak-cut rate is set.
It makes the heat pump unit standby for starting operation.
Current time and date can be set or corrected
■ In case of power failure within 80hours, the clock is kept going
by built-in battery for backup. If the period of power failure
exceeds 80hours, it is necessary to set clock time again.
On/Off, 12H/24H, display position of AM/PM can be set.
The contrast of LCD can be adjusted.
On/Off and lighting time of backlight can be set.
On/Off of beep sound at touch panel operation can be set.
Permission/Prohibition setting of each operation can be set
In order to calculate the power consumption in day/night time,
the time zone applied night tariff can be set.
The heat pump unit to be displayed on RC can be selected.
* If not selected, RC select a heat pump unit automatically.
RC name and HP unit name can be registered.
On/Off of [Defrost operation display] and [Display status of
HW amount] can be set.
Step size of HW temp (at 5°C or 1°C intervals) can be set.
* Factory default is 5°C.
Administrator password can be change.
Page 35
Page 39
Page 40
Page 40
Page 41
Page 41
Page 42
Page 43
Page 43
Page 44
Page 47
Change administrator
Page 47
password
User environment
By selecting the operation pattern of typical business type,
Page 48
the detailed operation pattern can be set easily.
Check of RC setting
Current setting list of RC and HP unit can be checked
Page 49
Contact company
Contact company and phone No. are displayed
Page 56
−15−
■ Before use
Names and functions of sections on the R/C (Operating section)
⑤ LCD display (With backlight)
③
switch
④ Operation lamp
①
②
switch
switch
Touch panel system, which is operated by tapping the LCD screen with a finger, is employed for any
operations other than the ①Run/Pause, ②Schedule setting and ③Operation to fill up switches.
①
switch (Run/Pause switch)
One push on the button starts operation and
another push pauses operation. (☞ Page 21)
②
switch (Schedule setting switch)
Pushing this button starts schedule setting.
(☞ Page 23)
⑤ LCD (With backlight)
A tap on the LCD lights the backlight.
The backlight turns off automatically if there
is no operation for certain period of time.
Lighting period of the backlight lighting can
be changed. (☞ Page 42)
If the backlight is ON setting, when the screen
is tapped while the backlight is turned off, the
backlight only is turned on. (Operations with
switches ①, ② and ③ are excluded.)
③
switch (Operation to fill up switch)
P
ushing this button starts operation to fill up.
(☞ Page 33)
④ Operation lamp
This lamp lights in green (yellow-green) during
operation. It changes to red if any error occurs.
−16−
Names and functions of sections on R/C (Display)
* All icons are shown for explanation.
① Clock, RC name display
② Icon display
③ Menu button
TOP screen
④ HW temp
setting button
⑥ Usage of HW
amount button
W amount
⑤H
display button
(Set More or Less)
⑦ Message display
① Clock, RC name display
③ Menu button
When setting other than the following items
④-⑦, tap the menu button. When menu
items are displayed, select one and set it.
④ HW temp setting button (☞ Page 22)
The hot water temp currently set is
displayed. When changing HW storage
temp, tap this button.
⑤ HW amount display and set button (☞ Page 34)
Display the current time (☞ Page 39) and
the name of remote control (☞ Page 44)
② Icon display
Each icon is displayed when one of following
setting is going on.
Center
When the central When setting is made
control (optional part) from the Sub RC
is running
(☞ Page 36)
The current HW amount is displayed. If set
HW amount [More] or [Less], tap this button.
∗ Despite no use of hot water, there is a
case that the display of HW amount may
decrease. Because the display of HW
amount shows the HW temp in the HW
storage unit whose temp is 50°C or higher.
If leaving hot water for long period
without use, HW is getting colder and
HW amount if going to decrease.
This is not a malfunction.
⑥ Display usage of HW amount (☞ Page 35)
Today’s usage of HW amount is displayed.
If change the date to be displayed or the
HP unit to be displayed, tap this button.
⑦ Message display section (☞ Page 14)
The operation state of HP unit and the
message of RC operation is displayed.
When the periodical When the Enable/
check is required. Disable setting is
made. (☞ Page 42)
(☞ Page 53)
When the peak-cut timer is set.
(☞ Page 29)
When hot water cannot be stored up to the
set HW amount. (☞ Page 46)
−17−
■ Before use
Screen flow
Top screen
Run/Pause switch
…………………………………… Refer to Page 21
Schedule setting switch …………………………………… Refer to Page 23
Setting of weekly operation pattern …… Refer to Page 24
Setting of day off ………………… Refer to Page 27
Setting of peak-cut ……………… Refer to Page 29
Checking of operation pattern …… Refer to Page 32
Operation to fill up switch …………………………………… Refer to Page 33
Hot water temp setting …………………………………… Refer to Page 22
Hot water amount setting …………………………………… Refer to Page 34
Display usage of Hot water amount …………………………………… Refer to Page 35
Operation mode display …………………………………… Refer to Page 14
Main menu
Initial settings
…………………………………… Refer to Page 39
Clock setting ……………………… Refer to Page 39
Date and time display …………… Refer to Page 40
Contrast …………………………… Refer to Page 31
Backlight ………………………… Refer to Page 41
Controller sound ………………… Refer to Page 41
Administrator settings
…………………………………… Refer to Page 42
Enable/Disable setting…………… Refer to Page 42
Night tariff setting ………………… Refer to Page 43
HP unit selection ………………… Refer to Page 43
RC display setting ………………… Refer to Page 44
Step size of HW temp …………… Refer to Page 47
Administrator password setting…… Refer to Page 47
User environment………………… Refer to Page 48
Check of RC setting
…………………………………… Refer to Page 49
Contact company
…………………………………… Refer to Page 56
−18−
Main menu
Installation setting
Installation date ……………
Company information ………
Test run ………………………
As for setting
method, please
refer to the
installation manual.
RC function settings
Main/Sub of RC ……………
External input ………………
Auto-restart …………………
As for setting
method, please
refer to the
installation manual.
Service & Maintenance
No. display of unit……………
Next service date ……………
Error display …………………
Save operation data…………
Special settings ……………
System off ……………………
−19−
As for setting
method, please
refer to the
installation manual.
■ Operation method of basic operation
Hot water operation method
The heat pump unit is operated according to the setting of [Hot water temp], [Target hot water
amount at each time zone] and [Hot water amount] set with remote control.
[Explanation of hot water operation method]
If the current HW amount is less than the target HW amount at current time zone, the heat
pump unit is operated to top up.
The hot water temp at the operation to top up is the setting value of the hot water temp
Target hot water amount
(Ex.) In case of the settings shown on the right
Target HW
amount 100%
: 65°C
HW temp
Target HW amount: 22:00-100%, 8:00-50%, 14:00-10%
Target HW
amount 50%
Target HW
amount 10%
Target HW
amount 100%
100%
50%
0%
22:00
8:00
Operation
14:00
Operation
22:00
Operation
Actual hot water amount
1. HW temp
Tap the HW temp button on the TOP screen.
Set the HW temp from the menu of the HW temp setting
(☞ Page 22)
2. Target HW amount at each time zone
Push the Schedule setting switch.
Set the target HW amount from the menu of the operation
pattern setting (☞ Page 23)
3. HW amount setting
The HW amount set at each time zone can be increased
or decreased (from 0.8 times to 1.2 times of HW amount).
For change setting, tap the HW amount button on the
TOP screen and set the HW amount on the [HW amount
setting] screen. (☞ Page 34)
−20−
How to Run/Pause
1.
Run
When push Run/Pause button during pausing, the
[Operation acknowledge] screen is displayed.
When tapping Yes , it starts operation.
■ If the current HW amount is less than the target HW amount, the
heat pump unit start operation to top up.
2. Pause
When push Run/Pause button during operating, the
[Pause acknowledge] screen is displayed.
When tapping Yes , it pauses operation.
■ In case of Pause, the heat pump unit does not operate to top up.
■ The heat pump unit may operate in order to protect itself.
When pausing, each operation button on the screen is lit off.
And after the set lighting time of the backlight (☞ Page 41)
has been elapsed, the backlight turns off.
When tapping the screen, backlight turns on and each
operation button is put the light on.
Information
· There is a case that the message of [Invalid operation] may display, when tapping a button.
However, it is not a malfunction. The operation button is set as [Invalid]. (☞ Page 42)
· The first operation after turning the power on, it starts operation according to the following operation conditions.
Please change setting according to the hot water heating load requested by the customer.
HW temp
… 65°C
Target HW amount
22:00 to 8:00 … 100%
8:00 to 22:00 … 30%
−21−
■ Operation method of basic operation
Setting of HW temp for the operation to top up
The HW temp for the operation to top up can be set as follows.
1. T ap the
HW temp button on the TOP screen.
2. The menu screen of the [Setting of HW temp] is displayed.
Tap the desired item.
1
2
① Setting temp to top up
② Setting temp to warm up (Out of use)
3. If the multiple heat pump units is connected to the
remote control, the list of heat pump units (Address No.)
is displayed.
Tap the [HP unit No.] to be set.
Up to 8 units is displayed on the [Select heat pump unit]
screen. If 9 or more units are connected, the 9th and the
subsequent units are displayed by tapping Next button.
4. Set the HW temp by tapping
▲ ▼ buttons and tap
Set button.
5. The TOP screen is displayed, when tapping
Information
Set button
■ The HW temp can be set at 5°C intervals.
HW temp setting range: From 60 to 90°C (Factory default: 65°C)
■ If tapping Back button without tapping Set button, the setting
becomes invalid and it returns to the TOP screen.
■ The [Admin password input] screen may be displayed according to
the setting of [Enable/Disable setting] (☞ Page 42)
· If the “Unvented cylinder” is connected, the HW temp for the operation to warm up can not be set.
· Actual HW outlet temp may differ about ±3°C from the set HW temp by the operating conditions.
−22−
Schedule setting
The operation schedule of the heat pump unit can be set.
The setting of target HW amount at each time zone, the setting of day off and setting of peak-cut can be set.
1. Push the
Schedule setting switch on the panel.
2. The menu screen of [Setting of schedule] is displayed.
The summary of each menu item is as follows
① Setting of weekly operation pattern (☞ To 3)
② Setting of day off (☞ To 4)
③ Setting of peak-cut (☞ To 5)
④ Checking of operation pattern (☞ To 6)
3. Setting of weekly operation pattern (See page 24 for detail)
The target HW amount at each time zone for each day can be set.
The operation pattern can easily be set from the setting of User environment (☞ Page 48)
4. Setting of day off (See page 27 for detail)
By setting day off, the heat pump unit operation to top up can be invalid on the day set day off.
It is available to set day off ①Every week ②Specific period of time ③Specific day.
5. Setting of peak-cut (See page 29 for detail)
By limiting the maximum capacity of the heat pump unit, the power consumption can be reduced.
It is available to set on weekly basis.
6. Checking of operation pattern (See page 32 for detail)
The current operation pattern can be checked.
−23−
■ Operation method of basic operation
How to set operation pattern
The target HW amount at each time zone for each day can be set.
1. Push the
Schedule setting switch on the panel.
2. The menu screen of [Setting of schedule] is displayed.
Tap the [Setting of weekly operation pattern]
3. The selection screen of [Weekly timer] is displayed.
Tap the item of setting day.
3
2
1
① Weekdays: From Monday to Friday
② Sat, Sun: Saturday and Sunday
(☞ Go to 6)
③ All days: From Monday to Sunday
④ Each day: Go to the [Day selection] screen (☞ Go to 4)
4
4. T ap the day to be set on the display ①.
1
The current setting contents of the day tapped are displayed.
(☞ Go to 6)
2
5. For the setting day off, tap the blank column on the display
② just below the day.
Switch it Day off: [ (off)] ⇔Release: [ (blank) ]
On the day set day off, the hot water storage operation
is not done. Multiple selections of day off settings are
available.
−24−
6. The [Checking of operation pattern] screen is displayed.
When changing the setting contents, ① select the
column of the setting No. to be changed ② and tap
Change button.
■ The setting contents displayed at first may differ depending on the
set day selected (☞ Go to 3)
① Weekdays: Set operation pattern on Monday
② Sat, Sun: Set operation pattern on Saturday
③ All days: Set operation pattern on Monday
④ Each day: Set the operation pattern on the day selected
1
2
7. The [HW amount] setting screen is displayed.
▼ buttons
①S
et the HW temp by tapping ▲
(at 10% intervals)
② The setting time can be changed by tapping Time
1
3
button (☞ Go to 8)
③ When tapping Set button, the time is set and it
return to the [Checking of operation pattern] screen.
2
8. The [Set time selection] screen is displayed.
① Select the time to be set
② When tapping Set button, the time is set and it
return to the [Checking of operation pattern] screen.
(☞ Go to 9)
1
2
■ If changing the set time of weekdays, select the [Weekdays]
(☞ Go to 3) and change the time.
■ Time setting range
The time can be changed within the range show in following table.
1
2
3
4
5
6
7
8
Defaultsetting
22:00
0:00
4:00
8:00
10:00
13:00
16:00
19:00
−25−
Setting range
22:00, 23:00
from 0:00 to 3:00
from 4:00 to 7:00
8:00, 9:00
from 10:00 to 12:00
from 13:00 to 15:00
from 16:00 to 18:00
from 19:00 to 21:00
■ Operation method of basic operation
9. [Checking of operation pattern] screen is displayed
When saving the setting, tap Set button.
① In case of setting all
It shifts to the [Set all contents acknowledge] screen
(☞ Go to 10)
In
② case of individual setting
Save the setting and shift to the [Day selection]
screen (☞ Go to 4)
10. [Set all contents acknowledge] screen is displayed
Tap Yes and save the setting
After saving, it returns to the [Day selection] screen
11. If the setting is done by changing the day, please start
setting from 4.
Notabilia
By applying 9 sensors on the cylinder at installation, it is available to control the HP unit for the operation to store hot
water or for the operation to top up at 10% intervals of HW amount.
In case that 9 sensors can not be applied on the cylinder, the unit cannot detect HW amount at 10% intervals and it
can detect only the preset HW amount shown in following table depending on the applying number of sensors.
The position to apply temp sensor according to the hot water amount %
Sensor No.
Tht-1
Tht-2
Tht-3
Tht-4
Tht-5
Tht-6
Tht-7
Tht-8
Tht-9
3pcs
20%
60%
100%*2
Number of sensors to apply
4pcs
5pcs
6pcs
20%
20%
10%
50%
40%
30%
75%
60%
40%
100%*2
80%
60%
100%*2
70%
100%*2
7pcs
20%
30%
40%
50%
65%
80%
100%*2
Recommendable
8pcs
10%
20%
30%
50%
60%
70%
80%
100%*2
9pcs*1
10%
20%
30%
40%
50%
60%
70%
80%
100%*2
*1 R
ecommendable number of sensors is 9pcs.
If the number of sensors is less than 9pcs, the hot water amount cannot be detected correctly.
*2 The sensor which detects 100% of HW amount shall be applied to the position within the range of sensitive volume with consideration of dead volume which is 10% of total volume of cylinder.
However, HW amount can be set at 10% intervals arbitrarily with RC despite of the number of sensors applied.
Therefore, in such case, please take note that the unit may not be controlled for the operation to store hot water or
for the operation to top up according to the set HW amount you intended.
Ex) In case of applying 3 sensors on the cylinder.
Heat pump unit can detect only 20%, 60% and 100% of HW amount in the cylinder.
Therefore, even though 80% of HW amount is set with schedule setting, the HP unit cannot stop at storing 80% of
HW amount and it still keeps on operating until storing 100% of HW amount.
And if 40% of HW amount is set for the operation to top up, HP unit cannot start operation to top up until HW
amount decreases to 20%.
−26−
How to set day off
The day off for ①Every week ②Specific period of time ③Specific day can be set.
If the day set day off, the operation to top up on that day is not done.
1. Push the
Schedule setting switch on the panel.
2. The menu screen of [Setting of schedule] is displayed.
Tap the [Setting of day off]
3. The menu screen of [Setting of day off] is displayed.
Tap the desired period.
① Set every week (☞ Go to item 5 on Page 24)
② Set specific period of time (☞ Go to 4)
③ Set specific day (☞ Go to 8)
1
2
3
4. The detail screen of [Setting of periodical off day] is
displayed.
2
1
3
① Switch the setting [Valid] ⇔ [Invalid].
by tapping Valid/Invalid button
② If changing the set contents, tap Change button.
(☞ Go to 5)
③ When tapping Set button, the contents are saved
and return to the TOP screen.
−27−
■ Operation method of basic operation
5. Set the [Starting day].
Set the dd/mm/yy by tapping
▲
▼
buttons.
▼
buttons.
After setting the date, tap Set button.
6. Set the [Ending day].
Set the dd/mm/yy by tapping
▲
After setting the date, tap Set button.
7. The [Checking of set contents] screen is displayed
(☞ Go to 4 )
8. The detail screen of [Setting of specific day] screen is
displayed.
If changing the set contents, ① select the line of setting
No. and ② tap Change button. (☞ Go to 10)
1
9. ③ When
3
2
tapping Set button, the set contents are
saved and it returns to the TOP screen.
10. Set the [Setting of day off].
① Tap Valid/Invalid button and switch the setting
[Valid] ⇔ [Invalid]
② Set the dd/mm/yy by tapping ▲
▼ buttons.
2
11.
1
3
③ When tapping Set button, the detail screen is
displayed. (☞ Go to 8)
−28−
How to set peak-cut
Peak-cut on weekly basis can be set
1. Push the
Schedule setting switch on the panel.
2. The menu screen of [Seting of schedule] is displayed.
Tap the [Setting of peak-cut]
3. The selection screen of [Peak-cut timer] is displayed.
Tap the item of setting day.
① Weekdays: From Monday to Friday
② Sat, Sun: Saturday and Sunday (☞ Go to 6)
③ All days: From Monday to Sunday
④ Each day: Go to the [Day selection] screen
(☞Go to 4)
4. Tap the day to be set on the display ①.
The current setting contents of the day tapped are
displayed (☞ Go to 6)
1
2
1
2
5. For the setting Valid/Invalid, tap the blank column on the
display ② just below the day.
Switch Valid : [ ] ⇔Invalid [
]
On the day set invalid, the peak-cut operation is not done.
Multiple selections of invalid settings are available.
−29−
■ Operation method of basic operation
6. The [Checking of current set contents] screen is displayed.
When changing or adding the setting contents, ① select
the column of the setting No. to be changed ② and tap
Change button.
■ The setting contents displayed may differ depending on the set day
selected (☞ Go to 3)
① Weekdays: Set peak-cut on Monday
② Sat, Sun: Set peak-cut on Saturday
③ All days in a week: Set peak-cut on Monday
④ Each day: Set peak-cut on the day selected
1
2
7. The detail screen of [Timer set contents] is displayed.
① Switch the setting [Valid] ⇔ [Invalid].
by tapping Valid/Invalid button
1
2
3
② Tap Change button. and set [Start time] and [End
time]. (☞ Go to 8)
③ When tapping Peak-cut % button, the [Peak-cut %]
can be set. (☞ Go to 10)
8. Set the [Start time].
▲
▼ buttons.
The [Start time] can be set at 5-minute intervals
Set the Hour/Minute by tapping
After setting the time, tap Set button. (☞ Go to 9)
9. Set the [End time].
▲
▼ buttons.
The [End time] can be set at 5-minute intervals from 5
minutes after the [Start time] up to 24:00.
Set the Hour/Minute by tapping
After setting the time, tap Set button. (☞ Go to 11)
−30−
10. Set the [Peak-cut %].
Set the [Peak-cut %] by tapping ▲
▼ buttons.
The [Peak-cut %] can be set at 10%, 40%, 60% and 80%.
After setting the [Peak-cut %], tap Set button.
(☞ Go to 11)
11. The [Checking of set contents] screen is displayed
(☞ Go to 7 )
When tapping Set button, the set contents are
confirmed and [Checking of set contents on the day]
screen is displayed. (☞ Go to 6)
12. If changing or adding the setting contents on the same
day continuously, please start the work from 6.
13. The
[Checking of setting contents] on the day is
displayed. (☞ Go to 6)
When saving the setting, tap Set button.
① In case of setting all
It shifts to the [All set contents acknowledge] screen
(☞ Go to 14)
② In case of individual setting
Save the setting and shift to the [Day selection]
screen (☞ Go to 4)
14. [All set contents acknowledge] screen is displayed
Tap Yes and save the setting
After saving, it returns to the [Day selection] screen
15. If the setting is done by changing the day, please start
setting from 4.
−31−
■ Operation method of basic operation
How to check operation pattern
The current operation pattern can be checked
1. Push the
Schedule setting switch on the panel.
2. The menu screen of [Setting of schedule] is displayed.
Tap the [Checking of peration pattern]
3. Tap the day to be set on the display.
The current setting contents of the day tapped are
displayed.
4. The [Checking of set contents] screen is displayed.
When tapping Next button, the next setting content is
displayed.
If changing the set contents, check the [Way to set
operation pattern] (☞ Go to 6 on Page 25)
−32−
How to do the [Operation to fill up]
Until the hot water amount becomes 100%, the heat pump units are operated.
1. Start operation
When pushing Operation to fill up switch,
the [Acknowledge for operation to fill up] screen is
displayed.
■ If it is pausing by pushing Run/Pause switch, the [Operation to fill
up] cannot be started.
After starting operation by pushing Run/Pause switch, push
Operation to fill up switch.
2. When tapping
Start button, the [Operation to fill up]
starts and the TOP screen is displayed.
3. End operation
The heat pump unit keeps operation, until the [Operation
to fill up] becomes end.
However the [Operation to fill up] can be interrupted with following. procedure.
① Push Operation to fill up switch and tap Finish buttonon
the [Operation to fill up acknowledge] screen. (☞ Go to 4)
② Make the operation in Pause by pushing Run/Pause switch.
■ Even if the setting becomes [Pause] during [Operation to fill up] due
to [Setting of day off], the [Operation to fill up] is kept on.
2
1
4. When
tapping Finish button on the [Acknowledge]
screen, the [Operation to fill up] finishes and it returns to
the TOP screen.
−33−
■ Operation method of basic operation
How to set to increase or decrease the hot water amount uniformly
In case that the usage amount of hot water may vary depending on the season or the day of a week,the
hot water amount set by [Setting of operation pattern] can be increased or decreased uniformly.
1. Tap
HW amount button on the TOP screen.
2. The current hot water set amount is displayed.
3. When changing the setting, tap the
section just below
the day to be changed and change the hot water amount.
The display changes as follows by every tapping.
Blank (Usual) ⇒More (1.2 time) ⇒Less (0.8 time)
After setting, return to the TOP screen by tapping Back button.
4. When setting [More] or [Less], the set result is displayed
at the message display section on the TOP screen.
■ In case of [Usual] (not set to increase or decrease), the massageis
not displayed.
Note
Target hot water amount
・If selecting [Usual], the HW amount set with [Operation pattern setting] is target amount.
The default setting is [Normal] on all days.
・If selecting [More] or [Less] set with [Operation pattern setting], it makes the target amount [1.2 time] or
[0.8 time] of the [Usual] amount uniformly.
・If target HW amount after increasing or decreasing may exceed the maximum or minimum limit, the set
amount becomes the max. or min. value. (Max value: 100%, Min value: 10%)
In case of [Less] setting, all HW amount is
(Ex) In case that the set HW amount is to be [Less]
set 0.8 times of [Usual] amount uniformly.
100%
[Less] = X 0.8
[Less] = X 0.8
[Less] = X 0.8
50%
0%
22:00
8:00
Not lower than the lower limit
14:00
−34−
22:00
Display usage of hot water amount
Today’s usage of hot water amount is displayed on the TOP screen. And the storage amount of
hot water by connected each heat pump unit from yesterday up to now can be checked.
1. The usage of hot water amount per hour is displayed at
the [Usage of HW amount] display section on the TOP
screen.
2. If displaying the [Usage of HW amount] on yesterday, or
switching the heat pump unit to be display, tap the
[Usage of HW amount] section.
3. The [Display usage of HW amount] screen is displayed.
① Tap Yesterday button and display the [Usage of
HW amount] of yesyerday. (☞ Go to 4)
② Tap HP address button and select the HP unit to be
displayed. (☞ Go to 5)
4. T he [Display usage of HW amount] screen of yesterday
2
is displayed.
① Tap Today button and display the [Display usage of
HW amount] of today.
1
5. The selection screen of heat pump unit is displayed.
Tap HP unit No. button to be displayed and the [Usage
of HW amount] of selected HP unit is displayed.
Display of operation mode
The operation mode of the heat pump unit is displayed at the message section on the TOP screen.
Regarding the details of the operation mode, please refer to Page 10.
Message display section
−35−
■ Operation method for menu manipulation
Limited items for Sub remote control
When controlling one heat pump unit with two remote
controls, following settings cannot be done with Sub remote
control. Please set them with Main remote control.
In case of setting with Sub remote control, the icon
is
displayed on the TOP screen.
■ Setting of HW temp
■ Setting of HW amount
■ Setting of schedule
■ Administrator settings
■ More information
−36−
How to operate on the menu screen
1. Tap
Menu button on the TOP screen
2. The [Main menu] screen is displayed.
When tapping the desired menu item, the setting screen
for each item is displayed.
If there are multiple pages, the Next button on the first
page and the Previous button on the last page are
displayed.
3. When
tapping Back button, it returns to the TOP
screen.
4. On the setting screen of each item, if the
Set button is
placed, the setting content can be confirmed by tapping
Set button.
−37−
■ Operation method for menu manipulation
How to operate on the menu screen
5. Regarding the item mentioning
Administrator password
in the user’s manual, when selecting such item, the
[Input Administrator password] screen is displayed.
Enter the administrator password (4 digits number) and
tap Set button.
If the administrator password is unknown or wrong, the
setting cannot be changed.
Note
・For the administrator password which is set at the shipping from the
factory, refer to the installation manual.
When your administrator password is forgotten, initialize the
password by referring to the installation manual.
Notabilia for each setting screen
・When returning to each following screen from the setting screen, please operate following
button or switch.
■ When returning to the main menu screen …… Tap Menu button
■ When returning to the previous screen …… Tap Back button
■ When returning to the TOP screen …… Tap Run/Pause button
・If tapping Back button without tapping Set button on the way of setting, the set contents
becomes invalid and it returns to the last previous screen. And if pushing Run/Pause switch
on the way of setting, the set content becomes invalid and it returns to the TOP screen after
ending this setting mode.
・If no button operation is done for about 5 minutes on the way of setting each item, it returns to
the TOP screen automatically and the content going to set becomes invalid.
・When tapping button, the message of [Operation invalid] may be displayed, but it is not a
malfunction. Because the button operation is set [Invalid] by setting limited operation.
−38−
■ Operation method for various settings
How to set [Initial settings]
1. Tap the [Initial settings] on the main menu screen.
2. The menu screen of [Initial settings] is displayed, tap
the desired item.
…
① Clock setting
② Date and time display …
…
③ Contrast
…
④ Backlight
…
⑤ Controller sound
Go to Page 39
Go to Page 40
Go to Page 40
Go to Page 41
Go to Page 41
■ How to set clock time
1. Tap the [Clock setting] on the [Initial settings] menu
screen, the [Clock setting] screen is displayed.
Set [dd/mm/yy] by tapping
▲
▼
buttons. After
setting, tap Time button.
■ Since the hot water storage operation by HP unit is done according
to the operation pattern set with the time and date, if the time and
date is not set correctly, the hot water storage operation cannot be
done correctly.
2. Set [Hour : Minute] by tapping
▲
After setting, tap Set button.
When change [Date], tap Date button.
−39−
▼
buttons.
■ How to set date and time display
1. When tapping [Date and time display] on the [Initial
settings] menu screen, the [Date and time display] screen
is displayed.
Set date and time display [Hide] or [Display].
Set a day of the week [Hide] or [Display].
Set the display method
Set [12H].............. In case of 3:50 in the afternoon, it is
displayed as [PM 3:50]
Set [24H].............. In case of 3:50 in the afternoon, it
is displayed as [15:50]
Position of AM/PM
Set [Infront] ........... It is displayed as [PM 3:50]
Set [Back] ............ It is displayed as [3:50 PM]
2. After setting each item, tap
Set button.
■ How to adjust contrast
1. When tapping [Contrast] on the [Initial settings] menu
screen, the [Contrast] setting screen is displayed. When
tapping Dark or Bright button, the contrast on the
screen is changed. Please adjust the contrast as
desired.
2. After setting, tap
−40−
Set button.
■ Operation method of various setting
■ How to set backlight
1. When tapping [Backlight] on the [Initial settings] menu
screen, the [Backlight] setting screen is displayed.
Please set ON/OFF of Backlight and its lighting time
(From 5sec to 90 sec at 5-sec intervals).
ON …… When tapping the LCD, Backlight is lit on.
If no operation is done during the set time
period, Backlight is lit off automatically.
OFF …… E
ven if tapping the LCD, Backlight is not lit
on.
2. After setting, tap
Set button.
■ How to set controller sound
1. When tapping [controller sound] on the [Initial settings]
menu screen, the [Controller sound] setting screen is
displayed.
Please set ON/OFF of controller sound.
ON …… When tapping the button on the screen, a
“beep” sounds.
OFF …… No “beep” sounds.
−41−
How to set Administrator settings
1. Tap
the [Administrator settings] on the main menu
screen.
Since Administrator [Input password] screen is displayed
enter the Administrator password (☞ Go to Page 38)
2. S ince
the [Administrator settings] menu screen is
displayed, please tap your desired item.
… Go to page 42
① Enable/Disable setting
… Go to page 43
② Night tariff setting
… Go to page 43
③ HP unit selection
… Go to page 44
④ RC display setting
… Go to page 47
⑤ Step size of HW temp
⑥ Change administrator password … Go to page 47
… Go to page 48
⑦ User Environment
■ How to set limited operation
1. When
tapping the [Enable/Disable setting] on the
[Admininstrator settings] menu screen, the [Enable/
Disable setting] menu is displayed.
Select the following operation items from this menu, and
setting of [Operation permission] or [Operation prohibition]
is available.
If setting [Permission], operation is available.
If setting [Prohibition], the message of [Operation is
invalid] is displayed for 3sec, when operating.
Depending on the operation item, [Administrator
password] is required.
■ The behavior at prohibition setting
① Run/Pause
… Prohibit Run/Pause operation
② Change set temp
… Request to enter administrator password at setting change
③ Change amount to top up… Request to enter administrator password at setting change
④ Manual operation to fill up… Prohibit to start manual opeartion to fill up
⑤ Setting of schedule
… Request to enter administrator password at setting change
2. Tap [Permission] or [Prohibition] on each operation item.
−42−
■ Operation method of various setting
■ How to set night tariff
Regarding the power consumption for day time and for night time displayed on the [More
information] screen, the time zone to integrate power consumption can be changed.
1. When tapping the [Night tariff setting] on the [Administrator
settings] menu screen, the [Night tariff setting] screen is
displayed.
If changing [Start time] or [End time] displayed, tap
Change button.
If the power consumption in day time and in night time
is not distinguished, tap Set button and after tapping
Valid button to switch it to Invalid , tap Set button.
2. Set the [Start time] of [Night tariff setting].
Adjust the [Start time] to the desired time (at 10 min
intervals) by tapping ▲
▼ buttons.
After adjusting [Start time], tap Set button. The [End
time] setting screen is displayed.
Adjust the [End time] to the desired time (at 10 min
intervals) and Set button.
■ How to select the HP unit displayed on RC
The heat pump unit to display its operation state on the TOP screen is selectable.
1. W h e n
2
tapping the [HP unit selection] on the
[Administrator settings] menu screen, the [HP unit
selection] screen is displayed.
If change the HP unit displayed on RC, select the HP
unit to be displayed and tap ① Set button.
If not selecting the HP unit displayed on RC, tap ②
1
Valid button and switch to Invalid . After that, tap ①
Set button.
In case of Invalid setting, the HP unit to be displayed
is selected automatically.
On the [HP unit selection] screen, up to 5 units can be
displayed. If more than 6 units are connected to one
remote control, when tapping Next button, the 6th and
the subsequence HP units are displayed.
−43−
■ How to set remote control display
The display contents of remote control can be set
1. When tapping the [RC display setting] on the [Administrator
settings] menu screen, the [RC display setting] menu
screen is displayed.
① Name of RC
(☞ Go to 2)
② Name of HP unit
(☞ Go to 3)
…Set the name of RC
…Set the name of HP unit
③ Defrost operation display …Set to display [In operation
(☞ Go to 4)
for defrosting] or not
④ Status of HW amount
(☞ Go to 5)
…Set to display [Status of HW
amount] or not
2. Set the [Name of RC] displayed on the TOP screen.
Name of RC can be set with up to 9 2-byte letters
(18 1-byte letters)
It can use alphabet or numeric letter. When each button
is tapped, allowable letters to be entered are displayed.
Select letters to be input one by one on the screen.
Tap Back Next button to display next candidate.
When the Delete button is tapped, selected letters are
deleted one by one.
When the input is over, tap Set button. The name of
RC is set and displayed on the TOP screen.
−44−
■ Operation method of various setting
3. Set the name of HP unit to be added to the
HP unit No.
button.
Tap the HP unit No. button to which the name is set.
When the letter selection screen is displayed same as at
the setting of the name of RC (☞ Go to 2), enter letters.
The name of HP unit can be entered up to 4 2-byte
(8 1-byte9 letters.
When the input is over, tap Set button.
4. Set the message of [In operation for defrosting] to be
displayed or not.
When the operating conditions is to start frosting on the
HP unit during its operation, it is controlled to operate
defrosting automatically.
Display…During defrosting operation, the message of
[In operation for defrosting] is displayed.
Hide …The message of [In operation for defrosting] is
not displayed.
−45−
5. S et
the icon for the [Status of HW amount] to be
displayed or not.
If the hot water amount does not reach to the set amount,
the icon for the [Status of HW amount] is displayed.
Display…If the hot water amount does not reach to the
set amount, the icon [ ] is displayed on RC.
Hide…[ ] is not displayed on RC.
The conditions to display the icon for the [Status of HW amount]
If the hot water is not stored up to the maximum of the set HW amount in one day operation pattern, it judges that
there is some possibility not to store the hot water according to the schedule and display the icon for the [Status of
HW amount].
If the icon is lit all the times, please check whether the relation between the HW storage operation pattern and HW
usage pattern is OK or not.
(Ex.1) At normal
∗In case that the actual HW amount reaches to the set amount.
Target hot water amount
Set hot water amount
Actual hot water amount
100%
50%
0%
22:00
[Status of HW amount]
icon display
(Ex.2) When the icon is displayed
Target hot water amount
The maximum HW amount is 100%
8:00
Light on
14:00
22:00
Light off
The [Status of HW amount] icon is lit off, because
the actual HW amount reaches to the set amount.
∗In case that the actual HW amount cannot reach to the set amount.
The [Status of HW amount] icon is lit on, because the
actual HW amount cannot reach to the set amount.
100%
50%
0%
22:00
8:00
[Status of HW amount]
icon display
14:00
Light on
−46−
22:00
■ Operation method of various setting
■ How to change the step sized of HW temp.
The step size of the hot water temp can be changed.
1. When
tapping the [Step size of HW temp] on the
[Administrator settings menu screen, the [Step size of
HW temp] menu screen is displayed.
Please tap a desired step size.
5°C …The step size of HW temp can be set at 5°C
intervals
60°C⇔65°C⇔ … ⇔85°C⇔90°C
1°C …The step size of HW temp can beset at 1°C
intervals
60°C⇔61°C⇔ … ⇔89°C⇔90°C
■ How to change the Administrator password.
The Administrator password can be changed.
1. When tapping the [Change administraor password] on
the [Administrator settings] menu screen, the [Change
administrator password] screen is displayed.
Enter the password (4-digit number) and tap Set
button.
2. [Change administrator password] confirmation screen is
displayed for 3sec and it returns to the [Administrator
setting] menu screen.
−47−
■ How to set the User environment
By selecting the typical operation pattern of business type, the detailed operation pattern can be set easily.
1. When tapping the [User environment] on the [Administrator
settings] menu screen, the [User environment] menu screen
is displayed.
Please select the business type whose operation pattern
is similar to the target hot water temp of each time zone
to be set.
① Care home/hospital
② Canteen/Caffereria
③ Restaurant
④ Hotel
⑤ Business hotel
⑥ Sports club/gym
Target water level for the business model
Time
22:00
0:00
4:00
8:00
10:00
13:00
16:00
19:00
Default
value
100%
100%
100%
30%
30%
30%
30%
30%
Care home/
hospital
60%
100%
100%
80%
50%
30%
30%
30%
Canteen/
Caffereria
60%
100%
100%
80%
60%
40%
20%
20%
Restaurant
Hotel
60%
100%
100%
80%
80%
60%
40%
30%
40%
100%
100%
80%
70%
60%
50%
40%
Business
hotel
40%
100%
100%
40%
40%
100%
100%
40%
Sports club/
gym
40%
100%
100%
100%
80%
60%
40%
30%
2. When tapping the business type on the [User environment]
menu screen, the [User environment] acknowledge screen
is displayed.
When tapping Yes , the time zone and the hot water
amount of selected business type is saved as the
operation pattern to be set.
After saving, the [Setting of weekly operation pattern]
selection screen is displayed.
(☞ Go to 4 on Page 24)
−48−
■ Operation method of various setting
How to check the remote control setting
A setting list for the current setting of remote control and heat pump unit can be checked.
1. Tap the [Check of RC setting] on the menu screen.
2. If multiple heat pump units are connected to the remote
control, a list of all heat pump unit connected. Tap the
HP unit to be displayed.
On the [Select heat pump unit] screen, up to 8 units are
displayed. If 9 or more units are connected, when tapping Next
button, the 9th and the subsequent units are displayed.
3. Since the current setting contents are displayed, the
final check of settings can be done.
Displayed item
No.
Item
Set range
1
Operation mode
Run/Stop/Pause
2
Hot water temp
From 60°C to 90°C
3
—
Out of USE
4
Storage tank Type
Unvented/Open
5
% Target HW amount
From 10% to 100%
6
HW amount setting
Usual/More/Less
7
Peak-cut %
0, 40, 60, 80%
8
Peak-cut setting
Valid/Invalid
9
Period of time off
Valid/Invalid
10
Specific day off
Valid/Invalid
11
Defrosting operation
Display/Hide
12
Status of HW amount
Display/Hide
13
Night tariff start
From 00:00 up to 23:50
14
Night tariff end
From 00:00 up to 23:50
15
Next service date
Day/Month/Year
−49−
■ For maintenance
Maintenance of remote control
● Maintenance of LCD and main body of remote control.
When the surface of LCD or main body becomes dirty, wipe it with a dry soft cloth. If the dirt on
the surface cannot be removed, soak the cloth in neutral detergent diluted with water, squeeze
the cloth tightly, and clean the surface. And then wipe the surface with a dry cloth.
Request
Do not use any paint thinner, organic solvent, or strong acid.
WARNING
Do not use flammable materials (e.g. hairspray or insecticide) near the remote control.
Do not clean the remote control with benzene or paint thinner.
It may cause crack damage to the remote control, electric shocks or fire.
Maintenance of heat pump unit
● Secure the air circulation of heat pump unit
Since the heat pump unit retrieve heat from the air, much air is needed to suck If blocking the
air way to the inlet air port or from the outlet air port of heat pump unit or put something to block
the air inlet way around the unit, it may cause decreasing capacity or malfunction.
● Washing the air to refrigerant heat exchanger
When using the unit for long period, the air to refrigerant heat exchange becomes dirty and it
cannot operate properly.
Regarding the washing method, please consult with the dealer where you purchased.
● Cleaning the water circuit
Please clean the strainer in the water circuit periodically.
Maintenance of hot water storage unit (Unvented cylinder)
Regarding the maintenance of hot water storage unit, please refer to the instruction manual
attached to the hot water storage unit.
−50−
■ For maintenance
Measure for anti-freezing water in winter
If the ambient temperature around the unit becomes below 0°C, the water pipe may freeze and it
may cause damage of the heat pump unit.
Please consult with the dealer and be sure to take proper measure for anti-freezing. And if the
water may freeze, please keep the power on supplying to the unit, even if the unit is pausing,
because the heat pump unit may start operation for anti-freezing.
When stopping the unit for long period.
If you do not use the unit for more than on month, shut the main power off and drain off from the
heat pump unit and the hot water storage unit as well.
The method for draining off, please consult with the installer or the dealer.
Request
When draining off, please shut off the power in advance according to the following procedure.
① Stop the heat pump unit
Select the [Service & Maintenance] on the menu screen and select the [System off] on the
[Service & maintenance] menu screen.
* The service password is required.
② Shut off the power breaker of the heat pump unit and hot water storage unit.
When power failure occurs
If power failure occurs and water may freeze, shut off the main power and drain off from the heat
pump unit and the hot water storage unit as well.
CAUTION
If shutting the power breaker off during operation of the heat pump unit, it may cause
malfunction of the heat pump unit
−51−
■ When error happens
However, please note the following cases are not anomaly.
The cases that are not anomaly
Q The heat pump unit repeats Run and Stop
A D
uring hot water storage operation, if the outdoor air temp is rather low, the HP unit repeats
Run and Stop due to defrost operation.
During standby, if the outdoor air temp is below 5°C the water pump built in the HP unit
repeats Run and Stop in order to prevent water in the HP unit and piping from freezing.
And during standby, the fan of the air to refrigerant heat exchanger on the HP unit repeats
Run and Stop depending on the SW setting in order to prevent snow from accumulating on
the fan. (SW setting is required)
Q D
uring hot water storage operation, the surface of the air to refrigerant heat exchanger
becomes white with frost.
A If the outdoor air temp is rather low, the surface of the air to refrigerant heat exchanger may
be covered with frost during operation.
Q During hot water storage operation, water comes out from the HP unit.
A When the HP unit retrieve heat from the air, dew condensation comes out. And if the outdoor
air temp is rather low, much water comes out due to melting frost by defrost operation.
Q Hot water does not come out
A If no hot water or no water comes out, water in the pipe may be frozen. Please consult with
the dealer where you purchased.
If only water (not hot water) comes out, it is the states that hot water is not stored in the
cylinder.
Please start operation to top up or to fill up and store hot water in the cylinder.
Q Hot water amount is decreasing despite no usage of hot water.
A The display of hot water amount shows the hot water amount in the cylinder whose temp is
about 50°C or higher.
If hot water does not be used for a long period of time, hot water in the cylinder becomes
colder due to natural heat dissipation so that the display of hot water amount becomes
decreasing.
−52−
■ When error happens
If error happens on the heat pump unit, [Under protection stopping] is displayed at the message
display section.
Please do following procedures and stop operation. And inform to the dealer where you purchased.
1. The message of [Under protection stopping] is displayed
at the message display section.
Tap Menu button.
Under protection stopping.
Check the content from Menu.
2. Error code is displayed on the [Error display] screen.
Check the error code and tap Contact button
3. [Contact company] screen is displayed
(Company name and Phone No.)
If it was input in advance, it can be displayed.
−53−
■ When error happens
A list of error code
Remote
controller
Error code
Green
Red
No display
Keep flashing
Stay off
Normal
E1
E10
Keep flashing
Keep flashing
Stay off
Stay off
Normal
Normal
E31
Keep flashing
1-time flash
E31
E32
Keep flashing
1-time flash
E32
E36
Keep flashing
E37
Keep flashing
1-time flash
1-time flash
2-time flash
3-time flash
4-time flash
5-time flash
6-time flash
E36-1
E37-1
E37-2
E37-3
E37-4
E37-5
E37-6
E37-7
E37-9
E38
E39-1
E39-3
E40
E41-1
E42-1
LED on heat pump unit
Keep flashing
E38
Keep flashing
E39
Keep flashing
E40
E41
E42
Keep flashing
Keep flashing
Keep flashing
E45
Keep flashing
E48
Keep flashing
E49
E51
Keep flashing
Keep flashing
E52
Keep flashing
1-time flash
1-time flash
3-time flash
1-time flash
1-time flash
1-time flash
1-time flash
E45-1
1-time flash
2-time flash
1-time flash
1-time flash
1-time flash
2-time flash
3-time flash
4-time flash
5-time flash
6-time flash
1-time flash
3-time flash
E48-1
E48-2
E49-1
E51-1
E52-1
E52-2
E52-3
E52-4
E52-5
E52-6
E52-7
E52-8
E52-9
E53-1
E53-3
1-time flash
E54-1
2-time flash
E54-2
3-time flash
E54-3
1-time flash
1-time flash
1-time flash
1-time flash
E55-1
E56-1
E58-1
E59-1
Keep flashing
E53
Keep flashing
E54
Keep flashing
E55
E56
E58
E59
Keep flashing
Keep flashing
Keep flashing
Keep flashing
7-segment
display
−54−
Contents of inspection
Power line anomaly
No display
Communication error between remote controller and heat pump unit
Excessive connected number of heat pump units to the remote controller
Duplicated address No. of heat pump unit
Address setting error of heat pump unit
Open phase on power source
Reverse phase on power source
Discharge pipe temperature anomaly (Tho-D1)
Heat exchanger temp. sensor 1 fault (Tho-R1)
Heat exchanger temp. sensor 2 fault (Tho-R2)
Heat exchanger temp. sensor 3 fault (Tho-R3)
Heat exchanger temp. sensor 4 fault (Tho-R4)
Fault of inlet water temp. sensor 1 on gas cooler (Tho-W1)
Fault of outlet water temp. sensor 2 on gas cooler (Tho-W2)
Fault of inlet gas temp. sensor 1 on gas cooler (Tho-G1)
Fault of outlet gas temp. sensor 3 on gas cooler (Tho-G3)
Outdoor air temp. sensor fault (Tho-A)
Discharge pipe temp. sensor fault (Tho-D1)
Fault of inlet temp. sensor 1 on intermediate receiver (Tho-M1)
High pressure anomaly (HP switch 63H1-1 activated)
Power transistor overheat (for CM1) (5 times within 60 minutes)
Current cut (for CM1)
Communication error between inverter PCB and control PCB (CM1)
High pressure anomaly (HP switch 63H-1 activated)
Outdoor fan motor 1 anomaly (FMo1)
Outdoor fan motor 2 anomaly (FMo2)
Low pressure anomaly (LP sensor PSL1 activated)
Power transistor 1 overheat (for CM1) (15 minutes continuously)
Fault of hot water temp. sensor 1 on unvented cylinder (Tht-1)
Fault of hot water temp. sensor 2 on unvented cylinder (Tht-2)
Fault of hot water temp. sensor 3 on unvented cylinder (Tht-3)
Fault of hot water temp. sensor 4 on unvented cylinder (Tht-4)
Fault of hot water temp. sensor 5 on unvented cylinder (Tht-5)
Fault of hot water temp. sensor 6 on unvented cylinder (Tht-6)
Fault of hot water temp. sensor 7 on unvented cylinder (Tht-7)
Fault of hot water temp. sensor 8 on unvented cylinder (Tht-8)
Fault of hot water temp. sensor 9 on unvented cylinder (Tht-9)
Suction pipe temp. sensor 1 fault (Tho-S1)
Injection inlet temp sensor 1 fault (Tho-inj1)
Disconnection of low pressure sensor 1(PSL)
Anomalous output of low pressure sensor 1
Disconnection of high pressure sensor 1(PSH)
Anomalous output of high pressure sensor 1
Disconnection of intermediate pressure sensor 1(PSM)
Anomalous output of intermediate pressure sensor 1
Under-dome temp. sensor 1 fault (Tho-C1)
Power transistor temp. sensor 1 fault (Tho-P1)
Compressor anomaly by loss of synchronism (CM1)
Compressor start-up failure (CM1)
A list of error code (Continue)
Remote
controller
Error code
LED on heat source unit
Green
7-segment
display
Contents of inspection
E61
Keep flashing
E63
Keep flashing
Red
1-time flash
2-time flash
3-time flash
1-time flash
E64
Keep flashing
1-time flash
E64
E89
No hot water comes out (1)
No hot water comes out (2)
No hot water comes out (3)
Anomalous sound
and vibration (1)
Anomalous sound
and vibration (2)
Keep flashing
Keeps flashing
Keeps flashing
Keeps flashing
1-time flash
Stays off
Stays off
Stays off
E89
Normally
Normally
Normally
Communication error between master unit and slave unit 1
Communication error between master unit and slave unit 2
Communication error between master unit and slave unit 3
Emergency stop , AF anomaly (set at adding active filter)
Water pump anomaly (no operation)
Water pump anomaly (excessive operation)
Communication error between control PCB and CPU
See troubleshooting
See troubleshooting
See troubleshooting
Keeps flashing
Stays off
Normally
See troubleshooting
Keeps flashing
Stays off
Normally
See troubleshooting
E61-1
E61-2
E61-3
E63
Maintenance code
Maintenance code is the signal for prompt service and maintenance, not to show anomaly.
7-segment display
RC display
No.
No.
Compressor operation hours
oPE-1
M1
oPE-2
M2
oPE-3
M3
Items
Remarks
<In case that SW6-8 is OFF>
When the cumulative operation hours of compressor has elapsed 5,000hr
since the last maintenance, and it is between 4,900hr and 5,100hr.
<In case that SW6-8 is ON>
When the cumulative operation hours of compressor has elapsed 2,000hr
since the last maintenance, and it is between 1,900hr and 2,100hr.
<In case that SW6-8 is OFF>
Synchronizing with the timing of alarming by
When the cumulative operation hours of compressor the simple remote monitoring equipment
has elapsed 10,000hr since the last maintenance.
<In case that SW6-8 is ON>
When the cumulative operation hours of compressor
has elapsed 5,000hr since the last maintenance
When the cumulative operation hours of compressor
has elapsed 30,000hr since the last maintenance.
Water pump operation hours
oPE-11
M11
oPE-12
M12
oPE-13
M13
Setting error
oPE-20
oPE-21
oPE-22
Error information
oPE-30
oPE-32
oPE-33
oPE-34
oPE-35
When the cumulative operation hours of water pump has elapsed 5,000hr
since the last maintenance, and it is between 4,900hr and 5,100hr.
When the cumulative operation hours of water pump Synchronizing with the timing of alarming by
has elapsed 10,000hr since the last maintenance.
the simple remote monitoring equipment
When the cumulative operation hours of water pump
has elapsed 20,000hr since the last maintenance.
M20
M21
M22
Setting error for type of cylinder
Setting error of heat pump unit model
Setting error of master/slave units
M30
M32
M33
M34
M35
Detection of AF error
But E63 is not displayed
Detection of drying up water
It is always displayed at test run
Detection of disconnection of cylinder water temp sensor
Detection of suspension of water supply
Detection of water pump error
−55−
Check setting of SW3-3 is OFF for unvented cylinder
Kept SW4-1, -2, -3, -4 “OFF” (Factory default)
Check setting of SW4-7 and -8
■ Contact company
From the menu screen, the service contact can be seen.
1. Please tap [Contact company] on the menu screen.
■ Next service date
If the setting of [Next service date] was done on the [Service & Maintenance] menu, the following
screen is displayed for 5sec at starting operation and for 20sec at ending operation.
And when the [Next service date] has passed by, the icon [ ] is displayed on the TOP screen.
If the [Next service date] is coming or the icon [ ] is displayed, please contact to the contact
company displayed on RC or the dealer where you purchased.
When the [Next service date] has passed by, the icon [ ] is
displayed on the TOP screen.
If the [Next service date] was set, the screen at left is
displayed at starting operation or ending operation.
−56−
■ When [Periodical check] is displayed
When [Periodical check 1] or [Periodical check 2] is displayed
In order to inform the periodical inspection period of heat pump unit, [Periodical check 1] or
[Periodical check 2] may be displayed at the message section of the TOP screen.
If the following display of periodical check is displayed, please
ask periodical check to the contact company displayed on the
[Contact company] screen or the dealer where you purchased.
· Periodical check 1 P
lease do periodical check of the
parts for water circuit.
· Periodical check 2 P
lease do periodical check of the
parts for refrigerant circuit.
■ If keeping on using without doing emergency check, it may cause
damage of the heat pump unit.
■ After-sales service.
● Inform your dealer
● Repairs after Warranty Period
Consult your dealer. Fare-paying services may be
possible at the request of customer.
● Model name
● Date of installation
● Failure conditions: As precise as possible.
● Your address, name, and telephone number
● Inquiry about After-sale Service
Contact your dealer or the service contact.
● Moving
The Moving of the unit requires special technology.
Consult your dealer. Necessary expenses for the
moving of the unit will be charged.
−57−
■ Specifications
Model
Item
Power supply
Operation to top up
(In intermediate season)*1
Operation to top up
(In cold region)*2
Operating sound*3
Outside dimension
Current
Heating capacity
Water amount
Power consumption
COP
Heating capacity
Water amount
Power consumption
COP
Height
Width
Depth
Max
Starting
Unit weight
Retained water amount
Color
Compressor
Refrigerant
Refrigerant oil
Type × Pcs
Nominal output
Type
Charged amount
Type
Charged volume
Crankcase heater
Anti-freezing heater
for water pipe
for drain pan
for drain hose
Heat exchanger, Air side
Heat exchanger, Water side(Gas cooler)
Type
Fan
Output × Pcs
Air volume
Type × output
Water pump
Materials contacting to water
Actual pump head
Outdoor air temp
Usage temp range
Feed water inlet temp
Hot water outlet temp
Water pressure range
Defrost
Vibration and sound proofing devices
Protection devices
Pipe size
Electric wiring
Design pressure
IP code
Feed water inlet
Hot water outlet
Drain water outlet
Earth leakage breaker
Power cable size
Moulded-case circuit breaker
Grounding wire size
Remote controller wire size
ESA30E-25
3-phase 380V ±5% / 400V ±5% / 415V ±5% 50Hz
kW
30
Liter/min
8.97
kW
6.98
–
4.3
kW
30
Liter/min
5.06
kW
10.73
–
2.8
dB(A)
58
mm
1,690
mm
1,350
mm
720 + 35 (Water pipe connection)
A
21
A
5
kg
375 (During operation 385)
L
10
Stucco white (4.2Y7.5/1.1 approx.)
Hermetic inverter compressor × 1
kW
6.4
R744 (CO2)
kg
8.5
MA68
cc
1200
W
20
W
48 × 3
W
40 × 2
W
40 × 2 + 48
Copper pipe straight fin type
Copper pipe coil type
Axial flow type (direct coupled motor) × 2
W
386 × 2
260
m3/min
Non-self-suction spiral type inverter pump × 100W
Bronze, SCS13
m (kPa)
5m (49kPa) @17Liter/min
°C
–25 to +43
°C
5-63
°C
60-90
kPa
500 or lower
Hot gas type
Compressor: placed on anti-vibration rubber and wrapped with sound insulation
High pressure switch, over current protection, power transistor overheat
protection and anomalous high pressure protection
Rc3/4 (Copper 20A)
Rc3/4 (Copper 20A)
Rc3/4 (Copper 20A)
30A, 30mA, 0.1sec
□14 × 4 (Length 40m)
Rated corrent: 30A, switch capacity: 30A
M6
0.3mm2 × 2cores shielding wire (MVVS)
MPa
High pressure: 14.0, Low pressure: 8.5
IP24
(Note)
1. Performance of operation to top up in intermediate season shows the capacity measured under the conditions that outdoor air temp is 16°C
DB/12°C WB, water inlet temp is 17°C and hot water outlet temp is 65°C.
2. Performance of operation to top up in cold region shows the capacity measured under the conditions that outdoor air temp is –7°C DB/–8°C WB,
water inlet temp is 5°C and hot water outlet temp is 90°C excluding heater for anti-freezing water (345W).
3. Operating sound shows a value measured at 1m in front of the unit and 1m above the floor in anechoic room where the sound is resonated a little.
Accordingly if the unit is installed on actual site, it is normal that the measured sound there is higher than the value shown above, because it is
influenced by surrounding noise and echo in the room.
4. The actual hot water outlet temp may vary ±3°C from target temp according to the change of outdoor Fixing heat pump unit
air temp and water inlet temp. And then if feed water inlet temp is 30°C or higher and outdoor air temp
Anchor bolt
M10 × 4
is 25°C or higher, hot water outlet temp may be controlled not to increase too high.
According to the installation conditions,
5. Please use the clean water. The water quality should follow a guideline of JRA-GL. 02:1994.
If the water quality is out of the standard, it may cause troubles such as scale buildup and/or corrosion. please take a measure to prevent from
falling, cross wind and heavy snow.
6. These articles mentioned above may vary without any notice according to the development status.
−58−
EC DECLARATION OF CONFORMITY
We
MITSUBISHI HEAVY INDUSTRIES, LTD.
AIR-CONDITIONING & REFRIGERATION DIVISION
3-1, Asahi, Nishibiwajima-cho, Kiyosu,
Aichi, 452-8561, JAPAN
declare under our sole responsibility that the apparatus
Description of apparatus: Heat Pump Water Heater
Model name: ESA30E Series
referred to in this declaration conforms with the following directives.
Relevant EC Directives :
Machinery Directive 2006/42/EC
Applied Standards :
EN 378-2
EN 60335-1
EN 60335-2-40
Authorized representative
in EU :
MITSUBISHI HEAVY INDUSTRIES AIR-CONDITIONING EUROPE, LTD.
7 Roundwood Avenue, Stockley Park, Uxbridge, Middlesex, UB11 1AX, United Kingdom
Note : About the detail of Conformity model, see EC DECLARATION OF CONFORMITY sheet
included in a package
AIR-CONDITIONING & REFRIGERATION DIVISION
3-1, Asahi, Nishibiwajima-cho, Kiyosu, Aichi, 452-8561, Japan
−59−
http ://www.mhi.co.jp
AIR-CONDITIONING & REFRIGERATION DIVISION
3-1, Asahi, Nishibiwajima-cho, Kiyosu, Aichi, 452-8561, Japan
http ://www.mhi.co.jp
MITSUBISHI HEAVY INDUSTRIES AIR-CONDITIONING EUROPE, LTD.
7 Roundwood Avenue, Stockley Park, Uxbridge, Middlesex, UB11 1AX, United Kingdom
Tel : +44-20-7025-2750
Fax : +44-20-7025-2751
http ://www.mhiae.com