1
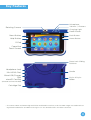
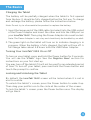
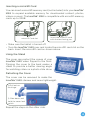
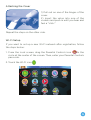
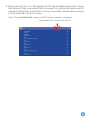
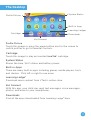
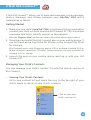
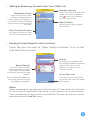
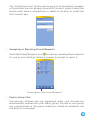
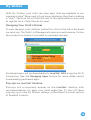
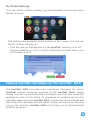
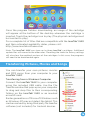
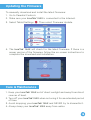
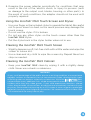
User's Manual
For troubleshooting tips, visit: www.vtechkids.com/tutorials/innotabmax
Register Now!
Register your InnoTab® MAX to receive:
• A one year limited warranty1
• Two FREE VTech downloads
• One Toca Boca bonus app
(1) CHARGE2 your InnoTab® MAX using the included USB cable and
adapter, and then power on the tablet.
(2)SET the date and time, and establish a Wi-Fi connection. Touch
the checkmark when the Wi-Fi setup is done.
(3)REGISTER3 your InnoTab® MAX by creating a Parent Account and
assigning Kid Connect IDs for yourself and your child. Then, choose
one Toca Boca bonus app4.
(4)BROWSE the Learning Lodge® and select an additional two free
VTech apps4 to download.
(5)PLAY, LEARN & CONNECT! Have fun with your InnoTab® MAX!
Please see the Warranty Sheet for details.
The battery should be fully charged before the first use. See the Charging the Tablet section for details.
3
Firmware update may be required before registration.
4
For first-time registration and designated content only.
1
2
1
Key Features
Microphone
Rotating Camera
Volume -/+ Buttons
Charging Light
Power Button
Menu Button
Back Button
Help Button
Home Button
D-Pad
Capacitive
Touch Screen
Cover Lock Sliding
Switches
Headphone Jack
Mini-HDMI5 Port
Micro-USB/Charger
Port
microSD Card Slot
Handle
Stylus & Stylus
Holder
(microSD card not included)
Cartridge Slot
5
The terms HDMI and HDMI High-Definition Multimedia Interface, and the HDMI Logo are trademarks or
registered trademarks of HDMI Licensing LLC in the United States and other countries.
2
The Basics
Charging the Tablet
The battery will be partially charged when the tablet is first opened
from the box. It should be fully charged before the first use. To charge
and recharge the battery, please follow the instructions below.
Note: Do not try to disassemble the product to replace the battery.
1. Insert the larger end of the USB cable (included) into the USB socket
of the Power Adapter and insert the other end into the USB port on
your InnoTab® MAX. Then, plug the Power Adapter into a wall socket.
Note: The Power Adapter is not a toy and should only be handled by an adult.
2.The green light on the tablet will turn on to indicate charging is in
progress. When the battery is fully charged, the light will turn off. A
full charge takes about 4.5 hours with the USB Power Adapter.
Turning Your InnoTab® MAX On or Off
To turn on your tablet, press and hold the Power button for 3 seconds.
You will see the VTech® logo. See the Register Now! section for
instructions on your first start up.
You may turn off the tablet if it will not be used for an extended period
of time. To turn off your tablet, press and hold the Power button and
touch the prompt to confirm.
Locking and Unlocking the Tablet
By default, the InnoTab® MAX screen will be locked when it is not in
use for a while.
To unlock the tablet 's screen, press the Power button to wake it up.
Then drag your profile icon to the circle at the center of the screen.
To lock the tablet 's screen, press the Power button once. The display
will go black.
3
Inserting a microSD Card
You can insert a microSD memory card (not included) into your InnoTab®
MAX to expand available memory for downloaded content, photos,
videos or music. The InnoTab® MAX is compatible with microSD memory
cards up to 32GB.
microSD Card slot
Insert the microSD card
with the text facing you.
• Make sure the tablet is turned off.
• Turn the InnoTab® MAX over, and locate the microSD card slot on the
back. Insert the microSD card as shown above.
Using the Stand
The cover can protect the screen of your
InnoTab® MAX when flipped to the front.
Flipping the cover to the back makes a
stand to provide a better viewing angle
for watching videos or a photo slide show.
Detaching the Cover
The cover can be removed to make the
InnoTab® MAX slimmer and more lightweight.
2) Pull out on
the hinge.
1) Slide down and
hold the cover lock
switch.
Repeat the steps on the other side.
4
Attaching the Cover
1) Pull out on one of the hinges of the
cover.
2) Insert the valve into one of the
sockets and push in until you hear and
feel a "click."
Repeat the steps on the other side.
Wi-Fi Setup
If you want to set up a new Wi-Fi network after registration, follow
the steps below:
1. From the Lock screen, drag the Parental Controls icon
to the
circle at the center of the screen. Then, enter your Parental Controls
passcode.
2.Touch the Wi-Fi icon
.
5
3.Make sure Wi-Fi is on. The tablet will list the available networks. Touch
the network that you would like to connect to, and enter a password if
needed. When the connection is set up, touch the checkmark to return
to the Parental Controls menu.
Note: The InnoTab® MAX supports 802.11 b/g/n wireless standards.
Touch here first to turn on Wi-Fi.
6
The Desktop
System Status
Profile Picture
Built-in Apps
Learning Lodge®
Cartridge
Downloads
Kid Connect
Profile Picture
Touch this image or press the menu button next to the screen to
switch profiles or go to Parental Controls.
Cartridge
Touch this image to play an inserted InnoTab® cartridge.
System Status
Shows the time, Wi-Fi status and battery power.
Built-in Apps
There are many built-in apps including games, media players, tools
and shelves. Flick left or right to see more.
Learning Lodge®
Download more content from VTech’s online store.
Kid Connect
With this app, your child can send text messages, voice messages,
photos, and more to your smartphone.
Downloads
Find all the apps downloaded from Learning Lodge® here.
7
VTech Kid ConnectTM
VTech Kid ConnectTM allows you to share text messages, voice messages,
photos, drawings, and stickers between your InnoTab® MAX and a
smartphone or tablet.
Getting Started
1. Make sure your child’s InnoTab® MAX is registered. During registration
you and your child will both receive a Kid Connect ID. This is a unique
username that helps identify people on the network.
(See the Register Now! section for more information about registration.)
2. Download and install the Kid Connect app on your mobile device. It
can be found at the App Store for iPhone or the Google Play Store
for Android.
(Kid Connect works with iPhone4 or above, iOS5.x or above; Android 2.3.3 or
above, minimum resolution: 320x480. Some functions are only available on
Android 4.0.3 or above).
3. Launch the app on your mobile device and log in with your Kid
Connect ID.
Managing Your Child’s Contacts
You can manage your child’s contact list with the mobile version of
Kid Connect.
• Viewing Your Child’s Contacts
Go to your contact list and touch the icon to the far right of your
child’s name to see all of your child’s contacts.
Click to view your
child’s contact list.
8
• Adding or Removing Contacts from Your Child’s List.
Remove contacts
Immediate Family
Your name and any other
children registered under
your account will appear in
this section. These are added
automatically and cannot be
removed.
Touch the wrench to enter edit
mode, then touch the delete
next to any contacts
icon
you wish to remove.
Add Contacts
Touch the plus sign to add a
new contact.
Other Family & Friends
Any other contacts on your
child’s list will appear here.
• Sending Friend Requests and Invitations
Touch the plus icon next to "Other Family & Friends" to go to the
Add New Friend screen:
Search
Search Results
Once the search is done,
touch the correct profile,
then follow the on-screen
instructions to send a friend
request.
The new friend will appear on
your child's contact list once
the request is accepted.
To search for someone who
has already joined Kid Connect,
type in their name or Kid
Connect ID and touch the
"Search" button.
Invite New User
Click here to invite any family
or friends who have not joined
Kid Connect.
Notes:
VTech recommends searching by the Kid Connect ID. Your child’s Kid Connect
ID can be found underneath their name in your contact list. Friend requests
from smartphone to smartphone are prohibited. The app can only be used to
communicate with InnoTab® users.
9
The "Invite New User" button can be used to invite a family member
or friend who has not already joined Kid Connect. Keep in mind the
invitee must have a smartphone or tablet to be able to install the
Kid Connect app.
• Accepting or Rejecting Friend Requests
Touch the Friend Requests icon
to view any pending friend requests
for you or your children. Select a request to accept or reject it.
Touch here to view Friend Requests.
• Family Group Chat
You and any children who are registered under your account are
automatically entered into your family group. Anyone in your group
can communicate in the group chatroom, where all members can
see and post messages.
10
To see who’s in your family group touch the icon to the far right of
your family icon in your contact list.
Touch to see the members of
your family group.
To add or remove members from your family group, follow the same
steps outlined in the sections above.
Parental Controls
From the Parental Controls screen, you can access all of the kid-safe
settings available on the InnoTab® MAX. From the lock screen, access
to the
Parental Controls by dragging the Parental Controls icon
circle at the middle of the screen.
Touch this
image or press
the menu key
to the left to
exit Parental
Controls.
Parental
Control
Settings
Wi-Fi
Touch this icon to set up a Wi-Fi connection.
Time Controls
Touch this icon to limit the amount of time your child
is allowed to play with the tablet.
Content Lock
Touch this icon to lock specific content from being
accidentally deleted.
Web Browser
Controls
Touch this icon to add or remove sites from each
child’s approved list. Navigation to sites that have not
been approved is prohibited.
Profile Manager
Touch this icon to add or remove user profiles from
the tablet.
Parent Account
Touch this icon to view or edit Parent Account
information, including My Wishes settings.
11
Progress Log
Touch this icon to view your child’s learning progress.
Note: The Progress Log can only track progress on
InnoTab® cartridge games.
Tablet Settings
Touch this icon to configure the tablet’s system
settings.
Learning Lodge®
Touch this icon to browse Learning Lodge® and
purchase games, e-books, music, videos and apps.
Gift Gallery
Download
Manager
Touch this icon to reward your child with extra Kid
Connect stickers, desktop themes and My Magic
Beanstalk gifts.
Use this to install or uninstall apps that you bought
from Learning Lodge®. See the Managing Apps
section for more details.
To exit from Parental Controls, press the Menu key
Log Out to exit to the lock screen.
and then touch
Managing Apps
From the Parental Controls screen touch the Download Manager icon
to manage the apps you have purchased from Learning Lodge® for
your InnoTab® MAX.
• Downloading or Removing Apps
From the Download Manager menu, touch any of the category tabs
to view the apps in the selected category.
Trash Can
Touch to remove
an installed app.
Stop
Touch to stop
downloading an app.
Download
Touch to download
and install an app.
12
• Automatic Download Settings
By default, newly purchased apps or updated apps will be
downloaded automatically. If they do not automatically download,
make sure automatic downloading is turned on in Tablet Settings.
Turn this on to
download newly
purchased apps
automatically.
Turn this on
to download
app updates
automatically.
Get More from Learning Lodge®
You can visit Learning Lodge® to expand the content on your child’s
InnoTab® MAX anytime you have a Wi-Fi connection. To access Learning
Lodge® from the InnoTab® MAX just touch the Learning Lodge® icon at
the bottom of the Parental Controls desktop. To visit from a personal
computer, go to http://www.vtechkids.com and click Downloads on
the top menu bar.
By default, when an internet connection is available on your child’s
InnoTab® MAX, any recently purchased apps will download automatically
even if you purchased them from another device.
13
My Wishes
With My Wishes, your child can view apps that are available in our
Learning Lodge® library and let you know what apps they like by making
a "wish". The wish list will then be sent to the email address you used
to register for a VTech Parent Account.
Managing Your Child’s Wishes
To view the apps your child has wished for, click on the link in the email
we send you. The Wish List Manager will open in a web browser. Follow
the prompts on screen if you want to purchase the app.
Purchased apps will be downloaded to InnoTab® MAX using the Wi-Fi
Connection. See the Managing Apps section for more details about
downloading purchased apps.
Pop-Ups on InnoTab® Desktop
Pop-ups will occasionally appear on the InnoTab® desktop with
recommendations for apps your child might like. To turn off these
pop-ups, go to the My Wishes settings in the Parent Account section
of Parental Controls.
14
My Wishes Settings
To access the My Wishes settings, go into Parental Controls and select
Parent Account.
The settings are available at the bottom of the screen. You can use
the My Wishes settings to:
• Turn the pop-up that appears on the InnoTab® desktop on or off.
• Choose whether or not to receive notification e-mails when your
child makes a wish.
Playing InnoTab Cartridges on the InnoTab® MAX
The InnoTab® MAX can play most cartridges designed for earlier
InnoTab® models. However, because of the InnoTab® MAX’s larger
screen, in order to play these older cartridges, you must first download
updated versions to the tablet. To download an updated version of a
cartridge, make sure your InnoTab® MAX is connected to the Internet and
then insert the cartridge into the tablet. When you touch the cartridge
icon on the desktop, InnoTab® MAX will prompt you to download the
updated program.
15
Once the program finishes downloading, an image of the cartridge
will appear at the bottom of the desktop whenever the cartridge is
inserted. Touch the cartridge icon to play. (The physical cartridge must
be inserted to play.)
For a complete list of titles that are compatible with the InnoTab® MAX
and their estimated availability dates, please visit:
http://www.innotabsoftware.com
Note: The InnoTab® MAX can store up to three InnoTab® cartridges. Additional
update files will overwrite the older ones. Resetting the tablet to factory settings
will also clear the updated versions of the cartridges. In this case, the programs
will need to be downloaded again.
Transferring Pictures, Movies and Songs
You can transfer your own pictures, movies
and MP3 songs from your computer to your
InnoTab® MAX.
Transferring from a Windows Computer
Connect the InnoTab® MAX to your computer
using the included USB cable. Use the File
Transfer window that pops up on your computer
to drag and drop files to their corresponding
folders on the InnoTab® MAX or an inserted
microSD card.
Earlier generations of Microsoft Windows such
as Windows XP may not detect the tablet. This
can be resolved by using third party file transfer
software (not included) for Android devices.
16
Transferring from a Macintosh Computer
Visit the official Android website below to download the Android File
Transfer software. Follow the instructions on the website to install the
software and transfer files:
https://www.android.com/filetransfer/
Converting Videos for the InnoTab® MAX
To convert your video content for the InnoTab® MAX, use the following
recommended settings:
Format: H.264 main profile video and AAC audio in an MP4 file.
Resolution: 1024x578 if source is 16:9. Other resolutions are supported
but are not optimal for the device.
Video birate: 2000kbps. Other birates are supported but are not
optimal for the device.
Audio birate: 128kbps constant birate. Other birates are supported but
are not optimal for the device.
Maximum file size: 4GB (over 4 hours of play time using the recommended
settings).
Notes:
• There may be legal restrictions associated with the use of commercial video
files, movies, programs and other content for which VTech® accepts no
responsibility or liability. Users should take responsibility for observing relevant
copyright law in their country for this type of media.
• VTech® does not endorse, support or accept any liability for any third party
software for file transfer or media conversion.
17
Updating the Firmware
To manually download and install the latest firmware:
1. Go to Parental Controls.
2. Make sure your InnoTab® MAX is connected to the Internet.
3. Select Tablet Settings
. Then select Firmware Update.
4. The InnoTab® MAX will check for the latest firmware. If there is a
newer version of the firmware, follow the on-screen instructions to
complete the download and installation.
Care & Maintenance
1. Keep your InnoTab® MAX out of direct sunlight and away from direct
sources of heat.
2.Turn off your InnoTab® MAX when not using it for an extended period
of time.
3.Avoid dropping your InnoTab® MAX and NEVER try to dismantle it.
4.Always keep your InnoTab® MAX away from water.
18
5.Examine the power adapter periodically for conditions that may
result in the risk of fire, electric shock, or injury to persons (such
as damage to the output cord, blades, housing, or other parts). In
the event of such conditions, the adapter should not be used until
properly repaired.
Using the InnoTab® MAX Touch Screen and Stylus:
• Use your finger or the included stylus to operate the tablet. Be careful
not to press down too hard, as too much pressure may damage the
touch screen.
• Do not use the stylus if it is broken.
• Do not use any other stylus on the touch screen other than the
InnoTab® MAX stylus.
• Put the stylus back in the stylus holder when not in use.
Cleaning the InnoTab® MAX Touch Screen
• Slightly dampen a soft, lint-free cloth with a little water and wipe the
screen to loosen dirt.
• Use a clean and dry cloth to wipe the screen dry. Repeat these two
steps as needed.
Cleaning the InnoTab® MAX Cabinet
• Keep your InnoTab® MAX clean by wiping it with a slightly damp
cloth. Never use solvents or abrasives.
WARNING
A very small percentage of the public, due to an existing condition, may experience
epileptic seizures or momentary loss of consciousness when viewing certain types
of flashing colors or patterns, especially on television. While the InnoTab® MAX does
not contribute to any additional risks, we do recommend that parents supervise their
children while they play video games. If your child experiences dizziness, altered
vision, disorientation, or convulsions, discontinue use immediately and consult your
physician. Please note that focusing on an LCD screen at close range for a prolonged
period of time may cause fatigue or discomfort. We recommend that children take
a 15-minute break for every hour of play.
19
Troubleshooting
Problem
Screen displays with
no sound.
Screen turns on, then
immediately off.
No picture (or
incorrect picture) on
screen, and pressing
the Power button has
no effect.
No screen display after
pressing Power button.
The cartridge icon
does not appear on
desktop.
Possible Reason
Volume is turned
down.
Headphones are
connected.
Battery power
is low.
Program needs to
be reset.
Battery power
is low.
Poor cartridge
connection.
The cartridge is
not compatible.
Solution
Adjust the volume control.
Unplug headphones from
headphone jack.
Recharge the battery.
Force the InnoTab® to turn off by
holding down the Power button
until the screen shuts off in
approximately 8 seconds. Then
turn the tablet back on again.
Recharge the battery, or plug the
tablet in to a wall outlet.
Remove the cartridge, clean it if
necessary, and then re-insert it
into the InnoTab® MAX.
Check the InnoTab® MAX desktop
for a message saying that the
cartridge is not compatible with
the InnoTab® MAX.
Safety Precautions for Using the Battery and Charger
Important Notes:
• This charger is not a toy. This charger is not intended for use by
children.
• The tablet will charge at temperarures between 41°F~95°F(5°C~35°C).
If the tablet is not charging properly, please move it to a location
with a suitable temperature.
• The battery is not removable.
• Disconnect the tablet from the Power Adapter and turn off the tablet
before cleaning.
• Only use the Power Adapter that is included with this package.
• To prevent fire or electric shock, do not expose the unit to rain or
moisture.
20
• To preserve battery life, the InnoTab® MAX will go into a sleep mode
automatically when there is no input for a few minutes. The Wi-Fi
connection will also be disconnected when the battery power is low.
Standard guidelines for adapter toys and electrically
operated products
• As with all electrical products, precautions should be used and
observed during handling and use to prevent electric shock.
• Do not leave the toy plugged in for extended periods of time.
• The toy shall only be used with the included adapter.
• Never clean a plugged-in toy with liquid.
• Never use more than one adapter.
• The adapter is not a toy.
• Parents should periodically examine the adapter for conditions that
may result in the risk of fire, electric shock, or injury to persons. In
the event of such conditions, the adapter should not be used until
properly repaired.
Caution
When not charging the battery or connected to a computer, close the USB port
cover on the InnoTab® MAX for safety.
Only use the InnoTab® MAX Power Adapter and Micro-USB cable to charge your
device.
Using a different charger may damage your InnoTab® MAX.
Please note: VTech is the only service provider that is authorized to replace the
battery on your InnoTab® MAX. Any attempt to remove or replace the battery by
a third party or by yourself may damage your InnoTab® MAX and will void your
warranty. If you feel your battery needs service, please contact VTech's Consumer
Services Department.
Technical Support
• If you have a problem that cannot be solved by using this manual, we
encourage you to visit us online or contact our Consumer Services
Department with any problems and/or suggestions that you might
have. A support representative will be happy to assist you. Before
requesting support, please be ready to provide or include the
information below:
• The name of your product or model number (the model number is
located on the back of the display panel).
• The actual problem you are experiencing.
• The actions you took right before the problem started.
21
Internet : www.vtechkids.com
Phone : 1-800-521-2010 in the U.S. or 1-877-352-8697 in Canada
Copyright Notices
© 2014 VTech®. All Rights Reserved. InnoTab®, Learning Lodge®, VTech®
and the VTech® logo are registered trademarks of VTech. All other
trademarks are property of their respective owners. The terms HDMI
and HDMI High-Definition Multimedia Interface, and the HDMI Logo
are trademarks or registered trademarks of HDMI Licensing LLC in the
United States and other countries.
IMPORTANT NOTE:
Creating and developing the InnoTab® MAX is accompanied by a
responsibility that we at VTech® take very seriously. We make every
effort to ensure the accuracy of the information that forms the value of
our products. However, errors sometimes can occur. It is important for
you to know that we stand behind our products and encourage you to
call our Consumer Services Department at 1-800-521-2010 in the U.S.
or 1-877-352-8697 in Canada, with any problems and/or suggestions
that you might have. A service representative will be happy to help
you. This product is licensed under the AVC patent portfolio license
for the personal use of a consumer or other uses in which it does not
receive remuneration to
(i) encode video in compliance with the AVC standard (“AVC video”)
and/or
(ii) decode AVC video that was encoded by a consumer engaged in a
personal activity and/or was obtained from a video provider licensed
to provide AVC video.
No license is granted or shall be implied for any other use. Additional
information may be obtained from MPEG LA, L.L.C. See
http://www.mpegla.com
22
Disclaimer and Limitation of Liability
VTech® Electronics North America, L.L.C. and its suppliers assume no
responsibility for any damage or loss resulting from the use of this
handbook. VTech® Electronics North America, L.L.C. and its suppliers
assume no responsibility for any loss or claims by third parties that
may arise through the use of this software. VTech® Electronics North
America, L.L.C. and its suppliers assume no responsibility for any
damage or loss caused by deletion of data as a result of malfunction,
dead battery, or repairs. Be sure to make backup copies of important
data on other media to protect against data loss. Company: VTech®
Electronics North America, L.L.C.
Address: 1156 W. Shure Drive, Suite 200, Arlington Heights, IL 60004 USA
Phone : 1-800-521-2010 in the U.S. or 1-877-352-8697 in Canada
Note: This equipment has been tested and found to comply with the
limits for a Class B digital device, pursuant to Part 15 of the FCC Rules.
These limits are designed to provide reasonable protection against
harmful interference in a residential installation. This equipment
generates, uses and can radiate radio frequency energy and, if not
installed and used in accordance with the instructions, may cause
harmful interference to radio communications. However, there is no
guarantee that interference will not occur in a particular installation. If
this equipment does cause harmful interference to radio or television
reception, which can be determined by turning the equipment off and
on, the user is encouraged to try to correct the interference by one or
more of the following measures:
• Reorient or relocate the receiving antenna.
• Increase the separation between the equipment and receiver.
• Connect the equipment into an outlet on a circuit different from that
to which the receiver is connected.
• Consult the dealer or an experienced radio/TV technician for help.
23
THIS DEVICE COMPLIES WITH PART 15 OF FCC RULES AND INDUSTRY
CANADA LICENCE-EXEMPT RSS STANDARD(S). OPERATION IS
SUBJECT TO THE FOLLOWING TWO CONDITIONS: (1) THIS DEVICE
MAY NOT CAUSE INTERFERENCE, AND (2) THIS DEVICE MUST
ACCEPT ANY INTERFERENCE, INCLUDING INTERFERENCE THAT MAY
CAUSE UNDESIRED OPERATION OF THE DEVICE.
LE PRÉSENT APPAREIL EST CONFORME AUX CNR D'INDUSTRIE
CANADA APPLICABLES AUX APPAREILS RADIO EXEMPTS DE
LICENCE. L'EXPLOITATION EST AUTORISÉE AUX DEUX CONDITIONS
SUIVANTES: (1) L'APPAREIL NE DOIT PAS PRODUIRE DE BROUILLAGE,
ET (2) L'UTILISATEUR DE L'APPAREIL DOIT ACCEPTER TOUT
BROUILLAGE RADIOÉLECTRIQUE SUBI, MÊME SI LE BROUILLAGE
EST SUSCEPTIBLE D'EN COMPROMETTRE LE FONCTIONNEMENT.
Caution: Changes or modifications not expressly approved by the party
responsible for compliance could void the user’s authority to operate
the equipment.
A USB cable with a ferrite core must be used with this equipment to
ensure compliance with the Class B FCC limits.
Legal Notices
Use of VTech Kid ConnectTM
• VTech Kid ConnectTM is a subscription-based service. The VTech Kid
ConnectTM service included with this purchase is free for one year
from the date of registration of this InnoTab® MAX.
• The VTech Kid ConnectTM app is available through the Apple App
Store and Google Play and comes with a one year free VTech
Kid ConnectTM subscription. Mobile data service and an Internet
connection are required.
Version: 0
Release date: Sep.19.2014
2014 © VTech US
24