1
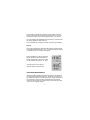
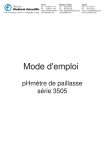
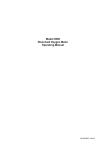
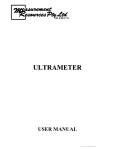
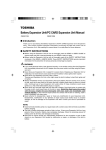
MODEL 970
DISSOLVED OXYGEN METER
OPERATING MANUAL
970 350/REV A/10-03
MODEL 970
DISSOLVED OXYGEN METER
OPERATING MANUAL
CONTENTS
Introduction
Specification
Installation
Displays
Controls
Preparation for Use
Operation
Calibration
Performing Measurements
Data Storage
Good Practice Guidelines
Maintenance
Troubleshooting Guide
Battery Replacement
Optional Accessories
Auto Shut Off
Health & Safety
EC Declaration of Conformity
1
1
2
2-3
4
5
6
6-8
8
9
10-11
11-12
12-14
14
14
14
15
16
MODEL 970
DISSOLVED OXYGEN METER
OPERATING MANUAL
INTRODUCTION
The Model 970 is a general purpose, hand held Dissolved Oxygen
Meter allowing accurate measurement with ease of use. The
custom liquid crystal display simultaneously shows percentage
dissolved oxygen or oxygen concentration (mg/l) and temperature.
The dissolved oxygen reading is automatically corrected for
temperature. Corrections for pressure and salinity can be entered
manually. The instrument is housed in a robust, ergonomically
designed case. An indication of battery life is also permanently
shown on the display. An automatic switch off facility helps to
conserve battery life.
SPECIFICATION
DO2 Ranges:
-5 to 199%
-5 to 25.0%
-5 to 19.99mg/l
Resolution:
1% / 0.1% / 0.01mg/l
Accuracy:
±2% within 10°C of calibration
temperature
Temperature Ranges: -10 to +105°C / 14 to 220°F
Resolution:
0.1°C / 1°F
Accuracy:
±0.5°C / ±1°F
ATC Range:
0 to +60°C / 32 to 140°F
Power:
2 AA cells
Size:
175(l)x75(w)x35(d)mm
Weight:
250g
1
INSTALLATION
Unpack the instrument and ensure the following items are present:
1. Model 970 DO2 Meter (970 201)
2. DO2/Temperature Probe (970 231)
3. 2 x AA alkaline batteries (021 007)(fitted)
4. Membranes & KCl (522 019)
5. Zero salts (983 030)
Optional accessories which may have been ordered:
1. Carrying Case (033 270)
DISPLAYS
gL-I
1.
Primary display - 3½ digit display providing direct
readout of % oxygen saturation, % air saturation, mg/l
oxygen. Underrange (-1) and Overrange (1) symbols
will be displayed if the instrument is reading outside the
ranges as shown below:
Primary Ranges:
% oxygen saturation
-5 to 25.0%
% air saturation
-5 to 199%
mg/l oxygen
-5 to 19.99mg/l
2
2.
Secondary display - 4 digit display showing temperature
(manual temperature compensation value if used with a
non-standard sensor, or ATC temperature using the
standard probe) in °C or °F.
Manually adjusted pressure values (Bar) and salinity
values (g/l) will be shown when the relavant mode is
selected.
3.
CAL annunciator - indicates when a calibration is being
performed.
4.
Battery Life Indication - 4 levels will be shown ranging
from 25%, 25-50%, 50-75% and 75-100%. Sensor
calibration data and user parameters are retained during
battery replacement.
5.
Mode annunciator - indicates which mode of operation is
selected.
6.
MAN - this is displayed to indicate when manual
temperature compensation (only operates with nonstandard probes or if the temperature sensor in the
probe is defective), salinity or pressure value adjustment
is being performed.
7.
RCL annunciator - this indicates that the displayed
reading is a stored value recalled from internal memory.
3
CONTROLS
STO RCL
STO stores the current data reading.
RCL enters recall mode to view the stored
readings.
I:O
Switches the instrument on and off. This key
should be pressed and held for 1-2 seconds to
operate. The instrument will automatically switch
off after 30 minutes if no key is pressed.
Back light. Pressing this key will illuminate the back
light for 10 seconds. It should be noted that, if
used excessively, this will degrade battery life.
56
Enables manual setting of DO2 calibration values
when performing a calibration, and adjustment of
the manual temperature compensation value,
pressure and salinity.
CAL
This key is used to select and perform DO2
calibration.
MODE
This key changes the primary measurement
parameter from %DO2 to mg/l, as required. When
temperature is displayed, holding this key for 3
seconds changes the display to read in °C or °F.
4
PREPARATION FOR USE
NOTE: Prior to using the chemicals listed, please refer to
the Health & Safety information at the rear of the
manual.
The probe is delivered with the membrane module detached. Prior
to use the membrane module must be fitted to the probe body.
A protective sheath is also supplied. This should be fitted to the
probe when not in use. The sponge contained within the sheath
should be wetted with deionised water prior to fitting. This covers
the membrane and keeps it wet, thus preventing the electrolyte
filling from drying out.
1.
2.
3.
4.
Remove the protective sheath from the probe.
Take a membrane module and hold in the vertical
position. Fill with the electrolyte solution (5% KCl)
supplied with the instrument. Ensure no air bubbles are
trapped in the bottom of the membrane cap.
Whilst still holding the module upright, screw the probe
slowly down onto the thread, allowing the excess
electrolyte to escape through the screw thread. Ensure
no air bubbles are present and that the membrane is not
creased.
The probe should be connected to the instrument and
left for 30 minutes to polarise, with the tip immersed in a
beaker of water.
To maintain polarisation and to enable immediate use, it is
recommended that the sensor should be permanently connected
to the instrument.
If the sensor is to be kept in extended storage, the membrane cap
should be removed and rinsed with water, and the sensor tip
cleaned. The probe should be stored dry without the wetting
sheath fitted.
5
OPERATION
Connect the DO2 probe to the instrument. Switch the instrument on
by holding down the I/O key for 1-2 seconds. All display segments
will be illuminated for approximately 2 seconds. An internal self
check routine is run during this display and on successful
completion normal operating mode is activated. The display will
either power up in %DO2 or mg/l mode depending upon previous
usage.
%DO2 MODE
This gives a direct readout of the %DO2 of the sample under test
as either % oxygen saturation or % air saturation. When the
instrument is calibrated to a value of <25.0% the resolution will
automatically increase to 0.1%.
CALIBRATION
Prepare a zero oxygen solution by dissolving the contents of the
vial of sodium sulphite supplied with the instrument (983 030) in
150mls of water. Allow to stand for a few minutes prior to use.
Press the CAL key. Immerse the probe in the zero solution and stir
gently for approximately 2 minutes. Once the reading has
stabilised press the Cal key. The instrument automatically detects
the zero solution and will calibrate the reading to zero % dissolved
oxygen, which will cause the primary display to read zero.
Remove the probe from the zero solution and rinse thoroughly
with deionised water..
% Air Saturation
This will directly assign a percentage dissolved oxygen to air
saturated water and further readings are then given as a
percentage of this air saturated water sample. All measurements
in this range are given to a resolution of 1%.
Calibrate the probe in zero solution as above.
6
Fill a suitable container with a sample of clean water. Press the
Cal key. Hold the probe so that the membrane is close to, but not
touching the surface of the water (approximately 1 cm above).
Once the reading has stabilised press the
Cal key. This will cause the primary display
to read 100% DO2 .
% Oxygen Saturation
This will give a reading of 20.9% in air where 20.9% is the amount
of oxygen as a percentage of oxygen in air and will give a reading
directly as a percentage of oxygen in the sample. All measurements in this range are given to a resolution of 0.1%.
Calibrate the probe in zero solution (refer page 6).
Fill a suitable container with a sample of clean water. Press the
CAL key. Use the 56 keys to adjust the primary display to read
20.9%. The MAN annunciator will be displayed. Hold the probe so
that the membrane is close to, but not touching the surface of the
water (approximately 1 cm above).
Once the reading has stabilised press the CAL key. The instrument
measures the manually entered value (20.9%). Once a calibration
value is set manually the instrument will automatically calibrate to
this value until an alternative value is entered.
mg/l
If measurements are to be performed in mg/l it will be necessary to
enter the current barometric pressure. and salinity values.
Barometric Pressure
Press the MODE key until the secondary
display shows the BAR annunciator for
barometric pressure. Adjustment to the
correct value can be made by using the
56 keys.
7
Fill a suitable container with a sample of clean water. Press the
Cal key. Hold the probe so that the membrane is close to, but not
touching the surface of the water (approximately 1 cm above).
Once the reading has stabilised press the Cal key. This will cause
the primary display to read 100% DO2 .
Press the Mode key to display pressure corrected mg/l readings.
Salinity
The oxygen dissolved in water decreases with increasing salinity
when making measurements in mg/l. If measurements are made in
% saturation then no correction is required.
Press the Mode key until the secondary
display shows the g/l annunciator for
salinity. Adjustment to the correct value
can be made by using the 56 keys.
The instrument is now ready to
perform sample measurements.
PERFORMING MEASUREMENTS
Select the mode required and immerse the probe in the sample to
be measured (40mm depth minimum). A flow rate of 15cm/min in
the sample is required, to avoid errors due to oxygen starvation at
the membrane. If the flow rate is insufficient then the sample
should be stirred (either by a gentle stirring action with the probe
or by use of a magnetic stirrer).
8
DATA STORAGE
The 970 can store up to 32 readings. Storage is intiated by manual
key press.
Storing Data
Pressing the STO key stores the current reading in the next
available data location. The storage location is indicated by Sto
and a number (1-32) momentarily displayed prior to the data point.
The results are stored sequentially until the memory is full. When
all 32 data locations are filled, the next stored reading will
overwrite the result previously stored in position 1. The stored
data is retained in the event of battery failure and during battery
replacement.
Recalling Data
Pressing the RCL key recalls the last stored reading on to the
display. The instrument is now in RCL mode, indicated by the RCL
annunciator at the top of the display.
The 56 keys are used to select previously stored data. The
storage location is indicated by rCL and a number (1-32)
momentarily displayed prior to the data.
To clear all readings press and hold the CAL key (>3 seconds)
while in RCL mode. When all stored readings are cleared the
display will momentarily show CLr ALL. The instrument will then
return to the main operating mode.
If storage locations are empty and the RCL key is pressed, the
display will show ALL CLr.
NOTE: It is not possible to delete individual stored
readings.
9
GOOD PRACTICE GUIDELINES
1. Ensure the membrane is kept wet at all times. When not in use
the probe should be stored with the tip in a beaker of deionised
water. For longer periods (overnight) the protective sheath should
be fitted, with the sponge insert soaked in distilled water. This will
prevent the electrolyte fill solution from drying out due to loss of
water through the porous membrane.
2. Ensure the probe is polarised prior to use. It is essential to
perform this procedure after replacement of the membrane
or probe. A 30 minute period of polarisation is required.
3. When replacing the membrane ensure no air bubbles are
trapped in the electrolyte fill solution and that the membrane is not
creased or damaged after fitting. If the probe response is
sluggish, or the readout is unstable after membrane replacement,
clean the anode and cathode (refer Maintenance).
4. The probe is fitted with a temperature compensating element.
This is housed underneath the silver ring on the probe body.
Always ensure the probe is immersed in solution to a depth
suitable to cover this ring. Allow sufficient time for these to
respond if measuring samples with varying temperatures or
where sample temperature is significantly different to ambient
temperature.
5. Ensure the sample is moving across the membrane at a speed
greater than 15cm/min to avoid oxygen starvation at the
membrane. If the flow rate is insufficient then the sample should
be stirred (e.g. either by a gentle stirring motion with the probe or
with a magnetic stirrer).
6. When using the probe in liquors, sludges or polymers a
coating may be deposited on the membrane, causing slow
response or drifting. This can be reduced by rinsing the probe in
deionised water, or a suitable solvent for the sample, followed by
a rinse with deionised water after each test.
10
7. Ensure the probe is rinsed in deionised water after each test.
8. When measuring in mg/l (ppm) results are pressure dependent
and determinations carried out at pressures other than 760mm/Hg
will need to be compensated.
9. When measuring in mg/l (ppm) results obtained from saline
samples will need to be adjusted for salinity.
MAINTENANCE
Although the oxygen probe is supplied in a clean and tested
condition it may, after some time, become sluggish or erratic due to
contamination of the gold cathode, silver anode or membrane.
a) Membrane Replacement
1.
Hold the probe in a vertical position and carefully
unscrew the membrane module.
2.
Take the new membrane module and holding it in a
vertical position, fill with electrolyte (5% KCl).
3.
Still holding the module in a vertical position, screw the
probe slowly down onto the thread, allowing excess
electrolyte to escape through the screw thread. Ensure
no air bubbles are present and the membrane is not
creased.
b) Cathode and Anode Cleaning
The gold cathode tip can be re-polished using a fine abrasive
(“crocus paper”) material. Lay the abrasive sheet on a flat
surface, hold the probe in a vertical position and gently polish by
moving the tip over the sheet in a circular motion.
A toothbrush dipped in diluted ammonia solution will remove any
deposits from the silver anode. For stubborn deposits a very fine
abrasive similar to that used for cleaning gold connectors in
electronics may be used sparingly. Rinse with deionised water
prior to re-assembly. If the probe is not to be used for 24 hours,
store with the protective sheath fitted to prevent the electrolyte
from drying out due to evaporation through the membrane,
11
which is porous to water vapour as well as oxygen. If the probe
is disconnected from the unit or a new membrane has been fitted,
it will be necessary to allow the probe to polarise before stable
readings can be obtained. Polarisation will normally be achieved
within 30 minutes.
TROUBLESHOOTING GUIDE
FAULT
PROBABLE CAUSE
No power
Battery failure
Replace batteries
Battery polarity incorrect Refit batteries
Unstable
display
DO2 probe defective
Probe not fitted correctly
Calibration to 100% with
zero solution
ACTION
Replace DO2 probe
Check connections
Repeat zero calibration
procedure with fresh zero
solution. Calibrate the
probe to 100% in air
Display
Intermittent or no
Check electrode
permanently connection
connection
under or
to instrument
over range DO2 probe defective
Replace DO2 probe
Contaminated solutions Replace solutions
Calibration on low oxygen Recalibrate with the probe
concentration
in air
Temp. value DO2 probe defective
incorrect
Replace DO2 probe
I/O switch I/O key not held down
not working long enough
Batteries not fitted
Retry holding key for 2
seconds
Fit batteries
12
FAULT
56 keys
not working
Back light not
on/goes out
PROBABLE CAUSE
ACTION
Operating in incorrect Refer to operation section
of manual
mode
10 second time
elapsed/ normal
function
Recheck
Unable to
Incorrect mode of
adjust manual operation
temperature
Reselect mode
Unable to
calibrate Erratic or slow
response
Clean the tip, replace
membrane module
Refill or replace membrane
Sensor tip may be
tarnished (Ag or Au)
Air bubbles inside the
membrane cap
Membrane damaged
Coating of membrane
due to use in oils or
slurries, strong
solvents, acids or
alkalis
DO probe defective
2
Replace membrane
Replace membrane
Replace DO probe
2
Inaccurate
Zero solution will
calibration absorb oxygen if left
Erratic or slow open
response
Use fresh zero solution
and recalibrate
Measurement Incorrect salinity
errors
Calibration error
Contaminated solution
Incorrect standards
Incorrect barometric
pressure
Reset salinity values
Recalibrate instrument
Replace solution
Replace standards
Reset barometric
pressure
13
FAULT
PROBABLE CAUSE
ACTION
Unable to
calibrate to
100%
Calibrating to
previously set value
Manually reset value to
100%
Permanently Membrane not fitted
reading zero Membrane damaged
Membrane not filled
with KCl
DO probe defective
Fit membrane
Replace membrane
Fill or replace membrane
Replace DO probe
2
2
If a fault is identified during the start up self check routine an error
code will be displayed. This indicates an internal hardware or
software problem. In the event of this, please contact your local
distributor or service agent.
BATTERY REPLACEMENT
Switch the unit off using the I/O key.
To fit new batteries; loosen the battery compartment cover (the
screws are captive in the cover), remove and carefully discard
the used batteries. Fit the new batteries, type R6, AA or AM3,
ensuring the correct polarities are observed, as indicated on the
moulding. Refit the battery compartment cover, ensuring that the
fixings are secured into place, but are not overtightened.
OPTIONAL ACCESSORIES
The following list of items are available for use with the Model 970:
033 270
Carry case
522 019
Membrane kit and KCl
541 553
KCl solution (30ml)
983 030
Vial of zero powder
522 016
B.O.D. bottle attachment 2.5°
522 017
B.O.D. bottle attachment 3.0°
522 018
B.O.D. bottle attachment 6.0°
AUTO SHUT OFF
This will occur after 30 minutes if no key is pressed.
14
HEALTH & SAFETY INFORMATION
PRODUCT: Potassium Chloride Solution
HEALTH HAZARD - May be harmful if ingested in quantity, causing
nausea, vomiting and diarrhoea.
May irritate eyes.
FIRST AID
Eyes: Irrigate thoroughly with water. If discomfort persists
OBTAIN MEDICAL ATTENTION.
Lungs: Remove from exposure.
Skin: Wash off thoroughly with soap and water.
Mouth: Wash out mouth thoroughly with water. In severe cases
OBTAIN MEDICAL ATTENTION.
PRODUCT: Sodium Sulphite Anhydrous
HEALTH HAZARD - If ingested in quantity can cause gastric
irritation, colic, diarrhoea, central nervous system depression and
death, due to liberation of sulphur dioxide. Irritating to skin, eyes
and respiratory system. Used in controlled quantities as a food
preservative and antioxidant.
FIRST AID
Eyes: Irrigate thoroughly with water for at least 10 minutes.
OBTAIN MEDICAL ATTENTION.
Lungs: Remove from exposure, rest and keep warm. In severe
cases OBTAIN MEDICAL ATTENTION.
Skin: Wash off thoroughly with water. Remove contaminated
clothing and wash before re-use. In severe cases OBTAIN
MEDICAL ATTENTION.
Mouth: Wash out mouth thoroughly with water and give plenty to
drink. In severe cases OBTAIN MEDICAL ATTENTION.
15
EC Declaration of Conformity
JENWAY Model 970 Dissolved Oxygen Meter complies with the
following European Standards:
EN 50081-1:1992 Electromagnetic compatibility - Generic emission
standard
EN 61326:1998 Electrical equipment for measurement, control and
laboratory use - EMC requirements.
EN 61010-1:1993 Safety requirements for electrical equipment for
measurement, control and laboratory use
Following the provision of:
EMC Directive - 89/336/EEC and
Low Voltage Directive - 73/23/EEC
Carl Warren
Technical Manager, Jenway,
Gransmore Green, Felsted, Dunmow,
Essex, CM6 3LB, England
16