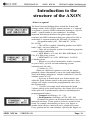
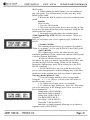
1
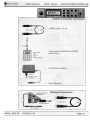
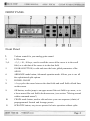
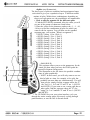
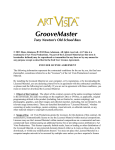
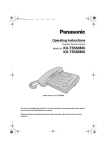
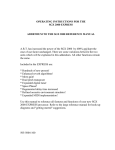
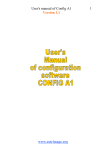
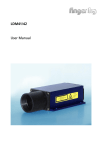
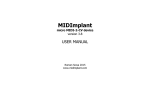
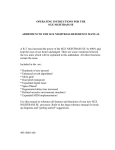
Table of Contents
Quickstart Guide ....................................7
• Connecting your AXON to synths, sound modules,
computer, mixer, amp............................................ 7
• Installation of your Pickup and guitar interface.. 7
• Powering up ............................................................. 7
• Synth/Sound module preparation.......................... 7
• AXON preparation.................................................. 8
• Playing sounds with your AXON and synth ......... 9
Reference Manual................................. 10
• Navigating the Menus ........................................... 10
• Introduction to the structure of the AXON.......... 11
• What is a segment?................................................. 11
• Velocity Mapping................................................... 14
• Global mode........................................................... 15
• Introduction to Scratch and Arrange modes ...... 19
• Chain Mode............................................................ 24
Appendices.............................................26
• Common functions:............................................... 26
• Editing a name: Guitar name, Arrange name, Scratch
name............................................................................... 26
• Moving around within command menus.................. 26
• Troubleshooting..................................................... 27
• Specifications ......................................................... 29
• System Exclusive Table......................................... 31
• MIDI Implementation........................................... 31
• Index....................................................................... 33
FRONT PANEL
Front Panel
l.
2.
3.,4.
Volume control for your analog guitar sound.
LCD screen
+!,-!, +10, -10 keys; used to scroll the screen if the cursor is in the scroll
field, or to edit data if the cursor is in the data field.
5.
GLOBAL BUTTON; to edit and store the basic global parameters of the
AXON.
7.
ARRANGE mode button; Advanced operation mode. Allows you to use all
the sophisticated split options.
POWER ON/OFF
8.
-> key cycles the cursor between the data fields and scroll fields of both lines
6.
on the screen.
9.
OK button; used to jump to an upper menu if the exit field is up arrow, or to
a lower menu if the exit field is the down arrow, (see section: "Moving around
within command menus")
10.
CHAIN mode button; used to edit and store your own sequence (chain) of
preprogrammed Scratch and Arrange presets.
11.
SCRATCH button; easy-to-use presets for basic operation without splits.
REARPANEL
Rear Panel
1. Input for AC/DC mains adaptor 10-12V, 1A
2. MIDI output
3. MIDI Input.
4. MIDI Thru.
5. BASS/LEAD mode selector. Must be set before the AXON is turned on.
6. CHAIN pedal connector. A preprogrammed chain of presets can be stepped through
by the Chain pedal.
7. HOLD pedal connector.
8. Input connector from the GK-2A compatible guitar interface.
9. Guitar audio signal output.
Quickstart Guide
• Connecting your AXON to synths, sound modules, computer, mixer, amp.
• Make sure all power switches are OFF before connecting
any cables.
• See illustrations on pages 3, 5 and 6 and connect the
appropriate cables according to your configuration.
• Installation of your Pickup and guitar interface.
• Refer to your Guitar Interface user's manual.
• Powering up
• The first time you turn your AXON on: Cold start: Hold
down Scratch button while turning on power switch. This insures that all the data is reset to the factory presets.
• Synth/Sound module preparation
• Your synth should have at least 7 channels and
multitimbral capabilities.
• Your synth should be set up to receive channels 1-7. 1-6
for the six strings, and channel 7 for HOLD pedal function.
• After connecting the MIDI cables from the AXON to your
synth, turn your synth on first and allow it to initialize BEFORE
turning the AXON on. The AXON will then send the proper information to your synth to allow for easiest possible setup.
• Pitchbend range (Important!): Set your synth's pitchbend
range to match the AXON (factory default is 12). You may have
to edit the pitchbend for each sound individually (in the case of
Korg, for example) (See Global command: SEND PBDRG)
• You should now control all your synth functions from the
AXON. For example, don't change patches from the synth. If
you do, you should know that it will only affect the sound of one
of the six strings.
• You can change your synth sounds directly from the UP/
DOWN buttons on the guitar Interface.
AXON preparation
• Sensitivity: You will need to teach the AXON to understand
the way you play your guitar. For example, your dynamic
ranges:
1. Press Global.
2. Press the arrow key until the cursor blinks over the
furthest position to the right of the screen (plus/minus sign)
3. Scroll using either the +1 or -1 keys
until the cursor is over "GUITAR NO:"
4. Press "OK." You will see the names of each of the six
strings followed by a number.
• In order to move the cursor from one string to another:
1. Position the cursor over the "+", "-", or "±" at the far
right of the screen.
2. The "+1", "-1" keys will allow you to scroll through
the six strings until you find the string you want to adjust.
3. Use the arrow key to move the cursor onto the number
you want to edit.
4. Use the "+1", "-1" keys or the "+10", "-10" keys to
adjust the value for the string.
5. When you play your Guitar, you will see Ivels on the
screen for all six strings. (The level at the top of the screen is
your high E-string, at the bottom of the screen the low E-string.)
• If a string is set for a sensitivity level that is too high,
you will see an overload message for that string when it is
played. You can then reduce the value of that string's sensitivity.
• The peak level of each string should be 8-9 led units.
(should come close to the names of the strings on the right side
of the screen)
• All six peak levels should be similar.
• If a string is set for a sensitivity level that is too low,
the level indicators will remain too far to the left of the screen.
You can then increase the value of that string's sensitivity.
• The editable numbers range from 16-64, where 16 is
the least sensitive and 64 the most sensitive setting. For
example, if you play loudly or if your pick-up is very close to
the strings, you may want to set this value lower. If you play
softly, you may want a higher value. These values should be set
for each string separately.
• Timing: It is critical that your guitar is tuned within a certain
pitch tolerance, so that the AXON can properly interpret midi
pitch values.
l.In Global mode, scroll using the +1, -1 keys, until you
find the command "TUNING AID"
2. Press OK. You will see a display similar to any chromatic guitar tuner.
3. Tune each string so that the pointer is above the
upward arrow in the middle of the screen.
• At the left of the screen, notice the "±30C". This means
that on the tuning scale, the left-most arrow is 30 cents lower
(30% of a half step), and the right-most arrow is 30 cents higher
than the middle arrow.
• Playing sounds with your AXON and synth
• Press the "Scratch" key. Don't change the sounds by
controlling them from the synth. Simply push the "Down/Sl"
and "Up/S2" buttons on your guitar interface. This will scroll
through the different sounds available on your synth by
automatically sending patch change information through the
AXON to your synth.
• Using the "Synth Vol." control on your guitar interface,
you can adjust the MIDI volume (Controller #7) for the sounds
on your synth.
• Using the Selector switch on your Guitar interface, you
can control the mix of your actual guitar sound and the synth
sounds. 1. Analog guitar sound alone, 2. Synth guitar alone, 3. a
combination of the two.
AXON NGC66
-VERSION 2.04
Page : 9
Reference Manual
• Navigating the Menus
• The arrow at the left edge of the line on your screen
indicates whether you can move up or down in the hierarchy. If
you place the cursor in the line where you see the arrow and
press the OK key, you will move in the direction of the arrow
hierarchically, (see illustration) If there is no arrow at the left
edge of the line, then you will need to move/to another part of
the page by using the +1,-1,+10,-10 keys (see below) until you
find an exit arrow to allow you to move to a different part of the
hierarchy.
• As you look at a given page in the hierarchy, imagine
that you only have a small view window through which you
look at the page. Through this view window you can only see
two lines. In order to see more of the page, you move the page
up or down behind the view window. You will see +, -, and ±
signs at the right edge of the screen. If you place the cursor on
these signs and use the +1, -1, +10, -10 keys, you will be able to
move the page up or down behind the view window in order to
see more of the page. The "+" means that you are at the top of
the page and can only move the page up by using the +1, +10
keys in order to see what is further down on the page. The "-"
means that you are at the bottom of the page and can only view
upward by moving the page down behind your view window by
using the -1 or -10 keys. The "±" means that you are in the
middle and can move the page in either direction behind your
view window.
• At any point in the hierarchy of pages and lines, you
may press one of the mode keys (Scratch, Arrange, Global,
Chain) and move directly to the top page of that mode.
• If you are deep in the hierarchy of any mode and want
to be immediately taken to the top page of that mode, then
simply press the mode button again, although it is selected (the
LED is lit)
Introduction to the
structure of the AXON
• What is a segment?
The basic functional building block in both the Scratch and
Arrange modes of the AXON's internal structure is a "segment".
A segment is a packet of MIDI information relating to a specific
sound... a patch number in your synthesizer. It contains
important information about how the guitar signal will be
translated into MIDI information that your synth will be able to
understand. A segment contains the following 14 parameters:
•Program number (All...D88 and A1...A128,
B1...B128)
• The AXON is capable of handling patches from MIDI
banks 0 and 1 on your synthesizer.
• There are two popular systems for numbering programs
(sounds) within synthesizers:
• MIDI Bank 0: A11-A88, B11-B88; MIDI Bank 1: CllC88, D 11-D88 (Korg system)
• MIDI Bank 0: A1-A128; MIDI Bank 1: B1-B128
(Yamaha system)
• Whenever you edit a Patch number within a segment
on your AXON, you will see both numbering systems
simultaneously on a line.
• Volume (O... 127)
Whenever a different segment is accessed, the preprogrammed volume information is sent to the synth immediately
after Patch change information. Volume (controller #7) uses the
standard values of 0-127.
• If you are in Scratch mode (see Scratch mode) and
adjust the Synth Volume control on the guitar interface, these
settings will simply override the preprogrammed values set in
the Segment page.
• If you are in Arrange mode and adjust the Synth
Volume control on the guitar interface, the volume levels of each
of the splits will be proportionally adjusted, maintaining their
preprogrammed balance.
• Transpose in halfsteps (-36...+36)
• Pitch Quantize to halfsteps (AUTO, OFF, ON)
By nature the guitar is an instrument that has a very wide
intonation tolerance. If your guitar is perfectly in tune for one
chord, for example, the moment you move your fingers to
another chord, the new chord will not be completely in tune.
Every guitarist has his own technique of placing his fingers on
the strings, different finger pressure factors, or slightly bending
of the strings unintentionally. Guitars are never totally in tune
from fret to fret up the neck, also depending upon the quality
and age of strings. If you want to use your guitar to control a
synth sound of an instrument that has little intonation tolerance
like piano, organ, harpsichord for example, you can tell the
AXON to take the pitches you play on your guitar and tune them
100% to the intended pitch. This is accomplished by turning
Pitch Quantize ON.
Disadvantages of Pitch Quantization: With Quantize
turned ON, it is not practical to do string bending, slides, etc.
They will sound in halfstep increments. (If you play them very
fast, the ear may not notice that the bend or slide is in halfstep
increments, but at slower speeds it becomes obvious.)
The AXON is equipped with an intelligent pitch
recognition feature called AUTO QUANTIZE that recognizes
the intent of the guitarist. If you play a chord, for example, it
will tune the chord completely for you, quantizing the notes to
half steps. If, however, you want to also bend a string, it will
recognize that bend and temporarily turn Pitch Quantize for that
one string, and that one moment, OFF.
AUTO is recommended as the default setting.
• Panorama position (OFF, -15, +15)
The sound can be set to a stereo panorama from left to
right in 30 increments: 15 left and 15 right. The middle position
is marked with "MID"
If this parameter is in the OFF position, then no panorama
information will be sent from the AXON, and the panorama
information from the patch in the synth will be used (if there is
any).
• Panorama spread (-15... +15)
Once the panorama position has been set for the basic
instrument sound, a spread across the six strings of the guitar
can be set, using the panorama position as the center point for
Jthe'spread. Here there are also 30 increments for the spread: Left
15 to Right 15.
Note: If you set your panorama position for the sound far
enough to one side or the other, and then set your panorama
spread too wide, it will only be physically possible to hear the
spread a total of 15 increments to the left and 15 to the right.
E.g.: If your panorama position is set for 10 Left, and you set a
spread of 15 Left, then you will only hear a spread of 5 Left
from the center of the sound, because there are only a total of 15
increments inclusive.
• Velocity sensitivity (0... 127)
Different synth patches have different velocity responses
For example, a harpsichord has a narrow dynamic range of
response, whereas an organ has no dynamic range of response,
and a piano has a broad range of dynamic response. To cause a
harpsichord sound being played by your guitar through the
AXON to sound realistic, the dynamic range has to be shaped.
Velocity sensitivity functions much like a dynamic
compressor in that a symmetrical dynamic limit is created at the
top and at the bottom of a tone so that no matter how loud or
soft you play, the resulting sound will always be between the
limits you have set. The notes that are played at dynamic levels
within these limits are adjusted proportionally so that the
dynamic range is not merely limited, but compressed to
maintain the original proportion of the dynamics as they relate
to each other. If the velocity sensitivity value is set for 127, the
velocities sent to the synth will provide the full possible
dynamic. If you reduce the velocity sensitivity level to 0, all
velocities will be 64. (see Illustration)
• Velocity offset (-63... +63)
The velocity offset parameter will be superimposed onto the
already existing velocity sensitivity "window". If the velocity
sensitivity setting is viewed as a window limiting the dynamic
range of what is played, then with the velocity offset parameter,
the window can be shifted up and down while maintaining it's
original size and shape, (see graphic)
•Trigger level (O...9)
A characteristic of guitar sound is a number of spurious noises
such as fingers slipping on wound strings, the overtones that
result from picking strings, etc. In order for the AXON to know
that these spurious noises should not be interpreted into NOTE
ON events, the trigger level can be set in much the same way as
a noise gate is used to filter out unwanted sounds. This is the
volume level at which you play a string that causes a NOTE ON
event to be sent. If you strum chords loudly, this trigger level
can be set higher.
• Pick controller (OFF, 0... 127)
The AXON has the unique feature of being capable of
recognizing the horizontal location on a string, where the string
is picked. In order to utilize this feature, two locations on a
given string have to be defined. When a string is picked between
these two positions, continuous MIDI controller information is
sent to the synth for the controller number that you choose, (see
illustration)
If the feature Pick Split is active in the Arrange mode, then you
will need to turn the Pick Controller feature OFF here.
Any MIDI controller can be assigned
• Pick position 1
•Pick value 1
• Pick position 2
• Pick value 2
EXAMPLE INPUT OF VELOCITY MAPPING
MIDI VELOCITY VALUES BY DIFFERENT SETTINGS OF
VELOCITY SENSITIVITY AND VELOCITY OFFSET
S=Sensitivity
0=0ffset
• Global mode
• Basic channel (BASIC CHAN:) 1-10
The basic channel setting corresponds to the channel for String
number 1 (the high E-string). This is the lowest channel number
that will be used. The other channel settings (see: Separate/
Common String modes) are discussed in the sections Scratch
Mode and Arrange Mode.
• Pitchbend range (PBEND RANGE:) 1-24
The default setting is 12 (i.e.: 12 half steps, or one octave). You
may set this parameter for less, however in doing so, you will
limit the ability of the AXON to correctly interpret hammer-ons,
pull-offs, glides, slides, etc.
Important: The pitchbend range setting for your synth (i.e. for
the individual sounds on your synth) should be identical with
this setting in your AXON.
If you turn your synth on first, (after connecting MIDI cables to
the AXON) and then turn on the AXON, these settings should be
automatically synchronized, (provided your synth has the ability
to receive MIDI pitchbend range information.)
• Send pitchbend range (SEND PBDRG:) ON, OFF
There are synth's (Korg for example) that store
pitchbend information with each individual patch (sound) and
therefore do not have a global pitchbend range parameter.
Therefore it is necessary to send pitchbend range information
after each patch change transmission. You can do that
automatically by turning this parameter ON. The default setting
is "ON", (illustration)
Because of the amount of data that has to be sent by this
command, if your synth doesn't need to have pitchbend range
information sent every time there is a patch change, then turn
this parameter off. (illustration)
•Note off limit (NOTE OFF L:)
4-15
This level sets the point on the decay envelope where the NOTE
OFF event will be sent. The higher the setting, the shorter the
note will be; the lower the setting, the longer the note will be
sustained.
• Level Meter (VU METER:)
ON, OFF
When strings are played, the display momentaneously shows a
horizontal level meter (the high E-string at the top, the low Estring at the bottom of the screen). The normal display appears
again when the decay reaches -40dB. This function can be
suppressed here by turning the VU METER off. Note: Even with
this function turned off, if you are in the Sensitivity Adjustment
mode, the level meter will still be displayed.
• Tune Base (TUNE BASE:) -99-+99
If your guitar is tuned to some other standard other than
440 Hz, then you should notify the AXON of this deviance. You
can do this in two ways:
Automatic tuning adjustment
1. Place the cursor over the tuning parameter in the
TUNE BASE: command and press "OK". The display will say,
"PICK THE OPEN A STRING".
2. Pick the open A-string on your tuned guitar. The
AXON will "hear" this note and adjust it's internal tuning base
accordingly. Note: this only works with the A-string.
3. When you pick the open A-string, you will notice that
the display returns to TUNE BASE:, and shows the new tune
base value in cents, depending on the tuning of your guitar.
Manual tuning adjustment.
If, for example you know how many cents deviation
from 440 Hz your guitar is tuned, you can enter that value as
follows:
1. Place the cursor over the tuning parameter in the TUNE
BASE: command.
2. Use the +1,-1,+10,-10 keys to set the value in cents
manually.
See also: "QUANTIZE:"
• Tuning aid (TUNING AID)
It is critical that your guitar is tuned within a certain pitch tolerance, so that the AXON can properly interpret MIDI pitch
values.
1. Press OK. You will see a display similar to any
chromatic guitar tuner.
2. Tune each string so that the pointer is above the
upward arrow in the middle of the screen.
3. At the left of the screen, notice the "±30C". This
means that on the tuning scale, the left-most arrow is 30 cents
lower (30% of a half step), and the right-most arrow is 30 cents
higher than the middle arrow.
4. The middle arrow corresponds directly to the tune
base value of the AXON as set above. If the tune base parameter
is set for 0, then the middle arrow will correspond to a tuning
calibration of 440. If the tune base value is +50, for example,
then the middle arrow will correspond to a pitch that is
appropriately higher (in this case a quarter step) than 440.
Note: Tuning aid is a feature that will allow you to tune
your guitar to the AXON quickly and simply, whereas Tune
base allows you to tune the AXON to your guitar.
• Guitar number (GUITAR N0:)/name
The AXON allows you to set Preferences for up to four different
totally separate guitars or bass guitars. If, for example, you
switch guitars in the middle of a concert, you don't have to
change all the sensitivity settings for that instrument, you merely
change to the appropriate guitar number (name) in your AXON.
Setting the guitar number and name:
1. Scroll the AXON window until GUITAR NO: is at
the TOP of the screen. You will see the number (1-4) to the
right on the top line.
2. The lower line on the screen now shows the name of
the guitar. This name can be changed according to your needs.
Please refer to the appendix: "Editing a name"
3. Setting the sensitivity controls for each string:
You will need to teach the AXON to understand the
way you play your guitar or the way each guitar plays
according to pick-up position, string quality, etc.
4. With the cursor in the line "GUITAR NO:", press
"OK". You will see the names of each of the six strings
followed by a number.
5. In order to move the cursor from one string to
another:
6. Position the cursor over the "+", "-", or "±" at the far
right of the screen.
The "+1", "-1" keys will allow you to scroll through
the six strings until you find the string you want to adjust.
7. Use the arrow key to move the cursor onto the
number you want to edit.
8. Use the "+1", "-1" keys or the "+10", "-10" keys to
adjust the value for the string.
You will see on the screen levels for all six strings.
(The level at the top of the screen is your high E-string, at the
bottom of the screen the low E-string.)
The editable numbers range from 16-64, where 16 is
the least sensitive and 64 the most sensitive setting. For
example, if you play loudly or if your pick-up is very close to
the strings, you may want to set this value lower. If you play
softly, you may want a higher value. These values should be
set for each string separately.
If a string is set for a sensitivity level that is too high,
you will see an overload message for that string when it is
played. You can then reduce the value of that string's
sensitivity.
The peak level of each string should be 8-9 led units.
(should come close to the names of the strings on the right side
of the screen)
All six peak levels should be similar.
If you adjust the level to the lowest possible value (16)
and you still get an overload message, then your pick-up is too
close to the strings and should be lowered.
If a string is set for a sensitivity level that is too low,
the level indicators will remain too far to the left of the screen.
You can then increase the value of that string's sensitivity.
If you adjust the level to the highest possible value
(64) and the level is still too low, then your pick-up is too far
from the strings and should be raised.
• Copy Scratch (COPY SCRATCH)
1. Position the cursor in the COPY SCRATCH line.
2. Hit OK
3. Position the cursor in the value to the right of
SOURCE SCR: to set the Scratch number you want to copy.
4. Using the +1, -1, +10, -10 keys, enter the Scratch
number that you want to copy.
5. Using the same process, set the value for the Scratch
number to which you want to copy in the line DEST. SCR:.
6. The line just below DEST. SCR: now reads: COPY:
OK.
7. Place the cursor in this line and press OK. You will see
a momentary message confirming the copy.
8. If you decide you don't want to complete the copy,
move the cursor to another line, and press OK. This will return
you to the main Global Menu page.
• Copy Arrange (COPY ARRANGE)
1. Position the cursor in the COPY ARRANGE line.
2. Hit OK
3. Position the cursor in the value to the right of
SOURCE ARR: to set the Arrange number you want to copy.
4. Using the +1, -1, +10, -10 keys, enter the Arrange
number that you want to copy.
5. Using the same process, set the value for the Arrange
number you want to copy to in the line DEST. ARR:.
6. The line just below DEST. ARR: now reads: COPY:
OK. Place the cursor in this line and press OK. You will see a
momentary message confirming the copy.
7. If you decide you don't want to complete the copy,
move the cursor to another line, and press OK. This will return
you to the main Global Menu page.
• Copy Segment (COPY SEGMENT)
1. Position the cursor in the COPY SEGMENT line.
2. Hit OK
3. Position the cursor in the value to the right of
SOURCE ARR: to set the Arrange number you want to copy.
4. Using the +1, -1, +10, -10 keys, enter the Arrange
number that you want to copy.
5. Using the same process, set the value for the Arrange
number you want to copy to in the line DEST. ARR:.
6. The line just below DEST. ARR: now reads: COPY:
OK. Place the cursor in this line and press OK. You will see a
momentary message confirming the copy.
7. If you decide you don't want to complete the copy,
move the cursor to another line, and press OK. This will return
you to the main Global Menu page.
• Copy Chain (COPY CHAIN)
1. Position the cursor in the COPY CHAIN line.
2. Hit OK
3. Position the cursor in the value to the right of
SOURCE CHN: to set the Chain number you want to copy.
4. Using the +1, -1, +10, -10 keys, enter the Chain
number that you want to copy.
5. Using the same process, set the value for the Chain
number you want to copy to in the line DEST. CHN:.
6. The line just below DEST. CHN: now reads: COPY:
OK. Place the cursor in this line and press OK. You will see a
momentary message confirming the copy.
7. If you decide you don't want to complete the copy,
move the cursor to another line, and press OK. This will return
you to the main Global Menu page.
• Send Scratch (sysex) (SEND SCRATCH)
1. Position the cursor in the SEND SCRATCH line.
2. Set the Scratch number you want to send using the +1,
•1,+10,-10 keys.
3. Position the cursor in the SEND: line and press OK
4. If you change your mind, position the cursor in
another line and press OK.
• Send Arrange (sysex) (SEND ARRANGE)
• Send All (sysex)
(SEND ALL:)
• Receive Scratch (sysex) (REC. SCRATCH)
• Receive Arrange (sysex) (REC. ARRANGE)
•Receive All (sysex) (REC. ALL: OK)
•ADC Monitor
(ADC MONITOR)
• Introduction to Scratch and Arrange modes
Scratch mode is a simplified set of menus and commands with a
limited set of functions. Arrange mode is an advanced set of
menus and commands that gives you access to all the parameters
that the AXON is capable of. In other words. Scratch mode is
merely a simplified version of Arrange mode. Everything that
you can do in Scratch mode, you can also do in Arrange mode.
Think of scratch mode as being a user-friendly tool for those
learning to use their AXON, and Arrange mode for advanced
users. The main difference between the two modes (Scratch and
Arrange) relates to the three different types of splits and their
combinations. In Scratch mode, there are no split possibilities.
• Scratch mode (presets 1... 128)
1. Press the Scratch button to select Scratch mode. Using
the +1, -1, +10, -10 keys, you can select one of the 128 possible
scratch presets.
2. To rename the scratch preset, see Appendix...
3. To edit the scratch parameters: press OK. This brings
you to the main page of this scratch preset. Here you will see the
two parameters: String mode (STRG MODE) and Hold mode
(HOLD MODE:) and then a third parameter allowing you to
choose a segment to edit. (EDT SEGM:)
• String mode (separate/common)
•Separate:
A separate MIDI channel is assigned to each string in the
following order:
El: Basic MIDI channel as assigned to the AXON in
Global mode
B2: Basic channel + 1
G3: Basic channel + 2
D4: Basic channel + 3
A5: Basic channel + 4
E6: Basic channel + 5
• Common:
All strings share a common MIDI channel (unless a
string split is implemented. See section "String Splits")
Note: This mode is necessary for use with non-multitimbral
synths, and can be implemented only with serious compromise
in pitchbend.
• Hold mode (Separate/Common/Sustain)
You can use your hold pedal to lock notes on by pressing the
pedal.
Separate:
How it works:
1. Press the HOLD pedal
2. Play a chord. The chord will be played using the
sound assigned to the HOLD channel, (the HOLD segment)
3. Release the HOLD pedal. The chord you played will
continue to sound.
4. While the chord continues to sound you may now play
your guitar with the normally assigned synth sound.
5. Press and release the pedal (don't play while pressing
the pedal) and the sustained chord will be released.
The sound for the HOLD chord will be assigned to the
first available MIDI channel above the string assignments; that
is the Basic MIDI Channel + 6 if you are in Separate String
Mode; Basic MIDI Channel + 1 if you are in Common String
Mode. For example if your AXON is assigned channel 2 as its
basic MIDI channel and it is in Separate String Mode so that
each string is assigned a subsequent MIDI channel, then the
HOLD events will be sent on channel 8.
Common:
How it works:
1. Set the selector switch on your guitar to MIX.
2. Play a chord. You will hear the chord using the normal
synth sound as well as the natural guitar sound.
3. While the chord is sounding, press and hold the
HOLD pedal.
4. While holding the HOLD pedal, you can continue to
play your guitar. You will hear what you play now only in the
natural guitar sound.
5. Release the HOLD pedal to release the sustained synth
sound.
Sustain:
How it works:
1. Press the HOLD pedal.
2. Play notes on your guitar. Every note you play as long
as you have the pedal depressed will be sustained, much like the
sustain pedal on a piano.
3. Releasing the pedal releases the sustained notes.
• Edit Segment Page (EDT SEGM:) See section: "What is a
segment?"
Here you can choose one of two segment pages: NORMAL or
HOLD.
• Normal (NORM)
This contains the parameters of a sound as described in
"What is a segment?" as it is used WITHOUT the HOLD pedal.
•Hold (HOLD)
This segment page defines the characteristics and
translation parameters for the sound used when the HOLD pedal
is used in Separate Hold Mode.
In order to edit one of these two segment pages, you
first choose the page you want to edit and then press OK to take
you into the page itself for editing. When you are finished
editing the segment page, press OK to return you to the EDT
SEGM: command.
• The UP/DOWN keys on your guitar interface allow
you to cycle through patches without changing any of the other
parameters in the segment page such as volume or panorama.
•Arrange mode (presets I... 64)
1. Press the Arrange button to select Arrange mode.
Using the +1, -1, +10, -10 keys, you can select one of the 64
possible arrange presets.
2. To rename the arrange preset, see Appendix...
3. To edit the arrange parameters: Press OK. This brings
you to the main page of this arrange preset. Here you will see
the six parameters:
String mode (STRG MODE:)
Hold mode (HOLD MODE:)
String Split (STRG SPLIT:)
Fret Split (FRET SPLIT:)
Pick Split 1 (PICK SPLIT1:)
Pick Split 2 (PICK SPLIT2:)
and then a seventh parameter allowing you to choose a
segment to edit. (EDT SEGM:)
• The first two parameters. String mode, and Hold mode are
identical to the two parameters in Scratch mode.
• String Split (I...6) (see illustration)
You can divide the six strings on your guitar into two different
groups, each group playing a particular synth sound. The
numbers correspond to the string numbers, the high E-string
being string number 1. For example, if you set the string split to
2, then strings 1 and 2 will play one sound and strings 3-6 will
play another. If you set the string split to 6, there will actually
not be a split at all since all six strings will play the same sound.
In other words, in order to turn String Split off, you would set it
to 6.
• Fret Split (0...24) (see illustration)
You can also divide the fretboard of your guitar into
two groups of frets so that when you play within one
of these groups of frets, regardless of what strings
you play, you will hear one synth sound. If you then
move to a position outside of this group of frets, you
will hear another sound. You can set a fret split from
0 to 24 (if your guitar has that many frets). Frets are
numbered starting with the nearest fret to the nut
upward to the nearest fret to the bridge. For example,
if you seryour Fret Split to 4, as long as you play
between frets 1 and 3 including fret 3, you will hear
one sound. If you play a note using fret 4 or above,
you will hear the second sound. If you do not want to
split the fretboard, set this parameter to 24.
• Pick Split 1 and 2 (0.. .99) (see illustration)
The pick area (the area of your guitar typically used
for picking), between the bridge and the highest fret,
can be divided into 3 parts. To do this, two split
points have to be determined. The entire pick area is divided into
100 units, numbered 0.. .99. 0 is the bridge and 99 is the highest
fret. Pick Split 1 and 2 are these two points. For example, you
can divide your pick area into 3 roughly equally sized parts by
setting Pick Split 1 to 33 and Pick Split 2 to 66. When you pick
in the area closest to the bridge, regardless of what string you
pick, you will hear one sound. If you move your picking into the
center of your pick area (between the two pick split points), you
will hear a second sound. If you move your picking further
forward near the frets, you will hear a third synth sound.
Note: The same effect will result if you set Pick Split 1 to 66 and
Pick Split 2 to 33.
If you don't want to use the pick split function, set both pick
split parameters to 99. If you want to use only one split (i.e.. two
sounds), set one pick split to 99 and the other one to the point in
your pick area at which you want the sound to change.
• Splits: (see illustration)
The three types of splits are combined and superimposed upon
each other to give you a synthesis of up to 12 different combinations of splits. Within these combinations, depending on
where your split points are, the possibilities are innumerable.
• How to edit the segments for the different splits:
1. Find the EDT SEGM: command. After the colon you will
see one of the groups of characters listed below.
2. Place the cursor on the characters and use the +1, -1, +10,
-10 keys to find the combination of splits for which you
want to edit the segment. You will then see the standard
segment page. (see section: "What is a segment?")
• S1F1P1 (String 1, Fret l,Pick 1)
• S1F1P2 (String 1, Fret 1, Pick 2)
• S1F1P3 (String 1, Fret 1, Pick 3)
• S1F2P1 (String 1, Fret 2, Pick 1)
• S1F2P2 (String 1, Fret 2, Pick 2)
• S1F2P3 (String 1, Fret 2, Pick 3)
• S2F1P1 (String 2, Fret 1, Pick 1)
• S2F1P2 (String 2, Fret 1, Pick 2)
• S2F1P3 (String 2, Fret 1, Pick 3)
• S2F2P1 (String 2, Fret 2, Pick 1)
• S2F2P2 (String 2, Fret 2, Pick 2)
• S2F2P3 (String 2, Fret 2, Pick 3)
• Hold (HOLD)
This segment allows you to set the parameters for the
sound you hear when you have the HOLD pedal depressed in Separate String mode.
• The illustration to the left shows the possible combinations of splits graphically:
• NOTE: In most cases, you will only want to use one
kind of split at a time, for example, a fret split, but
probably not more than one simultaneously. You will
then need to simply find the segment where the "F"
(for "fret") is 1 or 2 and "S" and "P" are 1 (S1F1P1
and S1F2P1). If you want to use a string split but no
other splits, find the segment where the "S" (for
"string") is 1 or 2 and the "F" and "P" are 1 (S1F1P1
and S2F1P1).
• The UP/DOWN keys on your guitar interface cycle you
through the entire arrange pages, not merely cycling through
patch numbers, as was the case in Scratch mode.
• Chain Mode (I...64)
Often, in live performance, you will want to change from one
scratch or arrange preset to another. You can do this very easily
by creating chains of presets in chain mode. You can then cycle
through the chain by using your UP/DOWN keys on your guitar
interface (UP to increase one step in the chain, DOWN to decrease one step in the chain), or by using a foot pedal plugged
into the chain jack on the back panel of your AXON. (Click the
pedal once to increase the chain step, double-click the pedal to
decrease one step in the chain.) You have the option of creating
up to 64 different chains with up to 32 presets in each chain.
• How to do it:
1. Press the Chain mode button
2. Select the chain you want to program or to edit by using the
+l,-l,+10,-10keys.
3. Press OK to begin editing the chain.
4. In the Edit Chain page, there are four parameters to choose
from:
A. Step (I...32)
Here you set the step number you want to edit. You can
cycle through the steps of this chain by using the +1, -1, +10, 10 keys or by using the UP/DOWN keys on your guitar
interface.
Note: If you want to increase the length of a chain by adding
more steps at the end of a previously existing chain, you have to
use the +1, -1, +10, -10 keys. The UP/DOWN keys on your
guitar interface will not allow you to go past an END or LOOP
point since they are intended for live use primarily.
B. Mode (EDIT, INSERT, DELETE)
In most cases you will want to use the Edit mode
whenever you create a new chain or edit an existing one.
If you want to insert a step in the chain, select the
number of the step, at which point you want to insert a step.
Selecting INSERT and pressing OK will copy the present step to
the very next step and move all the following steps up by one
number. You can then edit the inserted step using EDIT.
Similarly, if you want to delete a step in the chain, set the
MODE: to DELETE and select the number of the step you want
to delete and press OK. The following steps in the chain will be
copied to their previous steps and their step numbers will be
reduced by one.
C.,D. TYPE and VALUE
A chain element can be one of six different types: a
scratch preset, a patch change for MIDI bank A, a patch change
for MIDI bank B, an arrange preset, a loop, an end of chain
element.
To define a chain step using a scratch preset, you need to
select the SCRATCH option in the MODE: parameter and then
the number of the scratch preset in the VALUE parameter.
Often you will want to change only a patch within a
scratch preset but maintain all the other segment information. To
do this, create a step and select PROG A or PROG B in the
MODE: parameter immediately after the step in which the
scratch preset appears. Then set the VALUE to the number of
the patch you want to play. When you come to this step in the
chain, only patch change information will be sent to the synth
and everything else will stay unaffected. This way you don't
have to create a completely different scratch preset if you only
want to change a sound.
There may be a situation in which you will want to
repeat several steps in a chain. Use the LOOP element in the
MODE: parameter to do this. Then set the value of the loop for
the number of steps backward in the chain to which it will jump
when you come to the loop element in the chain. For example, if
you create a LOOP at step number 5 in the chain, and set it's
value for 3, when you reach step 5, it will activate step 2. You
will then be able to cycle through steps 2, 3 and 4. Upon
reaching step 5, you will be sent back to step 2 again. Looping is/
infinite and will continue until you change the chain number^w^
exit.
In order to avoid confusion it is recommended that you
include an END element as the very last step of your chain. The
value parameter here is set for 1 and cannot be changed because
it is irrelevant.
Appendices
• Common functions:
• Editing a name: Guitar name. Arrange name,
Scratch name.
1. Scroll the Axon window until desired edit function is
at the TOP of the screen.
2. The lower line on the screen now shows the name of
the guitar/Arrange/Scratch that you want to change.
3. Position the cursor on editable part of the lower line.
(the left-most of the two possible cursor positions)
4. Press OK. The Cursor will move to the first character
of the editable name.
5. Using the +1, -1,+10, -10 keys, scroll the characters
until you find the one you want.
6. When you are ready to move to the next letter, hit the -> key to edit the next character.
7. When you are finished editing the name, hit the OK
key again.
• Moving around within command menus
The arrow at the left edge of the line on your screen
indicates whether you can move up or down in the hierarchy. If
you place the cursor in the line where you see the arrow and
press the OK key, you will move in the direction of the arrow
hierarchically, (see graphic) If there is no arrow at the left edge
of the line, then you will need to move to another part of the
page by using the +1, -1, +10, -10 keys (see below) until you
find an exit arrow to allow you to move to a different part of the
hierarchy.
As you look at a given page in the hierarchy, imagine
that you only have a small view window through which you
look at the page. Through this view window you can only see
two lines. In order to see more of the page, you move the page
up or down behind the view window. You will see +, -, and ±
signs at the right edge of the screen. If you place the cursor on
these signs and use the +1, -1, +10, -10 keys, you will be able to
move the page up or down behind the view window in order to
see more of the page. The "+" means that you are at the top of
the page and can only move the page up by using the +1, +10
keys in order to see what is further down on the page. The "-"
means that you are at the bottom of the page and can only view
upward by moving the page down behind your view window by
using the -1 or -10 keys. The "±" means that you are in the
middle and can move the page in either direction behind your
view window.
At any point in the hierarchy of pages and lines, you may
press one of the mode keys (Scratch, Arrange, Global, Chain)
and move directly to the top page of that mode.
If you are deep in the hierarchy of any mode and want to
be immediately taken to the top page of that mode, then simply
press the mode button again, although it is selected (the LED is
lit)
• Troubleshooting
• Q: When I play the guitar, the Axon reacts with level meter
response, but the synth does not play.
Area: Synth/Axon setup
Solutions:
1. Make sure MIDI cables are correctly connected: MIDI
OUT on your Axon, MIDI IN on your synth
2. MIDI channel number should be properly set on both
machines.
3. The synth should be in Multi-timbral mode.
4. Audio OUT cables from your synth to the amp may
not be correctly connected or may be defective.
5. The Synth Volume control on your guitar interface
may be turned down.
6. The Selector switch on your guitar interface could be
set to Guitar.
• Q: When I pick a string, I hear the right note, but hammer-ons
and pull-offs and/or bending strings do not work.
Area: Discrepancy in pitchbend settings between Axon
and synth
Solution: Make sure the pitchbend range values within
the synth correspond to your settings in the Axon.
• Q: When I play the guitar, the notes I hear are wrong, partly or
completely.
Area: Intonation discrepancy or quantize discrepancy.
Solutions:
1. Make sure you tune your guitar to the Axon by using
the Tuning Aid feature in Global mode.
2. Tune the Axon to your guitar by using the Tune Base
feature in Global mode.
3. Your Axon may be set to transpose pitches in a
segment page. This should be turned off.
4. Your synth could be out of tune or set to transpose.
This should be turned off.
• Q: When I play my guitar, I hear synth sounds but no audio
guitar signal.
Area: The Audio chain is broken
Solutions:
1. Make sure the selector switch on your guitar interface
is set to "Mix" or "Guitar".
2. Make sure the audio connection cable between your
guitar and guitar interface is properly connected.
3. Make sure the audio controls on your guitar are turned
up.
4. Make sure the Guitar Volume control on the front
panel of your Axon is turned up.
5. Make sure an audio cable is connected from the
Axon's "Audio Out" jack on the rear panel and is properly
connected to your amp.
• Q: There is an irritating dynamic difference between notes.
Area: Velocity mapping problems
Solutions:
1. The velocity sensitivity settings in the Axon for a
given sound should match the synth patch.
2. Experiment with decreasing the velocity sensitivity
parameter in the segment page and eventually adding small
amounts of velocity offset.
• Q: One (or more) of the strings sounds too weak/too loud in
comparison to the others.
Area: String sensitivity adjustment
Solution:
Try adjusting the string sensitivity of the problematic
string in the Global menu under "GUITAR_NO:"
Specifications
Display
2-lines
16-characterLCD
Connectors (rear panel)
Guitar IN Connector (GK)
Guitar Audio OUT (1/4")
Hold Pedal (1/4")
Chain Pedal (1/4")
MIDI connectors (IN, OUT, THRU)
AC IN
Power Supply
10-12V AC/DC (AC adaptor included)
1000mA
Dimensions
Depth: 21.5cm
Width: 22 cm
Height: 4.4 cm (1 rack unit)
Weight
1.5kg
Accessories
User's Manual
AC Adaptor
MIDI Cable
Foot switch (pedal)
Optional Accessories (sold separately)
GK-2A Synthesizer Driver
Guitar to Interface cable
extra foot switch (pedal)
SYSTEM EXCLUSIVE
IMPLEMENTATION
Received:
1.DUMP:
0: FOH
1: OOH
2: 20H
3: 2DH
4: OAH
5: x
6: y
7: d
8: lengthO
9: length 1
10: length2
11: D[0] .L
12: D[0].H
...
...
...
...
D[N-1].L
D[N-1].H
CHS —
F7H—
- SYSTEM EXCLUSIVE
- header for 3 byte manufacturer' s ID
- 1 st byte of manufacturer' s ID
- 2nd byte of manufacturer's ID
- AXON model ID
- device number (not evaluated)
- y= 1 :ALL, y=2:SCRATCH, y=3 ARRANGE
- d=0: dump coming; d= 1: dump requested
- lowest 7 bits of length
- middle 7 bits of length
- highest 7 bits of length
- low nibble of first byte
- high nibble of first byte
-
low nibble of last byte
high nibble of last byte
checksum (modulo 128)
end of exclusive
2. BULK DUMP REQUEST:
0:FOH
- SYSTEM EXCLUSIVE
1: OOH
- header for 3 byte manufacturer's ID
2: 20H
- 1st byte of manufacturer's ID
3: 2DH
- 2nd byte of manufacturer's ID
4: OAH
- AXON model ID
5: x
- device number (not evaluated)
6: 1
- bulk dump (ALL)
7:1
- bulk dump requested
... F7H— - end of exclusive
Transmitted:
l.DUMP:
Same as Dump Received.
Model: AXON NGC 66 MIDI Implementation Chart Date : June 1995, Version: 2,04
Function...
Basic
Channel
Default
Channel
Default
Messages
Altered
Transmitted
Recognized Remarks
Note
Number
True Voice
1-10
1-10
Mode 3,4
X
X
0-127
X
Velocity
Note On
09n v=l-127
X
X
X
X
X
X
X
X
After
Touch
Note Off
Key's
Ch's
08n v=10
X
X
X
X
X
7
0
0
X
X
10
0
Panorama
64
0
Holdl
32
0
Bank 0,1
121
0
Reset Controllers
100,38,101,6
0
Pitch Bend Range
0-127
0
Assignable Pick
Position Controller
True #
0
0
Mode
Pitch Bender
Control
Change
Prog.
Change
Volume
0-127
System Exclusive
0
0
System
Common
:Song Pos
:Song Sel
:Tune
X
X
X
X
X
X
System
Real Time
:Clock
: Commands
X
X
X
X
Aux
Messages
:Local On/Off
:A11 Notes Off
:Active Sence
:Reset
X
X
X
X
X
X
X
X
Notes
Mode 1 : OMNI ON, POLY
Mode 3 : OMNI OFF, POLY
Mode 2 : OMNI ON, MONO
Mode 4 : OMNI OFF, MONO
0 : Yes
X : No
Index
A
ADC 19
Arrange 10, 11, 13, 15, 18, 19, 21, 24, 26, 27
AUTO QUANTIZE 12
C
Chain 10, 18, 24,25, 27
Channel 20
channel 7, 15, 20, 27
Common 15, 20
Common String Mode 20
Copy Arrange 18
Copy Chain 18
Copy Scratch 18
Copy Segment 18
D
DELETE 24
DEST.ARR 18
DEST.CHN 19
E
EDIT 24
EDTSEGM 20, 21, 23
F
Fret Split 21, 22,23
G
Global 7, 8, 10, 15, 20, 27, 28
Guitar interface 7, 9, 11, 21, 23, 24, 27, 28
Guitar number 16, 17
H
HOLD 20, 21, 22, 23
I
INSERT 24
L
LOOP 24, 25
M
main page 19, 21
N
Norm 21
Note off 15
P
Panorama 12, 21
PBDRG 7, 15
PBEND 15
Pick Controller 13
Pick Split 13, 21, 22
Pitch Quantize 11, 12
Pitchbend 7, 15, 27
PROG A 25
PROGB 25
Q
Quantize 11, 12, 16, 27
R
RECALL 19
REC. ARRANGE 19
REC. SCRATCH 19
Receive All 19
Receive Arrange 19
Receive Scratch 19
s
Scratch 7, 9, 10, 11, 18, 19, 24,25 26, 27
Segment 11, 18 21, 23, 25, 27
Send All 19
Send Arrange 19
Send Scratch 19
Separate 15, 20, 21
Separate String Mode 20, 23
SOURCE ARR 18
SOURCE CHN 19
Specifications 29
Splits 11, 19, 20, 23
Step 24, 25
STRGMODE 20, 21
STRG SPLIT 21
String mode 15, 20, 21, 22
String Split 20,21, 22,23
Sustain 20, 21
T
Transpose 11,27
Trigger level 13
Tune Base 15, 16
Tuning Aid 16,27
TYPE 24
u
UP/DOWN 21, 23, 24
V
VALUE 24, 25
Velocity offset 13,28
Velocity sensitivity 12, 13, 28
Volume 9, 11, 13,21,27, 28