1
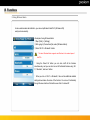
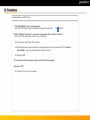
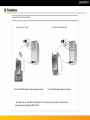
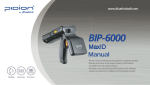
BIP-5000 GPS
User Manual
• Please read the following warnings before using the product.
• Shapes and colors of the images shown in this manual may differ from the actual products.
• Contents of the manual may differ based on the software version of products or conditions of the wireless provider.
This manual is protected by Copyright Laws and has been produced by Bluebird Inc.
(Please note that there may be editorial mistakes or possible omission of information.)
Programs embedded in the products are legally protected. Unauthorized copying, transferring, or deletion is strictly prohibited by
law.
There may be a few operational problems caused by the application environment, application program, or other surrounding
machinery. This product generates, uses and can radiate radio frequency energy and if not installed and used in accordance with
the instructions, it may cause harmful interference to radio communications. Service related to human security is not provided as
there may be a possibility of confusion in the electric waves of the product.
Registered Trademark
PIDION is a Leading Brand in the mobile industry. Bluebird Inc. is a trusted global company which represents
high technology and is currently registered worldwide with its PIDION trademark legally protected by law.
User Manual
Model
Users Manual
A-Class Machinery
(Information Communication
Device for Business)
This machinery has been registered for electromagnetic emission sufficiency so the attention of both the
sellers and users are required. If an inappropriate product is sold or bought, exchange it with a product for
domestic use.
Registered Form
This wireless product might cause radio jamming or there may be a possibility of confusion in the electric
waves of the product. Service related to human security cannot be provided under these circumstances
so it is up to the user to take precautions.
※ Please read “Cautions and Instructions” before using the product.
Cautions and Instructions
Please follow the instructions to properly use the product and avoid accidents in advance.
This PDA device has passed the standard for the emission of electromagnetic waves. However, for the users health and safety please only use the authentic
products provided by Bluebird Inc. Otherwise your safety cannot be guaranteed.
1. Precautions for Storing and Charging the Battery
• If the product or battery has been submerged under water, do not attempt to dry it by heater or microwave.
(In case of water damage, if the label inside the PDA changes color, you will not be able to receive free customer service for repair, so please be careful.)
• Ensure that necklaces, coins, etc. does not contact the battery’s connection terminal (the metal plate part).
• If you do not use the battery for a certain period of time, you must charge it first, and then store it in room temperature. This will ensure that the battery’s capacity
and durability are unaffected.
• Even when the battery is fully charged, usage time for a charge may shorten due to lowered voltage generated from the usage of the product.
• Use only original or authentic batteries and adaptors, and do not use them for applications other than those of the PDA.
(If you do otherwise there is a risk of explosion, or possibilities for shorter durability of the PDA, battery, and adaptor.)
• Plug in the adaptor firmly so it does not jiggle. If symptoms such as smoke, odor, or noise occurs, immediately turn the product off and detach the adaptor from
the outlet. Also in cases of thunder or lightening, please detach the adaptor from the outlet as well.
2. Precautions for the Phone and Product
• Make sure you are aware of all information related to the products electromagnetic waves.
- This product transmits and receives high-frequency energy (RF energy) while it is on. The Department of Information and Communication has legislated and is
enforcing the safety standards of these effects on the human body. This product meets all the standards.
(If you do not use the authentic product, we cannot guarantee the user’s safety related to electromagnetic transmission.)
• Please turn off the product in places where the use of it is prohibited (e.g.- airplanes, hospitals, etc.) or when you are in dangerous areas which may be
associated to electric waves.
• Do not put items using magnets such as credit cards, bankbooks, or transportation cards near the PDA. The magnetic waves from the PDA may damage the
data saved in the PDA.
• Record or store data from the PDA by making a backup copy. There may be cases where important data is deleted when repairing damage or upgrading the
PDA, so please backup your important data in advance.
• If the PDA has a RF Card reader we recommend that you do not use CDMA/GSM communications at the same time.
- If you use RF Card Reader and CDMA/GSM communication at the same time, calls may be cut off, incoming calls may not be received, or data connections
might became slow or completely cease. If you do not use it together, no problems with the connections will occur.
3. Other Precautions
• Data might be damaged by carelessness of the user or during reparation of the product. The producers are not responsible for the loss caused by it, so please
record or store your important data in advance.
• Do not remodel, disassemble or try to fix the product by yourself. Please contact customers service for reparations or inquiries.
• If you experience an allergic reaction from the product, stop using the PDA immediately and consult your doctor.
• Do not put dye or paint on the PDA. It may cause damage to the appearance or screen, or may cause the product to malfunction.
• Using the product in an environment with high temperature or humidity for a long period of time may cause damage to the product.
• If you use a drill, nail, or pen instead of the product’s Stylus Pen, it may cause damage to the LCD screen.
• Avoid external vibrations or shocks. When not in use and after detaching the power code, store it in a safe place where it cannot be dropped.
Certification
FCC RF EXPOSURE INFORMATION
WARNING! Read this information before using your phone
In August 1996 the Federal Communications Commission (FCC) of the United States with its action in Report and Order FCC 96-326 adopted an
updated safety standard for human exposure to radio frequency (RF) electromagnetic energy emitted by FCC regulated transmitters.
Those guidelines are consistent with the safety standard previously set by both U.S. and international standards bodies. The design of this phone
complies with the FCC guidelines and these international standards.
CAUTION : Use only the supplied or an approved antenna. Unauthorized antennas, modifications, or attachments could impair call quality, damage
the phone, or result in violation of FCC regulations. Do not use the phone with a damaged antenna. If a damaged antenna comes into contact with the
skin, a minor burn may result. Please contact your local dealer for replacement antenna.
Body-worn Operation
This device was tested for typical body-worn operations with the back of the phone kept 1.5 cm. from the body.
SAR compliance for body-worn operation is restricted to belt-chips, holsters or similar accessories that have no metalic component in the
assembly. The SAR limit of USA (FCC) is 1.6 W/kg averaged over one gram of tissue.
BIP-5000 Device(FCC ID : SS4BIP5XX0) has also been tested against this SAR limit. The highest SAR value reported under this standard
during product certification for use at the ear 1.25W/kg and when properly worn on the body is 0.289 W/kg.
WARNING
Any changes or modification not expressly approved by the party responsible could void the user's authority to operate the device.
Specific Absorption Rate (SAR) certification information
Your device conforms to European Union (EU) standards that limit human exposure to radio frequency (RF) energy emitted by radio and
telecommunications equipment. These standards prevent the sale of mobile devices that exceed a maximum exposure level (known as the Specific
Absorption Rate, or SAR) of 2.0 watts per kilogram.
During testing, the maximum SAR recorded for this model was 0.565 watts per kilogram. In normal use, the actual SAR is likely to be much lower, as
the device has been designed to emit only the RF energy necessary to transmit a signal to the nearest base station. By automatically emitting lower
levels when possible, our device reduces your overall exposure to RF energy.
The Declaration of Conformity at the next page of this guide demonstrates your device’s compliance with the European Radio & Terminal
Telecommunications Equipment (R&TTE) directive.
Certification
BIP-5000(Black)
※ The CE certification of the BIP-5000 communication.
Model: BIP-5000
TYPE: PDA
Satisfies all the technical regulations applicable to the product
within the scope of Council
Directives 99 /5/EC, 89 /336 /EEC, and 73 /23 /EEC:
Health
EN 50360, EN 62209-1
Safety
EN 60950-1+A11
EMC
EN 301 489-1/-3/-7/-17
Radio
EN 301 511
EN 300 328
EN 300 440-1/-2
All essential radio test suites have been carried out.
NOTIFIED BODY : EMCCert Dr.Rasek
- Address
Boelwiese 5, 9132 0 Ebermannstadt, Germany,
Identification Number : 0678
MANUFACTURER or AUTHORISED REPRESENTATIVE :
- Address
Bluebird Inc.
SEI Tower 13~14F, 467-14, Dogok-dong,
Gangnam-gu, Seoul, Korea (Postal Code 135-856)
POINT OF CONTRACT: Bluebird Inc. Tel:+82 2 548 0740
Table of Contents
Ⅰ. Knowing the Product
1. Components • 5
2. Basic Terms • 6
3. Button Description • 7
4. Function Key Description • 8
5. Attaching/Detaching the Battery • 9
6. Cautions for Battery • 10
7. Charging the Battery • 11
8. About Batteries • 12
9. PDA Specification • 14
Ⅱ. Learning the Basics
1. Turning On/Off • 15
2. Using the Stylus Pen• 15
3. Starting the PDA • 16
4. Making/Receiving Calls • 18
5. Typing • 20
6. Using SD Memory Card • 22
7. Software Reset (Initialization) • 23
8. Hardware Reset (Memory Format) • 23
9. Using SIM Card • 24
Ⅲ. Functions
1. Using Barcode Reader • 25
2. Using Camera • 28
3. Using Infrared Port (IrDA) • 30
4. Using Bluetooth • 31
5. Using Wireless Admin • 33
6. Using Wireless LAN Features • 34
7. Host PC Connection method • 35
8. Using ear jack • 36
Ⅳ. Connecting ActiveSync
1. Installing ActiveSync• 37
2. Downloading Files • 39
V. setting
1. Phone • 40
VI. Appendix
1. Q&A • 41
2. Customer Service • 42
3. Certifications of the Product • 43
I. Knowing the Product
1. Components
Thank you for purchasing a PIDION product.
Please check and make sure the following components are included in the package.
[BIP-5000 PDA 1 unit]
[Handstrap]
[BIP-5000 Cradle 1 unit]
[Adapter]
[Battery (standard/Extend)]
[USB cable]
The pictures or the figures in this manual may differ from the actual product.
!
If you would like to purchase an additional or optional version, please contact Customers Service.
[Stylus]
I. Knowing the Product
2. Basic Terms
Antenna
Speaker
Barcode
scanner
Window
Hand
Camera
strap
fixed
Flash
Power (LED)
Camera
GSM
(LED)
Barcode/
Camera
Button
Barcode/
Camera
Button
Power
button
Send
button
MIC
[Front]
Hand
strap
fixed
Battery Case
Fixed screw
[Right side]
Please familiarize yourself with the basic terms of the PDA product.
[Back]
[Left side]
I. Knowing the Product
3. Button Description
Use it to turn on/turn off the PDA
Laser(1D,2D) Barcode / Camera Type : Press left button to use barcode scanner
Press right button to use camera
CMOS Barcode Type : Use right and left button to activate barcode.
Execute after user input
Change character input mode. Default mode is numeric. Press once for lower case English,
press twice for capital English, press three times for special characters.
Execute program and make phone connection. Press once to execute phone program, press
twice to view recent calls, press three times to call the selected number.
Delete a character by moving the cursor one space to the left.
Move one space to the right.
Press 3 seconds to enable/disable silent mode
Press 3 seconds to lock the PDA. Password must be inserted to use the PDA.
I. Knowing the Product
4. Function Key Description
- To use the Function keypad
- The following functions will be executed after pressing the function key and button.
Contents
Description
Function + 1
LCD getting darker
Function + 2
Moving one space up
Function + 3
LCD getting brighter
Function + 4
Moving one space to the left
Function + 5
Execute the sign input
Function + 6
Moving one space to the right
Function + 7
Page Down
Function + 8
Moving one space down
Function + 9
Page Up
Function + 0
Run the sign character
Function + 1
Change display.
Function + 1
Starting menu.
I. Knowing the Product
5. Attaching/Detaching the Battery
[Attaching the Battery]
• Sit the battery to the groove,
Put the cover and swivel the screw.
!
[Detaching the Battery]
• Swivel the screw in arrow direction until
detached, take off battery.
※ Detach the battery only after you turn off the product.
※ Abruptly turning off the product may cause damage, and you may lose saved data.
I. Knowing the Product
6. Cautions for Battery
A. <Remove Battery> Pull the belt by using your hand.
B. <Install Battery> Insert battery in the same direction as the figure.
C. <Common examples of Faulty> Battery contact can be damaged in case of inserting battery like above.
I. Knowing the Product
7. Charging the Battery
[While connecting the adapter to the table charging cradle]
* Connect the adapter with table charging cradle as showed.
• Note: Using the provided/approved adapter is the most safely and effective way to use PDA.
I. Knowing the Product
8. About Batteries
[Battery charging and working time]
Working time
Standard (2200mhA)
Talk time
6 hours
12 hours (LCD on,
backlight off),
200hours (LCD off)
Standby time
Charging Time
Standard (2200mhA)
Time
Less than 4 hours (main
battery), less than 72
hours (backup battery)
* Modem power turns off automatically to prevent the battery power damage. Use is after recharging.
* The battery talk time and standby time can be different from the specification in various conditions.
[Battery Charging condition]
Charging
Lamp
Charging
Fully charged
Red
Green
* It is fully charged when table charging cradle and PDA’s charging lamp turn to green, there is no harm if keep
charging the PDA.
* The Charging time is subject to change of charging condition, please purchase the new one when it’s working
time is shortened by 50%.
I. Knowing the Product
9. PDA Specification
Contents
Description
GSM
GSM/GPRS/EDGE
CPU
Marvell PXA320 806MHz
OS
Window Mobile 6.1
DISPLAY
3.5”, 240 x 320 / 260,000 color
INTERFACE
1 x USB 1.1 Client / Host
1 x RS-232C
Mini-SD slot
IrDA 1.2 (Option: Bluetooth class )
GPS
Integrated GPS
CAMERA
2.0M pixel camera
BATTERY
Standard battery: 3.7V Li-ion :22000mAH / Extend battery : 3.7V Li-ion 3700 mAH
SIZE
79.5(width) x 150.3(length) x 34.9thickness) mm
WEIGHT
314 g
ADAPTER
5V 3A
II. Learning the Basics
1. Turning On/Off
- Power Button
* Press power button to turn on the PDA
* Depress power button for 2 seconds in the condition
of PDA is turned on, the Front light will be turned on
or turned off.
2. Using the Stylus Pen
▪ Stylus Pen is an input device that can be used for selecting, launching, and moving
items on the touch screen LCD.
▪ Pressing the Stylus Pen (Tap): Select or launch an item by touching an icon on the
screen with the tip of the Stylus Pen.
▪ Dragging the Stylus Pen (Drag): Used to select multiple items, select characters or
images by dragging.
▪ Holding the Stylus Pen Down (Tap and Hold): See the functions of the selected
item(s) that show up in a popup box when you tap the screen with the Stylus Pen.
! ※ The product can be damaged if you use a pen, nail, pin, etc. instead of the authentic Stylus Pen.
II. Learning the Basics
3. Starting the PDA
[Windows Mobile Starting Screen]
[Adjusting the Screen]
▪ Optimize the screen input by using the Stylus Pen on
the LCD screen.
▪ Once you complete the initial wizard, you will see
the starting screen as shown below.
Title Bar
Today’s
Section
▪ When you press the middle of the cross in the center using the
Stylus Pen, the target moves. Press it again precisely with the
Stylus Pen.
II. Learning the Basics
3. Starting the PDA
[Starting Windows Mobile]
▪ When you press the Start button on the upper left-hand corner of the title bar, the start menu will
appear.
Start
Button
Start Menu
Running
Programs and
Settings
II. Learning the Basics
4. Making/Receiving Calls
[Making Calls]
1)
Push and make a start the phone program.
2) Enter the phone number.
3) Edit the phone number with
.
4)
or
make you phone call.
• Re-send function: Automatically make a phone call which is the last number you input
5) Connecting.
• Talking time will show up on the screen.
[Receiving Calls]
1) With ringing ‘Calling’ sign will be shown on the screen.
2) Push
and it will be connected.
3) Push the disconnect button
4) Push the disconnected button
will make you disconnected with line.
longer, then modem will be off.
II. Learning the Basics
4. Making/Receiving Calls
[Using call program]
1) Dial number
a. Dial a phone number or a speed dial number
b. Number can be cleared by using [CLR] button
c. Press [SEND] button to make a call
- Redial function: Without inputting numbers, press the [SEND] button to redial the lasted call number
d. Communication is available after the call being connected
- Redial option and times can be set in SETTING-OPTION automatically when the connection failed.
- Call time is shown on the screen
e. Press [END] button to end the call
2) Receive the call
a. An incoming call message is shown when the bell rings.
b. Press any key to receive the call.
c. Press [END] to finish the call .
* Keep pressing [END] button can turn on/off the phone modem.
II. Learning the Basics
5. Typing
[ Keyboard ]
This input method displays
an on-screen keyboard that
can be used to input
characters by tapping
the screen using
the stylus pen.
[ Letter Recognizer ]
This option allows you to
enter texts using your own
handwriting.
The screen is divided into
three different sections.
A capital letter area,
lowercase letter area,
and a number area.
Characters are entered by
printing letters in each area.
The character is then
analyzed and typed on the
screen automatically.
[ Transcriber ]
The transcriber option is
similar to the letter
recognizer. However,
instead of entering
characters into a designated
area, you can enter entire
words and sentences using
your own handwriting.
Transcriber supports both
printing and cursive writing
styles and then automatically
types the information on the
screen.
II. Learning the Basics
5. Typing
[ Selecting Text Input Mode ]
[ Block Recognizer ]
There are five different
character input
methods available:
This input method uses the
traditional writing area box
split in the middle.
1. Block Recognizer
2. Built-in Numeric Keypad
3. Keyboard
4. Letter Recognizer
5. Transcriber
The left side is used to write
letters and the right side is
for number entries.
Symbols and common
functions are located in other
smaller boxes located in the
right of the writing box area.
[ Built-in Numeric Keypad ]
Using Keypad, you can type
letters, punctuations,
numbers, and other
Special characters
into the text entry fields
or other applications
available on your PDA.
II. Learning the Basics
6. Using SD Memory Card
[Insert Mini SD card]
Memory
Card
* Push the memory card into the slot as shown until
it’s plugged.
[Take out Mini SD card]
Memory
Card
* Press the memory card down deeply as shown and it
will bounce out and get detached.
II. Learning the Basics
7. Software Reset (Initialization)
• Press reset softly by using stylus
Reset button
* Soft reset can be used to restart the PDA when there is error
occurred and PDA stopped working. Same as computer reset, all
the unsaved data will be lost.
!
※ You can reset the software when something unexpected happens to
the PDA such as crashing of programs or freezing.
8. Hardware Reset (Memory Format)
• Perform the hard reset using Stylus and buttons
• Hard reset is used when the soft reset doesn’t work. The PDA will turn to the original condition after
being hard reset.
All the installed program in RAM, documents, settings will be lost after doing hard reset.
※ We are not responsible for the loss of data and programs, so we strongly advise that you backup your data
!
when launching Hardware Reset.
II. Learning the Basics
9. Using SIM Card
Detach the battery before using the SIM Card.
Please insert the SIM card in this slot.
SIM Card Slot
III. Functions
1. Using Barcode Reader
[Using laser Scanner]
[Using CMOS Imager Scanner]
[correct]
[incorrect]
[correct]
-Barcode can be read in every direction
[correct]
* Face the PDA the barcode as shown and press left/right button to use.
III. Functions
1. Using Barcode Reader
[Basic test method of laser barcode]
1) Run notepad
2) Create new notepad file
3) Face the scanner to the barcode and press barcode button.
4) The captured barcode value is shown in the new notepad.
• Please consult the program’s manufacture for using the special barcode program.
III. Functions
1. Using Barcode Reader
[Basic CMOS barcode test method]
1) Run notepad
2) Create the new notepad file
3) Face the scanner to the barcode and press barcode button.
4) The read barcode value is shown in the new notepad.
•Please consult the program’s manufacture for using the special barcode program.
III. Functions
2. Using Camera
[Taking Photo]
▪ Go to [Start] → [Programs] → [CAMERA] program.
▪ If you use Mapping to use the side button of the PDA as the camera button,
the [CAMERA] program will launch when you press the side button.
▪ If you press the [Barcode] button,the terminal takes the Still/Video and automatically saves the
Still/Video in the album.
▪ Menu
Video : Switches into video recording.
Mode : You can select Normal/Burst/Timer.
Resolution : 480×640/600×800/768×1024/1536×2048.
Flash : Select/deselect flash function.
Full Screen : The display is extended to the entire screen.
Options... : You can select Name/Folder/Size of files
III. Functions
2. Using Camera
[Viewing album]
▪ Start ► Programs ► Camera► Thumbnails
You can extend/reduce the selected Still/Video, or check information on the Still/Video.
By selecting the [Menu] button, you can select Zoom, Play Slide Show, Set as Today Background, Beam
picture, Save, Edit, Properties, Options or Send to your space for the selected Still/Video.
III. Functions
3. Using Infrared Port (IrDA)
• Matching the IrDA port as shown (transmission
speed is fastest when the distance at shortest)
Sample)
1. Start->Setting
2. Select WL transmission after pressing “connect” tab.
3. Click “OK” after check “receiving all the incoming WL”
4. Searching for the opposite IrDA port
5. Press “OK” after sending the data
III. Functions
4. Using Bluetooth
You can launch Bluetooth devices (Bluetooth printer, card reader, etc.) separately from the PDA.
Devices and connections of Bluetooth can be setup.
▪ Example of Using Bluetooth:
① Steps: [Start] -> [Settings]
② Press [Connections] tab and select [Bluetooth]
③ Check ‘Turn on Bluetooth’ from the [Mode] tab, and click
[OK]
▪ Turn on Bluetooth
- By checking or un-checking Bluetooth it will indicate
whether it is in use or not.
! ※ Please select OFF when Bluetooth is not in use.
You can save the battery by doing so.
▪ Setting up so other devices can find your device
- When Bluetooth is in use, other devices can search BIP5000.
III. Functions
4. Using Bluetooth
Scan and pair up with other Bluetooth devices.
▪ Example of using Bluetooth:
① Steps: [Start] -> [Settings]
② After pressing [Connections] tab, select [Bluetooth]
③ On the [Devices] tab, select ‘Add new device...’
※ If the PDA recognizes Bluetooth devices which are within
range, you will see its model and icon on the screen like
shown in the image.
※ If the PDA does not recognize any, it alerts that no devices
have been found.
▪ You may see a windows screen requiring a PIN number.
(The PIN number is different from every Bluetooth device and is used to
prove validation. Ask the Bluetooth producer for the PIN number.)
▪ Check if the icon indicates the same device as the device found.
▪ Double click the device found, select menu and type in the PIN number
again.
▪ Once you type in the correct PIN number, see if the red mark in front of
the device disappears.
▪ Select activate the device after double-clicking the name.
▪ See if a red mark appears on the icon.
!
※ To see if other Bluetooth devices interlock with the PDA, please consult with the Bluetooth producers.
III. Functions
5. Using Wireless Admin
As an overall wireless administration, you can set up Bluetooth and Wi-Fi (Wireless LAN)
easily and conveniently.
▪ Example of using Wireless Admin:
① Step: [Start] -> [Settings]
② After going to [Connections] tab, select [Wireless Admin]
③ Select ‘Wi-Fi’ or ‘Bluetooth’ button
! ※ The items Wireless Admin supports can differ due to the network spec of
the PDA.
※ Using the ‘Select All’ button you can turn on/off all the features
simultaneously, and you can also turn on/off individual features using ‘WiFi,’ ‘Bluetooth,’ and ‘send’ button.
※ When you turn on ‘Wi-Fi’ or ‘Bluetooth,’ there will be additional detailed
settings shown below the name of the function. You can set it individually
through the menu button at the bottom even after it is turned off.
III. Functions
6. Using Wireless LAN Features
1) The “WLAGS4681” menu window appears.
cf) If the “WLAGS4681” menu window does not appear, double click “
”in the tool bar.
2) Click “Wireless Information”, select the corresponding AP, and select “Connect”.
cf) If the AP information does not exist, enter it manually.
2-1) Double click “Add” in the AP list window.
2-2) When the wireless network properties window appears, enter the corresponding AP in “Network
Name (SSID)”. Check the corresponding settings for the AP.
2-3) Depress “OK”.
3) The window in (2) above appears again, and the AP name appears.
4) Depress “OK”.
4-1) Depress “Connect” on the window.
III. Functions
7. Host PC connection method
[Connect the cradle]
*Connect the PDA (cradle) -cable-computer as shown
[Connect to PDA directly]
* Connect PDA-cable-computer as shown
• ActiveSync can be used after connecting the PC or notebook to copy the files or install the new
program by synchronizing the PDA with PC.
III. Functions
8. Using ear jack
• Take off the ear jack cover and plug it straight into the PDA as shown.
IV. Connecting ActiveSync
1. Installing ActiveSync
▪ Download Microsoft ActiveSync Version 4.5
from http://www.microsoft.com/downloads/
▪ When the installation screen shows up, click Install.
▪ When ActiveSync starts, click Next.
!
※ The screenshots are for the Korean version of Microsoft ActiveSync 4.1 . There may be differences on
the screen or differences in the menu functions/features if you use other versions of the product.
IV. Connecting ActiveSync
1. Installing ActiveSync
▪ Exit the installation by selecting Done once the installation is finished.
▪ It might be necessary to restart the PC based on the environment of your PC. If requested please restart your PC.
!
※ If you connect the PDA to your PC for the first time, the new hardware search wizard will
launch on your PC.
※ You do not have to install any additional drivers if you already have Microsoft ActiveSync
installed.
※ You might experience failure when you connect the PDA and PC for the first time
(initial installation failure). If this happens, please exit and start again.
IV. Connecting ActiveSync
2. Downloading Files
▪ In order to use ActiveSync, connect your PC or
laptop to the PDA with the USB cable.
Or, you can also attach the PDA on the cradle and
connect the cradle to your PC or laptop with the
USB cable.
▪ If the PDA is turned on when connecting with the
PC, the PC automatically senses it and launches
ActiveSync.
▪ Open Mobile devices window by clicking Explore
button on ActiveSync window.
▪ Once you connect the PDA to the PC with ActiveSync, you
can synchronize features such as Favorites, Contact,
Schedule, Tasks, E-mail Inbox, etc. You can also copy or
paste files, and get help on installing new programs.
▪ Copy desired files by using Explorer on the PC, and move
them into the folder you want in PocketStore.
V. Setting
Phone
•
•
Phone Tab
You can select/deselect sound of the terminal.
•
•
•
•
•
•
•
•
•
•
Start ► Settings ► Personal
Tab ► Phone ► Phone Tab
Ring type : You can select Ring
/ Increasing ring / Ring once
/ Vibrate / Vibrate and ring /
Vibrate then ring / None.
Ring tone : You can select a bell.
Keypad : You can set the keypad
tone from Long tones / Short
tones / Off.
VI. Appendix
1. Q&A
Q. What should I do if the PDA gets wet?
A. You should detach the battery from the PDA, and lay it out to dry. If your PDA does not work even after drying
you may need to change the main board or other components, so please contact Customers Service.
Q. The PDA will not boot.
A. The program may be damaged. Try resetting and if it still does not work please contact Customers Service.
Q. I cannot charge the battery.
A. Check if the PDA and cradle are connected properly and if the lamp is working. Clean the charge terminal,
and if the machine still does not charge, either the battery is defective or you need a new battery
(Warranty period for batteries is 6 months).
Q. How do I request after-sales service?
A. You can send the product directly to Customers Service Center.
Q. How can I know that the PDA has been delivered?
A. We will inform you of the invoice number if you contact our Customers Service Center, or you may contact the
delivery company as well.
VI. Appendix
2. Customer Services
[Before Requesting Customers Service]
• Please backup all the data in your PDA before
requesting customers service.
• We do not backup products registered at the customers
service center. Therefore, we are not responsible for any
damage or loss of data.
[ Bluebird Customers Service ]
• Phone : +82-2-1588-1380
• FAX : +82-2-548-0870
• E-Mail : [email protected]
Address : Customers service center, SSang-young IT
twintower B 703, Sangdaewon-dong 442-5, Joongwon-gu,
Sungnam-si, Keonggi-do, Korea
• Mon.-Fri. : 9 :30A.M. ~ 6:30 P.M.
•We are not open on Saturday, Sundays and National
Holidays.
[Registering for Customers Service]
• According to company rules, registering for customers service requires prepaid postal or delivery service, or visitation.
• If you have purchased the product through any stores other than Bluebird , you have to be registered as a user in order
to request customers service.
• In order to be registered as a user, call Bluebird Inc. Call center +82-2-1588-1380.
• When you register for after-sales service, you need to attach the purchase receipt with the product.
• If you also post your name, contact number, address, and the problematic symptoms, the product will go through a
faster and more efficient examination.
• You can either ask for service from the company you purchased it from, or talk directly to the customers service center
at Bluebird Inc.
• Do not intentionally damage the label on the product. Customers may have disadvantages if the label is damaged.
• If you have to return the product to Bluebird Inc., you need to put it in a safely packed box.
• We do not warrant you for the damages incurred during transportation. Please use the original box of the product and
bubble wrap it.
• Transport the product safely. Bluebird Inc. is not responsible for any components lost during the transportation.
VI. Appendix
3. Authenticated Facts
▪ Name of Authenticator: Bluebird Inc.
▪ Name of Product: Wireless product for the wireless data communications system (Industrial PDA)
▪ Model: BIP-5000
▪ Date of Production: 2009. 06.
▪ Manufacturer/Country: Bluebird Inc./Republic of Korea
▪ Authenticator Identification: BBS