1
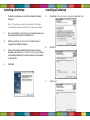
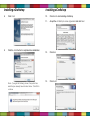
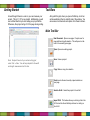
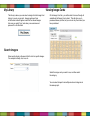
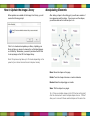
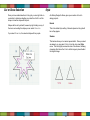
User Manual
TM
Contents
Registering Your eCraft.................................... 1
Downloading eCraftshop.................................. 2
Installing eCraftshop......................................... 3-7
Connecting the eCraft to the Computer............ 8
Getting Started..................................................8-9
Tool Bars........................................................... 10-14
Main Tool Bar.................................................... 10-12
Drawing Tool Bar............................................... 13-14
My Library..........................................................15
Search Images..................................................15
Viewing Image Cards........................................ 16
How to Update the Image Library......................17
Manipulating Elements......................................18
Cut or Draw Selection....................................... 19
Style..................................................................20-21
Welding.............................................................22-23
Importing SVG Images......................................24
Cutting...............................................................25-26
How to Validate Image Cards............................27-28
FAQ...................................................................29-32
Technical Support..............................................32
Registering Your eCraft
All users will need to register their new eCraft Electronic Cutting System to activate their product warranty. After successfully registering your eCraft machine, you will receive
an email to confirm your registration. This email will also provide you with your login, password, and your Activation Key which is necessary to install the software.
Downloading eCraftshop
After completing your product registration, you can download
the eCraftshop Design Software to your computer.
1.
After registering your eCraft, you will be directed to our Welcome page to login. The site is accessible at:
2.
Enter your Login Username (not email) and Password
http://register.ecraftcentral.com/FrontEnd/UserLogin.aspx
1.
Register your eCraft machine online:
http://register.ecraftcentral.com
2.
Click on the Register Your eCraft button
3.
Enter all required information on the registration form
Note: You will need to enter your eCraft Serial Number.
You will find this 13 character serial number located on a sticker on the bottom of your eCraft machine.
4.
Review and accept the Terms & Conditions
5.
Click Save
1
3.
On the download screen, click the Download button to download the installation file
Note: Please also review the FAQ section
for more information
4.
When prompted to Open or Save the file, click Save
5.
Save the file to your computer’s desktop
2
Installing eCraftshop
Follow the steps below to install the eCraftshop Design Software.
Note: This software is currently only available for Windows. The Installation wizard will install both the driver and software.
1.
Go to your desktop or the area of your computer where you downloaded and saved the installation file
2.
Click the setup file eCraftshopPro2 and then click Run
to begin the installation program
3.
If the system detected existing drivers were previously installed, select Maintain or Update Existing Copy to make sure multiple instances of the same driver are not installed on the system
4.
Click Next
Installing eCraftshop
5.
Accept the End User License Agreement and click Next
6.Click Next
7.Click Install
3
4
Installing eCraftshop
8.Click Finish
Installing eCraftshop
10.Click Next to start installing eCraftshop
11.
9.
Click the Install button to complete driver installation
Note: If you get the following screen, the system has identified you already have the latest driver. Click OK to continue.
5
Accept the eCraftshop License Agreement and click Next
12.Click Next
13.Click Install
6
Installing eCraftshop
14.Click Finish when eCraftshop installation is complete
Connecting the eCraft to the Computer
Locate the USB cable provided with your eCraft machine. Then locate the USB port on the side of the machine (it is next to the SD Card Slot), and plug in one end of the cable. Lastly, plug in the other end of the USB cable to an open USB port on your computer.
Getting Started
7
After successfully installing the eCraftshop Design Software,
you should see an icon on your desktop similar to the one pictured below:
Double click the icon to launch the software. This will open a new project. A window will appear with a white grid; this grid represents your page. All design elements will be placed
within this area.
Note: The first time you install and open eCraftshop, the system will prompt you to enter an Activation Key. This key was provided
in the email sent to you after registering your eCraft machine. Please refer to the email to obtain the key. Enter the activation key
exactly as it appears in your email onto the screen and click the Activate button.
8
Getting Started
Tool Bars
Around the grid there is a ruler so you can measure your project. This is 11.75” by any length. Additionally, you will see a dotted line that you must keep your project within. Otherwise, the project will go off of the page during cutting.
Along with the grid, when you open eCraftshop, a tool bar will be available at the top and left side of the window. You can access most features and options from these tool bars.
Main Tool Bar
New Document: Open a new page. Prompts user for page width and length selection. This will open in a tab next to the currently open page.
Open: Opens an existing project.
Note: To adjust the size of your virtual cutting grid,
select ‘File’-->’New’. You will be prompted for the width
and length measurements at this time.
Save: Saves a project.
Copy: Makes a copy of a selection.
Paste:Inserts the most recently copied selection on
your page.
Send to eCraft: Sends the project to the eCraft.
Import SVG: This feature allows you to bring a file in the SVG format into the eCraftshop software for cutting on
the eCraft.
9
10
Main Tool Bar
Main Tool Bar
Help: Instructions on how to use the software.
Flip Horizontal: Flip a selected element horizontally.
Redo: If you have removed an element you can put it back by using this button.
Flip Vertically: Flip a selected element vertically.
Undo: If you have placed an element that you want to remove, you can click here to remove the last element added to the design.
Ungroup Text: If you type text it will appear as one shape that can be moved together. If you ungroup the text, you can move the letters separately.
Kern +: This will add space between letters you have added to your project.
Auto-Fill: If you have created an image that you need many copies of, this feature allows you to enter the number
of images you want.
Select the option to draw or cut the
lines of the image. Note: You can also achieve this by right clicking on an image.
From drop down, select the style you want to apply to your project. Choose from Normal, Shadow, BlackOut, or Shadow Blackout.
Center: Align your project with the center of the page.
Kern -: This will decrease the space between letters in your project.
Bold: Selecting a letter and clicking this will make the image bold.
Italic: Selecting a letter and clicking this will italicize
the image.
Fonts: Access your true type fonts that are loaded onto your computer.
X and Y Coordinates: Displays where an element is on a page.
W and H Measurement: Displays width and height
of the image.
11
12
Drawing Tool Bar
Drawing Tool Bar
On the left side of the window, there is an additional tool bar. This is where you can easily access features that allow you
to draw.
Select: Click this icon and then click on an element of your project. Once selected, you can manipulate that element. To select multiple objects at once, click and drag until the highlighting box surrounds the objects you wish to select.
After selecting Show/Hide Keyboard, a virtual keyboard will appear over the grid.
Curved Line: Use to draw a curved line.
From the Keys tab, you can use the mouse to select the letter or symbol you would like to use in your project. You can switch the layout between Normal and QWERTY, which is the standard layout
of a computer keyboard.
Eraser: Use to erase lines you’ve drawn.
Note: Click anywhere outside of the keyboard to close the keyboard screen.
Add Text: Allows you to add letters and words to your project. Click to select, then click on the grid where you want to place the text.
Pen: Use to draw shapes.
Zoom in: Use to zoom in on your project.
Shapes: Click the Shapes button to view the available shapes.
Zoom out: Use to zoom out on your project.
Show/Hide Keyboard: This is a virtual keyboard that allows you to select letters and numbers with
your mouse.
13
14
My Library
Viewing Image Cards
The Library is where you can select a design from the Image Card
Library to use in your project. Images purchased from eCraftcentral.com will appear under the Purchased Images tab once you select ‘Sync’ and enter your username and password for eCraftcentral.
On the Image Card tab, you will be able to browse through all available eCraft Image Card content. This will allow you to preview whatever you like, but you can cut only the content you have purchased.
Select the image card you want to use, and then select
the category.
You can select shapes from multiple cards and categories in
the same project.
Search Images
Enter search criteria in the search field to look for specific images.
For example: butterfly, star, love, etc.
15
16
How to Update the Image Library
When updates are available for the Image Card Library, you will receive the following prompt:
Manipulating Elements
After adding a shape to the cutting grid, you will see a number of icons appear around the shape. If you mouse over the shapes, you will see what each icon allows you to do.
Move: Moves the shape on the page.
Rotate: Turns the shape clockwise or counter-clockwise.
Resize: Makes the shape bigger or smaller.
Skew: Tilts the shape to any angle.
Tip: If there are multiple shapes on the VCG (virtual cutting grid),
click the black arrow to select multiple shapes at once. This will allow you to move all of these selected shapes at the same time.
Click Yes to download and update your library. Updating your library will give you access to view and try out the latest images on eCraftshop. Remember, you need to purchase the SD Card to cut any image on the SD Card Image Library.
Note: This process may take up to 10 minutes depending on the speed of your internet connection and computer memory.
17
18
Cut or Draw Selection
Once you have added selections to the grid, you can right click on
a selection to determine whether you prefer the eCraft to cut the shape or draw the shape with the pen.
Style
Shapes will be cut by default, however by right clicking on any of the icons surrounding the shape you can select Draw Line.
If you select Draw Line, the selected shape will turn purple.
19
eCraftshop Design Software gives you a number of tools to
design projects.
Normal
This is the default style setting. Elements placed on the grid will be as they appear.
Shadow
This feature allows you to create a layered effect. Once you select
an element, you can select Shadow from the drop down Style menu. This will slightly increase the size of the element, allowing a layering effect when the Shadow effect image is placed behind the original image.
20
Style
Welding
BlackOut
This feature allows you to remove the cuts from the center of a shape, leaving the silhouette of the image.
Shadow BlackOut
This feature allows you to both remove the cuts from the center of
a shape and make the image slightly larger for the same layered effect that Shadow gives.
In the example below, the Normal B could be placed over the
Shadow Blackout B when cut.
21
Welding allows you to combine shapes and letters into one connected shape. This is great for banners and other projects when you wish to keep shapes attached.
Select the shape or type the word that you want to weld into the project grid. Letters will need to be typed individually.
Once you have decided on a word or design, move the elements into the arrangement you want to cut. The letters or shapes should
slightly overlap on the areas you wish to stay connected throughout
the cutting.
Click the Select arrow, then drag the arrow to create a highlighted
box around the elements you wish to connect. You will see the editing icons appear around the entire image.
22
Welding
Importing SVG Images
Next to your File tool bar, select Path and then Union.
This will weld the selected images/text together. The live preview of this action will be seen on the virtual cutting grid. There will
not be lines between the letters or shapes that previously overlapped, as they are now welded together. If necessary, the shapes can be moved to change the welding points.
23
Select the Import SVG button on the main tool bar. A window will display and allow you to find the SVG image on your computer. Select the image you want to import and click the Open button to place the SVG image on the virtual cutting grid.
Note: Currently, eCraftshop does not have a “Break Apart” function to separate layers of an .SVG image. We recommend using your third party design software to separate an .SVG image, then import each layer into eCraftshop.
24
Cutting
Cutting
Once you have finalized your project, you will send it directly to the
eCraft Electronic Cutting System.
Use the included USB cable to connect your computer to
your eCraft.
The eCraft can cut from the software using either front cutting mode or paper tray mode. Load the paper as you would when cutting straight from the machine.
When the eCraft starts cutting, a message will appear that will allow you to cancel your cut. Click the Cancel button if you wish to stop the cut. Otherwise, the eCraft will finish its cutting, and the
message will disappear.
Click the
Send to eCraft
button:
The software will now ask you the mode you wish to choose
(Front or Tray), the number of copies you would prefer, and what number of multicuts you would prefer. Multicut refers to the number of times the blade passes over the same image. This is helpful when cutting very thick materials that may take more than one pass of the blade in order to cut entirely through the material. Once you make your selection, your image will start cutting.
25
26
How to Validate Image Cards
When cutting an image from your Image Cards Library using the eCraftshop Design Software, you must have the actual image card
with you when it comes time to cut.
The software will ask you to insert the appropriate image card(s) into the eCraft machine. The machine will read the image card(s)
and perform the cut when it completes the validation process. You
may use images from multiple image cards. The time for validation
will vary. Please wait for validation to complete.
Single Image Card Validation
How to Validate Image Cards
Multiple Image Card Validation
This feature allows you to select images from multiple image cards for cutting.
1.
After selecting images from different image cards, click the
Send to eCraft button and the validation window will display
to prompt you to insert the appropriate image cards.
2.
Insert the image card requested into the eCraft SD Card slot.
1.Click Send to eCraft button. The validation window will display and prompt you to insert the appropriate image card.
2.
Insert the image card requested into the eCraft SD Card slot.
3.Press Reset on the eCraft and wait for it to finish resetting.
3.Press Reset on the eCraft and wait for it to finish resetting.
4.
Click the Check button in the validation window to start the
validation process.
5.
A green thumb will appear when validation is complete.
4.
Click the Check button in the validation window.
5.
A green thumb will appear when validation is complete.
6.
Repeat steps 3 to 6 until you validate all remaining
image cards.
6.
You are now able to click the Proceed to Cut button.
27
7.
You are now able to click the Proceed to Cut button.
28
FAQs
Q:
What are the system requirements to
install eCraftshop?
A.
The system requirements to run eCraftshop:
`Window XP SP3, Vista or WIN7 Operating Systems
`1+Ghz CPU
`1GB of RAM
`750 MB free disk space
`USB Port 2.0
`Microsoft .Net Framework 3.5
Q.
A.
Q.
A.
Q.
A.
Q.
A.
I receive error message “PCD is not connected”
Check to make sure the USB connection between your computer and the eCraft cutter is in place. If that does not
work, you may need to reset your port connection to the
machine. Save your project, then ensure the USB connection is secure. Restart your eCraftshop software.
FAQs
Q:
How do I get software updates?
A.
Your eCraftshop software will notify you when a new version/update is available for download. Follow the instructions to download the new install file. Internet connection is required to be notified of updates as they
are available.
Q.
What happens to my saved projects when I update
my software?
A.
You will not lose any saved projects.
Q.
I get a message saying new SD Image Cards are available for download. What does this mean?
A.
Your software will update your SD Card Library with
the latest SD Card images when available. Updating your library will give you access to view and try out the latest images on eCraftshop. Remember, you need to When installing the software, I am asked to insert the purchase the SD Card to cut any image in the SD Card activation key but I did not receive one.
Image Library.
The activation key is emailed to you when you registered your eCraft machine and downloaded the software. Note: The intial update may take up to 10 minutes
Contact our Technical Support Team
depending on the speed of your internet connection and ([email protected]) to receive a new activation key.
computer memory.
I can’t cut any of the SD Card Images.
Q.
Why do I see the message “Loading Library” everytime
You must have the actual SD Card for the image you want I open the software?
to cut using the software. The validation process will take A.
Each time you launch the software it will check to see if some time to process.
new images are available for download. This process should only take a few minutes depending on the speed
Can the software be used on multiple computers?
of your internet connection. If new images are available, eCraftshop is licensed for use on two computers. If you the software will notify you and ask to update the
have any issues with your license key, contact Technical Image Card Library.
Support for assistance ([email protected]).
29
30
FAQs
Q:
How do I uninstall eCraftshop?
A.
If you need to uninstall eCraftshop Design Software, follow
these steps:
1.
Go to Start, select Control Panels and then Add or Remove Programs
2.
Select eCraftshop from the list, then click Remove
3.Choose Uninstall and follow the instructions
OR
1.
Go to Start, then All Programs, then eCraftshop
2.Choose Uninstall from the menu. This will start the
Uninstall Wizard.
Q.
A.
Why are designs getting cut off?
Please ensure you have loaded the paper properly into position, especially when you choose to load the paper via
the front into the eCraft machine. Also, check to see if your
designs on eCraftshop are within the boundaries of the virtual cutting grid.
FAQs
Q.
Where can I go for user support or to provide feedback? (continued)
A.
Visit our YouTube channel eCraftbyCraftwell for tutorials and tricks. Follow suggestions and meet other eCraft
users on our Facebook page
(facebook.com/ecraftbycraftwell). We highly suggest
you tap into this knowledge base. We value your suggestions to improve the quality of our products.
Contact Technical Support
If you’re having issues with the eCraftshop Design Software and need further assistance, please contact our Technical Support Team via email at [email protected] or call 1-888-315-8885 ext 85.
Q.
Why are my designs cutting in a different location on my material in the machine?
A.
The top left of your virtual cutting grid visible on the computer screen correlates with the lower right corner of your material being cut. Image the screen has rotated 180 degrees to sit within your machine. The eCraft will cut the top left image of the software upside down in the bottom right material of the eCraft. When you remove the material,
the design will be as it was created on the screen.
Q.
Where can I go for user support or to provide feedback?
A.
The craftwellusa.com forums are a great place for anyone just starting and looking for tips, fresh ideas, or for experts
who want to share their wonderful knowledge. For project
ideas, check out our Official Craftwell Blog via our website
navigation (craftwellusa.com).
31
32