1
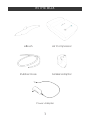
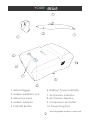
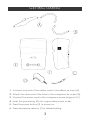
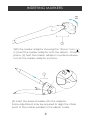
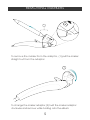
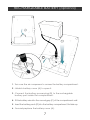
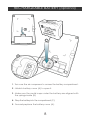
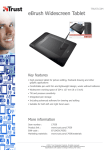
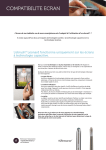
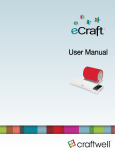
IN THE BOX
eBrush
Air Compressor
Rubber Hose
Marker Adaptor
Power Adapter
1
YOUR
1. eBrush Trigger
6. Battery* Power Indicator
2. Marker Adaptor Lock
7. Air Pressure Indicator
3. eBrush Air Input
8. Air Pressure Selector
4. Marker Adaptor
9. Compressor Air Outlet
5. ON/OFF Button
10. Power Plug Port
*rechargable battery optional
2
GETTING STARTED
1 - Connect one end of the rubber hose to the eBrush air input (A).
2 - Attach the other end of the hose to the compressor air output (B).
3 - Connect the power cord to the compressor power plug port (C).
4 - Insert the power plug (D) into a grounded power outlet.
5 - Press the power button (E) to power on.
6 - Press air pressure selector (F) to desired setting.
3
INSERTING MARKERS
With the marker adaptor showing the “Arrow” icon ( ),
(1) insert the marker adaptor onto the eBrush. Once in
place, (2) twist the marker adaptor counterclockwise
to lock the marker adaptor in place.
(3) Insert the desired marker into the adaptor.
Some adjustment may be required to align the chisel
point of the marker parallel to the eBrush nozzle.
4
REMOVING MARKERS
To remove the marker from the adaptor, (1) pull the marker
straight out from the adaptor.
To change the marker adaptor, (2) twist the marker adaptor
clockwise and remove while holding onto the eBrush.
5
eBRUSH FUNCTIONS
(1) Power Button to turn on or off the air compressor.
(2) If a battery (optional) is inserted, the Battery Power
Indicator will be flashing red while charging or stay green
when fully charged. When in use, Battery Power Indicator
will remain solid red. When low battery, Power Indicator
will flash red.
(3) Air Pressure Selector to change settings from
(4) low pressure, (5) medium pressure or (6) high pressure.
Pull back on (7) the eBrush trigger and hold to allow air flow.
To stop the air flow, release the trigger.
6
RECHARGEABLE BATTERY (optional)
1 - Turn over the air compressor to access the battery compartment.
2 - Unlatch battery cover (A) to open it.
3 - Connect the battery power plug (B) to the rechargable
battery port inside the compartment.
4 - Fit the battery wire into the curved gap (C) of the compartment wall.
5 - Insert the battery pack (D) into the battery compartment, flat side up.
6 - Securely replace the battery cover (A).
7
RECHARGEABLE BATTERY (optional)
1 - Turn over the air compressor to access the battery compartment.
2 - Unlatch battery cover (A) to open it.
3 - Make sure the metal caps under the battery are aligned with
the springs inside (B).
4 - Drop the battery into the compartment (C).
5 - Securely replace the battery cover (A).
8
DISCLAIMER
•
Depending on the marker brand & individual
marker life, airbrushing effects will vary.
•
It is normal for the eBrush air compressor to get
hot during extended use.
•
During use, the air compressor may
automatically cycle the air pressure.
You may hear the motor periodically turn on
and off.
•
When the eBrush trigger is released, air pressure
will build up in the hose. Push down on the
trigger to release built-up air.
LIMITED WARRANTY
Craftwell Inc. warrants that the eBrush and
any eBrush parts (“Products”) will be free
from defects in material and workmanship.
The one-year warranty on the airbrush and
compressor, and 30-day warranty on accessories
are expressly limited to manufacturing defects.
Craftwell will repair or replace a defective
Product without charge within the warranty
period with proof of purchase. If the Product is
damaged due to misuse or neglect, the warranty
is null and void. See www.craftwellusa.com for
warranty details.
This limited warranty excludes professional or
commercial use, and applies only to Products
purchased from Craftwell or an authorized
Craftwell distributor.
10
AIRBRUSHING TIPS
•
To create broad strokes with the eBrush, have
the air pressure on a lower setting and spray a
few inches away from the surface.
•
For thinner strokes, have the air pressure on a
higher setting and spray closer to the surface.
•
To create a dagger stroke (broad to thin),
position the eBrush a few inches away from
your surface and move the eBrush closer to the
surface as you create a line.
•
For blending colors with the eBrush, use to a
lower air pressure setting to create a finer spray
then overlap two or more colors.
•
Always have scrap paper or another surface
to practice airbrushing effects before using on
the final surface as some adjustments may be
required for optimal airbrushing effect.
•
Different marker brands may require different air
pressure settings for optimal airbrush effect.
•
It is recommended that the chisel tip or
largest nib of marker brands be used for
the eBrush.
CARE & MAINTENANCE
•
Ink from markers may splatter back onto
the eBrush. Use a soft cloth lightly damped
with a cleaning solution to wipe off any ink.
•
Always turn off your machine when not in use.
The eBrush will automatically turn off after 2
hours of non-use.
11
Visit us at craftwellusa.com for
eBrush accessories & project ideas...
stencils,
additional
marker adaptors,
portable
eBrush case,
...and more
coming soon!
new eBrush
products,
rechargable
battery pack,
www.craftwellusa.com