1
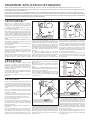
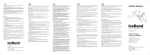
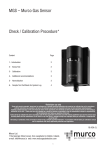
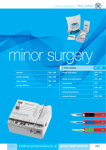
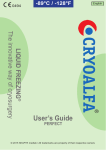
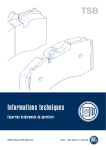
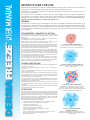
INSTRUCTIONS FOR USE
Dermafreeze™ pack should arrive in good condition with all it contents. If this is not the case or if any items are
missing from the pack or damaged you should contact us or your distributor before use.
Dermafreeze™ is conveniently packaged in a lightweight portable self contained aerosol canister for ease of
use, storage and portability.
The aerosol canister is pressurized. Therefore protect it from sunlight and do not expose to temperatures
exceeding 50°C. Do not pierce or burn, even after use. Do not spray on a naked flame or any incandescent
material. Can cause cold burns. Keep out of reach of children. This aerosol is classified as NON-FLAMMABLE, is
NON TOXIC TO THE ENVIRONMENT and DOES NOT CONTAIN CFC’s.
GENERAL
Dermafreeze™ is a liquid cryogen. Dermafreeze™ may only be supplied to Health Care Professionals as its
use may result in damage to skin and underlying structures. By carefully following the instructions below,
Dermafreeze™ may be used to safely and effectively treat a variety of skin conditions such as verrucae, warts,
skin tags, papillomas and other benign superficial skin growths. The name given to this technique of treatment
is ‘Cryosurgery’.
�����������
������
CRYOSURGERY - PRINCIPLE OF ACTION
Cryosurgery has been used in medicine to treat a variety of conditions.
The technique relies on the principle of thermodynamics and that of water
expansion.
Thermodynamics - when a liquid gas evaporates it takes heat from its
surroundings causing a cooling or freezing effect.
Water expansion - when applied to tissues (over 90% of living cells are
made of water) a living cell is frozen and the following occurs;
The cytoplasm (the liquid content of the cell) freezes and expands. The cell
membrane also freezes and loses it elasticity. The expansion of cytoplasm
causes damage or rupture of the cell membrane. This results in permanent
damage to the living cells which may subsequently die.
It is not the degree of freezing (so long as the tissue is frozen) but rather
the rate at which the tissue freezes which causes the damage. Furthermore
repeated cycles of freezing and thawing are more effective than one long
period of freezing. This is because is alters the osmotic potential within
the cell and results in fluid moving into the cell. This means that with each
cycle of freezing more cell damage is initiated.
This technique causes damage to the epidermis and to a lesser degree
other underlying structures, such as the dermis. Epidermal cells are more
sensitive to the effects of freezing than the underlying cells of the dermis.
Melanocytes are also highly sensitive to the effects of freezing.
CONTRA-INDICATIONS
Cryosurgery MUST NOT BE APPLIED when a patient has cryoglobulinaemia.
It should also be avoided;
• If there is uncertainty regarding the diagnosis e.g. a possibility of a
skin cancers.
• If the area of skin to be treated is broken (such as a deep fissure/s) or open
(such as an ulcerated site).
• If the treatment area is near the ear ensure that the liquid cryogen does
not enter the ear hole. For safety you should not treat the pinna of the ear
and if treating an area close to the pinna, block the ear hole with a nonabsorbant material or a suitable ear plug.
• If the area of the skin to be treated is close to the knuckles and other joint
areas where there is only a thin layer of skin because there is a danger of
damaging tendons and joint capsules.
• When treating a patient who has a darker skin complexion. There is a
risk of de-pigmentation and the patient should be made aware of this
side effect.
• Equally people with a lighter skin complexion may be left with a darkened
area (blemish) of pigmentation after treatment.
AFTER CARE
Advise the patient that there may be discomfort, pain and redness during
and after treatment. This is a result of reactive inflammation. Warn them
that the area may blister. The blister may sometime fill with blood. The
application of a soft padded dressing to the treated area will reduce
any post treatment discomfort. Ask the patient to attend a follow up
appointment so you can check the effects of treatment. If the condition
has not resolved treatment should be repeated.
Give the following written advice to patients;
1. Expect some pain after treatment. If necessary take pain-killers
available from your local pharmacist to control pain.
2. Keep the treated area clean.
3. Bathing and swimming is permitted.
4. Do not pick at the area of treatment.
5. Do not to lance the blister, instead protect it with a
plaster or small dressing.
6. Some conditions may require more than one treatment session.
Therefore please ensure you attend any follow-up
appointment you have.
1. THE CELL AT BODY TEMPERATURE:
The cell is at its normal size, the cell membrane is
elastic and the content is over 90% water (H20)
2. THE CELL DURING FREEZING STAGE: H2O
Expands and stretches the cell membrane causing
minor or major damage.
3. THE CELL DURING THAWING STAGE
As H2O thaws its contracts into a liquid form again.
However some of the H2O molecules form into
crystals. The crystals raise the osmotic potential within
the cell and more H2O moves into the cell.
4. THE CELL DURING A REPEATED
FREEZING STAGE: H20
Expands and stretches an already damaged cell
resulting in further damage and ultimate rupture and
death of the cell.
TREATMENT APPLICATION TECHNIQUES
Before starting treatment, debridement (removal), of any excess callous or hard skin that has formed over warts, verrucae or lesion is
recommended. This will maximize the freezing effect to the ‘active’ portion of the lesion(s). This will in turn increase the effectiveness and
reduce the number of the treatments.
This technique is painful, the extent of which will depend on the individual pain threshold of the patient. The consent, compliance and
pain perception will improve by following a few basic principles. Be honest with the patient and ask them to expect a degree of pain. Offer
them an idea of what will be involved during the treatment process, how many treatment visits will be required, the possible complications
of treatment and how to look after the treated area(s) after treatment.
CRYOFUNNEL™
The success of treatment depends on effective
delivery of the cryogen to the active site of the
treatment area. The cryogen used by Dermafreeze™
is a liquid gas which rapidly expands as soon as it
leaves the aerosol container.
So we have developed the NEW Cryofunnel™,
which allows you to direct the spray precisely to the
location of treatment with 3 sized circular openings
of 5mm, 10mm and 15mm which will met the needs
of most lesions. Furthermore this technique allows
visualisation of the lesion during treatment so that
you can monitor the progress. The technique is as
follows:
1. Ensure the correct spray head attachment is on the
aerosol canister. This is the one with the narrow spray
spout. Refer to the diagram.
2. Place the Cryofunnel™ over the lesion using the
chosen opening.
3. Hold the spray tip close to the Cryofunnel™ over
the area of treatment.
4. Spray the liquid cryogen into the Cryofunnel™
opening until the treatment area becomes frozen
white. This can be achieved by holding the spray for
about 15 -30 seconds.
5. Positioning the patient so that the lesion is facing
upwards to the ground level will ensure that this
technique results in a shallow collection of liquid
CRYOSPRAY
This is an alternative method employed when
treating an area which is larger than 15mm. It
allows easier visualization of the effects of freezing.
However in order to maintain the freeze the area
should be sprayed continuously or periodically. The
technique is as follows;
1. Ensure the correct spray head attachment is on the
aerosol canister. This is the one with the narrow spray
spout. Refer to the diagram.
2. Hold the nozzle/spray tip close to the area of
treatment.
cryogen inside the Cryofunnel™ over the area of
treatment. This will enhance the freezing effect as the
cryogen liquid will continue to freeze the treatment
area for a prolonged period of over 1 minute as it
evaporates. Since the only thermo-conductive area
in this technique in contact with the liquid cryogen is
the skin this treatment technique will also maximise
the working freezing temperature that can be
achieved.
6.
Once the liquid cryogen has completely
evaporated the Cryofunnel™ may be moved away
and the area observed as it thaws slowly, evidenced
by the return of the tissue to its usual complexion.
7. If the treatment position is not upwards but
rather vertical to the ground surface this technique
will still be effective in directing the cryogen to the
treatment area and creating a deep freeze. However
once the spraying has ceased the area of treatment
will begin to thaw as this position will not allow for
the collection of liquid cryogen. Therefore in order
to maintain a freeze for a longer period of up to one
minute repeated spraying of into the Cryofunnel™ for
the required period is indicated.
8. The treatment should be repeated 3 times for
every treatment session dependent on site and
severity of lesion(s) or at the discretion of the health
care professional
3. Spray the liquid cryogen until the area becomes
frozen white. This can be achieved by holding the
spray for 3-7secs.
4. Keep the area frozen for 1minute by periodically
spraying the tissue for a second or so if it starts to
thaw.
5. After the end of the first minute allow the area to
completely thaw out as evidenced by the return of
the tissue to its usual complexion.
6. The treatment should be repeated 3 times for
every treatment session dependent on site and
severity of lesion(s) or at the discretion of the health
care professional
CRYODRIP™
We have developed the New Cryodrip™ extension
tube which has a special ‘grommet’ attached at one
end. This grommet allows the user to ‘drip’ the liquid
cryogen from the end of the tube onto the surface
of the treatment area using the technique described
below.
This is an alternative method employed when
treating an area which is larger than 15mm. The
technique is as follows:
1. Cut a piece of absorbent material such as wool felt
or fleecy web to the size and shape of the area to be
treated and adhere it in position, over the lesion.
2. As before position the patient so the area of
treatment is facing upwards.
3. Ensure the correct spray head attachment is on
the aerosol canister. This is the one with the wide
spray spout into which is inserted the Cryodrip™
grommet spray tube.
4. Attached the Cryodripª spray head attachment to
the canister.
5. Remove the protective cap on the spray head,
insert the spray tube into the nozzle and press the
spray button, whilst holding the aerosol canister
vertically above the padded treatment area. Press
gently and the liquid cryogen will fill the tube and
form droplets within the grommet. Allow the droplets
to fall on the padded area until the pad is saturated.
If the spray head is pressed hard, the liquid cryogen
will not collect into a drip, but instead spray out. By
holding the spray tube directly onto the absorbent
materials will ensure that the spray is directed into it
and not lost to air.
6. As the liquid cryogen evaporates it will freeze
the area which is in contact with the pad. The freeze
will be maintained until all the liquid cryogen has
evaporated. The time of the freeze will depend on
the size and depth of the pad. Therefore the choice of
padding will determine the freeze times. If a longer
freeze is require you should use a thicker pad as this
will hold a larger amount of liquid cryogen which will
take longer to evaporate.
7. The treatment should be repeated 3 times for
every treatment session dependent on site and
severity of lesion(s) or at the discretion of the health
care professional.