1
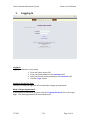
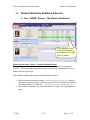
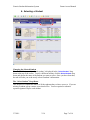
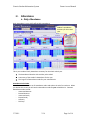
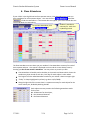
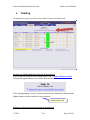
EDUCATIONAL SERVICES Parent Access User Manual Genesis Student Information System Parent Access Manual GENESIS STUDENT INFORMATION SYSTEM PARENT ACCESS I II III IV V VI VII VI Introduction Logging In Student Summary Dashboard (Home) Screen A. Viewing the Dashboard B. Choosing a Student Attendance A. Daily Attendance B. Class Attendance Grading / Interims p. 3 p. 4 p. 5 P. 5 P. 7 P. 8 P. 8 P. 9 P. 10 Scheduling (Next Year Scheduling) Setup A. Introduction to the Setup Screen B. Changing your Password C. Selecting your Home Screen FAQ p. P. P. P. P. P. 3/7/2011 V3.6 12 14 14 15 15 16 Page 2 of 16 Genesis Student Information System I. Parent Access Manual Introduction The Genesis Parents Module is a safe, secure way to view your child’s school record for the current school year. You will have access to the following information: - Your child or children’s Schedule - Your child or children’s Interims - Your child or children’s Report Cards - Your child or children’s daily attendance record and class attendance records for the High School. - The rest of this manual will guide you through all of the screens which are available to you and how to use them. Please be aware that you may not see every screen for every one of your students (if you have more than one student in the school district). 3/7/2011 V3.6 Page 3 of 16 Genesis Student Information System II. Parent Access Manual Logging In Logging In Logging into Genesis is very simple: 1. Go to the Parent Access URL 2. Enter your Email Address in the ‘Username’ field 3. Enter your Parent Access password in the ‘Password’ field. 4. Click the ‘Login’ button Logging In for the First Time The very first time you login you will be required to change your password. What if I forget my password? If you forget your password, you must click the ‘Forgot My Password’ link on the Login page. Your existing password will be emailed to you. 3/7/2011 V3.6 Page 4 of 16 Genesis Student Information System III. Parent Access Manual Student Summary Dashboard Screen A. Your “HOME” Screen - The Student Dashboard The highlighted course is the one the student is scheduled to be in ‘right this very minute’. Genesis Parent Access “Home” – Student Dashboard Screen When you login to Genesis Parent Access the first screen you see is Parent Access “Home”. This is the Student Dashboard screen. You will see a ‘dashboard’ for every student linked to your login. Each student’s ‘dashboard’ contains the following information: Basic information about the student: student id, homeroom, grade, age. If you are viewing the screen during the school day, you will also see information about the class your student is in ‘right now’: current class, current teacher and current room. Your student’s schedule. The class the student is in ‘right now’ is highlighted in green. 3/7/2011 V3.6 Page 5 of 16 Genesis Student Information System Parent Access Manual Figure 1 – Screen view without Bus Assignments displayed More Information About Each Student The ‘Parent Access Home’ screen has a dashboard for each of your students. The other tabs give you more information about one student at a time. Counselor name If your child has a schedule (in high school or middle school), click the icon to get a printable copy of their schedule. The Selected Student Only one student can be ‘selected’ at one time. When you ‘select’ a student that student’s information will appear when any of the additional tabs are clicked. 3/7/2011 V3.6 Page 6 of 16 Genesis Student Information System Parent Access Manual B. Selecting a Student Changing the Selected Student The name of the ‘currently selected student’ is displayed in the ‘Select Student’ drop down at the top of the screen. To pick a different student, click the Select Student drop down and choose the name of the student you want to select. Once you have done that, the tabs will take you to the newly selected student’s information. The “Select Student” Drop Down This drop down contains the names of all the students that you have access to. If you are missing a student, please contact your school office. You are required to submit a separate signature slip for each student. 3/7/2011 V3.6 Page 7 of 16 Genesis Student Information System Parent Access Manual Attendance IV. A. Daily Attendance Daily Attendance is your child’s official daily attendance. Student’s attendance summary for the school year. This is your student’s Daily Attendance summary for the whole school year. The Attendance Calendar with each day color coded A summary of the student’s Attendance for the year The ‘Legend’ of Attendance codes for your school district. Attendance Color Codes Your district selects its own set of Attendance codes and selects the color for each one. When you look at this screen you will see the Attendance codes for your school district. Common Attendance codes include: - Unexcused absence - Excused absence - Unexcused tardy - Excused tardy - Left early - Field trip 3/7/2011 V3.6 Page 8 of 16 Genesis Student Information System Parent Access Manual B. Class Attendance If your child is in the High School and has separate courses, Class Attendance may show you their attendance for each separate subject. You must click the tab under to find class attendance. If this button does not appear, your child’s school does not record individual class attendance. Student’s attendance To see Class Attendance, click summary for each class the tab. by Marking Period. The Class Attendance screen shows you your student’s Class Attendance summary for each of their separate subjects. One month is displayed at a time and the screen always starts by showing you the current month’s attendance. You may select any month you wish. Class attendance is listed by each school day in the month and shows which classes the student may have missed on each day. Each day for each subject is color coded. The ‘Legend’ of color‐coded Attendance codes for your school is shown at upper right. “Today” is always highlighted in yellow (e.g. above 11/21/2008). Along the right side of the screen there is a separate summary for each subject for the entire school year, divided by Marking Periods. Each subject summary contains the following attendance totals for the class: All ‐ All absences for the subject, U – the Unexcused absences E – the Excused absences 3/7/2011 V3.6 Page 9 of 16 Genesis Student Information System V. Parent Access Manual Grading The Grading screen gives you access to your student’s Interims or Report Cards. Viewing your Child’s Most Recent Interim or Report Card If you are able to view your child’s actual report card, a “Please click here to view” message will appear between your child’s name and the form: If this message appears, click it to view the actual interim displayed in Adobe Reader (Adobe Reader must be installed on your computer). Adobe Printer icon Procedure to Print a Copy of the Interim or Report Card 3/7/2011 V3.6 Page 10 of 16 Genesis Student Information System Parent Access Manual 1. Click on the ‘Setup’ tab. 2. If the “Please click here to view” message appears, click it. If it does not appear, you will not be able to view your child’s actual Interim or Report Card at this time. at the upper left 3. When the Interim appears, locate the Adobe printer icon of the Adobe Reader’s border. Click it to access a regular Print dialog and print the Interim. Procedure to Save a Copy of the Interim or Report Card 1. Click on the ‘Setup’ tab. 2. If the “Please click here to view” message appears, click it. If it does not appear, you will not be able to view your child’s actual Interim or Report Card at this time. 3. When the Interim or Report Card appears, locate the Save icon at the upper left of the Adobe Reader’s border. Click it to access a regular File dialog and print the Interim or Report Card. Procedure to Return to the Genesis Parents Module 1. When you are done viewing the Interim or Report Card, click the browser “Back” button. 3/7/2011 V3.6 Page 11 of 16 Genesis Student Information System VI. Parent Access Manual Scheduling The Scheduling screen shows you your student’s course requests for the next school year (e.g. 2010‐2011 if this year is 2009‐10). Printing Next Year’s Requests 1. Click the PDF Icon next to the “list of requests” header: This brings up an Adobe PDF view of your student’s next year requests (shown below). The printed report includes a “signature” line. 2. Use the Adobe Reader’s print button to send the report to the printer. 3. You may be asked to do print the request list, sign the set of requests and have your student return the signed list to school. 3/7/2011 V3.6 Page 12 of 16 Genesis Student Information System Parent Access Manual Figure 2 – Adobe PDF report of your student’s next year course requests. Use the Adobe Print button to print this on your printer. 3/7/2011 V3.6 Page 13 of 16 Genesis Student Information System VII. Parent Access Manual Setup A. Introduction to the Setup Screen The Setup screen is where you set up your Parent Access Module. There are two functions located on this screen: 1. Changing your password 2. Selecting your “startup” screen Each function has a separate “Save” button – when you make a change you must be sure to use the correct buttons. The following sections explain each of these functions. 3/7/2011 V3.6 Page 14 of 16 Genesis Student Information System B. Parent Access Manual Changing Passwords Procedure to Change Your Password 1. Click on the ‘Setup’ tab. 2. Enter your current password 3. Enter the new password you desire 4. Re‐enter the new password you desire. BE SURE TO WRITE DOWN YOUR NEW PASSWORD. 5. Click ‘Save’ When you are required to change your password If your password is changed by the system administrator, the next time you login, you will be required to change your password. The “Change Password” screen will automatically appear and you must do the following: 1. Enter your current password 2. Enter the new password you desire 3. Re‐enter the new password you desire. BE SURE TO WRITE DOWN YOUR NEW PASSWORD. 4. Click ‘Save’ C. Setting Your Home Screen Procedure to Change your Home Screen 1. Click on the ‘Setup’ tab. 2. Find the “Settings” section in the middle of the screen 3. Select your “Home” screen 4. Click ‘Save’ 3/7/2011 V3.6 Page 15 of 16 Genesis Student Information System Parent Access Manual Frequently Asked Questions (FAQ) 1. Where do I get my login? Your Genesis Parent Access login will usually be your email address. You will give the email address you want to use as your login to your school or district. The school or district will tell you when your login has been entered into the Genesis system. If your email address is not going to be your login, your school or district will assign you a login. 2. What if I forget my password? To replace a lost password you must choose FORGOT MY PASSWORD on the Parent Portal Sign in page. You cannot be given your existing password: for safety reasons, Genesis never displays a user’s password, even to the system administrators. If you lose or forget your password, you will be given a new, randomly generated password. You will then be required to change the new password the next time you login to Genesis Parent Access. 3. What is the URL for Parent Access? www.tenafly.k12.nj.us Click on the Genesis Parent Portal link to bring you to the parent portal page 4. How do I log out of Parent Access? There is a small “Log Off” button at the upper right of every Parent Access screen. Click the “Log Off” button. 5. Is it ok for me to just close the browser rather than log off? Do I really need to log off? Closing your browser is not the same as logging off. You must log off of Parent Access to eliminate the possibility of someone else accidentally getting access to your student’s information. For example, if you are accessing Parent Access from a public place, such as a library or other public internet access point, if you just close your browser and walk away, without logging out, there is a chance that someone else will be able to immediately reattach to your Parent Access session and view your child’s information. Logging off properly terminates the Parent Access session. Always log off of Parent Access – Never just close your browser 3/7/2011 V3.6 Page 16 of 16