1
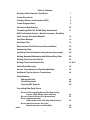
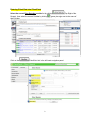
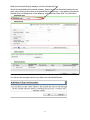
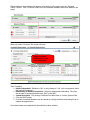
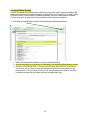
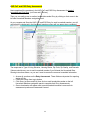
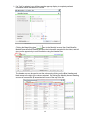
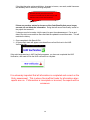
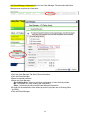
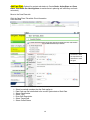
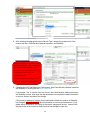
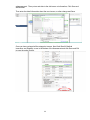
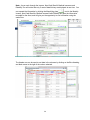
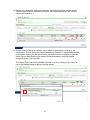
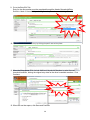
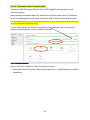
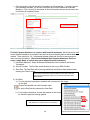
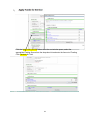
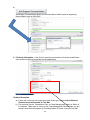
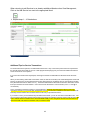
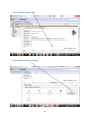
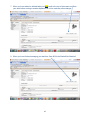
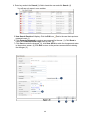
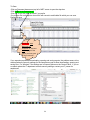
Prince William Area HMIS Workflow and Data Quality Guide ClientPoint ShelterPoint Service Transactions & Funding Administration 2015 February 2015 Table of Contents Entering Client Data into ClientPoint 1 Create Household 5 Creating Release of Information (ROI) 8 Create Program Entry 9 Household Data Sharing 10 Completing HUD CoC & ESG Entry Assessment 11 HUD Verification Checks – Medical Insurance, Disability Cash Income, Non Cash Benefits 12 Add Case Manager 15 Add Case Plan 16 Measurement -Self Sufficiency Outcome Matrix 19 Assessment Tab 20 Updating Client Information using Interim Assessment 20 Adding Household Members with different Entry Date 26 Exiting Client from ClientPoint 32 Exiting Client from ShelterPoint 33 & 37 ShelterPoint Bed entry 34 Service Transactions and Funding Workflow 38 Additional Tips for Service Transactions 43 Administration Manage Bed List Reset Passwords Running ART Reports 44 48 50 Correcting Data Entry Errors Errors in Data regarding Name, SSN, Data Quality, Veteran, DOB, Gender, Race, Ethnicity Errors in Data on Entry or Exit Assessments Errors related to Services (SVS column of the 0252 Data Quality Report) Errors related to Income, Non Cash, Medical Insurance, and Disability Index 1 54 55 56 59 60 Entering Client Data into ClientPoint Select the correct Enter Data As provider list by clicking Screen), then select the correct Provider by clicking that Provider. Click on the green plus sign next to the name of ClientPoint link in the left hand navigation panel. 2 (Top Right of the Search for the client by last name only before creating a new client record. This will bring up all possible scenarios for the client name (i.e. Susan Smith, Susie Smith, Suzie Smith). We have over 17,000 client entries, and it is likely your client already exists in ServicePoint!! Matching Client Records will be listed under the “Client Results” section (at the bottom of the page). If No matches are found, clear the form and search by the last four digits of the client’s SSN. If the client is not found, enter the Client’s full First and Last Name, SSN, and SSN Data Quality. Search one last time before clicking on the Add New Client with This Information button. If no match exists, create a new client record by clicking on the to create a new Client Profile. A warning window will open with a warning to look through all possible matches before continuing, click the Ok button. If one of the clients is a match, names will appear on the screen under Client Results. Click on the pencil next to the ID in the Client Results section at the bottom of the page. 3 Note: If the client has duplicate records, email HMIS System Administrator with the names and client ID’s duplicated so the client records can be merged. If duplicate record exists, click the pencil next to the client with the lowest client ID # to work with. Do not create another record for an existing client!! In the Back Date Mode Window Back Date to the Date of Entry when creating the client record, or backdate to the date of the change if making a change to the record. As a standard practice, I suggest you let the time default to 12 a.m. as the time of entry for Emergency Shelter, Transitional Housing and Permanent Supportive Housing entries. The computer connects all entry information for your program to this exact date and time from here on out and using 12 a.m. default time makes corrections to client records easier. Move across Tabs in the record from left to right as you create the entry for your program. 4 Enter information in the Client Profile Tab. Click the pencil next to Client Record and Client Demographics to input information Create Household Use the Household Tab only if there are 2 or more persons in the household. If you are working with a single person, skip the Household Tab and go directly to the ROI. If a household already has been created, do not create another household. If the household exists, but not all the household members are showing, click the Manage Household button to add other household members. Household members who are no longer with the household can be deleted by clicking Manage Household and clicking on the red circle If the household does not exist, Click Start New Household to create a New Household starting with the head of household Each household member needs to have a separate client record created and this household area is like a virtual paperclip connecting each file as a household 5 When the Household Pop-Up displays, select the Household Type Search for each additional household member. Search for the next household member by last name only to bring up all previous entry possibilities for that person If the additional household member does not already exist in the database, click “Add New Client With This Information”. You will see this message each time you Add a new Household Member. 6 Clients added to the household will appear at the bottom of the page under the “Selected Clients” section. Click “Continue” button once all household members have been added to the group. When you select “Continue” this screen will open Change the Head of Household to Yes, and select relationships Then Complete: Head of Household - Defaults to “No” so only change to “Yes” on the one person that is the Head of Household. Relationship to Head of Household – Select the appropriate relationship. The client that is head of household should have “Self” in this field. Joined Household - Only change if different from Back Date or Current System Date Click the SAVE button. Previous Household Members can be viewed by clicking the black arrow/triangle icon to expand the page section. Once these steps are completed the household has been created 7 Move to the ROI Tab. Click the Add Release of Information button to enter the dates of the Release of Information for your program. Click on the boxes next to each household member to include them in the ROI. Creating Multiple Program ROI’s Agencies with multiple programs have the option to create Multiple Program ROI’s for all agency programs at one time. If this is desired, contact the HMIS System Administrator for Multiple ROI set up. With the Multiple ROI set up activated, when you click the ROI tab the ROI screen will pop up then you can click the Search button to the right of Provider name to add the other programs, and the screen to the right will allow you to select additional programs.by clicking the green ball. 8 Create Program Entry for your program (Waitlist and Winter Shelter go to ShelterPoint as those programs are set up to do Entry/Exit through ShelterPoint) -From the Head of Household Entry Tab Then click Add Entry/Exit Because you are already in Enter Data As mode, the correct Provider Program should be displayed Make sure you are in the Head of Household record when you create the Entry & include all the household members Make sure all household members to be included in the entry have a checkmark left of their name. Select HUD type EntryMake sure the Date is correct for the entry which should have already been set when you began working on the client entry in backdate mode. Make sure the Entry Date is Date of Entry 12:00 AM. Select all household members that will be entered into the program as appropriate by clicking the box next to their name or clicking the box left of the household type will auto select all the displayed household members. Provider is defaulted to the provider you’re signed in as or provider that you’re Entering Data As (EDA) Select appropriate Entry Type “HUD” Entry date and time is defaulted to the current system date or the date and time you have backdated to Click Save & Continue 9 Household Data Sharing Use the Household Data Sharing feature which will copy to the other household members the responses to several required data elements (Residence Prior to Project Entry, Length of Stay in Previous Place, Client Location, Homeless questions, Zip Code, and Domestic Violence). This can save time on data entry for the remainder of the Household members. Click Add Household Data to open the household data sharing assessment. Select the household members to include in the Data Sharing. Answer the questions for the head of household in the Household Data Sharing screen. Be sure to click Save & Exit!! If you don’t see the Save, Save & Exit, Exit buttons on your screen you will need to move this assessment to the left of your screen so the buttons show. Once you Save & Exit, you will see the responses copied to the other household members as you select them and complete their entry. 10 HUD CoC and ESG Entry Assessment Next complete all the questions in the HUD CoC and ESG Entry Assessment for head of household and Click Save, (not Save and Continue) Then you can easily move to another household member Entry by clicking on their name in the left side Household Members navigation panel. As you compete and Save the HUD CoC and ESG Entry for each household member, you will notice that the checkmark in the Household member column will turn green when completed. The responses to Type of Living Situation, Housing Status, Zip Code, Zip Quality, and Domestic Violence should carry over to each household member if you followed the Household Data Sharing instructions above, so you won’t need to reenter the common household information. Answer all questions on the Entry Assessment. These fields are important for reporting status at Entry. Follow the screen from top to bottom Click Save (not Save and Exit) then click on each household member on the left Household Members navigation panel to complete their Entry Assessments Green checkmarks will appear next to each household member’s name as their assessment questions are answered & saved. 11 HUD Verification Checks for Medical Insurance, Disability, Income and Non Cash Benefits HUD requires that YES and NON-YES answers for Monthly Income, Non-Cash Benefits, Health Insurance and Disabilities be verified during Entry, Updates (Interims), Annual Assessments, Exits and Follow-Up for all adults 18 and older. For Children under 18 Heath Insurance and Disabilities must be verified during Entry, Updates (Interims), Annual Assessments, Exits and Follow-Up These can be updated individually by clicking “ADD” and manually entering the information for each sub-assessment and fields within those sub-assessments OR You can quickly do this by clicking the HUD Verification link The HUD Verification pop-up will display You can quickly select all the “No” answers by clicking the Radio button at the top of the pop screen 12 If a “Yes” is selected, you will have another pop-up display to complete pertinent information about that benefit or income Clicking the Magnifying glass next to the Monthly Income, Non-Cash Benefits, Medical Insurance and Disabilty will open the information recorded for the client, and will give you the opportunity to sort information using the Header Row The Header row can be used to sort the columns by clicking on the Blue Heading and black arrow to the right of the column selected. By clicking the Monthly Amount heading sources of income with $$ associated will come to the top of the list. 13 If the client has prior entries and history, changes to income, non cash, medial insurance and disability can be edited by clicking the pencil. Do NOT DELETE prior $$ entries for Income!! Instead End the old income and Add the new income and amount!! If there are previous entries for Income or Non Cash Benefits that are no longer accurate, do not delete the information. Doing that will cause Data Quality issues for the project that created it. If changes need to be made, click the pencil to open the subassessment. Put an end date to the old income and then Save and Add the updated income/information. This will maintain the history. Once completed, click Save & Exit A Green check mark will appear once benefits are all verified next to the HUD Verification link If the red triangle warning in HUD Verification appears, you have not completed the HUD Verification, and need to click the HUD verification to complete. It is extremely important that all information is completed and correct on the Entry assessment. This is where ServicePoint looks for information when reports are run. If information is incomplete or incorrect, the reports will be erroneous 14 Add Case Manager Information Move to the Case Manager Tab and select Add Case Manager and complete the information. Click the Case Manager Tab within Client Information Click Add Case Manager Select household members Select the Case Manager: ServicePoint User - allows to pick from a dropdown of users for that provider Me - will default you (user entering the information) Other - will allow manually entered Case Manager information Provider will be defaulted to user default provider or provider user is Entering Data As (EDA) Click Add Case Manager 15 Add Case Plan (Optional for projects who desire to Create Goals, Action Steps and Case Notes, Print Goals for client signature to assist clients in planning self sufficiency and track outcomes!) Move to the Case Plans tab Click the Case Plans Tab within Client Information Click Add Goal Questions in Bold are required to be answered to save the goal Select household members that the Goal applies to Date Goal was Set is defaulted to the current System date or Back Date Select Classification Select Type Enter Goal Description Select Target Date Select Overall Status 16 If necessary, create a follow-up. This will create a reminder within the Home Page Dashboard within the Follow-Up Dashlet. Assign the date the followup should be done by and the user who should follow up, if necessary. Once the follow-up has been made at a later date, the following fields can be answered: Follow Up Made, Completed Follow Up Date, and the Outcome is filled out. Add Case Notes Click Add Case Notes Complete Case Notes Click Save Case Note when finished 17 Add Action Plan Click Add Action Step Complete Action Step Field. This is a free text area so user can be specific. Click Save Action Step when finished Print Case Plans Click Print to print the Case Plan for your Client Select desired options. Then click Print Click Save Goal or Click Save & Exit when finished 18 Measurements - Self Sufficiency Outcome Matrix (SSOM) Case Managers can evaluate their clients at intake, mid program and exit on various life skills/ self-sufficiency measures by using the Measurement Tab. (HUD loves to see this in case records!!) Move to the Measurements Tab Click Add New Measurement to open the Self Sufficiency Outcome Matrix. Then click Continue to open the SSOM. Each measure has a 1-5 scale. Explanation for the scoring can be viewed by clicking the Magnifying Glass next to the Measure When completed Click Save & Exit The system will create a score each time the SSOM is completed so client progress can be tracked from Initial Assessment through Followup Assessments. 19 Assessments Tab Currently PWA Coordinated Assessments are available on the Assessment Tab for the Coordinated Assessment project. The Assessments Tab can be used by projects that desire to have additional assessments available to track client information. Contact the System Administrator if additional assessments are needed. Updating Client Information during Program Stay Interim Reviews and Annual Assessment Income sources and amounts, Non Cash Benefits, Health Insurance & Disability should be updated as they change during the client’s time in your project. This is especially important for Transitional Housing Projects and mandatory for HUD funded projects that submit an Annual Performance Report (APR) to HUD. HUD funded projects must perform an Annual Assessment each year within 30 days before or after the anniversary of the client’s Project Entry Date, regardless of the date of the most recent update, and even if the client had no change at all. This must be done for each adult 18 or older. Income associated with Children should be recorded on the Head of Household record, not the child’s record. 1. Go into “Enter Data As” Mode for Program the client is in 2. You can Backdate to the date you want to reflect the income changes, or skip Backdate and input the Date within the Interim Review assessment 3. Select the client 4. Go to the Entry/Exit tab 5. Click on the Interims icon 20 6. Click Add Interim Review 7. Select all household members. Select the type of Interim Review (30 Day, 60 Day, 90 Day, 120 Day, Annual Assessment or Update) and input the Date the review is to be recorded for in the Review Date fields. Note the Review Date will default to the current date and time if you did not Backdate. HUD funded programs recording the mandatory Annual Assessment must select “Annual Assessment” as the Interim Review Type. If there is no change in the data for the Annual Assessment navigate to the bottom of the assessment and click “Save and Exit”. This will record that you have met HUD’s requirement to complete an Annual Assessment. If the review is a 30 Day, 60 Day, 90 Day, 120 Day or Update, make the appropriate selection from the Interim Review Type drop down screen. (Note CA Phase 2 Review is for Coordinated Assessment only). 21 8. After selecting the appropriate Interim Review Type, answer the questions for Cash Income and Non- Cash Benefits, Medical Insurance, and Disability. You can complete the review for each household member. After completing the Head of Household, Save. Then select the next household member by clicking their name in the left navication panel. A Green Checkmark will appear left of the name when the review is Saved. 9. Complete the HUD Verification for Cash Income, Non-Cash Benefits, Medical Insurance, and Disability by clicking the blue HUD Verification If you answer “Yes” to Income from Any Source, Non-Cash Benefits, Medical Insurance, and Disability Income, then open the sub assessment to complete the detail information on source, amount and date of the change. If the source or amount of Income, Non-Cash Benefits, Medical Insurance or Disability has changed, DO NOT DELETE the old information or income source/amount!! If you delete the old information, the history of the client’s changes will be lost. Instead, click the pencil next to the income or other item that has changed to open the 22 subassessment. Then put an end date to the old income or information, Click Save and Add Another. Then enter the detail information about the new income, or other change and Save. Once you have reviewed all the categories Income, Non-Cash Benefit, Medical Insurance, and Disability, move to the bottom of the Assessment and click Save and Exit to save the entire Review. 23 Note: As you work through the Income, Non-Cash Benefit, Medical Insurance and Disability You will notice that only 5 rows of detail history are displayed at one time. You can expand the information by clicking the Magnifying glass next to the Monthly Income, Non-Cash Benefits, Medical Insurance and Disabilty will open the information recorded for the client, and will give you the opportunity to sort information using the eader Row The Header row can be used to sort data in the columns by clicking on the Blue Heading and black arrow to the right of the column selected. 24 10. Review of the Entry/Exit will show an additional Interim Review in the Interims column. Once the Interim Review Assessment is saved, the number displaying in the Interims column will increase by 1 11. Once the Interim Review is created it can be edited as necessary by clicking on the Interims icon. This will bring up the associated Interim Reviews. To make additional edits to the Interim Review click the pencil next to the desired review to navigate to either the Interim Review Data Screen or the Interim Review Assessment, make the needed changes and click “Save and Exit”. The Interim Review can also be deleted if created in error by clicking on the Trash Can next to the desired review to delete it from the system 25 Adding Household members who join the household on a different Entry Date 1. Go to the Head of Household Record “Household Tab” 2. Click the Manage Household button Click the Add/Delete Household Members button to search for the additional household member 26 3. When the next screen opens Click the black down arrow left of Add Clients to Household 4. Search for the individual to be added. If they are not in the system, Create the Client Profile for the new person 27 5. After the Name, Name Data Quality, SSN, SSN Data Quality and Veteran Status are added, Click “Add New Client with this Information”. You will see the new client at the bottom of the screen. Click Continue 6. Then indicate the relationship to the head of household 7. Click Save and Exit. 8. Go to the ROI Tab and create the Release of Information for the new household member, Save. 28 9. Go to the Entry/Exit Tab Entry for the new member must be completed through the Head of Household Entry Switch to Head of Household by selecting from dropdown box and clicking Submit 10. Open the Head of Household Entry by clicking the pencil next to Entry Date 11. When the Entry opens, Click Include Additional Household Members to select the new household member, leaving the original entry date for the other household members. Click Continue 12. When the next box opens, click Save and Continue 29 13. Click the pencil next to the new household member Entry to open it Uncheck the boxes next to the original household members to retain their original entry date Input the correct Entry Date for the new household member and click Save and Continue The new person will have their own entry date, and also be included in the proper household group. 14. Complete the data in the HUD CoC and ESG Entry Assessment by clicking on the new household member from the left Household Members navigation panel (including DOB, DOB type, HUD verifications, etc.) 15. To include the new member in the ShelterPoint Bed entry, go to ShelterPoint bed list Select the Head of Household Click Add Additional Household Member Check the new HH member and enter their correct date of entry, assign a bed, save 30 If you do not complete the new household member Entry through the head of household’s Entry, the person will not be included in the household, children would report as unaccompanied youth, and reporting will be incorrect. It is extremely important to follow these instructions when adding additional household members with a different entry date (i.e. Newborn) 31 Exiting Clients from the Program Clients must be exited from both ClientPoint and Shelter Point. (Except Winter Shelter where workflow is set tocomplete both Entry and Exit through ShelterPoint) ClientPoint Exit 1. Before creating an Exit for your client, ensure that all Service Transactions, Measurements and Case Plans are marked Completed and Closed. 2. End Case Manager relationship by adding an End Date 3. Backdate to the date of exit 4. Go to the Entry/Exit Tab 5. Click the pencil next to the Exit to open the Exit 6. Include all household members in the exit 7. Enter the date your client exited the program (if you have Backdated to the date of exit, the date will populate as the Exit Date) 8. Complete Reason for Leaving, Destination, and all information on the Exit screen, including HUD Verifications for Monthly Income, Non Cash Benefits, Insurance and Disability as they exists at the time of exit from your program. This information is used as a measure of client’s success in the program 9. Save 32 10. Complete Exit Assessment information for all clients in the household. Move through the household members from the left Household Members navigation panel. Green check marks will appear when each client is saved Click Save to move to the next household member. When all household members have been completed, Click Save & Exit To exit clients from ShelterPoint Go to ShelterPoint -Click on Transmit Today’s Checkout List Checkout date will default to the current date and time, but can be can be set for prior dates by inputting the desired date and time in the Check Out Date, and clicking Set Dates -Select the clients to exit -Select the checkout date based on the morning following the last night they spent in the program/shelter. (Example: If client spent the night of June 30, the exit is July 1. As a standard practice, set the time of exit from the Shelter bed at 7 a.m. The computer defaults to the current date and time when you open the Transmit Today’s Checkout List, so remember to select the correct date they left, or your bed night report will be wrong! -Click the Check Out button to complete the checkout 33 ShelterPoint Bed Entry Click Check Client In from the Dashboard which opens up the bedlist. Emergency Shelters, Transitional Housing and Permanent Supportive Housing programs use ShelterPoint to manage entry/exits into shelter beds. 1. Select ShelterPoint from the left module selection 2. Select the program in which to enter the client into a bed 3. Click Check Client In from the Dashboard which opens up the bedlist In Shelter Inventory Information – Unit List the bed list is displayed. (1) The Bed/Green Plus icon is displayed next to available beds. 4. Click the Bed/Green Plus icon (1) or the Empty hyperlink (2) to assign a client to a bed. The Client Search window will display. (See Figure 1-25) 34 5. In Client Search, search by client's name or Client ID, click Submit 6. The screen will refresh and display a list of matching clients. 7. When the client is located in Client Results, click the Green Plus icon client's Name to assign the client to the selected bed. next to IMPORTANT If the client is currently checked into a bed, the following error will display, "Error Client is currently in this bed list." 35 8. Enter the Date the Client Entered your project in the “Date In” field. Note, the system defaults to the current date and time so you must enter the correct Bed Entry Date The client will be assigned to the bed you select. Check in the other Household Members by checking the box left of their name Click Assign Unit button to assign beds, Click Select When you click Select, you will see that the clients have been entered, the Date In and the bed assignment 36 Exit Clients from ShelterPoint Checkout date will default to the current date and time, but can be can be set for prior dates by inputting the desired date and time in the Check Out Date, and clicking Set Dates Go to ShelterPoint -Click on Transmit Today’s Checkout List -Select the clients to exit -Select the checkout date based on the morning following the last night they spent in the program/shelter. (Example: If client spent the night of June 30, the exit is July 1. As a standard practice, set the time of exit from the Shelter bed at 7 a.m. The computer defaults to the current date and time when you open the Transmit Today’s Checkout List, so remember to select the correct date they left, or your bed night report will be wrong!) 37 Service Transactions and Funding Workflow Required for ESG (Emergency Solutions Grant), RRH (Rapid Re Housing projects) and Prevention projects After completing the standard data entry workflow you will need to enter Service Transactions for the Case Management and Financial services provided to Clients in these program types. The most important thing to remember when you start entering the Services is to be certain you switch to the Head of Household entry. You can easily switch to the head of household by clicking the down arrow in the Switch to Another Household Member, select the head, click Submit. Click on the Service Transaction Tab in the head of hh record Select Add Service Click (Note, when you click Add Service, a related Need is automatically established) 38 Click the boxes to Include the other hh members in the transaction. If you don’t see all the household members, you will see a box that says Include Additional Household Members. Click it to bring in the names of other hh members and put check marks next to the other hh members names. For Rent Payment Assistance or services with financial assistance, Add a Service for each month financial assistance is provided. Each Service will automatically have a related Need created. There must be a 1 to 1 relationship between Need and Service for some reports to return accurate information. (Do not add additional Rent Payment Assistance Services under a single Need, or reports may return inflated financial assistance). 1) Household Members: Select all Household Members to be included in the Service Transaction. 2) Service Provider: The Provider should already be set to your EDA Provider. 3) Start Date: The Start Date will be pre-populated with the effective date selected when entering the Client’s record If Transactions are being created AFTER the Client’s Entry Date, the “Use Current System Date” option can be selected in the Back Date Mode Window. 4) End Date: a) For one-and-done transactions (marked with a red arrow in the image on the right) Choose the calendar icon with the check mark to set the End Date the same as the Start Date. b) For monthly transactions, choose the last date of the month for which the payment is being applied. See the PWC ESG, RRH, and Prevention Quicklist with Definitions for allowed Service Transactions 39 5) Service Notes: In the notes section, type in the name and address of the Payee (Entity to which the payment is being made) and for ongoing rental and utility assistance, enter the address of the property for which the assistance is being paid. 6) In the Service Costs section Enter Number of Units: Each unit should be entered in a separate transaction, therefore, the Number of Units should be 1 for all transactions except Case Management. For Case Management, enter the number of 15 minute units. Unit Type: Select the Unit Type from the dropdown box. Total Cost of Units: This field is greyed out and not editable. Cost per Unit: Input the total cost of the service. (Note if 2 Funding Sources were used, Funding Source 1=$800, and Funding Source 2 = $100, the Cost per Unit = $900) To ensure full information is available for reports regarding cost and funding sources, you must complete BOTH the Service Costs and Apply Funds for Service Sources sections as described in steps 6) above and 7) below 40 7) Click the Add Funding Source button when the next window opens, select the appropriate Funding Source from the drop-down list and enter the Amount of Funding. Click Calculate for Total. 41 8) Add Support Documentation allows you to browse files to attach copies of supporting documentation such as Utility Bills 9) Follow-Up Information: If the Client is receiving services that will require recertification, enter a follow-up date as a reminder for the appointment. 10) Need Information: a) If there will not be any more payments made of this type, choose a Need Status of Closed and set the Outcome to Fully Met. b) For recurring Service Transactions such as Case Management, select a Status of In Progress. Make sure to close out the Case Management Service when you are exiting a client from the program by Choosing Status of Closed, Outcome Fully Met. 42 When returning to add Services to an already established Need such as Case Management; Click on the Add Service Icon next to the appropriate Need. Repeat steps 1 – 10 listed above. Additional Tips for Service Transactions For Services like Rent Payments, The Start Date would be the 1 st day of the month (if first month was a partial then the start day would be the date of move in or date program started paying rent), the Service End Date would be the end of the month the rent is paid for. If it is a one-time fee like a Security Deposit, rental app fee the Service Start Date and End Date will be the same date. When you start working with a RRH or Prevention client, the first service is likely to be Case Management and should be done no later than 2 pm the following business day (this would be in compliance with our new Timeliness of Data Entry Standard that went into effect 12-1-13). The Service Start Date and End Date would be the same date, and the time spent would be the actual CM time. Units of service are calculated in 15 min intervals (1 hour = 4 units @ 15 min intervals.) At one of the RRH Committee meetings, it was decided that a separate Case Management Service should be recorded for each time you provide case management services. The start and end date for the service would be the same day and the start/end time would be relative to the time you provided the service. If you need to correct your clients Rent Payment Start and End Date, you do not need to be in backdate mode. Just go to the service transaction related to that payment and change the end date to last day of the month and save. Be sure to include all the hh members in the service & MAKE SURE you are doing all the services from the Head of HH record and head of hh Service Transaction Tab, not a child’s record. 43 Managing Bedlists 1. From the Admin Drop Down box click Provider Admin 2. Click the Search button, then click the Pencil next to your Provider 44 3. Click the Module Settings Tab 4. Click ShelterPoint Module Settings 45 5. Click the Unit List Tab, then the Pencil 6. Open the Unit and bed list by clicking the Down Arrow in each level until the Bed List is displayed From here you can add or delete beds 46 7. When you have added or deleted beds you Must scroll to the top of the screen and Save your work before moving to another Apartment or unit to make any other changes 8. When you have finished managing your bed lists, Save & Exit the ShelterPoint Module!! 47 Reset a User's Password Those who have Agency Admin rights attached to their ServicePoint license can reset passwords for other users in your Provider group. Follow the steps below to reset a user's password. 1. Click the Admin tab on the navigation toolbar. 2. The screen will refresh and display the Admin Dashboard. 3. Click User Admin. (1) The User Search screen will display 48 4. Enter key words in the Search (1) field to locate the user and click Search. (2) You will see only users in your provider. 5. User Search Results will display. Click the Edit icon next to the user that requires a password reset. (1) 6. Click Generate Password to create a new password for the user. (1) Click Reset to return the Consecutive Bad Login count to zero. (2)\ 7. Click Save to retain the changes, (3), click Save & Exit to retain the changes and return to the previous screen. (4) Click Exit to return to the previous screen without retaining the changes. (5) 49 Running ART Reports To get into ART, Click on the word “Connected” at the top right of your screen. This opens ART. -Click on the triangle next to Public Folders to open that folder -Click on the triangle next to Your Program to open the reports in your folder 50 -Click on the Magnifying glass next to the report you want to run. Note, you may have more than 1 page of Reports/User Manuals. To locate reports on other pages, click Next. Each report has a User Manual that you can download if you have questions about what to put into the prompts. The information about the prompts is usually on page 2 or 3 of the Manual. -Click View Report 51 -Put in the necessary information for the prompts. -Allow the first prompt to remain at the default setting: “EDA Provider – Default Provider (which is the Level 1 provider for your agency) -In the left Entry Exit Provider ID, select the providers for the report by Double clicking the program in the left box to select. Double clicking will display them as selections in the right box -If no values show, click the Refresh Values button to get the selections -Remove unwanted selections by selecting and then hitting < button -Click Run Query button which is at the bottom of the screen. Make sure to correctly enter the prompts Use the scroll bar to make sure all prompts have been After the report runs, make sure you have data in it before saving it to pdf! entered!!! If you didn’t put in all information for the prompts, the data won’t be brought into the report. If you need to re run, just Click the “Refresh All” button 52 To Save -Click on Document down arrow top left of ART screen to open the drop box -Click “Save to my Computer as” -Click pdf, or you can save as Excel if you prefer -Or you can click on the printer icon which will convert to and Adobe file which you can save Report will save Do not use “Save Report to my computer as” because only the page of the report you have open on the screen will save. If you experience problems downloading, opening and saving reports, the problem seems to be resolved when the security settings for the computer are set to allow downloading, opening and saving files. For Windows 7 the settings are in Internet Options on the Control Panel. If you on a network where the IT department controls security settings, contact your IT person for assistance!! 53 Correcting Data Entry Errors and NULL Values in Data Quality Report Errors in Data regarding Name, SSN, Data Quality, Veteran, DOB, Gender, Race, Ethnicity must be corrected through the Client Profile Tab by clicking the Pencil to open the Client Record or Client Demographics. Backdate to the Date and Time of the initial incorrect entry. Make the correct selection. If the error is in Client Demographic fields, the incorrect entry must be removed by clicking on the History bar left of the field to remove the incorrect entry. Then Save. Click again on the History bar to make sure the incorrect entry has been removed. Then Save and Exit. Note: if you don’t remove the incorrect entry, reports will continue to pull from the initial incorrect selection!! 54 Errors in Data on Entry or Exit Assessments Errors in Data associated with an Entry or Exit can be corrected by clicking the pencil to open the Entry or Exit with incorrect data. To correct information associated with the Entry or Exit it is not necessary to backdate because the information in these assessments is linked to the Date and Time previously selected as the Entry/Exit date/time. Open the Entry or Exit with incorrect information by clicking the pencil. Click Save and Continue to open the Assessment. Re-answer any question that has the wrong answer. Remove the incorrect entry by clicking on the History bar left of the data field. Then Save. Click again on the History bar to make sure the incorrect entry has been removed. Then Save and Exit. (as shown in the previous example) Note: if you don’t remove the incorrect entry, reports will continue to pull from the initial incorrect selection!! 55 Data Quality Errors related to Services (SVS column of the 0252 Data Quality Report) NULL values on the SVS column of the 0252 Data Quality Report are related to Services and could be caused by one of the following: 1. The client did not get checked into ShelterPoint bed. To correct, go to ShelterPoint to enter the client into shelterbed 2. Date/Time stamp of the Need/Service is before the Date/Time of the program entry. The Date and Time of the Need/Service must be dated on or after the date of Entry. Check the Date and Time associated with the Entry Open the Service Transaction Tab Click View Entire Service History Click the pencil next to the Need, correct the date and time of the Need to be the same as or after the date of entry. Click the pencil next to the Service, correct the date and time of the Service to be the same as or after the date of entry. If the incorrect Date/Time is for a Shelterbed entry, and the client is still in the bed, the above correction can be made by changing the Date/Time of Need and then opening the 56 Service and Editing the Shelter Stay. If there is a household involved, you must do it separately through each household member’s Service Transaction Tab. If the client has already checked out of the bed, Go to the Service Transaction Tab, Entire Service History Click on the Magnifying glass next to the shelter stay needing correction When the next screen opens, click the Edit Shelter Stay button at bottom of screen 57 When the next screen opens, click on the Service Transactions Tab When the next screen opens, open the Shelter Stays Tab to change the incorrect Date In or Date Out. Click the pencil next to the incorrect shelter stay, change the incorrect date. Save. ` The above process must be completed for each member of the household. 58 Data Quality Errors related to Income, Non Cash, Medical Insurance, and Disability NULL values on the 0252 Data Quality Report in Income, Non Cash, Medical Insurance or Disability at Entry or Exit are caused by conflicting information such as: 1. A “Yes” answer to “Income from Any Source?”, but no Source and Amount of Income was put into the Income Subassessment. To correct: Click the pencil next to the type of income to be added. Input the Source, Amount, and make the start date prior to the entry date. 2. A “No” answer to “Income from Any Source?”, but the Source and Amount of Income was entered into the Income Subassessment. To correct: Re answer the question “Yes”. Remove the “No” answer by clicking the history status bar left of the data field to open the history, click the recycle icon next to the No answer. Save. Check to make sure the No was removed. Save and Exit. 3. There is a “Yes” answer to “Income from Any Source?”, and the Source and Amount of Income was entered, but there is NULL on the report. Reason: Start Date is after the Date of Entry and system doesn’t recognize client as coming in with income. To correct: Check the Start Date of the Income. To be associated with the Date of Entry, the start date must be on or before the date of entry for the system to recognize the client is coming in with income. For Non Cash, Medical Insurance and Disability NULL values in the 0252 Data Quality Report the same logic applies as described for Income. 59 Index Add Case Manager Add Case Plan Adding Household Members with different Entry Date ART Reports Assessment Tab Completing HUD CoC & ESG Entry Assessment Create Household Create Program Entry Creating Release of Information (ROI) Entering Client Data into ClientPoint Errors in Data on Entry or Exit Assessments Errors in Data regarding Name, SSN, Veteran, DOB, Gender, Race, Ethnicity Errors related to Income, Non Cash, Medical Insurance, and Disability Errors related to Services (SVS column of the 0252 Data Quality Report) Exiting Client from ClientPoint Exiting Client from ShelterPoint Household Data Sharing HUD Verification Checks – Medical Insurance, Disability Cash Income, Non Cash Benefits Manage Bed List Measurement -Self Sufficiency Outcome Matrix Reset Passwords Service Transactions – Additional Tips Service Transactions and Funding Workflow ShelterPoint Bed entry Updating Client Information using Interim Assessment 60 15 16 26 50 20 11 5 9 8 1 55 54 59 56 32 33 & 37 10 12 44 19 48 43 38 34 20