1
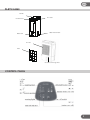
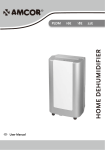
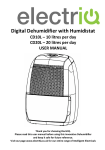
DESICCANT DEHUMIDIFIER
AM-DD8L
User Manual
GB
THANK YOU
Thank you for choosing this innovative desiccant dehumidifier . We suggest that you
keep this manual in a safe place for future reference. lt explains the many benefits and
advanced features this unique product has to offer. Before you use your new
dehumidifier you should carefully read these instructions to maximise product
performance.
For over 60 years Amcor has specialised in complete indoor environmental control;
manufacturing and marketing; dehumidifiers, portable air conditioners, coolers, air
purifiers, ionisers and aromatherapy scent diffusers. These world class products
incorporate the latest technological developments.
2
GB
IMPORTANT SAFETY INSTRUCTIONS
Before any installation, use or maintenance operation, read the safety instructions
in this manual carefully.
Remove all packaging materials from the unit. Keep all packaging away from babies
and small children to avoid the danger of suffocation.
.
It is recommended not using the unit with power extensions.
The dehumidifier is intended exclusively for the use for which it was created. Amcor is not
responsible for any damage caused by improper use.
As with all electrical appliances, please use with care. At present, desiccant dehumidification
is the best dehumidification method.Not having a compressor and refrigerant, a desiccant
dehumidifier prevents the negative effects of the environmental and noise pollutions
standard with a refrigerant dehumidifier. This exceptional product boasts the following
advantages: energy efficiency, environmentally friendly, low noise levels and it is very lightweight.
IMPORTANT!
• The unit is designed for indoor operation.
• Rating: This unit must be connected to a 220-240 V / 50Hz earthed outlet.
• The installation must be in accordance with regulations of the country where the
unit is used.
If you are in any doubt about the electrical installation, have it checked and if
necessary modified by a qualified electrician.
• Unplug when not in use. Do not unplug by pulling the cord.
• Do not operate this product with wet hands.
• Keep out of the reach of children.
• Do not clean the unit by spraying it or immersing it in water.
• Disconnect it from the mains before cleaning the unit or any of its components.
• Always unplug before cleaning or changing the filter.
• Do not connect the unit to an electrical outlet using an extension cord. If an outlet
is not available, one should be installed by a licensed electrician.
• The appliance is not to be used by children or persons with reduced physical, sensory or
mental capabilities, or lack of experience and knowledge, unless they have been given
supervision or instruction.
• Children must be supervised and not left unattended with the appliance.
Do not use your dehumidifier under the following conditions:
If the power cable
wires are frayed
or cut
When small
children may be
left unattended
On a slope or
uneven surface
Close to a heat
source
If an extension
cord is needed to
reach an outlet
Where the power
cable may be
damaged
This product is
not made for DIY
repair
If there is a risk of
liquid falling on
the unit
Inside unit exposed
to the weather
outdoors
In a permanent
very humid
environment
Where it may
be damaged by
chemicals
Where there is a
risk of interference
by foreign objects
3
GB
PLACEMENT
Your AMCOR dehumidifier will begin to protect your home from the harmful effects
of excessive moisture as soon as it is turned on.
Excess moisture travels throughout your home, in the same way that cooking smells
spread around the house. For this reason, the dehumidifier should be positioned in a
central and clear location so that it can draw this moist air towards it from all over the
home. A warm hallway or landing is an excellent position for your dehumidifier. If possible,
leave interior doors ajar to allow air circulation.
Alternatively, if you have a serious problem in one area you can begin by positioning
the dehumidifier there and moving it to a more central location at a later date.
For the most effective use, run your dehumidifier with external doors and windows
kept closed . Please note the unit should not be placed directly against a radiator or
other heat source.
When positioning your AMCOR dehumidifier, ensure that it is placed securely on a
level surface clear of any obstacle that may limit the air movement.
Before you move the unit, switch it off and empty the water tank.
IMPORTANT:
Keep a minimal 0.4m safety distance between
the appliance and any inflammable surface.
0.4m
0.4m
ADVANTAGES
1. Efficient, easy to use, modern design
2. Intelligent control panel with touch keys and indicators
3. Quiet running and air-cleaning
4. Works very well at low temperatures compared with classic compressor
dehumidifiers. Desiccant Dehumidifiers are very effective at low temperatures and do
not lose their ability to dehumidify effectively.
5. Laundry mode to help with clothes-drying
6. Heats the air passing through between 5-10℃, making the air dry and warm reducing the heating bills.
7. Water tank level window, and tank full alarm & auto-stop function
8. Folding carry handle for easy transportation
4
GB
PARTS NAME
Handle
A ir outlet
Control Panel
Water-level window
Water tank
Air inlet
Filter
Continuous Drainage Hole
CONTROL PANEL
5
GB
OPERATION
Switching the unit ON and OFF
Press the “ON/OFF” switch to turn on the unit. The power light will be green as soon
as it switches on. To turn off the unit press the “ON/OFF” key again.
Please note that when turning it off, the dehumidifier will still operate for a while
to discharge the remaining water from the desiccant disk and prevent mould growth.
Setting the Laundry Mode
Press Laundry Mode button, the LED light will turn on.
Press louvers position key to set louvers swing direction: front→top→static ,
corresponding indicator turns on.
Front: Air comes out from front with the louvers swing angle scale about 0°~60°
Top: Air comes out from front with the louvers swing angle scale about 30°~90°
Static: Louvers stop swinging.
Setting the Stopping Timer
On selecting stopping timer at 8/4/2 hours, the indicating light turns on until the
desired selection is made.
When selecting '8 hours', the indicator light will progress to 4 and respectively 2
hours until the unit stops.
Setting the Dehumidification level
Press dehumidify button to select Low-Middle-High level. Corresponding indicator
turns on the humidistat range for this unit from 40% to 80% RH. Use the unit on Low
mode for maximum power savings.
Setting the Ioniser
Press IONISER key on / off. Ioniser will sterilise the air preventing mould growth and
improving air quality.
Operating and Warning
1. Please use an individual safe power socket .
2. Plug to power, press ON/OFF key to turn-on the machine; press ON/OFF key again
to turn-off the dehumidifier.
3. Make sure water-tank is placed/fitted correctly. If the water tank is not fitted/placed
correctly the 'water full' light will turn on and the machine will not operate.
4. When the dehumidifiers first starts, default dehumidify setting is set to “LOW “.
5. After being turned off the machine will remember the last settings for the next power
cycle.
6. When unplugging from the wall socket use one hand to hold the plug and the other
hand against socket to avoid power cord damage.
Warning : Using poor quality sockets, extensions or overloading the circuits may
cause damage to the machine or may start a fire.
7. When switching OFF the machine, do not simply unplug the unit from the socket ensure you turn off the machine properly before unplugging. After dehumidifiers is
OFF, the fan will keep running for a couple of minutes and heat will be produced to
dry the dehumidifier.
6
GB
MAINTENANCE
Filter Cleaning
If the filter is covered by dust, the airflow and the performance of the unit will be
affected, it may even cause machine damage. We recommend that you regularly
clean the filter.
1. Turn off the unit and remove the filter from the unit.
2. Clean the filter with a vacuum cleaner or soft-brush.
3. Replace the filter in position.
Water-full Indicator and Water-tank Empty
1. When the water-tank is full, the water-full indicator turns on and the machine stops.
2. Hold the bottom of water-tank to pull it out and then carry it with its handle.
3. Open the water-tank cover to empty it .
4. Clean the water-tank to avoid mould growing.
5. Close the water-cover and put the tank back into the machine , the water-full
indicator turns-off and machine restarts.
Warning :
• Do not remove the water tank immediately after the unit stops. Please wait a
while to avoid the water dripping into the unit and causing damage.
• Please clean the water tank with soft wet cloth. Do not use detergent or hot water.
• Do not remove or damage the float switch in water-tank, otherwise the machine
will stop working.
• Please make sure the water tank cover and handle are put back into place
correctly before the water tank is reinserted.
• If the water-tank is inserted incorrectly, the tank full indicator will not turn off.
Reinsert the water tank to turn the indicator off and resume normal use.
• At all times, avoid water entering the unit. It may cause electrical
hazard and damage the unit.
Do not place the wet clothes on top of the unit when in laundry mode
in order to prevent water dripping into the unit. For best laundry
mode effect place the clothes within 1 meter of the unit.
Continuous draining
This dehumidifier has a continuous drain hole, connected with a plastic pipe.
The water in the body will drain through the drain hole first, so ensure it is closed if
using the water tank.
Cleaning
1.Before cleaning or performing maintenance, turn off the unit and unplug the cord.
2.Air-inlet and air-outlet may gather dust easily, please clean it often with a soft,
damp cloth. Let the unit dry before reuse.
7
GB
MAINTENANCE
Power Cord Maintenance and Replacement
If the power cord is damaged, it could cause a short circuit or become a fire risk. Please
avoid pulling the cord, twisting or pressing it and keep it away from pets. If the powercord
is damaged, power the unit off and unplug if immediately. Contact an electrician for
repairs; do not attempt to repair the unit yourself.
Before Storing
1. Turn off the unit and wait for the drying cycle to finish before unplugging the power cord.
2. Clean and dry the water-tank.
3. Clean the filter, air-inlet, air-outlet and unit body.
4. Cover the unit to prevent it from gathering dust.
5. Store the dehumidifier in a cool and dry place.
8
TECHNICAL DATA
AM-DD8L
Model
8 litres / day (max)
unaffected by low temperature
Dehumidify Capacity
Power supply
220-240V A C/50HZ
Current
2.8A
Power
630W
Working Temperature
1 -40℃
Noise
≤ 36 dB
Water tank Capacity
2L
Net Weight
6.5K g
Body Size
H 5 00· W 1 7 0· D 3 3 0m m
TROUBLE SHOOTING
SHOOTING
TROUBLE
Problem
Possible Cause
1.Power is abnormal
The unit does not work
Poor performance
Too Noisy
2.Wate-tank displaced or full
3.Room temperature is too high
or air-outlet is covered
1. Filter is dirty
2.Door & windows are open
3.Air-inlet or out-let is blocked.
1.Unit is not placed on even
surface.
2. Filter is blocked
Solution
1.Contact an electrician to perform
a repair.
2.Check water tank placement or
empty water tank
3.Lower room temperature, clear airoutlet
1. Clean the filter
2. Close door & windows
3. Clean air-inlet & air-outlet
1.Place the machine on the flat
surface.
2.Clean the filter
Note: when the fault cannot be solved by the solutions above, please contact service centre for help, do not
attempt repairs.
AMCOR UK SUPPORT
Please, for your own convenience, make these simple checks before calling the service line.
1. Has the unit been standing upright? (for at least 2 hrs)
2. Is the unit plugged into the mains? Is the fuse OK?
3. Switch the unit on and wait three minutes to see if the issue is resolved.
4. Check whether the water tank is full.
If the unit still fails to operate call: 0871 620 1057 or fill the online form
Office hours: 9AM - 5PM Monday to Friday
www.amcoruk.com
Unit 2, The Nursery, Berristow Lane, South Normanton, Derbyshire, DE55 2FX
Made in P.R.C.