1
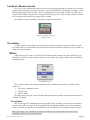
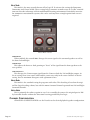
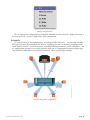
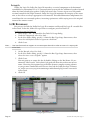
SurCode for Dolby®
Pro Logic II
User Manual
Minnetonka Audio Software
SurCode for Dolby Pro Logic II
Copyright 2006-2014 Minnetonka Audio Software, Inc.
“SurCode” is a trademark of Minnetonka Audio Software, Inc.
All rights reserved
Manufactured under license from Dolby Laboratories
“Dolby”, “Pro Logic” and the double D symbol are trademarks of Dolby Laboratories
Copyright 2014 Dolby Laboratories
All rights reserved
Minnetonka Audio Software, Inc.
17113 Minnetonka Blvd STE 300
Minnetonka MN 55345-1153
+1-952-449-6481 www.minnetonkaaudio.com
The SurCode for Dolby Pro Logic II user documentation ©2014 Minnetonka Audio Software, Inc. All right reserved.
Table of Contents
Overview
—5
System Requirements
—
6
—
6
For AAX
Installation
—7
Licensing
—7
Setting Up Your DAW
—
8
Interleaved Sources
—
8
Split Mono Sound Files
—
8
—
9
The Interface
—
9
The Sections
Enabling Modes
The ENCODE Section
—
—
—
9
9
10
Encoding
Employing LFE
—12
—
12
Loudness Measurement
—
Using SurCode for Dolby Pro Logic II
Enable or Disable Loudness 13
—13
Measurement
—13
Decoding
Modes
Channel Configuration
Lt/Rt Recordings
—13
—
13
—
14
—
16
Options
Meters Options
Decode Options
—19
—
19
—
19
Automation
—20
Encoding, Decoding & Monitoring
—
Maintenance
Disabling or Removing the Plug–in
20
—21
—
21
—
22
Why Loudness?
—
22
Measuring Loudness
LKFS
Gating
Additional Parameters
—
—
—
—
22
22
23
23
Loudness Regulations & Measurements
• SurCode for Dolby Pro Logic II
Page 3
True-Peak
Short Duration Loudness
Appendix 1
Decoder Defaults
Page 4
—
—
23
24
—
27
—
27
SurCode for Dolby Pro Logic II •
Overview
SurCode for Dolby Pro Logic II is a software toolset, in plug–in and stand–alone form, that
encodes and decodes into the six channel Dolby Pro Logic and Pro Logic II formats, as well as
decoding into the eight channel Dolby Pro Logic IIx and Pro Logic IIz formats. The interface places
all controls and information at your fingertips, without hidden tabs or layers. Being a certified encoder and decoder, SurCode for Dolby Pro Logic II behaves in exactly the same way as Dolby’s own
DP570 Multichannel Audio hardware.
Because you can encode and simultaneously decode in real time, it’s a simple matter to shape
your encoding parameters to optimize your product for delivery in the home or theater. With its
integrated loudness measurement feature, SurCode for Dolby Pro Logic II also allows you to create
encoded content that easily passes through downstream post–production without additional processing or loudness management, so your content will be delivered the way you intended.
SurCode for Dolby Pro Logic II converts six channels of discrete surround source files to the
broadly supported family of Dolby Pro Logic formats. By matrix encoding the center, surround,
and LFE or Low Frequency Effects content into the left and right tracks, the resulting stereo file is
playable on an extremely wide range of consumer electronics. Dolby Pro Logic–encoded stereo is
referred to as an Lt/Rt or Left total/Right total, meaning that the stereo channels contain an encoded version of all six source channels. Being stereo, Lt/Rt tracks can be played un–decoded, in stereo,
and also decoded and played back in derived surround sound.
SurCode for Dolby Pro Logic II can accept up to 6 mastered surround files in either WAV, BWF
or AIFF format. It outputs an Lt/Rt stereo file that can be distributed by any analog or digital stereo
storage or transmission medium. Audio files encoded by SurCode for Dolby Pro Logic II are fully
compatible with all branded Dolby Surround, Pro Logic, and Pro Logic II decoders, in either software or hardware.
SurCode for Dolby Pro Logic II also contains a decoder, which is essential for properly setting
your encode parameters. The encoder/decoder in SurCode can work in real-time, enabling you to
monitor encoder option changes while listening to the result.
Note: Dolby Pro Logic II matrix encoding is a creative process, unlike Dolby Digital or other discrete digital encoding methods. Because the matrix encoder combines or mixes the center,
LFE, and surround elements into the final Lt/Rt channels by changing amplitude, phase, and other
parameters, the channel Input Trim settings are quite important in assuring proper stereo and
surround compatibility. When compared to AC-3-encoded sound files, matrix-encoded sound files
are not discrete in their surround decoding capability. That said, Dolby Pro Logic II is the best way
to distribute encoded surround mixes or elements within an existing stereo distribution infrastructure, whether for broadcast, cable, gaming or optical disc. Matrix-encoded sound files take up no
additional space, and use no extra computer resources.
• SurCode for Dolby Pro Logic II
Page 5
System Requirements
For AAX
•
Page 6
This plug-in contains both a 32-bit version for Pro Tools 10.3.5+ and a 64-bit version
for Pro Tools 11.
SurCode for Dolby Pro Logic II •
Installation
Current installers are available on request via the Update Your Software link in the Support
section of our web site. On the Update Your Software page, please select the product you wish to
update. Click Next and complete the form. An installer download link will be e–mailed to you.
1. Download your installer and unZIP the file.
2. Select which platform, Windows or Mac OS, and which plug-in format you would
like to install, VST, RTAS or AAX.
3. Run the installer, which will install both the plug-in and the PACE (iLok) licensing
framework. This includes the iLok License Manager application.
Note:
For version 2 license holders, version 3 of SurCode for Dolby Pro Logic II requires
purchase of a license upgrade.
Licensing
This software product can use a 1st or 2nd Generation iLok dongle for copy protection. This
dongle must be plugged into a USB port on your host, and “visible” by the iLok License Manager in
order for the software to run. When you purchase software that is protected by an iLok USB Smart
Key, the license is generated electronically and must be programmed into the dongle. This requires
that you have an account at www.ilok.com.
When you purchase the software, you will have already supplied us with your iLok account’s
User ID. We will send the license, or a coupon code redeemable for your license, to your account.
When you launch iLok License Manager, it will indicate that a new license has been added to your
account. The new license will appear in bold type in your list of licenses. In the case of a coupon
code, you can Redeem Activation Code to receive your license. Please see iLok License Manager’s
built–in help for more information.
• SurCode for Dolby Pro Logic II
Page 7
Setting Up Your DAW
Interleaved Sources
If your source is an interleaved WAV or AIFF file, then you may need to anticipate the limitations of Pro Tools 11. Specifically, if your file’s header does not contain channel configuration
metadata, Pro Tools cannot pre–determine channel assignments and map them correctly. In that
case, the program configuration or channel assignment for interleaved files is predetermined.
Without that metadata, you will need to confirm or re–assign your program to conform to the
following configuration: L, C, R, Ls, Rs, LFE. This configuration corresponds to Pro Tools 11’s bus
assignment. This stricture applies only to interleaved files. Split mono files are assignable and can be
re–ordered as needed.
Inserting the SurCode plug–in is simple. When you import a 6 channel interleaved sound file
into Pro Tools, it creates a 6 channel track. Before importing the sound file, make sure that you have
defined a 6 channel path in your I/O Setup, and that it is selected. The imported interleaved sound
file will make a single 6 channel track on the time line. Map the output of this channel to the output
you previously specified.
Split Mono Sound Files
If your source files are split mono, then we recommend a particular setup in Pro Tools in order
to easily bus the 6 mono tracks into a six channel I/O path.
Recommended configuration for Pro Tools I/O
See the illustration above for the recommended configuration. A step–by–step, tutorial video showing you how to set up and instantiate the plug–in is available on our YouTube channel at
https://www.youtube.com/user/MtkaAudio.
Page 8
SurCode for Dolby Pro Logic II •
Using SurCode for Dolby Pro Logic II
The Interface
SurCode for Dolby Pro Logic II provides all user controls in one, unified window. This means
that all the information you need is available when you need it without calling new windows or
changing tabs.
The SurCode for Dolby Pro Logic II main window
The Sections
SurCode for Dolby Pro Logic II displays four sections in the main window; INPUT, metering,
OUTPUT and OPTIONS. The ENCODE section provides controls for adjusting input gain, and
enabling the brickwall limiter. The metering section provides three windows for standardized loudness measurements. The DECODE section provides output amplitude metering, along with decoder
and monitoring settings. Lastly, the OPTIONS section includes meter ballistics choices, and additional decoder options.
Enabling Modes
The two main section headers, INPUT and OUTPUT, serve as mode switches. Clicking on the
INPUT header enables that section, and places the plug–in to encode mode. Clicking on the OUTPUT header enables that section, and puts the plug-in into decode mode. In the illustration above,
both the ENCODE and DECODE sections are enabled.
INPUT enabled and OUTPUT disabled
• SurCode for Dolby Pro Logic II
Page 9
When both sections are enabled, the plug–in serves as a “round trip,” decode–after–encode processor so the input can be adjusted to produce an acceptable decoded output. When neither section
is selected, the processor simply monitors input.
The ENCODE Section
The ENCODE section provides controls for adjusting input gain, as well as ganging and resetting
the input trim controls. The brickwall limiter can also be enabled, and its accompanying LIMITING indicator is part of the ENCODE section.
Input Meters
There are six channels of input metering plus a separate two channel Lt/Rt just to the right of the
input metering. The meters are “quasi–peak” reading, meaning they are non–oversampling with generic peak reading ballistics. Each meter also has a floating RMS segment, with its characteristically
slower fall time. The stereo Lt/Rt meter is only active when the encoder is enabled.
Input Trims
The linear Input Trims, Left Front (L); Right Front (R); Center (C); LFE or “Subwoofer” (LFE)
Left Surround (Ls) and Right Surround (Rs), have a range from +6 dB of gain to infinite loss. The
input trim controls have input meters as their background. The trim “knobs” are transparent when
not in use so as to not obscure the metering. Option–clicking on an input trim control will reset
that trim to unity gain.
Beneath each input trim is a numeric gain readout. That numeric indicator also serves to set the
individual trim gain by direct numeric entry. Double click on any trim gain field to type in a new
trim gain value. After entering a desired value, hitting the enter or return key will cause that trim
control to assume the new gain value while updating the current trim gain readout.
It is very important to correctly set the Input Trims. Not only are the Gain Trim settings critical
for compatible stereo and surround playback, they are also important in ensuring that the matrix
encoder does not overload at the input, or when it “matrixes” the multiple channels. See Encoding,
page 12 for a detailed discussion.
Trim Controls
Beneath the input trims are two toggles Gang Faders and Reset Faders, along with the Limiter.
GANG FADERS
The Gang Faders toggle, when enabled, groups or gangs the input trims so they maintain their
current offset relative to each other. This function is useful if your overall levels are too high or low
after adjusting the individual Trims. This is particularly true if overloads occur during playback
prior to encoding. Gang Faders allows you to reduce the overall levels into the matrix encoder. For
more information on gain staging for the encoder, see Overload/Limiting Indicator, page 11.
RESET FADERS
The Reset Faders toggle is a momentary control. Clicking on it will reset all Trims to unity gain.
To reset individual Trims, control–click on the Trims’s handle. To quickly drop out an input channel, option–click on a Trim’s handle to jump the gain to -∞.
The Limiter
The Limiter in SurCode for Dolby Pro Logic II is designed to prevent excessive amplitude excursions from distorting playback. Although it is a brickwall limiter, and the threshold is not adjustable. The attack, sustain and release are all very short, and the ratio is internally variable in order to
achieve the goal of “no overs.”
The Limiter is useful if the Overload Indicator, discussed below, is only displaying a few overloads for your entire track. Instead of reducing the overall gain even further, the Limiter can catch
the few peaks before they overload the matrix encoder.
Page 10
SurCode for Dolby Pro Logic II •
Overload/Limiting Indicator
This indicator shows when the matrix encoder is overloaded, which can result in distortion.
If the red Overload Indicator is flashing more than three times per track or remains lit, then the
overall gain must be reduced until the indicator no longer indicates overload, or until there are only
a few flashes. The Overload Indicator becomes the Limiter Function Indicator, showing that the
Limiter is active, when the Limiter is engaged.
The Overload Indicator will be dark when disabled, green when the limiter is engaged but inactive, amber when the Limiter is engaged and actually affecting a gain change, and red if the signal is
overloading the matrix encoder.
The four states of the Overload/Limiting indicator
Note:�������The Limiter will prevent the output from exceeding about -0.5 dBFS. If the indicator shows red
when the Limiter is enabled, you should reduce the overall gain feeding the encoder. The Gang
Faders mode is recommended for that. The Limiter is meant as a short–term measure to reduce
very short duration peaks. For comprehensive dynamics management, use of a separate dynamics processor upstream in the signal path is recommended.
The Metering Section
The three loudness metering windows each provide different loudness metrics simultaneously.
The top window displays one of four variations of Program Loudness. The center window displays
one of two short duration loudness measurements, while the bottom window displays one of two
peak amplitude measurements. Clicking on the window or window label will produce a menu controlling its available loudness metrics.
As the loudness metering is designed to assist in creating LtRt–encoded material, measurement
stops when the Decoder is engaged. For an in–depth discussion of modern loudness measurement,
see Loudness Regulations & Measurements, page 22.
Measurement
Program Loudness
Integrated ITU 1770-1
Integrated ITU 1770-2/3
Integrated EBU
Integrated Dialog
Gating
Units
no
yes
LKFS
LKFS
LUFS
LKFS
Short Duration Loudness
Maximum Short Term Loudness
Maximum Momentary Loudness
LKFS
LKFS
Maximum Peak
Maximum True–Peak
Maximum Sample Peak —QPPM
dBTP
dBFS
PROGRAM LOUDNESS
In SurCode for Dolby Pro Logic II, Program Loudness metrics are available in four forms. Unless you have a particular reason to view one of the other versions, Integrated ITU 1770-2/3 is the
• SurCode for Dolby Pro Logic II
Page 11
preferred mode, being the mandated measurement method. Remember that Program Loudness is
applicable for the entire program, head to tail.
SHORT DURATION LOUDNESS
If you work on short form content, you should keep track of your material’s short duration metrics. When evaluated together, Maximum Short Term and Max Momentary are ideal for gauging
the loudness of short form content such as commercials.
PEAK AMPLITUDE
The Peak Amplitude meter is another metric where you should probably stay on the True–Peak
setting, as it is a mandated metric and will help you deliver distortion–free program to your listeners. Check with your own clients and regulations to determine the permissable True–Peak value for
your content.
Encoding
When up to six input files have been appropriately routed, you are now ready to set your encoding options. In addition to 5.1 surround stems, SurCode for Dolby Pro Logic II can also work with
5.0 channel inputs, a stem without an LFE channel. For that, you will need to create a 5.0 path in
your I/O setup.
It is very important to carefully set the six Input Trims. Not only are adjusting the inputs critical
for compatible stereo and surround playback, they are also important to insure that the encoder
matrix does not overload at its input or when it “matrixes,” summing multiple input channels. If
the input source files have been normalized, which is not recommended, the encoder will overload
as soon as the channels are matrixed. Multichannel peak input levels can also overload the matrix
encoder. Therefore, it is necessary to play back while monitoring your input or source files, the encoded stereo Lt/Rt output, and the decoded multichannel output in order to set the Input Trims for
the desired result.
As encoding and decoding settings are subjective, a simple guideline is that the best results are
those settings that sound best. That is, when the encoded Lt/Rt sounds reasonably like the Left,
Center and Right without the surrounds drawing attention to themselves, and the decoded Lt/Rt
sounds reasonably like the Source left and right front while maintaining dialog intelligibility. If you
are new to Pro Logic II encoding, we strongly recommend reading both of Dolby’s “Mixing With
Dolby Pro Logic II Technology” and “Mixing Information for Dolby Pro Logic II” PDFs, available
in the White Papers section on the Manuals, Literature & Guides page of our site. Even if you are an
experienced PL II mixer, a quick read might provide a tip or two that you can use. For more generic,
and more technically presented information, the ITU’s Broadcast service Recommendation ITU-R
BS.775-2 may be of interest.
Employing LFE
An optional LFE track can be included as a source, and will be diverged into the four or five
main channels. As with all surround content, the LFE channel should only be used for, as its name
implies, low frequency effects, not music or dialog. When including an LFE track as one of your
inputs, be advised that adding LFE content can cause clipping and unacceptable results in the LtRt
and the decoded surround. You should set up real time simultaneous encode and decode to monitor your delivery levels. While watching both the LtRt meter and the 6 channel Decoder meters, set
the input gains accordingly using the Trims.
The recommended industry best practice calls for the LFE channel to have a gain of -10 dB relative to the front channels during recording, and +10 dB on playback. The industry has generally not
adhered to that recommendation, and real world values are anywhere between 0 and 10 dB of compensation. In the case of SurCode for Dolby Pro Logic II, the default is +4 dB of gain on playback,
driven by customer requests. We recommend that you adjust the input Trim on the LFE channel,
starting with -4 dB and running through your program while making appropriate changes to the
Trim setting.
Page 12
SurCode for Dolby Pro Logic II •
Loudness Measurement
The ATSC A/85 recommended practice states that during production, the loudness of surround
programming should be measured in both its surround mix format (PCM audio in) and its 2-channel dowmix (output of the encoder). If the encoding mode is turned off, SurCode for Dolby Pro
Logic II will loudness measure the incoming PCM only, up to 5.1. If the encoding mode is turned
on, the plug-in will measure the output of the encoder.
An optional switch is available to disable measurement altogether.
Enable or Disable Loudness
Measurement
Decoding
Decoder options do not affect the Encoder, but do offer the ability to gauge the listener experience with both un–encoded LtRt and encoded material decoded into surround. It also provides an
entry–level upmix option.
Modes
Dolby Pro Logic I encodes 3/1 or three front channels and a mono surround, while Pro Logic
II encodes 3/2 or three front channels and stereo surrounds. Pro Logic II allows for four different
decoding modes.
The MODE menu
Three of these modes are totally predefined, and no additional controls are available. These
modes are:
1. Pro Logic (emulation) mode
2. Movie mode
3. Matrix mode
For Music mode only, the Center Width control, Dimension control, and Panorama modes are
available as options.
Pro Logic Mode
This is Pro Logic II’s emulation of the original Pro Logic decoding system. Because consumer
decoders now offer Pro Logic II as the default Dolby Surround decoding system, this emulation
mode is available to reproduce the original Pro Logic decoding if the consumer wishes to hear it.
Note This option is not available on all consumer decoders that incorporate licensed Pro Logic II
technology. Monitor in this mode with care.
• SurCode for Dolby Pro Logic II
Page 13
Music Mode
This mode is the most versatile feature of Pro Logic II. It activates the settings for Panorama,
Dimension, and Center Width. These settings help a consumer to make stereo or “Lo/Ro” material
into one that takes advantage of their multichannel listening environment. Particularly attractive
for automotive entertainment systems, this can be used anywhere a simple upmix from stereo is
required.
Music Mode controls
PANORAMA
When enabled, this control 100% diverges the stereo signal to the surround speakers as well as
the front Left and Right.
DIMENSION
This adjusts the front–to–back panning or “focus” of the signal from the front speakers to the
rear speakers.
CENTER WIDTH
This diverges the Center output signal from the Center to both the Left and Right outputs. At
the 0º setting, there is no center width and the center stays only in the center channel. At the 90º
setting, there is maximum divergence with a phantom center.
Movie Mode
This mode is the standard setting for programs with video. This decoding is based on the original Pro Logic decoding scheme, but with the mono Surround channel separated into Left and Right
Surround channels.
Matrix Mode
This is primarily for radio reception in cars. It is essentially the same as the original passive Dolby Surround decoder without the directional steering provided by Pro Logic.
Channel Configuration
CHANNEL CONFIGURATION sets the Decoder to the desired playback speaker configuration.
Page 14
SurCode for Dolby Pro Logic II •
Channel Configurations
The six channel 5.1 configuration is the default. Phantom Center is for Left + Right stereo only. 3
Stereo is for a Left + Center + Right front–only configuration.
Pro Logic IIx
7.1 and 6.1 Pro Logic IIx configurations, according to Dolby Labs, are “…an extension of Dolby
Pro Logic II matrixing technology that delivers enveloping 6.1 and 7.1 surround sound from both
stereo and 5.1 content… (and) incorporates soundfield tailoring for movies, music, and games.” The
6.1 configuration assumes a rear center channel, while the 7.1 configuration assumes left and right
side channels at 90 to 110º to each side of the listener. There are no height channels.
©2003 Dolby Laboratories, Inc.
Pro Logic IIx speaker configuration
• SurCode for Dolby Pro Logic II
Page 15
Pro Logic IIz
Unlike Pro Logic IIx, Dolby Pro Logic IIz introduces a vertical component to the horizontal
soundfield of a conventional 5.1 or 7.1 surround sound system with the addition of speakers located
above the front left and right speakers. Dolby Labs states that, “because it processes only nondirectional sounds for the height channels, Dolby Pro Logic IIz maintains the integrity of the source
mix, so the effects are always appropriate to the material. This added dimension complements the
sound from the rear surround speakers, increasing spaciousness while staying true to the original
intent of the content creator.”
Lt/Rt Recordings
You can use SurCode for Dolby Pro Logic II to monitor and decode Pro Logic II–encoded files
in Pro Tools. To do this, follow the steps below to configure your Pro Tools I/O.
Configuring your Pro Tools I/O:
1.Select Setup > I/O… to launch the Pro Tools I/O Setup dialog.
2. Under the Output tab, select New Path….
3. In the New Paths dialog, specify 5.1 from the Bus Type drop–down menu, then
select the Add default channel assignments check box.
4.Click Create.
Note��������Your Interface needs to support six or more output channels in order to create a 5.1 output path
in Pro Tools.
5. On the Bus tab, select New Path….
6. In the New Paths dialog, specify 5.1 from the Bus Type drop–down menu, then
select the Auto-create sub paths” option
7.Click Create.
You may want to re–name this bus by double clicking on the Bus Name. We recommend “LtRt Decode.” Each relative sub-path will then take on that root or base
name. Observing this optional step will allow for more complex routing schemes
as you get more comfortable with the new SurCode for Dolby Pro logic II feature
set, and is a necessary step in instantiating a multichannel plug–in on a stereo track
in Pro Tools.
6.Click OK.
Configuring Pro Tools I/O
Page 16
SurCode for Dolby Pro Logic II •
Routing SurCode for PLII in a Session:
1. Import an LtRt into your Pro Tools session, and instantiate it on a stereo audio
track.
2.Select Track > New…” to open the New Tracks dialog.
a. To monitor an LtRt for quality control purposes, create a 5.1, Aux Input.
b. To Decode an LtRt to your Pro Tools time line, create a 5.1, Audio Track.
3. Route the output of the stereo audio track containing your LtRt audio to the 5.1
bus you created in step 5 of the section Configuring your Pro Tools I/O:, page
16 above.
Preparing to print your LtRt to disk
4. Next, route the input of the 5.1 Aux Input (Step 2a above) or 5.1 Audio Track (Step
2b above) to the same 5.1 path referenced in the previous step.
Routing your inputs
5. Lastly, route the output of this track to the 5.1 output path you created in Step 3 of
the above section, Configuring your Pro Tools I/O:, page 16. [Print_2_Output.
• SurCode for Dolby Pro Logic II
Page 17
png]
Output selection
6. To begin decoding your LtRt, insert the plug–in onto the stereo audio track containing your LtRt by selecting Inserts A-E > multichannel plug-in > other > SurCode
for Dolby Pro Logic II (stereo/5.1).
Inserting the plug–in
7. Enable the plug–in’s DECODE section, and you are ready to monitor or decode
Dolby Pro Logic II–encoded content directly from your Pro Tools time line. [EngageDecode_2_Print.png]
Page 18
SurCode for Dolby Pro Logic II •
Enabling the decoder
Options
Meters Options
The OPTIONS section includes a meter ballistics choice, plus miscellaneous Decoder settings.
The METERS menu provides a choice of peak or RMS ballistics. The peak setting corresponds to a
“quasi–peak program meter” measurement method as discussed in the “True-Peak” section below.
Decode Options
There are four decoding options, one enabling a gain makeup feature, and the three remaining
provide LFE synthesis.
Gain Makeup
Because of gain staging in the encoder, a round trip encode/decode produces surround content
is -3 dB or 3 dB down from the original input stem. The Gain Makeup toggle compensates for that,
increasing the amplitude 3 dB on decode to provide unity gain across the encode/decode process.
LFE Synthesis
The LFE switch enables or disables the LFE synthesis function in SurCode for Dolby Pro Logic
II. Not part of the Pro Logic specs, LFE synthesis extracts low frequency information from the front
left and right channels, and routes it to the LFE output.
CROSSOVER
The Crossover menu sets the turnover or resonant frequency for the low pass filter that routes
content to the derived LFE.
SPEAKER SIZE
The Speaker Size label is borrowed from bass management and, though it is a bit of a misnomer
• SurCode for Dolby Pro Logic II
Page 19
in this application, was used because of its familiarity…Speaker Size determines whether the derived LFE is 100% routed to the LFE channel (Small) or is diverged equally to all channels (Large).
The Small setting redirects frequencies below the selected crossover frequency exclusively to the
LFE channel. High pass–filtered audio, above the crossover frequency, it directed equally to the
other , non–lFE channels. The Large setting directs an equal contribution of extracted LFE to all
channels, including the LFE.
Automation
The Input Trims, and all of the Routing controls, with the exception of Gang Faders and Reset
Faders, can be automated in Pro Tools. The Decoder controls cannot be automated.
Encoding, Decoding & Monitoring
The two section headers set the modes for encoding, decoding and monitoring. Clicking on
the ENCODE section header enables the Encoder, while clicking on the DECODE section header
enables the Decoder. When the Encoder or Decoder are active, their respective section header is
highlighted. Without eith er the Encoder or Decoder active, the inputs are connected directly to
the outputs.
When the Encoder is enabled, the Pro Logic II encoder is turned on, and the encoded stereo
signal is sent to the L and R channels of your I/O’s output path. The other four outputs are muted.
When the Encoder and Decoder are both enabled, you can preview a “round trip” path, hearing what the end listener might hear in their home. This is especially useful in tuning up the input
levels for best encoding.
Note��������Modern AVRs, or A/V Receivers, have many controls and features. Typical consumers use their
playback gear set to the factory defaults or, if they do change settings, use factory presets. Factory defaults are not standardized, only recommended, and some consumers are not listening to
what may be “correct,” only what they like. See Decoder Defaults, page 27 for Dolby’s decoder
defaults. Also realize that Dolby Pro Logic and Pro Logic II are only one of several matrix decoders
available to consumers. Other decoders include DTS’ Neo, Lexicon’s Logic 7, and DTS’ SRS Circle
Surround.
Page 20
SurCode for Dolby Pro Logic II •
Maintenance
Disabling or Removing the Plug–in
We encourage you to download a demo version of our product so you can try it in your own
studio. However, demos do expire and, each time you launch Pro Tools, you are reminded of that.
To remove an expired Pro Tools plug–in on Mac OS, open the:
Library/Application Support/Avid/Audio/Plug-Ins
directory, and either delete the plug–in, or move it from the Plug-Ins directory to the Plug-Ins
(Unused) directory. On Windows, you will find the corresponding directory at:
C:\Program Files\Common Files\Avid\Audio\Plug-Ins
The actual SurCode for Dolby Pro Logic II plug–in is named “SurCodeForDolbyProLogicII.
aaxplugin.”
• SurCode for Dolby Pro Logic II
Page 21
Loudness Regulations & Measurements
Why Loudness?
To quote the ATSC’s A/85 Recommended Practice: Techniques for Establishing and Maintaining
Audio Loudness for Digital Television, “Consumers do not expect large changes in audio loudness
from program to interstitials and from channel to channel. Inappropriate use of the available wide
dynamic range has led to complaints from consumers and the need to keep their remote controls at
hand to adjust the volume for their own listening comfort.”
To address complaints, both the EBU and ATSC have recommended that broadcasters move
from a peak normalization to a loudness normalization paradigm, where the gain of all content is
adjusted prior to playout so as to maintain a constant subjective loudness rather than a simple peak
amplitude. Loudness is a far more complex issue than simple amplitude. Being a psychoacoustic
phenomenon, it is dependent on power, frequency and duration. All these factors are processed in
our brains to create our perception of “loudness.”
Measuring Loudness
Specific concepts, terminology, and measurement methods have been defined, standardized and
adopted worldwide to manage the subjective loudness of broadcast material. These standards were
based on thorough testing using real people, not just mathematical models.
LKFS
The EBU and ATSC have adopted well defined standards for objective measurement of amplitude that correlate well with perceived loudness. Along with the new standards, a new methodology for measurement was defined by the ITU; LKFS or K–weighted loudness referenced to digital
full scale. A well established measurement scale is dBFS, on which LKFS is based. dBFS measures
amplitude, in decibels, referenced to the 24 bit AES/EBU or “AES” data word in use today by most
digital audio workstations (DAWs). Zero dBFS is assigned to the maximum possible digital amplitude that can be captured, and is defined as all available bits, whether 16, 24 or 32 in AES data
words being “filled” with valid data.
The dBFS measuring method itself is frequency–blind so, to adapt dBFS to measure and correlate
to subjective loudness, that needed to change. The result is the developed frequency–dependent
LKFS measurement process. LKFS is very different from older PPM, VU and proprietary legacy
amplitude measuring systems such as Dorrough meters.
LKFS incorporates the following measurement steps:
a)High frequencies are boosted 4 dB with a shelving filter having a 3 dB point at ≈2 kHz
b)Low frequencies are attenuated with a 2nd order high pass filter, with a 3 point at ≈60 Hz
c)RMS power for each of the five main channels in the file is derived
d)The two rear channels are gain compensated by +1.41 dB to slightly increase their contribution
e) The result of the previous power measurements for each channel are summed to derive a final
LKFS value
Of a standard six channel “surround” file, the five main channels are measured. The LFE channel is not included in measurements. The K weighting, or the K in LKFS, refers to the high boost
and low shelving mentioned above. Do not confuse K weighting with the unrelated and proprietary
K–System metering method. K weighting’s high shelf mimics the acoustical effects of our head,
while the low cut mimics our reduced acuity at low frequencies. The temporal power averaging,
spectral shaping that favors higher frequencies and discounts lower frequencies, and spatial weighting that boosts rear channel content incorporated into the LKFS standard correlates quite well with
what our ear/brain combination perceives as “loudness.”
As with older ad hoc and published industry standards that establish a nominal signal amplitude
defined as a reference level, the EU mandates -23 LKFS while -24 LKFS is the reference level for
North America; 23 or 24 decibels below LK Full Scale. This specified reference level is referred to as
Page 22
SurCode for Dolby Pro Logic II •
“Target Loudness.” As a point of reference, an in–phase stereo 1 kHz sine wave at 18 dBFS reads at
-18 LUFS absolute on an EBU mode loudness meter. However, since LKFS is frequency dependent,
this can only be used as a very rough “rule of thumb” when mixing in the era of constant loudness.
Gating
Our brain is quite good at adjusting to varying sound pressure changes over time. We can adapt
to a wide range of soundscapes, from a low amplitude outdoor background mix of mild wind and
insect noises, to an orchestral crescendo heard from the second row. In order to better measure
subjective loudness with only simple calculations, the EBU found that really quiet audio needs to
be ignored. This is accomplished with a “gate,” as in noise gate. A gate can be thought of as a garden
gate that is open under normal conditions, letting everything pass though unimpeded. When the
audio amplitude falls below a pre–defined threshold the gate closes, cutting off the passage of audio.
So, material around the reference level passes through the gate, but very quiet material is excluded.
In the EBU’s measurement regime, which applies to all loudness management practices worldwide, there are two cascaded gating processes. The first, dubbed “absolute gating,” excludes all values below -70 LKFS from the measurement. This suppresses dead air and low level noise. After the
-70 gate is applied, a second “relative” gating process is applied. As specified in ITU-R BS.1770-2,
relative gating excludes all measurements that are more than 10 dB below the RMS or mean loudness. If the mean loudness after absolute gating is, say, -19 LKFS, then all values below -29 LKFS are
removed from the loudness range evaluation. This relative gating is used to remove “atypical” parts
of the signal that are too quiet to draw our attention.
Additional Parameters
Once a weighted LKFS value has been measured, further temporal or time–based integration is
applied to derive additional parameters:
EBU Loudness Parameters:
- Programme Loudness
- Loudness Range
- True-Peak Level
- Momentary Loudness
- Short–Term Loudness
Programme Loudness
The principal loudness parameter is Programme Loudness, also known as Integrated Loudness,
which describes the loudness for an entire program, whether it is a 10 second bumper, a 15 minute
infomercial, or a 140 minute feature film. Programme Loudness, being a measurement derived
from LKFS, uses a related unit; LUFS or Loudness Units relative to Full Scale. It’s a matter of semantics, but think of LKFS and LUFS as conceptually interchangeable, though the EBU recommends using LUFS.
True-Peak
The True-Peak measurement method was developed to address inconsistent or unreliable measurements made with standard sample peak meters, also known as “quasi–peak” or QPPM, as
found in all DAWs and digital recorders today. The disparity between a QPPM and a True–Peak
reading is often 2 or 3 dB and can be more than 6 dB. Inaccurate measurements sometimes lead to
overloads, clipping and distortion when a signal passes through an analog–to–digital converter or
ADC in the listener’s home. The problem is most apparent for highly amplitude–compressed audio
sampled at the baseband rates of 44.1 or 48 kHz.
A True–Peak meter overcomes the inability for low sample rate audio to accurately account for
signal changes between sample snapshots. In other words, they account for signal excursions in
between ticks of the sample clock. Since a sampled signal cannot encode information at other than
the sampling interval, any changes to the signal amplitude during those moments of “blindness”
are not recorded.
However, with a bit of mathematical sleight of hand, that information between samples can be
• SurCode for Dolby Pro Logic II
Page 23
faithfully estimated and measured. This allows True–Peak meters to provide an accurate gauge
of how an ADC will behave in the real world. The worldwide standard for maximum permissible
True–Peak Level is -2 dBTP, or 2 dB below 0 LKFS when measured with a True–Peak meter.
Short Duration Loudness
Short-Term Loudness
A 3 second overlapping and sliding measurement “window” or time interval is integrated to
produce a Short–Term Loudness value. Imagine a 3 second selection that slides along the time line,
accumulating measurements as it goes. Three seconds is a relatively long time period, and provides
a good indication of the loudness trend of the material. As mentioned above, Short–Term Loudness
is weighted.
Momentary Loudness
The Momentary Loudness metric integrates a 400 msec. overlapping window that slides along
the audio time line; short enough to ignore the long term trends that our brain largely pays attention to, while still able to capture common transient events like percussive attacks and other events
that may either grab our attention or greatly annoy us. Momentary Loudness is also weighted.
Maximum Momentary and Maximum Short–Term Loudness, when evaluated together, are ideal
for gauging the loudness of short form content such as commercials.
Anchoring
The final aspect of loudness measurement that may need a bit of explanation is the “anchor element.” SurCode for Dolby Pro Logic II’s Program Loudness window provides two choices; implied
program or dialog.
Because our brain is highly tuned to speech recognition, we tend to pay attention to dialog when
it is present in an audio track. In the absence of speech, our attention reverts to the music and
effects in the track. The Integrated Dialog choice in the Program Loudness menu uses the industry
standard Dialogue Intelligence algorithm to evaluate the amount of dialog present in a file, which
allows the measurement to “pay attention” to a threshold amount of dialog just as our brain does.
None of the standards referenced in the Program Loudness menu mention dialog anchoring;
The ITU and EBU standards are “dialog–blind.” So, strict interpretation of the standards requires
this same approach. In SurCode for Dolby Pro Logic II you have a choice, enabling you to use
whichever method produces metrics that make sense to you.
Page 24
SurCode for Dolby Pro Logic II •
• SurCode for Dolby Pro Logic II
Page 25
Page 26
SurCode for Dolby Pro Logic II •
Appendix 1
Decoder Defaults
Parameter
Default Value
Autobalance1
Output Channel Configuration
Dimension
Decode Mode
PCM Scale Factor
Rs Polarity Inversion
Sample Rate
Panorama Mode
Center Width
Enabled
3/2
Neutral
Movie
1.0 (Unity Gain)
Disabled
48 kHz
Disabled
3
Dolby Pro Logic II decoder defaults
Note 1: Autobalance is a feature to the Dolby Pro Logic II decoder that attempts to keep dialog
centered by gently gain compensating slight off–center panned content to “steer” it to the center.
According to Dolby’s Dolby Surround Pro Logic II Decoder - Principles of Operation, there are “…
well-known characteristic differences between movie soundtracks and music recordings. For example, movies (and Dolby Surround TV shows) are mixed and monitored in a calibrated multichannel
environment, so the desired end result when listening at home can be obtained from a similarly calibrated home theater system. Stereo music, on the other hand, is not monitored through a surround
system when being mixed, so it is not really known at that time how it will sound when played on
a surround system. For these reasons, the Movie mode of Pro Logic II has preset characteristics to
ensure consistent results…”
“Music mode, however, can be user-adjustable, assuming the decoder manufacturer decides to
offer any of the following three optional controls. These controls are useful in any kind of decoder
to allow optimization of the soundfield as desired, but are especially effective in automotive applications due to seating and speaker positions.”
“The goal for music playback is to have the sounds from all the speakers arrive at the listener at
the same time, which is known as coincident arrival. In case the Surround or Center speakers are
closer to the listener than the main Left/Right front speakers, a compensating delay will be applied
in the decoder. This helps prevent any smearing or combing of the sounds as they combine from the
various speakers.”
“Lastly, the autobalance is turned off in Music mode, considering that vocalists are sometimes
deliberately placed off center in the mix.”
• SurCode for Dolby Pro Logic II
Page 27
Index
A
B
C
D
AAX................................................................................................................6
AC-3-encoding...............................................................................................5
Additional Parameters (loudness)..............................................................23
AIFF............................................................................................................5, 8
Anchoring (loudness)..................................................................................24
automation...................................................................................................20
ballistics (meter)...........................................................................................10
bus assignments.............................................................................................8
BWF................................................................................................................5
Center Width............................................................................................... 14
channel assignments......................................................................................8
Channel Configuration............................................................................... 14
channel configurations..................................................................................8
configuring your DAW..................................................................................8
Crossover......................................................................................................19
decoder
3rd Party decoders
default settings
Dolby Pro Logic II
20
27
5
Matrix
Movie
Music
Pro Logic
Pro Logic IIx
Pro Logic IIz
14
14
14
13
15
16
Gain Makeup
19
decoding.......................................................................................................20
decoding after encoding..............................................................................10
Decoding modes
Decoding options.........................................................................................19
Dimension.................................................................................................... 14
Dolby
DP570
Page 28
5
SurCode for Dolby Pro Logic II •
Pro Logic
5
decoders
5
Dolby documentation..................................................................................12
Dolby Pro Logic.............................................................................................5
Dolby Pro Logic II
Dolby Surround.............................................................................................5
DP570.............................................................................................................5
E
Enable or Disable Loudness
Measurement................................................................................................13
enabling Modes..............................................................................................9
ENCODE Section.........................................................................................10
encoding.................................................................................................12, 20
matrix vs. discreet
F
files
source
G
H
I
5
8
Gain Makeup................................................................................................19
Gang Faders............................................................................................ 10, 11
gating (loudness)..........................................................................................23
host platforms................................................................................................7
iLok
dongle
licensing
7
7
importing sound files....................................................................................8
Input Trims............................................................................................ 10, 12
inserting the plug-in................................................................................ 8, 18
Installation.....................................................................................................7
I/O
channel paths
configuring
routing inputs
selecting outputs
L
8
16
17
18
Left total/Right total......................................................................................5
• SurCode for Dolby Pro Logic II
Page 29
LFE.................................................................................................. 5, 8, 10, 12
employing
synthesis
12
19
Crossover
Speaker Size
19
19
LFE synthesis................................................................................................19
licensing
version 2
7
limiter..................................................................................................9, 10, 11
limiting indicator......................................................................................... 11
loudness
Additional Parameters
anchoring
gating
measuring
Momentary
regulations
Short Duration
True-Peak
23
24
23
22
24
22
24
23
pre-encoded
16
printing or bouncing
17
Loudness Measurement...............................................................................13
Lt/Rt.......................................................................................................... 5, 12
LtRt............................................................................................................... 11
Lt/Rt recordings...........................................................................................16
M
maintenance.................................................................................................21
matrix encoding................................................................................. 5, 10, 12
Matrix Mode................................................................................................ 14
Maximum Peak............................................................................................ 11
metadata
channel configuration
8
Metering Section.......................................................................................... 11
meters
ballistics
Decoder
Input
loudness
Maximum Peak
options
Peak Amplitude
Program Loudness
Short Duration Loudness
10
12
10
11
11
19
12
11
11, 12
MODE menu................................................................................................13
Modes
Page 30
SurCode for Dolby Pro Logic II •
enabling
Movie
Music
Pro Logic
9
14
14
13
Momentary Loudness..................................................................................24
monitoring...................................................................................................20
Movie Mode.................................................................................................. 14
Music Mode.................................................................................................. 14
O
P
output selection............................................................................................18
Overload indicator....................................................................................... 11
Overview........................................................................................................5
Panorama..................................................................................................... 14
Peak Amplitude...........................................................................................12
plug-in
inserting
8
pre-encoded Lt/Rt........................................................................................16
print your LtRt............................................................................................. 17
Program Loudness....................................................................................... 11
Pro Logic II decoders.....................................................................................5
Pro Logic IIx................................................................................................15
Pro Logic IIz.................................................................................................16
Pro Logic Mode............................................................................................13
R
regulations
loudness
22
Reset Faders..................................................................................................10
routing inputs.............................................................................................. 17
S
Sections.........................................................................................................20
ENCODE
10
AIFF
BWF
importing
interleaved
5
5
8
8
Sections (UI)..................................................................................................9
Setting Up Your DAW...................................................................................8
Short Duration Loudness................................................................ 11, 12, 24
source files......................................................................................................8
• SurCode for Dolby Pro Logic II
Page 31
WAV
5
Speaker Size..................................................................................................19
System Requirements.....................................................................................6
T
Trims
Input
10, 12
True-Peak.....................................................................................................23
tutorials..........................................................................................................8
U
UI....................................................................................................................9
sections
9
sections
9
upmixing......................................................................................................13
user interface..................................................................................................9
V
W
Y
version 2 licenses............................................................................................7
WAV............................................................................................................5, 8
YouTube
tutorials
Page 32
8
SurCode for Dolby Pro Logic II •
17113 Minnetonka Blvd STE 300
Heimbachstrasse 40
Minnetonka MN 55345
D-41747 Viersen Germany
+1-952-449-6481
+49-2162-1062622
©2014 Minnetonka Audio Software, Inc. SurCode is a trademark of Minnetonka Audio Software, Incorporated. SurCode and SurCode for Dolby Pro Logic II are registered trademarks of Minnetonka Audio Software, Incorporated. All
other trademarks are property of their respective companies.
140102