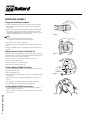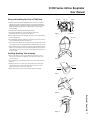
1
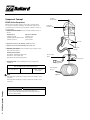
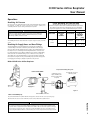
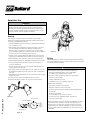
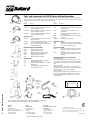
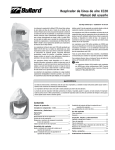
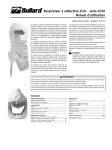
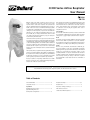
CC20E Series Airline Respirator User Manual 0194 EN 270 Bullard’s CC20E Series airline respirators, when properly used, provide a continuous flow of air from a remote air source to the respirator wearer. CC20E Series respirators offer protection from airborne contaminants that are not immediately dangerous to life or health or that do not exceed concentrations allowed by applicable regulations and recommendations. If you have any questions concerning the use of this respirator, or if you are not sure whether the atmosphere you are working in is immediately dangerous to your life or health, ask your employer. All instructions for the use and care of this product should be supplied to you by your employer as recommended by the manufacturer. CC20E Series airline respirators are approved to provide respiratory protection in general purpose applications including pharmaceutical manufacturing, chemical and pesticide handling, spray painting, or other industrial applications. The 20TICE model is intended for general use applications, and the 20TICHE model is used in work environments that require head protection. The 20SICE model includes a long outer bib and taped seams for protection from liquid penetration. This respirator, when properly fitted and used, significantly reduces, but does not completely eliminate, the breathing of contaminants by the respirator wearer. When properly fitted, used, and maintained, it will provide protection up to 1000x occupational exposure limit. (Check regulatory requirements to determine exposure limits.) Improper respirator use may damage health and/or cause death. Improper use may also cause certain life-threatening delayed lung diseases such as silicosis or pneumoconiosis. This respirator is not suitable for use in flammable atmospheres and is not designed for use in exceptionally low or high temperatures where moisture in the air could freeze or the worker could be at risk for heat exhaustion. The air supply moisture content should be controlled to avoid freezing the apparatus when used at temperatures below 4°C. Face and Eyes The lens of the 20TICHE model provides protection consistent with the requirements of EN166 (low energy impact). Wear appropriate safety glasses or goggles if higher protection levels are required. Head The TICH hood, when used with a Bullard model 5100E or 5100RE hard hat meets EN397 requirements for protective headwear. These hard hats are designed to provide limited head protection by reducing the force of falling objects striking the top of the helmet. Tyvek® There are uses, environments, and chemicals for which this garment is not suitable. It is the user’s responsibility to determine that this garment is appropriate for the intended use. This material should not be used around heat, open flames, sparks, or in any potentially flammable or explosive environment. This material is not flame resistant nor flame retardant and will melt. It can create static electricity. Contact your employer or Du Pont® Corporation at 1-800-44-TYVEK or 00352 3666 5664 for more information on this material. Warning Read all instructions and warnings before using this respirator. Save this manual for future reference. Table of Contents General Information .............................................................1 Respirator Assembly..........................................................4, 5 Component Concept...............................................................2 Respirator Use.......................................................................6 Operations Breathing Air Pressure Table................................................3 Typical Breathing Air Source and Respirator Configurations..............................................3 Inspection, Cleaning, and Storage........................................7 Parts and Accessories for CC20E Series Airline Respirators..........................................8 Respirator Hood Assembly Component Concept CC20E Airline Respirators Bullard’s CC20E Series airline respirators consist of three components (Figure 1): respirator hood assembly, breathing tube assembly and air supply hose. All components must be present and properly assembled to constitute a complete CE approved respirator. ➀RESPIRATOR HOOD ASSEMBLY: Includes hood and headband suspension or hard hat. Respirator Hood Suspension or Hard Hat 20TICNE* (Tyvek QC) 20TGE suspension 20SICNE* (Tychem SL with taped seams) 20TGE suspension 20TICHE** (Tyvek QC) 5100E or 5100RE Headband or Head Protection Inner Bib * Optional Accessories: 20NC chinstrap, 20LCL lens cover ** Optional Accessories: ES42 chinstrap, 20LCL lens cover ➁BREATHING TUBE ASSEMBLY: Connects respirator hood to air supply hose by an airflow control device and belt. Breathing Tube Assemblies V30E with 1/4” Industrial Interchange nipple V33E with 1/4” brass Snaptite nipple V39E with 9 mm European Interchange nipple Breathing Tube Assembly Air Flow Control Device Air Supply Hose ➂ AIR SUPPLY HOSE: Connects breathing tube to air source supplying clean breathable air. Hose for High Pressure Compressed Air Source E10 3/8” Coiled I.D. Hose E1010 E1020 Available in 10 and 20 meter lengths. NOTE When using V133-E breathing tube assembly, use E10B Connection Kit to connect to E10 hoses. Figure 1 When using V130-E breathing tube assembly, use E10A Connection Kit to connect to E10 hoses CC20 Component Concept Warning 2 4 Clean Breathable Air Source Do not modify or alter this respirator in any manner. Failure to use complete CE approved Bullard components and replacement parts voids approval of entire assembly. CC20E Series Airline Respirator User Manual Operations Breathing Air Pressure Air pressure must be continually monitored at the point-of-attachment while operating this respirator. A reliable air pressure gauge must be present to permit you to continually monitor the pressure during actual respirator operation. CC20E Breathing Air Pressure Table This table defines the air pressure ranges necessary to provide CC20E Series respirators with a volume of air that falls within the required range. The respirator provides an air flow of 240-325 lpm to the user. The minimum length of air supply hose is 10 meters, and the maximum length is 20 meters. Warning Failure to supply the minimum required pressure at the point-of-attachment for your hose length and type will reduce airflow and may expose you to lifethreatening conditions, diseases or death. The Breathing Air Pressure Table defines the air pressure ranges necessary to provide CC20E 1 2 3 4 AIR SOURCE BREATHING TUBE ASSEMBLY HOSE LENGTH POINT OF ATTACHMENT PRESSURE Bar (PSIG) Stationary or portable V30/V33E 10 meters 20 meters 1.2 - 1.5 1.4 - 1.7 17 - 22 19 - 25 V39E 10 meters 20 meters 0.7 - 0.8 0.9 - 1.0 9 - 12 12 - 15 Breathing Air Supply Hoses and Hose Fittings CE approved Bullard air supply hose(s) MUST be used between the breathing tube connection fitting on the wearer’s belt and the point-of-attachment to the air supply (Figure 2). When connecting lengths of E10 hose together, only use Bullard V11 hose-tohose adaptors. Secure connection(s) until wrench-tight and leak-free. Total connected hose length and number of hoses MUST be within the ranges specified on the Breathing Air Pressure Table. The maximum working pressure of E10 hoses is 500 psi (34 bar). The breathing tube connection fitting MUST be secured to the belt that is supplied with this respirator. Securing the air entry connection fitting helps prevent the air supply hose from snagging, disconnecting or pulling the respirator hood off your head. Bullard CC20E Series Airline Respirator POINT-OFATTACHMENT POINT-OF-ATTACHMENT Compressed Breathing Air System Suitable After-Cooler/ Dryers with filters and carbon monoxide monitor as required Breathing Air Compressor with storage tank Bullard Air Supply Hose Figure 2 Bullard 41 Series Airline Filter POINT-OF ATTACHMENT(POA) The point-of-attachment is the point at which the air supply hose connects to the air source. A pressure gauge attached to the air source is used to monitor the pressure of air provided to the respirator wearer. Be certain your employer has determined that the breathing air source provides clean breathable air. This respirator must be supplied with clean breathable air at all times. Do not connect the respirator’s air supply hose to nitrogen, oxygen, toxic gases, inert gases or other unbreathable air sources. Check the air source before using the respirator. Failure to connect to the proper air source may result in serious injury or death. Operations Warning 3 RESPIRATOR ASSEMBLY Sizing and Installing Headband 1.Size the 20TGE headband by squeezing the top and bottom edges of rear buckle with your thumb and forefinger. Decrease the size of headband by sliding band through buckle. 2.Squeeze the buckle to disengage sizing mechanism, and place headband on your head. Continue squeezing buckle while pulling headband down over your head. Headband automatically adjusts to your size and locks when you release your grip (see Figure 3). Headband should feel comfortable and snug. Figure 3 NOTE If using the optional 20RTE ratchet headband, adjust the size by turning the ratchet knob at the back of the headband. 3. Remove tissue paper from lens of respirator hood. 4. With clear lens facing you, insert headband into hood with headband snaps facing front. 5. Engage four headband snaps into corresponding snap studs mounted in lens (see Figure 4). Adjusting Crown Straps for Vertical Fit To improve the comfort of 20TGE, adjust the crown straps vertically by repositioning the headband keys in the crown straps. Vertical adjustment makes headband ride higher or lower on the wearer’s head. To adjust the crown strap: Figure 4 1.Rotate crown strap 90° until key dislodges from keyhole (see Figure 5). Crown Strap 2. Move key to desired vertical position. 3. Rotate crown straps 90° to secure key in keyhole. 4. Repeat steps 2-4 for other crown strap keys. If Using Optional 20NC Chin Strap: For most wearers, the headband holds the CC20E hood in place without a chin strap. To install the optional chin strap: 1. Remove headband from hood. 2. Snap chin strap stud buttons into the holes on each side of the headband, inserting from the inside. Headband Key Hole Headband Key Figure 5 3. Align holes on chin strap to stud buttons and pull downward to lock in place (see Figure 6). 4.Place headband on your head. Adjust chin strap length with the plastic slide. 5. Remove headband from your head, and install into respirator hood. If Using Optional 20LCL Lens Covers: 1. Apply optional adhesive-backed lens covers designed to protect the respirator’s plastic lens. Apply 2-3 lenses at a time. 2. When a lens cover becomes soiled, remove it by pulling tab at edge of lens cover to clear your vision. Respirator Assembly Figure 6 4 Brow Pad CC20E Series Airline Respirator User Manual Sizing and Installing Hard Hat in TICHE Hood Velcro strip Velcro tab Window 1. Assemble and adjust the standard TGE Bullard hard hat suspensions or the optional TGRE ratchet suspensions by following the directions on instruction sheet attached to headband on hard hat. Read all hard hat warning labels and instructions. The following Bullard hard hat models are approved for use with CC20E Series respirator hoods: 5100E and 5100RE. 2. If desired, install and adjust optional ES42 hard hat chin strap. 3. Before inserting hard hat into hood, remove the adhesive-backed Velcro® strip attached to the Velcro piece that is sewn into the hood. Front elastic band Figure 7 4. Peel the backing off the Velcro tab and apply it to the inside center rear of the hard hat, about 1/4” from the edge. Velcro Strip 5. Insert hard hat into respirator hood with cap visor facing front of hood. Tuck cap visor on top of front elastic band sewn into hood (see Figure 7). 6. Loop the Velcro strip sewn inside the hood around the back of the cap and affix it to the corresponding Velcro tab previously installed inside the hard hat in step 4 (see Figure 8). 7. Remove the plastic from lens of respirator hood. If desired, apply optional 20LCL adhesive backed lens covers designed to protect the respirator’s plastic lens. Apply 2-3 lenses at a time. When a lens cover becomes soiled, remove it by pulling tab at edge of lens cover to clear your vision. Installing Breathing Tube Assembly 1.Remove nylon clamp from open end of breathing tube (see Figure 9). Do not remove foam from inside the breathing tube. The foam helps reduce the noise level of incoming air. Figure 8 2.Insert breathing tube approximately five inches into hood’s air entry sleeve (see Figure 10). 3.Install nylon clamps over air entry sleeve and breathing tube, inserting clamp locks through two holes in plastic anchorplate that is sewn into hood. Locks should face away from user’s neck (see Figure 11). 4.Engage clamp locks and squeeze together with slip joint pliers until tight. To remove To tighten To tighten Figure 9 Figure 10 Respirator Assembly Figure 11 5 7 Respirator Use Warning Do not use this respirator in poorly ventilated areas or confined spaces such as tanks, small rooms, tunnels, or vessels unless the confined space iswellventilated, and contaminant concentrations are below the protection level of the respirator. In addition, follow all procedures for confined space entry, operation, and exit as defined in applicable regulations and standards. Donning Before using your CC20E Series respirator, assemble the respirator using the instructions given in Respirator Assembly Section. Before donning, make sure there is no dirt, dust or contamination inside the hood. 1.Connect the Bullard air supply hose to an air source supplying clean breathable air Turn on breathing air source. 2.With air flowing, connect breathing tube assembly to air supply hose (see Figure 12). Connect quick-disconnect fitting on breathing tube assembly to quick disconnect coupler on air supply hose. Once fitting is secured, release coupling sleeve to lock fittings together. Pull on both hoses to make sure they are attached securely. Check to assure air is flowing properly into the hood. 3.Adjust air pressure at point-of-attachment to within the approved pressure range (see Figure 13). See Breathing Air Pressure Table for approved pressure ranges. 4. With air still flowing, put on CC20E Series respirator hood, inserting chin first. 5. Position headband or hard hat for a comfortablefit. See instructions for proper sizing. 6. If using an optional chin strap, pull elastic strap under your chin. Adjust for a secure and comfortable fit. 7.Tuck inner bib of hood into shirt or protective clothing for additional splash and overspray protection (see Figure 14). 8.Pull respirator outer bib over collar of shirt or protective clothing. If you are using the 20SICNE model, pull the long outer bib down on the outside of clothing and tie at the sides. 9.With breathing tube assembly attached to the hood, fasten belt at waist or hip level and adjust for comfort. 10. Recheck air pressure at the point-of-attachment. Adjust if necessary. 11. With air flowing into your respirator, you are now ready to enter work area. Pressure Gauge Figure 13 Grade “D” Breathable Air Source Point-of-Attachment Respirator Respirator Use 6 Doffing When finished working, leave work area wearing respirator and with air still flowing. Once outside contaminated area, remove respirator and then disconnect the air supply hose using the quick-disconnect fittings Warning DO NOT wear this respirator if any of the following conditions exist: • Atmosphere is immediately dangerous to life or health (IDLH). • You CANNOT escape without the aid of the respirator. • Atmosphere contains less than 19.5% oxygen or is oxygen enriched. • Work area is poorly ventilated. • Unknown contaminants are present. • Contaminants are in excess of regulatory requirements. LEAVE work area immediately if: • Any respirator component becomes damaged. • Airflow into respirator hood stops or slows down. • Air pressure gauge drops below the minimum specified in the Breathing Air Pressure Table. • Breathing becomes difficult. • You become dizzy, nauseous, too hot, too cold or ill. • You taste, smell or see contaminants inside the respirator hood. • Your vision becomes impaired. Figure 12 Air Supply Hose Figure 14 DO NOT leave respirator in work area. Respirable dust contaminants can remain suspended in the air for more than one hour after work activity ceases, even though you may not see them. Proper work practice requires you to wear the respirator until you are outside the contaminated area. Failure to don, doff and store the respirator outside of the contaminated area could result in exposure to contaminants. CC20E Series Airline Respirator User Manual Inspection, Cleaning and Storage Air Supply Hoses Bullard CC20E Series respirators have a limited service life. Therefore, a regular inspection and replacement program must be conducted. The Bullard CC20E Series respirator and all component parts should be inspected for damage or excessive wear before and after each use to ensure proper functioning. Immediately replace worn or damaged components with approved Bullard CC20E components, or remove respirator from service. Since respirator use and the quality of maintenance performed vary with each job site, it is impossible to provide a specific time for respirator replacement. This respirator should be cleaned and sanitized at least weekly, or more often if subjected to heavy use. Respirators used by more than one person must be cleaned, inspected and sanitized after each use. If not cleaned, contamination may cause illness or disease. INSPECTION: Air supply hose(s) should be inspected closely for abrasions, corrosion, cuts, cracks and blistering. Be sure the hose fittings are crimped tightly to the hose so that air cannot escape. Make sure the hose has not been kinked or crushed by any equipment that may have rolled over it. If any of the above signs are present or any other signs of excessive wear are detected, replace the hose(s) immediately or remove the respirator from service. Do not use volatile solvents for cleaning this respirator or any parts and assemblies. Strong cleaning and disinfecting agents, and many solvents, can damage the plastic parts. After reusable respirator components have been cleaned and inspected, place them in a plastic bag or an airtight container. Store the respirator and parts where they will be protected from contamination, distortion and damage from elements such as dust, direct sunlight, heat, extreme cold, excessive moisture and harmful chemicals. Hood and Headband INSPECTION: Inspect the hood material for rips, tears, or damage from excessive wear. Inspect the inner neck cuff for elasticity. The respirator’s plastic lens should be inspected for cracks, scratches or any other signs of damage. Disassemble the breathing tube from the hood by removing the nylon clamp. To remove the clamp, slide the locks sideways in opposite directions. Remove the headband suspension and optional chin strap from the hood. Inspect headband for cracks, torn headband or size adjustment slots, loss of pliability or other signs of excessive wear. Check the chin strap for loss of elasticity, cuts and cracked hanger clips. If damage is detected, replace immediately with Bullard replacement part(s) or remove the respirator from service. CLEANING: The air supply hose(s) should be hand-sponged with warm water and mild detergent, rinsed and air-dried. Do not get water inside the air supply hose. After cleaning, once again carefully inspect air supply hose(s) for signs of damage. Storage CLEANING: Bullard does not recommend laundering the hood. When the hood becomes dirty, it should be discarded and replaced. The respirator’s plastic lens, headband suspension, and optional chin strap should be hand-sponged with warm water and mild detergent, rinsed and air-dried. After cleaning and before reassembling, once again carefully inspect parts for signs of damage. Hard Hat INSPECTION: Inspect the hard hat shell for nicks, gouges, cracks, and any damage due to impact, rough treatment or wear. Remove the headband suspension and optional chin strap from the hard hat. Inspect the headband for cracks, frayed or cut crown straps, torn headband and size adjustment slots, loss of pliability or other signs of excessive wear. Check the chin strap for loss of elasticity, cuts and cracked hanger clips. If damage is detected, replace immediately with Bullard replacement parts or remove the hard hat from service. Breathing Tube Assembly INSPECTION: Inspect the vinyl breathing tube for tears, cracks, holes, or excessive wear that might reduce the degree of protection originally provided. If any signs of excessive wear are present, replace the breathing tube immediately or remove the respirator from service. Be sure the quick-disconnect fitting is screwed tightly into the breathing tube so no air can escape during use. Check the flow control device for cracks and other damage. CLEANING: To clean the breathing tube assembly, hand-sponge with warm water and mild detergent, being careful not to get water inside. Rinse and air-dry. After cleaning, once again carefully inspect breathing tube for signs of damage. Warning DO NOT CUT OR REMOVE THE FOAM THAT IS INSIDE THE BREATHING TUBE. THE FOAM HELPS REDUCE THE NOISE LEVEL OF THE INCOMING AIR SUPPLY. IT DOES NOT FILTER OR PURIFY YOUR BREATHING AIR. Inspection, Cleaning, and Storage CLEANING: The hard hat shell, headband suspension and optional chin strap should be hand-cleaned with warm water and mild detergent, rinsed and air-dried. After cleaning, and before reassembling, once again carefully inspect parts for signs of damage. 7 Parts and Accessories for CC20E Series Airline Respirators CC20E Series airline respirators consist of three components: respirator hood assembly, breathing tube assembly and air supply hose. There are options for some components to fit customer specifications. All components must be present and properly assembled, including a Bullard air supply hose, to constitute a complete CE approved respirator. 5100E 5100RE TGE CATALOG NUMBER DESCRIPTION CATALOG NUMBER DESCRIPTION Respirator Assemblies Replacement Parts for Breathing Tube CC20TIC30EIncludes 20TICNE hood, 20TGE suspension and V30E breathing tube assembly. CC20TIC33EIncludes 20TICNE hood, 20TGE suspension and V33E breathing tube assembly. CC20TIC39EIncludes 20TICNE hood, 20TGE suspension and V39E breathing tube assembly. Respirator Hoods TGRE 20TICNETyvek hood with inner bib, for use with 20TGE suspension (10/pkg) 20SICNE Tychem SL hood with inner bib and long outer bib, for use with 20TGE suspension (5/pkg) 20TICHETyvek hood with inner bib, for use with 5100E or 5100RE hard hat (5/pkg) 20TICHE Standard headband suspension Ratchet headband suspension White hard hat with standard suspension White hard hat with ratchet suspension Standard suspension for 5100E Ratchet suspension for 5100RE Breathing Tube ES42 V30E20BTE breathing tube with 1/4” Industrial Interchange fitting and belt V33E20BTE breathing tube with 1/4” brass Snaptite fitting and belt V39E20BTE breathing tube with 9mm European Interchange fitting and belt 20TICNE 20TGE Parts and Accessories Chinstrap for use with 20TG or 20RT headbands Chinstrap for use with 5100-E and 5100R-E headbands Lens covers for use with all models E101010-meter air supply hose with V11 hose adaptor fitting and V13 hose-to-pipe fitting (3/8” hose to 3/8” pipe) E102020-meter air supply hose with V11 hose adaptor fitting and V13 hose-to-pipe fitting (3/8” hose to 3/8” pipe) Breathing Air Supply Hose Connection Kits AK30 Connection Kit Includes Industrial Interchange coupler/adaptor to connect E10 hose to V30E breathing tube assembly, and Industrial Interchange nipple/adaptor to connect E10 hose to coupler at point-of-attachment. AK33 Connection Kit Includes 1/4” Snaptite coupler/adaptor to connect E10 hose to V33E breathing tube assembly, and 1/4” Snaptite nipple/adaptor to connect E10 hose to coupler at point-of-attachment. AK39 Connection Kit Includes 9mm European Interchange coupler/adaptor to connect E10 hose to V39E breathing tube assembly, and 9mm European Interchange nipple/adaptor to connect E10 hose to coupler at point-of-attachment. Lens Covers 20LCL Clamp S18053E 20RTE 8 20NC ES42 20LCL V30E Series Breathing Tube Assembly 20BTE Breathing Tube 20LCL Belt 4612 F-Series Control Valve 20SICNE Optional Accessories Air Supply Hose Kits Headband Suspension and Hard Hats 20TGE 20RTE 5100E 5100RE TGE TGRE F30Econstant flow control valve with 1/4” Industrial Interchange nipple F33Econstant flow control valve with 1/4” brass Snaptite nipple F39Econstant flow control valve with 9mm European Interchange nipple 20BTE replacement breathing tube (no nipple included) 4612 nylon belt S18053E breathing tube clamp (10/pkg) 20NC E1010 E1020 EC Type examination to PPE 89/686/EEC Article 10 & Article 11B by INSPEC Certification LTD, 56 Leslie Houghway, Salford, Greater Manchester, M6 6AJ United Kingdom Americas: Bullard 1898 Safety Way Cynthiana, KY 41031-9303 Toll free: 877-BULLARD (285-5273) Tel: 859-234-6616 Fax: 859-234-8987 Europe: Bullard GmbH Lilienthalstrasse 12 53424 Remagen Germany Tel: +49-2642 999980 Fax: +49-2642 9999829 www.bullard.com Asia-Pacific: Bullard Asia Pacific Pte. Ltd. LHK Building 701, Sims Drive, #04-03 Singapore 387383 Tel: +65-6745-0556 Fax: +65-6745-5176 ISO 9001 certified ©2014 Bullard. All rights reserved. Free-Air and Sure-Lock are registered trademarks of Bullard. Tychem is a registered trademark of E.I. DuPont de Nemours & Company. Velcro is a registered trademark of Velcro USA. 6023205256B (0214)