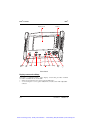
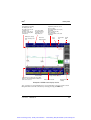
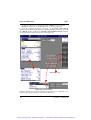
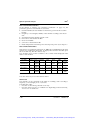
1
Artisan Technology Group is your source for quality new and certified-used/pre-owned equipment • FAST SHIPPING AND DELIVERY • TENS OF THOUSANDS OF IN-STOCK ITEMS • EQUIPMENT DEMOS • HUNDREDS OF MANUFACTURERS SUPPORTED • LEASING/MONTHLY RENTALS • ITAR CERTIFIED SECURE ASSET SOLUTIONS SERVICE CENTER REPAIRS Experienced engineers and technicians on staff at our full-service, in-house repair center WE BUY USED EQUIPMENT Sell your excess, underutilized, and idle used equipment We also offer credit for buy-backs and trade-ins www.artisantg.com/WeBuyEquipment InstraView REMOTE INSPECTION LOOKING FOR MORE INFORMATION? Visit us on the web at www.artisantg.com for more information on price quotations, drivers, technical specifications, manuals, and documentation SM Remotely inspect equipment before purchasing with our interactive website at www.instraview.com Contact us: (888) 88-SOURCE | [email protected] | www.artisantg.com USER MANUAL MTSe 5000 Series Manual reference: Software: Print ed: 5000M02 750000992/16 Versions 4.xx December 2001 2001 Acterna The information contained in this document is the property of Acterna. It is only provided for the operation and maintenance of the instrument. It must not be duplicated without the prior written permission of Acterna. Acterna Saint-Etienne 34 rue Necker 42000 Saint-Etienne Tel. +33 (0) 4 77 47 89 00 Fax +33 (0) 4 77 47 89 70 Web www.acterna.com Artisan Technology Group - Quality Instrumentation ... Guaranteed | (888) 88-SOURCE | www.artisantg.com MTSe Notice The information contained in this manual is subject to change without notice. Acterna shall not be liable for errors contained herein or for incidental or consequential damages resulting from the use of this material. This document must not be photocopied, reproduced, or translated into another language without the written consent of Acterna. Visual Conventions <Print> Name of the softkey depending on the current function (displayed on the right of the screen). Range Information displayed on the screen. PRINT Direct access key (below the screen). TITLE Name of the menu displayed in the pull down menus. Note Information concerning the operation of MTSe. Important Important information concerning the correct operation of the MTSe. Attention Message warning the user of the risk of damaging the instrument or loosing information if the instructions are not respected. Danger Message warning the user that he could be injured if the instructions are not respected. Laser safety The provisions contained in two standards define the safety procedures to be observed both by users and by manufactures when utilizing laser products: • EN 60825-1 : 1994 - Safety of laser products – Part 1: Classification of products, requirements and user guidelines. • FDA 21 CFR § 1040.10 - Performance standards for light-emitting products Laser products. Due to the range of possible wavelengths, power values and injection characteristics of a laser beam, the risks inherent in its usage differ. The laser classes form groups representing different safety thresholds. ii USER MANUAL 750000992/16 Artisan Technology Group - Quality Instrumentation ... Guaranteed | (888) 88-SOURCE | www.artisantg.com MTSe Laser classes applicable to the MTSe modules: Reference standard Modules EN 60825-1 :1994 FDA21CFR§1040.10 Class 1 Class 3A Class 1 Class 1 Class 1 Class 1 Singlemode HD - at 1310 nm, 20 µs - at 1310 nm, other pulse widths - at 1550 nm Class 3A Class 1 Class 1 Class 1 Class 1 Class 1 Singlemode VHD - at 1310 nm, 10 and 20 µs - at 1310 nm, other pulse widths - at 1550 and 1625 nm Class 3A Class 1 Class 1 Class 1 Class 1 Class 1 VFL option Class 2 Class 2 Multimode MM and ML - at 1300 nm - at 850 nm Singlemode SR, DR Warning labels for the laser classes of the MTS e Due to the reduced dimensions of the optical modules, it is not possible to attach the required warning labels to them. In line with the provisions of Article 5.1 of the EN 60825-1 standard, the warning labels are illustrated in the following table. Warning labels Reference standard EN 60825-1 :1994 FDA21CFR§1040.10 Class 1 CLASS 1 LASER PRODUCT Class 2 CAUTION LASER RADIATION DO NOT STARE INTO BEAM CLASS 2 LASER PRODUCT LASER RADIATION - DO NOT STARE INTO BEAM CLASS II LASER PRODUCT Class 3a DANGER LASER RADIATION DO NOT STARE INTO BEAM OR VIEW DIRECTLY WITH OPTICAL INSTRUMENT CLASS 3A LASER PRODUCT LASER RADIATION - DO NOT STARE INTO BEAM OR VIEW DIRECTLY WITH OPTICAL INSTRUMENTS CLASS III A LASER PRODUCT USER MANUAL 750000992/16 iii Artisan Technology Group - Quality Instrumentation ... Guaranteed | (888) 88-SOURCE | www.artisantg.com MTSe Optical connector The optical connector is the access point to the laser beam (see figure below). Laser emission Example of a laser connector on the MTS 5100e rear panel The user must take the necessary precautions concerning the optical output of the instrument and follow the manufacturers instructions. Important Measurements on optical fibers are difficult to execute and the precision of the results obtained depends largely on the precautions taken by the user. AC/DC and battery safety Important In conformance with the recommendations of standard EN 61010, the instrument should be operated within the manufacturer’s guidelines. Failure to do so may compromise the protection offered by the instruments design. Important Do not use any AC/DC adaptor or battery other than the supplied accessories. If another adapter or battery is used, it may damage the MTSe itself. The MTSe is supplied with a Nickel Metal Hydrid rechargeable battery. iv USER MANUAL 750000992/16 Artisan Technology Group - Quality Instrumentation ... Guaranteed | (888) 88-SOURCE | www.artisantg.com Table of contents 1 Visual Conventions ............................................................................................ ii Laser safety .......................................................................................................... ii AC/DC and battery safety ............................................................................... iv Measurement Principles ......................................................................1-1 OTDR measurements principle ...........................................................1-1 Measurement result .........................................................................................1-1 Measurement validity .....................................................................................1-2 Reflectance ........................................................................................................1-2 OTS Measurement principles ..............................................................1-3 Attenuation measurement ..............................................................................1-3 Power measurement ........................................................................................1-4 WDM principle and analysis .............................................................. 1-4 Measurement results .......................................................................................1-5 Introduction ....................................................................................... 2-1 Interchangeable modules ...............................................................................2-1 Measurements ..................................................................................................2-2 Setup ..................................................................................................................2-2 Results ...............................................................................................................2-2 Printing ..............................................................................................................2-3 Memory .............................................................................................................2-3 Getting Started ................................................................................... 3-1 Before switching on ...........................................................................3-1 Unpacking the instrument .............................................................................3-1 Installation and removal of module ..............................................................3-1 Positioning of the unit .....................................................................................3-2 Positioning the handle or the carrying strap ...............................................3-3 Charging the batteries .....................................................................................3-4 Battery management .......................................................................................3-5 Using MTSe from the mains supply .............................................................3-7 Connecting the fiber ........................................................................................3-7 USER MANUAL 750000992/16 v Artisan Technology Group - Quality Instrumentation ... Guaranteed | (888) 88-SOURCE | www.artisantg.com MTSe Switching on/off the MTSe ................................................................ 3-8 After switching on ............................................................................ 3-9 Installing a new version of the software ......................................................3-9 Instrument Set up .........................................................................................3-11 System setup ...................................................................................................3-12 Help ................................................................................................3-18 Printing ...........................................................................................3-18 Copying to the internal printer ....................................................................3-18 Loading a new roll of paper .........................................................................3-26 Coping to an external printer .......................................................................3-26 Copying to a file on a floppy disk ...............................................................3-27 Visual fault locator function .............................................................3-27 Optical Talk Set Function ................................................................ 3-28 Introducing a user logo ................................................................... 3-29 Conditions ......................................................................................................3-29 Method of integrating a logo .......................................................................3-29 Troubleshooting ............................................................................. 3-30 MTSe Controls ................................................................................... 4-1 Front panel ........................................................................................4-1 Display screen and softkeys ...........................................................................4-2 Directional arrow keys ....................................................................................4-4 Control keys .....................................................................................................4-4 Laser activity indicator ...................................................................................4-4 Configuration menus ........................................................................ 4-5 Editing ............................................................................................. 4-5 Use of the external keyboard .........................................................................4-7 Rear panel ........................................................................................ 4-8 Fiber connector .................................................................................................4-9 Floppy disk drive (option) .............................................................................4-9 Serial port (RS 232) ........................................................................................4-10 Parallel port (Centronics) .............................................................................4-10 IEEE port .........................................................................................................4-11 Computer display output .............................................................................4-11 Using an OTDR module ....................................................................... 5-1 OTDR Test SET-UP .............................................................................. 5-1 Selecting measurement acquisition parameters ..........................................5-3 Selecting measurement result display parameters .....................................5-4 vi USER MANUAL 750000992/16 Artisan Technology Group - Quality Instrumentation ... Guaranteed | (888) 88-SOURCE | www.artisantg.com MTSe Selecting fiber parameters .............................................................................. 5-5 Acquisition ....................................................................................... 5-6 Real-time mode ................................................................................................ 5-7 Automatic acquisition mode ......................................................................... 5-9 Manual acquisition mode ............................................................................. 5-11 Case of the multi-wavelength acquisition ................................................. 5-13 Detection of traffic ......................................................................................... 5-13 Result analysis ................................................................................ 5-14 Using the cursors ........................................................................................... 5-14 Zoom and shift functions ................................................................. 5-15 Events ............................................................................................. 5-15 Event display criteria .................................................................................... 5-15 Table of results ................................................................................ 5-17 Information given for each type of event detected .................................. 5-18 Notes in table ................................................................................................. 5-19 Automatic detection and measurement ............................................5-20 Addition of markers ......................................................................... 5-21 Addition of manual measurements ...................................................5-22 Making Slope measurements ...................................................................... 5-23 Making splice and reflectance measurements .......................................... 5-24 Manual ORL measurement .......................................................................... 5-26 ORL on a saturated trace .............................................................................. 5-27 Locking markers ..............................................................................5-27 Overlay trace function ..................................................................... 5-28 Overlay conditions ........................................................................................ 5-28 Transferring stored traces to the overlay memory ................................... 5-29 Adding overlay traces .................................................................................. 5-30 Swapping overlay traces .............................................................................. 5-30 Removing traces ............................................................................................ 5-30 Shifting traces ................................................................................................ 5-31 Exiting the overlay menu ............................................................................. 5-31 Both End Measurement ...................................................................5-32 Measurement Principles ............................................................................... 5-32 Execution of a Both End measurement ...................................................... 5-32 Fault locator mode ........................................................................... 5-37 Macro .............................................................................................5-38 Starting a macro (Play) ................................................................................. 5-39 Creating a user macro 1 to 4 (Learn) .......................................................... 5-40 Saving a macro on a floppy disk ................................................................. 5-40 Loading a macro from a floppy disk .......................................................... 5-41 Use of the macro to store a configuration .................................................. 5-41 Macro 5 description ...................................................................................... 5-41 USER MANUAL 750000992/16 vii Artisan Technology Group - Quality Instrumentation ... Guaranteed | (888) 88-SOURCE | www.artisantg.com MTSe Using the OTS module ........................................................................ 6-1 OTS Test SET-UP ................................................................................6-1 Selecting Light source parameters ................................................................6-2 Selecting Power meter parameters ................................................................6-3 OTS Results Window ......................................................................... 6-4 Light Source ......................................................................................................6-5 Power meter .....................................................................................................6-8 OTS Measurements ......................................................................... 6-11 Adjusting the power meter zero setting .....................................................6-11 Making a reference measurement ...............................................................6-11 Measuring the fiber under test ....................................................................6-12 Source Specific Functions ................................................................6-12 Using variable power (with laser source only) .........................................6-12 Scanning Mode ..............................................................................................6-12 Transmission of modulated signals ............................................................6-13 Power meter Specific Functions ........................................................6-13 Memory Functions ........................................................................................6-13 Automatic result storage ..............................................................................6-15 Automatic result printing .............................................................................6-16 Choosing a non calibrated wavelength ......................................................6-17 Setting an audible alarm threshold .............................................................6-17 Transferring OTS table to Excel ...................................................................6-17 Optical spectrum analyser .................................................................. 7-1 Configuration of the instrument ......................................................... 7-1 OSA test setup .................................................................................. 7-1 Acquisition parameters ...................................................................................7-2 Detection parameters ......................................................................................7-3 Signal/Noise parameters ...............................................................................7-3 Results display parameters ............................................................................7-4 Display of WDM results ......................................................................7-5 Trace ..................................................................................................................7-6 Table ..................................................................................................................7-9 Overlay of traces ............................................................................. 7-12 Overlaying a trace .........................................................................................7-12 Possible actions after overlaying a trace ....................................................7-13 Saving and transferring the results to Excel ..............................................7-13 viii USER MANUAL 750000992/16 Artisan Technology Group - Quality Instrumentation ... Guaranteed | (888) 88-SOURCE | www.artisantg.com MTSe File management ................................................................................ 8-1 Storage media ...................................................................................8-1 Selecting the storage location ........................................................................ 8-1 Storing data ..................................................................................... 8-2 Filename .......................................................................................... 8-2 Different file naming ....................................................................................... 8-2 OTDR Module Automatic Filenaming ......................................................... 8-3 OTDR Module Semi-Automatic Filenaming ............................................... 8-4 OTS Module Automatic Filenaming ............................................................ 8-7 OTS Module Semi- Automatic Filenaming ................................................. 8-8 WDM Module Automatic Filenaming ......................................................... 8-9 WDM Module Semi-Automatic Filenaming ............................................. 8-10 File format ...................................................................................................... 8-11 Transferring MTSe file (table) to Excel ....................................................... 8-11 Memory Info and Comments ...................................................................... 8-15 Manipulating stored data .................................................................8-16 Explore function ............................................................................................ 8-16 Finding files .................................................................................................... 8-18 Loading an OTDR trace ................................................................................ 8-19 Loading an OTS table ................................................................................... 8-20 Deleting a file ................................................................................................. 8-20 Deleting a directory ...................................................................................... 8-21 Copying files from one medium to another (if available) ....................... 8-21 Printing one or more stored traces ............................................................. 8-22 Renaming a file .............................................................................................. 8-23 Formatting ..................................................................................... 8-23 Formatting a floppy disk (if installed) ....................................................... 8-23 Formatting the hard disk (if installed) ....................................................... 8-24 Remote control ................................................................................... 9-1 Connection of the MTSe to a PC ..........................................................9-1 Connection via the RS232 interface .............................................................. 9-1 Connection via the Ethernet interface .......................................................... 9-2 Connection via a modem ............................................................................... 9-2 Connection via the IEEE interface ................................................................ 9-3 Description of commands and queries ............................................... 9-3 Command errors ............................................................................................. 9-3 Command Format ........................................................................................... 9-3 Command Syntax ............................................................................................ 9-4 Abbreviation of command header ................................................................ 9-4 USER MANUAL 750000992/16 ix Artisan Technology Group - Quality Instrumentation ... Guaranteed | (888) 88-SOURCE | www.artisantg.com MTSe Linking commands ..........................................................................................9-4 Parameters ........................................................................................................9-4 Queries ..............................................................................................................9-4 Common part commands .................................................................. 9-5 SRQ commands (IEEE interface only) ..........................................................9-5 Status structure Registers ...............................................................................9-6 Status commands .............................................................................................9-7 System setup commands ................................................................................9-7 Commands relative to the module and the function .................................9-8 Commands relative to the keys .....................................................................9-8 Identification commands for a previous measurement .............................9-9 Next measurement identification commands ...........................................9-10 Remarks in table ............................................................................................9-10 Command relative to the OTDR module ............................................. 9-11 Acquisition commands .................................................................................9-11 Result commands ..........................................................................................9-13 Fiber commands ............................................................................................9-15 Reading of OTDR results commands .........................................................9-16 Commands relative to the OTS modules ...........................................9-19 Power meter set-up .......................................................................................9-19 Power meter reference query .......................................................................9-20 Laser source set-up ........................................................................ 9-20 Reading of OTS results .................................................................................9-21 Commands relative to the WDM module .......................................... 9-23 Configuration OSA ........................................................................................9-23 Reading of OSA results .................................................................................9-25 Maintenance .....................................................................................10-1 Maintenance procedure ................................................................... 10-1 Returning an instrument ..............................................................................10-2 Guarantee conditions ....................................................................................10-2 Cleaning .........................................................................................10-2 Cleaning the front and rear panels and the covers ...................................10-2 Cleaning the screen .......................................................................................10-2 Precautions governing optical connections .......................................10-2 Cleaning the optical cable connector ..........................................................10-3 Cleaning the optical inputs or outputs of the MTSe .................................10-3 Battery replacement ........................................................................ 10-3 Checking the battery .....................................................................................10-3 x USER MANUAL 750000992/16 Artisan Technology Group - Quality Instrumentation ... Guaranteed | (888) 88-SOURCE | www.artisantg.com MTSe Technical specifications .................................................................... 11-1 Mainframe specifications ..................................................................11-1 Display ............................................................................................................ 11-1 Storage ............................................................................................................ 11-1 Input/Output ................................................................................................ 11-2 Internal printer (optional for MTS 5200e only) ......................................... 11-2 Power supply ................................................................................................. 11-2 Environmental conditions ............................................................................ 11-3 OTDR Measurement characteristics .................................................. 11-4 OTS measurement characteristics .................................................... 11-5 Modules, Options and Accessories ................................................... 11-5 OTDR modules .............................................................................................. 11-5 OTS modules available ................................................................................. 11-6 Chassis options ............................................................................................. 11-7 Accessories supplied with the instrument ................................................ 11-7 Other accessories (options) .......................................................................... 11-7 Application software .................................................................................... 11-8 Connectors supplied with the MTSe .......................................................... 11-8 Power meter adapters supplied with the MTSe ........................................ 11-9 Specifications of the OTDR modules ................................................11-10 Wavelength and pulsewidth ..................................................................... 11-10 Laser .............................................................................................................. 11-11 Ranges ........................................................................................................... 11-13 Specifications of the VFL option (OTDR module) .................................. 11-14 Specifications of the OTS modules at 25 °C ...................................... 11-15 Light sources ................................................................................................ 11-15 Multiple Wavelength Power Meter .......................................................... 11-15 Power Meter memory ................................................................................. 11-15 Specifications of the Talkset option (OTS module) ................................ 11-15 Specifications WDM modules ..........................................................11-16 Information about the 5020TF fiber modules .................................... 11-17 Index .................................................................................................. I-1 USER MANUAL 750000992/16 xi Artisan Technology Group - Quality Instrumentation ... Guaranteed | (888) 88-SOURCE | www.artisantg.com MTSe xii USER MANUAL 750000992/16 Artisan Technology Group - Quality Instrumentation ... Guaranteed | (888) 88-SOURCE | www.artisantg.com Chapter Measurement Principles 1 1 This chapter give the principle of measurement : ❏ for OTDR modules ❏ for OTS modules ❏ for the WDM modules OTDR measurements principle Optical time domain reflectometry consists of injecting a light pulse down the optical fiber to be analyzed and observing, at the point of injection, the intensity of the light reflected back in the opposite direction to the pulse propagation. The detected backscattered (or retrodiffusion) signal is a decreasing exponential, to which peaks caused by reflection from fiber connectors, splices or faults are added. Optical fiber End of fiber or a break Reflectometer Relative level (dB) Splice Connection Attenuation between 2 points Attenuation due to splice Attenuation due to the connection Reflectance Distance (km) Typical backscattered trace Measurement result The backscattered signal primarily allows the location of a segment of the fiber to be found on the link. USER MANUAL 750000992/16 1-1 Artisan Technology Group - Quality Instrumentation ... Guaranteed | (888) 88-SOURCE | www.artisantg.com MTSe Measurement Principles The measurement result should provide: • the attenuation • the location of faults in terms of distance from defined point • the attenuation versus distance (dB/km) • the reflectance of an event or an optical link Attention In so far as location is concerned, it should be noted that an OTDR is a time domain machine (Optical Time Domain Reflectometer). Consequently, group velocity must be introduced in order to determine the distance of the location. This is done by introducing the refractive index of the fiber into the instrument. Measurement validity The ITU-T Recommendations G.651 and G.652 state backscatter measurement as the second replacement method for the measurement of attenuation. The cut fiber technique is the reference method. The field of application for backscatter measurement is not limited, but the conditions for application of this method are nevertheless stipulated: • In so far as insertion conditions are concerned, Fresnel reflections should be limited at fiber input. • A high power source (laser) should be used. • Receiver bandwidth should be selected so as to achieve a compromise between pulse rise time and noise level. • Backscatter power should be represented on a logarithmic scale. Reflectance Reflectance is a characteristic allowing the reflection coefficient of a reflecting optical element to be quantified. It is defined as the ratio of the power reflected by the element over the incident power. The reflections are due to variations in refractive index along the fiber optic link, in some Telecom applications. If these reflections are not controlled they may degrade the system performance by perturbing the laser emitter operation (particularly DFB lasers), or, in the case of multiple reflections, generate interference noise in the receiver. The OTDR is particularly suited to reflectance measurements on a fiber link. The amplitude of the generated Fresnel reflection is measured, then the result is converted to reflectance. The conversion formula takes into account: • the amplitude of the reflection measured • the pulsewidth used to measure the reflection’s amplitude (in nanoseconds) 1-2 USER MANUAL 750000992/16 Artisan Technology Group - Quality Instrumentation ... Guaranteed | (888) 88-SOURCE | www.artisantg.com MTSe OTS Measurement principles • the backscattering coefficient of the fiber used. Typical values of backscattering coefficient for a 1ns pulse for a singlemode fiber - 79 dB at 1310 nm - 81 dB at 1550 nm and 1625 nm for a multimode fiber - 70 dB at 850 nm - 75 dB at 1300 nm In order to measure the largest range of reflection coefficient, a variable optical attenuator must be inserted between the OTDR and the link under test. This attenuator allows the level of the curve to be adjusted so that the OTDR is never saturated by the reflection to be measured. OTS Measurement principles Attenuation measurement The attenuation measurement in power of a complete link or elements such as fiber sections, connections, optical components, requires a calibrated laser light source and a power meter. This is generally deducted from the optical power measurement at two points: Calibrated laser light source 2 1 Powermeter Reference fiber Link under test Loss A(dB) = P1 (dBm) - P2 (dBm) Important To make accurate measurements the following conditions are required: • Use a light source that is stable in time and in respect to the temperature. • Verify that the connections, the fibers and the receiving cell are perfectly clean. • Use a reference link between the laser source and the element under test. To make several measurements with the same light injection conditions, the reference fiber must not be disconnected during the measurement period. Two methods are used to measure the fiber optic attenuation: • The cut fiber method • Insertion loss measurement method Cut fiber method 1. The power P1 at the output of the fiber under test is measured, then the fiber is cut approximately two meters from the extremity at the source end. USER MANUAL 750000992/16 1-3 Artisan Technology Group - Quality Instrumentation ... Guaranteed | (888) 88-SOURCE | www.artisantg.com MTSe Measurement Principles 2. The power P2 at the output of the fiber section of two meters is measured and serves as the reference. The attenuation of the fiber tested is: P1 - P2. This method is very accurate but is little used due to its destructive nature. It cannot be used during maintenance or installation but only during the manufacture of the fiber. Insertion loss measurement method 1. The power meter is first connected to the laser source via the reference fiber: P1 is measured. 2. The fiber to test is inserted between the reference fiber and the power meter: P2 is measured. 3. The difference between P2 and P1 gives the attenuation of the fiber under test. It is preferable to use the same type of connector at the extremities of the fiber tested, in order to have the same connection conditions for the P1 and P2 measurements. Although this method is less accurate than the previous method it is the most common because it is non destructive. Measurement accuracy • Very high accuracy is often necessary, It is therefore essential to first make a calibration without the fiber under test to eliminate as much as possible losses due to the connections. To do this use the OTS “reference value” function. • For measurements in a laboratory where the two extremities of the fiber are at the same site the repeatability of the attenuation measurements is better than 0.1 dB. For measurements in the field, with the extremities of the fiber at different sites, the variations between measurements is in the order of ± 0.2 dB (using a relative measurement). Power measurement The measurement of the power transmitted or received only requires a power meter: • To measure the transmitted power, connect the power meter directly to the output of the optical transmitter. To measure the power at the input of an optical receiver, the power meter is connected at the extremity of the fiber, where the optical receiver will be connected. WDM principle and analysis The Wavelength Division Multiplex (WDM) technology is a very effective way to increase the capacity of the fiber without having to install new links. Instead of increasing the data rate, it enables the fiber to carry several wavelengths, each wavelength transmitting signals. Channels are defined by the ITU-T recommendations G-692. 1-4 USER MANUAL 750000992/16 Artisan Technology Group - Quality Instrumentation ... Guaranteed | (888) 88-SOURCE | www.artisantg.com MTSe WDM principle and analysis With this new technology, new measurements are required. During installation and maintenance of WDM systems, it is important to verify the following parameters: 1. Presence of all channels at corresponding wavelengths, without any drift. 2. Right channel power levels, without any power variation 3. Enough signal over noise ratio (SNR). This value is determined by measuring the ratio of the peak channel power to the noise power level of the ASE1 noise signals to the left and/or right of the carrier. Usually, the noise measurement point is chosen as the calculated mid-point between two adjacent channels. The measured noise power level is converted to a standardized bandwidth of 0.1 nm. The most important test equipment for WDM systems able to perform those test is the spectrum analyser. This analyser can be connected along the WDM system on all critical measurement points, located at the extremities of the links or at the amplifier locations. Measurement results The optical spectrum analyser displays a waveform which is showing all the channels. Measured results are presented on a complete spectral analysis and as a WDM table, listing all carriers with their relevant parameters. The optical spectrum analyser is performing automatic detection and measurement for all channels. The number and the composite power are provided like, for each channel: • the wavelength • the spacing • the power level • the signal over noise ratio The total power of the system could also be provided. In order to qualify the amplifier, tilt and slope gain could be calculated. In principle, the amplification shall be flat over the full WDM spectrum. 1. Amplified Spontaneous Emission USER MANUAL 750000992/16 1-5 Artisan Technology Group - Quality Instrumentation ... Guaranteed | (888) 88-SOURCE | www.artisantg.com MTSe Measurement Principles 1-6 USER MANUAL 750000992/16 Artisan Technology Group - Quality Instrumentation ... Guaranteed | (888) 88-SOURCE | www.artisantg.com Chapter 2 Introduction 2 The Acterna 5000 series Media Test Set is a fully modular portable platform designed for the construction, commissioning and maintenance of fiber optic networks. This dedicated cost effective instrument allows testing to be fast and easy. It has the following principle characteristics: ❏ It has a modular design that allows interchangeable modules to be adapted for any present or future fiber optic application requirements. The MTSe modular structure provides the flexibility and upgradeability for it to be the tester of choice for extremely dynamic and rapidly growing telecommunications, CATV and datacom markets. Easy field exchange modules minimize the number of instruments to be carried. ❏ It can contain in a small package, multiple OTDR functions, Fault Locator, WDM analyzers, light source, power meter, VFL (Visual Fault Locator), OTS (Optical Test Set), Talk Set, etc. ❏ Its “RISC” microprocessor coupled with an optimized time base guarantees excellent acquisition and processing speed. ❏ Multitasking allows several operations to be performed at the same time, i.e. acquisition, modification of parameters, file analysis, printing. ❏ Software upgrades are easily achieved using the internal 3" 1/2 floppy disk drive. ❏ The measurement results can be stored in the internal 3 Mb SRAM memory or, as an option, on a hard disk drive (1 Gb) or floppy disk drive. ❏ The measurement tool, printing and file storage in the universal Bellcore GR196-CORE format, simplifies report creation. ❏ The easy to use Man-Machine interface means becoming familiar with the instrument is rapidly achieved. An external keyboard facilitates entry of data. ❏ Its compact rugged box allows the instrument to withstand severe environmental operating conditions. ❏ The MTS 5100e is a mini-OTDR perfectly designed for field use. ❏ The MTS 5200e, although in a very compact unit, is a classic mainframe OTDR providing high level performance and functions, including a built-in printer and IEEE interface. Interchangeable modules The MTSe can be equipped simultaneously with one or two of the following modules: • OTDR singlemode modules: SR, DR, HD, RTU • OTDR multimode modules: MM, ML • WDM modules USER MANUAL 750000992/16 2-1 Artisan Technology Group - Quality Instrumentation ... Guaranteed | (888) 88-SOURCE | www.artisantg.com MTSe Introduction • OTS modules: power meter, light sources and talk set. Measurements The MTSe allows long and short range tests to be made, in singlemode or multimode, on point-to-point or complex optical networks during: • the design and production of the equipment • the installation and qualification of the equipment of the network • the maintenance of the network Les mesures peuvent être réalisées sur des liaisons optiques en service. Measurements can be carried out on in service optical links with the 1625 nm wavelength. Simply pressing the START/STOP button starts or stops a measurement. Setup Pressing the SET-UP key provides access to the MTSe configuration menus: Test setup On the same screen, dialog boxes allow the selection of measurement parameters, the results display and the parameters of the fiber. System setup On the same screen menus provide selection of: • the screen parameters (automatic power off, backlight strength, contrast, welcome message), • the country parameters (date, time, date/time format, length units, language) • the printing parameters: internal (MTS 5200e only) or external printer or copy to file, type of external printer, printing contents (trace or table or both) • the I/O interface parameters : RS 232 or Ethernet (option) or IEEE (MTS 5200e only), connector Centronics for keyboard or printer. For a full description of the system set-up menus see "System setup" on page 3-12. Instrument setup A graphical screen displays all the modules available on the instrument and the user can select the test functions. Only the Laser Source and Power Meter can be simultaneous. When the instrument is switched off, its configuration along with the measurement results are saved. The configuration menus can be displayed and modified during an acquisition or a measurement. Some parameters are inhibited during acquisition. Results After any measurements, the trace and the associated results are displayed. The RESULTS key calls back these trace and results after another display. 2-2 USER MANUAL 750000992/16 Artisan Technology Group - Quality Instrumentation ... Guaranteed | (888) 88-SOURCE | www.artisantg.com MTSe Printing It is possible to print the displayed screen either on an internal (MTS 5200e) or external printer or to create a bitmap (.bmp) type file and store it on a floppy disk. The external printer uses the Centronics port. Epson, Canon or HP compatible printers can be used. Simply press the PRINT button to print the trace displayed or create the file on the floppy disk. Memory The FILE key calls up the file management menu: • to choose the storage medium: internal memory (SRAM or hard disk) or floppy disk; the name and the format of the file; information linked to the data stored in the file. • to store files or to retrieve them in order to carry out selection, copy, or deletion operations; with possibility to store them in directories and subdirectories. USER MANUAL 750000992/16 2-3 Artisan Technology Group - Quality Instrumentation ... Guaranteed | (888) 88-SOURCE | www.artisantg.com MTSe Introduction 2-4 USER MANUAL 750000992/16 Artisan Technology Group - Quality Instrumentation ... Guaranteed | (888) 88-SOURCE | www.artisantg.com Chapter Getting Started 3 3 This chapter explains the operations to carry out to start using the MTSe: ❏ before switching on: unpacking the instrument, installation and removal of a module, charging and installing batteries, connecting an external power supply, connecting the fiber, positioning the unit, connecting the handle or carrying strap. ❏ after switching on: installing new software from a 3.5" floppy disk, configuring the system (date, time, language, etc.). ❏ troubleshooting. Before switching on Unpacking the instrument Remove the MTSe and its accessories from the packing case. Check the presence of all the ordered accessories. If any part is missing or damaged please contact your local representative (see "Wavetek Customer Service Centers" at the end of the manual). The MTSe is delivered with the following accessories: • a user manual. • a battery that must be charged before use. • a mains supply unit to power the instrument from the mains and to charge the batteries. • a carrying strap. • soft carrying case (optional) • hard transit case (optional) Installation and removal of module It is very easy to remove or install a MTSe module. Whatever type of module, it can be installed in either of the two slots available on the rear panel of the instrument. When a slot is empty it is covered with a blanking plate attached with two locking screws similar to those of a module. USER MANUAL 750000992/16 3-1 Artisan Technology Group - Quality Instrumentation ... Guaranteed | (888) 88-SOURCE | www.artisantg.com MTSe Getting Started Module Locking screws MTS 5200e rear view Removal of module Attention The MTSe must be switched off and, if AC powered, the cord must be disconnected. 1. Completely unscrew the two large locking screws of the module. 2. Carefully pull the module backwards to slide it out of its slot. Installation of module Attention The MTSe must be switched off and, if AC powered, the cord must be disconnected. 1. Make sure that the two large locking screws of the module are completely unscrewed. 2. Carefully slide the module back into its slot. 3. Once the module is fully pushed back into its slot, keep pressure applied to the front face while tightening the two locking screws. Important You must fully tighten the screws to their stops. The rear panel of the module should be aligned with the rear panel of the chassis. Positioning of the unit Depending on the working conditions during operation, the MTSe can either be stood on a work top or hand held. In both cases it has several positions. Used on a work top, the MTSe can be positioned: 1. Vertically, when the operator is sitting down 2. Horizontally, if imposed by environmental conditions 3. At 45° using the stand, when the user is standing up. 3-2 USER MANUAL 750000992/16 Artisan Technology Group - Quality Instrumentation ... Guaranteed | (888) 88-SOURCE | www.artisantg.com MTSe Before switching on When the MTSe is being held during use, the support strap should replace the carrying handle. Two positions are available: 1. MTSe held in front, with the strap hanging around the neck of the user. The carrying strap must then be fixed at the upper studs, as shown in the following figure 1. 2. MTSe held at the side, with the strap hanging around neck and under the arm of the user. The carrying strap must then be fixed at one upper and one lower studs, as shown in the following figure 2. 1 2 Possible strap positions Positioning the handle or the carrying strap The handle and straps are attached with metal studs to the sides of the instrument as follows: left side 1- Position the attachment hole in the strap in-line with the attachment stud. left side 2- Rotate the handle through 90° so that it is locked onto the attachment stud. USER MANUAL 750000992/16 3-3 Artisan Technology Group - Quality Instrumentation ... Guaranteed | (888) 88-SOURCE | www.artisantg.com MTSe Getting Started Use the same procedure to attach the opposite end of the handle or strap. The transport handle is attached to two metal studs on the left hand side of the instrument. The strap is attached to both sides of the instrument as follows: • Attached to the top studs on each side of the instrument. In this position, the strap can be used as a carrying strap. It can also, be passed around the users neck, to be used to provide support during hand held operation of the instrument in the field. • Attached to the top right and bottom left studs. In this position the strap can be passed around the neck and under an arm to provide support when the instrument is held at the side. Charging the batteries The battery provided with the MTSe, needs to be fully charged before use. The following instructions are relevant for both a single battery or for two batteries installed in the instrument. The Charge indicator situated below the ON/OFF switch indicates the battery charge state (see "Charge indicator" on page 3-5). Socket for external mains adapter (example with MTS 5100e) To charge the batteries, proceed as follows: Important To efficiently charge the battery, the MTSe screen must be switched off. Connect the mains adapter from the mains supply to the MTSe (see above). The LED Charge switches on : the battery will charge in 2,5 hours (for a battery totally uncharged). Important If the charge of the battery is ≥ 95% (typical), the charge will not start. Once the battery is fully charged the Charge indicator switches off. The mains adapter can be disconnected and the MTSe can be supplied from the battery or 3-4 USER MANUAL 750000992/16 Artisan Technology Group - Quality Instrumentation ... Guaranteed | (888) 88-SOURCE | www.artisantg.com MTSe Before switching on the batteries and mains adapter can be left in place and it is powered from the mains. Important It is imperative to let the battery reach the end of its charge to provide the maximum autonomy. If this is not done this period will be considerably reduced. Important The battery charge indication on the screen is only accurate if a full charge has been performed. Important If you do not intend to use the MTSe for several weeks, it is recommended to remove the batteries to prolong their life and to fully recharge them before use. Attention If the ambient temperature is above safety threshold, the charge is automatically stopped. Battery management On the screen: the presence of one or two batteries is indicated, together with their state of charge. If the instrument is fitted with two batteries, as soon as one of them has discharged, the supply source for the MTSe is automatically switched to the other battery. Autonomy • If the battery has been fully charged, the autonomy reaches up to 8 hours of standard use, with low backlight, according to Bellcore /Telcordia GR-196CORE standard. • If acquisitions are permanently made, with low backlight, the unit can be operated during 3 hours. • If acquisitions are permanently made, with high backlight, the unit can be operated during 2 ½ hours. Charge indicator • If the green LED is on: the instrument is switched off and is being charged from the external source. To install the battery in the instrument, proceed as follows: 1. Under the MTSe, remove the battery compartment door after removing the two attachment screws. USER MANUAL 750000992/16 3-5 Artisan Technology Group - Quality Instrumentation ... Guaranteed | (888) 88-SOURCE | www.artisantg.com MTSe Getting Started Battery Battery compartment Connectors with keyways towards the top Installing the battery (example with MTS 5100e) 2. A keyway on the connector of the battery avoids any connection errors. Position the battery in its compartment, keyway towards the top and push the battery until it connects to its connector. 3. If necessary, repeat the procedure for the second battery. 4. Replace the battery door and tighten the two attachment screws. Important recommendations concerning batteries Nickel-metal hydrid batteries are designed to ensure maximum safety. Each cell includes a resealable pressure relief mechanism (safety vent) to prevent excessive build-up of pressure in the cell in the event it is overcharged or exposed to extremly high temperatures. Attention You must only use the batteries delivered with MTSe. Even though batteries delivered with other electronic equipment may appear identical, they risk damaging MTSe. Attention If you don’t intend using MTSe for several weeks it is recommended that you remove the batteries in order to prolong their life cycle, and to recharge them before re-using them again. 3-6 USER MANUAL 750000992/16 Artisan Technology Group - Quality Instrumentation ... Guaranteed | (888) 88-SOURCE | www.artisantg.com MTSe Before switching on Using MTSe from the mains supply The mains adapter allows the MTSe to be used, while charging the batteries, or during a measurement to save battery life, if a mains supply is available. Attention You must only use the mains adapter supplied with the MTSe. Even though mains adapters delivered with other electronic equipment may appear identical, they risk damaging MTSe. • Connect the adapter to a mains outlet. • On the rear panel of the MTSe, remove the power supply connector blanking cap and connect the cable from the mains adapter. The "AUTO TEST Vx.x" message is displayed on the screen for a short period and the and the On LED is on. Then the On LED flashes : the instrument is ready to be started • To switch on the instrument, press the On button. If the instrument is not switched on and if it contains a battery which needs a charge, the charge will start within 10 seconds max. and the Charge indicator will then be on until the end of the battery charge. Note During battery operation it is possible to change to mains operation without data loss. Note During mains operation it is possible to change to battery operation without data loss. But it is necessary to wait about 3 minutes to have a correct display of the battery charge level. Note When the OFF button is pressed, the current results and configuration are saved. When the On button is pressed they are recalled. Attention If there is a loss of power during operation the current results and configuration are lost. The next time the instrument is switched on, the initial configuration will be used. Connecting the fiber Connect the fiber to the tester as follows: • If necessary remove the dust cap from the optical socket situated on the rear panel of the MTSe • Use a dry air spray to remove any dust from the fiber connector and the optical socket of the MTSe. • If an universal connector is used, verify that the relevant adapter is connected. • Connect the fiber connector to the optical socket of the MTSe. Attention Take care to correctly align the connector to the optical socket otherwise the results obtained by MTSe will be affected by this bad connection. USER MANUAL 750000992/16 3-7 Artisan Technology Group - Quality Instrumentation ... Guaranteed | (888) 88-SOURCE | www.artisantg.com MTSe Getting Started Attention Note Refer to the Maintenance Chapter for all the precautions relative to fiber optic connectors. The connection quality indicator is displayed on the screen when the measurement is started. Switching on/off the MTSe Switching on the MTSe: • Press the ON/OFF button. When operating on battery, an AUTOTEST VX.X message appears on the screen. Then, the display is blank for approximately 2 seconds. Then a self test is carried out. If the MTSe is used from the mains supply, report to page 3-7. The opening screen is displayed showing: - the actual time and date, - the charge level of the battery or the batteries1 or the mains icon - the serial number of the instrument, - the date of the last calibration - the graphic of the MTSe showing the modules and options installed. • If the battery level is too low (less than 10%), then a warning is displayed on the screen. You must store your results and switch off the unit. • If the battery level is below 5%, then a beep occurs periodically. When the battery is too low, the MTSe is automatically switched off with storage of the current configuration. Switching off the MTSe When the MTSe is on, press the ON/OFF button to switch it off. Note When the instrument is switched off, a beep is emitted to indicate that it is possible to restart it. Any attempt to restart it before this beep is emitted, will fail. Reset If the MTSe is blocked, it can be reset by holding down the ON/OFF, button (for about 4 sec.) 1. This battery level does not appear immediatly. A few minutes are necessary to have a correct display of this level. 3-8 USER MANUAL 750000992/16 Artisan Technology Group - Quality Instrumentation ... Guaranteed | (888) 88-SOURCE | www.artisantg.com MTSe After switching on Opening screen example (MTS 5100e) After switching on Installing a new version of the software Attention During the installation of a new version of the software, there is a risk to reset the internal memory. It is therefore recommended, before installing the new software, to make a copy of the traces in memory, using the Copy option of the File manager menu, called by the FILE button. Attention Do not stop the process of software upgrade: you may damage the unit. Attention During the installation the MTSe must be used from the mains supply and not from batteries. New software media The application software is supplied on floppy disks: code 890 110 185/xx. If the actual MTSe boot version is less or equal to 4.51, the new boot needs to be installed. It is then supplied on two floppy disks: code 8901 10186/xx. USER MANUAL 750000992/16 3-9 Artisan Technology Group - Quality Instrumentation ... Guaranteed | (888) 88-SOURCE | www.artisantg.com MTSe Getting Started The user will receive the set of floppy disks he need to upgrade his MTSe. Installation of the boot (if necessary) 1. The MTSe being switched off (AC/DC adapter unplugged), insert the disk 1 of the boot into the floppy disk drive. 2. Plug in the AC/DC adapter. The floppy disk drive will then work and the MTSe will automatically begin to transfer the software from disk 1 to the RAM. The screen is switched on : "Starting file transfert to RAM" ........................... The dots from the left to the right are showing the load in progress. 3. When the following message appears insert disk 2 and hit the OK key. "Insert next boot disk and hit OK when ready.". 4. If the main power is not on, the following message appears : "PLUG-IN EXTERNAL POWER TO CONTINUE". You have to connect this external power supply. It is automatically detected. "Do not remove power before flashing is complete" This message is very important: if you stop the process, the MTSe may be damaged. 5. After the message "Boot flashing has begun" wait for the following message "Boot flashing successful". The boot software is then installed. 6. You can press ON when the MTSe is ready (LED ON flashing) to check it is operating correctly. 7. Switch off the MTSe and unplug the external power before starting to load the application software. Installation of the application software Proceed as follows to install the new software: 1. With the MTSe switched off (AC/DC adapter unplugged), insert the disk 1 into the floppy disk drive. 2. Plug in the AC/DC adapter. The green LED of the floppy disk drive lights up and the MTSe will automatically begin to transfer the software from disk 1 to the RAM. "Starting file transfer to RAM" ........................... The screen is switched on and some dots appear from the left to the right to show the transfer in progress. 3. Insert disk 2 and hit the OK key when the following message appears "Insert next boot disk and hit OK when ready.". 4. Repeat the preceding step, inserting the next disks. 5. Once all the disks have been transferred, the MTSe prompts you to confirm that you wish to update the internal memory with this new software release, by the message: "Current Flash contents will be erased, continue? (Y/N)" 1. this version is displayed when the MTSe is switched on, during the autotest. 3-10 USER MANUAL 750000992/16 Artisan Technology Group - Quality Instrumentation ... Guaranteed | (888) 88-SOURCE | www.artisantg.com MTSe After switching on Press the YES key. "Programming flash memory; in progress": the MTSe then programs its internal memory and starts up the new MTSe software. "Completed" appears then the screen is blank: the software upgrade is completed. The MTSe is ready for use when the LED ON is flashing. 6. Press the ON key to switch it on. Instrument Set up The instrument can be equipped with up to two modules and with several test functions. Before making measurements, it is necessary to select the function or functions required in the Instrument Set-up menu. If a module has been changed, after power up, the unit will directly go to this Instrument Set-up menu. The Talk Set option can be selected even if an OTDR function is selected. OTDR, OSA, VFL and Loss Test Set (Power Meter & Laser Source) functions are exclusive: the selection of one of them will cancel the previous selection. To configure the instrument Press the SET-UP button : the configuration menu is displayed with the last type of configuration defined: Test, System or Instrument. If the configuration menu displayed is not the one required, press the <Instrument Setup> key. The functions of the instrument are graphically displayed : OTDR, OSA, Source, Power Meter or Visual Fault Locator installed according to the modules present in the MTSe. To validate a function: • Use the directional arrows to move to the function icon. • Press the Select button to validate the choice. The icon will then be highlighted (in red with color screen) and the connection to the relevant connector will be displayed. If none of the function is selected • The MTSe is in the OTDR mode if an OTDR module is present, but no acquisition can be made. You can however analyze, store and recall traces. • The MTSe is in the WDM mode if an OSA module is present but no OTDR module. USER MANUAL 750000992/16 3-11 Artisan Technology Group - Quality Instrumentation ... Guaranteed | (888) 88-SOURCE | www.artisantg.com MTSe Getting Started OTDR Function Power meter Function Visual Fault Locator Function* Fault locator Function* Laser Source Function Talk Set Function* Valid the selected Function If VFL selected: Continuous or 1Hz IF Talkset selected call Talk Set commands * (if the option is present) Configuration screen of the instrument (example with MTS 5100e and OTDR and OTS modules) System setup When first using the MTSe or before a measurement session, the system parameters should be configured: • MTSe hardware parameters (contrast, automatic power off, bright or dim screen lighting, , black or white trace background) • country parameters (date, time, date/time format, length units, language) • printer parameters (printer type, copy on file, printer contents) • input/output parameters (remote control, Centronics port allocation). 3-12 USER MANUAL 750000992/16 Artisan Technology Group - Quality Instrumentation ... Guaranteed | (888) 88-SOURCE | www.artisantg.com MTSe After switching on To modify system setup parameters • With the MTSe powered up, press the SET-UP button. The configuration selection keys are displayed on the screen. • Press the <System Setup> menu key. • Use the displacement keys ↑and ↓ to move the cursor to the element to modify. The available values for the parameter selected are displayed on the right. • Use the displacement keys → or ←, to choose the required value. VGA softkey if a VGA screen If a TCP/IP interface System Set-up screen Adjusting the screen contrast (B & W screen only) This adjustment is only available with a B & W or passive color screen (option 5000/PAS). • Press the SET-UP button, then with the <System Setup> key, in the Screen window, move the cursor to Contrast. • Use the → or ← keys to modify the contrast (level from -20 to +20). The contrast remains at the selected level. USER MANUAL 750000992/16 3-13 Artisan Technology Group - Quality Instrumentation ... Guaranteed | (888) 88-SOURCE | www.artisantg.com MTSe Getting Started Choosing the color of the trace background Press the SET-UP button, then press the <System Setup> menu key in the Screen window. Place the cursor on "Trace Background" and then choose either Black or White. If the instrument includes a VGA monitor, then the <VGA> key enables the transfer of information to this screen (see page 4-11). Auto off Note The Auto off function is valid only with battery operation, to preserve battery life. This function automatically powers down the instrument if no action is performed or no key is pressed for the delay selected in this menu, after saving the session underway. • To validate this function, from the Screen window, move the cursor to Auto Off and select the time (5 min. or 15 min.) at which time the instrument will automatically power down if no key is pressed. • To disable this function, from the Screen window, move the cursor to Auto Off and choose the No option. Back-lighting level Press the SET-UP button, then with the <System Setup> key, in the Screen window, move the cursor to Backlight. • Choose the No option to select the normal screen level lighting. • In dim lighting conditions, choose the Always option for the screen to be permanently back-lit. • Choose one of the options 3 min. or 30 sec to have a back-lit screen for the chosen period. This backlight will then be available. Important When the MTSe is operating on battery, it is recommended to select the No or 30s backlight option, in order to maximize the autonomy. Welcome message The Welcome message gives the main possible actions after powering on the unit. 3-14 USER MANUAL 750000992/16 Artisan Technology Group - Quality Instrumentation ... Guaranteed | (888) 88-SOURCE | www.artisantg.com MTSe After switching on Welcome message (example with MTS 5100e) If you don’t want this message at each power on, press the SET-UP button, then with the <System Setup> key, in the Screen window: • move the cursor to Welcome message • select the No option. The Yes option will restore this message at each power on. Setting the time Press the Set-up button, then with the <System Setup> key, in the Country window, move the cursor to the Time option. The Hour and Minute keys are displayed. • Press the → or ← displacement keys to modify the minutes and hours. Setting the date • Press the SET-UP button, then with the <System Setup> key, in the Country window, move the cursor to the Date line. The date is displayed according to the format defined on the following line. • Modify the date using the → or ← displacement keys. Choice of date format • Press the SET-UP button, then with the <System Setup.> key, in the Country window, move the cursor to the Format option. • Choose one of the options dd/mm/yy (day/month/year) or mm/dd/yy (month/day/year) for the required date format. USER MANUAL 750000992/16 3-15 Artisan Technology Group - Quality Instrumentation ... Guaranteed | (888) 88-SOURCE | www.artisantg.com MTSe Getting Started Choice of length (OTDR) or frequency (WDM) unit Press the SET-UP button, then with the <System Setup> key, in the Country window, move the cursor to the Unit option to choose : • kilometers, kfeet or miles for an OTDR trace (MTS with OTDR module). • THz or nm for a WDM spectrum (MTS with WDM module) Choice of language Press the SET-UP button, then with the <System Setup> key, in the Country window, move the cursor to the Language option to choose the required language. Choice of printer In the Printer window move the cursor to Printer to choose one of the options : File save the display to a bitmap file None no printer selected Internal if the 5200 /PR optional internal printer is present (in the MTS 5200e mainframe only). External to use an external printer connected to the Centronics port. Choice of the printing mode This choice is present on the MTS 5200e version, if the internal printer is selected: Normal printing in the direction of the length of the paper roll, consequently the size of the characters provides easier reading than in the following mode. Compress printing across the width of the paper roll (see the examples on page 3-22). Choice of the external printer type If the external printer has been selected in the Printer window, move the cursor to Printer type to choose one of the options: Epson B&W for Epson FX-850 printer type Epson LQ for Epson Stylus color printer type Canon BJC70LQ for Canon BJ 30, Canon BJC 70 and Canon BJ200exprinter types Canon BJC240 LQ for Canon BJC 240 printer type HP for HP Deskjet 500, 510, 520, 540, 560, 660C, 690C, 895 Cxi and HP Laserjet 3, 4, 5, 6J printer types. DPU 411 for Seiko DPU 411 printers 3-16 USER MANUAL 750000992/16 Artisan Technology Group - Quality Instrumentation ... Guaranteed | (888) 88-SOURCE | www.artisantg.com MTSe After switching on Choice of the content of the copy (on internal or external printer) In the Printer window move the cursor to Printer Contents to choose one of the options: Trace copy of the trace only together with the header (not available with OTS module). Table copy of the table only together with the header Trace + Table copy of the trace and the table together with the header (not available with OTS module). Screen copy of the screen. Report on page 3-22 to see examples of printing for each options. I/O Interfaces Remote access line : IEEE : (for the MTS 5200e mainframe only, if it is equipped with the IEEE optional interface) Press the IEEE key to select the IEEE address RS 232 Press the RS 232 key to select the parameters: Baud rate: 300, 600, 1200, 2400, 4800, 9600, 19200, 38400, 57600 or 115200 Protocol: None, Xon/Xoff, Rts/Cts Parity: None, Even, Odd Data bits: 7 or 8 bits Stop bits: 1 or 2 bits Terminator: CR, LF or CR/LF See chapter chapter 9 for more information. TCP/ETH (if the option is available) Press the <I/O conf> key and select the configuration parameters (IP address, IP mask and IP gateway). See "Connection via the Ethernet interface" on page 9-2. TCP/PPP this function settle the communication between the hard disk of the OTDR and the PC via a modem. The WS-FTP PRO software (ref 5996/MTS) is used to download the data from the MTSe to the PC. See the user manual of this software. The <Init Modem> key allows to initialize the modem connected to the MTSe. See "Connection via a modem" on page 9-2. On the Centronics line, choose the peripheral connected to the Centronics connector: printer or keyboard. USER MANUAL 750000992/16 3-17 Artisan Technology Group - Quality Instrumentation ... Guaranteed | (888) 88-SOURCE | www.artisantg.com MTSe Getting Started Help The HELP key allows to access to an electronic manual : 1. a first press on the HELP key display the presentation and configuration of the MTSe. 2. a second press on the HELP key calls the electronic manual. Help contents • The left windows gives the list of the heading. Select the heading using the "↑" and "↓" directional arrows. • The right window gives the contents of the selected rubric. To scroll this window, press the "→", then the "↑" and "↓" directional arrow. Printing To allow you to keep a copy of the results as a record, you can, at any moment, dump the display to: • the internal printer (if version MTS 5200e), • an external printer • or to a file that is stored on a floppy disk in the internal disk drive. To print stored files report to page 3-27. You select where you require to print the data in the SYSTEM SETUP menu. Copying to the internal printer Use the following procedure to print on the internal printer of the MTS 5200e: 3-18 USER MANUAL 750000992/16 Artisan Technology Group - Quality Instrumentation ... Guaranteed | (888) 88-SOURCE | www.artisantg.com MTSe Printing Make sure the printer has paper (see "Loading a new roll of paper" on page 3-26). Attention 1. Press the SETUP key, then the <System setup> softkey and select the internal printer. 2. On the "Printer contents" line, select to print either only the trace or only the table, or both trace + table or the screen. 3. If the Screen option is selected, display the data you wish to print. 4. Press the PRINT key. The selected copy of the screen is printed. If there is no print on the paper, check if the roll of paper has been placed in the printer on the right side (see page 3-26) as only one face of the thermal paper can be printed. Attention A header containing the mains acquisition parameters will be printed (see the following table). Header A header including the following informations is printed to the top of the copy . Table 1: Example of header for OTDR results Instrument parameters e MTS 5200 , 101, 1.27 Module: SI7926HD, 150, Instrument used for the acquisition, serial number, software version. Identification of the module installed in the OTDR during the acquisition (type, serial number). File parameters Trace Title Operator Cable Id. Origin location End Location Direction Filename of the trace if it has been loaded from memory storage device. Title of the trace Operator name Identification name for the cable Name entered for the origin of the fiber Name entered for the end of the fiber Direction of the measurement (origin to end or end to origin) Acquisition parameters Measurement Date Laser Pulse USER MANUAL 750000992/16 Date and time the measurement was made Wavelength of the laser used to make the measurement Pulsewidth used to make the measurement 3-19 Artisan Technology Group - Quality Instrumentation ... Guaranteed | (888) 88-SOURCE | www.artisantg.com MTSe Getting Started Table 1: Example of header for OTDR results Range Resolution Averaging Fiber Number Fiber parameters Index Scatter Coeff. Range used for the measurement Space between measurement points Number of seconds of averaging for the measurement Fiber number Index of the fiber Back scattering coefficient of the fiber Result parameters Splice Threshold Reflec. Threshold Slope Threshold Display Ghosts Fiber End Threshold Launch cable Threshold for splice display. Threshold for reflective event display. Threshold used to display the slope. Selection of ghost display. Threshold used to detect the end of the fiber. Location of the end of launch cable (see page 5-4) Table 2: Example of header for WDM results Instrument parameters e MTS 5200 , 865, 3.22 Module: 5071 WDM, 280, Instrument used for the acquisition, serial number, software version. Identification of the module (type, serial number). Trace Filename of the trace if it has been loaded from memory storage device. Title of the trace Operator name Identification name for the cable Name entered for the origin of the fiber Name entered for the end of the fiber Identification name for the test point File parameters Title Operator Cable Id. Origin End Test point Fiber number Comments Acquisition parameters Measurement Date Laser 3-20 Date and time the measurement was made Wavelength of the laser used to make the measurement USER MANUAL 750000992/16 Artisan Technology Group - Quality Instrumentation ... Guaranteed | (888) 88-SOURCE | www.artisantg.com MTSe Printing Table 2: Example of header for WDM results Frequency Resolution Averaging Threshold S/N Distance Noise Acqu BW High sensitivity Channel detection USER MANUAL 750000992/16 Frequency range in THz Filter resolution Number of seconds of averaging for the measurement Threshold used to detect the channels Distance between the channel peak and the reference point for the noise Reference bandwidth used for noise acquisition Power scale range Detection reference 3-21 Artisan Technology Group - Quality Instrumentation ... Guaranteed | (888) 88-SOURCE | www.artisantg.com MTSe Getting Started Examples of OTDR print out The following examples concern the 4 possibilities given in the menu <System setup>, on the line Printer/Print Contents: print of the trace only, the table only, the trace and the table, the screen. Example of printed "Trace" 3-22 USER MANUAL 750000992/16 Artisan Technology Group - Quality Instrumentation ... Guaranteed | (888) 88-SOURCE | www.artisantg.com MTSe Printing Example of printed "Table" USER MANUAL 750000992/16 3-23 Artisan Technology Group - Quality Instrumentation ... Guaranteed | (888) 88-SOURCE | www.artisantg.com MTSe Getting Started Example of printed "Trace + Table" 3-24 USER MANUAL 750000992/16 Artisan Technology Group - Quality Instrumentation ... Guaranteed | (888) 88-SOURCE | www.artisantg.com MTSe Printing Example of hardcopy USER MANUAL 750000992/16 3-25 Artisan Technology Group - Quality Instrumentation ... Guaranteed | (888) 88-SOURCE | www.artisantg.com MTSe Getting Started Loading a new roll of paper Attention The paper rolls must be stored in a cool, dry and shaded place. see reference on page 11-7. An internal device detects the end of the roll and triggers display of "No paper". Also a red line is marked on the paper, beginning approximately 1 meter from the end of the roll. • On any new roll of paper remove the adhesive and cut back at least one turn of paper from the beginning of the roll to eliminate all traces of glue which could damage the print head. • Remove the protective cover of the printer below the instrument by undoing the two thumbscrews. The paper feed path, marked on the printer itself, is given below: Paper blocking lever Rear panel Paper feed path • Push the lever up • Position the new roll of paper and feed the paper by hand following the path indicated below, until it comes out of the rear panel. • Push the lever down. • Reposition the printer cover and secure it by tightening the two thumbscrews. Coping to an external printer To do this you must first connect a compatible printer to the Centronics connector on the rear panel of the MTSe. External Printer configuration Use the following procedure to set the correct printer configuration. In the SYSTEM SETUP menu: 1. Select the option External in the Printer windows. 2. Select the printer used on the line Printer type : see "Choice of the external printer type" on page 3-16. 3-26 USER MANUAL 750000992/16 Artisan Technology Group - Quality Instrumentation ... Guaranteed | (888) 88-SOURCE | www.artisantg.com MTSe Visual fault locator function 3. On the Printer contents line, select to print either the trace, or the table, or both trace + table or to make an hardcopy of the screen. 4. In the I/O interface windows, line Centronics, select the Printer option. Printing on an external printer Use the following procedure to print on an external printer: 1. Display the data you wish to print on the screen. 2. Press the PRINT key. The selected copy of the screen is printed on the external printer. The same header as for the internal printer is printed (see "Header" on page 3-19). Copying to a file on a floppy disk You can dump the displayed screen as a graphic file to include it in reports using many popular desktop publishing software packages. Use the following procedure to copy to a file on a floppy disk: Attention Make sure FILE is selected for PRINTER in the SYSTEM SETUP menu (see "Choice of printer" on page 3-16). Use the following procedure to copy to a file on a floppy disk: 1. Press the FILE key and select the Media : Floppy disk, the File naming: Manual or Auto (see "Filename" on page 8-2), and the file format (see "File format" on page 8-11). 2. Display the screen you wish to copy. 3. Press the PRINT key. A copy of the screen is saved on the floppy disk in the selected format and with the selected file name. Attention If you create several consecutive files on the same disk you must enter a new name before each press of print or the same file will be used and its contents replaced each time. Only the last screen copied is saved if you do not change or increment the file name each time. Visual fault locator function This VFL option available in the OTDR module, allows transmission of a visible red light (continuous or at 1 Hz) in a fiber, in order to find faults in the OTDR deadzone or to identify fibers. When the VFL function is selected in the Instrument Setup menu, a softkey allows the choice between the CW or 1 Hz transmission. USER MANUAL 750000992/16 3-27 Artisan Technology Group - Quality Instrumentation ... Guaranteed | (888) 88-SOURCE | www.artisantg.com MTSe Getting Started Optical Talk Set Function This function is available as an option with the OTS modules. It consists of a headset and microphone. It allows two users situated at each extremity of an optical link to communicate. Each extremity of the link must be equipped with a combined Laser source/ Power meter: • two MTSe, each equipped with an OTS module with the Talk Set option. • an MTSe (equipped with an OTS module with the Talk Set option) and an OTS type 7940X (with Talk Set option). The Talk Set function can be in three states: • not selected (the icon shaded). • selected but not active (icon light with headset light): the standby mode, ready to receive a transmission. • selected and active (icon light with headset dark): communication has been established. Establishing communication 1. At each extremity of the fiber: • Connect the Laser source of one of the OTS to the Power meter of the other and vice versa, with the aid of two jumpers or two optical links. • Plug the headset plug into the corresponding socket on the rear panel of the OTS module. 2. If the instrument calling is an MTSe, press the SET-UP key and validate the Talk Set function from the Instrument Configuration menu (see page 3-12). • the Talk Set icon becomes light with the headset light. • The icon appears at the top of the screen. • A message is sent to the other extremity of the fiber and an audio signal is given from the receiving instrument. 3. If remote instrument is ready to receive a communication (in standby), it transmits a validation signal to the calling instrument. • The MTSe Talk Set icon becomes light with the headset dark. • Telephonic communication can be established. • Press the <Talk Set> then the <Volume ++> or <Volume - -> keys to adjust the earpiece output level. 4. If the remote instrument is not ready to receive a communication (Talk Set function not validated): the icon remains light with the headset light. It becomes light with the headset dark as soon as the correspondent calls. 5. At the end of the communication, on the MTSe, press the <Select> key to disable the Talk Set function. The icon is displayed shaded. Note 3-28 The Talk Set function can be used during OTDR measurements. If this function is validated at the same time as the OTDR module, it is possible to call a correspondent during an acquisition. USER MANUAL 750000992/16 Artisan Technology Group - Quality Instrumentation ... Guaranteed | (888) 88-SOURCE | www.artisantg.com MTSe Introducing a user logo Specific key functions when the Talk Set is active Pressing the <Talk Set> key calls the following keys: <Com. Laser>Toggles the transmitted signal wavelength between 1550 and 1310 nm. This key is also available in the standby state. A 1550 nm wave length provides communication of greater distances than a 1310 nm wavelength. <Volume ++> and <Volume - - > Adjust the ear piece volume. <Ringing> Causes an audio signal to be transmitted from the distant instrument with which you wish to establish communication. <EXIT> Returns to the configuration keys. Introducing a user logo The Wavetek logo that appears by default in the help windows and in the headers of printouts can be replaced with the user’s logo. Conditions Dimensions of user’s logo The user’s logo must have the following dimensions: Height ≤ 40 pixels Width ≤ 400 pixels (this dimension must be a multiple of 8) Height x width ≤ 8000 Format of user’s logo Bitmap 16 colors. Configuration of MTSe The MTSe must be equipped with a floppy disk drive. Method of integrating a logo On the PC, using a "Paint" type drawing application: • create a file at the dimensions of the new logo. Modify it if necessary to meet the conditions above. • save the file as a bmp format file, type "Bitmap 16 colors". • copy the logo file onto the floppy disk On the MTSe : • insert the floppy disk • press the FILE key and find the file corresponding to the logo (see "Finding files" on page 8-18). • press the <Load logo> key. USER MANUAL 750000992/16 3-29 Artisan Technology Group - Quality Instrumentation ... Guaranteed | (888) 88-SOURCE | www.artisantg.com MTSe Getting Started • the new logo appears on the screen: it will now replace the previous logo on the help pages obtained by pressing the HELP button. It will also be present in headers of the printouts. Note It is possible that the colors selected on the PC are not the colors displayed on the MTSe. It is then recommended to integrate a logo in black & white. Troubleshooting Nothing happens when the ON/OFF switch is pressed. Make sure that the internal battery is installed or that the mains adapter is connected. You are using the MTSe normally when it suddenly switches off. The instrument may be configured to automatically switch off after five minutes of inactivity to preserve battery life (see "Auto off" on page 3-14). The MTSe injection level indicator shows a bad connection. Clean the MTSe optical socket with dry air. Clean the input connector of the fiber under test. The charge is not working (i.e. the charge LED does not switch on when the unit is AC powered and is off. There is no battery in the unit or the battery has a good level of charge. 3-30 USER MANUAL 750000992/16 Artisan Technology Group - Quality Instrumentation ... Guaranteed | (888) 88-SOURCE | www.artisantg.com Chapter 4 MTSe Controls 4 This chapter describes the MTSe commands: ❏ Front panel commands: buttons, softkeys, screen, etc … ❏ Rear panel commands: connectors (power, RS 232, Centronics), disk drive, optical connector. Note The MTSe is a multi-tasking instrument: the user can simultaneously make an acquisition, modify the configuration parameters, print the results and access an internal memory directory or floppy disk directory. Front panel The MTSe front panel contains the controls, display and the indications necessary to analyze the measurement: • the display and, to the right, the associated softkeys. • the ON/OFF switch and the On and battery charge leds. • the direct access keys: HELP to call the on-line help pages, PRINT for all printing operations, FILE for all file storage and management, START/STOP to execution measurements, and the “Run” indicator to show that a measurement is underway, RESULTS for all measurement analysis operations • the Run led flashing when the laser is on. • directional arrow keys USER MANUAL 750000992/16 . 4-1 Artisan Technology Group - Quality Instrumentation ... Guaranteed | (888) 88-SOURCE | www.artisantg.com MTSe Controls MTSe Display screen Charge On On Off Help Print File Results Run Softkeys Set-up Start Stop ↑ ←→ ↓ Front Panel Display screen and softkeys The MTSe is equipped with a large display screen that provides excellent resolution and that can also be backlit: • either an 8.4 inch TFT color screen (option 5000/COL) • or an 8 inch passive color (option 5000/PAS) or B/W screen with adjustable contrast. 4-2 USER MANUAL 750000992/16 Artisan Technology Group - Quality Instrumentation ... Guaranteed | (888) 88-SOURCE | www.artisantg.com MTSe Front panel Horizontal line localisating the display part of the trace with respect to the complete trace. Positions of the cursors are represented by little vertical lines. Acquisition parameters used: type of module, exact wavelength at 25°C (nm) pulsewidth, index of refraction (IR), fiber number N, way, time and date of the start acquisition Icon representing the actual function : printing, copy on floppy disk, etc... Battery(ies) charge level or mains power icon Title of the displayed trace Event number A and B cursor position, A-B cursor delta distance, slope and attenuation difference between two cursors. X&Y scales Lock marker icon Actual time Range indicated after >> Measurement results. Actual function of softkeys Example of OTDR trace display results Any operation or programming errors are signaled by a message on the screen. Help information can be called at any time by pressing the HELP key. USER MANUAL 750000992/16 4-3 Artisan Technology Group - Quality Instrumentation ... Guaranteed | (888) 88-SOURCE | www.artisantg.com MTSe Controls MTSe Directional arrow keys The directional arrow keys have two principle functions: • on the result page, they are used to position zoom and move the cursor. • on the setup pages, they are used to scroll though the menus. Control keys The six keys on the screen provide the following functions: START STOP This START STOP key has two functions. With OTDR module: - The START function starts an acquisition in accordance with the chosen parameters. When the key is pressed and held a real time acquisition is made. The red “RUN” indicator flashes during the measurement. The results of the measurement are displayed on the screen at the end of the acquisition. - The STOP function interrupts the acquisition underway. SET-UP The SET-UP key calls a menu which provides access to the following configuration options: - Test Set up to configure the measurement parameters. - System Set up to configure the system parameters (display, date, language, printing, etc …). - Instrument Set up to configure the instrument (choice of the module or modules to use). RESULTS The RESULTS key displays the result (OTDR trace or table) and allows the measurement to be analyzed. FILE The FILE key calls the file management menu to save, recall or delete files from the internal storage media (SRAM or hard disk) or the floppy disk. PRINT The Print key starts a printout of the screen or the chosen selection on the printer configured for the instrument. HELP Calls the Welcome page giving the main possible actions. A second press on this key calls the electronic manual (see "Help" on page 3-18) Laser activity indicator The red LED Run flashes the laser is transmitting. 4-4 USER MANUAL 750000992/16 Artisan Technology Group - Quality Instrumentation ... Guaranteed | (888) 88-SOURCE | www.artisantg.com MTSe Configuration menus Configuration menus • All the configuration menus are accessible from one another by pressing on the corresponding key. • The configuration menu can be displayed and modified during an acquisition or measurement. The parameters that cannot be modified are dimmed. The menu provides all the possible options with the exception of the numerical values. • To move from one parameter to another use the "↑" and "↓" directional arrows. Once a parameter is selected its values are displayed to the right of the parameter. • To modify the value of a parameter, use the "<" and ">" directional arrows to highlight the option chosen. • A message at the bottom of the screen indicates how to modify the parameter. • To leave a configuration menu, the user can press any of the keys located below the screen or the <EXIT> softkey. Editing1 In the configuration menus it is sometimes necessary to enter alpha-numeric information for names of files, results or for remarks. To call the following menu, press the <EDIT> key. 1. When an external keyboard is used (see "Use of the external keyboard" on page 4-7) USER MANUAL 750000992/16 4-5 Artisan Technology Group - Quality Instrumentation ... Guaranteed | (888) 88-SOURCE | www.artisantg.com MTSe Controls MTSe Edition menu This menu contains: • in the central window, the list of characters available (which can be understood by the DOS system) and, in the upper part of this window, the text to modify or the text that is being entered. • on the left side, the keys: <Valid. Char.> to select the character under the cursor. <Delete Char.> to delete the character under the cursor. <No Caps/Caps> to change the chosen characters from uppercase to lowercase and vice versa. • on the word, an underscore indicates what character is selected. To enter text: • Press the <No Caps/Caps> key, to change the characters proposed from uppercase to lowercase and vice versa if necessary. This option is not valid for the file name which are always in capital letters. • Using the directional arrows position the cursor on the first letter required. • Press the <Valid. Char.> key. • The character appears in the upper frame. • Repeat the above steps for the following characters 4-6 USER MANUAL 750000992/16 Artisan Technology Group - Quality Instrumentation ... Guaranteed | (888) 88-SOURCE | www.artisantg.com MTSe Editing To delete a character in a text: • Position the cursor on the character • Press the <Del Char.> key Repeatedly pressing this key deletes the proceeding characters. To insert characters in the text: • Position the cursor on the character proceeding the point you want to enter text. • Position the cursor on the character you want to insert. • Press the <Valid. Char.> key • Repeat the above steps to insert the following characters. Leaving the Edit menu • Press the <Exit> key or any hard key. Note If a file name is being edited only valid DOS characters are accepted. Use of the external keyboard The external keyboard (option 5000/keyb) facilitates data entry for set up, file naming and comments, and for remarks in the table of results. Keyboard connection • Connect the keyboard to the Centronics connector of the MTSe. • Using the SET UP / System Setup keys, access the Interface I/O setup menu. • On line Centronics, choose the option Keyboard. Note The keyboard must be connected to the MTSe before selection in the menu. If the keyboard is used, it is not possible to use an external printer. Equivalence between external keyboard and MTSe keyboard Althrough the external keyboard is mainly intended to stand in for the MTSe editing menu, it can replace all the MTSe keys except the ON/OFF key. • Softkeys at the right side of the screen are replaced by the function keys F1 to F6. • Hard keys below the screen are equivalent at Ctrl followed by the first character of the key (except for the Setup key equivalent to Ctrl U). • The arrow keys have the same function on the external keyboard and on the MTSe (except for the comment edition in the File menu). USER MANUAL 750000992/16 4-7 Artisan Technology Group - Quality Instrumentation ... Guaranteed | (888) 88-SOURCE | www.artisantg.com MTSe Controls MTSe Editing a text from the external keyboard Function External keyboard Help Ctrl + H Print Ctrl + P File Ctrl + F Results Ctrl + R Start/Stop Ctrl + S Set-Up Ctrl + U ← ↑ → ↓ ← ↑ → ↓ Softkey 1 to 6 (from top to bottom) F1 → F6 Exit Enter Abort Escape To edit a title or an identification in the setup menu or a remark in the table of results, using the external keyboard : • press Enter to open the edition menu. • enter the text • press Enter to quit the editing menu • The ESC key allows to quit the editing menu without recording the text Edition of a comment in the File menu • • • • • • • Move down the cursor to the Comments windows Press enter to open the Edition menu edit the text (3 lines of 18 characters max.) press enter to go to the next line use the ↑ and ↓ keys to go from on line to the next or the preceding on the third line, press enter to quit the editing menu and store the text. Press the Esc key to quit the editing menu without storing the text. Rear panel The rear panel contains the following elements: • the mains power adapter socket for charging the batteries, • the floppy disk drive (optional) • the RS 232 connector • the Centronics connector for the external printer or keyboard connection • the optical module or modules 4-8 USER MANUAL 750000992/16 Artisan Technology Group - Quality Instrumentation ... Guaranteed | (888) 88-SOURCE | www.artisantg.com MTSe Rear panel On the MTS 5200e only, if the corresponding options are present : • the internal printer • the connector IEEE VFL output (option) Connector for 12 V mains adapter Optical connector RS 232 connector IEEE connector Interchangeable modules (OTDRs in this example) Floppy disk drive (option) Internal printer MTS 5200e Centronics (printer / keyboard) Computer display output only Example of rear panel configuration (MTS 5200e with IEEE and internal printer options) Fiber connector The optical connector is used to connect the MTSe to the fiber you wish to test. The connector is protected with a dust cap which should remain in place when the fiber is not connected. Floppy disk drive (option) The floppy disk drive is a 3.5 inch, 1,44 Mb, high density (HD), MSDOS format unit. The floppy disk drive enables: • the installation of new MTSe software versions. • the storage of trace and measurement result files for use at a later date. USER MANUAL 750000992/16 4-9 Artisan Technology Group - Quality Instrumentation ... Guaranteed | (888) 88-SOURCE | www.artisantg.com MTSe Controls MTSe Serial port (RS 232) A 9 pin serial connector (RS232 DTE) allows a direct connection to a modem for programmed operation. 5 9 MTSe pin 1 2 3 4 5 6 7 8 9 1 6 Port RS232 Attention Function Input/output ← ← → → → ← → ← DCD RxD TxD DTR GND DSR RTS CTS In the case of a connection to a computer (PC for example) which has also a DTE behavior, use a cord inverting pins 2 and 3, 4 and 5, 8 and 9. It can be necessary to use a male/femelle adapter. Parallel port (Centronics) 25 pin connector (Centronics) allowing the connection of an external centronics printer or a keyboard. MTSe pin 1 2 3 4 5 6 7 8 9 10 11 12 13 14 15 16 17 18-25 4-10 Printer pin 1 2 2 2 2 2 2 2 2 10 11 12 13 14 32 31 36 19-31 Line name STROBE D0 D1 D2 D3 D4 D5 D6 D7 ACK BUSY PE SLCT AUTO FEED -ERROR INIT SLCT IN GND USER MANUAL 750000992/16 Artisan Technology Group - Quality Instrumentation ... Guaranteed | (888) 88-SOURCE | www.artisantg.com MTSe Rear panel IEEE port Optional, for MTS 5200e mainframe only: 24 pin parallel port allowing the connection to a controller. Reference of the option: 5200/IEEE. Computer display output Optional, for MTS 5200e mainframe with color TFT display only: 15 pin port allowing the connection to a projector or a monitor. Reference of the option: 5200/VGA When a monitor or a projector is connected, press the key <VGA> in the menu SET-UP / System Setup to switch to the VGA display. USER MANUAL 750000992/16 4-11 Artisan Technology Group - Quality Instrumentation ... Guaranteed | (888) 88-SOURCE | www.artisantg.com MTSe Controls 4-12 MTSe USER MANUAL 750000992/16 Artisan Technology Group - Quality Instrumentation ... Guaranteed | (888) 88-SOURCE | www.artisantg.com Chapter 5 Using an OTDR module 5 This chapter describes the different steps required to make a measurement: ❏ The configuration of the acquisition (manual, auto, etc.) and the acquisition parameters. ❏ The choice of the results to display. ❏ The start of measurement (acquisition) ❏ The analysis of the results (events, table of results). ❏ Automatic measurements (detection and measurement). ❏ Semi-automatic measurements (by addition of markers) ❏ Manual measurements. ❏ Both end measurements. ❏ Fault locator mode ❏ Macro. OTDR Test SET-UP* To set up the OTDR and then make a measurement of the fiber under test the following parameters need to be configured: ❏ Acquisition parameters: Laser wavelength, Acquisition mode, Pulsewidth, Range, Acquisition time, Resolution. All these parameters are configured from the Acquisition menu of the OTDR Test Setup window. ❏ Measurement result display parameters: Splice threshold, Reflectance threshold, Slope threshold, Display ghosts, Slope measurement method, Display results on trace (with or without launch cable), Display notes in table. All these parameters are configured from the Result menu of the OTDR TEST SETUP window. ❏ Fiber parameters: Wavelength, Reflective Index, Section A_B, Backscattering coefficient. All these parameters are configured from the Fiber Parameters menu of the OTDR TEST SETUP window. ❏ Trace identification information: Trace Title, Operator name, Cable identifier, Fiber number, File number auto-incrementing, Origin location, End location, Measurement direction. *. if an OTDR module is installed USER MANUAL 750000992/16 5-1 Artisan Technology Group - Quality Instrumentation ... Guaranteed | (888) 88-SOURCE | www.artisantg.com MTSe Using an OTDR module All these parameters are configured from the Identifiers menu of the File Manager window and can be entered before or after the acquisition. To select the required acquisition, you must call the OTDR TEST SETUP window measurement result display parameters and fiber parameters, pressing the <SET-UP> button. If either the SYSTEM or INSTRUMENT SETUP windows are already displayed press directly the <Test Setup> key. Automatic test setup With Both end measurements OTDR TEST SETUP window In these windows, the selected parameter is high-lighted or in a different color. Select this parameter using the ↓ and ↑ directional arrows. 5-2 USER MANUAL 750000992/16 Artisan Technology Group - Quality Instrumentation ... Guaranteed | (888) 88-SOURCE | www.artisantg.com MTSe OTDR Test SET-UP The available choices are displayed on the screen; these depend on the chosen function. Make the required choice with the ← and → directional arrows. Selecting measurement acquisition parameters You can choose the following measurement acquisition parameters, from the Acquisition menu of the ODTR TEST SETUP window, regardless of the type of measurement made on the trace: Laser Choose the wavelength for multi-lambda modules: the values provided depend on the modules installed. All: each acquisition is made on all the available wavelengths. Mode Choose the acquisition mode: Manual. Auto: the unit will automatically configure the best acquisition parameters according to the fiber under test. Pulse Depending on the modules. See Technical specifications chapter 9. Range Depending on the modules. See Technical specifications chapter 9. The range you can select depends on the pulse width you select. The range values you can select for each pulsewidth are given in section "Ranges" on page 11-13. Resolution from 4 cm to 160 m according to the module. No measurement sampling. The available values depend on the Range and on the Acq. time selected. AUTO : the resolution is automatically chosen depending on the Range and Acq. time parameters. Acq. Time From 5 s. to 10 mn This acquisition period is used for real time or averaged acquisition. For example, if 1 minute is selected and a real time acquisition is performed, the real time period will be 1 minute. Test Auto The key <Test Auto> sets the following parameters: • Acquisition parameters Laser All Mode Auto Resolution Auto • File parameters (see page 8-1) Autostore Yes Fiber Num Increment Yes File naming Auto USER MANUAL 750000992/16 5-3 Artisan Technology Group - Quality Instrumentation ... Guaranteed | (888) 88-SOURCE | www.artisantg.com MTSe Using an OTDR module Selecting measurement result display parameters You can choose the following measurement result display parameters from the Result menu of the OTDR TEST SETUP window: Splice threshold: Selection between: ALL, NONE or any value in dB between 0 and 6.00 in 0.01 dB steps. Factory default value: ALL Reflec. threshold: Selection between: ALL, NONE or any value in dB between -11 and -99 in 1 dB steps. Factory default value: ALL Slope threshold: Selection between: ALL, NONE or any value in dB/km between 0 and 2.00 in 0.01 dB/km steps. Factory default value: >0.10 dB/km Note If after a measurement, no results are displayed on the trace, make sure that the ALL parameter has been selected in the display options. Fiber end threshold It is advised to choose the AUTO option (factory default option) for which the end of fiber is automatically detected. The MANUAL option allows to select a specific threshold for the fiber end detection, from 3 to 15 dB using the «<« and «>» arrows keys. Display Ghosts Note Choose whether (yes or no) to display ghost informations. If ghosts are displayed: the reflection icon is shown dotted in the result table, the reflection value is shown between parentheses on the trace; e.g. “(R:-50dB)”. Factory default value: yes. Ghosts are only detected during an automatic measurement. Slope Method Choose between measurement methods: linear regression (LSA) or two point. Factory default value: LSA Launch Cable Choose to display in the event table, the results referenced to the launch cable. - No: all the results are displayed and the reference is the origin of the fiber. - Marker 1, 2 or 3: results are referenced from the marker (1, 2 or 3 selected using the «<« end and «>» keys). This marker is considered as the «end of launch cable" and is the reference for loss and distance measurements. Factory default value: No. 5-4 USER MANUAL 750000992/16 Artisan Technology Group - Quality Instrumentation ... Guaranteed | (888) 88-SOURCE | www.artisantg.com MTSe OTDR Test SET-UP Results on trace Choose to display: None: the trace only All: the trace with results and markers Graphics only: the trace with markers only. Factory default value: All. Remarks in table Selection of the display of notes in the table (see "Notes in table" on page 5-19) None: no additional display Note: display of notes entered by the user Uncertainties: displaying of notes entered by the user and confidence indicators for the result measurements. Factory default value: None. To call the factory default values of the Results parameters, press the <Factory Default> softkey. Selecting measurement result display parameters for both end measurement In the case of both end measurements (see "OTDR TEST SETUP window" on page 5-2 : • some parameters are not available. They are replaced with: Dist. Spacing Th. Selection of the distance spacing threshold between two markers (one on the E-O trace, the other on the O-E trace). If their spacing exceeds the threshold, the markers are considered as referring to separate events. This threshold is expressed in percentage of the length of the section before the event. Splice Alarm Th. Selection of the splice alarm threshold. If the average loss results exceeds this threshold, it will be displayed in red in the table of results. • The parameter Launch Cable is replaced by the two parameters Launch Cable O-> E and Launch Cable E -> O allowing to choose a marker End of fiber for each direction. Selecting fiber parameters You can choose the following fiber parameters from the Fiber Parameters menu of the OTDR TEST SETUP window: Wavelength: Choose the type of fiber wavelength for which the fiber parameters will be defined from the following values:, 850 nm MM, 1300 nm MM, 1310 nm SM, 1550 nm SM and 1625 nm SM Index: Choose the group index N of the total fiber. Selecting a given index will modify the A_B distance. - either select the index from 1.30000 to 1.70000 using the "<" and ">" arrows keys. USER MANUAL 750000992/16 5-5 Artisan Technology Group - Quality Instrumentation ... Guaranteed | (888) 88-SOURCE | www.artisantg.com MTSe Using an OTDR module - or select a predefined value : press the <Preset Index> softkey and select (using the «<«and «>» arrows keys) one of the cable. See in the following table the index for each cable type. Once a cable has been selected, press the <Confirm Index> softkey to validate it. Wavelength (nm) 850 1300 Corning 62.5/125 Corning 50/125 SpecTran 62.5/ 125 Litespec SpecTran SM Lucent Truewave Fitel (Furukawa) Corning SMF-LS Corning SMF-DS Corning LEAF Corning SMF-28 ATT SM 1.50140 1.48970 1.49600 1.49660 1.48560 1.49100 1310 1550 1625 1.46600 1.46750 1.47380 1.47000 1.47100 1.47180 1.46890 1.46750 1.46600 1.46700 1.46810 1.47320 1.47000 1.47000 1.47110 1.46840 1.46810 1.46700 1.46700 1.46810 1.47320 1.47000 1.47000 1.47110 1.46840 1.46810 1.46700 Preset index values Section A_B: Enable the index N calibration, the distance between the cursors A and B being known. Selecting this known distance will display the index of the fiber. The limits of the distance are given by the index (1.30000 to 1.70000). Scatter Coeff.: Choose the backscattered coefficient K from -99 dB to -50 dB in 0.1 dB steps. Modification of K modifies the reflectance and ORL measurements. The default values are given in "Reflectance" on page 1-2. Acquisition The MTSe provides three distinct methods of making an acquisition: ❏ A real-time mode, when the MTSe makes up to 10 acquisitions per second and displays the resulting trace on the screen along with a connection status indicator. ❏ A rapid automatic mode that allows you to make an acquisition with an automatic configuration process using the minimum of key strokes. 5-6 USER MANUAL 750000992/16 Artisan Technology Group - Quality Instrumentation ... Guaranteed | (888) 88-SOURCE | www.artisantg.com MTSe Acquisition ❏ A manual acquisition mode that lets you configure your acquisition parameters exactly for the fiber you wish to test. After any acquisition (except in real time mode), an automatic measurement is performed. With multi-wavelength modules, the acquisition can be started automatically on all the wavelenghts, each time the START button is pushed. Note For battery operation, the module will go into sleep mode if no acquisition is made within two minutes. A message "powering up in process" appears for few seconds at the next acquisition. The presence of traffic in the fiber under test is automatically detected (see "Detection of traffic" on page 5-13. Real-time mode To make an acquisition in real-time mode you must first configure all the acquisition parameters you require and then press and hold the START STOP key for more than one second. A real-time mode acquisition cannot be used to make accurate measurements, because of the high noise level, but is invaluable for quickly optimizing the connections and observing the fiber while it is being manipulated. 1. Use the following procedure to configure the acquisition parameters you require for the fiber and the test: • Either select the Acquisition parameters you require in the OTDR TEST SETUP window (see "Manual acquisition mode" on page 5-11). • Or press the SET-UP button to have a direct access to: - the parameters : wavelength, pulse, range, resolution. - the change to average mode. 2. Press and hold for more than one second the START STOP key to start the real-time acquisition. The red RUN LED comes on to indicate a real-time acquisition is underway and the screen shows the acquired trace in real-time mode. A connection condition indicator is also displayed on the screen to indicate the status of the fiber connection, GOOD or BAD. Note If the connection is not good, verify and clean the connector. Note A message "Low injection level, check your connection" is displayed in real time/ average mode, when the injection level measured is lower than a third of the max. level. Connection quality indicator The connection quality indicator readings provide the following connection status information: Status Good Connection condition A good connection. USER MANUAL 750000992/16 5-7 Artisan Technology Group - Quality Instrumentation ... Guaranteed | (888) 88-SOURCE | www.artisantg.com MTSe Using an OTDR module Status Bad Connection condition Indicates one of the following cases: There are several connectors close to the front end connector. One of the connectors is dirty or badly connected. You must re-connect or change the pigtail. There is no fiber connected. For a bad connection condition you can make measurements but very poor detection results should be expected. Real-time display The following illustration shows an example of an acquired trace in real-time mode. Acquired trace in real-time mode To stop or interrupt the real-time mode acquisition, press the START STOP key a second time. While the MTSe is operating in real-time mode, you cannot modify any of the acquisition parameters, the wavelength or select an overlay trace. You can only make reference and cursor measurements while in the real-time mode but once the acquisition is stopped, automatic measurements can be performed. 5-8 USER MANUAL 750000992/16 Artisan Technology Group - Quality Instrumentation ... Guaranteed | (888) 88-SOURCE | www.artisantg.com MTSe Acquisition Automatic acquisition mode The simplest way to quickly use the MTSe to detect any faults on your fiber optic link is to make use of the automatic acquisition function that is provided. This function allows you to automatically configure the MTSe to use the optimum acquisition parameters (pulsewidth and range) for the link under test with respect to the selected time. Once the acquisition has been made the automatic measurement mode displays all the detected events on the acquired trace. With the trace displayed you then use the powerful analysis functions to quickly identify any faults on the fiber. Only two measurement configuration parameters need to be set : the laser wavelength (if a multi-wavelength module is used) and the required maximum acquisition time. Note In automatic mode, all the parameters being reconfigured, overlay and marker functions are not possible when the acquisition is performed. Setting up the automatic acquisition configuration In the OTDR TEST SETUP window: 1. Select the Laser wavelength with the Acquisition:Laser option. 2. Select the Auto (Automatic) mode with the Acquisition:Mode option. 3. Select the acquisition period (5 seconds to 10 minutes) with the Acquisition:Acq. Time option. Acquisition in auto-configuration mode When you press the press the START STOP key, the MTSe first executes an automatic configuration phase which is designed to allow the instrument to automatically configure the optimum parameters to be used for the acquisition. To do this, the MTSe executes a three phase automatic configuration process: • Phase 1: Gives an indication of the quality of the connection (refer to "Connection quality indicator" on page 5-7). • Phase 2: Chooses the best range to see all of the fiber under test. • Phase 3: Chooses the pulsewidth required to accurately qualify the link i.e. gives the best resolution possible for a given dynamic range. Note The pulsewidth depends on the maximum acquisition time selected. • Phase 4 : averaging is realized. Averaged time and number of averages are displayed. At the end of the acquisition time, the automatic measurement is performed. USER MANUAL 750000992/16 5-9 Artisan Technology Group - Quality Instrumentation ... Guaranteed | (888) 88-SOURCE | www.artisantg.com MTSe Using an OTDR module Start Auto-Configuration Chose range Short Detected Range Medium Long Choose pulse: Auto select: - Pulsewidth - Range Acquisition for: MAX ACQ TIME Auto-Configuration Process 5-10 USER MANUAL 750000992/16 Artisan Technology Group - Quality Instrumentation ... Guaranteed | (888) 88-SOURCE | www.artisantg.com MTSe Acquisition Acquisition time in progress Number of averaging Acquisition measurement progress display You can push the <START STOP> key at any time to stop the acquisition measurement. If you do this, an automatic measurement is realized but certain events may not be detected because the instrument will not have made the required number of averages for an optimum measurement. Once the auto-configuration phase has been completed, the parameters are automatically updated in the Acquisition menu. Note Attention The Auto-configuration mode invalidates the "lock markers" function (see "Locking markers" on page 5-27): the measurement is then re-initialized. Manual acquisition mode The manual acquisition mode makes a fixed number of averages depending on the maximum acquisition time specified in the menu Acq. Time parameter field and then stops the acquisition. The acquisition is performed using the previously selected Acquisition menu parameters. The acquisition can be stopped at any time with the <START STOP> key. USER MANUAL 750000992/16 5-11 Artisan Technology Group - Quality Instrumentation ... Guaranteed | (888) 88-SOURCE | www.artisantg.com MTSe Using an OTDR module Use the following procedure to configure your manual acquisition in the OTDR TEST SETUP window (refer to "Selecting measurement acquisition parameters" on page 5-3): 1. Select the Laser wavelength with the Acquisition:Laser option. 2. Select the Manual mode with the Acquisition:Mode option. 3. Select the required pulsewidth with the Acquisition:Pulse option. 4. Select the Range you require, from the options available for the length of fiber you wish to test, Acquisition:Range option. 5. Select the Resolution value you require with the Acquisition:Resolution option. 6. Select the acquisition period (5 seconds to 10 minutes) with the Acquisition:Acq. Time option. 7. Press the START STOP key to start the acquisition. The red laser activity LED is on to indicate that the MTSe is making an acquisition and the screen shows the acquisition of the trace as it is made. The quality of the connection is shown for a few seconds and an acquisition status indicator is also displayed on the screen to indicate the time remaining to complete the acquisition. Acquisition in progress display 8. At the end of the acquisition the acquired trace is displayed on the screen, and an automatic measurement is performed. 5-12 USER MANUAL 750000992/16 Artisan Technology Group - Quality Instrumentation ... Guaranteed | (888) 88-SOURCE | www.artisantg.com MTSe Note Acquisition You can push the START STOP key at any time to stop the acquisition measurement. If you do this, an automatic measurement is realized but certain events may not be detected because the instrument will not have made the required number of averages for an optimum measurement. Case of the multi-wavelength acquisition With a multi-wavelength module, to start the acquisition on each wavelength: • In the Test Set-up menu, on the Laser line, select All. • Start the manual ou automatic acquisition pressing the START button. During the acquisition an icon in the upper bar shows that the acquisition is made on each wavelength. The several traces are displayed in the same windows and can be used as in the overlay trace mode (see "Overlay trace function" on page 5-28). Multi-acquisition icon Example of acquisition on two wavelength Detection of traffic If the fiber connected to the MTSe for analysis is active, no measurement is possible. The MTSe is fitted with a traffic detector which, in this case, displays a message indicating the presence of a signal in the fiber being tested. You must then: USER MANUAL 750000992/16 5-13 Artisan Technology Group - Quality Instrumentation ... Guaranteed | (888) 88-SOURCE | www.artisantg.com MTSe Using an OTDR module • Stop the measurement. • Disconnect the source sending out the signals in the fiber or disconnect the network fiber. • Restart the measurement. Result analysis Once you have completed an acquisition, Results are displayed to allow you to analyze the resulting trace. Report on page 4-3 to see an example of OTDR Trace result display and its description. The following functions are provided to make the analysis: • Display functions: Cursor, Zoom and Shift of trace (horizontal and vertical) • Analysis functions: Events, Addition of markers and Event Table • Expert functions: Trace Overlay, Manual measurements, Free and Lock markers, Delete measurement results and perform an automatic measurement. Using the cursors The cursor function allows you to position the A and B cursors on the trace, to position or remove markers on the trace. Using the cursors in combination with the Slope, Splice and ORL functions lets you make individual measurements of any events on the acquired trace. The cursors are represented as vertical axes: - the selected cursor(s) is (are) a plain line - the non-selected cursor is a dashed line. Use the following procedures to use the cursor functions: Cursors positioning/shift When a trace is displayed on the screen, a key allows selection of the A or B cursor or the selection of both cursors. The selected cursors are shown with a plain line. Use the < and > direction arrows to move the cursor (or the cursors) on the trace. The window displays the following values below the trace: • the distance of each cursor from the origin • the distance between the two cursors • the slope between the two cursors • the attenuation between the two cursors When one of the cursors goes off the screen, a horizontal shift is performed. Use the ↑ and ↓ keys to make a vertical shift. If a cursor is off the screen when you select it, as soon as you start to move it, it will appear at the edge of the screen nearest to its last location. 5-14 USER MANUAL 750000992/16 Artisan Technology Group - Quality Instrumentation ... Guaranteed | (888) 88-SOURCE | www.artisantg.com MTSe Zoom and shift functions Zoom and shift functions Zoom function The Zoom function allows you to analyze a detected event in greater detail. Using the Zoom function in combination with the Event function allows you to quickly verify any uncertain events. The zoom of the display is made around the selected cursor. If <Cursor AB> was selected the zoom is made at the mid point between the cursors. The position of the displayed part of the trace with respect of the complete trace is located by a (grey or yellow) line on the top of the trace window. The cursors are represented by small vertical dot on it. To gain access to the zoom function: • Select a cursor and put it at the point of the trace to verify • Press the <Shift> key in order to display Zoom • Use the "<" and ">" keys to zoom in and out. Note To reset the zoom and see the full trace, press and hold simultaneously the "<" and ">" keys. Successive zooms on each event • Zoom in on one of the event. • Press the <Event> key. • Use the "<" and ">" keys to move successively the display window on each event. Shift function The Shift function allows you to shift the trace on the screen using the arrow keys. The Shift is centered on the intersection between the selected cursor and the trace. This allows to scroll horizontally the trace on the screen, following vertically the trace, thus maintaining the trace in the screen. To gain access to the shift function: • Select eventually a zoom level. • Press the <Zoom> key in order to display Shift. • Use the arrow keys to shift the trace in the chosen direction. Events Event display criteria The Event function of the MTSe is an invaluable tool for quickly positioning the cursor on detected events that have been measured and have their results displayed on the screen. USER MANUAL 750000992/16 5-15 Artisan Technology Group - Quality Instrumentation ... Guaranteed | (888) 88-SOURCE | www.artisantg.com MTSe Using an OTDR module Once you have made an acquisition and have results, you can simply press the Event key to move the cursor from event to event. Using this function in combination with the ZOOM and CURSOR keys allows you to rapidly analyze the fiber. When moving from one event to another, the zoom value is retained (except if this is not possible). Notes In order to display all the events, verify that the thresholds are set to ALL in the TEST SET UP menu. In order to display the results on the trace, verify that the Results on trace option is activated in the TEST SET UP menu. The display of an event depends on the selected attenuation and reflectance thresholds. It will be displayed if either of these values is above a threshold given in the TEST SET UP menu (refer to "Selecting measurement acquisition parameters" on page 5-3). Both results for an event will be displayed if both can be calculated. The following table lists examples of faults displayed for various attenuation and reflectance thresholds. Ex. Thresholds set MTSe will display a value if the attenuation or the reflectance has the following values Attn. Refl. Attenuation Reflectance 1 0.05 dB - 60 dB > 0.05 dB > - 60 dBa 2 1 dB - 15 dB > 1 dB ≥ - 15 dBb 3 6 dB --- > 6 dB a. example: a - 43 dB value will be displayed. b. example: a - 14 dB value will be displayed but a - 20 dB value would not be displayed. The event reflectance is always measured unless all the elements of the event cannot be measured, e.g. Peak saturation or an event lost in noise. In such cases instead of giving the exact calculated reflectance value e.g. -30 dB, MTSe displays > - 30 dB to indicate that the reflectance is worse than -30 dB. The display of a slope depends on the selected slope thresholds. It will be displayed if the value is above a given threshold in the TEST SET UP menu (refer to "Selecting measurement result display parameters" on page 5-4). The following is an example of only hunting for all splice events that produce a loss of greater than 0.05 dB. • Select the different thresholds of the events to be detected by pressing the SET UP key. • Use the RESULTS key followed by the <Event> key to quickly move to each event that results in an attenuation greater than 0.05 dB. Two point relative measurements can be made using the <Event> key in conjunction with the two cursors. This enables you for example to analyze the loss budget of a link which has a launch cable. 1. Position one of the cursors at the end of the launch cable. 2. Select the other cursor. 5-16 USER MANUAL 750000992/16 Artisan Technology Group - Quality Instrumentation ... Guaranteed | (888) 88-SOURCE | www.artisantg.com MTSe Table of results 3. Use the <Event> key. The measurements given are the true distance from the beginning of the link, and the attenuation of the link plus the attenuation of the connection. This function may also be used to determine the loss budget for a partial section of the fiber under test. The <Event> key is directly linked to the Table of Results which is described below. Table of results Two types of tables of results are available with the MTSe: • A single line table below the full trace display giving the type and characteristics of the event nearest the current cursor on the trace. • A eight line table listing the events around the current cursor. The event line nearest the cursor is highlighted. The highlighted line is updated if you move the cursor or select the next/previous event. Notes In order to display all the events, verify that the thresholds are set to ALL in the TEST SET UP menu. In order to display the results on the trace, verify that the Results on trace option is activated in the TEST SET UP menu. To see this table, in the Results window, press the <Table> key. To scroll the table if it has more than 7 lines, either move the cursor, or press the <Event> key then the ↑ or ↓ keys. Note Each event is identified on the trace by an order number. USER MANUAL 750000992/16 5-17 Artisan Technology Group - Quality Instrumentation ... Guaranteed | (888) 88-SOURCE | www.artisantg.com MTSe Using an OTDR module Table of results To return to the display of only one line of the table, press the <Trace> key. Information given for each type of event detected • the type of event with its associated event number: Non-reflective event (e.g. a splice). Reflective event (e.g. a connection). Reflective ghost. Slope of the fiber (when no fault follows the slope). End of the fiber. ORL measurement Global ORL measurement 5-18 USER MANUAL 750000992/16 Artisan Technology Group - Quality Instrumentation ... Guaranteed | (888) 88-SOURCE | www.artisantg.com MTSe Table of results Event marker when a measurement cannot be made. If an added event is too close of an existing event, this icon appears on the trace and on the table for the second event, but no measurement is made : a manual measurement is necessary to have results for this event. End of launch cable: losses and distances are referenced from this marker. • The distance from the beginning of the fiber to the event, given in meters (kfeet or miles). • The attenuation loss of the event causes, given in dB. • The event reflectance, if any, in dB (or ORL if an ORL measurement has been performed). • The slope value before the event. • The section length, between the event marker and the previous marker. • The total loss budget of the trace given in dB. The Event Result Table is totally interactive and reflects the actual measurements that you make. Whenever you carry out an operation on the acquired trace the Event Result Table is immediately updated to show the result of the operation you made. When a reflective event is saturated, the maximum value is displayed with a > sign. This indicates that the real reflectance is greater than the given value (e.g. >29.5 dB means that the reflectance could be -18 dB). When the Results on trace is activated in the TEST SET UP menu, the loss, reflectance and slope measurements are shown on the trace. The reflectance of a ghost event is displayed in brackets on the trace. Notes in table To each event: • a note (40 characters max) can be associated. • an uncertainty indicator concerning the displayed result They are displayed in the table, below the event line, if they are validated in the "Test Setup" menu of the "Result", in the Remarks in Table option. Notes For each wavelength, a maximum of 16 notes are possible. For each note 40 characters can be entered. When uncertainties are validated, only the first 17 characters will be displayed or printed. Note Each note is associated to an event. So, if this event is erased, the note will be erased too. To enter a note: • in the table, choose the event • press the <Expert> key USER MANUAL 750000992/16 5-19 Artisan Technology Group - Quality Instrumentation ... Guaranteed | (888) 88-SOURCE | www.artisantg.com MTSe Using an OTDR module • press the <Notes table> key and select the Notes option • enter the note in the Edit menu. • press the <Exit > key. The user can display indicators in the result table to evaluate the uncertainty about the result. This function must be validated from the Test Setup menu, in the Result window with the Remarks in table option. Indication of the level of confidence in result table The following remarks are possible: Indication of the level of confidence in result table Concerning loss measurements 2c manual Result of a manual measurement between the reference and the cursor, “two cursor” method. 5c manual Result of a manual measurement according to the “five cursor” method. Global The loss displayed is the global result for Fresnels that are not sufficiently separated. Close evts Several events being too close, only the attenuation of the last is displayed. Concerning slope measurements Few points Slope measurement using the linear regression method not using many acquisition points. 2 points Slope measurement using the “two point” method. Automatic detection and measurement The automatic measurement performed at the end of the acquisition allows you to quickly detect all the events on the trace. All the detected events are then measured and displayed with automatic event markers. Then only the measurement results, or a table of results, are displayed for any of the events that are above the thresholds set in the OTDR TEST SET UP menu. The results are also displayed on the trace if the Results on trace option of the OTDR TEST SET UP menu is selected. 5-20 USER MANUAL 750000992/16 Artisan Technology Group - Quality Instrumentation ... Guaranteed | (888) 88-SOURCE | www.artisantg.com MTSe Note Addition of markers If only automatic measurements are to be made, verify that the lock marker function is not activated (i.e. icon not shown in the title bar of the display). Using this method of detection and measurement allows you to rapidly find all the events on the fiber under test. If an automatic measurement does not detect all the events, additional manual measurements can be made. To delete all the markers, select <Expert> followed by <Delete Results>. When no measurements have been made, if you want to make an automatic measurement, select <Expert> followed by <Auto measure>. The following measurement sequence is recommended: 1. Full automatic measurement. The instrument automatically locates and measures the events. 2. Addition of markers (in the case of low loss splices and close events). In this case, the MTSe automatically measures the slopes before and after the selected markers and measures the splice losses. 3. Addition of manual measurements if necessary (in the case of very close events). The MTSe follows the user measurements. All previous measurements are retained. Note If you only want to perform automatic measurements when a measurement is already in place: 1. Press the <Expert> key. 2. Press the <Delete results> key. 3. Press the <Auto Measure> key. Addition of markers When performing measurements, it is recommended to use the following configuration: • set thresholds to All in the TEST SET UP menu. • set Results on trace to YES in the TEST SET UP menu. You can manually position event markers anywhere on the trace where you want to make specific measurements using the automatic measurement mode with markers. You can also specify locations where you want to position additional markers to those automatically placed during an automatic measurement. You can then use the automatic measurement mode with markers to display the results of all measurements made using the combination of these markers. Display of markers Markers are represented by : • if they are placed by automatic measurements or with the <Marker> key. • if they are placed by manual measurements in Expert mode. USER MANUAL 750000992/16 5-21 Artisan Technology Group - Quality Instrumentation ... Guaranteed | (888) 88-SOURCE | www.artisantg.com MTSe Using an OTDR module Adding markers To add event markers: 1. Select a cursor. 2. Use the positioning arrows to move the cursor to the position where you want to add a marker. 3. Press the <Marker> key. 4. An event marker is displayed at the cursor location and a full measurement is immediately performed. The slope before the marker will start just after the previous marker (or the front end dead zone), and the slope after the marker will end just before the next marker or the end of fiber. Warning about markers Note Do not add markers (with the marker key) after manual measurements, because this will convert automatically all the manual measurements. Note If two markers are too close, they appear on the trace and on the table but no measurement is made for the second marker. In this case a manual measurement is necessary to have results for both markers. Note There are two sets of markers: one for 1550 nm, the other for 1310 nm. Markers defined for 1550 nm will not be used at 1310 nm and vice versa. Important If the <Marker> key is pressed when the cursor is very close to an existing marker, this marker will be deleted. Deleting markers To delete a marker, position the cursor on the marker and press the <Marker> key. The selected marker is deleted and a full measurement without the marker is immediately performed. To delete several successive markers, use the <Event> key to go to the first marker and press the <Marker> key as many times as necessary to delete the markers. The cursor will be positioned automatically on successive markers. Deleting markers may lead to incorrect measurements. Addition of manual measurements Once you have made an acquisition with or without an automatic measurement you can add manual measurements of any events on the trace using the cursors in conjunction with the splice, slope and ORL functions. Whenever manual measurements are made, it is recommended to set to ALL the result thresholds, and to activate the Results on trace option in the OTDR Test Setup window. The manual measurements are controlled with the <Manual> key accessible from the Results page, after pressing the <Expert> key. 5-22 USER MANUAL 750000992/16 Artisan Technology Group - Quality Instrumentation ... Guaranteed | (888) 88-SOURCE | www.artisantg.com MTSe Addition of manual measurements Making Slope measurements To make a manual slope measurement: • Press the RESULTS button to call the trace. • Position the A cursor at the start of the section of the trace where you wish to measure the slope. • Position the B cursor at the end of the section. • Successively press the <Expert>, then <Manual>, then <Slope> keys. The specified fiber section’s slope is measured. Slope measurement results The result is displayed on the screen between the slope identifiers [ ]. The measurement results are also available in the event result table and can be displayed by pressing the <Table> key, if it is not already displayed (after pressing the <Exit> key to leave the Expert functions) : • under distance is given the distance between the beginning of the trace and the end of the slope; • under section is given the distance between the previous marker (if no marker : between the beginning of the link) and the end of the slope. This section is not the distance between the two slope identifiers [ ]. In this case Distance = Section (distance between the beginning of the link and the end of the slope) Slope measurement USER MANUAL 750000992/16 5-23 Artisan Technology Group - Quality Instrumentation ... Guaranteed | (888) 88-SOURCE | www.artisantg.com MTSe Using an OTDR module If no result is displayed If no result is displayed this can be due to: • the display slope measurement result threshold is higher than the slope you are trying to measure, • the Slope Threshold option in the OTDR Test Setup menu, is set to NO slope display. • the distance between A and B is too short. To delete a slope measurement To delete an individual slope measurement result, superpose the A and B cursors on the concerned slope and press the <Slope> key. Making splice and reflectance measurements There are two methods of making manual splice measurements on the trace: the two cursor method and the five cursor method. The five cursor method is the most accurate, because it takes into account the difference in level between the slope before the splice and the slope after the splice. It is recommended to always use this method if possible. If a slope measurement cannot be made, due to very close events where the dead zone does not permit a slope measurement, the two cursor method should be used. The two cursor method takes into account the difference in levels between the cursors. Before making either type of measurement, set the display splice and slope measurement result thresholds you require with the Splice Threshold and Slope Threshold options (All is recommended) in the OTDR Test Setup window. You should also enable the Results on trace option. Two cursor method To make a two cursor splice measurement, press the <Result> key: 1. Position cursor A exactly at the position of the fault and the cursor B after the splice you want to define. Select the A/B cursor. 2. Successively press the <Expert>, then <Manual>, then <Splice> keys. The splice event marker is positioned at the point defined by the first (left) cursor and the result is displayed on the screen. If the event is reflective, the reflectance value is also measured and displayed. These results are also shown in the event result table. Important To perform a two cursor splice measurement always use the cursor A/B. If no result is displayed this is due to: the display splice measurement result threshold being higher than the splice you are trying to measure, the threshold is set to NO splice display, or the Results on trace function being disabled. Important 5-24 If you try to measure a splice on a slope, the measurement is not carried out and the “slope found in region between two cursors” error message is displayed. USER MANUAL 750000992/16 Artisan Technology Group - Quality Instrumentation ... Guaranteed | (888) 88-SOURCE | www.artisantg.com MTSe Addition of manual measurements Two cursor splice measurement result Five cursor method To make a five cursor splice measurement: 1. Measure the slopes that precede and follow the fault to be measured using the slope function. 2. Position the cursor at a point between the two slopes (at the location of the fault). Attention Select cursor A or B, do not select the cursor A/B or a 2 cursor splice measurement will be performed. USER MANUAL 750000992/16 5-25 Artisan Technology Group - Quality Instrumentation ... Guaranteed | (888) 88-SOURCE | www.artisantg.com MTSe Using an OTDR module Five cursor splice measurement result 3. Successively press the <Expert>, then <Manual>, then <Splice> keys. The splice event marker is positioned at the point defined by the cursor and the result is displayed on the trace and in the event result table. Important To perform a five cursor splice measurement, when the <Splice> key is pressed, either the A or B cursor must be selected, NOT the cursor A/B. Note If no result is displayed this is due to: the display splice measurement result threshold being higher than the splice you are trying to measure, the threshold is set to NO splice display, or the Results on trace function being disabled. If you try to measure a splice on a slope, the measurement is not carried out and the “slope found in region between two cursors” error message is displayed. Note Manual ORL measurement The ORL can be measured for a section of the fiber. Use the following procedure to measure a section of the trace: 1. Position the A and B cursors to define the section you want to measure. 2. Successively press the <Expert>, then <Manual>, then <ORL> keys. 5-26 USER MANUAL 750000992/16 Artisan Technology Group - Quality Instrumentation ... Guaranteed | (888) 88-SOURCE | www.artisantg.com MTSe Locking markers The ORL is measured for the section of the trace defined and the result indicator shows the ORL in dB in the table of results and on the trace. ORL measurement result ORL on a saturated trace When events are saturated, then the ORL value is given with a < sign. This means that the real ORL is less than the value displayed. Locking markers To lock the markers in order to repeat exactly the same measurement on a future acquisition or another trace, press the <Expert> key then the <Lock markers> key. The lock marker icon is displayed in the display title bar. The locked markers will then be used to realize the next measurements either at the end of the acquisition or when recalling a trace. Note This function locks markers placed by the automatic measurements, the <Marker> key and measurement markers added manually (<Manual> key). USER MANUAL 750000992/16 5-27 Artisan Technology Group - Quality Instrumentation ... Guaranteed | (888) 88-SOURCE | www.artisantg.com MTSe Using an OTDR module Recommended sequence The following sequence is recommended: 1. Make an automatic measurement 2. add markers using the <Marker> key. 3. add required manual measurements (<Expert> / <Manual> key) Attention If a marker is added using the <Marker> key, after performing manual measurements, then all markers on the trace ( . AUTO and MANUAL) will be converted to AUTO markers and an automatic measurement will be made using these manual markers. Previous slope results will be lost, 2 point measurements will be recalculated. Whenever the lock markers icon is displayed, the automatic measurement following an acquisition is executed using the markers that were present before the acquisition. If you only want to make a measurement without markers, press the <Free Markers> key to deselect the lock markers option. Overlay trace function The Overlay Trace allows you to have up to 4 traces on the screen at the same time. This function is very useful : • for comparing traces acquired from several fibers in the same cable, • for comparing traces from the same fiber over a period of time or at different wavelengths. • for comparing traces resulting of measurements made in both directions of the fiber (see "Both End Measurement" on page 5-32) In order to do this, the instrument is equipped with an overlay memory where the trace files to be overlaid can be stored. These traces can be: • the current trace, for comparison with traces of new acquisitions. • traces stored on a floppy disk or internal memory, for comparison with the current trace. Overlay conditions When traces have been set in the overlay memory, if an acquisition is made with acquisition parameters compatible with the overlay trace (pulsewidth and range), the acquired trace will remain on the screen to allow the comparison with the stored traces. 5-28 USER MANUAL 750000992/16 Artisan Technology Group - Quality Instrumentation ... Guaranteed | (888) 88-SOURCE | www.artisantg.com MTSe Overlay trace function Example : overlay of 3 traces Transferring stored traces to the overlay memory To display up to 4 traces originating from the memory, with the erasing of the current trace or the traces already loaded, do as follows: • Find the file as described in the section "Finding files" on page 8-18. • Press the <Load> key. • Press the <Main+Overlays> key : as the traces are loaded, they progressively disappear from the file list. • At the end of the loading, the Results screen is displayed: the first trace selected is the active trace (green on a colored screen), the other traces being overlaid. Display of overlaid traces • Traces are of different colors (the active trace is green). • The name of the displayed traces is on the top of the screen, the same color as the trace ( the active trace name is in square brackets). • The markers are located: - on the active trace by the usual symbol - on the other traces by vertical dash. USER MANUAL 750000992/16 , 5-29 Artisan Technology Group - Quality Instrumentation ... Guaranteed | (888) 88-SOURCE | www.artisantg.com MTSe Using an OTDR module Adding overlay traces With one or more traces already displayed, you can add other traces to the display (up to 4 traces on the screen at the same time can be displayed). To do this: • Press the FILE key, and then in the Memory menu select the trace files to be added (see "Selection of several files" on page 8-18). • Press the <Load> key. • Press the <Add Overlay> key: as the traces are loaded, they progressively disappear from the file list. • At the end of the loading, the Results screen is displayed: the new traces are displayed superimposed with the already existant traces. Note If the number of selected files is above the allowed total of traces to be displayed, then a message indicating that only a partial load will be carried out: only the first selected traces of the authorised total of 4 will be displayed. Overlaying the current trace To copy the current trace in overlay memory use the following procedure: • With the current trace displayed on the screen, press the <Expert> then <Overlay> key, then on <New>. The current trace is stored in the overlay memory: it is shown dimmed (or, with a color screen, in a different color) and it is automatically shifted above the new trace. • It is possible to start a new acquisition. Overlaying the current trace Press the <New> key to copy the current trace in the overlay memory. Note In the case of Multi-trace display with a multi-wavelength acquisition, pressing the <New> key removes all the displayed traces leaving an available space for new acquisitions. Swapping overlay traces Measurements can only be made on the trace that is active and not on overlay traces. To make a measurement on an overlay trace you must swap it with the active trace. To do so, press the <Swap> key. Removing traces To remove a displayed trace, you must first make it active (see previous section), then press the <Remove> key. 5-30 USER MANUAL 750000992/16 Artisan Technology Group - Quality Instrumentation ... Guaranteed | (888) 88-SOURCE | www.artisantg.com MTSe Overlay trace function Shifting traces Manual shift of the current trace To vertically shift the active trace while the overlaid traces remain at their original position, select the Cursor mode, then use the ↑ or ↓ arrow key. Manual shift of all the traces To simultaneously shift the displayed traces, select the Shift mode, then use the ↑ and ↓ arrow keys. Automatic shift of the traces This vertical shift is made according to the active cursor location on the current trace. A key in the Expert/Overlay menu, allows the following choice: Cursor Active trace Y Scale Exact Y Reset Y Scale Shift 1 Div. 1 Div. Y reset Focus the display on the active trace and adjust the overlaid traces at the cursor-current trace intersection point. Y Scale Shift Impose a vertical shift of one division between the traces at the level of the cursor Y Scale Exact Remove any Y shifts: the traces are at their exact position. Exiting the overlay menu To exit the overlay menu, press the <Exit> key. USER MANUAL 750000992/16 5-31 Artisan Technology Group - Quality Instrumentation ... Guaranteed | (888) 88-SOURCE | www.artisantg.com MTSe Using an OTDR module Both End Measurement The Both End measurement function allows the results of measurements made in both directions of the fiber (Origin to End or End to Origin) to be used to obtain more accurate splice and connector loss results. Measurement Principles The Both End measurement function uses the Trace Overlay function "Overlay trace function" on page 5-28. The traces obtained form the two measurements (one in each direction) are displayed with event markers. They are first displayed superimposed, then one of them is inverted (left ↔ right), in order that the markers associated to the same events are on the same horizontal position (see "Both End Measurement display" on page 5-34). The Both End measurement result table show the following loss types: • The O -> E and E -> O* losses correspond to the measurements made in each direction. They are different because the insertion loss and reflectance thresholds of the segments situated at either side of the event are different. • The last loss is equal to half the sum of the two previous losses. By thus taking the average value of both previous results we eliminate the error due to the difference of the reflectance thresholds from either side of the event. Therefore this loss corresponds to the real value of the insertion loss of the event. • The loss displayed in the last line of the table represents the total loss of the analysed link. It is possible to define a splice loss threshold beyond which the result is displayed in red in the table. This threshold can be selected in the OTDR TEST SET menu, on the Splice Alarm Th. line, (see "Selecting measurement result display parameters for both end measurement" on page 5-5). Execution of a Both End measurement Display of two traces O to E and E to O saved in memory In this case, before loading these traces, you have to check that: • the two traces have not the same direction (E->O and O->E); if necessary change the direction in the Memory Info menu, on the line Direction from the FILE page. • measurement results are available for both traces. To load the traces, from the FILE page: 1. Select the required file and display it by successively pressing the <Load> and <Trace> keys. 2. Select the other file required and successively press the <Load> and <Overlay> keys to superimpose it over the previously displayed trace. *. O=origin, E=End 5-32 USER MANUAL 750000992/16 Artisan Technology Group - Quality Instrumentation ... Guaranteed | (888) 88-SOURCE | www.artisantg.com MTSe Both End Measurement Acquisition of the two traces If you need to make an acquisition in both directions: • Make a measurement in one direction. The corresponding trace is displayed in the Results page. • Successively press the <Expert>, <Overlay> and <2 Traces> keys to put this trace into the overlay mode. • Make the second measurement in the other direction. The corresponding trace is displayed as the active trace. Note The active trace (trace displayed as normal OTDR trace) serves as the distance reference. Note To swap the traces so the trace in overlay mode becomes the active trace, press the <Expert>, <Overlay> and <Swap> keys. Accessing the Both End measurement mode Successively press the <Expert>, <Overlay> and <Both End Overlay> keys. The overlayed trace is inverted. Attention The <Both End Overlay> key is only present if two compatible traces are displayed.It is not available if the traces are not compatible or if there are more than two traces. The two traces are aligned on the x axis, by taking into account the launch cables declared "Launch Cables" on page 5-35. The markers corresponding to the same event, on each trace, are therefore superimposed on the X-axis. A small gap can separate these two markers linked to the same event (e.g. gap due to a slightly different length of the fiber according to the measurement direction). You must select in the OTDR TEST SET menu, on the line Dist. Spacing Th., the threshold beyond which the markers will be considered as linked to different events. Description of the active and non-active traces • The active trace is represented in green (dark grey with a monochrome screen), the other trace is in blue (light grey with a monochrome screen). • The characteristics of the active trace are displayed in a status bar above the trace. • The active trace is represented with its markers and measurement results. • On the non-active trace the markers are represented with a vertical dash. USER MANUAL 750000992/16 5-33 Artisan Technology Group - Quality Instrumentation ... Guaranteed | (888) 88-SOURCE | www.artisantg.com MTSe Using an OTDR module Data corresponding to active trace Active trace: green (or dark) u doc n nt e me n atte te Non-active trace: blue (or light) Simplified marker The active trace in this example is O to E Both End Measurement display Changing the active trace If you are in Cursor or Zoom/Shift mode, press the <Evt OE> key. The event search function is activated and can be started with the directional keys. Pressing the <Evt OE> key again causes the active trace to become non-active and the non-active trace to become active. The markers and results are then displayed on the new active trace. Changing the active trace keeps the active cursor at the same position, this allows a new marker to be easily positioned on the new active trace at a position marked by the cursor on the previously active trace. Both End measurement method To obtain the Both End measurement results in the result table, all the events must have been detected and measured in both directions. If the automatic measurement has not detected an event in one of the directions: • On the corresponding trace there is no maker for this event. • In the result table there is neither the corresponding loss value (E to O or O to E) nor the real calculated loss value. 5-34 USER MANUAL 750000992/16 Artisan Technology Group - Quality Instrumentation ... Guaranteed | (888) 88-SOURCE | www.artisantg.com MTSe Both End Measurement Non detected event Total result of the fiber link (distance and loss) without Results displayed in red if they exceed the splice alarm threshold defined in the OTDR TEST SET menu. Result Table A marker must therefore be placed on the corresponding trace, at the position where the event was detected in the other direction. A measurement is then made automatically at this marker (see "Addition of markers" on page 5-21). To do this, see "Changing the active trace" on page 5-34. Carry out the same procedure for all the non detected events on each trace. The result table should then show all the results. If one or more splices could not be measured in semi-automatic mode, for example if the segment of the fiber is too short to make linear regressions, then manual measurements must be made (see "Addition of manual measurements" on page 5-22). Launch Cables If the fiber uses a launch cable at one or both ends, it is possible to eliminate results linked to launch cables in identifying it or them in the menu SET-UP / Test Setup / Results on lines: - Launch Cable O->E - Launch Cable E->O. In each case the identifiers “Marker 1” or “Marker 2” and “Marker 3” are available. Example: USER MANUAL 750000992/16 5-35 Artisan Technology Group - Quality Instrumentation ... Guaranteed | (888) 88-SOURCE | www.artisantg.com MTSe Using an OTDR module Origin launch cable Fiber Under Test launch cable O-> E Marker 1 Extremity Launch Cable launch cable E-> O Marker 1 Saving Both End measurement result table Once the result table is complete, it is possible to save it as an ASCII file which can be imported into EXCEL. This file has the extension .OEO. First the two traces must be saved if they have been created or modified. • Save the active trace, by pressing the <Store> key, after choosing the WTK or SOR format. • Swap the active trace. • Save the other trace, by pressing the <Store> key, after choosing the WTK or SOR format. • Save the both end measurement result table by pressing the <Store both end> key. Note The traces and the both end measurement result table must be saved in the same directory. Otherwise when recalling the table, the associated traces are not recalled. Note If the traces have been modified and not saved the MTSe will refuse to store the both end measurement result table. Note This table contains the links to the two trace files, so when it is loaded, the traces are loaded too. Opening the table with Excel To open the table with Excel, select “Tabulation” as the field separator. To do this in the Excel Text Import Wizard click on the “Delimited” radio button then press the <Next> key. Check the “Tab” check box and press the <Finish> key. For more details about this function, see "Transferring MTSe file (table) to Excel" on page 8-11. Loading the both end measurement result table If one of the two trace files, or both files, have been modified or deleted after saving the table, the MTSe will import the table but will not import the traces which will be replaced by two straight horizontal lines. A warning will also be displayed on the screen during loading. Note Loading a table is only possible if it has not been modified by a spread sheet program (Excel or other). Exiting the both end measurement mode Use either of the following two methods to exit the both end measurement mode: 5-36 USER MANUAL 750000992/16 Artisan Technology Group - Quality Instrumentation ... Guaranteed | (888) 88-SOURCE | www.artisantg.com MTSe Fault locator mode • Return to the normal display of the two traces in overlay by successively pressing the <Expert>, <Overlay>, <Standard overlay> keys. • Return to displaying a single trace by successively pressing the <Expert>, <Overlay>, <1 trace> keys. Note The MTSe also exits this mode if a new trace is loaded or a new acquisition is started and the trace obtained is not compatible with the active trace. Fault locator mode Function The Fault Locator detects the distance from the beginning (origin) of the fiber to the end, thus locating any possible break in the fiber. Choice of function Press the SETUP key, then the <Config. Instrument> key and select the Fault Locator icon "Instrument Set up" on page 3-11. Configuring the test Press the <Config. Test> key. Three parameters must be defined: Acquisition Laser wavelength of signal emitted (1310 or 1550 nm, 850 or 1300 nm, 1550/1625 nm depending on module). Index index of fiber. It is then possible either to choose this index directly by using the arrow keys < and >, or to choose the type of cable in the proposed list by pressing the <Preset Index> key. In this latter case, move the cursor to the type of cable by using the < and > keys, then press the key <Confirm Index> to validate this choice. See "Preset index values" on page 5-6. Fiber end threshold Loss threshold corresponding to the end of the fiber being detected: Auto or Manual (from 3 to15 dB). The Auto position is recommended. Starting the test Press the START/STOP key. The test is configured automatically, then a bar graph indicates the state of progress of the test and the number of acquisitions made. By default, the test lasts 1 minute, but it may be stopped at any moment by pressing the START/STOP key. At the end of the test, the instrument measures the distance of the end of the fiber and displays the value in the chosen units. USER MANUAL 750000992/16 5-37 Artisan Technology Group - Quality Instrumentation ... Guaranteed | (888) 88-SOURCE | www.artisantg.com MTSe Using an OTDR module Fault location The OTDR trace is also displayed with the cursors A and B placed on the end of the fiber. Cursor and Zoom keys are available. Messages indicate how to return to the instrument configuration menu (SETUP key) and to locate the end of the fiber again (START key). The trace may be saved as a normal trace (see chapter 8). After it has been recorded, it may be viewed: • either in OTDR mode (with analysis) if the OTDR function is chosen in the Instrument configuration menu. • or in Fault location mode (with indication of end of fiber), if the FAULT LOCATOR function is chosen in the Instrument configuration menu Macro The macro function gives the possibility of starting a sequence of actions (up to 200) by only a single key. There are five macros : • Three user macros (1 to 4) • A predefined macro, macro 5 (DUAL LASER) which starts a bi-lambda measurement with storage of acquisition and comparison of traces. 5-38 USER MANUAL 750000992/16 Artisan Technology Group - Quality Instrumentation ... Guaranteed | (888) 88-SOURCE | www.artisantg.com MTSe Macro Macro menu Starting a macro (Play) • Press the SET-UP, then the <Macro> key. The Macro menu appears. • Select the macro to use • Press the <Play> key if you want to execute the actions with the same delay as when creating the Macro; press the <Fast> key to execute the successive actions of the Macro without any delay. 1. For the user macros (1 to 4), the configuration of the MTSe is restored, like it was when the macro was created. 2. All the actions saved in the macro will be executed (the delay between actions has been saved). Note Pressing one of the keys interrupts the macro. At any time it is possible to quit the macro menu by pressing the <Exit> key Note Attention The configuration of the MTSe is not modified when the predefined macro is played. After a software up-grade the macros previously created may not functions correctly if they use keys which have been modified. USER MANUAL 750000992/16 5-39 Artisan Technology Group - Quality Instrumentation ... Guaranteed | (888) 88-SOURCE | www.artisantg.com MTSe Using an OTDR module Creating a user macro 1 to 4 (Learn) Precautions before creating a macro • Set-up the MTSe. When a macro is played, the MTSe set-up is restored to the state when creating the macro. Therefore it is advised to set-up the MTSe before creating the macro. The macro will then be executed faster and will occupy a smaller file. • Prepare the sequence of actions. When creating a macro, delays between actions are saved too. When executing the macro, there delays will be respected if the Macro is started by <Play> and they will be ignored if it is started by <Fast>. To create a user macro: • Press the SET-UP key, then the <Macro> key (see "OTDR TEST SETUP window" on page 5-2). The macro menu appears. • Select the macro 1 to 4 to define. • Press the <Edit> key and give a name to the macro (see "Editing" on page 4-5). • Press the <Learn> key. The preceding macro will be erased. Then you are requested to: - either confirm the creation of a new macro with the <Confirm> key. - or stop the operation with the <Abort> key. Note If the operation is confirmed, the macro save the actual MTSe configuration. This configuration will be recalled with the macro. See "Use of the macro to store a configuration" on page 5-41. • After confirmation, enter the successive actions (set-up, acquisition, storage, etc.). 200 actions can be saved. The delay between each action is also saved. • After the last action, go back to the set-up menu using the SET-UP key and press <Macro end>. Note If the created macro does not work, increase the pause after the disk store or print steps. Saving a macro on a floppy disk Saving macro on floppy disk allows the user to copy macros from one MTSe to other ones. To save a macro on floppy disk: • In the file menu, select the macro file name. • In the macro menu (called by the SET-UP then <Macro> key), select the macro to save. • Press the <Store> key. The macro is stored on the floppy disk with the extension.mac. 5-40 USER MANUAL 750000992/16 Artisan Technology Group - Quality Instrumentation ... Guaranteed | (888) 88-SOURCE | www.artisantg.com MTSe Macro Loading a macro from a floppy disk Press the FILE key. Press the <Explore> key and select the directory of the floppy disk. Press the <Open Dir> key and select the macro file. It has a .mac extension. Press the <Load Macro> keys. The keys <Macro 1>, <Macro 2> , <Macro 3>, <Macro 4> are displayed. • Select one of these positions to transfer the macro. • • • • Use of the macro to store a configuration With the MTSe set-up with the configuration you wish to save: • Press the SET-UP, then the Macro key. The Macro menu is displayed. • Select one of the three user macros and press the <Edit> key to eventually change the name. • Press the <Store> key and confirm the action. • Press the <Macro end> key. The MTSe configuration is saved in the corresponding macro. Loading this macro will load the configuration. Set-up parameters saved in the macro • • • • • the instrument set-up (OTDR for example). the test set-up. the markers if they are locked (by the <Expert> /< Lock markers> function). in the file menu, the Auto-increment and the auto file naming. zoom/shift value, cursor positions, etc. Note Instrument and test set-up can only be restored if the instrument is equipped with the corresponding module. Macro 5 description The macro 5 starts a measurement at each wavelength (1310 and 1550 nm or 850 and 1300 nm) and stores the results. Parameters to set-up before starting the macro 1. Acquisition parameters - Manual mode - Pulsewidth - Range - Resolution - Acquisition time 2. Configuration parameters - OTDR Module: Dual-wavelength - File naming: Auto - File Nbr Increment: No USER MANUAL 750000992/16 5-41 Artisan Technology Group - Quality Instrumentation ... Guaranteed | (888) 88-SOURCE | www.artisantg.com MTSe Using an OTDR module - Markers: not locked - Fiber Number The macro 5 starts the following actions: • acquisition for the selected time • storage of acquisition and results (first wavelength) • overlay • wavelength change • new acquisition for the selected time • storage of acquisition and results (second wavelength) • incrementation of the fiber number. • return to the Macro menu. Note The macro 5 can only be started with the <Fast> softkey. 5-42 USER MANUAL 750000992/16 Artisan Technology Group - Quality Instrumentation ... Guaranteed | (888) 88-SOURCE | www.artisantg.com Chapter 6 Using the OTS module 6 This chapter describes the different steps required to make an OTS measurement: ❏ OTS Test Setup ❏ OTS Result Display ❏ OTS measurements ❏ Result acquisition methods OTS Test SET-UP1 To set up the OTS and then make a measurement of the fiber under test the following parameters need to be configured: ❏ Light source parameters (if available): Wavelength, Transmission mode, Scanning, Power type and Unit required. All these parameters are configured from the Light Source menu of the OTS Test Setup window.2 ❏ Power meter parameters (if available): Wavelength, Range, result storage mode and storage frequency, Real Time mode, Unit required, External Attenuation and Alarm Threshold. All these parameters are configured from the Power meter menu of the OTS Test Setup window.2 1. 2. If an OTS module is installed To call the OTS TEST SETUP window to select the required source and power meter parameters, press the <SET-UP> button. If either the SYSTEM or INSTRUMENT SETUP windows are already displayed press the <Test Setup> key to call the OTS TEST SETUP window. USER MANUAL 750000992/16 6-1 Artisan Technology Group - Quality Instrumentation ... Guaranteed | (888) 88-SOURCE | www.artisantg.com MTSe Using the OTS module OTS TEST SETUP window (including light source and power meter) In these windows, the selected parameter is high-lighted. Select this parameter using the ↓ and ↑ directional arrows. The available choices are displayed on the screen; these depend on the chosen function. Make the required choice with the ← and → directional arrows. Selecting Light source parameters You can choose the following Light source parameters, from the Light Source menu of the OTS Test Setup window: Wavelength The required source: 1310 nm or 1550 nm for LASER source, 850 or 1300 nm for LED sources. Mode Choose the transmission mode: CW: Continuous signal. 270 Hz, 330 Hz, 1 KHz and 2 KHz: the source transmits a modulated signal at the frequency selected. Emul. OLS: to communicate with an Acterna OLS or OFI instrument. Scanning The source then switches every 10 seconds between the two wavelengths and provides a signal indicating the wavelength of the transmitted signal. When the Scanning 6-2 USER MANUAL 750000992/16 Artisan Technology Group - Quality Instrumentation ... Guaranteed | (888) 88-SOURCE | www.artisantg.com MTSe OTS Test SET-UP mode is selected, the output power is calibrated (CAL). In the "Emul. OLS» mode the signal is alternated every 4 s. in order to be compatible with the TwinTest mode of the OLS and OFI Acterna series. Mode only available with laser sources. Choice of the output power of the laser source: CAL: Output power calibrated at 1 mW i.e 0 dBm. VAR: Variable power from 0 to - 10 dBm. Power The Power option is only available if the continuous signal (CW) mode has been selected and the Scanning mode is NOT selected. If this is not true the output power is calibrated by default. Note Choice of the transmitted power unit: W or dBm. Unit Selecting Power meter parameters You can choose the following Power meter parameters from the Power meter menu of the OTS Test Setup window1: Wavelength Selection from: Auto, 850nm, 1310nm, 1550nm or User. (Selecting the User wavelength allows you to select the exact wavelength you require with the User Select menu option described below). User Select Note Selection of the any wavelength value between 800 nm to 1650 nm in 1 nm steps, using the arrow key <- or ->. The User Select menu option is only available if User has been selected from the Wavelength menu option. Range The measurement range of the power meter: Auto, mW, µW or nW. If Auto is selected the optimal range is chosen for the Power meter acquisition. Mode Selection of the measurement result storage method: None, Autostore orAutoprint. None: No measurement results are stored. Autostore: The autostore mode automatically stores the measurement results to a file at the time interval selected with the Auto Time function described below. Refer to "Manipulating stored data" on page 8-16 for the description of the file storage function. Autoprint: The autoprint mode automatically send measurement results to a printer connected to the 1. During storage and printing operations none of the menu options apart from the Unit and Alarm Threshold can be modified. USER MANUAL 750000992/16 6-3 Artisan Technology Group - Quality Instrumentation ... Guaranteed | (888) 88-SOURCE | www.artisantg.com MTSe Using the OTS module instrument at the time interval selected with the Auto Time function described below. User Select Selection of the any wavelength value between 800 nm to 1650 nm in 1 nm steps, using the arrow key <- or ->. Time Auto Choice of the time interval between measurements for Autostore or Autoprint. This interval can be a period (between 1 second and 11 hours 59 minutes and 59 seconds), in 1 second increments. It is selected by the Arrow key <- and ->. Real Time Choice of the real time or averaging mode. When this mode has not be selected the power meter is, by default, in averaging mode. Unit Selection of the measurement unit: W, dBm or dBr. Ext. Attenuator Entry of the value (0 to 30 db) of an external attenuator, if one is being used. It is selected by the Arrow key <- and ->. Alarm Threshold Selection of the required alarm threshold (-70 to +30 dBm). OTS Results Window The OTS Results window contains the Light source display and Power meter display. These are only displayed if they have been selected from the Instrument Setup window and if they are available. Depending on the selection made they are either both shown together or only the single selected unit. The <Source> and <Power meter> softkeys select either the Light source or the Power meter functions in the OTS results window. A key also provides the results in memory to be displayed. Note 6-4 When this memory is recalled with both the Power meter and Light source windows, the Light Source window is reduced to a single line at the bottom of the screen. USER MANUAL 750000992/16 Artisan Technology Group - Quality Instrumentation ... Guaranteed | (888) 88-SOURCE | www.artisantg.com MTSe OTS Results Window OTS Results Window (including light source and power meter) Light Source Light Source Display The Light source display provides all the details of the currently selected Light source configuration. It also contains the specific softkeys required to control the various functions of the Light source when it is selected. • The selected wavelength. • The light power in the selected unit and the non-selected unit. • The power mode: Laser (or LED) Off, Calibrated or Variable (for laser source only). • The transmission mode: CW or the modulated frequency (270Hz, 330Hz, 1KHz, or 2KHz). The icon is displayed when the modulated frequency mode is selected. • SCANNING and the icon when the scanning mode is selected. • the icon when the source is in operation. USER MANUAL 750000992/16 6-5 Artisan Technology Group - Quality Instrumentation ... Guaranteed | (888) 88-SOURCE | www.artisantg.com MTSe Using the OTS module Light Source Softkeys The following softkeys are available when the laser source function is selected from the OTS Results window: <Laser On> / <Laser Off> (or <LED on> / <LED Off>) used to switch the light on and off. When <Source> is selected from the OTS Results window the <Laser On> (or <LED on>) switches on the source and the other specific source softkeys are displayed. When the source is on the softkey is labelled <Laser Off> (or <LED off)> and the icon is displayed next to the wavelength indicator. Note None of the following softkeys are available unless the source is on. <Toggle Laser> (or <Toggle LED>) switches between the two wavelengths: 1310 and 1550 nm with laser source, 850/1300 nm with LED source. Note None of the following softkeys are available unless the CW transmission mode is selected. <Send Lambda> transmits a lambda signal to the Power meter to automatically switch the power meter to the wavelength of the source. <Mode> this key allows the transmission mode to be chosen: CW or modulated frequency: 270Hz, 330Hz, 1KHz, or 2KHz. With laser source, if the CW and variable power option has been selected, the arrows keys increases and decreases the laser output power. It is then displayed on the left side of the screen. <Return> exits the source functions and returns the <Source> and <Power meter> selection softkeys. 6-6 USER MANUAL 750000992/16 Artisan Technology Group - Quality Instrumentation ... Guaranteed | (888) 88-SOURCE | www.artisantg.com MTSe OTS Results Window Source wavelength: 1310 or 1550 nm Power in selected unit Power mode indicator: LIGHT OFF, CALIBRATED or VARIABLE SCANNING mode icon Laser on icon Power in nonselected unit Transmission mode indicator: CW, 270Hz, 330Hz, 1KHz, 2KHz or SCANNING Toggle between the 2 wavelengths Send Lambda signal to the radiometer (if Power = Calibrated) Laser On / Off (only available if VARIABLE power mode is selected) Laser Source Display (if available) USER MANUAL 750000992/16 6-7 Artisan Technology Group - Quality Instrumentation ... Guaranteed | (888) 88-SOURCE | www.artisantg.com MTSe Using the OTS module Source wavelength: 850 or 1300 nm Power mode indicator: LIGHT OFF or CALIBRATED LED On icon SCANNING mode icon Transmission mode indicator: CW, 270Hz, 330Hz, 1KHz, 2KHz or SCANNING Toggle between the 2 wavelengths Send Lambda signal to the radiometer LED On / Off (only displayed if VARIABLE power mode is selected) LED Source Display (if available) Power meter Power meter Display The power meter display provides all the details of the currently selected power meter configuration. It also contains the specific softkeys required to control the various functions of the power meter when it is selected. • The selected source wavelength: 850 nm, 1310 nm, 1550 nm (Calibrated values) or any user value between 800 nm and 1650 nm in 1 nm increments. • The measured light power in the selected unit and the non-selected unit. • The selected reference level value in dBm. • The measured light power cursor showing the value in dB. 6-8 USER MANUAL 750000992/16 Artisan Technology Group - Quality Instrumentation ... Guaranteed | (888) 88-SOURCE | www.artisantg.com MTSe OTS Results Window • The selected threshold cursor showing the current threshold in dB. Pressing the ← and → directional arrows modifies this value. • The icon that indicates an audible alarm will be given if the measured power passes the selected threshold. • The AUTOLAMBDA indicator shows that the automatic selection of the same wavelength as the source when a send lambda signal is received. • The AUTORANGE indicator shows that the optimal measurement range will be used to measure the received light power. • The AUTOSTORE indicator shows that measurement results will be automatically saved when the START/STOP direct access key is pressed and the RUN indicator is on. • The AUTOPRINT indicator shows that measurement results will be printed when the START/STOP direct access key is pressed and the RUN indicator is on. • The REALTIME indicator shows that the real time mode is selected and the measured value displayed is being made in real time rather than as an averaged measurement. • ATTENUATION INCLUDED if a value has been selected on the Ext. Attenuator line of the Test Setup menu (Radiometer). USER MANUAL 750000992/16 6-9 Artisan Technology Group - Quality Instrumentation ... Guaranteed | (888) 88-SOURCE | www.artisantg.com MTSe Using the OTS module Wavelength: 850, 1310, 1550 nm calibrated or any value between 800 and 1650nm in 1nm increments Light Power in selected unit Selected reference Measured level value value cursor Autolambda or TwinTest indicator Autorange indicator Selected threshold cursor Shows that an external attenuation has been included in the test setup menu. Light Power in non-selected unit Select wavelength softkey Zero adjust softkey Set reference value softkey Autostore and Real Time Threshold Autoprint indicator alarm indicator On/Off softkey Threshold audible Change in real alarm icon time mode Power meter display Power meter Softkeys The following softkeys are available when the power meter function is selected from the OTS Results window. Certain selections can also be made from the Test Setup menu. • The <Set Ref.> key1 which is used to select the currently displayed value as a reference value to compare to other measured results. When the <set Ref.> key is pressed the currently displayed value is displayed below the REF 1. Not available during Autostore or Autoprint operations 6-10 USER MANUAL 750000992/16 Artisan Technology Group - Quality Instrumentation ... Guaranteed | (888) 88-SOURCE | www.artisantg.com MTSe OTS Measurements LEVEL legend on the power meter display and remains displayed until another value is selected. • The <Wavelength> key1 is used to select the required measurement wavelength. Each press of the key toggles the available calibrated wavelengths (850, 1310 1550nm), the currently entered User Select wavelength and Autolambda automatic wavelength selection. • The <Zero Adjust> key1 is used to adjust the zero setting of the power meter when a blanking cap is fitted to the power meter optical input. • <Real Time>: selects displaying the results in real time (not averaged). • The <Thre. On> / <Thre. Of> key toggles the audible threshold alarm on and off. • The <Return> key exits the power meter functions and returns the <Source> and <Power meter> selection softkeys. OTS Measurements Use the following general procedure to make measurements with the OTS module: • Zero the power meter • Make a reference measurement with a jumper connected between the light source output and the power meter input. • Replace the jumper with the fiber under test and measure the power. The power measured corresponds to the insertion loss of the fiber under test. Adjusting the power meter zero setting Use the following procedure to adjust the zero setting of the power meter: 1. Fit the blanking cap to the power meter input to ensure no light reached the photodiode of the power meter. Carrying out the zero adjustment without the blanking cap installed will cause a “Measurement Error” message to be displayed because the photodiode will have detected too much ambient light. 2. From the OTS Results window press the <Powermeter> softkey to access the power meter functions of the OTS. 3. Press the <Zero Adjust> softkey. The zero adjustment is made and <Zero Adjust> key is displayed white until it is finished. Making a reference measurement Use the following procedure to make a reference measurement: 1. Fit an adapter to power meter input in order to connect a jumper. 2. Connect a jumper between the output of the light source and the input of the power meter. 3. Configure the light source and power meter so that both are using the same wavelength. USER MANUAL 750000992/16 6-11 Artisan Technology Group - Quality Instrumentation ... Guaranteed | (888) 88-SOURCE | www.artisantg.com MTSe Using the OTS module 4. From the OTS Results window press the <Source> softkey to access the Light source functions of the OTS. 5. Press the <Laser On> (or <LED on>) softkey. The resulting measured power is displayed on the power meter. 6. From the OTS Results window press the <Return>, then <Power meter> softkey to access the power meter functions of the OTS. 7. Press the <Set Ref. Level> to store the displayed value as the reference level. 8. Press the <Return> then the <Source> softkeys. 9. Press the <Laser Off> (or <LED off>) softkey to switch off the source. Measuring the fiber under test After making a reference measurement use the following procedure to measure the insertion loss of the fiber under test: 1. Using suitable jumpers and adapters to connect the fiber under test between the output of the light source and the input of the power meter. 2. Press the SET-UP direct access key to display the OTS TEST SETUP window. 3. In the power meter configuration menu select dBr as the measurement unit. 4. Press the RESULTS then the <Source> softkey. 5. Press the <Laser On> (or <LED on>) softkey. The resulting measured power is displayed on the power meter and corresponds to the insertion loss of the fiber under test. Source Specific Functions Using variable power (with laser source only) The output power of the laser source can be modified between 0 and -10 dBM typically. To modify the output power: 1. Press the SET-UP direct access key to display the OTS TEST SETUP window. 2. In the laser source configuration menu select CW as the transmission mode. 3. Select Variable for the output power. 4. Press the RESULTS direct access key to display the OTS Results window. 5. From the OTS Results window press the <Source> softkey then the <Laser On> softkey. 6. Use the ↑ et ↓ arrow keys to select the required output power. Scanning Mode In the scanning mode the Light source alternately transmits on the two wavelengths every 10 seconds. To use the scanning mode: 1. Press the SET-UP direct access key to display the OTS TEST SETUP window. 2. In the Light source configuration menu select Yes for the Scanning menu option. The CW transmission mode is automatically selected when Scanning is enabled. 6-12 USER MANUAL 750000992/16 Artisan Technology Group - Quality Instrumentation ... Guaranteed | (888) 88-SOURCE | www.artisantg.com MTSe Power meter Specific Functions 3. Press the RESULTS direct access key to display the OTS Results window. 4. From the OTS Results window press the <Power meter> softkey to access the power meter functions of the OTS. 5. Use the <Wavelength> key to select the AUTOLAMBDA mode. 6. Press the <Return> key, then the <Source>, then the <Laser On> (or <LED on>) softkey. The Light source provides a graphical display of the two sources and indicates which one is connected to the output during the scanning process. The power meter automatically switches to the source wavelength and displays the resulting power measurement. Transmission of modulated signals In order to easily identify a fiber under test the Light source can transmit a modulated signal that can be identified by the power meter. This ensures that two users at the extremities of a fiber link are connected to the same fiber. To use this function: 1. Press the SET-UP direct access key to display the OTS TEST SETUP window. 2. In the Light source configuration menu select the required modulated signal frequency for the Mode menu option. The following frequencies are available: 270Hz, 330Hz, 1KHz and 2 KHz. 3. From the OTS Results window press the <Source> softkey to access the Light source functions of the OTS. 4. Press the <Laser On> (or <LED on>) softkey. The source transmits a modulated signal on the fiber. If the power meter is connected to the same fiber as the source the selected modulation frequency is displayed in place of the measured power indication. For example, if a 2KHz modulated signal is detected by the power meter the measured power is replaced by 2000 Hz. Power meter Specific Functions Memory Functions The power meter of the OTS module contains a memory which can contain up to 300 measurement results. The stored results are displayed in a table format with each line corresponding to a measurement result. The columns for each measurement gives the following information: • the number of the tested fiber • the date and time of the measurement • the wavelength • the power measured in dBm • the power mesured in dBr • the level of the chosen reference (if unity= dBr) • the transmission mode of the measured signal: continued or modulated at a frequence of 270Hz, 330Hz, 1KHz, or 2KHz. USER MANUAL 750000992/16 6-13 Artisan Technology Group - Quality Instrumentation ... Guaranteed | (888) 88-SOURCE | www.artisantg.com MTSe Using the OTS module • To access the memory functions press the <Memories> key. The following memory functions are displayed. Name of the displayed memory: - OTS RESULTS for the active memory - FILENAME for the currently displayed loaded table - CURRENT for the results saved during an Autostore operation Go to : - the top, - the middle - the bottom of table - the last result saved Clear the 300 lines of the memory Number of the fiber Selected result in memory Save current measured result to selected memory location (1 to 300). If the TwinTest mode is detected, save the 2 results. Sort results in the table by fiber number, time or lambda Display of the Memories Sorting the results in the memory After pressing the <Display> key, the <Sort Table> gives access to the different memory sorting options in the displayed table: - by fiber number (then by wavelength) - by date - by wavelength (then by fiber number) Moving about in the memory After pressing the <Display> key, the following functions are available: 6-14 USER MANUAL 750000992/16 Artisan Technology Group - Quality Instrumentation ... Guaranteed | (888) 88-SOURCE | www.artisantg.com MTSe Power meter Specific Functions • the <top> key moves the display window to the first set of memorised results in the table • the <Middle> moves the display window to the middle of the memorised results in the table • the <Bottom> moves the display window to the end of the memorised results in the table • the < Current Line> moves the cursor to the last memorised result. Editing the fiber number The <Edit Fiber Nb> key enables the modification of the fiber number for the selected result. If this number is modified in the Memory menu, then it is automatically updated in the Configuration menu accessed by the File button. Conversely, if a new fiber number is entered in the File menu, it will be used when the results are next stored in the memory. Incrementing the fiber number The <Incremen Fiber Nb> key increases the number at the next save. This number is also incremented in the Configuration menu accessed by the File button. Saving the current measurement result To save the currently displayed measurement result (or, if the TwinTest mode is detected, the two corresponding results): 1. From the OTS Results window press the <Memories> key, then the <Display> key. 2. Use the <Top>, <Middle>, <Bottom>or <Current Line> key in conjunction with the ↓ and ↑ directional arrows to select the memory location to store the result. 3. Press the <Save Result> key. The current measurement is saved in the selected line of the memory (and in the following lines in the TwinTest mode). Automatic result storage The power meter can automatically save up to 300 results at predefined intervals while Run is executed with the STOP/START direct access key. When this key is pressed to stop the execution the File window is automatically displayed to save the results in a file. Use the following procedure to automatically store results: 1. Press the SET-UP direct access key to display the OTS TEST SETUP window. 2. In the Powermeter menu select: mode / Autostore. 3. Select the time interval with the Time Auto menu option, 1 second to 11 hours 59 minutes and 59 seconds in 1 second increments. 4. Press the RESULTS direct access key then the <Memories> softkey to display the memories. USER MANUAL 750000992/16 6-15 Artisan Technology Group - Quality Instrumentation ... Guaranteed | (888) 88-SOURCE | www.artisantg.com MTSe Using the OTS module 5. Press the START/STOP direct access key to execute the automatic result storage sequence. Note It is possible to integrate manual storage to an automatic storage.To do this the cursor must be positioned on the last line of the memory. Then the <Store Results> key appears. Each time this key is pressed the current result is saved. Note If the cursor is positioned on the last line loaded in memory, it is repositioned after each save to remain on the last line. If not it remains on the last line. 6. The sequence is stopped either when the START/STOP key is pressed to stop the execution or when 300 results have been saved. The File window is automatically displayed at the end of the sequence so that the results can be saved in a file (Refer to "Manipulating stored data" on page 8-16 for a full description of the MTSe file management). Saving the memory in a file When the START/STOP key is pressed to stop the execution or at the end of the automatic result storage, the File window is automatically displayed so that the memorized results can be saved in a file. This file has the extension .OTS. • Select the media (see page 8-1) • Select the file naming mode and the file name (see page 8-2, page 8-7 and page 8-8) • Press the <Save> key. Loading memorized results 1. Find the file as described page 8-18. 2. Press the <Load> then the <Table> key. Automatic result printing The power meter can automatically print results at predefined intervals while Run is executed with the STOP/START direct access key. Use the following procedure to automatically store results: 1. Make sure a printer is connected to the printer port. 2. Press the SET-UP direct access key to display the OTS TEST SETUP window. 3. In the power meter configuration menu select Autoprint as the storage mode. 4. Select the time interval with the Time Auto menu option, 1 second to 11 hours 59 minutes and 59 seconds in 1 second increments. 5. Press the RESULTS direct access key to display the OTS RESULTS window. 6. Configure the light source and power meter with the required parameters. 7. From the OTS RESULTS window press the <Source> softkey to access the Light source functions of the OTS. 8. Press the <Laser On> (or <LED on>) softkey. 6-16 USER MANUAL 750000992/16 Artisan Technology Group - Quality Instrumentation ... Guaranteed | (888) 88-SOURCE | www.artisantg.com MTSe Power meter Specific Functions 9. Press the START/STOP direct access key to execute the automatic result storage sequence. The results are printed on the printer at the selected time interval. 10. The sequence is stopped either when the START/STOP key is pressed to stop the execution or when 300 results have been printed. Choosing a non calibrated wavelength If a Light source is transmitting on a specific wavelength the same wavelength can be selected for the power meter. To select a specific wavelength: 1. Press the SET-UP direct access key to display the OTS TEST SETUP window. 2. In the power meter configuration menu select User as the Wavelength. 3. Select the require wavelength to match the source with the User Select menu option. 4. Press the RESULTS direct access key to display the OTS Results window. The selected wavelength is displayed on the power meter display. Setting an audible alarm threshold In order to easily detect a measurement result that exceeds a chosen threshold the power meter is equipped with an audible threshold alarm. To enable the audible alarm: 1. From the OTS Results window press the <Power meter> softkey to access the power meter functions of the OTS. 2. Press the horizontal arrow keys to get the required alarm level (or, in the power meter configuration menu, select the alarm threshold level). 3. Press the <Thre. On> to enable the audible threshold alarm. 4. Press the <Thre. Of> to disable the audible threshold alarm. Note The alarm threshold can also be selected in the Test Set-up menu. Transferring OTS table to Excel See in chapter 8 how to save results in a file and how to transfer OTS table of results on Excel (see page 8-11). USER MANUAL 750000992/16 6-17 Artisan Technology Group - Quality Instrumentation ... Guaranteed | (888) 88-SOURCE | www.artisantg.com MTSe Using the OTS module 6-18 USER MANUAL 750000992/16 Artisan Technology Group - Quality Instrumentation ... Guaranteed | (888) 88-SOURCE | www.artisantg.com Chapter 7 Optical spectrum analyser 7 This chapter describes the different steps in carrying out a spectrum analysis of an optical signal by an MTS equipped with a WDM 507x module: ❏ OSA configuration test ❏ Display of spectrum and results of the WDM analysis Configuration of the instrument After connecting the fiber to be tested to the optical connector, you must select the OSA module (see "Instrument Set up" on page 3-11), then setup this module. OSA test setup To setup the MTSe for an OSA test on a fiber, press the SET-UP button then the <Test setup> key. The different measurement parameters are displayed. You may : 1. either choose the default values by pressing the key <Auto Mode>. Auto Mode Configuration: • Sweep : Continue • High Sensitivity: No • Resolution : Full • Channel Detection: First sweep • Signal Threshold: Auto • Statistic Mode: No • SNR Methode : Left & Right. • S <-> N Distance: Auto • Noise Acq. BW: 0.100 nm. • Start Screen: Auto 2. or define your own configuration. The parameter to be modified must be chosen by using the direction arrow keys «↓» and «↑». The screen will then display the possible options: use the direction arrow keys ← and → to make a choice. The different parameters proposed are described below. USER MANUAL 750000992/16 7-1 Artisan Technology Group - Quality Instrumentation ... Guaranteed | (888) 88-SOURCE | www.artisantg.com MTSe Optical spectrum analyser OSA CONFIGURATION TEST Acquisition parameters Note When a channel power is higher than10 dBm or when the composite power of the input signal is higher than20 dBm, a warning is displayed and the signal is cut off. Sweep Continuous Every two seconds there will be a measurement with a trace refresh and a real-time display of the results and statistics on these results. Single There will only be one measurement and a display of the results. 2. .100 Number of acquisitions required from 2 to 100. High Sensitivity No Power scale ranges from +15 to - 65 dBm. Yes Power scale ranges from - 25 to - 75 dBm. Resolution Full Maximum filter resolution (<0.1 nm). 0.1 / 0.2 / 0.3 / 0.4 or 0.5 nm. 7-2 USER MANUAL 750000992/16 Artisan Technology Group - Quality Instrumentation ... Guaranteed | (888) 88-SOURCE | www.artisantg.com MTSe OSA test setup Detection parameters Channel Detection1 1st swap Channels of the first measurement serve as a detection reference. Grid Manual, ITU and Auto grid serve as a detection reference. The grid selection has priority on the "Channel Detection". For example it is not possible to choose Channel Detection = Grid, if the grid option is Off or Convent. Note Signal Threshold1 Channel detection threshold (see "Threshold of channel detection" on page 7-7). Auto Threshold is automatically determined. from -79.9 to + 20 dBm. Manual Statistic Mode To use or not to use statistics. Yes / No Note A change in the «Channel Detection» and «Signal Threshold» parameters will be only transferred to the trace, if the used WDM module is the one used for acquisition. Signal/Noise parameters SNR Method1 Side of the peak where the reference point for the noise is taken (Left, Right, Left & Right). S<-> N Distance1 Distance between the channel peak and the reference point for the noise. Auto distance determined according to the interval (space) between channels. at 0.2/ 0.4 / 0.8 nm if the unit is nm (or at 25 GHz, 50 GHz, 100 GHz if the unit is THz) of the value corresponding to the peak. Noise Acqu BW Reference bandwidth used for noise acquisition: - standard 100 pm - values ranging from 10 pm to 10 000 pm. 1. Caution: every change in this parameter is immediately transferred to the trace, leading to the loss of the statistics. USER MANUAL 750000992/16 7-3 Artisan Technology Group - Quality Instrumentation ... Guaranteed | (888) 88-SOURCE | www.artisantg.com MTSe Optical spectrum analyser Results display parameters Start screen1 Start of display. Auto Automatic detection of start of display depending on the channels detected. Start and end of displays are set automatically. Start of display at 1525 nm (for a 5071 WDM module). Full Start of display manually chosen. Manual End screen 1 Auto Automatic detection of end of display. Full End of display at 1570 nm (for a 5071 WDM module). Manual End of display manually chosen. Tilt and Slope gain No / Yes Validates measurement and display of max. difference of gain (in dB) and slope of gain (in dB by nm or by THz) above the trace. Remarks in table No / Yes Allows display and entry of notes in table ("Table remarks" on page 7-11). Grid Four different types of grid are available in the Display window of the menu: Off No grid. Convent. The grid coincides with the graduations. The interval therefore varies according to the zoom level. ITU Press the <Set grid> key to access the ITU grid choices. Two keys allow to have the ITU grid either only between the A and B cursors or on the whole band. Three lines in the menu allows the followings choices: - ITU reference channel, - interval (space) between channels: 50, 100 or 200 GHz. - number of channels: 1 to 100. Manual Press the <Set grid> key to access a choice of the following grid elements: - first channel - interval between channels: 1. The channels which are out of the screen limits are not in the result table. 7-4 USER MANUAL 750000992/16 Artisan Technology Group - Quality Instrumentation ... Guaranteed | (888) 88-SOURCE | www.artisantg.com MTSe Display of WDM results from 50 to 400 GHz by steps of 5 GHz, or from 0.160 to 8.000 nm by steps of 0.001nm. - number of channels. The <Between A and B> key allows to have only between the cursors the grid with the defined spacing . AUTO The AUTO grid is lined up to the present channels whatever are their interval. To get this grid the option «1st sweep» has to be selected on the «Channel Detection» line. The Grid line and the Auto option being selected, press the <Save Ref> key to take as grid reference the location of the detected channels. Alarms The results whose standard deviation exceeds a chosen threshold may be displayed in red in the table. To define the alarm thresholds: • select the Alarms line and press the <Set Alarms> key. The alarms selection menu is displayed. • Assign Yes to the chosen alarm: the direction arrow keys "<" and ">" allow you to choose the corresponding threshold value. According to the chosen statistic, three alarms are possible on: Delta L (or F): threshold from 0.01 to 4.01 nm (or from 1 to 500 GHz) Delta P: threshold from 0.1 to 10.0 dB Delta SNR: threshold from 0.1 to 10.0 dB Display of WDM results The results screen obtained by pressing the RESULTS button, presents zones from the top to bottom displaying: • the file name (if the result is stored in the memory). • characteristics specific to WDM test: module name, resolution used (Res), number of acquisitions used for the statitics (Acq), signal threshold (Th), distance chosen for the S<->N ratio, fiber number (N:), date and time of acquisition. • the trace (see "Trace" on page 7-6). • the results associated with the A and B cursors of the trace, the type of channels displayed, the composite power and the total power. • the results table (see "Table" on page 7-9). USER MANUAL 750000992/16 7-5 Artisan Technology Group - Quality Instrumentation ... Guaranteed | (888) 88-SOURCE | www.artisantg.com MTSe Optical spectrum analyser Module number Resolution Number of acquisition Signal threshold Distance SNR Fiber number Date and hour of acquisition Channels Threshold Scale Cursors A and B Channel numbers Frequency (or wavelength) and power at point of the trace marked by the cursors A and B Frequency difference (or wavelength) and the power between the points of the trace marked by the cursors A and B Displayed channels (current, found or exceeding the threshold alarm) Composite power of peaks (excluding noise) in dBm and in W. Example of an OSA test result (with grid) The <1/2 tabl.> / <Table> / <Trace> key (or the RESULTS button) is used to obtain: • either a a scaled-down display of the trace, but with 5 to 8 lines of the table (depending on whether the table remarks are displayed or not). • either the table only. • or the main display of the trace with only one line of the table at the bottom of the page. Trace The trace represents the power (in dBm) according to the frequency (in THz) or the wavelength (in nm). The detected channels are represented by peaks. Note 7-6 When several acquisitions are made, the trace corresponding to the last acquisition is displayed. USER MANUAL 750000992/16 Artisan Technology Group - Quality Instrumentation ... Guaranteed | (888) 88-SOURCE | www.artisantg.com MTSe Display of WDM results Cursors To move the A (or B) cursor by pressing the cursor key, first display <Cursor A> (or <Cursor B>), then use the < or > arrow keys. To move both cursors simultaneously, press the cursor key to display the <Curs. AB> key, then use the < or > arrow keys. The coordinates of the intersection point of the cursors with the trace are indicated underneath the trace as well as the frequency difference (or the wavelength) and the power between these points. Trace shifting To shift the trace horizontally or vertically, press the <Shift/Zoom> key to display <Shift>, then use the direction arrow keys to make the required shift. Zoom In order to zoom in on the trace, press the <Shift/Zoom> key to display <Zoom>, then use the direction arrow keys to zoom in either horizontally or vertically. The zoom of the display is made around the selected cursor. If <Cursor AB> was selected the zoom is made at the mid point between the cursors. Note To reset the zoom and see the full trace, press and hold simultaneously the < and > keys. The position of the displayed part of the trace with respect of the complete trace is located by a (grey or yellow) line on the top of the trace window. You can also manually zoom in on a part of the trace defining the start and/or end of the screen in the OSA test-set menu (Display windows). In this case, the channels which are out of the screen limits are not in the result table. Successive zooms on each event • Zoom in on one of the event. • Press the <Event> key. • Use the < and > keys to move successively the display window on each event. Threshold of channel detection On the trace some peaks corresponding to a noise could be mistaken for channels. It is therefore necessary to set a power threshold level: only peaks exceeding the threshold will be considered as channels and included in the results table. This threshold is represented by a red horizontal line on the trace: To display this threshold or not, press the <Expert> key then the <Threshold> key: • if the key indicates <Threshold> the threshold is displayed and can be moved using the "↑" and «↓» arrow keys; • if the key indicates < Threshold Off> then the threshold is not displayed. USER MANUAL 750000992/16 7-7 Artisan Technology Group - Quality Instrumentation ... Guaranteed | (888) 88-SOURCE | www.artisantg.com MTSe Optical spectrum analyser Grid display The display window of the trace may contain a grid to facilitate the control of the position of the channels. Several grid types are possible: • The Conventional grid has an interval (spacing) indicated in the top right corner of the window, which varies according to the zoom level. • The ITU grid uses a channel reference at 193,10 THz and three steps are possible for the spacing between the channels: 50, 100 or 200 GHz. • The Manual grid can be defined by the user to correspond exactly to the channels. The position of the first vertical line must then be defined according to the wavelength of the first channel, the spacing (from 50 to 400 GHz by 5 GHz steps) and the number of intervals desired. The grids are defined in the OSA test setup menu (see "Results display parameters" on page 7-4). The grid may be put into service either in the OSA test setup menu, or on the Results page, by pressing the <Expert> key then the <Grid> key. Display of total power between cursors To display the total power between the two cursors A and B on the trace: • Place the cursors. • Press the <Expert> key, then the <Manual> key, and finally the <T Power A<-->B> key. • The space between the trace and the two cursors is shadowed in grey and the power is displayed using the «P = -4.95 dBm» format. • Press the <T power A<-->B> key a second time to remove the total power measurement result. Display of Gain Tilt (delta) and Gain Slope results The MTSe allows for the display of two additional results: • The Gain Tilt, that is to say the difference between the max. and min. peak values of the whole spectrum of the signal between the cursors. • The Gain Slope measured by the least squares method, using a linear regression algorithm. To display the results above the channels: • In the OSA test setup menu, verify that the «Tilt & Slope gain» parameter is set on «Yes». • Place the cursors • Press the <Expert> key, the <Manual> key and finally the <Tilt & Slope> key. The Gain Tilt is displayed in dB. The Gain Slope is traced and the value is displayed in dB/THz or dB/nm depending on the chosen unit. 7-8 USER MANUAL 750000992/16 Artisan Technology Group - Quality Instrumentation ... Guaranteed | (888) 88-SOURCE | www.artisantg.com MTSe Display of WDM results Total power Gain Tilt Gain Slope Display of total power, Gain Tilt and gain slope between the cursors Overlay See "Overlay of traces" on page 7-12 Table Lines Depending on the choice made in the Set-up menu, in the Detection window, for the «Channel Detection» parameter, the table contains: • either one line for each detected channel, if the «1st sweep» option is selected • or a line for each graduation if the grid option is selected. Display type By defect only one line of the table is displayed below the trace. • To display 8 lines of the table, under the trace, press the <1/2 tabl> key or the RESULTS button. • to display 18 lines of the table (without trace), press the <Table> key or the RESULTS button. • to display again the trace with only a line of the table, press the <Trace> key or the RESULTS button. USER MANUAL 750000992/16 7-9 Artisan Technology Group - Quality Instrumentation ... Guaranteed | (888) 88-SOURCE | www.artisantg.com MTSe Optical spectrum analyser Table contents without statistics In the absence of statistics (see "Detection parameters" on page 7-3), the parameters given for each channel are as follows: 1. Channel number (the total number of channels is given in the first column header). 2. Frequency or wavelength (Lambda) of the channel according to the chosen unit. 3. Spacing between the channels in THz or nm. 4. Power level of the channel in dBm. 5. Noise level in dBm. 6. S/N ratio for the channel in dB. 7. Relationship between channel power and composite power (P/Pcomp) in %. Table contents with statistics If the test involves multiple acquisitions (2..100 mode or Continuous mode), then statistics are conducted on the results. To display these results in the table, press the <Cont Tab> key, then the <Statist.> key. Five "Statistics" keys are then available to choose what will be displayed in the table for each channel: Key Table Contents No statist. Channel Freq. or Spacing Level Noise SNR P/ Lambda P comp Freq or Channel Freq. or Spacing F or L Avg F or L F. or Sdev a F or L Lambda Statist. Lambda max Min L. Level Statist. Channel Freq. or Level Avg. P. Max P. Min P. Sdev P Lambda Mixed Statist. Channel Freq. or F or L F or L Max Level P min P Max Lambda min Statist. SNR Channel Freq. or SNR Avg. SNR Max SNR Min SNR Sdev Lambda SNR a. Standard deviation Press the <Exit> key to leave the Statistics menu. Channel sort The channels can be classified in the table in ascending order according to frequency (or wavelength), level or S/N ratio. To modify this order: • Press the <Cont Tab> key, then the <Sort> key. • Press the <Freq sort> key (or <Lambda sort> depending on the chosen unit), <Level sort> or <SNR sort>. 7-10 USER MANUAL 750000992/16 Artisan Technology Group - Quality Instrumentation ... Guaranteed | (888) 88-SOURCE | www.artisantg.com MTSe Display of WDM results Successive addressing of channels according to the chosen sort On the trace and in the table, it is possible to make the cursor successively pass on the channels according to the selected sort order. To do this: • Use the cursor key to choose the cursor A or B for use on the trace. • Press the <Channel> key. • Press on the > or < key to make the cursor jump back to the previous channel or on to the following channel: - with the frequency sort, the cursor follows the normal order of channels. - with the level sort, the cursor follows the order of the channel levels. - with the SNR sort, the cursor follows the order of S/N ratios. Table remarks A remark with the maximum of 40 characters, entered by the user, can be associated with each channel. For each trace, a maximum of 16 remarks is possible. Notes These remarks appear in the table if they have been validated in the «OSA test setup» menu on the Remarks in table line (Display window). Note Each remark is associated with a channel. Therefore, if the channel is erased, then the remark will also be erased. To enter a remark: • Press the SET-UP button, then the <Test Setup> key. • In the Results window, in the Remarks in table line, select Yes. • Press the RESULTS button and, if necessary, on the <Table> key to return to the Table display. • In the table, select the channel. • Press the <Expert> key, then the <Notes> key. • Enter the text of the note by using the edit menu which is displayed (see "Editing" on page 4-5). • Press the <Exit> key. Display of relative results The table usually gives the results in absolute values. To obtain these results as relative values, that is with respect to the reference channel, do the following: • Press the <Tab Cont> key, then the <Absolute Result> key: this key will then indicate <Relative Result>. • Move the cursor on to the channel that must be used as the reference. • Press the <Set Ref Channel> key. The results are then recalculated in relation to the reference channel. Current channels- found channels If the test initiates multiple acquisitions (2..100 mode or Continuous mode): • the number of «found channels» is registered with the first acquisition and the position of the channels is stored. USER MANUAL 750000992/16 7-11 Artisan Technology Group - Quality Instrumentation ... Guaranteed | (888) 88-SOURCE | www.artisantg.com MTSe Optical spectrum analyser • during the following acquisitions, the detected channels or «current channels» are not necessarily the same as the channels found with the first acquisition. To choose the channels to be displayed, use the <Current Channels> / <Found channels> key. Displaying in red the results exceeding alarm thresholds To display in red in the table the results exceeding the alarm thresholds that have been chosen in the OSA test setup menu, proceed as follows: • Press the <Cont Tab> key, then the <Current channels> / <Found channels> key until <Alarm channels> is displayed. Overlay of traces This Overlay Trace function which allows two traces to be displayed simultaneously on the screen is very useful to compare either the acquired spectrums from different fibers of the same cable, or to know how the spectrums from the same fiber evolve over time. For this, the instrument has an overlay memory in which the trace to be superimposed on the current trace must be stored. This memory can be used to store either: • the current trace to compare it with traces which will be acquired in the future. • a reference trace previously saved on a floppy disk or in internal memory, to compare it with the current trace. Overlaying a trace Overlaying the current trace To copy the current trace in overlay memory, do as follows: • On the trace display screen, obtained by pressing the RESULTS key, press the <Expert> key, then the <Overlay>, and finally the <Set overlay> key. The current trace copied in overlay memory is represented by a pale line (or, with a colored screen, in blue) which is automatically offset with respect to the current trace. • a new acquisition can then be started to compare the new trace with the one being overlaid. Transferring a stored trace to the overlay memory 1. Select the trace to be put in the overlay memory by using the procedure described in "Finding files" on page 8-18. 2. Press the <Load> key, then the <Overlay> key. The selected trace is then put in the overlay memory: it is represented by a pale (or blue) line and is automatically offset with respect to the current trace. It can be compared with the current trace. 7-12 USER MANUAL 750000992/16 Artisan Technology Group - Quality Instrumentation ... Guaranteed | (888) 88-SOURCE | www.artisantg.com MTSe Overlay of traces Possible actions after overlaying a trace Returning to a single trace display When two traces are displayed, press the <Remove> key to remove the overlay trace and display only the current trace. The softkey <View 2 curves> allows you to recall the last overlay trace so that you can have both traces on the screen again. Note The trace transferred to overlay memory is stored there and can therefore be recalled at any time until a new trace erases it. Removing the Y offset (shift) between traces To superimpose the overlaid trace and the current trace, press the <Adjust Y> key: the vertical offset (shift) of the traces is removed at the level of the selected cursor. Swapping traces The measurements can only be carried out on the current trace and not on an overlay trace. To make measurements on an overlaid trace, you have to exchange it with the current trace. To do this, press the <Swap> key. Shifting the current trace To vertically shift the current trace of the overlaid trace which remains fixed, press the <Exit> key twice to exit the overlay mode and the Expert mode, press the <Cursor> key, then use the ↑ or ↓ arrow keys. Shifting of the two traces To simultaneously shift the current trace and the overlaid trace, press the <Zoom/Shift> key to go to Shift mode, then use the ↑ and ↓ arrow keys. Trace resulting from the difference between the compared traces When two traces are simultaneously displayed, it is possible to obtain the trace corresponding to the difference, point by point, between the current trace and the overlaid trace. To do this, press the <2 Traces Diff.>. key. The screen then displays the overlaid trace and the trace resulting from the «Difference». It is then possible to recall the current trace and to erase the «Difference» trace by pressing the <Main trace> key. Exiting the overlay menu To exit from the overlay menu, press the <Exit> key. Saving and transferring the results to Excel To save the test results and transfer them to Excel, proceed as indicated in chapter 8. USER MANUAL 750000992/16 7-13 Artisan Technology Group - Quality Instrumentation ... Guaranteed | (888) 88-SOURCE | www.artisantg.com MTSe Optical spectrum analyser 7-14 USER MANUAL 750000992/16 Artisan Technology Group - Quality Instrumentation ... Guaranteed | (888) 88-SOURCE | www.artisantg.com Chapter File management 8 8 This chapter describes the following file management functions: ❏ Choosing the storage medium ❏ Storing data ❏ Using stored data (loading traces, copying and deleting a file) ❏ Automatic and manual file naming ❏ Overlaying traces ❏ Formatting a floppy disk Storage media For storing and recalling acquisition data MTSe is equipped with the following: • an internal RAM memory or an optional hard disk • an optional high density (HD) MS-DOS compatible 3.5” floppy disk drive. Selecting the storage location • Press the FILE key. The File manager window appears. File Manager Window (example with OTDR module) USER MANUAL 750000992/16 8-1 Artisan Technology Group - Quality Instrumentation ... Guaranteed | (888) 88-SOURCE | www.artisantg.com MTSe File management • In the File window, with the directional keys, select the Media/Dir option, then the support: Internal or Floppy Disk or Hard Disk (options). When the Media line is selected, the key <Format> is available to format the selected media (see "Formatting" on page 8-23). Storing data Use the following procedure to store the acquired data (trace and result table displayed on the screen): 1. Press the FILE key, then select the storage medium. 2. If the file must be stored in a directory, press the <Explore> key, select the directory then press the <Exit> key to return to the file menu. 3. Choose either the automatic storage after acquisition, or the manual storage. 4. Choose the required file naming mode, Manual or Automatic (see "Filename" on page 8-2). If the auto storage is selected, then the file naming must be auto or semi-auto. If not, a warning asks, after each acquisition, if the previous file must be deleted by the new one. 5. Choose the file format (see "OTDR file format" on page 8-11) 6. Press the <Save> key to save the trace and measurement results that are displayed on the screen to the selected medium. Note The date specified with the file name is the date of the storage. Filename The filename uses the DOS format: eight characters followed by three character extension. Different file naming When a trace has been called from memory, the Filenaming option of the File menu is not available to avoid an inopportune renaming of this file. The Filenaming option of the File menu provides the following choices: MANUAL The name of the file must be entered by the user on the Filename line, using the menu call by the <Edit> key. This menu display the available characters (understood by the DOS system) and, in the upper part the name being entered or to modify. Select the characters with the arrow keys. The <Valid Char.> key selects the character on which is the cursor; the <Delete char.> key delete it. For more details on this menu report to "Editing" on page 4-5. Note If a character is entered that is not a valid DOS character, it will be ignored. 8-2 USER MANUAL 750000992/16 Artisan Technology Group - Quality Instrumentation ... Guaranteed | (888) 88-SOURCE | www.artisantg.com MTSe Filename AUTO The file name is automatically created when it is saved, conforming to the naming conventions given below. SEMI-AUTO The file name is automatically created when it is saved, conforming a code defined by the user. Warning concerning file naming Note When saving in internal memory (RAM), if the first character of the identifier is a digit, it will be replaced with an A in the file name. Note If the identifier is in lower case, the three characters will be converted to upper case. Note If the identifier contains less than three characters, the missing characters will be replaced with Xs. OTDR Module Automatic Filenaming When you store a data to disk using automatic file naming, the filename is automatically created using the following file naming conventions: OTDR module automatic file naming: cccffwps First three characters of the Cable Id, defined in the Identifiers section of this menu ccc ff w 0 to 99 A0 to YZ 3 5 6 8 9 Fiber number decimal code alphanumeric code (100 to 999) Acquisition laser wavelength used for the measurement 1310 nm 1550 nm 1625 nm 850 nm 1300 nm USER MANUAL 750000992/16 8-3 Artisan Technology Group - Quality Instrumentation ... Guaranteed | (888) 88-SOURCE | www.artisantg.com MTSe File management OTDR module automatic file naming: cccffwps p s A B C D E F G H I J K L M Pulsewidth used for the measurement* 3 ns 5 ns 10 ns 20 ns 30ns 100ns 200ns 300 ns 500 ns 1 µs 3 µs 10 µs 20 µs O E Direction origin to extremity extremity to origin * the available values are depending on the module used. When a stored curve is displayed on the screen the filename is indicated in the display title bar. OTDR Module Semi-Automatic Filenaming The semi-auto Filenaming, being selected: • move the cursor on the line Filename. • Press the <Edit> key. The following editing menu appears: 8-4 USER MANUAL 750000992/16 Artisan Technology Group - Quality Instrumentation ... Guaranteed | (888) 88-SOURCE | www.artisantg.com MTSe Filename Semi-auto file naming edition • On the Coding line of the editing menu, define the filename code. For that, move the cursor on the different line of the menu (in the order you wish for the coding) and enter the corresponding characters pressing the <Valid Char.> key. • On the Title line, enter as much «t» as you want of characters of the title in the filename. In the above example, 3 «t» has been entered to start the coding, then the 3 first letters of the title began the filename. • On the Cabl. Ident., Origin and Extremity lines enter as «c», «o» or «e» as you want of characters of the concerned identification in the filename. • On the Fiber Number line, the 2 ff are imperative for the fiber number is always coded on two characters (see table below). If, after the coding, a f is remove in the coding, only the last figure of the fiber number will be in the filename. • To code Direction, Lambda, Pulse and Resolution only one character is necessary: see the following table. • The semi-automatic coding can also include fixed characters, different from coding parameter characters and selected, as in Manual Filenaming, in the list located on the 3 last lines of the editing menu. USER MANUAL 750000992/16 8-5 Artisan Technology Group - Quality Instrumentation ... Guaranteed | (888) 88-SOURCE | www.artisantg.com MTSe File management Attention when you leave the semi-automatic mode for another mode, the coding is lost. OTDR module semi-automatic file naming t... First characters of the title c ... First characters of the cable identification defined in the File windows ff 0 to 99 A0 to YZ o ... First characters of the origin location First characters of the extremity location e ... d w p 8-6 Fiber number decimal coding alphanumeric coding (100 to 999) O E Direction origin to extremity extremity to origin 3 5 6 8 9 Laser wavelength used for the measurement * 1310 nm 1550 nm 1625 nm 850 nm 1300 nm A B C D E F G H I J K L M Pulse * 3 ns 5 ns 10 ns 20 ns 30 ns 100 ns 200 ns 300 ns 500 ns 1 µs 3 µs 10 µs 20 µs USER MANUAL 750000992/16 Artisan Technology Group - Quality Instrumentation ... Guaranteed | (888) 88-SOURCE | www.artisantg.com MTSe Filename OTDR module semi-automatic file naming 0 1 2 3 4 5 6 7 8 9 10 A B D r Resolution * 4 cm 8 cm 16 cm 32 cm 64 cm 125 cm 250 cm 5m 10 m 20 m 40 m 80 m 160 m 320 m * the available values are depending on the module used. OTS Module Automatic Filenaming When you store an OTS data to disk using automatic file naming, the file name is automatically created using the following file naming conventions : OTS module automatic file naming: cccffwps ccc ff w First characters of the cable identification defined in the File windows 0 to 99 A0 to YZ 3 5 8 A U Fiber number decimal coding alphanumeric coding (100 to 999) Laser wavelength used for the measurement * 1310 nm 1550 nm 850 nm AUTO USER USER MANUAL 750000992/16 8-7 Artisan Technology Group - Quality Instrumentation ... Guaranteed | (888) 88-SOURCE | www.artisantg.com MTSe File management OTS module automatic file naming: cccffwps r s M U N A Range mW manual range µW manual range nW manual range Auto range O E Direction origin to extremity extremity to origin * the available values are depending on the module used. OTS Module Semi- Automatic Filenaming When you store an OTS data to disk using semi-automatic file naming, the file name is created using the file naming conventions selected by the user as follows: • Move the cursor on the Filename line. • Press the <Edit> key. The Editing menu appears. On the Coding line of the editing menu, define the filename code. For that, move the cursor on the different line of the menu (in the order you wish for the coding) and enter the corresponding characters pressing the <Valid Char.> key. • On the Title line, enter as much «t» as you want of characters of the title in the filename. • On the Cabl. Ident., Origin and Extremity lines enter as «c», «o» or «e» as you want of characters of the concerned identification in the filename. • On the Fiber Number line, the 2 ff are imperative for the fiber number is always coded on two characters (see table below). If, after the coding, a f is remove in the coding, only the last figure of the fiber number will be in the filename. • To code Direction, Lambda, Pulse and Resolution only one character is necessary: see the following table. • The semi-automatic coding can also include fixed characters, different from coding parameter characters and selected, as in MANUAL file naming, in the list located on the 3 last lines of the editing menu. OTS module semi-automatic file naming t ... First characters of the title c ... First characters of the cable identification defined in the File windows 8-8 USER MANUAL 750000992/16 Artisan Technology Group - Quality Instrumentation ... Guaranteed | (888) 88-SOURCE | www.artisantg.com MTSe Filename OTS module semi-automatic file naming ff 0 to 99 A0 to YZ o ... Fiber number decimal coding alphanumeric coding (100 to 999) First characters of the origin location First characters of the extremity location e ... d O E Direction origin to extremity extremity to origin 3 5 8 9 A U Laser wavelength used for the measurement * 1310 nm 1550 nm 850 nm 1300 nm AUTO USER M U N A Range mW manual range µW manual range nW manual range Auto range M T Real time / Averaging averaging real time w r m * the available values are depending on the module used. WDM Module Automatic Filenaming When you store an WDM data to disk using automatic file naming, the file name is automatically created using the following file naming conventions : WDM module automatic file naming: cccpppff ccc First characters of the cable identification defined in the second windows of the File menu. ppp First characters of the test point name USER MANUAL 750000992/16 8-9 Artisan Technology Group - Quality Instrumentation ... Guaranteed | (888) 88-SOURCE | www.artisantg.com MTSe File management WDM module automatic file naming: cccpppff ff 0 to 99 A0 to YZ Fiber number decimal coding alphanumeric coding (100 to 999) WDM Module Semi-Automatic Filenaming When you store an WDM data to disk using semi-automatic file naming, the file name is created using the file naming conventions selected by the user as follows: • Move the cursor on the Filename line. • Press the <Edit> key. The Editing menu appears. On the Coding line of the editing menu, define the filename code. For that, move the cursor on the different line of the menu (in the order you wish for the coding) and enter the corresponding characters pressing the <Valid Char.> key. • On the Title line, enter as much "t" as you want of characters of the title in the filename. • On the Cabl. Ident., Origin and Extremity, Test point lines enter as «c», «o», «e» or «p» as you want of characters of the concerned identification in the filename. • On the Fiber Number line, the 2 ff are imperative for the fiber number is always coded on two characters (see table below). If, after the coding, a f is remove in the coding, only the last figure of the fiber number will be in the filename. • To code the Resolution only one character (from 0 to 5) is necessary: see the following table. • The semi-automatic coding can also include fixed characters, different from coding parameter characters and selected, as in MANUAL file naming, in the list located on the 3 last lines of the editing menu. WDM module semi-automatic file naming t ... First characters of the title c ... First characters of the cable identification defined in the File windows ff 0 to 99 A0 to YZ o ... Fiber number decimal coding alphanumeric coding (100 to 999) e ... First characters of the origin location First characters of the extremity location p ... First characters of the test point name 8-10 USER MANUAL 750000992/16 Artisan Technology Group - Quality Instrumentation ... Guaranteed | (888) 88-SOURCE | www.artisantg.com MTSe Filename WDM module semi-automatic file naming 0 1 2 3 4 5 r Resolution Full 0.1 nm 0.2 nm 0.3 nm 0.4 nm 0.5 nm File format OTDR file format The Format option of the FILE menu provides the following file format choices, when an OTDR module is selected: WTK Wavetek format corresponding to a compressed Bellcore format, which optimizes storage space (recommended format). SOR 1.1 Format conforming to the Bellcore/Telcordia SR-5731 standard (issue december 1998). SOR 2.0 Format conforming to the Bellcore/Telcordia SR-5731 standard (issue february 2000). OTS file format .OTS Note if the OTS module is selected The OTS format can be opened by ExcelTM as a tab delimited file. WDM file format Each time a WDM result is saved, two files are created with the following format: .WDM: Acterna formats (compatible with the Acterna WinTrace and WinCable softwares) . .TXT ASCII format for a possible transfer to a spreadsheet or word processing program. Transferring MTSe file (table) to Excel This transfer concerns: - OTS tables of results - Both end measurement table of results (.oeo file) with OTDR module. It is not possible to transfer table of results of single OTDR measurement. - table of WDM results (files .txt) Transfer processing: Attention USER MANUAL 750000992/16 8-11 Artisan Technology Group - Quality Instrumentation ... Guaranteed | (888) 88-SOURCE | www.artisantg.com MTSe File management • Save the file on a floppy disk: see "Copying files from one medium to another (if available)" on page 8-21. • Copy this file on the PC loaded with the Excel software. • On the PC open Excel • In the Excel window select the type of file "Text file» and open the file to transfer. • The following window is displayed (example with an OTS file): Transferring OTS results under Excel (1) • Select the following parameters: File type: Delimited Start import at row: 1 File Origin: Windows (ANSI) • Click on: Next>. The following window is displayed: 8-12 USER MANUAL 750000992/16 Artisan Technology Group - Quality Instrumentation ... Guaranteed | (888) 88-SOURCE | www.artisantg.com MTSe Filename Transferring OTS file under Excel (2) • Select the following parameters: Delimiters: Tab Text Qualifier: " • Click on: Next>. The following window is displayed: Transferring OTS results under Excel (3) • Select the Column Data Format: General. • Click on: Finish. For OTS table The OTS measurement results are displayed in an Excel table as follows: USER MANUAL 750000992/16 8-13 Artisan Technology Group - Quality Instrumentation ... Guaranteed | (888) 88-SOURCE | www.artisantg.com MTSe File management OTS table under Excel A Macro (ref macroots.xls) is available to improve the layout of the table under Excel: it adds the column title (for parameters and results). To get this macro, ask your Acterna service center. Use of the file macroots.xls: • Open the file "macroots.xls ", then the OTS file to display. • In the menu bar select: Tools / Macro... • Select the file "macroots.xls" • Click on Run. The table is then displayed as follows: 8-14 USER MANUAL 750000992/16 Artisan Technology Group - Quality Instrumentation ... Guaranteed | (888) 88-SOURCE | www.artisantg.com MTSe Filename Memory Info and Comments In this example, the Memory info and Comments concern the trace recalled from Memory info menu of the File Manager window The information displayed in the Memory Info and Comments windows concerns: • either the acquired trace. • or the loaded trace if an acquisition has not been made since it was loaded. In this case to read again the data for the current configuration, press the <Next Acq Info> key. When the Memory Info and Comments concerning the current trace are displayed to call the informations concerning the loaded trace, press the <Memory Info> softkey. Memory Info The Memory Info menu allows the operator to add the following identification to the file, using the Edit function. Title A title for the measurement of up to 16 characters can be entered to aid identification of the measurement at a later date. Operator Enter an operator name. USER MANUAL 750000992/16 8-15 Artisan Technology Group - Quality Instrumentation ... Guaranteed | (888) 88-SOURCE | www.artisantg.com MTSe File management Cable Id. Choose an identification name for the cable. The first three characters of this name are used for the file name when automatic file naming* is selected. Fiber Number Select the identification number of the fiber from 0 to 999. This number is used in the file name when automatic file naming is selected. Auto increment Selection of auto-increment file name function. The fiber number automatically is incremented at each save operation. This number is also incremented in the file name (auto mode). Origin Location Allows a name to be entered for the origin of the fiber. End Location Allows a name to be entered for the end of the fiber. Direction Selection of the measurement direction: O → E (origin to extremity) or E → O. Comments The Comments zone allows the operator to enter with the Edit menu, comments about the file for future reference when the file is reloaded. This zone contains 3 independent lines of 31 characters. Manipulating stored data You can carry out any of the following operations on the data files stored on floppy or internal storage medium: <Load>, <Overlay>, <Copy>, <Delete> or <Rename>. Note Only files compatible with the selected module can be loaded : for example, you cannot load an OTS file if an OTDR module is selected. Explore function When the media is selected, press the <Explore> key. The display (see page 8-19) presents three windows: *. See "Filename" on page 8-2 8-16 USER MANUAL 750000992/16 Artisan Technology Group - Quality Instrumentation ... Guaranteed | (888) 88-SOURCE | www.artisantg.com MTSe Manipulating stored data Directory management Directory window The left window displays: • the icons representing the available media RAM or Hard disk and diskette (a double click on these icons gives a direct access at the corresponding media); • the directories contained in the selected media; • the free space in the selected media. When the cursor is in this window softkeys allows: <Open Dir> to open the selected directory <Create Dir> to create a new directory in the selected media or directory (seven levels of directory are possible). The Edit menu appears to select the directory name (8 characters max.). <Remove Dir>to remove the selected directory, on the condition this on is empty. Files window The right window displays the number of files contained in the selected media or directory and lists these files. If the list of files is not completely displayed, arrows on the right of this window shows where are the non-displayed files: • ↑: at the beginning of the list USER MANUAL 750000992/16 8-17 Artisan Technology Group - Quality Instrumentation ... Guaranteed | (888) 88-SOURCE | www.artisantg.com MTSe File management • ↓ : at the end of the list. Use the «↑» and «↓» arrow keys to scroll the list. The directory whose files are listed is highlighted. Use the arrow keys to move from one window to another or to select a file or a directory in a window. Bottom window The bottom window has the name of the selected file. It recalls the following parameters of this file, in order to facilitate the selection: • For file containing a macro or a logo: the type of file • For files containing an OTDR trace: its «Memory info» and acquisition parameters on 2 or 3 lines: title, operator, cable id, fiber number origin, extremity, direction, acquisition date and time module, wavelength, pulse, range, average time, (comments • For files containing OTS measurement results title, operator, cable id, fiber number origin, extremity, direction module, serial number, version, measurement date, number of memories Finding files To locate a file: 1. Press the FILE key, then select the storage medium, Internal or optional Hard disk or optional Floppy disk. The name of the selected directory is displayed on the following line (DIR). 2. Press the <Explore> key. The following menu is displayed (if the hard disk has been selected). 3. Select the directory where the file is stored, then press the <Open dir> key. The list of files contained in this directory is displayed. 4. Select the required file with the →, then ↑ and ↓ keys. Note To have a faster movement of the cursor, if scrolling by using one of the ↑ and ↓ arrow keys, maintaining pressure on this key causes the cursor to skip 3 files at a time. Selection of several files It is possible to select several files in order to delete them, print them or copy them on another media. The selected files are highlighted (yellow with a color screen). • Move the cursor to the first file as described above, then press the <Select> key. The cursor then moves to the following file. • If a several consecutive files must be selected, then press the <Select.> key as many times as required. • If there are several non-consecutive files to be selected, then move the cursor to each file and press the <Select.> key. 8-18 USER MANUAL 750000992/16 Artisan Technology Group - Quality Instrumentation ... Guaranteed | (888) 88-SOURCE | www.artisantg.com MTSe Manipulating stored data To deselect a file, place the cursor on this file, then press the <Deselect> key. Selecting all the files in a directory The <Select all> key selects all the files of the selected directory. Then, the <Cancel Select.> key allows to deselect all the files. Note If there hasn’t been any files selected by the <Select.>key, then the file where the cursor is currently placed above is considered as selected. File explorer Loading an OTDR trace When loading a trace, two possibilities are available: • either load only the trace • or load together with the trace: - the acquisition parameters and the fiber parameters selected when the trace was saved - the parameters selected in the file menu (except the media, the directory, the auto increment) In each case, automatic file naming is inhibited in order to keep the name of the loaded file. USER MANUAL 750000992/16 8-19 Artisan Technology Group - Quality Instrumentation ... Guaranteed | (888) 88-SOURCE | www.artisantg.com MTSe File management If the configuration can be recalled it is possible to make an acquisition with the same conditions as those of the recalled trace. Note If, during the acquisition of the trace, the OTDR was equipped with a different type of module to the current module, certain configuration parameters will not be able to be set. An error message will notify the user of this problem. Loading only the trace: 1. Find the file as described above. 2. Press the <Load> then the <Trace> keys. • If the lock markers icon is displayed, the trace is loaded and a measurement is started with the current locked markers. This allows several traces to be measured using the same markers. • If the lock markers icon is not displayed, the trace is loaded with its associated measurements. A floppy disk icon or internal memory icon is displayed in the title bar of the display while the trace is loading. Once the trace has been loaded the MTSe gives a warning tone and the trace is displayed. Loading a trace with the configuration: 1. Find the file as described above. 2. Press the <Load> then the <Trace + config.> keys. • If the lock markers icon is displayed, the trace is loaded with all the parameters defined in "Loading an OTDR trace" on page 8-19 and a measurement is started using the current locked markers. • If the lock markers icon is not displayed, the trace is loaded with all the parameters defined in "Loading an OTDR trace" on page 8-19 and its associated measurements. A floppy disk icon or internal memory icon is displayed in the title bar of the display while the trace is loading. Once the trace has been loaded the MTSe gives a warning tone and the trace is displayed. Loading an OTS table 1. Find the file as described above. 2. Press the <Load> then the <Table> key. A floppy disk icon or internal memory icon is displayed in the title bar of the display while the table is loading. Once the table has been loaded the MTSe gives a warning tone and the table is displayed. Deleting a file Use the procedure given page 8-18 to locate the file(s) to be deleted, then: 8-20 USER MANUAL 750000992/16 Artisan Technology Group - Quality Instrumentation ... Guaranteed | (888) 88-SOURCE | www.artisantg.com MTSe Manipulating stored data • Either press the <Select> key to select each file you want to delete. Select any of the stored files you want to delete. • or press the <Select all> key to select all the files in the directory. • Press the <Transfer> then the <Delete> key. • Press the <Confirm> key to delete the file or the <Cancel> key to abort the operation. A floppy disk icon or internal memory icon is displayed in the title bar of the display while the file(s) is (are) being deleted. Once the files have been deleted the MTSe gives a warning beep. Deleting a directory A directory can only be deleted if it is empty. So before to start deleting directories you must delete the files they contained. Use the Find file procedure to locate the directories to be deleted, then: • Press the <Remove Dir> key. • Press the <Confirm> key to delete the directory or the <Cancel> key to abort the operation. A floppy disk icon or memory icon or hard disk icon is displayed in the title bar of the display according to the media containing the directory. Once the directory has been deleted the MTSe gives a warning beep. Note Copying files from one medium to another (if available) Copies can be made from the floppy disk to the internal memory (or hard disk), or from the internal memory (or hard disk) to the floppy disk. Copying from floppy disk to internal memory or hard disk (if optional floppy disk present) • • • • • • • • Press the FILE key to call the File manager window. Select the Floppy disk medium. Press the <Explore> key: the directory of the floppy disk is displayed. Find the file(s) or directories to be copied (refer to "Finding files" on page 8-18). Press the <Select> key. Press the <Transfer> then the <Copy> key. Select the media and the directory, then press the <Open Dir> key. Press the <Confirm copy> key. The file(s) or directories is (are) copied to the internal memory or hard disk. the action can be aborted by pressing the <Abort Copy> key. While the file(s) is (are) being copied: - an internal memory or hard disk icon is displayed in the title bar. - the name of the copied file is displayed at the bottom of the screen. Once the files have been copied, the MTSe gives a warning beep. USER MANUAL 750000992/16 8-21 Artisan Technology Group - Quality Instrumentation ... Guaranteed | (888) 88-SOURCE | www.artisantg.com MTSe File management Copying from internal memory or hard disk to floppy disk (if option selected) • • • • • • • • Press the FILE key to call the File manager window. Select the Internal medium or Hard disk. Press the <Explore> key: the corresponding directory is displayed. Find the file(s) or directory (ies) to be copied (refer to "Finding files" on page 8-18). Press the <Select> key. Press the <Transfer> then the <Copy> key. Select the Floppy disk media and the directory, then press the <Open Dir> key. Press the <Confirm copy> key. The file(s) or directories is (are) copied to the floppy disk. the action can be aborted by pressing the <Abort Copy> key. While the file(s) is (are) being copied: - a floppy disk icon is displayed in the title bar. - the name of the file being copied is displayed at the bottom of the screen. Once the files have been copied, the MTSe gives a warning beep. Printing one or more stored traces Select printing parameters in the System setup menu (see page 3-12). Press the FILE key to call the File manager window. Select the medium with the files to print: Internal, Hard disk or Floppy disk Press the <Explore> key. Find the file(s) to be printed (move the cursor on each file and press the <Select> key). • Press the <Transfer> then the <Print Files> key. You can then cancel the printing using the <Abort > key. • • • • • 8-22 USER MANUAL 750000992/16 Artisan Technology Group - Quality Instrumentation ... Guaranteed | (888) 88-SOURCE | www.artisantg.com MTSe Formatting Printing files Renaming a file To rename a file: • Move the cursor on the filename to change as described above (see "Finding files" on page 8-18) • press the <Rename> key: the Editing menu appears. You can then enter the new name (see "Editing" on page 4-5). Formatting The internal RAM memory cannot be formatted. Formatting a floppy disk (if installed) Use the following procedure to format a 3 1/2 inch HD floppy disk: 1. Insert a 3 1/2 inch HD floppy disk in the disk drive. 2. Press the FILE key. The File manager window appears. 3. Move the cursor on the media line and select the floppy disk option in order to display the <Format> key. USER MANUAL 750000992/16 8-23 Artisan Technology Group - Quality Instrumentation ... Guaranteed | (888) 88-SOURCE | www.artisantg.com MTSe File management 4. Press the <Format> key. The <Abort> and <Confirm> keys are displayed to format the disk or abort the operation. 5. Press the <Confirm> key to start formatting the floppy disk. Note If there is no disk inserted in the disk drive, when you try to format it MTSe will display the following error message: (201) Insert a disk Hit any key to continue. Note If the disk is write protected MTSe will display the following error message: (200) disk error Hit any key to continue. While the disk is formatting, the floppy disk icon is displayed in the window title bar. No other operation can be carried out while this formatting is in progress. Once the formatting has completed the floppy disk icon is removed and you can continue using MTSe normally. Formatting the hard disk (if installed) Attention Formatting the hard disk will erase all the files present. Use the following procedure to format a the hard disk: 1. Press the FILE key. The File manager window appears. 2. Move the cursor on the media line and select the hard disk option in order to display the <Format> key. 3. Press the <Format> key The Format Code window is displayed. 4. Enter the code: 1313 using the left/right arrow key 5. Press the <Valid> key The <Abort> and <Confirm> keys are displayed to format the disk or abort the operation. 6. Press the <Confirm> key to start formatting the hard disk. While the disk is formatting, the hard disk icon is displayed in the window title bar. No other operation can be carried out while this formatting is in progress. Once the formatting has completed the hard disk icon is removed and you can continue using the MTSe normally. 8-24 USER MANUAL 750000992/16 Artisan Technology Group - Quality Instrumentation ... Guaranteed | (888) 88-SOURCE | www.artisantg.com Chapter 9 Remote control 9 Remote control of the MTSe uses either the IEEE 488 standard (or international equivalent IEC625-1) or RS232 interface. English is the default language. This chapter includes: ❏ Remote control principles (link to controller, format of commands, tree menus of commands) ❏ Description of programming commands and queries. Connection of the MTSe to a PC The MTSe can be remotely controlled via the RS 232-C (type DCE) interface of the controller or by the IEEE option if it is present in the unit. Connection via the RS232 interface Connect the serial remote controller to the 9 pin serial connector (RS232 DTE) of the MTSe. As PCs are usually configured as DTE, an adaptor (DTE to DCE) may be needed to connect the PC to the MTSe: see "Serial port (RS 232)" on page 4-10. Local / Remote command Send the command *REM to go in remote control mode. Send the command *LOC to return in local mode. Selection of the transmission parameters In the SYSTEM / RS232 menu, if necessary modify the following configuration parameters: BAUD RATE: 300, 600, 1200, 2400, 4800, 9600, 19200 38400, 57600, 115200 CHAR. LENGTH: 7 or 8 bits STOP BIT: 1 or 2 PARITY: Without, Even, Odd TERMINATOR: CR, LF, CR LF PROTOCOL: XON/XOFF, RTS/CTS, WITHOUT USER MANUAL 750000992/16 9-1 Artisan Technology Group - Quality Instrumentation ... Guaranteed | (888) 88-SOURCE | www.artisantg.com MTSe Remote control Connection via the Ethernet interface Equipment delivered with the option • RS232/Ethernet Adaptor plugged into RS232 port. • Ethernet crossed cable for direct link between PC and MTSe • WS-FTP Pro software (ref. 5996/MTS) • Diskette containing set-up file for WS-FTP Pro. Link with PC The link with the PC may be direct or via a network: 1. To establish a direct link, connect the Ethernet ports of the MTSe and PC by means of the cross cable supplied. 2. To establish a link via the network, ask the network administrator for an IP address and connect the MTSe on a hub by using a direct cable supplied by the administrator (and not the crossed cable provided for the MTSe Ethernet option). What to do with the PC • Install the software WS-FTP Pro. • Copy the file «.ini» from the diskette into the directory containing the software WS-FTP Pro by writing over the existing «.ini» file. • Make sure that the PC has an Ethernet card whose parameters are defined (TCP/IP protocol, IP address and bridge). To access these parameters, in Windows Explorer click on the icons «Work station», then «Configuration panel», then «Network». • Open the software WS-FTP pro. • If necessary, change the address of the MTSe in «Host Name». Configuration of MTSe • Start the MTSe and press the key <Config. System>. • Select the interface E/S: FTP/Ethernet. To do this, if the interface selected is RS232, press the left arrow <- to avoid passing via the FTP/PPP position, for which you would have to wait for the protocol change. • Configure the Ethernet interface: IP address, IP mask, IP bridge. Note The IP address is in the following form: xxx.xxx.xxx.xxx If one of the numbers in this address has only one or two figures, enter only this (or these) figure(s). Do not add a zero, otherwise the link will not be established. Note To check that the connection has been made correctly, without using the software WS-FTP Pro, click on Start, then on Execute..., and choose: «ping» followed by the IP address of the MTSe. Connection via a modem 1. Connect the modem to the MTSe: 9-2 USER MANUAL 750000992/16 Artisan Technology Group - Quality Instrumentation ... Guaranteed | (888) 88-SOURCE | www.artisantg.com MTSe Description of commands and queries • either via the RS232 connector. In this case, in the menu System set-up menu, on the Remote Access line select the option TCP/PPP. • or via the Ethernet connector (if the option is present). In this case, in the menu System set-up menu, on the Remote Access line select the option TCP/ ETH. 2. Press on the <Init Modem> key: the modem connected to the MTSe is initialized. You are ready to transfer data. Connection via the IEEE interface (optional, for MTS 5200e mainframe only: ref 5200/IEEE) Connect the controller to the IEEE port of the MTSe. The primary address of the MTSe should be selected from 0 to 30 in the system setup menu. Usually the address 0 is reserved for the controller. Description of commands and queries Command errors Remote control errors are saved in the event status register. • a «command error» (bit 5 of the register) is detected: - if the command is not in the programming dictionary. - if the parameters are out of range or incorrect. • an «execution error» (bit 4 of the register) is detected: if the instrument cannot execute the command in the given context; examples: if modification of an acquisition parameter while measurement is in process, etc. To know the command error, either read the Standard Event Register by < *ESR?> or enable the selected bit(s) of the Standard Event Enable Register by <*ESE> to be warned by a SRQ. See "Status structure Registers" on page 9-6. Command Format Remote control commands conform to the IEEE 488 (IEC 625-2) standard. They have a hierarchical structure with a top level (root) and one or more lower-levels (nodes). Commands are performed by stringing together nodes. Example: ACQ:PULS P5NS • ACQ is the root • :PULS is the second level node • P5NS is the parameter of the second level node. USER MANUAL 750000992/16 9-3 Artisan Technology Group - Quality Instrumentation ... Guaranteed | (888) 88-SOURCE | www.artisantg.com MTSe Remote control Command Syntax • Commands include upper and lowercase characters - only uppercase characters are required, - lower case characters can be removed to abbreviate the commands. • Successive nodes should be separated by a colon (:) • A space should separate the last level node from any possible associated parameter. If there are several parameters, a comma should separate them. • Examples of command: - complete: ACQUISITION:LASER L850 - abbreviated: ACQ:LAS L850 Abbreviation of command header Generally, when the header has more than four characters, the following rules are adopted: • The first four characters of the header are used, except if the fourth is a vowel. In the latter case the vowel is dropped and only the first three characters are necessary. Example: ACQ for ACQUISITION MEAS for MEASUREMENT • If the command is made from several words, the first letter of each word is used, except for the last one (three or four first characters). Example: MSL for Measurement Slope DSPL for Display Splice Linking commands Successive commands should be separated by a semicolon(;). Parameters There are several parameter types: • Numerical: decimal, signed and scientific numbers Examples: 245, 687E2, -1.48E3, .426, 1.100E-4 • Key words. Examples: OFF, ON, YES, NO • String of ASCII characters which should be enclosed within quotes (") or (’) Example: «TRACE TITLE» Queries The commands generally have an associated query. • Most of the queries have no parameters. They are terminated by? They are not specified in the following dictionary of the commands. Examples: SYST:PRIN? request the printer mode selected IDEN:OPER? request the identification of the operator 9-4 USER MANUAL 750000992/16 Artisan Technology Group - Quality Instrumentation ... Guaranteed | (888) 88-SOURCE | www.artisantg.com MTSe Common part commands • For queries requiring parameters the “?” is between the last node and the first parameter. They are given in the following command dictionary. A space is required just after the “?”. Examples: FIB:K? L1310 request the K coefficient for the wavelength 1310 nm ONOT? 24 request the note entered in the table for event number 24 Common part commands Remote Local mode (RS232 commands only) *REM Request to go to the remote mode. *LOC Request to return to local mode. Identification and option queries *IDN? MTSe request the MTSe identification. MTSe Response: Acterna, MTS5100, n, X.YZ with: n serial number X.YZ software version *OPT? Request options available on the MTSe Reset commands *RST Reset the SLGX1 LP to a predefined configuration (default state) SRQ commands (IEEE interface only) The IEEE.2 commands recognized by the MTSe are the following: Device status register read request *STB? Device Response: NR1 number from 0 to 255. Response to serial poll with bit 6: MSS. Device service request enable *SRE *SRE is followed by a number from 0 to 63 or 128 to 191. Action: The device modifies the bits in its service request enabling register. This instruction is associated with *SRE?. Device event register contents query *ESR? Device Response: NR1 number from 0 to 255. All events are cleared and the register is reset. USER MANUAL 750000992/16 9-5 Artisan Technology Group - Quality Instrumentation ... Guaranteed | (888) 88-SOURCE | www.artisantg.com MTSe Remote control *ESE *CLS Device event bit enable * ESE is followed by a number (0 to 255) Action: Enabling register modified and ESB bit updated. This instruction is associated with *ESE? Clear status registers - clear standard event register in RS 232 - clear standard event register and device status register in IEEE. Action: The device resets the status word register. If this command is the first in a message, the output queue is reset. If not, the queue is initialized on reception of the next message. Status structure Registers Status Byte Event Status Register Operation complete 0 Request control 1 Query error 2 Device dependent error 3 Execution error 4 Command error 5 User request 6 Power on 7 End acq 0 Error Temperature warning 1 2 3 SRQ (IEEE only) MAV 4 5 ESE ESE? MSS SRE SRE? 6 7 STB? ESR? • Bit 0 of STB • Bit 1 of STB • Bit 2 • Bit 4 of STB • Bit 6 of STB 9-6 at 1 at the end of the measurement; at 0 at the next acquisition or if STATUS:ACQ? is read at 1 if a warning is displayed; at 0 when a message is read by STATUS:ERROR? warning: excessive temperature in a module Message Available (MAV) Master Summary Status (MSS) USER MANUAL 750000992/16 Artisan Technology Group - Quality Instrumentation ... Guaranteed | (888) 88-SOURCE | www.artisantg.com MTSe Common part commands Status commands STATus ACQ? MTSe Response : "In-process" or "Stopped" (reported to bit 0 of STB page 9-6) TOP? Message displayed at the top of the screen Error message (Warning, reported to bit 1 of STB page 9-6) ERRor? They query results from a previous command. A result field indicates if the command succeeded and an error code in the case of failure. System setup commands Format des commandes SYSTem DATe [1997 : 2050], [1:12], [1:31] TIMe [0:23], [0:59], [0:59] LANGuage PRINter UNITs [FRENch, ENGlish, GERMan, SPANish, ITALian, CHINese, TAIWan, PORTuguese, JAPanese, [NONE, INTernal, EXTernal, FILE] [KM, KFEet, MILes] Description des fonctions DATe update the MTSe clock (year, month, day of the month). TIMe set the time (minutes, hours, seconds) LANGuage select the language used in the menus (if a VGA monitor is used) UNITs select the length unit: kilometers, kfeet or miles. Example of command SYST:DAT 2000,1,31 USER MANUAL 750000992/16 9-7 Artisan Technology Group - Quality Instrumentation ... Guaranteed | (888) 88-SOURCE | www.artisantg.com MTSe Remote control Commands relative to the module and the function Format des commandes MODule FONction? FONction NAME? [LEFT, RIGHt], [OTDR, SOUR, PWM, VFL, TSET, OSA] [LEFT, RIGHt], [OTDR, SOUR, PWM, VFL, TSET, OSA], [ON, OFF] [LEFT, RIGHt] Description des fonctions • Module functions OTDR Reflectometer SOUR Source PWM Power meter VFL Visual fault locator TSET Talk set OSA Optical Spectrum Analyser (WDM) • Module on or off ON Module On OFF Module Off • Position of the module in the instrument LEFT, RIGHt: position of the module in the instrument (seen from the rear of the MTSe). Commands relative to the keys Format des commandes KEY [STARt, FILE, RESult, SETup, HELP, UP, DOWN, LEFT, RIGHt, HOMe, PREView, SK1, Description des fonctions STARt Starts /stops an acquisition. FILE Calls up the file storage and management menu. RESult Calls up the results screen for all measurement analysis operations. SETup Calls up the set-up menus. HELP Calls up the on-line help pages. UP, DOWN, LEFT, RIGHt: directional arrows ↑ , ↓ , ← , →. HOMe 9-8 re-displays the trace with no shift or zoom. USER MANUAL 750000992/16 Artisan Technology Group - Quality Instrumentation ... Guaranteed | (888) 88-SOURCE | www.artisantg.com MTSe Common part commands PREView Begins the waveform acquisition in real time without averaging the results. The unit either can be stopped remotely during the real time acquisition or will stop automatically after 10 minutes. SK1, …SK6 Softkey 1 to 6 (from top to bottom of the display). BEGinacq Begins the waveform acquisition and averages waveform results during the acquisition period. The unit either accepts a number of seconds for the acquisition time or can be stopped remotely during averaging. HALTacq Stops an acquisition. Identification commands for a previous measurement This information concerns the loaded trace («memory info» of the file menu). Format des commandes IDENt TITLe [«string of 16 characters»] OPERator [«string of 16 characters»] CABLe [«string of 16 characters»] ORIGin [«string of 16 characters»] TERMin [«string of 16 characters»] DIRection [OE, EO] FNUMber [0...999] INCFiber [YES, NO] FILEName [«string of 8 characters»] COMMents [string of 93 characters] TPOint [«string of 16 characters»] Description des fonctions TITLe Title for the measurement. OPERator Operator name. CABLe Identification name for the cable. The first three characters of this name are used for the file name when automatic file naming is selected. ORIGin Name for the origin of the fiber. USER MANUAL 750000992/16 9-9 Artisan Technology Group - Quality Instrumentation ... Guaranteed | (888) 88-SOURCE | www.artisantg.com MTSe Remote control TERMin Name for the end of the fiber. DIRection Measurement direction: O → E (origin to extremity) or E → O. FNUMber Identification number of the fiber from 0 to 999. This number is used in the file name when automatic file naming is selected. INCFiber Auto-increment file name function. The fiber number is automatically incremented at each save operation. This number is also incremented in the file name (auto mode). FILEName Filename. COMMents comments about the file for future reference when the file is reloaded (3 independent lines of 31 characters). TPOint Test point (WDM module only). Next measurement identification commands This information concerns the acquired trace («next acq. info.» of the file menu). Format des commandes NACQuisition TITLe [«string of 16 characters»] OPERator [«string of 16 characters»] CABLe [«string of 16 characters»] ORIGin [«string of 16 characters»] TERMin [«string of 16 characters»] DIRection [OE, EO] FNUMber [0...999] INCFiber [YES, NO] FILENAME [«string of 8 characters»] COMMents [string of 93 characters] TPOint [«string of 16 characters»] Description des fonctions Identical to Identification commands for a previous measurement. Remarks in table (Result window display chosen via the Test Setup menu). 9-10 USER MANUAL 750000992/16 Artisan Technology Group - Quality Instrumentation ... Guaranteed | (888) 88-SOURCE | www.artisantg.com MTSe Command relative to the OTDR module Format des commandes ONOTes [1:100], [string of 41characters] Description des fonctions Note of up to 41 characters associated with an event. For each wavelength, a maximum of 16 notes are possible. Command relative to the OTDR module Acquisition commands Format des commandes ACQuisition LASer PROGram PULSe RANGe MAXTime RESolution BEEP [L850, L1300, L1310, L1550, L1625] [MANual, AUTO] [P3NS, P5NS, P10Ns, P20Ns, P30Ns, P50Ns, P100ns, P200ns, P300ns, P500ns, P1US, P3US, P10Us, [R1, R2,…R8] The range depends on the module (see page 11-13) [5 : 600] [AUTO, MANU].[0.0:320.0] [ON, OFF] Description des fonctions LASer Sets the laser source to the appropriate wavelength supported by the optics subsystem of the unit (depending on the module installed). PULSe Sets the pulse width to a value supported by the optics subsystem of the unit (from 3 ns to 20 µs depending on the modules). RANGe Sets the distance range to a value supported by the optics subsystem of the unit (depending on the modules). MAXTime Sets the acquisition period used for averaged acquisitions (from 5 s. to 10 mn). Note: a real time acquisition will stop after 10 minutes. RESolution Set the resolution to a value supported by the optics subsystem of the unit (from 8 cm to 320 m depending on the module): USER MANUAL 750000992/16 9-11 Artisan Technology Group - Quality Instrumentation ... Guaranteed | (888) 88-SOURCE | www.artisantg.com MTSe Remote control AUTO: The MTSe will choose the appropriate resolution. The second parameter is necessary but not significant. MANU: the resolution must be given in the second parameter. If the selected value is less than the min. possible value, then the min. possible value will be selected. BEEP Choice of whether or not the end of an acquisition is signalled by an audible beep. PROgram Autoconfiguration command for the next acquisition MANual: the MTSe will choose the acquisition range, pulse, resolution and acquisition time specified by the operator using the above commands. AUTO: the auto-config function is enabled. The MTSe will choose the appropriate acquisition range, pulse and resolution in relation to the acquisition time specified by ACQ:MAXTime for the fiber under test. As soon as these acquisition parameters have been chosen, a «final acquisition» is launched using these chosen parameters for the specified acquisition time. An automatic measurement is made at the end of the final acquisition. 9-12 USER MANUAL 750000992/16 Artisan Technology Group - Quality Instrumentation ... Guaranteed | (888) 88-SOURCE | www.artisantg.com MTSe Command relative to the OTDR module Result commands Format des commandes MEASure DSPLice DREFlectance [0 : 601] [-100 : -10] DSLope [0:2001] DGHOst [YES, NO] MSLope [TWOpoints, LINear] DCURve [YES, NO, GRAPhic] DREMarks [NO, UNCertainty, NOTes, YES*] ENDFiber [2:15] End of fiber 2= automatic 3 to 15 = threshold in LCABle [0,3] Launch cable0= not valid 1 to 3 = marker 1 to 3 *. NOTes and YES are equivalent Description des fonctions DSPLice Splice threshold between 0 and 601 in hundredth of dB: 0: all splices displayed; 601: no splice displayed Factory default value: ALL DREFlectance Reflectance threshold in dB, between -11 and -99. - 100: all reflectances displayed. - 10: no reflectances displayed. Factory default value: ALL DSLope Slope threshold in thousandth of dB/km between 0 and 2001: 0: every slope displayed 001: no slope displayed 100: slopes > 0.1 dB displayed Factory default value: >0.10 dB/km DGHOst Choose from yes or no to display ghost information. If ghosts are displayed: the reflection icon is shown dotted in the result table, the reflection value is shown between parentheses on the trace; USER MANUAL 750000992/16 9-13 Artisan Technology Group - Quality Instrumentation ... Guaranteed | (888) 88-SOURCE | www.artisantg.com MTSe Remote control e.g. “(R:-50dB)”. Factory default value: yes. Ghosts are only detected during an automatic measurement. MSLope Slope measurement methods: least squares (LSA) or 2-point loss. Factory default value: LSA DCURve Measurements displayed on trace: No: the trace only YES: the trace with results and markers GRAPhic: the trace with markers only. Factory default value: YES DREMarks display of notes in the table NO: no additional display YES and NOTes: display notes entered by the user UNCertainty: display notes entered by the user and confidence indicators for the result measurements. Factory default value: No ENDFiber Fiber end threshold from 2 to 15. 2= automatic (factory default option) 3 to 15 = threshold in dB In most cases the AUTO option is advised. LCABle Choose to display in the event table, the results referenced to the launch cable. - 0: all the results are displayed and the reference is the origin of the fiber. - 1, 2 or 3: results are referenced from the marker 1, 2 or 3 selected. This marker is considered as the «end of launch cable» and is the reference for loss and distance measurements. Factory default value: No. 9-14 USER MANUAL 750000992/16 Artisan Technology Group - Quality Instrumentation ... Guaranteed | (888) 88-SOURCE | www.artisantg.com MTSe Command relative to the OTDR module Fiber commands Format des commandes FIBer N [L850, L1300, L1310, L1550, L1625], [1.3 : 1.7] Index of the fiber depending on the wavelength K [L850, L1300, L1310, L1550, L1625], [-99 :-50] Backscattering coefficient depending on the wavelength N? [L850, L1300, L1310, L1550, L1625] K? [L850, L1300, L1310, L1550, L1625] Description des fonctions N Sets the group index of refraction of the total fiber under test from 1.30000 to 1.70000. K Backscatter coefficient from -99 dB to -50 dB in 0.1 dB steps. Modification of K modifies the reflectance and ORL measurements. N and K depends on the wavelength: 850 nm MM, 1300 nm MM, 1310 nm SM, 1550 nm SM and 1625 nm SM. N? Reads the group index of the fiber, for the given wavelength. K? Reads the backscatter coefficient of the fiber, for the given wavelength. USER MANUAL 750000992/16 9-15 Artisan Technology Group - Quality Instrumentation ... Guaranteed | (888) 88-SOURCE | www.artisantg.com MTSe Remote control Reading of OTDR results commands Format des commandes OTResult OTDR? PULSewidth? RANGe? LASer? ATIMe? DATE? SIZE? XOFFset? XSCale? YOFFset? YSCale? BUFFer? CURSor [A, B], [0 : 400.000.0] m CURSor? [A, B] CVALue? [A, B] STABle? LTABle? [1: 200] RTABle? [1 : 200] N? K? OFILe? [SOR, WTK, BSOR, BWTK] Description des fonctions These commands retrieve test results in the Bellcore GR-196-CORE Issue 1, 1995 Standard OTDR Record (SOR) format. OTDR? Returns the MTSe type. 9-16 USER MANUAL 750000992/16 Artisan Technology Group - Quality Instrumentation ... Guaranteed | (888) 88-SOURCE | www.artisantg.com MTSe Remote control PULSewidth? Returns the pulsewidth RANGe? Returns the range LASer? Returns the wavelength ATIMe? Returns the acquisition time DATE? Returns the date SIZE? Returns the number of points (size of the trace). XOFFset? Returns the X axis offset XSCale? Returns the X axis scale YOFFSet Returns the Y-axis offset YSCale? Returns the Y axis scale BUFFer? Returns the buffer storing the trace (see next section for more details). CURSor Choice of cursor A or B. CURSor? Returns the A or B cursor position. CVALue? Returns the result at the cursor A or B position (value in dB). STABle? Returns the number of lines in the table LTABle? Splice Type of event RTABle Returns the content of a line in the table Response given as a string. Error message if the line does not exist. Example of response to the command: OTResult:LTABle? 30 27953.35 0.015 0.274 3257.2 7.670 distance attenuation reflectance (if available) slope before event section length Returns the content of a user note in the table (number of the line between 1 and 200). Response given as a string. Error message if the line does not exist. N? Returns the group index used for the fiber trace. K? Returns the backscatter coefficient used for the fiber trace. OFILe? Total Loss Returns the current trace as a file (analog to files saved using the FILE menu) in either a Bellcore or Wavetek file format: SOR: Bellcore WTK: Wavetek BSOR: Bellcore with the size of the file in front of the results BWTK: Wavetek with the size of the file in front of the results 9-17 USER MANUAL 750000992/16 Artisan Technology Group - Quality Instrumentation ... Guaranteed | (888) 88-SOURCE | www.artisantg.com MTSe Remote control Reading the buffer storing the trace The current curve is stored in a buffer. Capacity of this buffer: 4 x number of points. Each point is coded using four ASCII characters on 16 bits. Command used to read the buffer: OTResult:BUFFer? Example of response for a buffer of 2000 points: #6008000217F217E2180 Size in bytes number of characters for the size First point 2nd poin CBFF CB00 2000t h 3rd point In this example, for the first point, the y value is 217F in signed hexadecimal. To know the value in dB process as follows: • convert 217F in signed decimal: 8575 • use the commands given below to know the coefficients A and B • value in dB with the given examples: A*y + B = (-0.001470 x 8575) + 12.640910 = 0.036 dB In this example, for the last point, the y value is CB00 in signed hexadecimal. Thus: • CB00 in signed decimal = -13568 • the value in dB is: A*y + B = [-0.001470 x (-13568)] + 12.640910 = 32,586 dB Number of points in the buffer? OTRESult:SIZE? Example of response: 32000 Abscissa of the first point in second? OTRESul:XOFFset? Example of response: 0.000000 To convert this result from second to distance, report to "Conversion from delay to distance" on page 9-19. Time between 2 points? OTRESul:XSCale? Example of response: 6.250000e-09 To convert this result from second to distance, report to "Conversion from delay to distance" on page 9-19. Coeff B of the function A*y + B? OTRESult:YOFFset? Example of response: 12.640910 Coeff A of the function A*y + B? OTRESult:YSCale? Example of response: -0.001470 9-18 USER MANUAL 750000992/16 Artisan Technology Group - Quality Instrumentation ... Guaranteed | (888) 88-SOURCE | www.artisantg.com MTSe Commands relative to the OTS modules Conversion from delay to distance To convert the result from second to meter, use the following formula: c×t 8 D ( meters ) = ------- ∼ 10 × time (s) 2×n with: c = speed of light in vacuum (2.99792458 m/s) n = refractive index of the fiber t = time (expressed in second) to convert in distance Commands relative to the OTS modules Power meter set-up Format des commandes PWMeter LAMBda LUSer [AUTO, L850, L1310, L1550, USER] [800: 1650] valid if LAMbda= user RANGe [AUTO, MW, UW, NW] auto and manual range MODe [NONE, STORE, PRINT], [1:43200]time in seconds REALtime ALArm ATTenua [YES, NO] [OFF, ON], [-70:30] [0:30] REFeren ZERo Description des fonctions LAMbda Wavelength for the measurement LUser Selection of any wavelength value between 800 nm to 1650 nm (if LAMbda = USER) RANGe Measurement range of the power meter: Auto, mW, µW or nW. MODe NONE: no automatic storage, neither automatic printing of the results. STORE: automatic storage of the results in a file at the time interval selected in seconds in the second parameter. USER MANUAL 750000992/16 9-19 Artisan Technology Group - Quality Instrumentation ... Guaranteed | (888) 88-SOURCE | www.artisantg.com MTSe Remote control PRINT: automatic printing of the results on the printer connected to the MTSe at the time interval selected in seconds in the second parameter. REALtime Choice of the real time or averaging mode. When this mode has not be selected the power meter is, by default, in averaging mode. ALArm Selection of the required alarm threshold (-70 to +30 dBm). ATTen Entry of the value (0 to 30 db) of an external attenuator, if one is being used. REFeren Select the currently displayed value as a reference value to compare to other measured results. ZERo Adjust the zero setting of the power meter when a blanking cap is fitted to the power meter optical input. Power meter reference query Format des commandes PWMeter GETRef? [L850, L1310, L1550] Response: reference value for the Wavelength selected. Laser source set-up Format des commandes SOURce LASer LAMBda [ON, OFF] [L850, L1300, L1310, L1550] MODe [CW, M270, M330, M1000, M2000,SCANNING] POWer [CALIBRATED, VARIABLE], [0:255] , [0:255] SENDlamb EMUL [NO, YES] Description des fonctions LASer ON: validates the emission from the laser or LED. OFF: stops the emission from the laser or LED LAMBda Choice of wavelength (according to configuration of module): 1310 or 1550 nm for LASER source 850 or 1300 nm for LED source 9-20 USER MANUAL 750000992/16 Artisan Technology Group - Quality Instrumentation ... Guaranteed | (888) 88-SOURCE | www.artisantg.com MTSe Laser source set-up MODe Transmission mode of signal emitted: CW: continuous power M270, M330, M1000, M2000: power modulated to selected frequency (270 Hz, 330 Hz, 1 kHz, 2 kHz) SCANNING: sources are alternated at regular intervals. POWer Transmitting power of laser source: CALIBRATED: power calibrated to 1 mW (0 dBm). VARIABLE: variable power from 0 to -10 dBm (if continuous mode only). Second parameter: rough setting from 0 to 255. Third parameter: fine setting from 0 to 255. SENDlamb If continuous mode was chosen, this commands the sending of a signal to the radiometer which switches it to the same wavelength as the source. EMUL Used to emulate the operation of the OLS sources of the WWG family. Reading of OTS results Format des commandes OTSResult PWE? [W, DBM] MEA? [W, DBM, DBR] MODe? BUFFer? MEM? [1:300] Reply to command PWE? Power emitted by source in W or dBm. MEA? Power measured by radiometer in W, dBm or dBr. MODe? Reception mode: continuous (CW) or modulated to following frequencies: 270 Hz, 330 Hz, 1 kHz or 2 kHz (M270, M330, M1000, M2000). BUFFer? Result of measurement stored by Auto store mode. Response on a line for each measurement: Date Hour, Lambda, Result (dBm), result Received mode (dBr), Example of response: 22/12/98 09:42:28, 1310 nm, -10,03 dBm, 0,00 dBr, Cw Only the parts of the buffer containing measurement results are USER MANUAL 750000992/16 9-21 Artisan Technology Group - Quality Instrumentation ... Guaranteed | (888) 88-SOURCE | www.artisantg.com MTSe Remote control read. For example, if ten measurements have been conducted, ten lines with the above format will be sent. MEM? Reading of one of 300 measurement results which were able to be stored in memory. This result is given on one line in the form: Date Hour, Lambda, Result (dBm), Res. (dBr), Ref (dBm), Received mode 9-22 USER MANUAL 750000992/16 Artisan Technology Group - Quality Instrumentation ... Guaranteed | (888) 88-SOURCE | www.artisantg.com MTSe Commands relative to the WDM module Commands relative to the WDM module Configuration OSA Format des commandes OSASetup DEFault MODe [0:100] HSEns [YES, NO] RESO [FULL, R01nm, R02nm, R03nm, R04nm, R05nm] DETection [FIRst, GRId] STH [-80.0: 20.0] STAtistics [YES, NO] SNI [AUTO, I25ghz, I50ghz, I100ghz] SNM [LEFT, RIGHt, BOTH] NBAnd [10:10000] SEScreen [AUTO, FULL, MANual] MSScreen [190.0:198.0] MEScreen [190.0:198.0] UNIt GRID [THz, NM] TYPe ITU [OFF, CONv, ITU, MANual, AUTo] FIRst CNUmber SPAcing Manual FIRst CNUmber ASAve SPAcing [ 185.0:198.0] [1.100 ] [ [ 185.0:198.0] [1.100 ] [ 20.0:100.0] Description des fonctions DEFault Configuration choice by default. MODe The number of acquisitions used for the statistics 1 = only one acquisition USER MANUAL 750000992/16 9-23 Artisan Technology Group - Quality Instrumentation ... Guaranteed | (888) 88-SOURCE | www.artisantg.com MTSe Remote control 2 to 100: the number of acquisition 0= continuous acquisition HSEns YES = commutation of High sensitivity saving. RESO Filter resolution. FULL: maximum filter resolution (<0,1 nm) R01, R02, R03, R04, R05 = 0,1 / 0,2 / 0,3 / 0,4 or 0,5 nm. DETection Detection of channels: FIRst: on the first acquisition. GRId: according to the manual grid. STH Signal presence threshold (-80 to 20 dBm) on the measurement table. Threshold Auto = - 80.0. STAtistics YES / NO: to do / not to do statistics. SNI Space with the peak, from the reference point for the noise: AUTO I25ghz, I50ghz, I100ghz: to 25, 50 or 100 GHz of the peak. SNM Side of the peak from where the reference point is taken for the noise. LEFT, RIGHt: left, right. BOTH: left and right. NBAnd Width of the noise bandwidth used in the Signal/Noise, from 10 pm to 10 000 pm. Default value 100 pm. SEScreen Start and end of screen display: AUTO: Automatic detection of start and end of display. FULL: Start of display at 1525 nm; End of display at 1570 nm. MANual: choice of the following commands MSScreen Choose the start of the display (from 190.0 THz to 198.0 THz). MESceen Choose the end of the display (from 190.0 THz to 198.0 THz). UNIt Unit chosen for the horizontal axis. GRID Choose the type of reference grid: ITU FIRst first channel in THz MAN number of channel SPA spacing between channel in tenth of GHz MAN FIRst first channel in THz MAN number of channel SPA spacing between channel in tenth of GHz ASAve 9-24 Save the locations of the channels to set the automatic grid on them. USER MANUAL 750000992/16 Artisan Technology Group - Quality Instrumentation ... Guaranteed | (888) 88-SOURCE | www.artisantg.com MTSe Commands relative to the WDM module Reading of OSA results Format des commandes OSAResult DATE? TIME? SIZE? XOFfset? XSCale? YOFfset? YSCale? BUFfer? FBUffer? CURsor [A, B] , [190.0: 198.0] m CURsor? [A, B] CVAlue? [A, B] GAIN TILT? GAIN SLOpe? POWER TOTal? POWER COMposit? NCHannel TOTal? NCHannel [1 : 100] AVG? [1 : 100] NOIse? [1 : 100] IBUf? [1 : 100] NOW? [1:100] FREQ AVG? [1:100] LEVel MIN? [1:100] OSNR MAX? [1:100] TABle? SDEV? [1:100] TABle OFILe? PREsent? PREsent? STATus? [WDM, BWDM] USER MANUAL 750000992/16 9-25 Artisan Technology Group - Quality Instrumentation ... Guaranteed | (888) 88-SOURCE | www.artisantg.com MTSe Remote control Description des fonctions DATE Acquisition date TIME Acquisition time SIZE? Number of points on the curve* XOFfset? First point of Abscissa (in THz)1 XSCale? Space X between two points (in THz)1 YOFfSet Y axis shift - Coefficient B of «val dB = A*y + B» 1 YSCale? Y axis scale - Coefficient A of «val dB = A*y + B» 1 BUFfer? Reading of the memory containing the curve in ASCII1. FBUffer? Reading of the memory containing the curve in binary. CURsor A or B cursor position CURsor? A or B cursor position? CVAlue? Intersection level (in dBm) point of the A or B cursor and the curve? GAIN:TILT? Gain tilt between the cursors in dB? GAIN:SLOpe? Gain slope in dB /THz? POWER:TOTal? Power total in dBm? POWER:COMpos? Composite power? NCHannel:TOTal? Total number of detected channels at first acquisition? NCHannel:PREsent? Total number of detected channels at last acquisition? Commands relative to a channel for which the order number is indicated: PREsent? Present channel? AVG? Number of acquisitions on the channel to calculate the min., max., and average value? NOIse? Channel noise level? IBUf? Channel position in the buffer? FREQ:NOW? Last acquisition channel frequency? FREQ:AVG Average channel frequency? FREQ:MIN? Minimum channel frequency? FREQ:MAX? Maximum channel frequency? FREQ:SDEV? Channel standard deviation frequency? *. Refer to the "Reading the buffer storing the trace" on page 9-18. 9-26 USER MANUAL 750000992/16 Artisan Technology Group - Quality Instrumentation ... Guaranteed | (888) 88-SOURCE | www.artisantg.com MTSe Commands relative to the WDM module LEVEL:NOW? Last acquisition channel level? LEVEL:AVG Average channel level? LEVEL:MIN? Minimum channel level? LEVEL:MAX? Maximum channel level? LEVEL:SDEV? Channel level standard deviation? OSNR:NOW? Signal/Noise of the channel during the last acquisition? OSNR:AVG Signal/Average noise for the channel? OSNR:MIN? Signal/Min. noise for the channel? OSNR:MAX? Signal/Max. noise for the channel? OSNR:SDEV? Signal/Noise standard deviation for the channel? OFILe? Returns the current results in a file. Acterna file format: WDM or BWDM. The BWDM file is the same as the WDM one but the size of the file is given in front of the response. TABle? Returns the current table in a file in ASCII format. TABle:STATus Returns "UPDATED" if a new table can be read. Otherwise returns "NOT UPDATED". Reading the buffer storing the trace The current curve is stored in a buffer. Capacity of this buffer: 4 x number of points. Each point is coded using four ASCII characters on 16 bits. Command used to read the buffer: OTResult:BUFFer? Example of response for a buffer of 2000 points: #6008000217F217E 2180 Size in bytes First point number of characters for the size 2nd point 3rd point CBFF CB00 2000th point In this example, for the first point, the y value is 217F in signed hexadecimal. To know the value in dB process as follows: • convert 217F in signed decimal: 8575 • use the commands given below to know the coefficients A and B • value in dB with the given examples: A*y + B =(-2.939746e-03 x 8575) + 34.590000= 9.382 dB USER MANUAL 750000992/16 9-27 Artisan Technology Group - Quality Instrumentation ... Guaranteed | (888) 88-SOURCE | www.artisantg.com MTSe Remote control In this example, for the last point, the y value is CB00 in signed hexadecimal. Thus: • CB00 in signed decimal = -13568 • the value in dB is: A*y + B = [-2.939746e-03 x (-13568)] + 34.590000 =- 13533.412 dB Number of points in the buffer? OSARESult:SIZE? Example of response: 32000 Abscissa of the first point in THz? OSARESul:XOFFset? Example of response: 196.585464 Interval between 2 points in THz? OSARESul:XSCale? Example of response: 7.566895e-04 Coeff B of the function A*y + B? OSARESult:YOFFset? Example of response: 34.590000 Coeff A of the function A*y + B? OSARESult:YSCale? Example of response: -2.939746e-03 9-28 USER MANUAL 750000992/16 Artisan Technology Group - Quality Instrumentation ... Guaranteed | (888) 88-SOURCE | www.artisantg.com Chapter Maintenance 10 10 This section details the following operations for the MTSe: ❏ Maintenance procedure ❏ Conditions of guarantee ❏ Cleaning For software updates or to find our Acterna representatives and technical support offices around the world please visit our web site: www.acterna.com Maintenance procedure Maintenance work on this instrument can only be undertaken by qualified personnel using suitable equipment. In the majority of cases, it is advisable to contact the nearest Acterna Service Centre, which will undertake the appropriate troubleshooting and repair work. The performance and technical complexity of the MTSe class this instrument in a new generation of equipment, for which Wavetek has defined a maintenance policy based on the modular standard replacement principle. In implementation of this policy, we have set up powerful card troubleshooting test resources in our factories and a rapid dispatch system operating between our factories and branches. Only by this procedure can the high quality of the instrument continue to be ensured after repair work. This procedure also has the advantage of reducing repair cost and time. In order to ensure maximum quality and efficiency, we strongly recommend adoption of the following maintenance procedure in the event of a fault or failure: • Verify that the instrument is plugged in. • Verify the connections of any peripheral equipment to the MTSe. USER MANUAL 750000992/16 10-1 Artisan Technology Group - Quality Instrumentation ... Guaranteed | (888) 88-SOURCE | www.artisantg.com • MTSe Maintenance • If a fault is detected, or if a doubt exists, it is advisable to contact the nearest Wavetek Service Centre which will undertake the appropriate repair work. Returning an instrument When returning an instrument, please indicate the following minimum information: • The type and serial number of the instrument • A description of the fault found with the instrument. The returned instrument will then be repaired and calibrated. Guarantee conditions Any exchange of boards or sub-assemblies during the instrument’s guarantee period is carried out at the expense of Wavetek. For any work carried out on a board or sub-assembly other than by Wavetek Service Centers, the cost of the replacement board or sub-assembly will be invoiced. Cleaning Cleaning the front and rear panels and the covers The front and rear panels, as well as the covers, can become tarnished with use. To clean them, use soapy water. Do not use products with a petroleum spirit, trichloroethylene, benzene or alcohol base, as they attack the printed markings. Cleaning the screen To clean the screen, use anti-static products. Precautions governing optical connections • The normal operating life of an optical connector is usually of the order of a few hundred manipulations. It is therefore advisable to manipulate the optical connections as rarely as possible. • The instrument is designed to function correctly in a non - hostile environment, hence the cleanliness of the optical connectors as well as their delicate manipulation is paramount to the instrument’s measurement abilities. • The optical connector must therefore be clean and dust-free. If the optical connection is not being used, protect the connections of MTSe using the covers provided. As an example, the use of connectors that have not been cleaned will represent an error of the order of 10% for all measurements. This error is added to other errors present, for example the quality of the fiber (circularity and concentricity), the means of alignment (axis alignment, distance between fiber faces, quality of fiber face) and propagation modes. 10-2 USER MANUAL 750000992/16 Artisan Technology Group - Quality Instrumentation ... Guaranteed | (888) 88-SOURCE | www.artisantg.com MTSe Battery replacement Cleaning the optical cable connector Note If your module has an universal connector, unscrew its adaptor to access the ferule. • Use a non degradable type of paper, such as Joseph paper, soaked in ethanol. • Pay particular attention to the polished face of the fiber, rubbing it in a perpendicular motion to the fiber. Cleaning the optical inputs or outputs of the MTSe • Squirt a highly flammable solvent (such as ethanol or «Trijelt») into the connector. • Blow out the connector using a clean dry air supply from an aerosol can fitted with an extension. Battery replacement The MTSe lithium battery found on the microprocessor board ensures that date, hour and certain information are not lost when the instrument is powered down. Checking the battery If there is doubt as to whether the battery is to be changed or not, switch off the instrument. On switching the instrument on again, check whether the date is still correct. If the date has been lost, the battery needs replacing. Contact your nearest Wavetek Customer Service Centre. This battery has a lifetime of more than five years. Battery replacement should not be carried out by the user: this may be dangerous to the microprocessor board (certain components may be damaged or destroyed) and requires special tools USER MANUAL 750000992/16 10-3 Artisan Technology Group - Quality Instrumentation ... Guaranteed | (888) 88-SOURCE | www.artisantg.com MTSe Maintenance 10-4 USER MANUAL 750000992/16 Artisan Technology Group - Quality Instrumentation ... Guaranteed | (888) 88-SOURCE | www.artisantg.com Chapter Technical specifications 11 11 This chapter gives the specifications of: ❏ the MTS 5100e and MTS 5200e mainframes ❏ the OTDR modules ❏ the OTS modules ❏ the available options and accessories. Mainframe specifications Display Screen: • 8" Black & White or color passive (option 5000/PAS) or 8.4" TFT color (option 5000/COL) • High resolution display • Vertical scale display resolution of 0.001 dB • Horizontal scale display resolution of 0.01 m (0,4 inch) • Screen saver Adjustment • Contrast (Black & White or color passive screen) • Backlight intensity Storage Medium • RAM: 3Mb • Optional 1 Gb Hard disk • Optional 3.5 inch MS DOS compatible HD floppy disk drive Storage capacity • 400 OTDR traces typical in internal memory • 250 OTDR traces typical on HD floppy disk • Bellcore GR196 or TD 3000 Laser Precision (write only) compatible format for OTDR modules; Wavetek format for OTDR and OTS modules. USER MANUAL 750000992/16 11-1 Artisan Technology Group - Quality Instrumentation ... Guaranteed | (888) 88-SOURCE | www.artisantg.com MTSe Technical specifications Input/Output • RS232C • Ethernet (option) • Centronics • IEEE-488 GPIB (option), for MTS 5200e only. Internal printer (optional for MTS 5200e only) • • • • Reference 5200/PR High quality (graphical) thermic printer 832 dots / line paper width: 112 mm. Power supply Batteries • Up to 2 Nickel Metal Hydrid batteries • Battery autonomy at 25° C (for 1 battery): - up to 8 hours of standard use, with normal backlight, according to Bellcore / Telecordia GR-196-CORE standard. - up to 3 hours with permanent acquisition, with normal backlight - up to 2.5 hours with permanent acquisition, with high backlight AC/DC Adapter / Charger Reference Input Output Compliant 11-2 MTS 5100e MTS 5200e 5003AC/DC adapter / charger 100-250 V 50-60 Hz 1.6 A 12 V DC 4.2 A CE 5007AC/DC adapter / charger 85-264 V 47-400 Hz 1.3 A 12 V DC 55 Watt max. CE USER MANUAL 750000992/16 Artisan Technology Group - Quality Instrumentation ... Guaranteed | (888) 88-SOURCE | www.artisantg.com MTSe Mainframe specifications Dimensions Base unit MTS 5100e MTS 5200e Height Width Depth Weight 90 mm 235 mm 300 mm 3.5 kg including 1 module & 1 battery 130 mm 235 mm 300 mm 5.5 kg including internal printer, 2 modules & 1 battery Dimensions of the external keyboard (optional): 280 x 130 x 25 mm (11 x 5.1 x 1 inch). Environmental conditions Vibration The MTSe is able to withstand the following vibration tests: • Complete test consists of 6 cycles for each of the 3 axes x, y, z. • One cycle sweeps from 5 Hz to 200 Hz and back down to 5 Hz with a sweep duration of one minute per octave. • 3 mm amplitude displacement test for the range of 5 Hz to 9 Hz. • 1G acceleration test for the range of 10 Hz to 200 Hz. Temperature range • Operating on mains, options not included: -20° C to + 50° C (- 4°C to + 122°F) • Operating, specifications guaranteed, all options included: 0° C to +40° C (+ 32°F to + 104°F) • Storage: -20° C up to + 60° C (- 4°F up to + 140°F) Humidity • 95% without condensing EMI/ESD • CE compliant USER MANUAL 750000992/16 11-3 Artisan Technology Group - Quality Instrumentation ... Guaranteed | (888) 88-SOURCE | www.artisantg.com MTSe Technical specifications OTDR Measurement characteristics Distance measurement • • • • • • dual cursors distance displayed with respect to the calibration of the fiber’s group index group index adjustable from 1.30000 to 1.70000 in 0.00001 step display resolution: 1 cm (0.39 inch) max cursor resolution: 1cm (0.39 inch) max sampling spacing: from 4 cm (1.57 inch), with up to 128 000 acquisition data points • accuracy: ±1 m ± 10-5x distance ± sampling resolution (excluding group index uncertainties) Attenuation measurement • • • • dual cursors display resolution: 0.001 dB cursor resolution: 0.01 dB accuracy: ± 0.05 dB / dB ± 0.05 dB Reflectance measurement • display resolution: 0.01 dB • accuracy: ± 4 dB Automatic measurement • Automatic measurement of all signal characteristics. Slope measurement by linear regression or 2 points measurements. • Thresholds for fault display: 0 to 5.99 dB in 0.01 dB steps for event threshold -11 to -99 dB in 1 dB steps for reflectance 0 to 1.99 dB/km in 0.001 dB/km steps for slope • Display of fiber segment slope and attenuation • Display of position and loss • Display of reflectance • Display of ORL Manual measurement • • • • • measurement of slope between the cursors measurement of the loss between two fiber sections measurement of the reflectance of a reflective event measurement of the Optical Return Loss between the two cursors. measurement of a splice either by 2 point or 5 point method 11-4 USER MANUAL 750000992/16 Artisan Technology Group - Quality Instrumentation ... Guaranteed | (888) 88-SOURCE | www.artisantg.com MTSe OTS measurement characteristics OTS measurement characteristics The OTS modules comprise: a Power meter, Light sources and combinations of Light source/Power meter. Note Light source = Laser source or Led source A complete range of optical connectors and adaptors is available. Light source specifications • • • • Transmission of a dual wavelength signal on the same connector. Transmission of a signal indicating the wavelength transmitted. Modulation of the transmitted signal. Variable transmission power (for Laser source only) Power meter specifications Choice of wavelength from 800 to 1650 nm in 1 nm increments. Automatic detection of the wavelength and the modulation. Selection of automatic or manual calibration. Manual or automatic storage and printing of the results. Audio alarm signal when the results is outside the chosen threshold. Reference level stored in memory. Automatic zero adjustment. Result display in dBm, dBr or W (mW, µW or nW). Alternating 1310/1550 nm (laser source) or 850/1300 nm (LED source) measurement option. • Display of average result or real time result. • • • • • • • • • Modules, Options and Accessories OTDR modules Multimode OTDR modules The specifications of the 5023 module are the specifications of the modules 5021 and 5022 according to the wavelength. Wavelength 850 nm 1300 nm 850 & 1300 nm Multimode Modules 5021MM 5022MM 5023MM Module ML USER MANUAL 750000992/16 5023ML 11-5 Artisan Technology Group - Quality Instrumentation ... Guaranteed | (888) 88-SOURCE | www.artisantg.com MTSe Technical specifications Singlemode OTDR modules available The specifications of the 5026 (SR, DR, HD, VHD) modules are the specifications of the modules 5024 and 5025 (SR, DR, HD, VHD) according to the wavelength. The specifications of the 5029 VHD module are the specifications of the 5025 and 5027 VHD according to the wavelength. Wavelength (nm) 1310 1550 1310 & 1550 Short Range 5024SR 5025SR 5026SR Medium Range High Resolution 5024DR 5025DR 5026DR High Dynamic Long Range 5024HD 5025HD 5026HD 5027HD (RTU) 5036 HD 5025VHD 5026VHD Very High Dynamic 1625 1550 & 1625 5027VHD 5029VHD OTDR module options 502X/VFL/FC VFL option for OTDR module with FC connector 502X/VFL/ST VFL option for OTDR module with ST connector OTS modules available Power meter: 50600 PM (800- 1650 nm) Singlemode Laser source Wavelength (nm) 1310 1550 1310&1550 Laser source 50540 LS 50550 LS 50560 LS Laser source + Power meter 50640 LTS 50650 LTS 50660 LTS Laser source + Power meter + Talkset 50641 LTS/TS 50651 LTS/TS 50661 LTS/TS 11-6 USER MANUAL 750000992/16 Artisan Technology Group - Quality Instrumentation ... Guaranteed | (888) 88-SOURCE | www.artisantg.com MTSe Modules, Options and Accessories LED source Wavelength (nm) 850 1300 850&1300 LED source + power meter 50610 LTS 50620 LTS 50630 LTS LED source + Power meter + Talkset 50611 LTS/TS 50621 LTS/TS 50631 LTS/TS Chassis options 1 5000/PAS Color passive display 5000/COL Color TFT display 5000/FD Floppy disk unit 5000/HDisk Hard disk 5000/Eth Ethernet Interface. This option includes: - an adapter RS232/Ethernet - an Ethernet crossed cable for direct connection to the PC. - a software WS-FTP pro. - the init file for the software WS-FTP pro in a diskette. 5200/PR Internal printer with (MTS 5200e only) 5200/IEEE IEEE interface (MTS 5200e only) 5200/VGA Computer display output (MTS 5200e with color TFT display only) Accessories supplied with the instrument 5000M02 User manual in English 5001 Rechargeable battery Mains lead and AC/DC adaptor: 5002/1 • for Europe 5002/2 • for United Kingdom 5002/3 • for USA Other accessories (options) 5000/Keyb External keyboard Additional AC adapter / Charger MTS 5100e 5003/1 • for Europe 1. Must be ordered with the instrument USER MANUAL 750000992/16 11-7 Artisan Technology Group - Quality Instrumentation ... Guaranteed | (888) 88-SOURCE | www.artisantg.com MTSe Technical specifications 5003/2 • for United Kingdom 5003/3 • for USA 5004 Soft carrying case for MTS 5100e 5005 Hard transit case for MTS 5100e 5006 Cigarette lighter Power Adapter Additional AC Adapter / Charger for MTS 5200e 5007/1 • for Europe 5007/2 • for United Kingdom 5007/3 • for USA 5008 Batch of paper rolls for the MTS 5200e internal printer Application software 9551 WinTrace PC processing software 9552 WinWDM PC processing software 9558 WinCable software to generate measurement report under Windows™ 5996/MTS WS-FTP Pro software to backup the OTDR hard disk to a PC Connectors supplied with the MTSe With OTDR singlemode modules and Light source One connector is supplied per module: either an universal connector (UNI) with an adapter (FC, SC, etc.) or a fixed connector (FC, SC, etc.). FC or Universal connector with adaptor SC or Universal connector with adaptor ST or Universal connector with adaptor DIN or Universal connector with adaptor E2000 EC FC/APC or universal low reflectance connector with adaptor SC/APC or universal low reflectance connector with adaptor DIN/HRL or universal low reflectance connector with adaptor With OTDR multimode modules One connector is supplied per module: either an universal connector (UNI) with an adapter (FC, SC, etc.) or a fixed connector (FC, SC, etc.). FC or Universal connector with adaptor SC or Universal connector with adaptor ST or Universal connector with adaptor 11-8 USER MANUAL 750000992/16 Artisan Technology Group - Quality Instrumentation ... Guaranteed | (888) 88-SOURCE | www.artisantg.com MTSe Modules, Options and Accessories DIN or Universal connector with adaptor Power meter adapters supplied with the MTSe for connector VFO: 506VFO for connector FC/PC:506FC for connector ST: 506ST for connector DIN: 506DIN for connector D4: 506D4 for connector PFO: 506PFO for connector SC: 506SC USER MANUAL 750000992/16 11-9 Artisan Technology Group - Quality Instrumentation ... Guaranteed | (888) 88-SOURCE | www.artisantg.com MTSe Technical specifications Specifications of the OTDR modules Wavelength and pulsewidth Multimode Modules 5023MM 5021MM 5023 ML 5022MM Wavelengtha 850 ± 20 nm 1300 ± 20 nm 8500/1300 ± 20 nm Dynamic rangeb with long pulse 20 dB 18 dB 16/14 dB RMSc 25 dB 23 dB 18/16 dB Pulsewidth 3 ns to 200 ns 3 ns to 200 ns Dead zoned at 3 ns - Event dead zone - Attenuation dead zone a. b. c. d. 1.5 m 5m 1.5 m 5m 2m 10 m laser at 25°C at 50ns Specified values, at 25°C, corresponding to the one-way difference (in dB) between the extrapolated backscattering level at the start of the fiber and the level containing 98 % of noise data points, after 3 minutes averaging. Typical value at 25°C corresponding to the one-way difference (in dB) between the extrapolated backscattering level, at the start of the fiber and the RMS noise level, after 3 minutes averaging. Typical Values at 25°C : - The event dead zone is measured at 1,5 dB down from the peak of an unsaturated reflective event. - The attenuation dead zone is measured at ± 0.5 dB from the linear regression on a reflectance type FC/APC (-50 dB). 11-10 USER MANUAL 750000992/16 Artisan Technology Group - Quality Instrumentation ... Guaranteed | (888) 88-SOURCE | www.artisantg.com MTSe Specifications of the OTDR modules Singlemode Modules Short Range Modules High Resolution Medium range High Dynamic Long range 5024/25/26 5024/25/26 5024/25/26 SR DR /36 HD Wavelengtha 1310 / 1550 ± 20 nm Dynamic rangeb with long pulse 27,5 / 25 dB RMSc Pulsewidth Dead zoned - Event dead zone - Attenuation dead zone a. b. c. d. 5024/25/26 VHD 5029 VHD 1310 / 1550 1310 / 1550 1625 1310 / 1550 1550/1625 ± 20 nm ± 20 nm ± 10 nm ± 20 nm ± 20 nm 31 / 29 dB 36,5 / 35 dB 31 / 29 dB 35 / 33 dB 40 / 38 dB Distance range 5027 / 36 HD Very High Dynamic Long range 35 dB 39 dB 42 / 43 dB 43 / 41 dB 260 km 380 km 380 km 10 ns to 10 5 ns to 10 µs µs 10 ns to 20 µs 10 ns to 20 µs (at 10 ns) 4m 25 m (at 10 ns) 8m 30 m (at 10 ns) 4m 25 m (at 5 ns) 1m 15 m laser at 25°C at 10 µs Specified values, at 25°C, corresponding to the one-way difference (in dB) between the extrapolated backscattering level at the start of the fiber and the level containing 98 % of noise data points, after 3 minutes averaging. Typical value at 25°C corresponding to the one-way difference (in dB) between the extrapolated backscattering level, at the start of the fiber and the RMS noise level, after 3 minutes averaging. Typical Values at 25°C : - The event dead zone is measured at 1,5 dB down from the peak of an unsaturated reflective event. - The attenuation dead zone is measured at ± 0.5 dB from the linear regression on a reflectance type FC/APC (-50 dB). Laser Laser classes applicable to the MTSe modules: Reference standard Modules USER MANUAL 750000992/16 EN 60825-1 :1994 FDA21CFR§1040.10 11-11 Artisan Technology Group - Quality Instrumentation ... Guaranteed | (888) 88-SOURCE | www.artisantg.com MTSe Technical specifications Multimode MM and ML - at 1300 nm - at 850 nm Class 1 Class 3A Class 1 Class 1 Singlemode SR, DR Class 1 Class 1 Singlemode HD - at 1310 nm, 20 µs - at 1310 nm, other pulse widths - at 1550 nm Class 3A Class 1 Class 1 Class 1 Class 1 Class 1 Singlemode VHD - at 1310 nm, 10 and 20 µs - at 1310 nm, other pulse widths - at 1550 and 1625 nm Class 3A Class 1 Class 1 Class 1 Class 1 Class 1 VFL option Class 2 Class 2 11-12 USER MANUAL 750000992/16 Artisan Technology Group - Quality Instrumentation ... Guaranteed | (888) 88-SOURCE | www.artisantg.com MTSe Specifications of the OTDR modules Ranges Ranges for MM and 5023ML modules 500 m (1.6 kft) 1 km (3.25 kft) 2 km (6.5 kft) 5 km (16 kft) 10 km (33 kft) 20 km (65 kft) 40 km (131 kft) 80 km (262 kft) 3 ns x x x x x x 20 ns x x x x x x x 50 ns x x x x x x x 200 ns 30 ns x x x x x 100 ns x x x x x x 300 ns 1 µs 3 µs x x x x x x x x x x x x x x x 20 ns x x x x x 100 ns x x x x x x 300 ns 1 µs 3 µs 10 µs x x x x x x x x x x x x x x x x x x x x x x Ranges for SR modules 2 km (6.5 kft) 5 km (16 kft) 10 km (33 kft) 20 km (65 kft) 40 km (131kft) 80 km (459kft) 140 km (459 kft) 260 km (853 kft) 10 ns x x x x x 10 µs x x x x Ranges for DR modules 2 km (6.5 kft) 5 km (16 kft) 10 km (33 kft) 20 km (65 kft) 40 km (131 kft) 80 km (262 kft) 140 km (459 kft) 260 km (853 kft) 5 ns x x x x USER MANUAL 750000992/16 x x x x x x 11-13 Artisan Technology Group - Quality Instrumentation ... Guaranteed | (888) 88-SOURCE | www.artisantg.com MTSe Technical specifications Ranges for HD modules 5 km (16 kft) 10 km (33 kft) 20 km (65 kft) 40 km (131kft) 80 km (262kft) 140km (459kft) 260km (853kft) 380 km 10 ns x x x x x 30 ns x x x x x x 100 ns 300 ns x x x x x x x x x x x x 1 µs 3 µs 10 µs 20 µs x x x x x x x x x x x x x x x x x x x x x 30 ns x x x x x x 100 ns 300 ns x x x x x x x x x x x x x 1 µs 3 µs 10 µs 20 µs x x x x x x x x x x x x x x x x 1 µs 3 µs 10 µs 20 µs x x x x x x x x x x x x x x x x x x x x x Ranges for VHD modules 5 km (16 kft) 10 km (33 kft) 20 km (65 kft) 40 km (131kft) 80 km (262kft) 140km (459kft) 260km (853kft) 380 km 10 ns x x x x x x x x x x x Ranges for 1625 nm 5027 modules (RTU) 5 km (16 kft) 10 km (33 kft) 20 km (65 kft) 40 km (131kft) 80 km (262kft) 140km (459kft) 260km (853kft) 380 km 10 ns x x x x x 30 ns x x x x x x 100 ns 300 ns x x x x x x x x x x x x x Specifications of the VFL option (OTDR module) • wavelength: 635 nm ± 15 nm at 25 °C • fiber length: up to 5 km 11-14 USER MANUAL 750000992/16 Artisan Technology Group - Quality Instrumentation ... Guaranteed | (888) 88-SOURCE | www.artisantg.com MTSe Specifications of the OTS modules at 25 °C Specifications of the OTS modules at 25 °C Light sources Laser sources LED sources Wavelength (source at 25°C) 1310 & 1550 ± 30 nm 850 nm ± 30 nm 1300 nm ± 30 nm 850 & 1300 nm ± 30 nm Spectral width < 5 nm 50 nm 150 nm 50 / 150 nm Stability in 1 hour Stability in 24 h. ± 0,05 dB ± 0,15 dB 0 dBm Calibrated output power Variable output power -17 dBm -19 dBm -18 / -20 dBm 0 to - 10 dBm Modulation of transmitted signal 270 Hz, 330 Hz, 1 kHz and 2 kHz Possibility of alternated transmission at 1310/1550 nm (Laser source) or 850/ 1300 nm (LED source), every 10 seconds approx. Multiple Wavelength Power Meter Calibrated wavelengths: 850 / 1310 / 1550 nm Possible wavelengths: 800 to 1650 nm in 1 nm increments Accuracy for calibrated wavelengths: ± 0,2 dB (at - 30 dBm, FC/PC) Resolution: 0,01 dBm / 0,01 nW Measurement range: + 5 to - 65 dBm (at 850 nm) + 5 to - 70 dBm (at 1310 and 1550 nm) Possibility of alternated measurement at 1310 and 1550 nm. Power Meter memory • Capacity: 300 results • Stored parameters for manual or automatic measurement: - Date / time - Wavelength - Measurement result (dBm) - Reference (dBm) - Received mode (CW, 270 Hz ... 2 kHz) Specifications of the Talkset option (OTS module) • Dynamic: 35 dB typical at 25°C USER MANUAL 750000992/16 11-15 Artisan Technology Group - Quality Instrumentation ... Guaranteed | (888) 88-SOURCE | www.artisantg.com MTSe Technical specifications Specifications WDM modules Typical values measured at 25° C, unless otherwise stated. Module 5071- C band Module 5073- C+L band 1525-1570 nm 1525-1610 nm <1s <1,5 s Wavelength Range Sweep time (real time) Accuracy a ± 10 pm Display Resolution 1 pm Min. spacing between channels 10 GHz (80 pm) Optical Bandwidth (FWHM) 35 pm Power levels Display range - 90 dBm at + 30 dBm Display Resolution Measurement range on a channel 0,01 dB - 70 dBm at + 10 dBm Max. admissible power: - total (before signal cut off) - for a channel + 20 dBm + 10 dBm Accuracy b ± 0,5 dB max Linearity 1 ±0,1 dB Flatness Polarization dependence (PDL) ORL (Optical Return Loss) ORR (Optical Rejection Ratio)e- ± 0,2 dBc ± 0,2 dBd ± 0,2 dB > 35 dB 40 dB at 0,8 nm from the carrier 34 dB at 0,4 nm from the carrier a. from -40 dBm to +5 dBm. b. at -30 dBm and 1550 nm, excluding the uncertainty due to the input connector. c. at -30 dBm and in the range 1530 nm - 1565 nm (reference : 1550 nm) d. at -30 dBm and in the range 1530 nm - 1605 nm (reference : 1550 nm) e. from the top of a carrier, in the range 1530 to 1605 nm and at 0 dBm 11-16 USER MANUAL 750000992/16 Artisan Technology Group - Quality Instrumentation ... Guaranteed | (888) 88-SOURCE | www.artisantg.com MTSe Information about the 5020TF fiber modules Information about the 5020TF fiber modules The 5020 TF single-mode and multi-mode contains two reels of fiber to be used with the reflectometer. They are destined for training, demonstrations and can be used as a launch fiber. Note As these modules are not qualified as measurement devices, there is no need for calibration certificate. Port 1 Port 2 Port 3 Port 4 Front panel of a module Type of fiber used Recommended group index Length of fiber 1 Length of fiber 2 Module 5020TF/MM (Multi-mode) Module 5020TF/SM (Single-mode) Corning MM Corning SMF 28 1.50140 850nm ; 1.49660 @ 1310nm 1.46750 @ 1310nm ; 1.46810 @ 1550/1625nm 300 ± 30 m 300 ± 30 m 466 ± 23 m 1000 ± 50 m Loss of the connectors 0.5 dB a a. Guaranteed to 1625 nm, except for the port 1 of fiber 2. Advice on how to use the fiber 2 (long fiber) Given that the loss per unit on fiber 2 may be higher near port 1: • when measuring a dead zone, it is preferable to connect the reflectometer to the port 4. • when measuring the insertion loss of a connector located after the launching cable, the reflectometer should be connected to port 1. USER MANUAL 750000992/16 11-17 Artisan Technology Group - Quality Instrumentation ... Guaranteed | (888) 88-SOURCE | www.artisantg.com MTSe Technical specifications 11-18 USER MANUAL 750000992/16 Artisan Technology Group - Quality Instrumentation ... Guaranteed | (888) 88-SOURCE | www.artisantg.com 12Index A Abbreviation of command header 9-4 Accessories option 11-7 supplied with the MTS 11-7 Acquisition acq. time 5-3 automatic 5-9 manual 5-11 real time 5-7 Adapters AC/DC adapter (use) 3-7 for powermeter 11-9 Attenuation 5-19 Attenuator (powermeter) 6-4 B Backscattering coefficient 1-3, 5-6 Battery autonomy 3-5 charge 3-4 installation 3-6 on microprocesseur board 10-3 recommendations 3-6 type 11-2 C Carrying strap 3-3 Charger (battery) specification 11-2 use 3-4 Cleaning 10-2 Command errors 9-3 Command format 9-3 Command syntax 9-3 Comments 8-15 Confidence in results 5-20 Configuration alarmes WDM 7-5 Connecting USER MANUAL 750000992/16 optical fiber 3-7 Connection optical cleaning 10-3 precautions 10-2 quality 5-7 Connectors computer display 4-9 optical connectors (ref.) 11-8 Contrast (screen) 3-13 Control external keyboard 4-7 keys 4-4 Cursor definition 5-14 five cursor method 5-25 positioning/shift 5-14 resolution 11-4 D Date setting 3-15 Décalage de courbe WDM 7-13 Dimensions 11-3 Direction 5-1, 8-16 Directory deleting a directory 8-21 directory window 8-17 E Edition 4-5 End Location 8-16 Environmental conditions 11-3 Ethernet configuration 3-17 contenu de l’option 11-7 reférence de l’option 11-7 use 9-2 Event display criteria 5-15 types (icons) 5-18 I-1 Artisan Technology Group - Quality Instrumentation ... Guaranteed | (888) 88-SOURCE | www.artisantg.com MTSe Index F Fault locator mode 5-37 Fiber commands 9-13 Fiber number 8-16 auto increment 8-16 File copy from one medium to another 8-21 deleting 8-20 format 8-11 search 8-18 transfert to Excel (OTS file) 8-11 Filenaming modes 8-2 OTDR, automatic 8-3 OTDR, semi-automatic 8-4 OTS, automatic 8-7, 8-9 OTS, semi-automatic 8-8 warning 8-3 WDM, semi-automatic 8-10 Floppy disk drive 4-9 Formatting floppy disk 8-23 hard disk 8-24 G Gain Tilt et Slope (WDM) 7-4 Ghosts 5-4 Guarantee conditions 10-2 H Handle 3-3 Help 3-18 I IEEE address selection 3-17 connection to the interface 9-3 Index group index 11-4 index of the fiber 5-5 Interface (I/O) 3-17 K Keyboard (external) 4-7 Keys arrow keys 4-4 I-2 control keys 4-4 softkeys 4-2 L Language 2-2, 3-16 Laser activity indicator 4-4 Laser source set-up 9-20 Launch cable 5-4 Length section length 5-19 unit 3-16 Linking commands 9-4 Loading an OTDR trace 8-19 an OTS table 8-20 OTS results 6-16 Logo (user) 3-29 M Macro creation (learn) 5-40 definition 5-38 load from disquette 5-41 macro 5 - 5-41 saving on diskette 5-40 start (play) 5-39 used to store a config. 5-41 Maintenance procedure 10-1 Markers 5-21 adding 5-22 deleting 5-22 display 5-21 warning 5-22 Measurement attenuation 1-3, 11-4 automatic 5-20, 11-4 both end measurement 5-32 distance 11-4 five cursor method 5-25 identification commands 9-9 insertion loss method 1-4 manual 5-22, 11-4 ORL 5-26 OTDR 1-1 OTS (specification) 11-5 power measurement 1-4 principles 1-1 reflectance (spec.) 11-4 USER MANUAL 750000992/16 Artisan Technology Group - Quality Instrumentation ... Guaranteed | (888) 88-SOURCE | www.artisantg.com MTSe slope 5-23 validity 1-2 Memory 2-3 capacity 11-1 comments 8-15 medium 11-1 memory info 8-15 powermeter 6-13, 11-15 Méthode S/B (WDM) 7-3 Mode acquisition (manual/auto) 5-3 Modules installation and removal 3-1 list & references 11-6 specifications fiber modules 11-17 OTDR 11-10 OTS 11-15 WDM 11-16 N Notes in table 5-5 O Operator 8-15 Options 11-7 Origin 8-16 ORL measurement 5-26 on a saturated trace 5-27 OTDR module relative command in Remote control 9-11 OTDR result commands reading 9-16 OTS modules relative commands 9-19, 9-23 OTS results reading 9-21 Overlay trace function OTDR 5-28 WDM 7-12 P Panel front 4-1 rear 4-8 Parameters USER MANUAL 750000992/16 Index acquisition 5-3 fiber 5-5 OTDR 5-1 Port parallel (Centronics) 4-10 serial port (RS 232) 4-10 Positioning of the unit 3-2 Power mode (source) 6-3 set ref. level (powermeter) 6-10 variable (laser source) 6-12 Powermeter alarm 6-17 automatic printing 6-16 automatic storage 6-15 measurement 6-12 memory (specifications) 11-15 memory function 6-13 non calibrated wavelength 6-17 ref. measurement 6-11 zero setting 6-11 Printer external setup 3-26 type selection 3-16 internal loading paper 3-26 specifications 11-2 use 3-18 internal/external/file choice 3-16 Printing 2-3 autoprint (powermeter) 6-3 content 3-17 examples 3-22 header 3-19 normal/compress 3-16 to a BMP file 3-27 Pulsewidth 11-10, 11-11 R Range 5-3, 11-13 Reading OTDR result commands 916 Reflectance definition 1-2 result in table 5-19 specification 11-4 Remarks in table 9-10 Remote control I-3 Artisan Technology Group - Quality Instrumentation ... Guaranteed | (888) 88-SOURCE | www.artisantg.com MTSe Index abbreviation of command header 9-4 command errors 9-3 command format 9-3 command syntax 9-4 commands relative to module 9-8 commands relative to the keys 9-8 commands relative to the OTS 919, 9-23 common part commands 9-5 connecting MTS to a PC 9-1 description of commands 9-3 description of queries 9-3 fiber commands 9-15 laser source set-up 9-20 linking commands 9-4 parameters 9-4 power meter set-up 9-19 queries 9-4 reading OTDR result commands 9-16 reading OTS results 9-21 result commands 9-13 SRQ commands 9-5 status commands 9-7 status structure registers 9-6 system setup commands 9-7 Reseting the MTS 3-8 Resolution 5-3, 11-4 Result commands 9-13 Results analysis (OTDR) 5-14 light source 6-5 on trace 5-5 OTDR screen 4-3 powermeter 6-8 powermeter (automatic storage) 6-15 WDM 7-5 RS 232 3-17, 4-10 connection to the interface 9-1 S Screen adjusting contrast 3-13 auto off 3-14 back-lighting level 3-14 options 4-2 trace background color 3-14 Setup instrument setup 2-2, 3-11 I-4 light source setup 6-2 OTDR test setup 5-1 OTS test setup 6-1 powermeter setup 6-3 system setup 2-2 test setup 2-2 WDM setup 7-2 Shift active trace 5-31 of OTDR trace 5-15 Slope Method 5-4 Software MTS (installation) 3-9 WinTrace 11-8 WS-FTP Pro 11-8 Source (OTS) modulated signal 6-13 scanning mode 6-12 specification 11-5 Specifications 11-1 SRQ commands 9-5 Status commands 9-7 Status structure registers comman part commands 9-6 Storage media 8-1 OTDR & OTS data 8-2 OTS automatic storage 6-15 Swapping overlay traces 5-30 Switching on 3-8 T Table of results 5-17 confidence 5-20 contents 5-18 loading an OTS table 8-20 Talkset specifications 11-15 use 3-28 Threshold audible alarm (OTS) 6-17 end fiber 5-4 reflectance 5-4 slope 5-4 splice 5-4 Time 3-15 acq. time 5-3 real time (OTS) 6-4 USER MANUAL 750000992/16 Artisan Technology Group - Quality Instrumentation ... Guaranteed | (888) 88-SOURCE | www.artisantg.com MTSe time Auto (OTS) 6-4 Title 8-15 Trace background color 3-14 identification 5-1 loading 8-19 OTDR overlay 5-28 printing 8-22 Index Visual fault locator (VFL) 3-27 W Unit frequency (WDM) 3-16 length (OTDR) 3-16 powermeter 6-4 source 6-3 Unpacking the instrument 3-1 Wavelength powermeter non calibrated 6-17 selection 6-3 selection (OTDR) 5-5 specification OTDR 11-10, 11-11 specification OTS 11-15 WDM sauvegarde résultats 7-13 tableau 7-9 test setup 7-1 trace 7-6 Welcome message 3-14 V Z Visual Fault Locator (VFL) selection 3-12 specifications 11-14 Zero setting (powermeter) 6-11 Zoom 5-15 U USER MANUAL 750000992/16 I-5 Artisan Technology Group - Quality Instrumentation ... Guaranteed | (888) 88-SOURCE | www.artisantg.com Index I-6 MTSe USER MANUAL 750000992/16 Artisan Technology Group - Quality Instrumentation ... Guaranteed | (888) 88-SOURCE | www.artisantg.com Artisan Technology Group is your source for quality new and certified-used/pre-owned equipment • FAST SHIPPING AND DELIVERY • TENS OF THOUSANDS OF IN-STOCK ITEMS • EQUIPMENT DEMOS • HUNDREDS OF MANUFACTURERS SUPPORTED • LEASING/MONTHLY RENTALS • ITAR CERTIFIED SECURE ASSET SOLUTIONS SERVICE CENTER REPAIRS Experienced engineers and technicians on staff at our full-service, in-house repair center WE BUY USED EQUIPMENT Sell your excess, underutilized, and idle used equipment We also offer credit for buy-backs and trade-ins www.artisantg.com/WeBuyEquipment InstraView REMOTE INSPECTION LOOKING FOR MORE INFORMATION? Visit us on the web at www.artisantg.com for more information on price quotations, drivers, technical specifications, manuals, and documentation SM Remotely inspect equipment before purchasing with our interactive website at www.instraview.com Contact us: (888) 88-SOURCE | [email protected] | www.artisantg.com