1
Anti-virus
for UNIX File Servers
Administrator Manual
© Doctor Web, 2014. All rights reserved
This document is the property of Doctor Web. No part of this document may be reproduced, published or
transmitted in any form or by any means for any purpose other than the purchaser's personal use
without proper attribution.
TRADEMARKS
Dr.Web, SpIDer Mail, SpIDer Guard, CureIt!, CureNet!, Dr.Web AV-Desk and the Dr.WEB logo are
trademarks and registered trademarks of Doctor Web in Russia and/or other countries. Other
trademarks, registered trademarks and company names used in this document are property of their
respective owners.
DISCLAIMER
In no event shall Doctor Web and its resellers or distributors be liable for errors or omissions, or any loss
of profit or any other damage caused or alleged to be caused directly or indirectly by this document, the
use of or inability to use information contained in this document.
Dr.Web® Anti-virus for UNIX File Servers
Version 6.0.2
Administrator Manual
01.12.2014
Doctor Web Head Office
2-12A, 3rd str. Yamskogo polya
Moscow, Russia
125124
Web site: www.drweb.com
Phone: +7 (495) 789-45-87
Refer to the official web site for regional and international office information.
Doctor Web
Doctor Web develops and distributes Dr.Web® information security solutions which provide
efficient protection from malicious software and spam.
Doctor Web customers can be found among home users from all over the world and in
government enterprises, small companies and nationwide corporations.
Dr.Web antivirus solutions are well known since 1992 for continuing excellence in malware
detection and compliance with international information security standards. State certificates
and awards received by the Dr.Web solutions, as well as the globally widespread use of our
products are the best evidence of exceptional trust to the company products.
We thank all our customers for their support and devotion to the Dr.Web products!
4
Table of Contents
Introduction
Terms and Abbreviations
7
9
System Requirements
10
Compatibility with Linux Distributions
11
Package File Location
12
Configuration Files
13
Logging
16
Allowed Actions
17
Installation and Deinstallation
Installation from Distribution Package for UNIX Systems
18
18
Using GUI Installer
20
Using Console Installer
24
Removing Distribution Package for UNIX Systems
27
Using GUI Uninstaller
28
Using Console Uninstaller
30
Updating Distribution Package for UNIX Systems
31
Installing from Native Packages
32
Installing Dr.Web Samba VFS SpIDer from Source Codes
36
Registration Procedure
38
Starting Dr.Web for UNIX File Servers
40
For Linux and Solaris OS
40
For FreeBSD OS
41
Configuring SeLinux Security Policies
42
Dr.Web Updater
45
Updating Anti-Virus and Virus Databases
45
Cron Configuration
46
Command Line Parameters
47
Blocking Updates for Selected Components
47
Restoring Components
48
Configuration
48
Updating Procedure
51
Dr.Web Agent
Operation Mode
53
53
Administrator Manual
5
Command Line Parameters
55
Configuration File
56
[Logging] Section
56
[Agent] Section
56
[Server] Section
57
[EnterpriseMode] Section
58
[StandaloneMode] Section
59
[Update] Section
60
Running Dr.Web Agent
60
Interaction with Other Suite Components
61
Integration with Dr.Web Enterprise Security Suite
61
Configuring Components to Run in Enterprise Mode
62
Automatic Creation of New Account by ES Server
62
Manual Creation of New Account by Administrator
63
Configuring Components via Dr.Web Control Center (embedded in Enterprise Security Suite)
63
Export of Existing Configuration to ES Server
63
Starting the System
63
Integration with Dr.Web ESS 10
64
Gathering Virus Statistics
65
Dr.Web Monitor
69
Operation Mode
69
Command Line Parameters
70
Configuration File
70
[Logging] Section
71
[Monitor] Section
71
Running Dr.Web Monitor
74
Interaction with Other Suite Components
74
Dr.Web Command Line Scanner
76
Running Dr.Web Scanner
76
Command Line Parameters
77
Configuration
82
Exit Codes
89
Dr.Web Daemon
90
Command-Line Parameters
90
Running Dr.Web Daemon
91
Dr.Web Daemon Testing and Diagnostics
91
Administrator Manual
6
Scan Modes
93
Processed Signals
94
Log Files and Statistics
94
Configuration
95
Integration with Samba
104
Requirements
104
Integrating Dr.Web solution with Samba
104
Dr.Web Samba VFS SpIDer Startup
105
Configuration File
105
Dr.Web Console for UNIX File Servers
112
Installation
112
Basic Configuration
115
User Interface
116
Configuration
116
Daemon Communication
117
Scanning
118
Action
119
Logging
120
Quarantine
121
Running in Enterprise Mode
121
Configuring User Permissions
122
Configuring Workstation
123
Types of Administrator Accounts
124
Contacts
126
Appendix. The License Policy
127
File Servers Protection
127
Administrator Manual
Introduction
Introduction
This Manual describes the following anti-virus software:
Dr.Web® Anti-virus for UNIX File Servers for Linux;
Dr.Web® Anti-virus for UNIX File Servers for FreeBSD;
Dr.Web® Anti-virus for UNIX File Servers for Solaris x86.
As far as all these solutions for UNIX systems differ from each other only slightly, all of them will be
referred to as Dr.Web for UNIX File Servers. Critical differences are described in the corresponding
chapters and paragraphs.
The manual is designed for a person responsible for anti-virus protection and security ("Administrator"
hereinafter).
Protection of UNIX file servers involves detection and neutralization of viruses and other malware.
Although most malware is designed for non-UNIX systems, viruses for other operating systems and
macro-viruses for applications can spread via local networks.
Virus check is made when a server performs a requested file operation (i.e. writing or reading files on
the server).
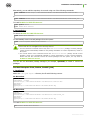
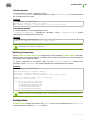
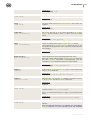
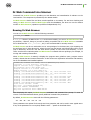
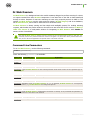
Dr.Web for UNIX File Servers includes the following components:
Dr.Web Scanner - console anti-virus scanner that provides detection and neutralization of
viruses on the local machine and in the shared directories;
Dr.Web Daemon - a background that performs functions of an external anti-virus filter;
Dr.Web Monitor - a resident component that runs and terminates other Dr.Web modules in the
required order;
Dr.Web Agent - a resident component that helps to configure and manage Dr.Web
components, gathers statistics and provides integration with Dr.Web Enterprise Security Suite
(Dr.Web ESS);
By default, the solution includes Dr.Web Agent, designed for integration with Dr.Web ESS 6.0. If
you want to integrate the suite with Dr.Web ESS 10.0, install the updates for Dr.Web Agent and
perform additional configuration steps. For details, refer to the Dr.Web Agent section.
Dr.Web Engine and virus databases that are regularly updated;
Dr.Web Updater (implemented as a Perl script) - a component that provides regular updates to
virus databases;
Dr.Web Samba VFS SpIDer - a resident component that monitors file operations. The
component is implemented as a plug-in for a VFS interface ( Virtual File System ) in Samba. It
serves as a client for Dr.Web Daemon and integrates all other packages with Samba file
servers;
Dr.Web Console for UNIX File Servers – web management interface, a Webmin built-in
module, used for Dr.Web for UNIX File Servers management and configuration via the web
interface from any browser.
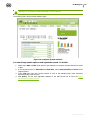
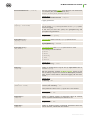
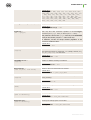
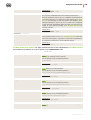
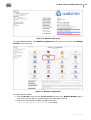
The following picture shows the structure of Dr.Web for UNIX File Servers and its components.
Administrator Manual
7
Introduction
Figure 1. Structure of Dr.Web for UNIX File Servers and its components
The present manual provides information on setup, configuration, and usage of Dr.Web for UNIX File
Servers, that is:
General product description
Installation of Dr.Web for UNIX File Servers
Running Dr.Web for UNIX File Servers
Usage of Dr.Web Updater
Usage of Dr.Web Agent
Usage of console scanner Dr.Web Scanner
Usage of background on-demand scanner Dr.Web Daemon
Usage of Dr.Web Monitor
Integrating Dr.Web Samba VFS SpIDer with Samba file servers
Usage of Dr.Web Console for UNIX File Servers web interface for Dr.Web for UNIX File
Servers configuration
At the end of this manual, you can find contact information for technical support.
Doctor Web products are constantly developed. Updates to virus databases are issued daily or even
several times a day. New product versions appear. They include enhancements to detection methods,
as well as to the means of integration with UNIX systems. Moreover, the list of applications compatible
with Doctor Web is constantly expanding. Therefore, some settings and functions described in this
Manual can slightly differ from those in the current program version. For details on updated program
features, refer to the documentation delivered with an update.
Administrator Manual
8
Introduction
Terms and Abbreviations
The following conventions are used in the Manual:
Convention
Description
Bold
Names of buttons and other elements of the graphical user interface (GUI), and
required user input that must be entered exactly as given in the guide.
Green and bold
Names of Doctor Web products and components.
Green and underlined
Hyperlinks to topics and web pages.
Monospace
Code examples, input to the command line and application output.
Italics
Placeholders which represent information that must be supplied by a user. For
command-line input, it indicates parameter values.
CAPITAL LETTERS
Names of keys and key sequences.
Plus sign ('+')
Indicates a combination of keys. For example, ALT+F1 means to hold down the ALT
key while pressing the F1 key.
Exclamation mark
A warning about potential errors or any other important comment.
To define directories, where the suite components are installed, the following conventions are used:
%bin_dir, %etc_dir and %var_dir. Depending on the OS, these symbols refer to the following
directories:
for Linux and Solaris:
%bin_dir = /opt/drweb/
%etc_dir = /etc/drweb/
%var_dir = /var/drweb/
for FreeBSD:
%bin_dir = /usr/local/drweb/
%etc_dir = /usr/local/etc/drweb/
%var_dir = /var/drweb/
The following conventions are used in the Manual:
Abbreviation
Description
ASCII
American Standard Code for Information Interchange
CIDR
Classless Inter-Domain Routing
DEB
Extension for package files for software distribution in Debian (and others used dpkg)
DNS
Domain Name System
HTML
HyperText Markup Language
IP
Internet Protocol
IPv4
Internet Protocol, version 4
IPv6
Internet Protocol, version 6
IPC
Inter-Process Communication
MD5
Message Digest 5 algorithm
OS
Operating System
PID
Process IDentifier in UNIX based OS
POSIX
Portable Operating System Interface for Unix
RFC
Request for Comments
Administrator Manual
9
Introduction
Abbreviation
Description
RPM
Package files format (and extension) for Red Hat Package Manager
SSL
Secure Socket Layers protocol
TCP
Transmission Control Protocol
TLS
Transport Layer Security protocol
URL
Uniform Resource Locator
UUID
Unique User IDdentifier
XML
eXtensible Markup Language
The following abbreviations are used in chapter about component Dr.Web Console for UNIX File
Servers:
Abbreviation
Description
CGI
Common Gateway Interface
JSON
JavaScript Object Notation
System Requirements
Dr.Web for UNIX File Servers is compatible with
Linux distributions that meet requirements listed in Compatibility with Linux Distributions;
FreeBSD version 6.x and higher for Intel x86 and amd64 platform;
Solaris version 10 for Intel x86 and amd64 platform.
Used platform must be fully compatible with x86 processor architecture in 32-bit or 64-bit modes. 64-bit
systems must support 32-bit applications.
The products, operating in FreeBSD 6.x, cannot be integrated with Dr.Web ESS 10.
For example:
To enable support for 32-bit applications in systems based on Debian/Ubuntu Linux the libc6i386 library must be installed, in systems based on ALT Linux - the i586-glibc-core library.
For successful operation of Dr.Web for UNIX File Servers, it is required to:
Install and run Dr.Web Daemon and anti-virus Dr.Web Engine version 6.0.2 or later.
Install and run Samba file server version 3.0 or later.
Installed Perl 5.8.0 or later for Dr.Web Updater.
Dr.Web for UNIX File Servers hardware requirements are the same as requirements for the
command line interface of the compatible operating system.
Installation requires 150 megabytes of free space on hard drive. Web interface installation requires
additional 50 megabytes.
GUI installer of Dr.Web for UNIX File Servers requires X Window System. Execution of interactive
configuration script in graphical mode requires xterm or xvt terminal emulators.
In addition to that, the following packages must be installed in your system:
base64
unzip
Administrator Manual
10
Introduction
crond
For successful installation of Dr.Web for UNIX File Servers in FreeBSD OS (version later than 8.0),
the compat7x library is required.
Depending on the range of problems to be solved by Dr.Web for UNIX File Servers and operational
load, meeting additional hardware requirements can be necessary.
Please note that Dr.Web Samba VFS SpIDer component of Dr.Web for UNIX File Servers does not
support the CLUSTER_SUPPORT option by default. If the installed Samba includes the
CLUSTER_SUPPORT option, errors can occur during scanning.
To avoid such problems, you can configure the Dr.Web Samba VFS SpIDer source codes after
Dr.Web for UNIX File Servers installation and enable support for all required options, including
CLUSTER_SUPPORT. Once you finish configuring the source codes, compile Dr.Web Samba VFS
SpIDer.
To check whether the installed Samba includes the CLUSTER_SUPPORT option, use the following
command:
smbd -b | grep CLUSTER_SUPPORT
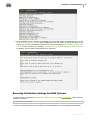
Compatibility with Linux Distributions
Dr.Web for UNIX File Servers solution is compatible with x86 and x86-64 Linux distributions.
Requirements for kernel versions and glibc library depend on the type of the installation package:
Universal package for UNIX systems (Linux x86):
o kernel version 2.4.x, glibc version 2.2 (not recommended) and later,
OR
o kernel version 2.6.x, glibc version 2.3 and later;
Universal package for UNIX systems (Linux x86-64):
o kernel version 2.6.x, glibc version 2.3 (recommended) and later;
Native RPM distribution packages (rpm-apt, urpmi, yum, zypper):
o kernel version 2.6.18 and later, glibc version 2.5 and later;
Native DEB distribution packages (apt):
o kernel version 2.6.26 and later, glibc version 2.7 and later.
Performance of Dr.Web for UNIX File Servers was tested on the following distributions:
Linux distribution
ALT Linux
Versions
32-bit
64-bit
4.0 – 5.0
5.0
СПТ 6.0 (ru)
СПТ 6.0 (ru)
Arch Linux
–
all
ASPLinux
12.0 – 14.0
–
Debian
3.1 – 6.0
4.0 – 6.0
Fedora
–
14.0
Gentoo
all
Administrator Manual
11
Introduction
Versions
Linux distribution
32-bit
64-bit
higher than 2009, CS4
2010.x
Mandrake
10.x
10.x
openSUSE
10.3 – 11.0
10.3 – 11.0
2010
2010
RedHat Enterprise Linux (RHEL)
4.0 – 6.0
5.0 – 6.0
Suse Linux Enterprise Server
9.0 – 11.0
10.0 – 11.0
7.04 – 11.04
7.04 – 11.04
Mandriva Linux
PCLinux
Ubuntu
Compatibility with MSVS OS
Dr.Web for UNIX File Servers is compatible with the following versions of MSVS OS:
MSVS 3.0 80001-12 (rev. 0, 1, 2, 3);
MSVS 3.0 80001-14 (rev. 0, 1, 2);
MSVS 3.0 80001-08;
MSVS 3.0 80001-16;
MSVS 3.0 FSTEK.
Other Linux distributions that meet the requirements mentioned above are also supported (but they
were not tested). If you encounter any compatibility problems with the used Linux distribution, please
contact technical support at http://support.drweb.com/request/.
Package File Location
Dr.Web for UNIX File Servers solution is installed to the default %bin_dir, %etc_dir and %
var_dir directories. OS independent directory tree is created in the following directories:
%bin_dir - directory with executable modules of Dr.Web for UNIX File Servers and
Dr.Web Updater (perl script update.pl);
%bin_dir/doc/ - documentation on the product. All documentation is available in both Russian
and English languages and represented in KOI8-R и UTF-8 text files.
%bin_dir/doc/samba/ - documentation for Dr.Web Samba VFS SpIDer, script for automatic
creation and update of symbolic links - update-links.sh and a script example.
%bin_dir/lib/ - directory with various service libraries and supporting files for Dr.Web for
UNIX File Servers component operation, for example:
ru_scanner.dwl - file of Dr.Web Scanner language resources.
%bin_dir/web/ - Dr.Web for UNIX File Servers web interface module for connection to
Webmin.
%etc_dir/ - directory with Dr.Web for UNIX File Servers configuration and enable files that
manage startup of components operating in daemon mode*
%etc_dir/agent/ - directory with additional configuration files for Dr.Web Agent;
%etc_dir/monitor/ - directory with additional configuration files for Dr.Web Monitor;
%var_dir/bases/ - directory with virus databases (*.vdb files);
%var_dir/infected/ - Quarantine folder that serves for isolation of infected or suspicious
files if the corresponding action is specified in Dr.Web for UNIX File Servers settings.
%var_dir/lib/ - anti-virus engine implemented as a loadable library (drweb32.dll).
Administrator Manual
12
Introduction
*) Directory of the enable files depends on Dr.Web for UNIX File Servers installation method:
Installation using the universal package for UNIX systems:
Files are stored in the %etc_dir directory and named as follows
drwebd.enable,
drweb-monitor.enable.
Installation using the native DEB packages:
Files are stored in the /etc/defaults directory and named as follows
drwebd,
drweb-monitor.
Installation using native RPM packages:
Files are stored in the /etc/sysconfig directory and named as follows
drwebd.enable,
drweb-monitor.enable.
Configuration Files
General format of configuration files
All Dr.Web for UNIX File Servers settings are stored in configuration files which you can use to
configure all suite components. Configuration files are text files, so they can be edit in any text editor.
They have the following format:
--- beginning of file --[Section 1 name]
Parameter1 = value1, ..., valueK
...
ParameterM = value1, ..., valueK
[Section X name]
Parameter1 = value1, ..., valueK
...
ParameterY = value1, ..., valueK
--- end of file --Configuration files are formed according to the following rules:
Symbols ';' or '#' mark the beginning of a comment. Text that follows these symbols is ignored
by Dr.Web for UNIX File Servers modules when reading a file.
Contents of the file is divided into sets of named sections. Possible section names are hardcoded
and cannot be changed. The section names are specified in square brackets.
Each file section contains configuration parameters, grouped by meaning.
One line contains a value (or values) only for one parameter.
General format for parameter value setting (spaces enclosing the '=' signed are ignored) is the
following:
<Parameter name> = <Value>
Parameter names are hardcoded and cannot be changed.
Names of all sections and parameters are case insensitive.
Order of sections in a file and order of parameters in sections are of no consequence.
Parameter values in a file may be enclosed in quotation marks (and must be enclosed in quotation
marks if they contain spaces).
Administrator Manual
13
Introduction
Some parameters can have more than one value. In this case, parameter values are separated by
a comma or each parameter value is set separately in different lines of the configuration file. If
values of a parameter are separated by commas, spaces between a comma and a value are
ignored. If a space is a part of a value, the whole value must be enclosed in quotation marks.
If a parameter can have several values, that is explicitly designated. If the possibility to assign
several values to a parameter is not explicitly designated, the parameter can have only one value.
Example of assigning several values to a parameter:
1) Separating values by commas:
Parameter = Value1, Value2,"Value 3"
2) Setting of each parameter value separately:
Parameter = Value2
Parameter = Value1
Parameter = "Value 3"
If a parameter is not specified in a configuration file, this does not mean that the parameter does not
have any value. In this case, the parameter value is assigned by default. Only a few parameters are
optional or do not have default values, which is mentioned separately.
Parameter description rules used in this Manual
Each parameter in this manual is described as follows:
ParameterName =
{Parameter type |
Possible values}
Description
{Whether more than one value is possible}
{Special remarks}
{Important remarks}
Default value:
ParameterName = {value | nothing}
Description of parameters is provided in this document in the same order as they are specified in the
corresponding configuration file created upon Dr.Web for UNIX File Servers installation.
The Parameter type field can be one of the following:
numerical value — parameter value expressed as a whole non-negative number.
time — parameter value expressed as a date unit. The value is a whole number that can be
followed by a symbol defining the type of a date unit (s – seconds, m – minutes, h – hours;
symbol is case insensitive). If the value does not have a symbol, the parameter is expressed in
seconds (by default).
Examples: 30h, 15m, 6 (in the last example, time is expressed in seconds).
size — parameter value expressed as a unit of memory size (disk space or RAM). The value is
a combination of a whole number that can be followed by a symbol defining the type of a memory
size unit (b – bytes, k – kilobytes, m – megabytes, g – gigabytes; symbol is case insensitive). If
the value does not have a symbol, the parameter is expressed in bytes.
Examples: 20b, 15k
permissons — parameter value expressed as a three-digit number which determines file
access permissions in UNIX format:
Each permission is a combination (sum) of three base permissions:
o Read permission (r) is specified by 4;
o Write permission (w) is specified by 2;
Administrator Manual
14
Introduction
o Execute permission (x) is specified by 1.
First digit in the value defines permissions for the file owner, second digit - for owner's group, and
third digit - for all other users (neither owners nor members of the group).
Examples: 755, 644
logical (Yes/No) — parameter value expressed as a string that can be one of the following:
"Yes" or "No".
path to file/directory — parameter value expressed as a string which contains a path to
a file or folder in the file system. Note, that names of files and folders are case sensitive. If
mentioned, you can specify a file mask as a parameter value. A mask can include the following
symbols:
o ? – replaces one symbol in the file (folder) name;
o * – replaces any sequence of symbols (including an empty sequence) in the file (folder) name.
Example: "?.e*" – this mask defines all files with a name consisting of only one character and
with an extension which is of any length and starts with "e" (x.exe, g.e, f.enable and
others).
action — parameter value expressed as a string which contains actions (those that are applied
to objects by Dr.Web for UNIX File Servers components). In some cases, the parameter can
have one basic and three additional actions specified (in such a case, the name of the parameter
type is actions list). Basic action must be the first in the list. Different parameters can have
a different action list and, in this case, it is specified separately for each parameter. For
information on available actions, see Allowed actions.
address — parameter value expressed as a string which contains socket address of a Dr.Web
for UNIX File Servers component or used external program.
Address is of the following format: TYPE:ADDRESS. There are three available TYPEs:
o inet — a TCP socket, ADDRESS is specified in the following format: PORT@HOST_NAME,
where HOST_NAME can be either a direct IP address or domain name of the host.
Example:
Address = inet:3003@localhost
o local — a local UNIX socket, ADDRESS is a path to the socket file.
Example:
Address = local:%var_dir/.daemon
o pid — a real process address that is to be read from the process PID file. This address type
is allowed only in certain cases that are explicitly designated in the parameter description.
text value, string — parameter value expressed as a text string. The text can be enclosed
in quotation marks (and the text must be enclosed in quotation marks if it contains spaces).
log level — parameter value expressed as a string which contains the verbosity level of
logging into the file or syslog system service.
value — parameter has the type that is not described in the previous items of the list. In this
case, all available values are provided.
Behaviour of the modules if configuration file parameters are ill-defined
If any parameter value is incorrect, the respective Dr.Web for UNIX File Servers module
outputs an error message and terminates.
If any unknown parameter is found when loading a configuration file, Dr.Web for UNIX File
Servers logs the corresponding message and continues operation in the normal mode.
Administrator Manual
15
Introduction
Logging
All Dr.Web for UNIX File Servers components keep records about their operation in the logs. You
can set a log mode for each component (output of information into the file or to syslog).
You can also select a log verbosity level: for example, set high level of verbosity (the Debug option) or
disable logging (the Quiet option). To set the verbosity level, use the LogLevel parameter. You can
also specify additional parameters for certain plug-ins to configure their verbosity log level (for example,
keeping records of IPC subsystem operation is modified by the IPCLevel parameter).
If the LogLevel configuration parameter is not available for a plug-in, it is not allowed to adjust its log
mode. In this case, the default log mode has a verbosity level similar to Debug.
Log verbosity levels
If allowed, you can set one of the following log verbosity levels for a Dr.Web for UNIX File Servers
component (the list is arranged in ascending order of detail):
o Quiet – Logging is disabled.
o Error – The component logs only fatal errors.
o Alert – The component logs errors and important warnings.
o Warning – The component logs errors and all warnings.
o Info – The component logs errors, warnings and information messages.
o Notice – This mode is similar to the Info mode, but the component also logs notifications.
o Debug – This mode is similar to the Notice mode, but the component also logs debug information.
o Verbose – The component logs all details on its activity (this mode is not recommended, because a
large volume of logged data can considerably reduce performance of both the program and syslog
service if it is enabled).
Each Dr.Web for UNIX File Servers component can have different set of allowed log verbosity levels.
For information on available verbosity levels, see description of the corresponding parameters.
Logging into syslog
If you select the mode of logging information into syslog, it is necessary to specify a verbosity log level
and a message source label. The label can be used by the syslog service for internal routing of
messages to different logs. Routing rules are configured in the syslog daemon configuration file
(usually, the path to the file is /etc/syslogd.conf).
To set a flag for syslog messages, specify SyslogFacility parameter value in configuration files.
You can specify one of the following parameter values:
o Daemon – label of a resident system service (daemon) message;
o Local0, ..., Local7 – label of a user application message (8 values are reserved Local0 to
Local7);
o Kern – label of a system kernel message;
o User – label of a user process message;
o Mail – label of a mail system message.
Note that if information is logged into syslog, an additional parameter - SyslogPriority - can be
specified in configuration files. SyslogPriority defines a verbosity level of logging into syslog and
is modified by one of the values available for the LogLevel parameter. If you select the mode of
logging into the file, SyslogPriority is ignored. Otherwise, information is logged into syslog with
Administrator Manual
16
Introduction
the less verbosity level.
Example:
Let us assume that logging of component operation is defined by the following parameter values:
LogLevel = Debug, SyslogPriority = Error. If mode of logging into syslog is selected, the
log verbosity level is Error (that means only records about errors are to be logged and the Debug
value is ignored).
Allowed Actions
You can configure Dr.Web for UNIX File Servers components to apply specified actions to objects
that are detected to be malicious, suspicious or potentially dangerous.
Different parameters can have different available actions, they are listed in each parameter description.
You can use the following actions when configuring the settings:
You can use the following actions when configuring Dr.Web Scanner:
o Move
– move the file to the Quarantine folder;
o Delete – delete the infected file;
o Rename – rename the file;
o Ignore – ignore the file;
o Report – only log information about the file;
o Cure
– try to cure the infected object.
The following actions are available for Dr.Web Samba VFS SpIDer:
o Pass
– allow access to the file;
o Rename
– rename the file and restrict access to it;
o Discard
– delete the file;
o Quarantine – move the file to the Quarantine folder and restrict access to the object;
o Reject
– restrict access to the file.
Please note that action names are case insensitive (for example, value Report equals to report).
Administrator Manual
17
Installation and Uninstallation
Installation and Deinstallation
Below you can find detailed description of Dr.Web for UNIX File Servers installation, update and
uninstallation procedures in UNIX systems. You need superuser (root) privileges to perform these
operations. To get it, use the su command or sudo prefix.
If previously the product was installed from packages of other formats (for example, RPM or DEB),
ensure that they are carefully uninstalled.
Dr.Web for UNIX File Servers distribution package for UNIX systems is delivered in EPM format
(script-based distribution package with installation and uninstallation scripts and standard install/
uninstall GUIs) designed to use with ESP Package Manager (EPM). Please note that all these scripts
relate to the EPM package, not to any of the Dr.Web for UNIX File Servers components.
You can install, deinstall, and update Dr.Web for UNIX File Servers in one of the following ways:
using GUI;
using console scripts.
During installation, dependencies are supported, that is if a component installation requires other
components to be installed in the system (for example, drweb-daemon package requires drwebcommon and drweb-bases packages), they will be installed automatically.
Please note that the Dr.Web Samba VFS SpIDer component of Dr.Web for UNIX File Servers does
not support the CLUSTER_SUPPORT option by default. If the installed Samba includes the
CLUSTER_SUPPORT option, errors can occur during scanning.
To avoid such problems, you can configure the Dr.Web Samba VFS SpIDer source codes after
Dr.Web for UNIX File Servers installation and manually enable support for all required options,
including CLUSTER_SUPPORT. Once you finish configuring the source codes, compile Dr.Web Samba
VFS SpIDer.
To check, whether the installed Samba includes the CLUSTER_SUPPORT option, use the following
command:
smbd -b | grep CLUSTER_SUPPORT
If you install Dr.Web for UNIX File Servers to a computer where other Dr.Web products have been
previously installed from EPM packages, then at every attempt to remove a module via graphical
installer you will be prompted to remove absolutely all Dr.Web modules, including those from other
products.
Please, pay special attention to the actions you perform and selections you make during uninstallation to
avoid accidental removal of some useful components.
Installation from Distribution Package for UNIX Systems
Dr.Web for UNIX File Servers solution is distributed as a self-extracting package
drweb-file-servers_[version number]~[OS name].run.
The following components are included in this distribution:
drweb-common: contains the main configuration file - drweb32.ini, libraries, documentation
and directory structure. During installation of this component, drweb user and drweb group are
created;
Administrator Manual
18
Installation and Uninstallation
drweb-bases: contains Anti-virus search Engine (Dr.Web Engine) and virus databases. It
requires drweb-common package to be installed;
drweb-libs: contains common libraries for all the components of the suite;
drweb-epm6.0.2-libs: contains libraries for graphical installer and uninstaller. It requires
drweb-libs package to be previously installed;
drweb-epm6.0.2-uninst: contains files of graphical uninstaller. It requires drweb-libs
package to be previously installed;
drweb-boost147: containes common libraries for Dr.Web Agent and Dr.Web Monitor. It
requires drweb-libs package to be previously installed;
drweb-updater: contains update utility - Dr.Web Updater for Dr.Web Engine and virus
databases. It requires drweb-common and drweb-libs packages to be installed;
drweb-agent: contains Dr.Web Agent executable files and its documentation. It requires
drweb-common and drweb-boost147 packages to be installed;
drweb-agent-es: contains files required for communication between Dr.Web Agent and
Dr.Web ESS server version 6 in central protection mode. It requires drweb-agent, drwebupdater and drweb-scanner packages to be installed;
drweb-agent10: contains executable files and documentation for the updated Dr.Web Agent
(designed for operation with Dr.Web ESS server version 10).
drweb-agent10-es: contains files required for communication between the updated Dr.Web
Agent and Dr.Web ESS server version 10 in central protection mode.
drweb-daemon: contains Dr.Web Daemon executable files and its documentation. It requires
drweb-bases and drweb-libs packages to be previously installed;
drweb-scanner: contains Dr.Web Scanner executable files and its documentation. It requires
drweb-bases and drweb-libs packages to be installed;
drweb-monitor: contains Dr.Web Monitor executable files and its documentation. It requires
drweb-agent, drweb-common and drweb-boost147 packages to be installed;
drweb-samba-web: contains web interface - Dr.Web Console for UNIX File Servers;
drweb-file-servers-doc: contains Dr.Web for UNIX File Servers documentation;
drweb-smbspider: contains compiled libraries for different versions of Samba servers. It
requires drweb-libs;
drweb-smbspider-src: contains source codes used to build necessary libraries for specific
version of Samba.
In distributions for 64-bit systems, two additional packages are included: drweb-libs and drweblibs32, which contain libraries for 64 and 34-bit systems correspondingly.
To install all Dr.Web for UNIX File Servers components automatically, use either console (CLI) or
the default file manager of your GUI-based shell. In the first case, allow the execution of the
corresponding self-extracting package with the following command:
# chmod +x drweb-file-servers_[version number]~[OS name].run
and then run it:
# ./drweb-file-servers_[version number]~[OS name].run
As a result,
drweb-file-servers_[version number]~[OS name]
directory is created, and the GUI installer starts. If it starts without root privileges, the GUI installer
tries to gain required privileges.
If the GUI installer fails to start, then interactive console installer starts automatically.
Administrator Manual
19
Installation and Uninstallation
If you need only to extract the content of the package without starting the GUI installer, use --noexec
command line parameter:
# ./drweb-file-servers_[version number]~[OS name].run --noexec
After you extract the content, you can start the GUI installer and continue setup with the following
command:
# drweb-file-servers_[version number]~[OS name]/install.sh
To install with the use of the console installer, use the following command:
# drweb-file-servers_[version number]~[OS name]/setup.sh
Installation, regardless of the used method, includes the following steps:
Original configuration files are recorded to the %etc_dir/software/conf/ directory with the
following names: [configuration_file_name].N.
Operational copies of configuration files are installed to the corresponding directories.
Other files are installed. If a file with the same name already exists in the directory (e.g. after
inaccurate removal of previous package versions), it is overwritten with the new file, and a copy of
the old one is saved as [file_name].O. If a file with the [file_name].O name already exists in
this directory, it is replaced with the new file.
If you select the Run interactive postinstall script check box in the corresponding window of the
GUI installer, then after installation of the components completes, the post-install script is initialized
for Dr.Web for UNIX File Servers basic adjustment.
Script update-links.sh is initialized to check the version of Samba installed in the system. The
script creates a symbolic link in the /usr/lib/samba/vfs/ directory to the library required for
the Samba version. If different Samba versions are installed to the same directory, a symbolic link
is created to only one of the versions. If different Samba versions are installed to different
directories, a symbolic link to each of the libraries is created. At that, the following text is logged for
each installed Samba:
Example for Linux:
Update links for /usr/sbin/smbd
create symlink /opt/drweb/lib/libsmb_spider.so.3.X.X --> /usr/lib/samba/vfs/
smb_spider.so
Please, update your config /etc/samba/smb.conf
Please note that if the used Linux distribution features SELinux, installation can be interrupted by the
security subsystem. If such situation occurs, set SELinux to (Permissive) mode. To do this, enter the
following command:
# setenforce 0
and restart the installer.
After the installation completes, configure SELinux security policies to enable correct operation of antivirus components.
You can remove the drweb-file-servers_[version number]~[OS name] directory and .run
file after successful completion of installation.
Using GUI Installer
To install with GUI
Administrator Manual
20
Installation and Uninstallation
1. Enter the following command:
# drweb-file-servers_[version number]~[OS name]/install.sh
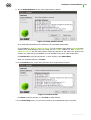
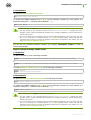
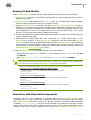
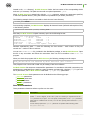
The setup program launches. On the Welcome screen, click Next.
At any step you can return to the previous one by clicking Back. To continue installation, click
Next. To abort installation, click Cancel.
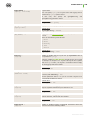
Figure 2. Welcome screen
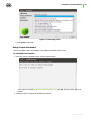
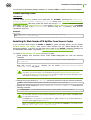
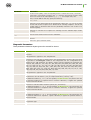
2. On the Install Type screen, select the installation type: typical configuration for Dr.Web for
File Servers with all the necessary components selected by default or custom configuration.
Figure 3. Install type window
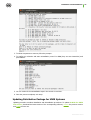
If you selected Custom Configuration, then select necessary components on the Select
Software screen:
Administrator Manual
21
Installation and Uninstallation
Figure 4. Select Software screen
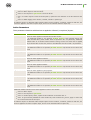
If installation of a component requires some other components to be previously installed, all
corresponding dependencies are selected for installation automatically. For example, if you select to
install Dr.Web Antivirus Daemon, then Dr.Web Bases and Dr.Web Common Files are installed
automatically.
Click to Select all to select all components. Click Install None to clear selection.
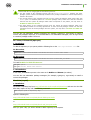
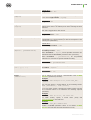
3. On the Confirm screen, review and confirm the list of components to install:
Figure 5. Confirm screen
Click Next to confirm selection, or click Back to make changes.
4. Review the License Agreement. To proceed, you need to accept it. If necessary, use the
Language list to select a preferred language of the agreement (Russian and English languages
are available):
Administrator Manual
22
Installation and Uninstallation
Figure 6. License Agreement screen
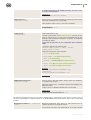
5. After you accept the License Agreement, installation starts. On the Installing screen, you
can review the installation process in real-time:
Figure 7. Installing screen
This report is logged at the same time in the install.log log file located at the
drweb-file-servers_[version number]~[OS name]
directory. If you selected Run interactive post-install script, once component installation
completes, the post-install script for Dr.Web for UNIX File Servers basic configuration
initializes.
Administrator Manual
23
Installation and Uninstallation
Figure. 8. Interactive post-install script
After initialization of the script, you can specify a path to the key file, set an order of mail
processing by the plug-ins and automatically enable services necessary for Dr.Web for UNIX
File Servers proper operation (for example, Dr.Web Daemon, Dr.Web Agent, Dr.Web
Monitor). You can also select from the list network disks to be protected by Dr.Web for UNIX
File Servers.
On the Finish screen, you can see a notification that further adjustment is required to provide
proper operation of Dr.Web for UNIX File Servers, click Close to exit setup:
Figure 9. Finish screen
Using Console Installer
Console installer starts automatically if the GUI installer fails to start. If the console installer also fails to
Administrator Manual
24
Installation and Uninstallation
start (for example, if it is impossible to gain necessary privileges), you can try to run the following
command with root privileges:
# drweb-file-servers_[version number]~[OS name]/setup.sh
To install from console
1. Once the console installer starts, the following dialog window opens:
2. If you want to install Dr.Web for UNIX File Servers, enter Y or Yes (values are case
insensitive), otherwise enter N or No. Press ENTER.
3. If you chose to install Dr.Web for UNIX File Servers, installer suggests you to select the
installation type:
To select a required mode, enter the respective number and press ENTER.
4. If you selected Custom Configuration, specify required components to install:
Administrator Manual
25
Installation and Uninstallation
To specify a required component, enter the respective number and press ENTER.
5. Review the License Agreement. To scroll the text, press SPACEBAR:
To continue the installation, you need to accept the License Agreement. If you agree to the
terms, enter Y or Yes. Otherwise, the installation aborts.
6. The installation process starts immediately. You can review results of the installation steps in the
console in real time:
Administrator Manual
26
Installation and Uninstallation
7. Once installation of the components completes, the post-install script runs automatically to set up
Dr.Web for UNIX File Servers basic configuration. You are offered to specify the path to the
license key file and automatically enable all the services necessary for Dr.Web for UNIX File
Servers proper operation (for example, Dr.Web Daemon, Dr.Web Agent, Dr.Web Monitor).
In addition, you can specify network disks to be protected.
Removing Distribution Package for UNIX Systems
To remove all the components of Dr.Web for UNIX File Servers via GUI uninstaller, start it with the
following command:
# %bin_dir/remove.sh
If startup is performed without root privileges, the GUI uninstaller tries to gain appropriate privileges.
Administrator Manual
27
Installation and Uninstallation
If the GUI uninstaller fail to start, then interactive console uninstaller is initialized.
After uninstallation you can also remove drweb user and drweb group from your system.
During uninstallation, the following actions are performed:
Original configuration files are removed from the %etc_dir/software/conf/ directory.
If operational copies of configuration files are not modified by the user, they are also removed. If
the user made any changes to them, they are preserved.
Other Dr.Web files are removed. If a copy of an old file was created during installation, this file is
restored under the name it had before the installation. Such copies are usually named
[file_name].O .
License key files and log files are saved to their corresponding directories.
update-links.sh script is executed with the --remove parameter and removes a symbolic link /
usr/lib/samba/vfs/smb_spider.so.
If there are several symbolic links for different Samba versions, all links are removed and the following
information displays:
Remove link /usr/lib/samba/vfs/smb_spider.so
Please, update your config /etc/samba/smb.conf
Please note that after removing Dr.Web for UNIX File Servers, you must remove the following line
from the smb.conf file for each protected shared resource:
vfs objects = smb_spider
Using GUI Uninstaller
To uninstall with GUI
1. Enter the following command:
# %bin_dir/remove.sh
On the Welcome screen, click Next:
At any step, you can return to the previous stage by clicking Back. To continue installation, click
Next. To abort uninstallation, click Cancel.
Figure 10. Welcome screen
Administrator Manual
28
Installation and Uninstallation
2. On the Select Software screen, select components to remove:
Figure 11. Select Software screen
All corresponding dependencies are selected to be uninstalled automatically.
If you installed Dr.Web for UNIX File Servers on the computer with another Dr.Web product
installed from EPM-packages, then the setup lists all Dr.Web modules for both Dr.Web for
UNIX File Servers and the older product. Please pay attention to the actions you perform and
selection you make during uninstallation to avoid accidental removal of useful components.
Click Select All to select all components. To clear selection, click Select None.
When you complete selection, click Next.
3. On the Confirm screen, review and confirm the list of components to remove:
Figure 12. Confirm screen
Click Next to confirm selection, or click Back to make changes.
4. On the Removing screen, you can review results of the uninstallation steps in real time:
Administrator Manual
29
Installation and Uninstallation
Figure 13. Removing screen
5. Click Close to exit setup.
Using Console Uninstaller
Console uninstaller starts automatically when graphical uninstaller fails to start.
To uninstall from console
1. Once the console uninstaller starts, a dialog window opens:
If you want to uninstall Dr.Web for UNIX File Servers, enter yes, otherwise enter no. Press
ENTER.
2. Review the list of components available for removal:
Administrator Manual
30
Installation and Uninstallation
3. To select components to remove, follow the prompts .
4. To confirm you selection and start uninstallation, enter Y or Yes (they are case insensitive) and
press ENTER:
5. You can results of the uninstallation steps in the console in real time.
6. Once the process completes, exit setup.
Updating Distribution Package for UNIX Systems
Updating procedure combines installation and deinstallation procedures. To update Dr.Web for UNIX
File Servers, download the latest version of the corresponding software, remove the previous version
and install the new one.
Administrator Manual
31
Installation and Uninstallation
After an update, license key files, log files, and configuration files modified by the user are remained in
the corresponding directories.
Installing from Native Packages
You can install Dr.Web for UNIX File Servers from native packages for common Linux distributions
or FreeBSD operating system.
All packages are located in the Dr.Web official repository http://officeshield.drweb.com/drweb/. Once
you added the repository to the package manager of your system, you can install, update or remove
necessary packages like any other program from repository. All dependencies are resolved
automatically.
After installing packages from repository, automatic post-install script for installing license key file is not
initiated. Licence key file must be manually copied to %bin_dir.
For the updates to take effect, you need to restart all Dr.Web services after updating from repository.
All the following commands to add repositories, import keys, install and remove packages must be run
with administrator privileges (root).
If it is necessary, use the sudo or su commands.
Debian, Ubuntu (apt)
1. Installation:
Debian repository is signed with the digital key. It is necessary to import the key or correct operation.
To do this, use the following command
wget -O - httwp://officeshield.drweb.com/drweb/drweb.key | apt-key add -
or
curl http://officeshield.drweb.com/drweb/drweb.key | apt-key add -
To add the repository to your system, add the following line to /etc/apt/sources.list file:
deb http://officeshield.drweb.com/drweb/debian stable non-free
To install Dr.Web for UNIX File Servers, use the following commands:
apt-get update
apt-get install drweb-file-servers
2. Deinstallation:
To remove Dr.Web for UNIX File Servers, use the following command:
apt-get remove drweb-file-servers
To remove all installed packages from Dr.Web, use the following command (in some systems, it is
required to escape the '*' character with a backslash: '\*'):
apt-get remove drweb*
To automatically remove unused packages from the system, use the following command:
apt-get autoremove
Administrator Manual
32
Installation and Uninstallation
Removal with the use of apt-get has the following features:
1. The first variant of the command removes only the drweb-file-servers package, but other
packages (which could be automatically installed on the package installation to resolve dependences)
remain in the system.
2. The second variant of the command removes from the system all packages which names start with
'drweb' (this is a standard pattern for a Dr.Web package name). Please note that this command
removes from the system all packages which name corresponds to the pattern, not only those of
Dr.Web for UNIX File Servers.
3. The third variant of the command removes from the system all unused packages which were
automatically installed for resolving dependences of some removed packages. Please note that this
command removes all unused packages from the system, not only those of Dr.Web for UNIX File
Servers.
You can also use alternative package managers (for example, Synaptic, aptitude) to install or
remove the packages. Moreover, it is recommended to use alternative managers, such as aptitude,
to resolve a package conflict if it occurs.
ALT Linux, PCLinuxOS (apt-rpm)
1. Installation:
To add the repository to you system, add the following line to the /etc/apt/sources.list file:
32-bit version:
rpm http://officeshield.drweb.com/drweb/altlinux stable/i386 drweb
64-bit version:
rpm http://officeshield.drweb.com/drweb/altlinux stable/x86_64 drweb
To install Dr.Web for UNIX File Servers:
apt-get update
apt-get install drweb-file-servers
2. Uninstallation:
In this case, uninstallation process is the same as for Debian and Ubuntu (see above).
You can also use alternative package managers (for example, Synaptic, aptitude) to install or
remove the packages.
Mandriva (urpmi)
1. Installation:
Download a repository key from http://officeshield.drweb.com/drweb/drweb.key and save it to the disk.
After that, import the key with the following command:
rpm --import <path to repository key>
Open the following file:
http://officeshield.drweb.com/drweb/drweb-i386.urpmi-media
or
http://officeshield.drweb.com/drweb/drweb-x86_64.urpmi-media
After you open a file, you will be offered to add a repository to the system.
Administrator Manual
33
Installation and Uninstallation
Alternatively, you can add the repository via console using one of the following commands:
urpmi.addmedia drweb http://officeshield.drweb.com/drweb/mandriva/stable/i386/
or
urpmi.addmedia drweb http://officeshield.drweb.com/drweb/mandriva/stable/x86_64/
To install Dr.Web for UNIX File Servers:
urpmi.update drweb
urpmi drweb-file-servers
2. Deinstallation:
To remove Dr.Web for UNIX File Servers:
urpme drweb-file-servers
To automatically remove unused packages from the system:
urpme --auto-orphans drweb-file-servers
Removal with the use of urpme has the following features:
1. The first variant the command removes only the drweb-file-servers package, but other packages
(which could be automatically installed on the package installation to resolve dependences) remain in
the system.
2. The second variant of the command removes the drweb-file-servers package and all unused
packages, which were automatically installed to resolve dependences of some removed packages.
Please note that this command removes all unused packages from the system, not only those of
Dr.Web for UNIX File Servers.
You can also use alternative package managers (for example, rpmdrake) to install or remove the
packages.
Red Hat Enterprise Linux, Fedora, CentOS (yum)
1. Installation:
Add to the /etc/yum.repos.d directory the file with following content:
32-bit version:
[drweb]
name=DrWeb - stable
baseurl=http://officeshield.drweb.com/drweb/el5/stable/i386/
gpgcheck=1
enabled=1
gpgkey=http://officeshield.drweb.com/drweb/drweb.key
64-bit version:
[drweb]
name=DrWeb - stable
baseurl=http://officeshield.drweb.com/drweb/el5/stable/x86_64/
gpgcheck=1
enabled=1
gpgkey=http://officeshield.drweb.com/drweb/drweb.key
To install Dr.Web for UNIX File Servers:
yum install drweb-file-servers
Administrator Manual
34
Installation and Uninstallation
2. Deinstallation:
To remove Dr.Web for UNIX File Servers:
yum remove drweb-file-servers
To remove all installed packages from Dr.Web, use the following command (in some systems, it is
required to escape the '*' character with a backslash: '\*'):
yum remove drweb*
Removal with the use of yum has the following features:
1. The first variant of the command removes only the drweb-file-servers package, but other
packages (which could be automatically installed on the package installation to resolve dependences)
remain in the system.
2. The second variant of the command removes from the system all packages, names of which start with
the 'drweb' string (this is a standard pattern for a Dr.Web package name). Please note that this
command removes from the system all packages which name corresponds to the pattern, not only
those of Dr.Web for UNIX File Servers.
You can also use alternative package managers (for example, PackageKit, Yumex) to install or
remove the packages.
Zypper package manager (SUSE Linux)
1. Installation:
To add the repository, use the following command:
zypper ar -t YUM http://officeshield.drweb.com/drweb/el5/stable/i386/ drweb
or
zypper ar -t YUM http://officeshield.drweb.com/drweb/el5/stable/x86_64/ drweb
To install Dr.Web for UNIX File Servers, use the following commands:
zypper refresh
zypper install drweb-file-servers
2. Deinstallation:
To remove Dr.Web for UNIX File Servers, use the following command:
zypper remove drweb-file-servers
To remove all installed packages from Dr.Web, use the following command (in some systems, it is
required to escape the '*' character with a backslash: '\*'):
zypper remove drweb*
Removal with the use of zypper has the following features:
1. The first variant of the command removes only the drweb-file-servers, package but other
packages (which could be automatically installed on the package installation to resolve dependences)
remain in the system.
2. The second variant of the command removes from the system all packages, names of which start with
the 'drweb' string (this is a standard pattern for a Dr.Web package name). Please note that this
command removes from the system all packages which name corresponds to the pattern, not only
those of Dr.Web for UNIX File Servers.
Administrator Manual
35
Installation and Uninstallation
You can also use alternative package managers (or example, YaST) to install or remove the packages.
FreeBSD operating system
Installation:
You can install Dr.Web products from meta-ports for FreeBSD. Download the drweb-fileservers_current-current~freebsd_all.tar.gz archive from http://officeshield.drweb.com/
drweb/freebsd/ports/. After that, unpack the archive and use the make install command to compile
and install Dr.Web for UNIX File Servers. If you install Dr.Web for UNIX File Servers in FreeBSD
6.1, specify the path to the /usr/ports/Mk/ directory using the -I parameter. That directory
contains the ports tree.
Example:
tar -xzvf drweb-file-servers_current-current~freebsd_all.tar.gz
make install -I /usr/ports/Mk/
Installing Dr.Web Samba VFS SpIDer from Source Codes
If you use some other versions of Samba or Samba for 64-bit operating system, you can compile
Dr.Web Samba VFS SpIDer from source codes included into the drweb-smbspider-src
distribution package. To do this, you also need source codes of your Samba (respective packages can
be downloaded from Samba.org website (http://us1.samba.org/samba/ftp/old-versions/).
To compile Dr.Web Samba VFS SpIDer from source codes:
Install package with necessary source codes drweb-smbspider-src with the following
command:
# drweb-file-servers_[version number]~[OS name]/drweb-smbspidersrc.install.
After that, in the /usr/src/ directory the tar archive drweb-file-servers_[version
number].src.tar.gz will appear.
You can use the now command-line option to install the component without confirmations. Please
note that if you use this option, you automatically accept the Software License Agreement.
Text of the Software License Agreement is provided in English and Russian languages in the
following files respectively LICENSE and LICENSE.ru.
Change the current directory to /usr/src/ and extract archive file with the following command:
# tar -xzvf drweb-smbspider-[version number].src.tar.gz
Change the current directory to drweb-smbspider-[version number].src and enter the
following command:
# ./configure –with-samba-source=<dir_with_Samba_source_codes>
For successful execution of this command, m4 macro-processor, gcc compiler and make utility
are required in the system.
In Solaris OS, it is required to use GNU m4 (i.e. gm4) insteand of the standard m4 macroprocessor and the gcc compiler version 4.*.
When you compile Dr.Web Samba VFS SpIDer for operating with Samba 4, you should use the
path <dir_with_Samba_source_codes>/source3.
Administrator Manual
36
Installation and Uninstallation
Finish building of Dr.Web Samba VFS SpIDer and install it with the following commands:
# make
# make install
Administrator Manual
37
Registration Procedure
Registration Procedure
Permissions to use Dr.Web for UNIX File Servers are specified in the key file.
License key file contains the following information:
list of Dr.Web for UNIX File Servers components licensed to the user;
license period;
other restrictions (for example, number of protected workstations).
By default, the license key file is located in the directory with Dr.Web for UNIX File Servers
executables.
License key file is digitally signed to prevent its editing. Edited key file becomes invalid. It is not
recommended to open your key file in text editors in order to avoid its accidental invalidation.
Users who have purchased Dr.Web for UNIX File Servers from Doctor Web certified partners
obtain the license key file. Key files contain the following information which depends on the license
type. The license key file also contains information on the user and seller of the product.
For evaluation purposes users may also obtain a demo key file. It allows them to enjoy full functionality
of the Dr.Web for UNIX File Servers solution, but has a limited term of use, and no technical
support is provided.
License key file can be supplied as:
a drweb32.key file license key for workstations, or as a zip archive containing a license key file
in case of purchasing Dr.Web for UNIX File Servers as a standalone product;
a zip-archive, which contains a key file for Dr.Web Enterprise Server (enterprise.key) and
a key file for workstations (agent.key) in case of purchasing Dr.Web for UNIX File Servers
as a part of Dr.Web Enterprise Security Suite.
License key file can be received in one of the following ways:
by email as a ZIP-archive containing license key file with *.key extension (usually after
registration on the website). Extract the license key file using an appropriate archiving utility and
copy (or move) it to the directory with Dr.Web for UNIX File Servers executable files (default
directory for UNIX systems is %bin_dir);
within the distribution package;
on a separate data carrier as a file with *.key extension. In this case, a user must copy it
manually to the %bin_dir directory.
License key file is sent to a user via email usually after registration on the website (website location is
specified in the registration card supplied with the product). Visit the website, fill in the web form with
your customer data and submit your registration serial number (printed on the registration card). After
that, your license is activated and a key file is created according to the specified serial number. The key
file is sent to the specified email address.
It is recommended to keep the license key file until it expires, and use it to reinstall or restore Dr.Web
for UNIX File Servers. If the license key file is damaged or lost, it can be recovered by the same
procedure as during license activation. In this case, you must use the same product serial number and
customer data that you provided during the registration; only the email address can be changed (in this
case, a license key file will be sent to the new email address). If the serial number matches any entry
in Dr.Web for UNIX File Servers database, the corresponding key file will be automatically
dispatched to the specified email address.
One serial number can be registered no more than 25 times. If you need to recover a lost license key
file after its 25th registration, send a request for license key file recovery at http://support.drweb.com/
Administrator Manual
38
Registration Procedure
request/ stating the data input during registration, valid email address, and detailed description of your
problem. The request will be considered by Dr.Web for UNIX File Servers technical support service
engineers. If the request is approved, a license key file will be provided via automatic support system or
dispatched via email.
Path to a license key file of the certain component must be specified as a Key parameter value in the
corresponding configuration file (drweb32.ini).
Example:
Key = %bin_dir/drweb32.key
If a license key file specified as a Key parameter value failed to be read (wrong path, permission
denied) or is expired, blocked or invalid, the corresponding component terminates its operation.
If the license expires in less than two weeks, Dr.Web Scanner outputs a warning message on its
startup and Dr.Web Daemon notifies the user via email. Messages are sent on every startup, restart
or reload of Dr.Web Daemon for every license key file installed. To enable this option, set up the
MailCommand parameter in the [Daemon] section of the drweb32.ini configuration file.
If you want to use a key file from another location, specify the full path to it as a LicenseFile
parameter value in the [StandaloneMode] section of the Dr.Web Agent configuration file (see
[StandaloneMode] section description).
Administrator Manual
39
Starting Dr.Web for UNIX File Servers
Starting Dr.Web for UNIX File Servers
This section describes startup of Dr.Web for UNIX File Servers in Linux, Solaris or FreeBSD
operating systems.
For Linux and Solaris OS
To run Dr.Web for UNIX File Servers:
1. Register the software.
2. Copy or move the key file to the directory with Dr.Web for UNIX File Servers executable files
(the default directory for UNIX systems is %bin_dir). Name of the key file can be different in
different distribution packages (for details, see Software Registration):
If Dr.Web for UNIX File Servers was purchased as a standalone product, license key file is
named drweb32.key. In this case, copy the file to the %bin_dir directory without
changing its name.
If Dr.Web for UNIX File Servers was purchased as a part of Dr.Web Enterprise
Security Suite, archive received during registration contains a key file for Dr.Web
Enterprise Server (enterprise.key) and a key file for workstations (agent.key).
Rename agent.key as drweb32.key and copy it to the %bin_dir directory.
To use a key file from a different location or with another name (for example, agent.key),
specify its full path as a Key parameter value in the drweb32.ini configuration file. In the
Standalone mode, alternative path to the key file must be specified as a value of the
LicenseFile parameter in agent.conf (a configuration file of Dr.Web Agent).
3. Configure the software by making necessary changes to the configuration files. For details on
configuration parameters, see the corresponding sections of this Manual.
4. Set 1 as a value of the ENABLE variable in the drwebd.enable file to run Dr.Web Daemon. If
it is not required to run Dr.Web Daemon on the local machine (properly configured Dr.Web
Daemon is working on another local network computer), the value of the ENABLE variable must
be 0 (its default value).
5. Set 1 as a value of the ENABLE variable in the drweb-monitor.enable file to run Dr.Web
Monitor.
Location of the enable files depends on Dr.Web for UNIX File Servers installation type:
Installation from universal package for UNIX systems:
Files are saved to the %etc_dir directory and named as follows
drwebd.enable,
drweb-monitor.enable.
Installation from native DEB packages:
Files are saved to the /etc/defaults directory and named as follows
drwebd,
drweb-monitor.
Installation from native RPM packages:
Files are saved to the /etc/sysconfig directory and named as follows
drwebd.enable,
drweb-monitor.enable.
6. Run Dr.Web Daemon and Dr.Web Monitor either from the console or a file manager of your
operation system. After startup, Dr.Web Monitor starts all other Dr.Web for UNIX File
Administrator Manual
40
Starting Dr.Web for UNIX File Servers
Servers components.
In case of installation from native packages in Solaris:
During Dr.Web for UNIX File Servers installation, the SMF service management system
attempts to run Dr.Web Monitor. If Dr.Web Monitor cannot find a licence key file (for
example, on the first installation of Dr.Web for UNIX File Servers), it stops its operation and
SMF goes into the maintenance state.
To run Dr.Web Monitor, reset the maintenance state:
Enter the following command
# svcs -p <FMRI>
where FMRI is a unique identifier of a controlled resource. In this case, a unique identifier
of Dr.Web Monitor is required.
Force termination of the process from svcs -p output list.
# pkill -9 <PID>
where PID is a number of the process listed above.
Restart Dr.Web Monitor with the following command:
# svcadm clear <FMRI>
While installing Dr.Web for UNIX File Servers from native packages in Solaris, run Dr.Web for
UNIX File Servers with the SMF service management system:
# svcadm enable <drweb-monitor>
# svcadm enable <drweb-daemon>
To stop the service:
# svcadm disable <service_name>
The drwebd module can be launched in one of the following two modes:
1. with the init script (standard launch)
2. with the Dr.Web Monitor
In the second mode, set the ENABLE parameter to 0 in the enable file.
Each of the components can be run independently as well, but note that Dr.Web Agent must be
started first since all other modules receive configuration from Dr.Web Agent.
For FreeBSD OS
To run Dr.Web for UNIX File Servers:
1. Register the software.
2. Copy or move the key file (with the .key extension) to the directory with Dr.Web for UNIX File
Servers executable files (the default directory for UNIX systems is %bin_dir). Name of the key file
can differ in different distribution packages (for details, see Software Registration):
If Dr.Web for UNIX File Servers was purchased as a standalone product, license key file is
named drweb32.key. In this case, copy the file to the %bin_dir directory without changing
its name.
If Dr.Web for UNIX File Servers was purchased as a part of Dr.Web Enterprise Security
Suite, archive received during registration contains a key file for Dr.Web Enterprise Server
(enterprise.key) and a key file for workstations (agent.key). Rename agent.key to
Administrator Manual
41
Starting Dr.Web for UNIX File Servers
drweb32.key and copy the file to the %bin_dir directory.
To use a key file from a different location or with another name (for example, agent.key), specify
its full path as a Key parameter value in the drweb32.ini configuration file. In the Standalone
mode, alternative path to the key file must be specified as a value of the LicenseFile parameter
in agent.conf (a configuration file of Dr.Web Agent).
3. Configure the software by making necessary changes to the configuration files. For details on
configuration parameters, see the corresponding sections of this Manual.
4. Add the following lines to the /etc/rc.conf file:
drwebd_enable="YES" - to run Dr.Web Daemon. If it is not required to run Dr.Web
Daemon on the local machine (properly configured Dr.Web Daemon is working on another
local network computer), then you do not need to add the line to the rc.conf file;
drweb_monitor_enable="YES" - to run Dr.Web Monitor.
5. Run Dr.Web Daemon and Dr.Web Monitor either from the console or from a file manager of your
operation system. After startup, Dr.Web Monitor starts all other Dr.Web for UNIX File Servers
components.
Each of the components can be run independently as well, but note that Dr.Web Agent must be
started first since all other modules receive their configuration from Dr.Web Agent.
Configuring SeLinux Security Policies
If the used Linux distribution features SELinux security subsystem (Security-Enhanced Linux),
you need to configure security policies used by SELinux in order to enable correct operation of antivirus components (Dr.Web Daemon and Dr.Web Console Scanner) after the installation.
Moreover, if SELinux is enabled, product installation from distribution packages (.run)can fail
because an attempt to create drweb user, whose privileges are used by Dr.Web for UNIX File
Servers, will be blocked.
Thus, before installing the product, check SELinux operation mode with the use of getenforce
command. This command outputs the current operation mode which can be one of the following:
Permissive – protection is active, but permissions are supported: actions that violate the security
are not denied but logged.
Enforced – protection is active and restrictions are enforced: actions that violate the security are
logged and blocked.
Disabled – SELinux is installed but not active.
If SELinux is operating in the Enforced mode, temporarily (until the product is installed and security
policies are configured) enable Permissive mode. To do this, enter the setenforce 0 command
that temporarily (until the next restart) sets SELinux operation mode to Permissive. To enable the
Enforced mode again, enter the setenforce 1 command.
Note that regardless of the mode enabled with the setenforce command, after system restart
SELinux will operate in the mode specified in the settings (normally, SELinux configuration file is
located in the /etc/selinux directory).
In general, if audit daemon is used, the log file resides in /var/log/audit/audit.log.
Otherwise, notifications on forbidden actions are logged to the following log file: /var/log/
messages.
For correct operation of anti-virus components when SELinux is enabled, compile special security
policies once the product installation completes.
Administrator Manual
42
Starting Dr.Web for UNIX File Servers
Please note that some Linux distributions may not have the below mentioned utilities installed by
default. In this case you need to additionally install the required packages.
To create required policies:
1. Create a new file with SELinux policy source code (.te file). The file defines restrictions applied to
the described module. The source file can be created in one of the two ways:
1) With the use of audit2allow utility. This way is more simple. The utility generates
permissive rules based on the messages on denial of access to system log files. You can set
automatic search of messages in log files or set path to the log file manually.
audit2allow utility resides in the policycoreutils-python package, or
policycoreutils-devel package (for RedHat Enterprise Linux, CentOS, Fedora OS,
depending on the version), or python-sepolgen package (for Debian, Ubuntu OS).
Example usage:
# audit2allow -M drweb -i /var/log/audit/audit.log
OR
# cat /var/log/audit/audit.log | audit2allow -M drweb
In this example, audit2allow utility searches for access denied messages in the
audit.log file.
# audit2allow -a -M drweb
In this example, audit2allow searches for access denied messages in log files
automatically.
In both cases two files are created as a result of the utility operation: drweb.te policy source
file and drweb.pp policy module which is ready for installation.
In most cases you do not need to adjust policies created by the utility. So, it is recommended
to go to step 4 for installation of the drweb.pp policy module. Note that audit2allow utility
outputs semodule command invocation string. Copy the string to the command line and
execute. That way, you will do instructions of step 4. Go to step 2 only if you want to adjust
the policies which are automatically formed for Dr.Web for UNIX File Servers components.
2) With the use of policygentool utility. As a parameter, specify the name of the module
which operation you want to configure and the path to its executable file.
Note that policygentool utility included in selinux-policy package for RedHat
Enterprise Linux and CentOS Linux OS might not function correctly. In this case, use
audit2allow utility.
Example of creating policies with policygentool:
o For Dr.Web Console Scanner:
# policygentool drweb-scanner /opt/drweb/drweb.real
o For Dr.Web Daemon:
# policygentool drweb-daemon /opt/drweb/drwebd.real
You will be prompted to get information on some domain features and then for each of the
modules, 3 files will be created which determine the policy:
[module_name].te, [module_name].fc и [module_name].if.
Administrator Manual
43
Starting Dr.Web for UNIX File Servers
2. If necessary, edit generated source file of the [module_name].te policy and then use the
checkmodule utility to create a binary representation (.mod) of the policy source file.
Please note that for successful policy compilation, a checkpolicy package must be installed in the
system.
Usage example:
# checkmodule -M -m -o drweb.mod drweb.te
3. Create a policy module (drweb.pp) with the use of semodule_package utility.
Example:
# semodule_package -o drweb.pp -m drweb.mod
4. To install a new policy module into the module store, use the semodule utility.
Example:
# semodule -i drweb.pp
After system restart, SELinux security subsystem will be configured to enable correct operation of
Dr.Web for UNIX File Servers.
For details on how to configure SELinux and on its operation features, refer to documentation for the
used Linux distribution.
Administrator Manual
44
Dr.Web Updater
Dr.Web Updater
You can use Dr.Web Updater to enable automatic updates of virus databases and content-specific
black and white lists of Internet resources for Dr.Web for UNIX File Servers. Dr.Web Updater is
implemented as a console script update.pl written in Perl, and you can find the module in the
directory with Dr.Web for UNIX File Servers executable files.
Dr.Web Updater requires installed Perl 5.8.0 or later.
Dr.Web Updater settings are located in the [Updater] section of the drweb32.ini configuration
file in %etc_dir directory. To use an alternative configuration file, specify the full path to it with a
command line parameter on the startup.
To run the script, use the following command:
$ %bin_dir/update.pl [parameters]
For details on allowed parameters, see Command Line Parameters.
In the standard mode, updates are downloaded and installed automatically under the drweb user.
Do not start updating under the root superuser as this results in changing the ownership of updated files
to root superuser and may cause an error on attempt to update them automatically in the future.
Updating Anti-Virus and Virus Databases
To provide reliable protection, Dr.Web for UNIX File Servers requires regular updates to virus
databases.
Dr.Web for UNIX File Servers virus databases are stored as files with the *.vdb extension. Update
servers of Dr.Web Global Updating System (Dr.Web GUS) can also store them within lzmaarchives. When new viruses are discovered, small files (only several KBytes in size) with database
segments describing these viruses are released to provide quick and effective countermeasures.
Updates are the same for all supported platforms. There are daily "hot" updates (drwtoday.vdb) and
regular weekly updates (drwXXXYY.vdb), where XXX is a version number of an anti-virus engine, and
YY is a sequential number, starting with 00 (for example, the first regular update for version 6.0 is
named drw60000.vdb).
"Hot" updates are issued daily or even several times a day to provide effective protection against new
viruses. These updates are installed over the old ones: that is, a previous drwtoday.vdb file is
overwritten. When a new regular update is released, all records from drwtoday.vdb are copied to
drwXXXYY.vdb, and a new empty drwtoday.vdb file is issued.
If you want to update virus databases manually, you must install all missing regular updates first, and
then overwrite drwtoday.vdb file.
To add an update to the main virus databases, place the corresponding file to the directory with
Dr.Web for UNIX File Servers executable files (/var/drweb/bases/ by default) or to any other
directory specified in the configuration file.
Signatures for virus-like malicious programs (adware, dialers, hacktools and others) are supplied in two
additional files - drwrisky.vdb and drwnasty.vdb - with the structure similar to virus databases.
These files are also regularly updated: dwrXXYYY.vdb and dwnXXYYY.vdb are for regular updates,
and dwrtoday.vdb and dwntoday.vdb are for "hot" updates.
Administrator Manual
45
Dr.Web Updater
From time to time (as new anti-virus techniques are developed), new versions of the anti-virus package
are released, containing the updated algorithms, implemented in the anti-virus engine Dr.Web
Engine. At the same time, all released updates are brought together, and the new package version is
completed with the updated main virus databases with descriptions of all known viruses. Usually after
an upgrade of a package version, new databases can be linked to the old Dr.Web Engine. Please note
that this does not guarantee detection or curing of new viruses, as it requires upgrading of algorithms
in Dr.Web Engine.
Being regularly updated, virus databases have the following structure:
drwebase.vdb – general virus database, received with the new version of the package;
drwXXXYY.vdb – regular weekly updates;
drwtoday.vdb – "hot" updates released daily or several times a day;
drwnasty.vdb – general database of other malware, received with the new version of the
package;
dwnXXXYY.vdb – regular weekly updates for other malware;
dwntoday.vdb – "hot" updates for other malware;
drwrisky.vdb – general database of riskware, received with the new version of the package;
dwrXXXYY.vdb – regular weekly updates for riskware;
dwrtoday.vdb – "hot" updates for riskware.
Virus databases can be automatically updated with Dr.Web Updater module (%bin_dir/
update.pl). After installation, a user crontab file (/etc/cron.d/drweb-update) is automatically
created to run Updater every 30 minutes. That ensures regular updates and maximum protection. You
can modify this file to change update period.
Cron Configuration
For Linux: a special file with user settings is created in the /etc/cron.d/ directory during
installation of the software. It enables interaction between cron and Dr.Web Updater.
In the task created for crond, the vixie cron syntax is used. If you use a different cron daemon, such
as dcron, create a task to start Dr.Web Updater automatically.
For FreeBSD and Solaris: manual configuration of cron is required to enable its interaction with
Dr.Web Updater.
For example, when you use FreeBSD you may add the following string to crontab of drweb user:
*/30 * * * * /usr/local/drweb/update.pl
If you work with Solaris, the following set of commands is used:
# crontab -e drweb
# 0,30 * * * * /opt/drweb/update.pl
Please note that by default the cron daemon launches Dr.Web Updater once in 30 minutes (at the 0
and 30 minutes of every hour). This may result in increased load on the Dr.Web GUS update servers
and cause update delays. To avoid such situation, it is recomended to change default values to
arbitrary.
Administrator Manual
46
Dr.Web Updater
Command Line Parameters
--help – shows brief help.
--ini – specifies another (not default) configuration file to be used. To use another configuration
file, specify the full path to it with the --ini command line parameter. If the name of the
configuration file is not specified, %etc_dir/drweb32.ini is used.
Example:
$ /opt/drweb/update.pl --ini=/path/to/conf_file
--what – temporarily overrides value of the Section parameter on Updater startup. The new
specified value is used until next start of the script. Possible values: scanner or daemon.
Example:
$ /opt/drweb/update.pl --what=Scanner
--components – displays a list of all product components available for update.
Example:
$ /opt/drweb/update.pl --components
You can also use the command line parameter
--not-need-reload:
o if this parameter is not specified, all daemons (Dr.Web Daemon for Dr.Web for UNIX File
Servers) which components were updated, removed, or added are restarted after update.pl
script finishes;
o if the --not-need-reload parameter is specified without any value, after the update.pl
script finishes no daemon of Dr.Web for UNIX File Servers is restarted;
o if some daemon names are specified as the not-need-restart value, the corresponding
daemons are not restarted after the update.pl script finishes. Names of non-restarted daemons
must be separated be commas and listed without white spaces. The names are case insensitive.
Example:
$ /opt/drweb/update.pl --not-need-reload=drwebd
Blocking Updates for Selected Components
You can configure Dr.Web Updater to block updates to selected components of your Dr.Web for
UNIX File Servers.
To view the list of available components, use the --components command line parameter:
Example:
# ./update.pl --components
Available Components:
agent
drweb
(frozen)
icapd
(frozen)
vaderetro_lib
If updates to a component are blocked, that component is marked as frozen. Frozen components are
not updated when Dr.Web Updater is started.
Administrator Manual
47
Dr.Web Updater
Blocking updates
To block updates for specific component, use the
--freeze=<components> command-line parameter, where <components> is a comma separated
list of components to be frozen.
Example:
# ./update.pl --freeze=drweb
Updates for component 'drweb' are frozen.
Run command './updater --unfreeze=drweb' to start updates again.
Unblocking updates
To enable updates for a frozen component, use the
--unfreeze=<components> command-line parameter, where <components> is a comma
separated list of components to be unfrozen.
Example:
# ./update.pl --unfreeze=drweb
Updates for component 'drweb' are no longer frozen.
Unfreezing will not update the component.
Restoring Components
When Dr.Web for UNIX File Servers components are being updated, Dr.Web Updater saves their
back-up copies to the working directory. It enables you to restore any component to its previous state if
any problem occurs during an update.
To restore component to its previous state, use the --restore=<components> command line
parameter, where <components> is a comma separated list of components to be restored.
Example:
# ./update.pl --restore=drweb
Restoring backup for component 'drweb'...
Updates for component 'drweb' are frozen.
Run command './updater --unfreeze=drweb' to start updates again.
Backup for component 'drweb' has been restored!
Dr.Web (R) restore details:
Following files has been restored:
/var/drweb/bases/drwtoday.vdb
/var/drweb/bases/dwntoday.vdb
/var/drweb/bases/dwrtoday.vdb
/var/drweb/bases/timestamp
/var/drweb/updates/timestamp
Restored components are automatically frozen. To enable updates for a restored component, unfreeze it.
Configuration
Dr.Web Updater settings are stored in the Updater section of the configuration file (drweb32.ini
by default) which is located in %etc_dir directory:
Administrator Manual
48
Dr.Web Updater
Section [Updater]
UpdatePluginsOnly =
{logical}
If Yes value is specified, Dr.Web Updater does not update
Dr.Web Daemon and Dr.Web Scanner. It updates only the
plug-ins.
Default value:
UpdatePluginsOnly = No
Section =
{Daemon | Scanner}
Specifies the section of configuration file where Dr.Web Updater
takes the settings, such as a path to the key file, paths to virus
databases and others. Possible values: Scanner, Daemon.
Value of this parameter can be temporarily overriden by the -what command line parameter. The specified value is used until
the next start of the script.
Default value:
Section = Daemon
ProgramPath =
{path to file}
Path to the executable file of Dr.Web Daemon or Dr.Web
Scanner. It is used by Dr.Web Updater to get the product
version.
Default value:
ProgramPath = %bin_dir/drwebd
SignedReader =
{path to file}
Path to the program which is used to read digitally signed files.
Default value:
SignedReader = %bin_dir/read_signed
LzmaDecoderPath =
{path to directory}
Path to the directory that contains a program used for unpacking
of lzma-archives.
Default value:
LzmaDecoderPath = %bin_dir/
LockFile =
{path to file}
Path to the file used to prevent sharing of certain files during their
processing by Dr.Web Updater.
Default value:
LockFile = %var_dir/run/update.lock
CronSummary =
{logical}
If you specify Yes, Dr.Web Updater outputs an update report
for each session to stdout.
This mode can be used to send notifications to administrator by
email, if Dr.Web Updater is run by the cron daemon.
Default value:
CronSummary = Yes
DrlFile =
{path to file}
Path to the file (*.drl) with the list of Dr.Web GUS servers.
Dr.Web Updater selects a server from this list in random order to
download updates.
For details on downloading updates, see Updating Process.
This file is signed by Doctor Web and must not be modified by a
user. The file is updated automatically.
Default value:
DrlFile = %var_dir/bases/update.drl
Administrator Manual
49
Dr.Web Updater
CustomDrlFile =
{path to file}
Path to the file (*.drl) with the alternative list of Dr.Web GUS
servers.
Dr.Web Updater also selects a server from this list in random
order to download updates.
For details on downloading updates, see Updating Process.
This file is signed by Doctor Web and must not be modified by a
user. It is updated automatically.
Default value:
CustomDrlFile = %var_dir/bases/custom.drl
FallbackToDrl =
{logical}
Allows using the file specified by DrlFile when connection to
one of the servers listed in CustomDrlFile failed.
If the parameter value is No, the file specified in DrlFile is not
used.
If the file specified in CustomDrlFile does not exist, the file
specified in DrlFile is used regardless of the FallbackToDrl
parameter value.
For details on downloading updates, see Updating Process.
Default value:
FallbackToDrl = Yes
DrlDir =
{path to directory}
Path to the directory that contains drl files with lists of Dr.Web
GUS servers for each plug-in.
These files are signed by Doctor Web and must not be modified
by a user.
Default value:
DrlDir = %var_dir/drl/
Timeout =
{numerical value}
Maximum wait time for downloading updates from the selected
Dr.Web GUS server, in seconds.
Default value:
Timeout = 90
Tries =
{numerical value}
Number of attempts by Dr.Web Updater to establish connection
with the selected update server.
Default value:
Tries = 3
ProxyServer =
{host name | IP address}
Host name or IP address of the proxy server which is used for
Internet access.
If the proxy server is not used, the value of this parameter must
be empty.
Default value:
ProxyServer =
ProxyLogin =
{string}
User login to access the used proxy server (if it requires
authentication).
Default value:
ProxyLogin =
Administrator Manual
50
Dr.Web Updater
ProxyPassword =
{string}
The password to access the used proxy server (if it requires
authentication).
Default value:
ProxyPassword =
LogFileName =
{syslog | file name}
Path to the log file name.
You can specify syslog as a log file name and logging will be
performed by syslogd system service.
Default value:
LogFileName = syslog
SyslogFacility =
{syslog label}
Log type label which is used by syslogd system service.
Default value:
SyslogFacility = Daemon
LogLevel =
{log level}
Log verbosity level.
The following levels are allowed:
Quiet
Error
Warning
Info
Debug
Verbose
Default value:
LogLevel = Info
BlacklistPath =
{path to directory}
Path to the directory with .dws files.
Default value:
BlacklistPath = %var_dir/dws
AgentConfPath =
{path to file}
Path to Dr.Web Agent configuration file.
Default value:
AgentConfPath = %var_dir/agent.conf
ExpiredTimeLimit =
{numerical value}
Number of days left before license expiration during which
Dr.Web Updater is attempting to update license key file.
Default value:
ExpiredTimeLimit = 14
ESLockfile =
{path to file}
Path to the lock file.
If the lock file exists, Dr.Web Updater can not be automatically
initialized by cron daemon.
Default value:
ESLockfile = %var_dir/run/es_updater.lock
Updating Procedure
Updating is performed in the following stages:
1. Dr.Web Updater reads the configuration file (drweb32.ini by default, or specified with the --
Administrator Manual
51
Dr.Web Updater
ini command line argument).
2. Dr.Web Updater uses parameters from the [Updater] section of the configuration file (see the
description above) as well as the following parameters: EnginePath, VirusBase, UpdatePath and
PidFile.
3. Dr.Web Updater selects Dr.Web GUS server for downloading updates. The server is selected in
the following way:
Reading of the files which contain lists of update servers. The filenames are specified in the
DrlFile and CustomDrlFile parameters;
If both files are not accessible, updating process stops and terminates;
If only one of the files is accessible, it is used regardless of the value specified for the
FallbackToDrl parameter;
If both files are accessible, Dr.Web Updater uses the file specified in the CustomDrlFile
parameter;
If it is impossible to connect to any of the servers from this file (specified in CustomDrlFile),
and the FallbackToDrl value is set to Yes, Dr.Web Updater tries to establish connection
with the servers from the file specified in the DrlFile parameter. If the connection fails, the
updating process stops and terminates.
4. Dr.Web Updater tries to connect to servers from the selected file in random order until
connection is established (Dr.Web Updater waits for the server to respond during the period
specified in the Timeout parameter).
5. Dr.Web Updater requests the list of available updates from the selected Dr.Web GUS server
and then requests the corresponding lzma archives. If the archives are not available on the
server, the updates are downloaded as vdb files. To unpack lzma-archives, lzma utility is used.
Path to the directory with the utility is specified in the LzmaDecoderPath parameter.
6. After updates are unpacked, they are saved to the corresponding directories as described in
Updating.
Administrator Manual
52
Dr.Web Agent
Dr.Web Agent
Dr.Web Agent is a resident module used to manage settings of Dr.Web for UNIX File Servers
modules, define anti-virus policy depending on available licenses and collect virus statistics. Statistics,
depending on Dr.Web Agent operational mode, is sent with the predetermined frequency either to the
public server of the company or to the central protection server that works under Dr.Web Agent.
When Dr.Web for UNIX File Servers modules are started or settings are changed, Dr.Web Agent
sends all necessary configuration to these modules.
Note that drweb-agent can operate in enterprise mode only with Dr.Web ESS 6. If you want to ensure
connection to the central protection server Dr.Web ESS 10, install and configure the new agent version,
implemented as drweb-agent10 module. For details on how to install and configure drweb-agent10,
refer to the Migration to Dr.Web ESS 10 section.
Dr.Web Agent can interact with other modules through exchanging control signals.
Since all Dr.Web for UNIX File Servers components (except for Dr.Web Monitor) receive their
configuration via drweb-agent module, it must be run before all these modules, but after the drwebmonitor module.
Please note that when several parameters with the same name are specified in the configuration file,
Dr.Web Agent unites them in one comma delimited string. You can also use a backslash symbol "\" to
define parameter value in several lines. New line after backslash is added to the previous line when
Dr.Web Agent is reading configuration. Note that using of a space character after a slash is not
allowed.
Operation Mode
If necessary, Doctor Web can be connected to a corporate or private anti-virus network managed by
Dr.Web Enterprise Security Suite (Dr.Web ESS). To operate in the central protection mode, you
do not need to install additional software or uninstall your Dr.Web solution.
To provide you with this option, Dr.Web Agent can operate in one of the two following modes:
Standalone mode when a protected computer is not included in an anti-virus network or
managed remotely. In this mode, configuration files and key files reside on local drives, and
Dr.Web Agent is fully controlled from the protected computer.
Enterprise mode (or central protection mode), when protection of the computer is managed
from the central protection server. In this mode, some features and settings of Dr.Web for
UNIX File Servers may be modified and blocked for compliance with a general (for example,
company) security policy. Licence key file for operation in this mode is received from the central
protection server. Your personal key file on the local computer is not used.
Note that drweb-agent can operate in enterprise mode only with Dr.Web ESS 6. If you want to ensure
connection to the central protection server Dr.Web ESS 10, install and configure the new agent version,
implemented as drweb-agent10 module. For details on how to install and configure drweb-agent10,
refer to the Migration to Dr.Web ESS 10 section.
To use central protection mode
1. Contact the anti-virus network administrator of your company for a public key file and
parameters of connection to the central protection server.
2. In the Dr.Web Agent configuration file (by default, %etc_dir/agent.conf), adjust the
following parameters in the [EnterpriseMode] section:
Administrator Manual
53
Dr.Web Agent
Set the PublicKeyFile parameter value to location of a public key file received from antivirus network administrator (usually, %var_dir/drwcsd.pub).This file includes an
encryption public key for access to Dr.Web ESS. If you are the anti-virus network
administrator, you can locate the file in the corresponding directory on the Enterprise
Server.
Set the ServerHost parameter value to the IP-address or host name of the Enterprise
Server.
Set the ServerPort parameter value to the Enterprise Server port number.
3. To connect to the central protection server, set the UserEnterpriseMode parameter value to
Yes.
In the central protection mode, some features and settings of Dr.Web for UNIX File Servers
may be modified and blocked in compliance with the general security policy. A key file for
operation in this mode is received from the central protection server. Your personal key file on the
local computer is not used.
To run Dr.Web Agent in the central protection mode, drweb-agent-es package must be
installed.
To enable Dr.Web for UNIX File Servers to fully support the central protection mode, set
Dr.Web Monitor to operate in enterprise mode. For more details, see Operation Mode of
Dr.Web Monitor.
To use standalone mode
1. Ensure that all parameters in the [StandaloneMode] section of the Dr.Web Agent
configuration file (by default, %etc_dir/agent.conf) are adjusted properly.
2. In the [EnterpriseMode] section of the Dr.Web Agent configuration file, set the
UseEnterpriseMode parameter to No.
When switching to this mode, all settings of Dr.Web for UNIX File Servers are unlocked and
restored to their previous or default values. You can access all features of Dr.Web for UNIX File
Servers solutions again and configure them.
For correct operation in the standalone mode, Dr.Web for UNIX File Servers requires a valid
personal key file. The key files received from the central protection server cannot be used in this
mode.
Using Dr.Web for UNIX File Servers and Dr.Web Anti-virus for Linux together in the
central protection mode
Because of the implementation features, Dr.Web for UNIX File Servers and Dr.Web Anti-virus for
Linux cannot be simultaneously operate in the central protection mode if they are both installed on the
same computer. To enable Dr.Web for UNIX File Servers to operate in the central protection mode,
change the operation mode of Dr.Web Anti-virus for Linux to the Standalone mode and delete or
move to another directory the following files: %etc_dir/agent/drweb-cc.amc and %etc_dir/
agent/drweb-spider.amc.
If you want to switch Dr.Web Anti-virus for Linux back to the central protection mode later, we
recommended to save the files as a back up copy in a directory that is different from %etc_dir/
agent. In this case, disable the central protection mode of Dr.Web for UNIX File Servers, copy back
up copies of drweb-cc.amc and drweb-spider.amc files to the %etc_dir/agent/ directory and
follow the instructions provided in the Dr.Web Anti-virus for Linux User Manual.
Administrator Manual
54
Dr.Web Agent
Command Line Parameters
To run Dr.Web Agent, use the following command:
drweb-agent [parameters]
where the following parameters are available:
Short case
-h
Extended case
--help
Arguments
Description: Show information about supported command line parameters on the screen and terminate the
module
-v
--version
Description: Show Dr.Web Agent version on the screen and terminate the module
-u
--update-all
Description: Start updating all Dr.Web for UNIX File Servers components
-f
--update-failed
Description: Start updating Dr.Web for UNIX File Servers components, updating of which failed in the
standard mode
-C
--check-only
Description: Check correctness of Dr.Web Agent configuration. This parameter cannot be used if a Dr.Web
Agent process is already running in the system
-c
--conf
<path to file>
Description: Enable the module to use the specified configuration file
-d
--droppwd
Description: Discard registration data required to access Dr.Web Enterprise Server (username, password). At
the next connection attempt, a new process of workstation registration will start.
-p
--newpwd
Description: Change username and password required to access Dr.Web Enterprise Server
-s
--socket
<path to file>
Description: Use the specified socket for interaction with the controlled modules
-P
--pid-file
<path to file>
Description: Use the specified file as a PID file of Dr.Web Agent
-e
--export-config
<application name>
Description: Export configuration of the specified application to Dr.Web Enterprise Server. Use the application
name specified in the header of the Application "<application name>" section in the corresponding
amc file (see Interaction with other Suite components).
This parameter cannot be used if a Dr.Web Agent process is already running in the system or if you want to
export Dr.Web Anti-virus for Linux configuration.
Administrator Manual
55
Dr.Web Agent
Configuration File
Configuration of Dr.Web Agent is specified in the following file: %etc_dir/agent.conf.
For general organization concept of Dr.Web for UNIX File Servers configuration files, see
Configuration Files.
[Logging] Section
The [Logging] section contains Dr.Web Agent logging settings:
[Logging]
Level =
{log level}
Dr.Web Agent log verbosity level.
The following levels are available:
Quiet
Error
Alert
Info
Debug
Default value:
Level = Info
IPCLevel =
{log level}
Log verbosity level of IPC library.
The following levels are available:
Quiet
Error
Alert
Info
Debug
Default value:
IPCLevel = Error
SyslogFacility =
{syslog label}
Log type label used by syslogd system service.
FileName =
{path to file | syslog}
Path to the log file.
Default value:
SyslogFacility = Daemon
You can specify syslog as a log file name and logging will be
performed by syslogd system service.
Default value:
FileName = syslog
[Agent] Section
The [Agent] section contains general Dr.Web Agent settings:
[Agent]
MetaConfigDir =
{path to directory}
Name of the directory where meta-configuration files of drwebagent are located.
Administrator Manual
56
Dr.Web Agent
These files contain settings of interaction between Dr.Web Agent
and other modules of the Dr.Web suite. Meta-configuration files
are provided by Dr.Web developers and do not need to be
modified.
Default value:
MetaConfigDir = %etc_dir/agent/
UseMonitor =
{logical}
Yes value indicates to drweb-agent that Dr.Web Monitor is
used as a part of Dr.Web for UNIX File Servers.
Default value:
UseMonitor = Yes
MonitorAddress =
{address}
Socket used by Dr.Web Agent for interaction with Dr.Web
Monitor (the parameter value must be the same as the Address
parameter value in the Dr.Web Monitor configuration file).
Default value:
MonitorAddress = local:%var_dir/ipc/.monitor
MonitorResponseTime =
{numerical value}
Maximum time to get a response from drweb-monitor module,
in seconds.
If Dr.Web Monitor does not respond during this period, Dr.Web
Agent considers drweb-monitor not running and stops trying to
establish connection with Dr.Web Monitor.
Default value:
MonitorResponseTime = 5
PidFile =
{path to file}
Name of the file where Dr.Web Agent PID is written on Dr.Web
Agent startup.
Default value:
PidFile = %var_dir/run/drweb-agent.pid
[Server] Section
The [Server] section contains parameters that control interaction of Dr.Web Agent with other
Dr.Web for UNIX File Servers modules:
[Server]
Address =
{address}
Socket used by Dr.Web Agent to interact with other modules of
the suite.
You can specify multiple sockets separating them by comma.
Default value:
Address = local:%var_dir/ipc/.agent,
inet:[email protected]
Threads =
{numerical value}
Number of drweb-agent simultaneous threads.
This parameter determines maximum number of simultaneous
connections to modules that report virus statistics to Dr.Web
Agent. The parameter value cannot be changed with SIGHUP
signal.
If 0 is specified,
recommended).
number
of
threads
is
unlimited
(not
Default value:
Threads = 2
Administrator Manual
57
Dr.Web Agent
Timeout =
{numerical value}
Maximum time (in seconds) for establishing connection between
Dr.Web Agent and other Dr.Web modules.
If the value is set to 0, time for establishing connection is
unlimited.
Default value:
Timeout = 15
[EnterpriseMode] Section
The [EnterpriseMode] section contains parameters of Dr.Web Agent operation in the Enterprise
mode:
[EnterpriseMode]
UseEnterpriseMode =
{logical}
If the value is set to Yes, Dr.Web Agent operates in the
Enterprise mode, if the value is set to No - in the Standalone
mode.
Default value:
UseEnterpriseMode = No
ComputerName =
{text value}
Name of the computer in Anti-virus network.
VirusbaseDir =
{path to directory}
Path to the directory where virus databases are located.
PublicKeyFile =
{path to file}
Path to the public key file required to access Dr.Web Enterprise
Server.
Default value:
ComputerName =
Default value:
VirusbaseDir = %var_dir/bases
Default value:
PublicKeyFile = %bin_dir/drwcsd.pub
ServerHost =
{IP address}
IP address of Dr.Web Enterprise Server .
ServerPort =
{port number}
Number of the port required to access Dr.Web Enterprise
Server.
Default value:
ServerHost = 127.0.0.1
Default value:
ServerPort = 2193
CryptTraffic =
{Yes | Possible | No}
Encryption of traffic between Dr.Web Enterprise Server and
Dr.Web Agent:
Yes – force encryption
Possible – encrypt if possible
No – do not encrypt
Default value:
CryptTraffic = possible
CompressTraffic =
{Yes | Possible | No}
Compression of traffic between Dr.Web Enterprise Server and
Dr.Web Agent:
Yes – force compression
Administrator Manual
58
Dr.Web Agent
Possible – compress if possible
No – do not compress
Default value:
CompressTraffic = possible
CacheDir =
{path to directory}
Path to the directory, where different utility files are stored:
configuration files, files with access privileges for applications
managed by Dr.Web Enterprise Server, files with registration
information on Dr.Web Enterprise Server, etc.
Default value:
CacheDir = %var_dir/agent
[StandaloneMode] Section
The [StandaloneMode] section contains parameters of Dr.Web Agent operation in the Standalone
mode:
[StandaloneMode]
StatisticsServer =
{text value}
Address (URL) of the virus statistics server
If the value is not specified, statistics is not sent.
Default value:
StatisticsServer = stat.drweb.com:80/update
StatisticsUpdatePeriod = {numerical
value}
Period (in minutes) for statistics updating.
Value cannot be less than 5
Default value:
StatisticsUpdatePeriod = 10
StatisticsProxy =
{hostname | IP address}
IP address or host name of proxy server for sending virus
statistics.
Please note that if the parameter value is not set, the value of
http_proxy environment variable is used.
Example:
StatisticsProxy = localhost:3128
Default value:
StatisticsProxy =
StatisticsProxyAuth = {text
value}
Authentication string (<username>:<password>) to access
proxy server.
Example:
StatisticsProxyAuth = test:testpwd
Default value:
StatisticsProxyAuth =
UUID =
{text value}
Unique user ID for the statistics server http://stat.drweb.com/.
Please note that this parameter is mandatory for sending statistics.
Thus, if you want to enable this option, specify the personal UUID
as the parameter value (md5 sum of license key file is usually used
as UUID).
Default value:
UUID =
Administrator Manual
59
Dr.Web Agent
LicenseFile =
{paths to files}
Location of Dr.Web license key files or demo key files.
Paths in the list are separated by commas (if the list contains more
than one path).
Default value:
LicenseFile = %bin_dir/drweb32.key
[Update] Section
The [Update] section contains parameters of Dr.Web for UNIX File Servers update via Dr.Web
Enterprise Server:
[Update]
CacheDir =
{path to directory}
Directory where Dr.Web Agent temporarily stores downloaded
update files.
Default value:
CacheDir = %var_dir/updates/cache
Timeout =
{numerical value}
Maximum time (in seconds) for Dr.Web Agent to process
downloaded update files.
If 0 is specified, time for process is unlimited.
Default value:
Timeout = 120
RootDir =
{path to directory}
Path to the root directory.
Default value:
RootDir = /
For more information, see Administrator Manual for Dr.Web ESS.
Running Dr.Web Agent
Please note that if at the post-install script runtime you select the "Configure Services" option in the
conversation, all services including Dr.Web Agent, will be started automatically.
When Dr.Web Agent starts with the default settings, the following actions are performed:
Dr.Web Agent searches and loads its configuration file. If the configuration file is not found,
Dr.Web Agent terminates.
If the parameters in the [EnterpriseMode] section are set correctly and Dr.Web for UNIX
File Servers is operating within Anti-virus network, Dr.Web Agent starts in the Enterprise
mode. Otherwise, if parameters in the [Standalone] section are set correctly, Dr.Web Agent
starts in the Standalone mode. If the parameters in the [Standalone] section are not set,
Dr.Web Agent terminates.
Socket for interaction of Dr.Web Agent with other Dr.Web modules is created. If a TCP socket
is used, several connections can be established (loading continues if at least one connection is
established). If a UNIX socket is used, it can only be created if the user, whose privileges are used
to run drweb-agent, has read and write access to its directory. If a socket cannot be created,
Dr.Web Agent terminates.
Further loading process depends on the selected operation mode.
Administrator Manual
60
Dr.Web Agent
If Dr.Web Agent operates in the Enterprise mode:
Dr.Web Agent connects to Dr.Web Enterprise Server. If the server is unavailable or
authorization process fails during the first connection attempt, Dr.Web Agent terminates. If
Dr.Web Agent worked previously with this server and now the server is temporary unavailable
(for example, if any connection problem occurs), Dr.Web Agent uses backup copies of
configuration files received from the server earlier. These files are encrypted and must not be
edited by a user. An attempt to edit the files makes them invalid.
If the connection is established, Dr.Web Agent receives key files and settings from Dr.Web
Enterprise Server. After all settings and key files are received, Dr.Web Agent is fully
operational.
If Dr.Web Agent operates in the Standalone mode, meta-configuration files (.amc) that manage
Dr.Web Agent interaction with other Dr.Web modules are loaded. Location of meta-configuration files
is set in the MetaConfigDir parameter in the [Agent] section of the Dr.Web Agent configuration
file. When meta-configuration files are successfully loaded, Dr.Web Agent is ready to operate.
Interaction with Other Suite Components
Interaction with other suite components is performed by Dr.Web Agent metaconfiguration files (amc
files). These files contain configuration parameters that are sent to the respective Dr.Web modules by
Dr.Web Agent. The files reside in the directory specified in the MetaConfDir parameter (by default
- %etc_dir/agent). Usually, one file contains configuration parameters of one component and name
of the file matches to the name of the Dr.Web for UNIX File Servers component.
Each module is described in the Application section with the corresponding name. At the end of the
section EndApplication must be specified.
The following parameters must be present in the module description:
id: identifier of the module in Dr.Web ESS.
ConfFile: path to the module configuration file.
Components: description of the modules. At the end of this section, EndComponents must be
specified. Description of each module must contain the following information: name and list of
sections in the configuration file with parameters that are necessary for proper operation. The list
of sections and parameters is comma separated.
To describe individual parameters properly, specify the full path to them (for example, /
Quarantine/DBISettings). In the section descriptions, only their names can be specified
(for example, General).
To denote line breaks, a back slash (\) is used.
If the component requires all settings from the configuration file, you can specify a path "/*"
instead of the list of sections and/or parameters.
Example of amc file for Dr.Web Samba VFS SpIDer for Linux:
Application "Dr.Web (R) SMB_SPIDER"
ID
110
ConfFile
"/etc/drweb/smb_spider.conf"
Components
smb_spider
DaemonCommunication, Scanning, Actions, Logging
EndComponents
EndApplication
Integration with Dr.Web Enterprise Security Suite
There are two possible situations which require integration of Dr.Web for UNIX File Servers with
Dr.Web Enterprise Security Suite:
Administrator Manual
61
Dr.Web Agent
Setup and initial configuration of Dr.Web for UNIX File Servers in the existing Anti-virus
Network operated by Dr.Web ESS;
Embedding of working UNIX server with already installed and configured Dr.Web for UNIX File
Servers in the Anti-virus Network operated by Dr.Web ESS.
To enable Dr.Web for UNIX File Servers to work in Dr.Web ESS environment, configure Dr.Web
Agent and Dr.Web Monitor components for operation in the Enterprise mode, and register the
suite on Dr.Web Enterprise Server.
According to the connection policy for new working stations (for details, see Dr.Web Enterprise
Security Suite administrator manual), Dr.Web for UNIX File Servers can be connected to Dr.Web
Enterprise Server in two different ways:
when a new account is automatically created by the central protection server
when a new account is created by administrator manually.
Configuring Components to Run in Enterprise Mode
To start the components in the Enterprise mode after installation, it is necessary to adjust
parameter values in the local configuration files of Dr.Web Agent and Dr.Web Monitor.
For Dr.Web Agent
In the [EnterpriseMode] section of Dr.Web Agent configuration file (%etc_dir/
agent.conf) set the following parameter values:
UseEnterpriseMode = Yes;
PublicKeyFile = %var_dir/drwcsd.pub (public encryption key used to access Dr.Web
Enterprise Server. Administrator must move this file from the corresponding directory of
Dr.Web Enterprise Server to the specified path);
ServerHost = IP address or host name of Dr.Web Enterprise Server;
ServerPort = Dr.Web Enterprise Server port (2193 by default).
For Dr.Web Monitor
In the [Monitor] section of the Dr.Web Monitor configuration file %etc_dir/monitor.conf set
the following parameter values:
UseEnterpriseMode = Yes.
Automatic Creation of New Account by ES Server
When a new account is created automatically:
1. On the first run in the Enterprise mode, Dr.Web Agent sends a request for the account details
(station ID and password) to Dr.Web Enterprise Server;
2. If Dr.Web Enterprise Server is set to the Approve access manually mode (used by default;
for details, see the administrator manual for Dr.Web ESS), system administrator must confirm
registration of a new station via Dr.Web Control Center web interface in one minute;
3. After the first connection, Dr.Web Agent records the hash of the station ID and password into
the pwd file. This file is created in the directory specified in the CacheDir parameter of the
[EnterpriseMode] section (default value is %var_dir/agent/);
4. Data from this file is used every time Dr.Web for UNIX File Servers connects to Dr.Web
Enterprise Server;
5. If you delete the password file, repeated registration request will be sent to Dr.Web Enterprise
Server on the next Dr.Web Agent startup.
Administrator Manual
62
Dr.Web Agent
Manual Creation of New Account by Administrator
To create a new account manually:
1. Create a new account on Dr.Web Enterprise Server: specify the station ID and password (for
details, see the administrator manual for Dr.Web ESS).
2. Start Dr.WebAgent with the --newpwd command line parameter (or -p) and enter the station
ID and password. Dr.Web Agent records the hash of station ID and password into the pwd file.
This file is created in the directory that is specified in the CacheDir parameter of the
[EnterpriseMode] section (default value is %var_dir/agent/).
3. Data from this file is used every time Dr.Web for UNIX File Servers connects to Dr.Web
Enterprise Server.
4. If you delete the password file, retry registration on the next Dr.Web Agent startup.
Configuring Components via Dr.Web Control Center (embedded in Enterprise
Security Suite)
You can configure Dr.Web for UNIX File Servers and Dr.Web Daemon (anti-virus module included
in the standard installation package) via Dr.Web Control Center.
The standard installation package Dr.Web Enterprise Security Suite includes basic configuration
files for Dr.Web for UNIX File Servers and Dr.Web Daemon for Linux, FreeBSD and Solaris.
When you configure certain components via the web interface (Dr.Web Control Center), values of
the corresponding parameters change in these configuration files on Dr.Web Enterprise Server. After
that, every time the components start, Dr.Web Agent requests configuration from Dr.Web
Enterprise Server.
Export of Existing Configuration to ES Server
You can export configuration from the local computer to Dr.Web Enterprise Server automatically
when Dr.Web Agent is operating in the Enterprise mode. To export configuration, use the
command line parameter --export-config (or -e).
You must specify the name of the component (DAEMON, SMB_SPIDER).
Example:
# %bin_dir/drweb-agent --export-config SMB_SPIDER
Starting the System
To start the system:
1. Start Dr.Web Monitor on the local computer:
For Linux and Solaris:
# /etc/init.d/drweb-monitor start
For FreeBSD:
# /usr/local/etc/rc.d/00.drweb-monitor.sh start
Administrator Manual
63
Dr.Web Agent
Integration with Dr.Web ESS 10
Dr.Web for UNIX File Servers 6.0.2 includes two versions of the Dr.Web Agent:
Dr.Web Agent, implemented as drweb-agent module, in enterprise mode can interact only
with Dr.Web ESS server version 6.
Dr.Web Agent, implemented as drweb-agent10 module, in enterprise mode can interact only
with Dr.Web ESS server version 10.
To start using the central protection server Dr.Web ESS 10, configure standard integration and also
make additional settings.
The products, operating in FreeBSD 6.x, cannot be integrated with Dr.Web ESS 10.
Configuring connection to Dr.Web ESS 10
As Dr.Web ESS does not support management of Dr.Web Monitor and Dr.Web Daemon, drwebagent10 uses two supplementary configuration files in addition to the standard file %etc_dir/
agent.conf: es_monitor.conf and es_daemon.conf. They are located in the same directory.
These files store configuration for Dr.Web Monitor and Dr.Web Daemon. The configuration settings
will be used for adjusting operation of these modules in enterprise mode.
Each file line contains the parameter value of the corresponding module configuration. The format is as
follows: <section>/<parameter> <value>, where <section> is the name of the section from
the component configuration file, <parameter> is the parameter name, and <value> is the value
specified for this parameter.
Example (for es_monitor.conf file that contains settings for Dr.Web Monitor component
operation in enterprise mode):
Monitor/RunAppList DAEMON
This line contains the value of RunAppList parameter stored in [Monitor] section in Dr.Web
Monitor configuration file. This parameter value is used when the suite is running in enterprise mode.
In this case, Dr.Web Monitor starts only Dr.Web Daemon.
Example (for es_daemon.conf file that contains settings for Dr.Web Daemon component
operation in enterprise mode):
Daemon/MaxCompressionRatio 500
This line contains the value of MaxCompressionRatio parameter stored in [Daemon] section in
Dr.Web Daemon configuration file. This parameter value is used when the suite is running in
enterprise mode. In this case, Dr.Web Daemon uses 500 as the threshold value of compression
ratio.
To connect Dr.Web for UNIX File Servers to the central protection server Dr.Web ESS 10:
1. Open agent.mmc meta-configuration file (used by Dr.Web Monitor for communication with
Dr.Web Agent) and replace the specified binary file name drweb-agent with drweb-agent10.
Administrator Manual
64
Dr.Web Agent
2. In es_monitor.conf file, specify components to be started int enterprise mode. For that
purpose, edit the es_monitor.conf accordingly. The set of started components must be similar to
the set of components started in standalone mode (specified as the value of RunAppList
parameter stored in [Monitor] section in Dr.Web Monitor configuration file). If more than one
component must be started, they are specified as a comma-separated list. Note that white spaces
are not allowed. Example:
Monitor/RunAppList DAEMON
As the component names, here should be used the names specified in Application section of
mmc-files.
3. If required, configure parameters in es_daemon.conf file that is used by Dr.Web Daemon
respectively in enterprise mode.
4. If standalone mode was previously used, switch operation of Dr.Web Agent and Dr.Web
Monitor components to enterprise mode by specifying appropriate settings in their configuration
files, as described in the Configuring Components to Run in Enterprise Mode section.
5. Restart Dr.Web Monitor by using the following command:
# service drweb-monitor restart
Gathering Virus Statistics
Dr.Web Agent receives statistics on computer threats from the controlled modules and sends it either
to the official Doctor Web statistics website: http://stat.drweb.com/ (if the Internet connection is
available) or to Dr.Web ESS (if Dr.Web Agent is operating in the Enterprise mode).
Dr.Web Agent needs the unique user identifier (UUID) to connect to this website. By default, MD5
hash of the key file is used as a UUID. Also you can get a personal UUID from Doctor Web Technical
Support. In this case, specify your UUID explicitly in the Dr.Web Agent configuration file
(StandaloneMode] section).
Statistics is gathered only for those Dr.Web modules that receive settings from Dr.Web Agent.
Instructions on how to set up interaction with Dr.Web Agent are given in the sections describing the
modules.
On the statistics website (at http://stat.drweb.com/), you can view aggregate statistics on computer
threats both for a given server and for all servers supported by Dr.Web Anti-virus for UNIX or by
Dr.Web for UNIX File Servers with an anti-virus plug-in. Dr.Web Agent can simultaneously process
statistics on computer threats from several different Dr.Web products which are able to interact with
Dr.Web Agent.
If Dr.Web Agent is operating in the Enterprise mode, you can view statistics on the special page of
Dr.Web Control Center. In this case, statistics gathered by Dr.Web Enterprise Server is also sent
to the Doctor Web statistics server as a summary of the Anti-virus network statistics.
Statistics is available in both HTML and XML formats. The second format is convenient if you plan to
publish this statistics on another website, since data in the XML format can be transformed according to
the website concept and design.
To view aggregate statistics on computer threats for all supported servers, visit http://stat.drweb.com/.
You can view a list of detected threats for all supported servers (in descending order) with overall
percentage of detections.
Administrator Manual
65
Dr.Web Agent
Appearance of the webpage can differ depending on the used browser.
The following figure shows threats statistics page.
Figure 14. Computer threats statistics
You can change search options and repeat the search. To do this:
1. Select either Mail or Files check boxes to get statistics on computer threats detected in emails
or files.
2. In the drop-down lists for Start date and End date, select start/end date and time for the
required period.
3. In the Top field, enter the required number of rows in the statistics table (most frequently
detected threats will be shown).
4. Click Query. The file with aggregate statistics in the XML format can be found at http://
info.drweb.com/export/xml/top
Administrator Manual
66
Dr.Web Agent
Example:
<drwebvirustop period="24" top="5"
vdbaseurl="http://info.drweb.com/virus_description/"
updatedutc="2009-06-09 09:32:02">
<item>
<vname>Win32.HLLM.Netsky</vname>
<dwvlid>62083</dwvlid>
<place>1</place>
<percents>34.201062139103</percents>
</item>
<item>
<vname>Win32.HLLM.MyDoom</vname>
<dwvlid>9353</dwvlid>
<place>2</place>
<percents>25.1303270912579</percents>
</item>
<item>
<vname>Win32.HLLM.Beagle</vname>
<dwvlid>26997</dwvlid>
<place>3</place>
<percents>13.4593034783378</percents>
</item>
<item>
<vname>Trojan.Botnetlog.9</vname>
<dwvlid>438003</dwvlid>
<place>4</place>
<percents>7.86446592583328</percents>
</item>
<item>
<vname>Trojan.DownLoad.36339</vname>
<dwvlid>435637</dwvlid>
<place>5</place>
<percents>7.31494163115527</percents>
</item>
</drwebvirustop>
In this file, the following XML attributes are used:
period – duration (in hours) of the statistics collection process;
top – number of the most frequently detected threats shown in the statistics table (number of
rows);
updatedutc – last statistics update time;
vname – threat name;
place – place of the virus in the statistics;
percents – percentage of the total number of detections.
Value of the period parameter and size of the sample cannot be changed by user.
To get personalized threat statistics
Visit one of the following webpages:
For statistics in HTML format, go to http://stat.drweb.com/view/ < UUID>. Page with the
personalized statistics is similar to the aggregate statistics page.
For the file with the personalized threat statistics in XML format, go to http://
stat.drweb.com/xml/ < UUID>.
The < UUID> in both cases stands for the MD5 hash of your license key file (unless you have a
personal UUID received from Doctor Web Technical Support).
Administrator Manual
67
Dr.Web Agent
Example:
<drwebvirustop period="24" top="2" user="<UUID>"
lastdata="2005-04-12 07:00:00+04">
<item>
<caught>69</caught>
<percents>24.1258741258741</percents>
<place>1</place>
<vname>Win32.HLLM.Netsky.35328</vname>
</item>
<item>
<caught>57</caught>
<percents>19.9300699300699</percents>
<place>2</place>
<vname>Win32.HLLM.MyDoom.54464</vname>
</item>
</drwebvirustop>
In this file, the following XML attributes are used:
period – duration (in hours) of the statistics collection process;
top – number of the most frequently detected threats shown in the table (number of rows);
user – user identifier;
lastdata – time when user last sent data to the server;
vname – threat name;
place – threat place in the statistics;
caught – number of detections of the certain threat;
percents – percentage of the total number of detections.
Value of the period parameter and size of the sample cannot be changed by user.
Administrator Manual
68
Dr.Web Monitor
Dr.Web Monitor
Dr.Web Monitor is a memory resident module drweb-monitor.
It is used to increase fault-tolerance of the whole Dr.Web for UNIX File Servers suite. It ensures
correct startup and termination of suite components as well as restart of any component if it is
operating abnormally. Dr.Web Monitor starts all modules and loads, if necessary, some extra
components of these modules. If Dr.Web Monitor fails to start a module, it repeats an attempt later.
Number of attempts and time period between them are defined by Dr.Web Monitor settings.
After all modules are loaded, Dr.Web Monitor permanently controls their operation. If any module or
one of its components operates abnormally, Dr.Web Monitor restarts the application. Maximum
number of attempts to restart a component and a period of time between them are defined by Dr.Web
Monitor settings. If any of the modules starts to operate abnormally, Dr.Web Monitor notifies the
system administrator.
Dr.Web Monitor can interact with Dr.Web Agent by exchanging control signals.
Operation Mode
If necessary, Doctor Web solutions can be used to connect to a corporate or private Anti-virus
network managed by Dr.Web Enterprise Security Suite. To operate in the central protection
mode, it is not required to install additional software or uninstall your Dr.Web solution.
To provide you with this option, Dr.Web Monitor can operate in one of the following modes:
Standalone mode when a protected computer is not included in an anti-virus network and is
managed locally. In this mode, configuration files and key files reside on local drives, Dr.Web
Monitor is fully controlled from the protected computer, and all modules start in accordance with
the settings specified in the Dr.Web Monitor configuration file.
Enterprise mode (or central protection mode) when protection of the local computer is
managed from the central protection server. In this mode, some features and settings of Dr.Web
for UNIX File Servers can be modified and blocked for compliance with a general security policy
(for example, corporate security policy). A key file for operation in this mode is received from the
central protection server. Your personal key file on the local computer is not used.
To enable central protection mode
1. Contact anti-virus network administrator of your company for a public key file and parameters of
connection to the central protection server.
2. In Dr.Web Monitor configuration file (by default, %etc_dir/monitor.conf), set the
UseEnterpriseMode parameter value to Yes.
In the central protection mode, some features and settings of Dr.Web for UNIX File Servers
can be modified or blocked for compliance with the general security policy. A key file for operation
in this mode is received from the central protection server. Your personal key file on the local
computer is not used.
For Dr.Web for UNIX File Servers to fully support the central protection mode, also enable Dr.Web
Agent to operate in the Enterprise mode. For details, see Operation Mode of Dr.Web Agent.
To enable standalone mode
1. Ensure that all modules that you want Dr.Web Monitor to start are listed in the RunAppList
parameter in the [Monitor] section of Dr.Web Monitor configuration file (by default,
%etc_dir/monitor.conf). The modules must be installed and configured properly.
Administrator Manual
69
Dr.Web Monitor
2. In the [Monitor] section of Dr.Web
UseEnterpriseMode parameter value to No.
Monitor
configuration
file,
set
the
On switching to this mode, all settings of Dr.Web for UNIX File Servers are unlocked and
restored to their previous or default values. You can access all settings of Dr.Web for UNIX File
Servers again and configure them.
For correct operation in the standalone mode, Dr.Web for UNIX File Servers requires a valid personal
key file. The key files received from the central protection server cannot be used in this mode.
Command Line Parameters
To run Dr.Web Monitor, use this command:
drweb-monitor [parameters]
where the following parameters are allowed:
Short case
-h
Extended case
--help
Arguments
Description: Show information about supported command line parameters on the screen and terminate the
module
-v
--version
Description: Show Dr.Web Monitor version on the screen and terminate the module
-u
--update
Description: Start updating all Dr.Web for UNIX File Servers components
-C
--check-only
Description: Check correctness of Dr.Web Monitor configuration. This parameter cannot be used if a Dr.Web
Monitor process is already running in the system.
-A
--check-all
<path to file>
Description: Check correctness of configuration of all Dr.Web for UNIX File Servers components
-c
--conf
<path to file>
Description: Module must use the specified configuration file
-r
--run
<application name>[,<application name>,...]
Description: Run applications, name of which are specified. Use the application name specified in the header of
the Application "<application name>" section in the corresponding mmc file (for details, see
Interaction with other Suite Components).
This parameter cannot be used if a Dr.Web Monitor process is already running in the system.
Example usage:
drweb-monitor -r AGENT
Configuration File
Adjustment of Dr.Web Monitor settings is performed in its configuration file
Administrator Manual
70
Dr.Web Monitor
%etc_dir/monitor.conf.
For general organization concept of Dr.Web for UNIX File Servers configuration files, see
Configuration Files.
[Logging] Section
In the [Logging] section, parameters responsible for logging information on operation of Dr.Web
Monitor are collected:
[Logging]
Level =
{log level}
Dr.Web Monitor log verbosity level.
The following levels are available:
Quiet
Error
Alert
Info
Debug
Default value:
Level = Info
IPCLevel =
{log level}
Log verbosity level for IPC library.
The following levels are available:
Quiet
Error
Alert
Info
Debug
Default value:
IPCLevel = Error
SyslogFacility =
{syslog label}
Log type label which is used by syslogd system service.
FileName =
{syslog | path to file}
Path to the log file.
Default value:
SyslogFacility = Daemon
You can specify syslog as a log file name and logging will be
performed by syslogd system service. In this case, you must also
specify the SyslogFacility parameter.
Default value:
FileName = syslog
[Monitor] Section
The [Monitor] section contains main settings of Dr.Web Monitor:
[Monitor]
RunForeground =
{logical}
Yes value forbids Dr.Web Monitor to operate in daemon mode.
This option can be used by some monitoring utilities (for example,
daemontools).
Administrator Manual
71
Dr.Web Monitor
Default value:
RunForeground = No
User =
{text value}
Name of the user whose privileges are used by Dr.Web Monitor.
Group =
{text value}
User group name used to run Dr.Web Monitor with certain user
privileges.
Default value:
User = drweb
Default value:
Group = drweb
PidFileDir =
{path to directory}
Path to the directory of a file where information on Dr.Web
Monitor process identifier (PID) is written upon the module
startup.
Default value:
PidFileDir = %var_dir/run/
ChDir =
{path to directory}
Change of working directory upon Dr.Web Monitor startup.
If this parameter is set, Dr.Web Monitor changes directory to the
one specified in this parameter value. Otherwise, working directory
is not changed.
Default value:
ChDir = /
MetaConfigDir =
{path to directory}
Path to the directory where metaconfiguration files reside.
These files contain settings defining Dr.Web Monitor interaction
with other Dr.Web components. Metaconfiguration files are
provided by Dr.Web developers and do not require editing.
Default value:
MetaConfigDir = %etc_dir/monitor/
Address =
{address}
Socket used by Dr.Web Monitor to receive control signals from
other Dr.Web components.
Default value:
Address = local:%var_dir/ipc/.monitor
Timeout =
{numerical value}
Maximum time (in seconds) to establish connection between
Dr.Web Monitor and other Dr.Web components.
Default value:
Timeout = 5
TmpFileFmt =
{text value}
Name templates for Dr.Web Monitor temporary files.
Template format: path_to_file.XXXXXX
where X is a random symbol (letter or digit), used in temporary file
names.
Default value:
TmpFileFmt = %var_dir/msgs/tmp/monitor.XXXXXX
RunAppList =
{text value}
List of modules started by Dr.Web Monitor; use comma as a
delimiter.
Please note that this parameter is not modified upon uninstalling a
Dr.Web component. You must manually remove the uninstalled
Administrator Manual
72
Dr.Web Monitor
component from this parameter value. Otherwise, Dr.Web
Monitor will not be able to run and start other Dr.Web
components.
Default value:
RunAppList = AGENT
UseEnterpriseMode = {logical}
If the value is set to Yes, Dr.Web Monitor receives the list of
modules to be started from Dr.Web Agent rather than from the
RunAppList parameter value.
Default value:
UseEnterpriseMode = No
RecoveryTimeList =
{numerical values}
Time intervals between attempts to restart components that are
not responding (in seconds).
This parameter can have multiple values, separated by commas.
First attempt to restart a component is made after a period of time
specified in the first parameter value, second attempt – using the
second parameter value, and so on.
Default value:
RecoveryTimeList = 0,30,60
InjectCmd =
{string}
Command to send reports.
Please note that if you want to send reports to other addresses
(not only to root@localhost), you need to specify the
addresses in the command.
Default value:
InjectCmd = "/usr/sbin/sendmail -t"
AgentAddress =
{address}
Socket used by Dr.Web Monitor to interact with Dr.Web Agent
(parameter value must be the same as the Address parameter
value from Dr.Web Agent configuration file).
Default value:
AgentAddress = local:%var_dir/ipc/.agent
AgentResponseTime = {numerical
value}
Maximum time to wait a response from drweb-agent module in
seconds.
If Dr.Web Agent does not respond during this time period,
Dr.Web Monitor considers drweb-agent not working and tries
to restart it.
If 0 is specified, response time is unlimited.
Default value:
AgentResponseTime = 5
Administrator Manual
73
Dr.Web Monitor
Running Dr.Web Monitor
When Dr.Web Monitor is started with the default settings, the following actions are performed:
1. Dr.Web Monitor searches for and loads its configuration file. If the configuration file is not found,
loading process stops;
2. Dr.Web Monitor starts operating in the daemon mode. So, information about loading problems
cannot be output to the console and, thus, is logged to the file;
3. Socket for Dr.Web Monitor interaction with other Dr.Web for UNIX File Servers modules is
created. If a TCP socket is used, several connections can be established (loading process continues
if at least one connection is established). If a UNIX socket is used, it can be created only if the user
whose privileges are used to run drweb-monitor has read and write access to the certain
directory. If a socket cannot be created, loading process stops;
4. PID-file with information on drweb-monitor process identifier is created. If the PID-file cannot be
created, loading process stops;
5. drweb-monitor module starts other suite components. If a module cannot load, Dr.Web
Monitor tries to restart it. If all Dr.Web Monitor attempts to start the module failed, Dr.Web
Monitor unloads all previously loaded modules and terminates. Dr.Web Monitor reports problems
connected with the modules startup in one of the available ways (logging to the file, notifying via
email, startup of a custom program). Notification methods used for various modules are set in the
Dr.Web Monitor meta-configuration file (.mmc).
To start Dr.Web Monitor in the automatic mode, do one of the following:
change the value of the ENABLE variable to 1 in the drweb-monitor enable file (for Linux
and Solaris);
add drweb_monitor_enable="YES" line to the /etc/rc.conf file (for FreeBSD).
Please note that if at the post install script runtime you select the "Configure Services" option in the
conversation, all services including Dr.Web Agent will be started automatically.
Location of the enable files depends on Dr.Web for UNIX File Servers installation type:
Installation from the universal package for UNIX systems:
Files will be saved to %etc_dir directory and have the following names
drwebd.enable,
drweb-monitor.enable.
Installation from native DEB packages:
Files will be saved to /etc/defaults directory and have the following names
drwebd,
drweb-monitor.
Installation from native RPM packages:
Files will be saved to /etc/sysconfig directory and have the following names
drwebd.enable,
drweb-monitor.enable.
Interaction with Other Suite Components
Interaction with other suite components is performed with the use of Dr.Web Monitor metaconfiguration files (mmc files). These files are included in packages of those products which can interact
with Dr.Web Monitor and reside in reside in the directory specified in the MetaConfDir parameter
(by default - %etc_dir/monitor). The files contain information on component composition, location
of binary files, their launch order and startup options. Usually, one file contains information on one
component and name of the file matches to the name of the Dr.Web for UNIX File Servers
Administrator Manual
74
Dr.Web Monitor
component.
Each component is described in the Application section with the corresponding name. At the end of
the section, EndApplication must be specified.
The following parameters must be present in the component description:
FullName – full name of the component.
Path – path to the binary files.
Depends – names of the components which must be started before the described component.
For example, AGENT component must be started before Dr.Web Daemon, therefore in the mmc
file for Dr.Web Daemon Depends parameter has the AGENT value. If there are no
dependencies, this parameter can be skipped.
Components – list of binary files of modules started together with the component. Modules are
started in the same order as they are specified in this parameter. For each module the following
information must be specified (space separated): command line parameters (can be enclosed in
quotation marks), timeouts for startup and stop (StartTimeout and StopTimeout),
notification type and startup privileges. Notification type – defines where notifications on
component failure are sent. When MAIL value is specified, notifications are sent by mail, when
LOG value is specified, information is only logged to the file. Startup privileges – defines a group
and a user, whose privileges are used by the component.
Example of mmc file for Dr.Web Daemon:
Application "DAEMON"
FullName "Dr.Web (R) Daemon"
Path
"/opt/drweb/"
Depends
"AGENT"
Components
# name args MaxStartTime MaxStopTime NotifyType User:Group
drwebd "-a=local:/var/drweb/ipc/.agent --foreground=yes" 30 10 MAIL drweb:drweb
EndComponents
EndApplication
Administrator Manual
75
Dr.Web Command Line Scanner
Dr.Web Command Line Scanner
Command line Dr.Web Scanner provides you with detection and neutralization of malware on the
local machine. The component is presented by the drweb module.
Dr.Web Scanner checks files and boot records specified on its startup. For anti-virus checking and
curing, Dr.Web Scanner uses Dr.Web Engine and virus databases, but does not use the resident
module Dr.Web Daemon (operation is performed independently of it).
Running Dr.Web Scanner
You can run Dr.Web Scanner with the following command:
$ %bin_dir/drweb
If %bin_dir directory is added to the PATH environment variable, you can run Dr.Web Scanner from
any directory. However, doing so (as well as making a symbolic link to Dr.Web Scanner executable
file in directories like /bin/, /usr/bin/, etc.) is not recommended for security reasons.
Dr.Web Scanner can be run with either root or user privileges. In the latter case, virus scanning can
be performed only in those directories, where the user has read access, and infected files will be cured
only in directories, where the user has write access (usually it is the user home directory, $HOME).
There are also other restrictions when Dr.Web Scanner is started with user privileges, for example, on
moving and renaming infected files.
When Dr.Web Scanner is started, it displays the program name, platform name, program version
number, release date and contact information. It also shows user registration information and statistics,
list of virus databases and installed updates:
Dr.Web (R) Scanner for Linux, v6.0.1 (February 19, 2010)
Copyright (c) Igor Daniloff, 1992-2010
Support service: http://support.drweb.com/
To purchase: http://buy.drweb.com/
Program version: 6.0.0.10060 <API:2.2>
Engine version: 6.0.0.9170 <API:2.2>
Loading /var/drweb/bases/drwtoday.vdb - Ok, virus records:
Loading /var/drweb/bases/drw60012.vdb - Ok, virus records:
-------------------------------------------Loading /var/drweb/bases/drw60000.vdb - Ok, virus records:
Loading /var/drweb/bases/dwn60001.vdb - Ok, virus records:
Loading /var/drweb/bases/drwebase.vdb - Ok, virus records:
Loading /var/drweb/bases/drwrisky.vdb - Ok, virus records:
Loading /var/drweb/bases/drwnasty.vdb - Ok, virus records:
Total virus records: 538681
Key file: /opt/drweb/drweb32.key
Key file number: XXXXXXXXXX
Key file activation date: XXXX-XX-XX
Key file expiration date: XXXX-XX-XX
1533
3511
1194
840
78674
1271
4867
After displaying this report, Dr.Web Scanner terminates and command line prompt. To scan for
viruses or neutralize detected threats, specify additional command line parameters.
By default, Dr.Web Scanner starts with the following parameters:
-ar -ha -fl- -ml -sd -al -ok
These parameters are optimal for thorough anti-virus protection and can be used in most typical cases.
If any of the parameters is not required, disable it with "-" postfix as described above.
Administrator Manual
76
Dr.Web Command Line Scanner
Disabling scan of archives and packed files will significantly decrease an anti-virus protection level,
because viruses are often distributed in archives (especially, self-extracting archives) attached to an
email message. Office documents (Word, Excel) dispatched within an archive or a container can also
pose a threat to security of your computer as they are vulnerable to macro viruses.
When you start Dr.Web Scanner with default parameters, no cure actions and no actions for incurable
and suspicious files are performed. To enable these actions, specify the corresponding command line
parameter explicitly.
The following actions are recommended:
cu – cure infected files and system areas without deleting, moving or renaming infected files;
icd – delete incurable files;
spm – move suspicious files;
spr – rename suspicious files.
When Dr.Web Scanner is started with cu action specified, it tries to restore the original state of an
infected object. It is possible only if a detected virus is a known virus, and cure instructions for it are
available in virus database; even in this case a cure attempt may fail if the infected file is seriously
damaged by a virus.
When an infected file is found within an archive, the file is not cured, deleted, moved or renamed. To
cure such a file, manually unpack the archive to the separate directory and instruct Dr.Web Scanner
to check it.
When Dr.Web Scanner is started with icd action specified, it removes all infected files from the disk.
This option is suitable for incurable (irreversibly damaged by a virus) files.
The spr action instructs Dr.Web Scanner to replace a file extension with another one (*.#?? by
default, that is the first extension character is replaced with the "#" character). Enable this parameter
for files of other operating systems, detected heuristically as suspicious. Renaming helps to avoid
accidental execution of such files in these operating systems and therefore prevents infection.
The spm action instructs Dr.Web Scanner to move infected or suspicious files to the Quarantine
directory (%var_dir/infected/ by default). This option is of insignificant value since infected and
suspicious files of other operating systems cannot infect or damage a UNIX system. Moving of
suspicious files of a UNIX system may cause system malfunction or failure.
Thus, the following command is recommended for day-to-day scanning:
$ drweb <path> -cu -icd -spm -ar -ha -fl- -ml -sd
You can save this command to the text file and convert it into simple shell script with the following
command:
# chmod a+x [filename]
Dr.Web Scanner default settings could be adjusted in the configuration file.
Command Line Parameters
You can run Dr.Web Scanner with the following command:
$ %bin_dir/drweb <path> [parameters]
where <path> – is either the path (or paths) to scanned directories or mask for checked files. If a path
is specified with the following prefix: disk://<path to device file> (files of the devices are
Administrator Manual
77
Dr.Web Command Line Scanner
located in the /dev directory), Dr.Web Scanner checks the boot sector of the corresponding device
and cure it, if necessary. The path can start with an optional parameter - path.
When Dr.Web Scanner is started only with the <path> argument, without any parameters specified,
it scans the specified directory using the default set of parameters (for details, see below).
The following example shows a command to check the user home directory:
$ %bin_dir/drweb ~
Once scanning completes, Dr.Web Scanner displays all detected threats (infected and suspicious files)
in the following format:
/path/file infected [virus] VIRUS_NAME
After that, Dr.Web Scanner outputs summary report in the following format:
Report for "/opt/drweb/tmp":
Scanned
: 34/32
Cured
Infected
: 5/5
Removed
Modifications : 0/0
Renamed
Suspicious
: 0/0
Moved
Scan time
: 00:00:02 Scan speed
:
:
:
:
:
0
0
0
0
5233 KB/s
Numbers separated by slash "/" mean the following: the first number – total number of files, the
second one – number of files in archives.
You can use readme.eicar file, included in the distribution package, to test Dr.Web Scanner. Open
this file in any text editor and follow the instructions from the file to transform it into eicar.com
program.
When you check the program with Dr.Web Scanner, the following message must be output:
%bin_dir/doc/eicar.com infected by Eicar Test File (Not a Virus!)
This program is not a virus and is used only for testing of anti-virus software.
Dr.Web Scanner has numerous command-line parameters. In accordance with UNIX conventions, the
parameters are separated from a path by a space character and start with a hyphen ("-"). To get a full
list of parameters, run Dr.Web Scanner with either -?, -h, or -help parameters.
The Console Scanner basic parameters can be divided into the following groups:
Scan area parameters
Diagnostic parameters
Action parameters
Interface parameters
Scan Area Parameters
These parameters determine where to perform a virus scan:
Parameter
-path [=] <path>
Description
Sets the path to be scanned.
Symbol '=' can be skipped, in this case a path for scanning is separated from the path parameter by a space. You can specify several paths in one -path parameter
(paths will be combined into one list). You can also specify paths without the -path
parameter.
If in the startup options the <path> parameter is specified with following prefix:
disk://<path to device file>,
Administrator Manual
78
Dr.Web Command Line Scanner
Parameter
Description
the boot sector (MBR) of the corresponding device is checked and cured, if necessary.
Device file is a special file, located in the /dev directory and named as sdX or hdX,
where X is a letter of the Latin alphabet (a, b, c, ...). For example: hda, sda.
Thus, to check MBR of disk sda, specify the following:
disk:///dev/sda
-@[+]<file>
Instructs to scan objects listed in the specified file. Add a plus '+' if you do not want
the file with the list of objects to be deleted when scanning completes. The file can
contain paths to directories that must be periodically scanned or list of files to be
checked regularly.
--
Instructs to read the list of objects for scanning from the standard input stream
(stdin).
-sd
Sets recursive search for files to scan in subfolders.
-fl
Instructs to follow symbolic links to both files and folders. Links that cause loops are
ignored.
-mask
Instructs to ignore filename masks.
Diagnostic Parameters
These parameters determine object types to be scanned for viruses:
Parameter
-al
Description
Instructs to scan all objects defined by scan paths regardless of their file extension and
structure.
This parameter is opposite to the -ex parameter.
-ex
Instructs to scan only files of certain types in the specified paths. The list of file types must
be specified in the FileTypes variable of the configuration file. The configuration file is
defined by the -ini parameter. By default, objects with the following file extensions are
scanned: EXE, COM, DLL, SYS, VXD, OV?, BAT, BIN, DRV, PRG, BOO, SCR, CMD, 386, FON,
DO?, XL?, WIZ, RTF, CL*, HT*, VB*, JS*, INF, PP?, OBJ, LIB, PIF, HLP, MD?, INI, MBR, IMG,
CSC, CPL, MBP, SH, SHB, SHS, SHT*, CHM, REG, XML, PRC, ASP, LSP, MSO, OBD, THE*,
NWS, SWF, MPP, OCX, VS*, DVB, CPY, BMP, RPM, ISO, DEB, AR?, ZIP, R??, GZ, Z, TGZ,
TAR, TAZ, CAB, LHA, LZH, BZ2, MSG, EML, 7Z, CPIO.
This parameter is opposite to the -al parameter.
-ar[d|m|r][n]
Instructs to scan files within archives (ARJ, CAB, GZIP, RAR, TAR, ZIP, etc.). An archive is
understood to be a tar archive (*.tar) or compressed archive (*.tar.bz2, *.tbz).
If additional modifiers (d, m or r) are not specified, Dr.Web Scanner only informs the user
on detected malicious or suspicious files in archives. Otherwise, it applies the specified
actions to detected threats.
-cn[d|m|r][n]
Instructs to scan files within containers (HTML, RTF, PowerPoint).
If additional modifiers (d, m or r) are not specified, Dr.Web Scanner only informs the user
on detected malicious or suspicious files in containers. Otherwise, it applies the specified
actions to detected threats.
-ml[d|m|r][n]
Instructs to scan contents of mail files.
If additional modifiers (d, m or r) are not specified, Dr.Web Scanner only informs the user
on detected malicious or suspicious objects. Otherwise, it applies the specified actions to
detected threats.
-upn
Scan executable files packed with LZEXE, DIET, PKLITE, EXEPACK without output of the
compression type.
-ha
Enables heuristic analysis to detect unknown threats.
Administrator Manual
79
Dr.Web Command Line Scanner
For some parameters, you can use the following additional modifiers:
Add d to delete objects to avert the threat
Add m to move objects to Quarantine to avert the threat
Add r to rename objects to avert the threat (that is, replace the first character of the file extension with
'#')
Add n to disable logging of the archive, container, mail file or packer type
If malicious objects are detected within complex objects such as archives, containers, packed or mail files, the
reaction is applied to the whole complex object, and not to the included malicious object only.
Action Parameters
These parameters determine which actions are applied to infected (or suspicious) objects:
Parameter
-cu[d|m|r]
Description
Defines an action applied to infected files and boot sectors.
If an additional modifier is not specified, Dr.Web Scanner cures infected objects and
deletes incurable files (unless another action is specified in the -ic parameter). Additional
modifiers allow to set another action instead of curing, but the new action can be applied
only to infected files. In this case, action for incurable files must be set with -ic parameter.
-ic[d|m|r]
Defines an action applied to incurable files.
If an additional modifier is not specified, Dr.Web Scanner only informs the user about the
threat.
-sp[d|m|r]
Defines an action applied to suspicious files.
If an additional modifier is not specified, Dr.Web Scanner only informs the user about the
threat.
-adw[d|m|r|i]
Defines an action applied to adware.
If an additional modifier is not specified, Dr.Web Scanner only informs the user about the
threat.
-dls[d|m|r|i]
Defines an action applied to dialers.
If an additional modifier is not specified, Dr.Web Scanner only informs the user about the
threat.
-jok[d|m|r|i]
Defines an action applied to joke programs.
If an additional modifier is not specified, Dr.Web Scanner only informs the user about the
threat.
-rsk[d|m|r|i]
Defines an action applied to potentially dangerous programs.
If an additional modifier is not specified, Dr.Web Scanner only informs the user about the
threat.
-hck[d|m|r|i]
Defines an actionapplied to hacktools.
If an additional modifier is not specified, Dr.Web Scanner only informs the user about the
threat.
Additional modifiers indicate actions that is applied in order to avert threats:
Add d to delete objects.
Add m to move objects to Quarantine.
Add r to rename objects, that is, replace the first character of extension with '#'.
Add i to ignore threats (available for minor threats only such as adware etc), that is, apply no action and
do not list such threats in the report.
If malicious objects are detected within complex objects such as archives, containers, packed or mail files, the
action is applied to the whole complex object, and not to the included malicious object only.
Administrator Manual
80
Dr.Web Command Line Scanner
Interface Parameters
These parameters configure Dr.Web Scanner output:
Parameter
-v, -version,
--version
Description
-ki
Instructs to output information about the license and its owner (in UTF8
encoding only).
-go
Instructs to run Dr.Web Scanner in batch mode when all questions implying
answers from a user are skipped and all decisions implying a choice are taken
automatically. This mode is useful for automatic scanning of files, for example,
during a daily (or weekly) check of the hard drive.
-ot
Instructs to use the standard output (stdout).
-oq
Disables information output.
-ok
Instructs to list all scanned objects in the report and mark the "clean" object
with Ok.
-log=[+]<path to
file>
Instructs to log Dr.Web Scanner operations in the specified file. The file name
is required for enabling logging. Add a plus '+' if you want to append the log file
instead of overwriting it.
-ini=<path to file>
Instructs to use the specified configuration file. By default, Dr.Web Scanner
uses drweb32.ini (this configuration file is shared by Dr.Web Daemon,
Dr.Web Scanner and Dr.Web Updater). Dr.Web Scanner uses parameters
specified in the [Scanner] section of this file. The list of the scanner
parameters and available values are similar to the those specified in the
[Daemon] section.
-lng=<path to file>
Instructs to use the specified language file. The default language is English.
-a = <Control Agent
address>
Run Dr.Web Scanner in the central protection mode.
-ni
Disables the use of the configuration file for adjusting scanner settings. Dr.Web
Scanner is configured via command line parameters.
-ns
Disables interruption of scanning process even upon receipt of interruption
signals (SIGINT).
--only-key
On startup, only key file is received from Dr.Web Agent.
Instructs to output information on the product and engine versions and exit
Dr.Web Scanner.
You can use the hyphen «-» postfix (no space) to disable the following parameters:
-ar -cu -ha -ic -fl -ml -ok -sd -sp
For example, if you start Dr.Web Scanner with the following command:
$ drweb <path> -haheuristic analysis (enabled by default) will be disabled.
For the -cu, -ic and -sp parameters, the "negative" form disables any action specified with
additional modifiers, that is, information on detection of infected or suspicious object is logged, but no
action is performed to avert threats.
The -al and -ex parameters have no "negative" form, but specifying one of them cancels actions of
the other.
By default (if Dr.Web Scanner configuration is not customized and no parameters are specified),
Dr.Web Scanner is started with the following parameters:
-ar -ha -fl- -ml -sd -al -ok
Administrator Manual
81
Dr.Web Command Line Scanner
Default Dr.Web Scanner parameters (including scan of archives, packed files, files of email programs,
recursive search, heuristic analysis and others) are sufficient for everyday diagnostics and can be used
in most typical cases. You can also use hyphen «-» postfix to disable required parameters (as it is
shown above with an example of heuristic analysis).
Disabling scanning of archives and packed files significantly decreases anti-virus protection level,
because viruses are often distributed as archives (especially, self-extracting ones) attached to an email
message. Office documents are potentially susceptible to infection with macro viruses (e.g., Word,
Excel) and can also be dispatched via email within archives and containers.
When you run Dr.Web Scanner with default parameters, no cure actions and no actions for incurable
and suspicious files are performed. To enable these actions, specify the corresponding command line
parameters explicitly.
Configuration
Dr.Web Scanner can be used with default settings, but it could be convenient to configure it
according to your needs. Dr.Web Scanner settings are stored in the configuration file (drweb32.ini
by default) which is located in %etc_dir directory.
To use another configuration file, specify the full path to it as a command line parameter, for example:
$ %bin_dir/drweb -ini=%bin_dir/etc/drweb.ini
For general principles of the Dr.Web for UNIX File Servers configuration files organization, see
Configuration files.
[Scanner]
EnginePath =
{path to file}
Location of drweb32.dll module (anti-virus engine Dr.Web
Engine).
This parameter is also used by Dr.Web Updater.
Default value:
EnginePath = %bin_dir/lib/drweb32.dll
VirusBase =
{list of file masks}
Masks for loading virus databases.
This parameter is also used by Dr.Web Updater. Multiple values
are allowed (separated by commas).
By default, virus databases files has a .vdb extension
Default value:
VirusBase = %var_dir/bases/*.vdb
UpdatePath =
{path to directory}
This parameter is used by Dr.Web Updater (update.pl) and is
mandatory.
Default value:
UpdatePath = %var_dir/updates/
TempPath =
{path to directory}
Directory where anti-virus engine Dr.Web Engine
temporary files.
stores
It is used for unpacking archives or when the system is low on
memory
Default value:
TempPath = /tmp/
Administrator Manual
82
Dr.Web Command Line Scanner
LngFileName =
{path to file}
Language file location.
By default, language files have a .dwl extension
Default value:
LngFileName = %bin_dir/lib/ru_scanner.dwl
Key =
{path to file}
Key file location (license or demo).
By default, key files have a .key extension
Default value:
Key = %bin_dir/drweb32.key
OutputMode =
{Terminal | Quiet}
Output mode:
Terminal - console output
Quiet - no output
Default value:
OutputMode = Terminal
HeuristicAnalysis = {logical}
Enables or disables heuristic detection of unknown viruses.
Heuristic analysis can detect previously unknown viruses which are
not included in the virus database. It relies on advanced
algorithms to determine if scanned file structure is similar to the
virus architecture. Because of that, heuristic analysis can produce
false positives: all objects detected by this method are considered
suspicious.
Please send all suspicious files to Dr.Web through http://
vms.drweb.com/sendvirus/ for checking. To send a suspicious file,
put it in a password protected archive, include password in the
message body and attach Dr.Web Scanner report.
Default value:
HeuristicAnalysis = Yes
ScanPriority =
{signed numerical value}
Dr.Web Scanner process priority.
Value must be between –20 (highest priority) and 19 (Linux) or
20 (other UNIX-like operating systems).
Default value:
ScanPriority = 0
FilesTypes =
{list of file extensions}
File types to be checked "by type", i.e. when the ScanFiles
parameter (explained below) has ByType value.
"*" and "?" wildcard characters are allowed.
Default value:
FilesTypes = EXE, COM, SYS, OV?, BAT, BIN, DRV,
PRG, BOO, SCR, CMD, VXD, 386, DLL, FON, DO?, XL?
, WIZ, RTF, CL*, HT*, VB*, JS*, INF, AR?, ZIP,
R??, PP?, OBJ, LIB, HLP, MD?, INI, MBR, IMG,
CSC, CPL, MBP, SHS, SHB, PIF, SO, CHM, REG, XML,
PRC, ASP, LSP, MSO, OBD, THE*, NWS, SWF, BMP,
MPP, OCX, DVB, CPY, MSG, EML
FilesTypesWarnings = {logical}
Notifies about files of unknown types.
Default value:
FilesTypesWarnings = Yes
ScanFiles =
{All | ByType}
Instructs to scan all files (All value) or only files with the
extensions specified in the FileType parameter (ByType value).
Administrator Manual
83
Dr.Web Command Line Scanner
The parameter can have the ByType value only in the local scan
mode. In other modes, the value must be set to All.
All mail fails are scanned regardless of the ScanFiles parameter
value.
Default value:
ScanFiles = All
ScanSubDirectories = {logical}
Enables or disables scanning of subdirectories.
Default value:
ScanSubDirectories = Yes
CheckArchives =
{logical}
Enables or disables checking of files in archives (RAR, ARJ, TAR,
GZIP, CAB and others).
Default value:
CheckArchives = Yes
CheckEMailFiles =
{logical}
Enables or disables checking mail files.
ExcludePaths =
{list of path | file masks}
Masks for files to be skipped during scanning.
Default value:
CheckEMailFiles = Yes
Multiple values are allowed (separated by commas).
Default value:
ExcludePaths = /proc,/sys,/dev
FollowLinks =
{logical}
Allows or forbids Dr.Web Scanner to follow symbolic links during
scanning.
Default value:
FollowLinks = No
RenameFilesTo =
{mask}
Mask for renaming files when the Rename action is applied.
MoveFilesTo =
{path to directory}
Path to the Quarantine directory.
EnableDeleteArchiveAction ={logical}
Enables or disables Delete action for complex objects (archives,
mailboxes, HTML pages) if they contain infected files.
Default value:
RenameFilesTo = #??
Default value:
MoveFilesTo = %var_dir/infected/
Please note, if the action is enabled, a whole complex object is to
be deleted. Use this option carefully!
Default value:
EnableDeleteArchiveAction = No
InfectedFiles =
{action}
Sets one of the following actions upon detection of an infected file:
Report, Cure, Delete, Move, Rename, Ignore.
Delete and Move actions are applied to a whole complex object
upon detection of infected files within it.
Default value:
InfectedFiles = Report
Administrator Manual
84
Dr.Web Command Line Scanner
SuspiciousFiles =
{action}
Sets one of the following actions upon detection of a suspicious
file:
Report, Delete, Move, Rename, Ignore.
Default value:
SuspiciousFiles = Report
IncurableFiles =
{action}
Sets one of the following actions applied if an infected file cannot
be cured (use only if InfectedFiles = Cure):
Report, Delete, Move, Rename, Ignore.
Default value:
IncurableFiles = Report
ActionAdware =
{action}
Sets one of the following actions upon detection of adware:
Report, Delete, Move, Rename, Ignore.
Default value:
ActionAdware = Report
ActionDialers =
{action}
Sets one of the following
program:
actions upon detection of a dialer
Report, Delete, Move, Rename, Ignore.
Default value:
ActionDialers = Report
ActionJokes =
{action}
Sets one of the following actions upon detection of a
program:
joke
Report, Delete, Move, Rename, Ignore.
Default value:
ActionJokes = Report
ActionRiskware =
{action}
Sets one of the following actions upon detection of a potentially
dangerous program:
Report, Delete, Move, Rename, Ignore.
Default value:
ActionRiskware = Report
ActionHacktools =
{action}
Sets one of the following actions upon detection of a hacktool:
Report, Delete, Move, Rename, Ignore.
Default value:
ActionHacktools = Report
ActionInfectedMail = {action}
Sets one of the following actions upon detection of an infected file
in a mailbox:
Report, Delete, Move, Rename, Ignore.
Default value:
ActionInfectedMail = Report
ActionInfectedArchive = {action}
Sets one of the following actions upon detection of an infected file
in an archive (ZIP, TAR, RAR, etc.):
Report, Delete, Move, Rename, Ignore.
Default value:
ActionInfectedArchive = Report
Administrator Manual
85
Dr.Web Command Line Scanner
ActionInfectedContainer = {action}
Sets one of the following actions upon detection of an infected file
in a container (OLE, HTML, PowerPoint, etc.):
Report, Delete, Move, Rename, Ignore.
Default value:
ActionInfectedContainer = Report
Logging parameters:
LogFileName =
{syslog | file name}
Log file name.
You can specify syslog as a log file name to use syslogd system
service for logging.
In this case you must also specify the SyslogFacility and
SyslogPriority parameters.
Default value:
LogFileName = syslog
SyslogFacility =
{syslog label}
Log type label which is used by syslogd system service.
SyslogPriority =
{log level}
Log verbosity level when syslogd system service is used.
Default value:
SyslogFacility = Daemon
The following levels are allowed:
Error
Alert
Warning
Info
Notice
Default value:
SyslogPriority = Info
LimitLog =
{logical}
Enables or disables limit of log file size (if LogFileName value is
not set to syslog).
With this parameter enabled, Dr.Web Scanner checks log file
size on startup. If log file size exceeds the MaxLogSize parameter
value, log file content will be erased and logging will start from
scratch.
Default value:
LimitLog = No
MaxLogSize =
{numerical value}
Maximum log file size in Kbytes.
Used only with LimitLog = Yes.
If this parameter value is set to 0, log file size is not checked.
Default value:
MaxLogSize = 512
LogScanned =
{logical}
Enables or disables logging of information about all scanned
objects regardless whether they are infected or not.
Default value:
LogScanned = Yes
LogPacked =
{logical}
Enables or disables logging of additional information about files
packed with DIET, PKLITE and other utilities.
Administrator Manual
86
Dr.Web Command Line Scanner
Default value:
LogPacked = Yes
LogArchived =
{logical}
Enables or disables logging of additional information about files
archived with various archiving utilities.
Default value:
LogArchived = Yes
LogTime =
{logical}
Enables or disables logging of time for each record. Parameter is
not used if LogFileName = syslog.
Default value:
LogTime = Yes
LogStatistics =
{logical}
Enables or disables logging of scan statistics.
RecodeNonprintable = {logical}
Enables or disables transcoding of characters that are
undisplayable on a given terminal (see also the description of the
following two parameters).
Default value:
LogStatistics = Yes
Default value:
RecodeNonprintable = Yes
RecodeMode =
{Replace | QuotedPrintable}
Decoding
mode
for
non
printable
characters
if
RecodeNonprintable = Yes.
When RecodeMode = Replace, all non-printable characters are
substituted with the RecodeChar parameter value (see below).
When RecodeMode = QuotedPrintable, all non-printable
characters are converted to the Quoted Printable encoding.
Default value:
RecodeMode = QuotedPrintable
RecodeChar =
{"?" | "_" | ...}
Sets
character
for
replacing
non-printable
characters
if
RecodeMode = Replace.
Default value:
RecodeChar = "?"
The following parameters can be used to reduce time of scanning archives (by skipping some objects in an
archive).
MaxCompressionRatio = {numerical
value}
Maximum compression ratio, that is ratio between size of
unpacked file and its size within an archive. If a ratio exceeds the
specified value, the file will not be extracted and therefore will not
be checked. An email message with such an archive is considered
as a "mail bomb".
Parameter can have only natural values.
If the value is set to 0, compression ratio will not be checked
Default value:
MaxCompressionRatio = 5000
CompressionCheckThreshold = {numerical
value}
Minimum size of a file enclosed within an archive, in Kbytes. If a
file size is less than the specified value, the compression ratio will
not be checked (if such a check is enabled by the
MaxCompressionRatio parameter).
Administrator Manual
87
Dr.Web Command Line Scanner
Default value:
CompressionCheckThreshold = 1024
MaxFileSizeToExtract = {numerical
value}
Maximum size of a file enclosed in an archive, in Kbytes. If a file
size exceeds the specified value, the file is skipped.
An email message with such a file is considered as a "mail bomb".
Default value:
MaxFileSizeToExtract = 500000
MaxArchiveLevel =
{numerical value}
Maximum archive nesting level.
If an archive nesting level exceeds the specified value, the archive
is skipped.
An email message with such a file is considered as a "mail bomb".
If the value is set to 0, archive nesting level will not be checked
Default value:
MaxArchiveLevel = 8
MaximumMemoryAllocationSize =
{numerical value}
Maximum size of the memory (in Mbytes) that can be used by
Dr.Web Scanner to check one file.
If the value is set to 0, memory allocation is not limited.
Default value:
MaximumMemoryAllocationSize = 0
ScannerScanTimeout = {numerical
value}
Maximum time period allowed for scanning one file (in seconds).
If the value is set to 0, scanning time is not limited.
Default value:
ScannerScanTimeout = 0
MaxBasesObsolescencePeriod =
{numerical value}
Maximum time (in hours) after last update when virus databases
are considered as up-to-date.
Upon the expiration of this time period, notification displays
informing that the databases are obsolete.
If the value is set to 0, database actuality will not be checked.
Default value:
MaxBasesObsolescencePeriod = 24
ControlAgent =
{address}
Dr.Web Agent socket address.
Example:
ControlAgent = inet:[email protected],local:%
var_dir/ipc/.agent
Dr.Web Scanner receives a license key file and configuration
from Dr.Web Agent. (if OnlyKey = No).
Default value:
ControlAgent = local:%var_dir/ipc/.agent
OnlyKey =
{logical}
Enables receiving only a license key file from Dr.Web Agent,
without configuration. At that, Dr.Web Scanner uses the local
configuration file.
If the value is set to No and the address of a Dr.Web Agent
socket is specified, Dr.Web Agent also receives statistics on
Dr.Web Scanner operation (information is sent after scanning of
each file).
Administrator Manual
88
Dr.Web Command Line Scanner
Default value:
OnlyKey = No
Exit Codes
When the scan task ends, Dr.Web Scanner returns an exit code which determines result of scanning.
The exit code is always constructed as an combination (sum) of codes that are related to the
corresponding events of scanning process. The possible events and related codes are following:
Code
Event
1
Known virus detected
2
Modification of known virus detected
4
Suspicious object found
8
Known virus detected in archive, mailbox or other container
16
Modification of known virus detected in archive, mailbox or other container
32
Suspicious file found in archive, mailbox or other container
64
At least one infected object succesfully cured
128
At least one infected or suspicious file deleted/renamed/moved
The actual value returned by Dr.Web Scanner is equal to the sum of codes for the events that
occurred during scanning. Obviously, the sum can be easily decomposed into separate event codes. For
example, return code 9 = 1 + 8 means that known viruses were detected, including viruses in archives,
mail archives or containers; curing and others actions were not executed; no other threat events
occurred during scanning.
If no threat events occurred during scanning, Dr.Web Scanner returns the exit code 0.
Dr.Web Scanner has one feature: in some cases, when no threats were found during scanning, it can
return the exit code 128 instead of exit code 0. This case is similar to the case "no threats found" (exit
code 0).
Administrator Manual
89
Dr.Web Daemon
Dr.Web Daemon
Dr.Web Daemon is a background anti-virus module drwebd, designed to perform scanning for viruses
on request received from other Dr.Web components. It can scan files on the disk or data transferred
through a socket. Requests for anti-virus scanning are sent using a special protocol via UNIX or TCP
sockets. Dr.Web Daemon uses the same anti-virus engine (Dr.Web Engine) and virus databases,
like Dr.Web Scanner, and is able to detect and cure all known viruses.
Dr.Web Daemon is always running and has simple and intelligible protocol for sending scanning
requests, which makes it a perfect solution to be used as an anti-virus filter for file servers. Dr.Web for
UNIX File Servers is a ready-made solution for integrating Dr.Web Daemon with Samba file
servers version 3.0 and later..
Note that Dr.Web Daemon cannot scan the contents of the encrypted files because in this case it is
necessary to know the password that been used for encryption. So, these files will be passed without the
scan, and for the client application the special return code will be returned.
Command-Line Parameters
To run Dr.Web Daemon, use the following command:
drwebd [parameters]
where the following parameters are available:
Short case
-h, -?
Extended case
-help, --help
Arguments
Description: Show information about supported command line parameters on the screen and terminate the
module
-a
<Agent socket address>
Description: Start Dr.Web Daemon in the central protection mode under control of the specified copy of
Dr.Web Agent
-ini
<path to file>
Description: Module must use the specified configuration file
--foreground
<yes|no>
Description: Operation mode of Dr.Web Daemon. If yes is specified, Dr.Web Daemon is a foreground
process. Otherwise (no), Dr.Web Daemon is a background process
--check-only
<command line parameters for checking>
Description: Check Dr.Web Daemon configuration correctness on startup. If any command line parameter is
specified, correctness of the value is also checked
--only-key
Description: On startup, Dr.Web Daemon receives from Dr.Web Agent only the license key file
Administrator Manual
90
Dr.Web Daemon
Running Dr.Web Daemon
When Dr.Web Daemon is started with the default settings, the following actions are performed:
Search and load of the configuration file. If the configuration file is not found, loading of Dr.Web
Daemon terminates. Path to the configuration file can be specified on startup with the -ini
command line parameter: {path/to/your/drweb32.ini}, otherwise, the default value
(%etc_dir/drweb32.ini) can be used. On startup, correctness of several configuration
parameters is checked, and if a parameter value is incorrect, the default parameter value is set;
Creation of a log file. A user account under which Dr.Web Daemon is started must have
appropriate privileges to write to the log file directory. Users do not have write permission for the
default log directory (/var/log/). Therefore, if the User parameter is specified, adjust the
LogFileName parameter and provide alternative log file directory;
Load of a key file from the location specified in the configuration file. If the key file is not found,
loading of Dr.Web Daemon terminates;
If the User parameter is specified, Dr.Web Daemon attempts to change its privileges;
Load of Dr.Web Engine (drweb32.dll). If Dr.Web Engine is damaged or not found (because
of errors in the configuration file), initialization of Dr.Web Daemon terminates;
Load of virus databases in arbitrary sequence from the location specified in the configuration file.
If virus databases are damaged or absent, initialization of Dr.Web Daemon proceeds;
Dr.Web Daemon enters daemon mode, so all information about initialization problems cannot be
output to the console and is logged to the log file;
Creation of a socket for interaction between Dr.Web Daemon and other Dr.Web for UNIX File
Servers modules. When TCP-sockets are used, there can be several connections (loading
continues if at least one connection is established). When a UNIX socket is used, Dr.Web
Daemon user account must have appropriate privileges to read and write from the directory of
this socket. User accounts for modules must have execution access to the directory and write and
read access to the socket file. Users do not have write permission for the default socket directory
(/var/run/). If the User parameter is specified, adjust the Socket parameter and provide
alternative path to the socket file. If creation of the UNIX socket was unsuccessful, initialization of
Dr.Web Daemon terminates;
Creation of a PID file with Dr.Web Daemon PID information and transport addresses. User
account under which Dr.Web Daemon is started must have appropriate privileges to write to the
directory of the PID file. Users do not have write permission for the default socket directory (/
var/run/). So, if the User parameter is specified, adjust the PidFile parameter and provide
alternative path to the PID file. If creation of the PID file was unsuccessful, initialization of
Dr.Web Daemon terminates.
Dr.Web Daemon Testing and Diagnostics
If no problems occurred during initialization, Dr.Web Daemon is ready to use. To ensure that the
daemon is initialized correctly, use the following command:
$ netstat -a
and check whether required sockets are created.
Administrator Manual
91
Dr.Web Daemon
TCP sockets:
. . .
Active Internet connections (servers and established)
Proto
Recv-Q
Send-Q
Local Address
Foreign Address
0
0
localhost:3000 *:*
State
. . .
tcp
LISTEN
. . .
Unix socket:
. . .
Active UNIX domain sockets (servers and established)
Proto
RefCnt
Flags
Type
State
I-Node
Path
. . .
unix
0
[ ACC ] STREAM LISTENING 1127
%var_dir/.daemon
. . .
Missing of the required sockets in the list indicates problems with Dr.Web Daemon initialization.
To perform a functional test and obtain service information, use Dr.Web Daemon console client
(drwebdc).
TCP sockets:
$ drwebdc -nHOSTNAME -pPORTNUM -sv -sb
Unix socket:
$ drwebdc -uSOCKETFILE -sv -sb
Report, similar to the following example, is output to the console:
- Version: DrWeb Daemon 6.00
- Loaded bases:
Base /var/drweb/bases/drwtoday.vdb
contains 5 records.
Base /var/drweb/bases/drw60003.vdb
contains 409 records.
Base /var/drweb/bases/drw60002.vdb
contains 543 records.
Base /var/drweb/bases/drwebase.vdb
contains 51982 records.
Base /var/drweb/bases/drw60001.vdb
contains 364 records.
Total 53303 virus-finding records.
If the report was not output, run extended diagnostics.
For TCP socket:
$ drwebdc -nHOSTNAME -pPORTNUM -sv -sb -v
For UNIX socket:
$ drwebdc -uSOCKETFILE -sv -sb -v
Administrator Manual
92
Dr.Web Daemon
More detailed report can help to identify the problem:
dwlib: fd: connect() failed - Connection refused
dwlib: tcp: connecting to 127.0.0.1:3300 - failed
dwlib: cannot create connection with a DrWeb daemon
ERROR: cannot retrieve daemon version
Error -12
You can test Dr.Web Daemon with the special eicar.com program included in the installation
package. Use any text editor to transform readme.eicar into eicar.com (see instructions within the
file).
For TCP-socket:
$ drwebdc -n<HOST> -p<PORT> eicar.com
For UNIX socket:
$ drwebdc -u<SOCKETFILE> eicar.com
The following result are output:
Results: daemon return code 0x20
(known virus is found)
If the results were not output, check Dr.Web Daemon log file to see whether the file was scanned. If
the file was not scanned, run extended diagnostic (see above).
If file was scanned successfully, Dr.Web Daemon is fully operational.
When scanning very large archives, some issues with timeout expiration may occur. To fix this, increase
values of the FileTimeout and SocketTimeout parameters.
Please note that Dr.Web Daemon cannot scan files larger than 2 Gbytes. Such files will not be sent for
scanning.
Scan Modes
Dr.Web Daemon has two scan modes:
scan of chunks received from the socket (remote scan mode);
scan of files on the disk (local scan mode).
In the remote scan mode, client sends data to be scanned to Dr.Web Daemon through a socket.
Dr.Web Daemon can scan both anonymous memory and memory mapped objects with only one
difference - in logging. This mode enables scanning of files without read access but is less efficient than
the local scan mode.
Local scan mode is easier to use and provides better performance since client sends to Dr.Web
Daemon only a file path instead of the file. For the reason that clients can be located on different
computers, the path must be specified in relation to the actual location of Dr.Web Daemon.
Local scan mode requires careful configuration of user privileges. Dr.Web Daemon must have read
access to each file that is to be scanned. To perform Cure and Delete actions to files in mailboxes, you
must also permit write access.
Administrator Manual
93
Dr.Web Daemon
If the system is configured correctly, Dr.Web Daemon does not require root superuser privileges..
If required, name of the user with whose privileges Dr.Web Daemon must run is set as the User
parameter value in Dr.Web Daemon settings. In addition, you can configure user and their group used
on module startup. For that purpose, edit mmc-file of Dr.Web Monitor if it is used for management of
Dr.Web for UNIX File Servers components.
Processed Signals
Dr.Web Daemon can receive and process the following signals:
SIGHUP – reload the configuration file;
SIGTERM – correct termination of Dr.Web Daemon;
SIGKILL – force termination of Dr.Web Daemon (if any problem occurs);
SIGUSR1 – save process pool statistics to the log file.
Please note that SIGUSR1 signal must be sent to its parent process only, because child processes are
terminated after receiving of SIGUSR1.
Log Files and Statistics
Daemon Log
Since Dr.Web Daemon is a resident program, information on its operation can be obtained only from
a log file. Log file contains details on processing of all scanning request sent to Dr.Web Daemon. You
can specify the log file location in a value of the LogFileName parameter.
Dr.Web Daemon can log information to different files depending on a client that sent the request. You
can specify different log files for every Dr.Web clients (for example, Dr.Web for UNIX File Servers)
in the ClientsLogs parameter value.
Regardless of the ClientsLogs parameter, if Dr.Web Daemon recognizes its client, scanning results
will marked with a prefix indicating the client. The following prefixes are available:
<web> – Dr.Web ICAPD;
<smb_spider> – Dr.Web Samba SpIDer;
<mail> – Dr.Web MailD;
<drwebdc> – console client for Dr.Web Daemon;
<kerio> – Dr.Web for Kerio Internet Gateways;
<lotus> – Dr.Web for IBM Lotus Domino.
In the FreeBSD operating system, syslog service can intercept information output by Dr.Web
Daemon to the console. In this case, the information is logged character-by-character. That occurs when
the logging level is set to *.info in the syslog configuration file (syslog.conf).
Statistics on process pool
Statistics on pool used for processing scanning request is output to the log file upon receipt of
SIGUSR1 signal (the signal must be sent only to parent process, as if a child process receives
SIGUSR1, it terminates).
Output of statistics on process pool is regulated by the stat value (yes or no), specified for the
ProcessesPool parameter. Collected statistics is not aggregated. Each time the saved record
Administrator Manual
94
Dr.Web Daemon
contains statistics on the pool state between previous and current moment of saving.
Example of pool statistics output record:
Fri Oct 15 19:47:51 2010 processes pool statistics: min = 1 max = 1024
(auto) freetime = 121 busy max = 1024 avg = 50.756950 requests for new
process = 94 (0.084305 num/sec) creating fails = 0 max processing time =
40000 ms; avg = 118646 ms curr = 0 busy = 0
where:
min – minimal number of processes in the pool;
max – maximal number of processes in the pool;
(auto) – displays if limits on number of processes in the pool are determined automatically;
freetime – maximum idle time for a process in the pool;
busy max – maximum number of simultaneously used processes, avg - average number of
simultaneously used processes;
requests for new process – number of requests for new process creation (frequency of
requests per second is displayed in parenthesis);
creating fails – number of failed attempts to create a new process (failures usually occur
when the system is running low on resources);
max processing time – maximum time for processing a single scanning request;
avg – average time for processing a single scanning request;
curr – number of all current processes in the pool;
busy – number of currently used processes in the pool.
Configuration
Dr.Web Daemon can be run with default settings, but you can configure it according to your specific
requirements. Daemon settings are stored in the [Daemon] section of the configuration file
(drweb32.ini by default) which is located in %etc_dir directory. To use another configuration file,
specify the full path to it as a command-line option.
[Daemon]
EnginePath =
{path to file}
Location of drweb32.dll module (anti-virus engine Dr.Web
Engine).
This parameter is also used by the Dr.Web Updater.
Default value:
EnginePath = %bin_dir/lib/drweb32.dll
VirusBase =
{list of files (masks)}
Masks for virus databases.
This parameter is also used by Dr.Web Updater. Multiple values
are allowed (separated by commas).
By default, virus databases files has the .vdb extension
Default value:
VirusBase = %var_dir/bases/*.vdb
UpdatePath =
{path to directory}
Directory to store updates. The parameter is mandatory.
TempPath =
{path to directory}
Directory where the Dr.Web Engine anti-virus engine puts
temporary files.
Default value:
UpdatePath = %var_dir/updates/
Administrator Manual
95
Dr.Web Daemon
It is used when system has insufficient memory or to unpack
certain types of archives.
Default value:
TempPath = %var_dir/spool/
Key =
{path to file}
Key file location (license or demo). By default, a key file has the
.key extension.
Please note that Dr.Web Daemon and Dr.Web Scanner can
have different license key files. In this case, change the value of
this parameter correspondingly.
The parameter value can be set several times to specify several
license key files. In this case, Dr.Web Daemon tries to combine
all license permissions from all available license key files.
Default value:
Key = %bin_dir/drweb32.key
OutputMode =
{Terminal | Quiet}
Output mode:
Terminal - console output
Quiet - no output
Default value:
OutputMode = Terminal
RunForeground =
{logical}
Allows to disable or enable daemon mode for Dr.Web Daemon.
With Yes value specified Dr.Web Daemon runs as a foreground
process. This parameter can be used for certain monitoring utilities
(for example, Dr.Web Monitor).
Default value:
RunForeground = No
User =
{text value}
User under which Dr.Web Daemon operates.
It is strongly recommended to create a separate drweb user
account, which will be used by Dr.Web Daemon and filters. It is
not recommended to run Dr.Web Daemon with root privileges,
even though it may take less time to configure.
This parameter cannot be changed when reloading configuration
using SIGHUP.
Default value:
User = drweb
PidFile =
{path to file}
File to store Dr.Web Daemon's PID and UNIX socket (if it is
enabled by the Socket parameter) or port number (if TCP socket
is enabled by the Socket parameter).
If more than one Socket parameter is specified, this file contains
information on all the sockets (one per line).
This file is created every time Dr.Web Daemon starts.
Default value:
PidFile = %var_dir/run/drwebd.pid
BusyFile =
{path to file}
File where Dr.Web Daemon busy flag is stored.
This file is created by a Dr.Web Daemon child process upon
receipt of the scan command and is removed after successful
command execution.
Administrator Manual
96
Dr.Web Daemon
Filenames created by each Dr.Web Daemon child process are
appended by a dot and ASCII representation of the PID (for
example, /var/run/drwebd.bsy.123456).
Default value:
BusyFile = %var_dir/run/drwebd.bsy
ProcessesPool =
{process pool settings}
Settings of dynamic process pool.
At first, specify the number of processes in the pool:
auto - number of processes is set automatically depending
on system load;
N - nonnegative integer. Pool will have at least N active
processes, additional processes will be created if necessary;
N-M - positive integer, M>=N. The pool will have at least N
active processes, additional processes will be created if
necessary, but maximum total number of processes cannot
exceed M.
Then specify optional secondary parameters:
timeout = {time in seconds} – timeout for closing an
inactive process. This parameter does not affect the first N
processes which wait for requests indefinitely.
stat = {yes|no} – statistics on processes in a pool. If yes,
it is saved to the log file each time SIGUSR1 system signal is
received.
stop_timeout = {time in seconds}
to wait for a running process to stop.
– maximum time
Default value:
ProcessesPool = auto,timeout = 120, stat = no,
stop_timeout = 1
OnlyKey =
{logical}
Enables receiving only a license key file from Dr.Web Agent,
without configuration. At that, Dr.Web Scanner uses the local
configuration file.
If the value is set to No and the address of a Dr.Web Agent
socket is specified, Dr.Web Daemon sends operational statistics
to Dr.Web Agent (information is sent after scanning of every
file).
Default value:
OnlyKey = No
ControlAgent =
{address}
Dr.Web Agent socket address.
Example:
ControlAgent = inet:[email protected],local:%
var_dir/ipc/.agent
Dr.Web Daemon receives from Dr.Web Agent a license key file
(and configuration if OnlyKey = No. Moreover, in this case the
socket is used for sending statistics on Dr.Web Daemon
operation to Dr.Web Agent).
Default value:
ControlAgent = local:%var_dir/ipc/.agent
MailCommand =
{string}
Shell command used by Dr.Web Daemon and Dr.Web Updater
for sending notifications on new updates to the user
(administrator) via email.
If the period before the key file (or one of the key files) expiration
Administrator Manual
97
Dr.Web Daemon
is less than the period specified by the NotifyPeriod parameter,
Dr.Web Daemon starts sending notifications upon every system
startup, restart or reboot.
Default value:
MailCommand = "/usr/sbin/sendmail -i -bm -f
drweb -- root"
NotifyPeriod =
{numerical value}
This parameter value specifies the period (in days) before license
key expiration date when Dr.Web Daemon starts prompting a
user to renew the license.
If the parameter value is set to 0, Dr.Web Daemon starts
sending out notifications immediately after the key file expires.
Default value:
NotifyPeriod = 14
NotifyFile =
{path to file}
Path to the file with a timestamp of the last license expiration
notification.
Default value:
NotifyFile = %var_dir/.notify
NotifyType =
{Ever | Everyday | Once}
Frequency of sending license expiration notifications.
Once – notification is sent only once.
Everyday – notification is sent daily.
Ever – notification is sent upon every Dr.Web Daemon
restart and every database update.
Default value:
NotifyType = Ever
FileTimeout =
{numerical value}
Maximum time (in seconds) allowed for Dr.Web Daemon to
perform scanning of one file.
If the parameter value is set to 0, time to scan of one file is
unlimited.
Default value:
FileTimeout = 30
StopOnFirstInfected = {logical}
Enables or disables interruption of file scanning upon detection of
the first virus.
If the value is set to yes, it can significantly reduce mail server
load and scan time.
Default value:
StopOnFirstInfected = No
ScanPriority =
{signed numerical value}
Priority of Dr.Web Daemon process.
Value must be in the following range: -20 (highest priority) to 19
(lowest priority for Linux) or 20 (lowest priority for FreeBSD and
Solaris).
Default value:
ScanPriority = 0
FilesTypes =
{list of file extensions}
Types of files to be checked "by type", that is, when the
ScanFiles parameter value (described below) is set to ByType.
"*" and "?" wildcard characters are allowed.
Administrator Manual
98
Dr.Web Daemon
Default value:
FilesTypes = EXE, COM, SYS, OV?, BAT, BIN, DRV,
PRG, BOO, SCR, CMD, VXD, 386, DLL, FON, DO?, XL?
, WIZ, RTF, CL*, HT*, VB*, JS*, INF, AR?, ZIP,
R??, PP?, OBJ, LIB, HLP, MD?, INI, MBR, IMG,
CSC, CPL, MBP, SHS, SHB, PIF, SO, CHM, REG, XML,
PRC, ASP, LSP, MSO, OBD, THE*, NWS, SWF, BMP,
MPP, OCX, DVB, CPY, MSG, EML
FilesTypesWarnings = {logical}
Notify on files of unknown types
Default value:
FilesTypesWarnings = Yes
ScanFiles =
{All | ByType}
Scan only files with extensions specified in the FileTypes
parameter (the ByType value) or all files (the All value).
This parameter can have the ByType value only in the local scan
mode (in other modes, only the All value can be set).
In mailboxes, all files are always checked (regardless of the
ScanFiles parameter value).
Default value:
ScanFiles = All
CheckArchives =
{logical}
Enables or disables checking of files in archives.
The following formats are supported: ZIP (WinZip, InfoZIP, etc.),
RAR, ARJ, TAR, GZIP, CAB and others.
Default value:
CheckArchives = Yes
CheckEMailFiles =
{logical}
Enables or disables checking of email files.
ExcludePaths =
{list of path | file masks}
Masks for files to be skipped during scanning.
FollowLinks =
{logical}
Enables or disables Dr.Web Daemon to follow symbolic links
during scanning.
Default value:
CheckEMailFiles = Yes
Default value:
ExcludePaths = /proc,/sys,/dev
Default value:
FollowLinks = No
RenameFilesTo =
{mask}
Mask for renaming files when the Rename action is applied.
MoveFilesTo =
{path to directory}
Path to the Quarantine directory.
BackupFilesTo =
{path to directory}
Directory for backup copies of cured files.
Default value:
RenameFilesTo = #??
Default value:
MoveFilesTo = %var_dir/infected/
Default value:
BackupFilesTo = %var_dir/infected/
Administrator Manual
99
Dr.Web Daemon
LogFileName =
{syslog | file name}
Log file name.
You can specify syslog as a log file name and logging will be
performed by syslogd system service.
In
this
case,
also
specify
the
SyslogFacility
and
SyslogPriority parameter values.
Default value:
LogFileName = syslog
SyslogFacility =
{syslog label}
Log type label used by syslogd system service.
SyslogPriority =
{log level}
Logging priority (log verbosity level) when syslogd system service
is used.
Default value:
SyslogFacility = Daemon
There are the following levels allowed:
Error
Alert
Warning
Info
Notice
Default value:
SyslogPriority = Info
LimitLog =
{logical}
Enables or disables limit for log file size (if LogFileName value is
not specified to syslog).
If limit is enabled, Dr.Web Daemon checks the size of a log file
on startup or on receipt of HUP signal. If the log file size is greater
than MaxLogSizevalue, the log file is overwritten with an empty
file and logging starts from scratch.
Default value:
LimitLog = No
MaxLogSize =
{numerical value}
Maximum log file size in Kbytes.
Used only with LimitLog = Yes.
Set this parameter value to 0 if you do not want a log file to be
unexpectedly modified on startup.
Default value:
MaxLogSize = 512
LogScanned =
{logical}
Enables or disables logging of information about all scanned
objects regardless whether they are infected or not.
Default value:
LogScanned = Yes
LogPacked =
{logical}
Enables or disables logging of additional information about files
packed with DIET, PKLITE and other utilities.
Default value:
LogPacked = Yes
LogArchived =
{logical}
Enables or disables logging of additional information about files
archived with various archiving utilities.
Administrator Manual
100
Dr.Web Daemon
Default value:
LogArchived = Yes
LogTime =
{logical}
Enables or disables logging of time for each record. The parameter
is not used if LogFileName = syslog.
Default value:
LogTime = Yes
LogProcessInfo =
{logical}
Enables or disables logging PID of the scanning process and filter
address (host name or IP address) from which scanning has been
activated.
This data is logged before each record.
Default value:
LogProcessInfo = Yes
RecodeNonprintable = {logical}
Enables or disables transcoding of characters that are
undisplayable on a given terminal (see also the description of the
following two parameters).
Default value:
RecodeNonprintable = Yes
RecodeMode =
{Replace | QuotedPrintable}
Decoding
mode
for
non-printable
characters
(if
RecodeNonprintable = Yes).
When RecodeMode = Replace, all non-printable characters are
substituted with the RecodeChar parameter value (see below).
When RecodeMode = QuotedPrintable, all non-printable
characters are converted to Quoted Printable encoding.
Default value:
RecodeMode = QuotedPrintable
RecodeChar =
{"?" | "_" | ...}
Sets a character to replace all non-printable characters if
RecodeMode = Replace.
Default value:
RecodeChar = "?"
Socket =
{address list}
List of sockets to be used for communication with Dr.Web
Daemon (separated by commas).
Example:
Socket = inet:[email protected],local:%var_dir/
.daemon
You can also specify a socket address in the following format:
PORT [interfaces] | FILE [access].
For a TCP socket, specify a decimal port number (PORT) and the
list of interface names or IP addresses for incoming requests
(interfaces).
Example:
Socket = 3000 127.0.0.1, 192.168.0.100
For UNIX sockets, specify a socket
access permissions in the octal form.
name
(FILE)
and
Example:
Socket = %var_dir/.daemon 0660
Number of Socket parameter values is not limited. Dr.Web
Daemon will work with all sockets described correctly.
Administrator Manual
101
Dr.Web Daemon
To enable connections on all available interfaces, set 3000 0.0.0.0
as a value of this parameter.
Default value:
Socket = %var_dir/run/.daemon
SocketTimeout =
{numerical value}
Maximum time (in seconds) allowed for transferring data through
socket (file scanning time is not included).
If the parameter value is set to 0, the time is unlimited.
Default value:
SocketTimeout = 10
ClientsLogs =
{string list}
Enables splitting of log files.
If during communication with Dr.Web Daemon a client uses the
option to transfer its ID, log file will be substituted with the file
specified in this parameter. Descriptions of log files are separated
by commas or spaces.
If more than six values are set, the configuration file is considered
invalid.
Log files are defined in the following way:
<client name1>:<path to file>, <client
name2>:<path to file>
Client name may be one of the following:
— Dr.Web ICAPD;
smb_spider — Dr.Web Samba SpIDer;
mail — Dr.Web MailD;
drwebdc — console client for Dr.Web Daemon;
kerio — Dr.Web for Kerio Internet Gateways;
lotus — Dr.Web for IBM Lotus Domino.
web
Example:
drwebdc:/var/drweb/log/drwebdc.log,
smb:syslog,
mail:/var/drweb/log/drwebmail.log
Default value:
MaxBasesObsolescencePeriod =
{numerical value}
Period, in hours, after last update, during which virus databases
are considered up-to-date.
When this period is over, a message notifying that databases are
obsolete is output.
If value is set to 0, database obsolescence is not checked.
Default value:
MaxBasesObsolescencePeriod = 24
The following parameters can be used to reduce scanning time in archived files (some objects in archives are not
checked). Actions applied to skipped depend on the ArchiveRestriction parameter value of the corresponding
modules.
MaxCompressionRatio = {numerical
value}
Maximum compression ratio, that is a ratio between size of
unpacked file and its size within an archive.
The parameter can have only natural values. If the ratio exceeds
Administrator Manual
102
Dr.Web Daemon
the specified value, file will not be extracted and therefore will not
be checked.
Value of this parameter must be not less than 2.
Default value:
MaxCompressionRatio = 5000
CompressionCheckThreshold = {numerical
value}
Minimum size of a file enclosed within an archive (in Kbytes) for
which compression ratio check is performed (if such a check is
enabled by the MaxCompressionRatio parameter). Value of this
parameter must be greater than 0.
Default value:
CompressionCheckThreshold = 1024
MaxFileSizeToExtract = {numerical
value}
Maximum size of a file enclosed in an archive, in Kbytes. If a file
size exceeds the specified value, the file is skipped.
Default value:
MaxFileSizeToExtract = 40960
MaxArchiveLevel =
{numerical value}
Maximum allowed archive nesting level.
If an archive nesting level exceeds the specified value, an archive
is not scanned.
Default value:
MaxArchiveLevel = 8
MessagePatternFileName = {path to
file}
Path to template for a license expiration message.
You can configure output of an expiration message according to
your needs. To do this, use the following variables in the template.
The specified variables are substituted with the corresponding
values:
$EXPIRATIONDAYS
expiration;
$KEYFILENAME
— number of days left until license
— path to license key file;
— license number;
$KEYACTIVATES — license activation date;
$KEYEXPIRES — license expiration date.
$KEYNUMBER
If there is no user-defined template, standard message in English
is output.
Default value:
MessagePatternFileName =
%etc_dir/templates/drwebd/msg.tmpl
MailTo =
{email address}
Email address of an administrator where the following information
is sent: messages about license expiration, virus databases
obsolescence, etc.
Default value:
MailTo =
Administrator Manual
103
Integration with Samba
Integration with Samba
Integration of Samba file service and Dr.Web Daemon, resident anti-virus component, is
implemented with the use of a special module Dr.Web Samba VFS SpIDer. When Samba file
servers attempt to access a file, Dr.Web Samba VFS SpIDer sends this file through a socket to
Dr.Web Daemon for anti-virus check.
Requirements
Integration of Samba file service and Dr.Web Daemon, resident module which performs anti-virus
check, requires the following components to be installed:
Samba file server version 3.0.x — 3.5.x or later; the server must be configured accordingly.
Dr.Web Daemon, configured accordingly, and Dr.Web Engine version 6.0.2
Dr.Web Samba VFS SpIDer plug-in, which supports all options used by Samba file server
Webmin component to enable use of web interface Dr.Web Console for UNIX File Servers.
Dr.Web Samba VFS SpIDer does not provide full support for Samba server version 4: the module
supports only s3fs file system; thus, ntvfs file system is not supported.
Integrating Dr.Web solution with Samba
Add the following section to the Samba configuration file (/etc/samba/smb.conf by default) and
edit the settings in accordance with the used directories:
[drweb_audit]
comment = Dr.Web protected directory
path = /<path to directory to be protected>/
vfs objects = smb_spider
smb_spider: config = <path to configuration file or Agent socket address>
writeable = yes
browseable = yes
guest ok = yes
public = yes
After you finish editing, restart Samba file server.
If you want each protected shared resource to be configured with a separated configuration file, add
the following line to each resource section:
smb_spider: config = %etc_dir/smp_spider.conf
Dr.Web Samba VFS SpIDer can also receive settings from Dr.Web Agent. To enable this option, in
the smb.conf file substitute the line containing the smb_spider.conf file path with the following
line:
smb_spider: config = <Agent socket address>
Example:
UNIX socket (Dr.Web Agent is running on the local machine):
smb_spider: config = local:%var_dir/ipc/.agent
Administrator Manual
104
Integration with Samba
TCP socket (Dr.Web Agent is running on a remote machine):
smb_spider: config = inet:[email protected]
Note that if you specified Dr.Web Agent address in smb_spider: config, Dr.Web Samba VFS
SpIDer sends statistics to Dr.Web Agent. To ensure correct statistics gathering, add the line with
Dr.Web Agent address to the section of each protected shared resources.
Dr.Web Samba VFS SpIDer Startup
Dr.Web Samba VFS SpIDer monitor is activated on attempt to open a shared resource on the server.
When the monitor is initialized
Dr.Web Samba VFS SpIDer checks versions of the interface and Samba server
Dr.Web Samba VFS SpIDer reads its configuration file
(%etc_dir/smb_spider.conf by default)
Dr.Web Samba VFS SpIDer starts monitoring file operations performed by the clients.
On the first and second steps, Dr.Web Samba VFS SpIDer outputs information to the system log
(syslog). By default, the following values are used to configure syslogd :
SyslogFacility = Daemon
SyslogPriority = Info
It is recommended to starts the modules in the following order:
Dr.Web Daemon
Dr.Web Samba VFS SpIDer
To ensure optimal performance, grant Dr.Web Daemon with permissions to access shared resources.
If Dr.Web Daemon is running without read access (for scanning) or write access (for curing, removing
files, etc.) to files on a shared resource, the component will operate in the remote scanning mode and
receive necessary files via the socket. In this mode, performance is considerably reduced.
Dr.Web Daemon cannot scan files size of which exceeds 2 GB; therefore, Dr.Web Samba VFS
SpIDer does not send such files for scanning.
Configuration File
Dr.Web Samba VFS SpIDer can be started with default settings, but if you want to ensure optimal
performance, you may adjust it according to your specific requirements. Configuration of Dr.Web
Samba VFS SpIDer is located in the %etc_dir directory (smb_spider.conf file by default). To use
another configuration file, specify the full path to it in the smb.conf configuration file by adding the
following line:
smb_spider: config = /my/new/path/smb_spider.conf
For description of Dr.Web for UNIX File Servers configuration files, refer to the Configuration Files
section.
[DaemonCommunication]
Address = {addresses list}
List of socket addresses used for communication with Dr.Web
Daemon.
Addresses in the list are separated by commas.
Administrator Manual
105
Integration with Samba
Default value:
pid:%var_dir/run/drwebd.pid
Cache = {logical}
Enables or disables cashing the IP address of the host where
Dr.Web Daemon operates.
If the parameter value is set to No, the IP address is requested
every time the files are sent for scanning.
This parameter is used only when communicating with Dr.Web
Daemon via TCP sockets (see the description of the previous
parameter).
Default value:
Cache = Yes
Timeout = {numerical value}
Timeout for one file to be scanned (in seconds).
If the parameter is set to 0, scanning time is not limited.
Default value:
Timeout = 120
UseTcpNodelay = {logical}
Enables the TCP_NODELAY option to configure TCP socket for
connection with Dr.Web Daemon.
Use this option only if network stability problems occur.
Default value:
UseTcpNodelay = No
[Scanning]
HeuristicAnalysis = {On | Off}
Enables or disables the heuristic analyzer mode.
The detection method used by the heuristics analyzer is based on
certain knowledge about the attributes that characterize malicious
code. Each attribute or characteristic has a weight coefficient that
determines the level of its severity and reliability. Depending on
the sum weight of a file, the heuristics analyzer calculates the
probability of unknown virus infection. As with any system of
hypothesis testing under uncertainty, the heuristics analyzer may
commit type I or type II errors (i.e., it may omit viruses or raise
false alarms).
Default value:
HeuristicAnalysis = On
StripPath = {numerical value}
Remove the specified number of segments from the beginning of
the scanning path.
If the parameter value set to 0, a full path is used. If the value is
set to 1, one segment, including the first forward slash character
( "/"), is removed from the beginning of the scanning path. If the
value is set to 2, two segments, including the second forward slash
character, are removed.
Example:
Let us assume that a scanning path is specified as:
path = /some/path/to/file.ext
If StripPath = 1, the path will be as follows:
path = some/path/to/file.ext
If StripPath = 2, the path will be as follows:
path = path/to/file.ext.
Default value:
StripPath = 0
Administrator Manual
106
Integration with Samba
PrefixPath = {path to directory}
Specifies the path segment that is added to the beginning of the
scanning path after it has been processed by the StripPath
parameter.
Value of this parameter must not end with a slash ("/") character;
the required slash character will be added automatically.
Example:
Let us assume that a scanning path is specified as:
path = /certain/path/to/file.ext
If StripPath = 2, the path will be as follows
path = path/to/file.ext
If PrefixPath = /quite/another, the final path will be as
follows
path = /quite/another/path/to/file.ext
Default value:
PrefixPath =
MaxFileSizeToScan = {numerical
value}
Sets the maximum size of file to be for scanned, in KB.
If the value is set to 0, file size is unlimited.
Default value:
MaxFileSizeToScan = 0
ScanMode = {onWrite | onRead |
onAccess}
You can specify the following parameter values:
onAccess — a file is scanned on attempt to open or run it as
well as on close (after the file was created or modified).
onRead — a file is scanned only on attempt to open or run it.
This mode allows to increase performance, but decreases the
protection level as files are not scanned when copied to the
server. Although an infected file can not be run by a remote
user in this mode, the file can be run by a user with local
access to the shared directory (that is, bypassing the Samba
server).
onWrite — a file is scanned only on close after it was created
or modified. This mode allows to further increase performance,
but significantly decreases the protection level as files are not
scanned on execution. An infected file can be copied to the
shared directory by a user with local access (that is, bypassing
the Samba server) and then run by a remote user without
scanning.
Default value:
ScanMode = onAccess
RewriteDataBase = {logical}
When the parameter value is set to Yes, databases of blocked
(infected) and allowed (clean) files are overwritten every time a
new user accesses a shared directory.
Default value:
RewriteDataBase =
BlockedCacheSize = {numerical value}
Yes
Size (in bytes) of database that stores blocked (infected) files.
When the parameter value is set to 0, a database of blocked files
is not created. Otherwise, md5 hash sum of files scanned by
Dr.Web Daemon and detected as infected are saved to the
database. On a subsequent attempt to open a file, its md5 hash
sum is compared to sums stored in the database and if the match
is found, the file is treated as infected without sending it to
Dr.Web Daemon for repeated scanning.
Administrator Manual
107
Integration with Samba
Default value:
BlockedCacheSize = 4096
AllowedCacheSize = {numerical value}
Size (in bytes) of database that stores allowed (cleaned) files.
When the parameter value is set to 0, a database of allowed files is
not created. Otherwise, md5 hash sum of files scanned by Dr.Web
Daemon and detected as clean are saved to the database. On a
subsequent attempt to open a file, its md5 hash sum is compared
to sums stored in the database and if the match is found, the file is
treated as clean without sending it to Dr.Web Daemon for
repeated scanning.
Default value:
AllowedCacheSize = 4096
LocalScan = {logical}
Enables or disables the local scan mode.
If the parameter value is set to Yes, Dr.Web Daemon scans files
in the local mode; that is, only paths to the files are transmitted to
the component. Otherwise, it receives the file content.
Default value:
LocalScan = yes
Dr.Web Samba VFS SpIDer can apply specified actions to files independently if Dr.Web Daemon
has insufficient permissions or is set to operate in the remote scan mode.
[Actions]
LicenseLimit = {action}
Action applied to files during scanning of which a license error
occurred (for example, license expired).
You can specify one of the following actions:
pass, reject.
Default value:
LicenseLimit = reject
Infected = {action}
Action applied to an infected object.
You can specify one of the following actions:
cure, rename, discard, quarantine, reject.
Default value:
Infected = quarantine
Suspicious = {action}
Action applied to a suspicious object
You can specify one of the following actions:
pass, rename, discard, quarantine, reject.
Default value:
Suspicious = quarantine
Incurable = {action}
Action applied to an incurable object.
You can specify one of the following actions:
rename, discard, quarantine, reject.
Default value:
Incurable = quarantine
Adware = {action}
Action applied to an object containing an advertising program
(adware).
Administrator Manual
108
Integration with Samba
You can specify one of the following actions:
pass, rename, discard, quarantine, reject.
Default value:
Adware = quarantine
Dialers = {action}
Action applied to a dialer program.
You can specify one of the following actions:
pass, rename, discard, quarantine, reject.
Default value:
Dialers = quarantine
Jokes = {action}
Action applied to a joke program.
You can specify one of the following actions:
pass, rename, discard, quarantine, reject.
Default value:
Jokes = quarantine
Riskware = {action}
Action applied to riskware.
You can specify one of the following actions:
pass, rename, discard, quarantine, reject.
Default value:
Riskware = quarantine
Hacktools = {action}
Action applied to a program used for hacking.
You can specify one of the following actions:
pass, rename, discard, quarantine, reject.
Default value:
Hacktools = quarantine
Archives = {action}
Action applied to archives containing infected files.
You can specify one of the following actions:
rename, discard, quarantine, reject.
To
enable
removal
of
EnableDeleteArchiveAction =
configuration file drweb32.ini.
such
archives,
set
Yes parameter in the main
Default value:
Archives = quarantine
SkipObject = {action}
Action applied to files which cannot be scanned by Dr.Web
Daemon (for example, password protected or broken archives,
symbolic links, non-regular files).
You can specify one of the following actions:
pass, reject.
Default value:
SkipObject = pass
ArchiveRestriction = {action}
Action applied to an archive that cannot be scanned by Dr.Web
Daemon because a threshold value specified in the main
configuration file is exceeded (for example, compression ratio, size
of archived objects, nesting level).
Administrator Manual
109
Integration with Samba
You can specify one of the following actions:
pass, reject.
Default value:
ArchiveRestriction = pass
ScanningErrors = {action}
Action applied to files that caused errors during scanning (for
example, Dr.Web Daemon is out of memory or does not have
permissions required for further processing).
You can specify one of the following actions:
pass, reject.
Default value:
ScanningErrors = reject
ProcessingErrors = {action}
Action applied to files that caused errors during scanning (for
example, Dr.Web Samba VFS SpIDer is not configured
appropriately or cannot connect to Dr.Web Daemon).
Possible values are:
pass, reject.
Default value:
ProcessingErrors = reject
ShellScriptForBlockedFile = {path to
file}
Path to the shell script that is initialized when a file is blocked.
Dr.Web Samba VFS SpIDer passes the following parameters to
the script:
FileName — name of the infected file
UserName — login name of the user who tried to access the
blocked file
UserHost — name of the host from which the user tried to
open the blocked file
DaemonReport — Dr.Web Daemon report.
Example of such a script (file smb_script.sh) is located in the
following directory
%bin_dir/doc/samba/
Default value:
ShellScriptForBlockedFile =
Quarantine = {path to directory}
Path to the Quarantine directory.
Default value:
Quarantine = %var_dir/infected/
QuarantineFilesMode = {access
permissions}
Permissions to access files in Quarantine.
Default value:
QuarantineFilesMode = 0660
[Logging]
LogFileName = {syslog | path to
file}
Log file name.
You can specify syslog to enable logging with the syslog service.
In this case, you must also specify values for SyslogFacility and
SyslogPriority parameters.
Default value:
LogFileName = syslog
Administrator Manual
110
Integration with Samba
Level = {log level}
Log verbosity level.
You can specify one of the following levels:
Quiet
Errors
Alerts
Info
Debug
Verbose
Default value:
Level = Info
SyslogFacility = {syslog label}
Facility label for logging with the syslog service.
Default value:
SyslogFacility = Daemon
SyslogPriority = {log level}
Verbosity level for logging with the syslog service.
You can specify one of the following levels:
Alert
Info
Notice
Debug
Default value:
SyslogPriority = Info
Administrator Manual
111
Dr.Web Console for UNIX File Servers
Dr.Web Console for UNIX File Servers
Setup and configuration of Dr.Web for UNIX File Servers can be performed via the web interface
Dr.Web Console for UNIX File Servers. It is implemented as a plug-in to Webmin (for detailed
information on Webmin interface, visit its official website at http://www.webmin.com/).
To achieve optimal performance of web interface Dr.Web Console for UNIX File Servers, ensure
that the following Perl modules are installed on your system:
XML::Parser — module for parsing XML documents
XML::XPath — set of modules for parsing XPath statements
CGI — module enabling operation with Common Gateway Interface
Cwd — module for detection of the current working directory of any process
Data::Dumper — module for writing arbitrary data structures to memory and reading from it
Text::Iconv —
function
module that provides a Perl interface to iconv() encoding conversion
perl-devel (or libperl-dev, depending on the distribution) — packaged used for building
Text::Iconv
JSON — module for parsing and converting to JSON (JavaScript Object Notation)
Encode::CN - module used for Chinese character encoding
Encode::HanExtr - module with additional set of Chinese character encodings
Switch – module that enables use of switch-case statements.
It is recommended to install missing modules from the command line. For that purpose, root privileges
are required. Names of the modules may vary, but typically they are included in the following
packages: perl-Convert-BinHex, perl-IO-stringy, perl-MIME-tools, perl-XML-Parser,
perl-XML-XPath. To install modules in rpm systems, it is recommended to choose noarch.rpm
packages.
Appearance of the web interface may differ from the given screenshots depending on the Webmin
version and used browser.
Due to features of Webmin implementation, Dr.Web Console for UNIX File Servers web interface
does not display correctly in Internet Explorer 7. If problems with displaying of web pages occur, try to
use Internet Explorer 8 or 9 (and later) or use another browser.
Installation
To start working with Dr.Web Console for UNIX File Servers, do the following:
install Webmin;
install Dr.Web Console for UNIX File Servers plug-in located in the %bin_dir/web/ directory.
Webmin configuration and installation of modules is performed with the use of Webmin web
interface.
Administrator Manual
112
Dr.Web Console for UNIX File Servers
Figure 15. Webmin main page
To install additional modules, click Webmin Configuration on the main menu and then click Webmin
Modules on the open page.
Figure 16. Webmin configuration
To install required modules
1. Click the Browse button near the From local file text field on the Webmin Modules page. A
new browser window opens to provide navigation through folders and files.
2. Choose the corresponding installation package from the list
(%bin_dir/web/drweb-samba-web.wbm.gz by default).
Administrator Manual
113
Dr.Web Console for UNIX File Servers
Figure 17. Webmin modules
3. After you click an item from the list, path to this item is added to the field below. If you click the
item twice, the folder opens. With the second click on the previously selected file, navigation
window closes, and the full path to the selected file appears in From local file text field. You can
also click OK after you select a required file.
4. After you select an installation package file, click Install Module.
5. When the installation completes, a link to the new Dr.Web Console for UNIX File Servers
module appears in the Servers section of the main menu.
Figure 18. Dr.Web Console for UNIX File Servers module
If you use Webmin 1.680 or later, you should also add the following line to its configuration file (usually,
this is the file /etc/webmin/config):
no_content_security_policy=1
Administrator Manual
114
Dr.Web Console for UNIX File Servers
Basic Configuration
You can select the language for web interface Dr.Web Console for UNIX File Servers. For that
purpose, select the Change Language and Theme item in the Webmin section of the main menu.
Figure 19. Webmin main page
If you want to use Russian language for both web interfaces, select Russian KOI8 (RU_SU) or
Russian CP1251 (RU_RU) option from the Personal choice.. drop-down list in the Webmin UI
language section. If you select the Russian UTF-8 (RU.UTF-8) option, Russian language will be
used only for Dr.Web Console for UNIX File Servers web interface.
On this page, you can also change layout of Webmin web interface (select the required item in the
Personal choice.. drop-down list of the Webmin UI theme section) as well as set a new password
to access Webmin (in the the Webmin login password section, select the Set to.. item and type the
password).
To save and apply all changes, click Make Changes button and refresh the page.
To access Dr.Web Console for UNIX File Servers basic settings, click
on the top pane of the
page. On the open page, you can specify the path to smb_spider.conf configuration file, number of
files shown per page in Quarantine and the operation mode.
Figure 20. Module configuration
Administrator Manual
115
Dr.Web Console for UNIX File Servers
User Interface
When navigating within the Dr.Web Console for UNIX File Servers sections, you cannot open the
previous page using the standard Back function. If you click Back or use the corresponding key
combination, the previous section of the main menu opens.
Figure 21. Dr.Web Console for UNIX File Servers main page
Right of the module header, information on the current versions of Dr.Web Samba VFS SpIDer and
Dr.Web for UNIX File Servers web interface displays.
Under the module header, you can see the following two sections: Quarantine and Configuration.
By default, the Daemon Connection tab of the Configuration section opens.
To adjust parameters, selected the required values in the drop-down lists or specify manually in the
corresponding text fields. For detailed description of the parameters, click more.
Configuration
You can specify required parameter values either by selecting them from the corresponding drop-down
lists or typing them in the text fields.
After changing a parameter value, you can immediately undo the change by clicking
default settings by clicking
or restore the
. The latter action is always available, even after the changes are saved.
If Dr.Web for UNIX File Servers operates in the central protection mode, the administrator of the
central protection server can block an option to adjust the settings. If so, users cannot configure Dr.Web
for UNIX File Servers settings.
To view the changes, click Preview. On the open page, you can choose whether or not to save the
adjustments (to undo a change, clear the corresponding checkbox). To continue adjusting the settings,
click Continue Editing and the previous page will open. To cancel all of the changes, click Cancel
changes. To save the changes, click Save.
Administrator Manual
116
Dr.Web Console for UNIX File Servers
Figure 22. Preview page
When you click Save, notification on the configuration being saved displays on the screen. Click the
notification to return to the settings page.
Figure 23. Saving configuration
Changes specified on the Scanning and Action tabs will be applied only after the Samba server is
restarted or a new user session starts.
Daemon Communication
On the Daemon Configuration tab, you can configure communication with Dr.Web Daemon (for
example, specify its socket address, maximum time to scan one file).
Administrator Manual
117
Dr.Web Console for UNIX File Servers
Figure 24. Daemon Communication tab
Scanning
On the Scanning tab, you can enable heuristic analysis, specify scanning mode, set limits on file size,
configure paths to scanned directories.
Administrator Manual
118
Dr.Web Console for UNIX File Servers
Figure 25. Scanning tab
Changes specified on the Scanning and Action tabs will be applied only after the Samba server is
restarted or a new user session starts.
Action
On the Action tab, you can specify actions to be applied to detected threats and files that caused
errors during scanning. You can also specify path to the Quarantine directory and permissions to
access quarantined files.
Administrator Manual
119
Dr.Web Console for UNIX File Servers
Figure 26. Action section
Changes specified on the Scanning and Action tabs will be applied only after the Samba server is
restarted or a new user session starts.
Logging
On the Logging tab, you can configure logging for Dr.Web for UNIX File Servers.
Administrator Manual
120
Dr.Web Console for UNIX File Servers
Figure 27. Logging tab
Quarantine
Quarantine page contains the list of links to quarantined files. If the quarantine action is specified
on the Action tab for a certain file type, such files are moved to the Quarantine directory and their
names are created from address of those web pages from which the files were downloaded.
Figure 28. Quarantine tab
To remove a file from the Quarantine directory, select the corresponding checkbox and click Delete.
Running in Enterprise Mode
To start Dr.Web Console for UNIX File Servers in the central protection mode, configure Dr.Web
Agent as described in the corresponding section. After making necessary changes, click
on the
navigational menu at the top of the page. In the open window, set Central Protection Mode
parameter value to Yes.
Central Protection Mode parameter can have one of the following two values:
No – in this mode Dr.Web Console for UNIX File Servers interacts with local configuration file
and does not have access to the configuration received by Dr.Web Agent from Dr.Web
Enterprise Server. Changes made to the configuration in this mode take effect only after
Administrator Manual
121
Dr.Web Console for UNIX File Servers
Dr.Web Agent is set to operate in the Standalone mode.
Yes – in this mode Dr.Web Console for UNIX File Servers receives configuration from the
Dr.Web Agent socket. If Dr.Web Agent is operating in the Stanalone mode, the following
warning is output to the Dr.Web Console for UNIX File Servers:
Receiving settings error: unable to establish connection with Dr.Web
Agent.
If there is a problem connecting to Dr.Web Enterprise Server, the following behaviours of Dr.Web
Console for UNIX File Servers are possible:
If Dr.Web Enterprise Server is unavailable upon the initial connection or authorization process
fails, Dr.Web Agent terminates. In this case, check the settings and try to restart Dr.Web
Agent and Dr.Web Console for UNIX File Servers.
If connection to Dr.Web Enterprise Server was established earlier, but now the server is
temporary unavailable (for example, in the event of connection problems), Dr.Web Agent uses
backup copies of configuration files that were previously received from the server. These files are
encrypted and must not be edit by users. Edited files become invalid.
Configuring User Permissions
When Dr.Web Agent is running in the Enterprise mode, Dr.Web Control Center administrator
can partially or completely block user permission to configure Dr.Web components installed on the
workstation.
To set permissions of a workstation user:
Enter Dr.Web Control Center. Note that the administrator must have sufficient privileges to
adjust settings of Dr.Web anti-virus software.
On the main menu, select Network, then click the workstation name in the hierarchical list. On
the open control menu (left pane), select Permissions. This opens the permission configuration
window.
Figure 29. User permissions configuration
In the Components section, select components to be available for the workstation user to
Administrator Manual
122
Dr.Web Console for UNIX File Servers
change. For example, to allow the workstation user to adjust Dr.Web for UNIX File Servers
configuration, select the Using Dr.Web Samba SpIDer Control Centre for Linux checkbox
and click Save.
To disable the workstation user to adjust Dr.Web for UNIX File Servers configuration, clear
the Using Dr.Web Samba SpIDer Control Centre for Linux checkbox and click Save. In this
mode, Console displays the corresponding warning and Preview and Save buttons become
unavailable.
Figure 30. Read-only user permissions
Configuring Workstation
When a new workstation is created, its configuration settings are inherited from a group it belongs to.
That group is called the primary group. If the settings of the primary group are modified, these changes
are inherited by all workstations included into the group, unless the workstation configuration is
customized. When creating a workstation, you can specify what group is to be treated as primary. By
default, the primary group is the Everyone group.
Inheritance in nested groups depends on the group hierarchy. If for a station no custom settings are
specified, it inherits configuration from its parent group, and this process repeats recursively. Therefore,
search for the group configuration is performed upwards through the hierarchical tree of nested groups,
starting from the primary group of the station and further until the root group is reached. If no custom
settings are found, the workstation inherits configuration of the Everyone group.
Example:
The structure of a hierarchical list is as follows:
Group4 is the primary group for Station1. To determine the settings to be inherited by Station1,
Administrator Manual
123
Dr.Web Console for UNIX File Servers
the search is performed in the following order: Station1
Everyone.
Group4
Group3
Group2
Group1
You can edit configuration inherited from the primary group in two ways:
Using Dr.Web Control Center interface. To edit configuration, select Network on the main
menu, then click the workstation name in the hierarchical list. On the control menu (on the left
pane), select the component you want to configure. You need the corresponding permissions to
perform this operation. The configuration process is similar to the one via Console. When
necessary changes are made, click Save to save them.
Figure 31. Configuration of Dr.Web Samba SpIDer for Linux via Dr.Web Control Center
interface
If appropriate permissions are set, parameters can be reconfigured via Dr.Web Console for
UNIX File Servers. The configuration process is similar to the one in the Standalone mode. If
the workstation user has insufficient privileges for that, settings are open in read-only mode.
Types of Administrator Accounts
There are four types of administrator accounts:
Administrators with full rights have exclusive rights for management of Dr.Web Enterprise Server
and Anti-virus network. They can view and edit the Anti-virus network configuration and create
new administrator accounts. An administrator with full rights can configure the anti-virus software
installed on the workstation, limit and disable user intervention into anti-virus software
administration.
An administrator with full rights can view and edit the list of current administrator accounts.
Administrator Manual
124
Dr.Web Console for UNIX File Servers
Administrators with read-only rights can only view Anti-virus network settings and its separate
elements, but cannot modify them.
Group Administrators with full rights have access to all system groups and those custom groups which
they are allowed to manage (including nested groups). Group Administrator accounts can be created
for custom groups only (see Administrator manual for Dr.Web® Enterprise Security Suite). In the
hierarchical tree, only those groups are displayed for group administrators which they are allowed to
access.
The list of current administrator accounts is not available for Group Administrators.
Group Administrators with read-only rights can be granted full rights to adjust the available groups or
read-only rights.
Default adm inistrators with full rights created automatically during Dr.Web Enterprise Server (the
admin account).
Thus, Administrators with full rights can:
Add new and delete already existing administrator accounts.
Adjust settings for all administrators of Anti-virus network.
Group administrators and administrators with read-only rights can:
Adjust some of their account settings.
Administrator Manual
125
Contacts
Contacts
Dr.Web for UNIX File Servers solution is constantly improved. You can find news and the latest
information on available updates on the website at:
http://www.drweb.com/
Sales department:
http://buy.drweb.com/
Technical support:
http://support.drweb.com/
Please include the following information in the problem report:
full name and version of your operating system;
versions of Dr.Web for UNIX File Servers modules;
configuration files of all modules;
log files of all modules.
Administrator Manual
126
Appendix. The License Policy
Appendix. The License Policy
Dr.Web for UNIX File Servers solution is available as a separate product and as a part of
«universal» and «economy» Dr.Web kits. Types of licenses vary correspondingly.
All licenses can be purchased for definite terms, i.e. for 1, 2 or 3 years. Amount of protected file servers
may also vary. License terms, their quantitative parameters and limitations may be different for various
regional partners of Doctor Web, or may be revised hereafter.To learn more about regional license
terms, contact our partner in your region. List of the Doctor Web trusted partners can be found on the
corporate web site http://partners.drweb.com/.
During the whole license term client have the right to download updates from the Dr.Web Global
Updating System (Dr.Web GUS) servers and to receive a technical support from Doctor Web and
its partners.
File Servers Protection
Dr.Web for UNIX File Servers solution is being licensed according the number of file servers used.
Minimal license covers protection of 1 file server.
Components continue to work 24 hours after the license has expired.
Address of product's page: http://products.drweb.com/fileserver/unix/?lng=en
Administrator Manual
127
© Doctor Web, 2014