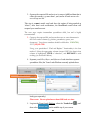
1
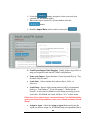
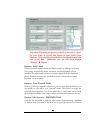
TEAM LEADS INC. Online Lead Generation & Management Software PlatformUser Manual BROKER/ ADMIN PERMISSION T E A M L E A D S P L A T F O R M U S E R M A N U A L Table of Content INTRODUCTION ............................................................................................................................... 3 Questions about our Platform…? .............................................................3 Broker and Administrator Guide ......................................................................................................... 4 Main Header ...................................................................................................................................... 4 Agent Dropdown Box – BROKER ONLY ..................................................4 Lead Search bar .......................................................................................4 Welcome Icon ..........................................................................................4 Help icon ..................................................................................................4 Dashboard – BROKER ONLY ............................................................................................................ 5 Traffic Dashboard .....................................................................................5 Agent Accountability .................................................................................5 Scorecard .................................................................................................5 Today ................................................................................................................................................ 6 Events ......................................................................................................6 Tasks .......................................................................................................6 Showings .................................................................................................6 Manage Leads ................................................................................................................................... 6 Buttons Overview .....................................................................................6 Filters Overview .....................................................................................11 Mass Buttons Overview ..........................................................................14 Tasks .....................................................................................................16 Lead Profile ..................................................................................................................................... 16 Blue buttons ...........................................................................................16 White buttons .........................................................................................16 Lead Lifeline ...........................................................................................16 Visit History ............................................................................................17 Tasks .....................................................................................................17 Add Showing ..........................................................................................17 Email ......................................................................................................18 Notes......................................................................................................18 Call Log ..................................................................................................19 Listing Alerts...........................................................................................19 Edit Listing Alerts....................................................................................20 Communications Timeline ......................................................................20 Drip Plans ........................................................................................................................................ 20 Drip Dashboard ......................................................................................20 Add/Edit Plan .........................................................................................21 Pause Options........................................................................................21 Activity time of day .................................................................................21 Auto Start Statuses ................................................................................22 Auto Start Drip Plans ..............................................................................22 Regular/Fixed Date/Holiday ....................................................................22 Agents – BROKER ONLY ................................................................................................................ 23 1 T E A M L E A D S P L A T F O R M U S E R M A N U A L Agent Dashboard Page ..........................................................................23 Agent Edit Page .....................................................................................24 Coming Soon ................................................................................................................................... 24 Dashboard - Coming Soon .....................................................................24 Add a listing............................................................................................25 Calendar .......................................................................................................................................... 25 Calendar View / Share – BROKER ONLY ..............................................25 Create Event ..........................................................................................26 Coaches Corner............................................................................................................................... 26 Add – BROKER ONLY ...........................................................................26 View .......................................................................................................26 Ideal Leads ...................................................................................................................................... 27 Dashboard..............................................................................................27 Priority Leads ................................................................................................................................... 27 Tracking .................................................................................................27 Action Icons............................................................................................27 Auto Tasks – BROKER ONLY ......................................................................................................... 28 Library Auto Tasks .................................................................................28 Add Task ................................................................................................28 Edit/Delete Task .....................................................................................29 Settings .....................................................................................................30 Manage General Settings – BROKER ONLY .........................................30 Manage Property Details Widgets & Display Info – BROKER ONLY ......30 Manage Property Thumbnails – BROKER ONLY ...................................31 Cole Realty (Pre-authenticated login) - BROKER ONLY ........................31 Manage Custom Pages – BROKER ONLY.............................................32 Manage Testimonials – BROKER ONLY ................................................32 Manage Property’s Detailed Information- BROKER ONLY .....................32 Manage Advanced Search Settings – BROKER ONLY ..........................33 Search Widget ........................................................................................34 Gmail......................................................................................................34 Vulcan ....................................................................................................35 Bomb Bomb ...........................................................................................35 Emails ....................................................................................................35 Listing Alerts – BROKER ONLY .............................................................36 Leads Imported ......................................................................................37 Manage Lead Import Sources ................................................................37 Lead Import Template ............................................................................37 Lead Profile ..................................................................................................................................... 38 Property Info...........................................................................................38 Showing Feedback .................................................................................38 Market Analysis ......................................................................................38 Prospectives...........................................................................................39 Cole Realty.............................................................................................40 Questions for Team Leads: .............................................................................................................. 42 2 T E A M L E A D S P L A T F O R M U S E R M A N U A L 1 Chapter INTRODUCTION Sell MORE Homes with Team Leads! W elcome to Team Leads! On the following pages you will find concise instructions and helpful hints to pave the way for your new Platform. We have also provided you interactive help within your actual Team Leads Platform, as well as helpful training videos accessible from our Platform. You can read through this manual on its own, you can refer to it while using your Team Leads Platform, and you can make notes on the left-hand columns, or jot down questions on the Questions for Team Leads page at the end of the manual. Questions about our Platform…? We are here to help you with any question or concern you have with your platform. However, we do ask that you refer to this manual, our videos, our integrated platform help feature, or our FAQ list before you send us an email or give us a call. Due diligence on your part will allow us to better serve our entire Team Leads client base. If, after consulting these resources, you still have a question, feel free to give us a call, an email, or raise a Ticket from the platform itself. Please see our Contact & Support section at the end of this manual for support contact information and options. 3 Broker and Administrator Guide BUYER SIDE Main Header Agent Dropdown Box – BROKER ONLY This dropdown allows you to alias into any of your agents’ personal Team Leads accounts. By having this accessibility you can oversee their entire activity level and manage without being seen. Please note: After aliasing in an agent’s account you must log back in to access your account again. Lead Search bar This lead search bar is available on every page of our system for easy access to any leads profile page. You have the ability to search by lead name, phone number or email. Welcome Icon Here you will see the different views you have access to as well as the settings and log off button Help icon The right hand side of the header allows you to input a support ticket when concerning a: question, suggestion, adjustment, etc. Upon submission you will receive an email with the ticket details. Additionally, the information will display on the page upon clicking submit. Upon completion of the ticket by the Team Leads staff you will receive an email notification that it has been closed. Submitting a ticket is the quickest way to get in touch with our team. The left hand side of this box is for contextual FAQ's/Glossary to try and assist in any questions you may have prior to putting in a trouble ticket. Please note: Based on the page you are on when you submit the ticket we will list common questions and answers. 4 Dashboard – BROKER ONLY Traffic Dashboard This is a snapshot of all traffic sources being driven to your consumer site. Here you can see percentages and ratios of registered and non-registered leads. This dashboard also shows: all imports, Vulcan 7 leads, 800 phone call leads and any 3rd party leads from integrations sources such as Zillow. Agent Accountability This is high-level overview of all of your agents’ daily activities. - Phone calls will show up here if they were done via a Vulcan dial session or if a call is logged manually. - New Leads have a hyperlink that allows you to go directly to their lead profile. - Average time to call shows how long it takes for an agent to call the lead. o Please note: If a red hyperlinked number shows up that indicates the lead(s) has yet to be called. Additionally, the average time to call monitors only between the hours of 8am-8pm local standard times. Scorecard You have the ability to create a team scorecard to put everyone on the same playing field or create individual scorecards that could be based around their personal goals and your expectations. When clicking on the name of an agent you can exclude specific days of the week that will not affect the overall valuation of the scorecard. You can also weight any of the listed categories. For example: You may personally think calls made are more valuable than showings, in which case you have the opportunity to weight them at the percentage you desire. The weights will be reflected in the total score. Please note: any daily tasks for your agents will increase the goal number for each category. Example: Josh has 10 calls to 5 make as a goal, and 5 previous tasks for calls - it will show he needs to make a total of 15 calls for the given time period. Today Events Today’s events will synchronize with your calendar as well as with Google services if you have previously synchronized your account. Broker/Admin – Has the ability to alias into any one of their agent’s today’s dashboard. Tasks Today’s Tasks will list any calls, emails, appointments, showings, etc. If an agent is unable to complete a task on the specific day it’s listed, the task will then move to the “past due” section. Tasks that are completed on this page will be reflected on the leads profile, and vice-versa. Broker/Admin – This feature ensures the agent will be accountable to their tasks, as well as gives the broker the privilege to oversee all efforts and productivity. Showings Any of today’s showings will be listed here, but you can also customize the date range to view upcoming or past showings. Manage Leads Buttons Overview Buttons: Import Leads – BROKER ONLY Steps to importing leads into Team Leads Platform LEAD EXPORTS STEPS: 1. Export your Leads from your current Lead Platform (e.g. Top Producer, Boomtown) and save on your computer. The export can be a .CSV, .XLS, or .XLSX file. Consult your software’s FAQ/support if you do not know how. 6 2. Open up the exported file and review it; remove ALL lead data that is either not current (e.g. more than 1 year) and/or if leads are on a donot-call/opt-out list. This step is a must; emails sent leads have the option of being marked as “abuse”; after three such notifications, the BombBomb email client will suspend your email account. The next steps require intermediate spreadsheet skills, but and is highly recommended: 3. Open up the exported file, and ensure there are no extra characters in the Phone number columns (e.g. dashes, parenthesis, spaces, text characters). Your phone numbers should look like this: 1234567890, NOT (123)456-7890 Using your spreadsheet’s “Find and Replace” functionality is the best method. Select the appropriate column (ensure ONLY the data in that column is highlighted), FIND a “character”, and REPLACE it with nothing (see screenshot below). 4. Separate your Seller, Buyer, and Aftercare Leads into three separate spreadsheet files (the Team Leads Platform currently uploads these INCORRECT– Find and Replace Characters CORRECT Formatting lead types separately). Please note: Do not upload more than 4000 leads at a time 5. Log into the Team Leads Platform, select the “Leads Icon” then select on the middle-top of your screen. 7 , and 6. Select the button, navigate to where you saved your exported file, and double-click it. 7. Back in the Import Leads/File Upload window select the button. 8. Read the Import Rules, check each box; then select 9. Lead Export/Import Data Mapping: Finally, follow steps below to map your exported Leads into the Team Leads platform: Name your Import - Insert the name of your exported file (e.g. “Top Producer, Buyer Leads”). Leads State - Select whether the Leads are Buyer, Seller, or Aftercare. Lead Status - Insert a single custom status for all of your imported leads (ex. “Top Producer”, “From Newspaper”, “Referral from Friend”), or leave the box blank to use the status previously given to your leads. If left blank, the Leads will have “New” as their status. Please note: If you want to insert “customized statuses” for individual leads, open up each exported spreadsheet, create a new column, and name it Lead Status. Assign to Agent - Select the Assign to Agent button and select the Agent you wish to assign. Or, if left blank, and your spreadsheet has a 8 column(s) called “Agent Full Name” the appropriate name will be taken from there. Please note: You can also do the same steps as in “Lead Status” to create a custom “Agent Full Name” column, and manually assign each Lead to a specific Agent. 10. Under the Data Mapping area in the middle of your screen, using the individual drop-down arrows, match your exported columns with Team Leads’ columns. Referring to the screen shot on the next page, the “Your Field <name>...” items are columns from your exported file, and the drop-down boxes are Team Leads’ columns, with which you need to match your data. 11. Once you have matched all boxes, go back to the left-hand side of your screen; if you wish to send an email to all your imported Leads, place a checkmark in the Send Email checkbox. Leads will receive a pre-defined email with a user name and password. 12. In the Send Date box, insert the date you wish to send these emails. Please note: DO NOT select this option if you ARE NOT 100% sure that all your leads would want this email. 15. Lastly, select the Start Import box. 9 Please note: Depending on the size of your file, it may take 1-2 hours for your Leads to upload, and appear in your Team Leads Platform. Upon completion you will receive a notification email with your import data. Additionally, you can drill down through “Settings” “Imports”. Buttons: Add a Lead Please ensure all required fields are filled out prior to adding a new lead. Our system requires first name, last name, email and primary phone number. We understand you may not always know both the email and phone number, however for this lead to save in our system you must populate one as required. Buttons: View Trashed Leads Here you can view trashed leads, notice you can view their profile but you are unable to edit unless you "untrash" them. The reason we keep the archived data is because a lot of our teams like to circle back and re-scrub these leads for validity. One man’s trash is another man’s treasure we say. Buttons: Edit Statuses – BROKER ONLY Only the broker is able to add and edit statuses. Brainstorming a number of statuses with your team is the ideal way to generate this list. Feel free to 10 customize them any way you wish, the more detailed statuses the better you can filter and sort your leads. Status titles can range from a location, an import name, a price point, etc. You will be able to filter these statuses to view all leads with a specific status. Please note: You are able to drag and drop all statuses in any order you choose - the order of which adjusts on the manage leads page as well for easier, more convenient navigation. Filters Overview Filters: Sort by: By selecting any of the filters listed you will be able to view specifically the criteria you selected. The page will refresh once selected and the leads will appear based on that sort option. This is beneficial for your mass calls or emails. By clicking on the check all you can easily mass email all leads, start a dial session with all leads, share, trash or transfer by selecting the buttons at the bottom of the page. You will notice you can filter the amount of leads viewable per page, which will allow you to email or call more than the defaulted 20 that appear. Filters: Show by Status: This will display only leads that have a specific status. You can display more than one status at a time by clicking on multiple statuses. This allows you to drill down on specific leads based on their status. Filters: Search by: This search bar allows you to type in the email, name and phone number of any lead you are searching. As you type this information the lead data will auto populate. Notice you can filter by active, trashed or all leads here. By default the search bar is set to active leads only. Icons: Statuses This icon appears as a colored dot, and appears to the right of the leads name on the manage leads page. When hovering over it will display the name of the status. These statuses are reflected on the lead profile page as well once the page is refreshed Icons: Add a call log 11 This icon appears as a telephone, and is located to the right of the colored dot status for each lead. This is where you are able to log a call manually outside of the dialer. This feature can be done on the manage leads page, lead profile page and the todays task page. Icons: Send an email This icon appears as an envelope, and is located to the right of the telephone icon. When sending an email you will notice subject is a required field, and you have the ability to add an additional email address in the custom email box. The rich text editor allows you to format the email to your liking including adding an attachment, image, aligning the email, and giving you numerous styling options. For the more advanced users you are able to click on "source" and adjust/ paste in source code from 3rd party templates, newsletters, etc. On the right side of the email sending window, you can save your current email as a template, use an existing template you have previously created or add a video and/or image to the body of the email. Adding a variable allows you to send multiple emails without having to customize each one. Some of the variables include: leads name, your consumer site URL, time of day, your details such as: cell phone number, email, name, signature and many others. Icons: Add a note This icon appears as a piece of paper with the corner folded. This is located to the right of the envelope icon meant for emailing. Hovering over the note shows the last note that was entered for that lead. Notice you can add a note to the lead by clicking on the icon. From there you are able to share/notify the corresponding lender with the note you added. Sharing a note means it will show up on the lender's notes for the lead, and notifying the lender will send them an email of the note immediately. Icons: Visited (last time on site) 12 This icon appears as a clock and is located to the right of the note icon. This icon indicates the last time the lead was on your consumer site. When the clock is green it means they have been on within the last 24 hours, yellow is the last 7 days, and red is beyond that. Icons: Average Price point This icon appears as a dollar sign and is located to the right of the clock icon. This icon shows an average price of all homes viewed by the lead on your consumer site when hovering over it. Icons: Showings Scheduled This icon appears as a house and is located to the right of the dollar sign icon. When the house icon is green it indicates you have scheduled showings with this lead, past/present or future. When it is black it means there have been no showings scheduled for the lead. Icons: Favorites This icon appears as a heart and is located to the right of the house icon. When the icon is red it indicates the lead has favorited one or more homes on your consumer site. When hovering over the icon it tells you how many homes have been favorited by the lead. By clicking on this icon it will bring you to your consumer site to show you the home(s) thumbnails that were favorite by the lead. Icons: Drip plan This icon appears as a raindrop and is located to the right of the heart icon. Hovering over the icon shows the name of the plan that the lead is on whether it’s activated or paused. 13 After clicking on the icon a pop up window will show all drip plans available to add to the lead. Once a drip is activated you can also pause it on this pop up window. When the raindrop color is green it indicates you have an active drip plan for the lead, when yellow it means its paused and white indicates no plan is set up for the lead. Please note: When a drip plan is paused you can hover over the description in the plan status to receive a more detailed description of the reason the drip plan was paused. For Example: If the reason is “Visited” under the plan status, by hovering over the word “Visited” it reads: Lead visited web page and logged in or Lead visited site from Listing Alerts Icons: Listing Alerts This icon appears as an eyeball and is located to the right of the raindrop icon. Hovering over indicates the number of listing alerts that are active, and the last time one was emailed to the lead. Clicking on this icon shows all the listing alert criteria that is active for the lead in deeper detail. Icons: Lead name Hovering over any of the bolded lead names on the Manage Lead page will show the total number of visits to your consumer site as well as the amount of properties viewed by that lead. When clicking on their name you will notice the box expands to give you additional information to the lead without bringing you to the leads profile page. Notice from this expanded view you can view the full profile, edit or trash the lead. Mass Buttons Overview Mass Buttons (Bottom of Page): Vulcan dialing session After selecting 1 individual lead or checking numerous leads you can click on the Vulcan button at the bottom of the manage leads page to start a dial session. 14 After clicking on the Vulcan 7 icon you will be brought to the Vulcan / Team Leads integration page. You will notice the dial session at the top half of the page and the lead profile at the bottom half. Prior to calling you can adjust your voicemail based on the types of leads you are calling. This reassures each lead will get the correct voicemail. You will not hear the voicemail being left but the next call will begin as your automated voicemail is left - this is a big convenience to ensure more efficient dial sessions. During your dial session you have the ability to include notes from the call either into the lead profile directly or into the Vulcan dial window. Adding it in either place ensures it is saved in the leads profile for future convenience. Using any of the Vulcan 7 disposition sets after the call also transfer back to the leads profile. After one lead is called the dialer automatically proceeds to the next lead in line to be called. With this happening the lead profile below the dial window also changes to reflect the new lead being called. Mass Buttons (Bottom of Page): Email selected leads In the same way we can sort before beginning a dial session, you can also sort leads for mass emailing using this button at the bottom of the page. For Example: If you are interested in emailing all of your “Nurture” status leads, you can set the filter to “Nurture”, increase the amount of leads per page and select all checkboxes. This will ensure you will mass email all of the leads at one time. Using a pre-designed template to send to these leads in this situation can help save even more time. Mass Buttons (Bottom of Page): Transfer/Share Selected Leads By selecting one or more leads, and clicking the "transfer" button at the bottom of the page you can move these leads to any agent in the buyer/seller or aftercare side of the system. This is helpful for someone who is in charge of lead delegation. Mass Buttons (Bottom of Page): Trash/Untrash Trash or untrash large quantities at one time by selecting multiple leads and clicking on this button. 15 Mass Buttons (Bottom of Page): Add Status/ Remove status Add or remove the statuses in a mass quantity by utilizing this button. When clicking on “Add Status” you will notice all of your statuses will show up with the colored dot associated with each. Just simply click on the status you would like to add or remove to these leads, and it will immediately be applied. Tasks You can click on the magnifying glass on the manage leads page to drill down on tasks needed for completion. These show all of “Todays Tasks, Past Due Tasks and Future Tasks”. Clicking on the + icon allows you to quickly add a task for the given lead. Adding a task will sync to yours or the agents "Today’s Dashboard" based on the date entered. Clicking on the ! icon allows you to view all the past due tasks for the lead. Broker/Admin - when adding a task here you will notice you can add it for yourself or for the assigned agent. Lead Profile Blue buttons The lead profile page is an overview of all of the communications with a lead. In the profile you have easy access to transfer, share, trash or edit the profile. Any editing on the lead profile will reflect on the manage leads page as well. White buttons Just like covered on the manage leads page, here you have easy access to call, email, create a new task or note, add a drip or a call log all accessible at the top of the lead profile page. Lead Lifeline Under the profile you will notice the Lead Lifeline. Just above the “Lead Lifeline” text you will notice the amount of homes viewed by the lead on your consumer site, there average price point, any 16 showings that have been scheduled or the last time the user visited your consumer site. Lead lifeline is a snapshot of the communication you have had with the lead. When scheduling an appointment you will notice you can be date specific, give a title and a description to the event that syncs directly with your calendar. If you have enabled Google services it will also sync to your Google calendar. Under lead lifeline you have the ability to mark the lead as closed. Upon doing this it will ask for the closing date, once inserted it will move the lead to our aftercare section. Visit History By expanding this pod you will notice individual date/time history of the properties viewed by the lead. This is in order from the most recent to the oldest viewed. Clicking on the “view details” text can see further details. Upon doing so, the listing ID is clickable to take you directly to your consumer site to view the property listed. If the "mortgage calculated" field has a "yes" you can hover over to view the valuation selected by the lead. This is very helpful for any lenders you are sharing the lead with. Tasks By expanding this pod you will see all the tasks for the given lead in descending order of present, past due, future tasks. You can complete your tasks from this pod by clicking on the blue button. You can also edit and delete a task from here. If a task is completed in your Today’s Dashboard it will move that task to “completed here” in the lead profile. Add Showing After clicking on properties to show you will notice a pop up window allowing you to search properties by MLS ID number or address/location. Please note: If searching by address/location you must fill in the State/ Province and the City before being able to search. This property search is dependent on the MLS we have set up for your consumer site/ IDX feed. Once properties have populated you can view the thumbnail and details prior to choosing the exact property you would like. 17 After adding these properties you have the option to generate the driving route for the showing. Clicking "yes" displays the desired properties on Google maps with text description of your route on the left and the map view on the right of the screen Please note: The starting location is based on the office location of your brokerage. Additionally, you can reverse the route by clicking "start from here" or change the starting location by deleting the entry and inputting your current address. After generating the route you have the option to email the driving instructions to the lead or print to have a hard copy on hand. If you prefer to do neither you can be taken back to the lead profile by clicking on the blue button. Broker/ Admin – When adding a showing you can set a showing for yourself or choose an agent on your team from the drop down to assign it for them. Email Expanding the pod will display the last 3 emails sent or received from/to the selected lead. Here you will notice the analytics provided on each email, provided by Bomb Bomb. We are displaying if the email was: sent, delivered, opened, clicked, opted out or resulted in an abuse claim. The “Show All” button at the bottom of the pod will display a dashboard for all email communications with the lead. Additionally, the search bar will allow you to quickly search for specific parts of an email that you want to display. Notes Here the functionality is consistent with email as you can search any notes within our search bar as well click on "show all" to display all notes ever written for the given lead. You have the ability to add a note in the text box, as well as share with or notify the lender assigned to the lead. After saving you can click on the blue text on the note text to edit further. 18 Please note: If you share or notify a lender and there is no note currently assigned then the note will be saved for the time when a lender is shared with the lead. Call Log Expanding the pod will put all calls in descending order listing the newest first. Clicking on the blue text in the call log will give you the ability to edit. Clicking on "show all" will display all the call logs ever created for the given lead. You have the ability to add a call log by clicking on the blue call log button. Here you can adjust the phone number, assign a status for the number dialed and add any notes into the log text box. Please note: Assigning a call log status gives you many different options. The statuses are separated by “status, action and result”. Depending on the situation with the lead you have many different assigning options. Listing Alerts This is a tool used to automatically generate emails based on the leads previous search criteria. Our system will automatically begin to suggest listing alerts 24 hours after the lead has visited your consumer site. You can add these suggestions to the automatically generated listing alerts to ensure your clients have the most specific and targeted properties being emailed to them as they hit the market. You have the ability to choose the frequency of how often these emails are sent, as well as being date specific if you choose weekly or bi-weekly. Additionally you can select how many properties are shown in each email. The blue hyperlinked text seen when expanding the listing alerts pod allows you to view any properties created on that specific day that match your criteria. You can also edit and archive any of these listing alerts at your client’s request Please note: The hyperlinked text that brings you to your consumer site is only relevant for the specific time period outlined. It does not allow you to view current day activity but 19 only a snapshot of the specific criteria sent to the client in the past. Edit Listing Alerts This page allows you to select the exact criteria your lead is interested in for their new property. If a change occurs on either of those pages, it will also occur here. The best time to create a listing alert would be during a Vulcan dial session. While on the call with this lead you are able to narrow down and create a specific search that they are interested in. Please note: this page is identical to your "advanced search" dropdown on your consumer site, as well as the “ideal leads” page. The fields in “listing alerts” are customized for your MLS and are interchangeable based on the needs of your clients and your team. Communications Timeline Communications Timeline acts as a snapshot of the lead history for easy viewing. It also allows you to filter exactly what you are interested in seeing (Emails, calls, Notes, Visits, Showings, Listing Alerts) by default all filters are available to be viewed, but if at any time you want to view a specific filter just uncheck the box. If you share or transfer a lead the new agent should be able to get up to speed very quickly by reviewing the communication timeline for the lead. Drip Plans Drip Dashboard We structure our drip plans in 3 parts. You have your own plans, called "my plans', you have team plans - which are shared within your own team/brokerage, and we have "shared plans" these plans are uploaded via the whole Team Leads community. If you don't want to create a custom plan for yourself, we have a whole library of plans available in the "shared plans" section that you can copy over to your plans. Upon doing so you will be prompted to customize and or edit your copied plan to ensure you only send intended material to your clients. You can copy over as many plans as you would like however a plan will only be sent to your clients once it’s set to "active". 20 Add/Edit Plan Clicking on adding and/or editing a drip plan brings you to the same drip page called “edit drip plan”. When first loading this page you can create a name for your drip, and a description as well as adjust the share option of the drip plan. Tip: Since we have integration with Bomb Bomb we suggest that you create personal videos as steps within your drip campaigns. Emailing a video to a lead proves as another form of communication that can help enhance the chances for conversion. Pause Options Adding a pause option would be done when editing or adding a drip plan. Pause options are important because a plan will run for the allocated time unless you execute a pause option. Example: a plan with 20 days will run consecutively even if a client replies to an email or log a call, however if either of those are selected as a pause option it will immediately pause the drip from continuing. Only when you restart it manually will the plan continue. You can notice if a drip plan has been paused on the manage leads page by the color of the raindrop icon. If it’s yellow then it is paused, in which case you can click on the raindrop icon and see the reason it was paused by hovering over the status listed. Activity time of day This option can be seen when editing or adding a drip plan. It is located as the 5th option down the page. This functionality will be synced with your time zone, as it enables you to trigger what time of day your emails will be sent out. Please note: Choosing the activity time of day for a drip plan excludes step 1 in the plan. Step 1 will be sent out based on the wait time set when the drip becomes activated. 21 Auto Start Statuses Auto Start statuses are the next option in “edit drip plan” below “activity time of day.” All of the statuses you have created will appear here. Selecting statuses will ensure that when the lead is assigned a status or multiple statuses that your drip plan will automatically begin for that lead. Example: If you create a status called "new", you can have a corresponding drip plan called "new registration" that sends out as soon as you apply the status to the lead. This will give you the ability to send custom, automatic emails on a consistent basis targeted to a specific client just by assigning a status to the lead. Auto Start Drip Plans Once the drip plan finishes we have provided the option for you to create an automatic trigger to assign a new status to the lead. This is done from the “edit drip plan” page. After assigning a status you can also choose which drip plan will activate immediately following the completion of the current plan. This functionality is called "auto flow" and it allows seamless communication through the life cycle of a lead. Regular/Fixed Date/Holiday When on the “edit drip plan” page you have the option to write a custom drip plan based on a sending timeline specific for your needs, or you can write one to send on a specific date or holiday. These are the 3 choices you have through our system. All 3 provide the same functionality, and can overlap in sending patterns. Example: If I have a Regular plan set to send tomorrow, I have a Fixed Date plan for the day after, and a Holiday plan that follows the day after that - there will be 3 emails sent out from this plan on consecutive days. 22 You have the ability to repeat a step, as well as designating the timeframe in which each step is initiated. The wait time can be set to send hours, days, or months in the future. You have the option to set the communication type as an automated email, a task for the agents to call the lead, or to send a task reminder to physically mail a newsletter to the lead. The system knows when the lead is on your consumer site; therefore we have given you the ability to ask multiple questions based on the user activity. If you choose a question you can have either a yes or no response that you have pre formulated to send to the user - the system will automatically send the correct email based on the yes/no activity of the lead. Broker/Admin - You can select which agent sends out the drip - as the broker this is beneficial if you would like to set up a plan for one of your agents as the email will send as them. All steps in a drip plan can be moved up, down or deleted. We have also enabled the drag and drop functionality for easier movement of a step. Agents – BROKER ONLY Agent Dashboard Page - Here you will see all of your agents, a hyperlink to each of their profiles, as well as the description of their role within the company and email address. - You also have the ability to show them on the site as well as have them receive leads through a simple yes or no button. - For lead delegation purposes you can set how many leads are assigned to each agent per round. Agents can be deleted from this screen as well. - You have the ability to add an agent up to a limit of 10 agents. Any additional agents added will be at a fee and must contact Team Leads Support for assistance. - All of this functionality remains consistent when clicking on the lender tab on the page. 23 o Please note: There is a built in a drag and drop feature on this page that will reflect the order of agents displayed on your consumer site. Agent Edit Page You as the broker have the ability to edit any agents profile at any time, which could include their role within the company, their login info, image that displays on your consumer site, or how they would like to be contacted (text or email) for notifications to name a few. Also, we have given you the ability to set a "personal agent page" for each agent within his or her profile. This URL ensures they are the only agent that is showcased on the consumer site. One benefit of having this URL is so the agent can advertise or target strictly their clients. This can also be beneficial as they can market this URL through business cards, marketing apparel, magazine/newspaper/billboard advertising, etc. Whatever is added to the "signature" field in the agent’s bio will appear when the signature variable is added to any emails sent out. We have provided a rich text editor for building the signature; the editor includes images, links or different types of text. The phone number added to the profile will be used when notifications are sent to the agent. Please note: We advise all agents to input their cell phone number in their profile so they receive the notifications in real time when new leads are assigned to them. There is also an option at the bottom of the page that says, “Select an agent to share your future leads with”. This option allows the broker to share leads between agents automatically without having to do it individually. Coming Soon Dashboard - Coming Soon The Coming Soon dashboard will display any listings you have previously added as Coming Soon within the last 30 days. 24 Having this option allows the agent the ability to promote what the industry calls a "pocket listing". This functionality will allow you to promote the Coming Soon listing live on your consumer site prior to the property being listed on the MLS. This feature is helpful because it allows your client to see that you are promoting their property even before it is active on the MLS. The amount of time you are able to post it via your consumer site prior to it hitting the MLS is dependent on each real estate board and their specific regulations. Some boards differ from allowing it 24, 48 or 72 hours prior to the listing hitting the MLS. Please consult your board prior to posting. Add a listing Once you have made a listing you are able to remove or edit that listing if any of the details change, and these changes will reflect on the consumer site. To begin adding a listing you have necessary fields required for input such as: street name, street address, city, state, zip and property type. Please note: You must add at least 1 image for the property to show up on your consumer site. Additionally you can add as many photos as you would like, as well as entering any data into the fields available. All of this information will show up either in the property details or on the property thumbnail. Calendar Calendar View / Share – BROKER ONLY The broker view allows you to view your calendar, Google included if it’s synchronized. Agents and lenders are able to view their own calendars and will not have the option to view other member’s calendars unless they "share their calendar". The Google calendar of the agent will show here if they have synchronized it previously via the “Settings” tab. Broker/Admin - Your credentials allow you to view all of your agent’s individual calendars 25 Create Event Agents and lenders are able to view their own calendars as well as share their calendar with any member of their team for synchronization purposes. If other members share their calendar with an agent these will be able to view not only their own calendar but the shared calendar as well. Creating an event allows you to add to your Team Leads calendar as well as your Google calendar. Here you have the fields: title, date range, time range and description. Clicking on the event on your calendar gives you the ability to edit or delete this event. Coaches Corner Add – BROKER ONLY Coaches Corner allows Broker/Admins to "Add Videos" that their agents can watch. Agents can only view and not add videos. - To add videos simply click the "Add" button. - Provide a Title, Date, Time, Author, Video Link and brief post if you like. - After all fields are complete click save and your video will be instantly uploaded to the "Coaches Corner" page. This feature allows you to keep your agents up to date with important market reports, closing tips and any other information you feel would be benefit their success. Here is where you can train your agents on best practices and new techniques in the real estate industry. View This feature allows your team to stay up to date with important market reports, closing tips and any other information you feel would be benefit their success via YouTube videos. This section is meant for learning and improving. 26 Ideal Leads Dashboard Ideal leads is a reverse search lookup for leads most likely to purchase a specific property. This information can be easily found since all of the buyers searching behavior is tracked and recorded in our system. Now when a new home comes on the MLS all team members are able to input the listings credentials and perform a reverse search of their lead database. The system will begin to filter through the individual agents leads and begin to rank them in order of relevance. The more data a lead has that is similar to the inputted criteria the more ideal they are as a potential buyer. These leads will be displayed below the "Search" button rank in order with their % percentage to the right of the lead name. You will now have the ability call all "Ideal Leads" via the Vulcan dialer, which will be located below the list of leads. A "Select All" check box will be available once the search is complete. This functionality helps keep potential buyers up to date on new listings that could be a great fit for them. Priority Leads Tracking Priority Leads showcases very active leads on your consumer site. Our system has seven built in algorithms that track registered leads and rank them based on their activity on the consumer site, and their importance. To show up on our priority leads icon these leads would have had to do one or more of the following, in order of importance (each of these are given points so cumulative points mean highest ranking): 1. Has been on the site within the last 30 minutes 2. Calculated a Mortgage Payment within the last 3 days 3. Registered less than 2 hours ago 4. Logs back into site twice or more within 7 days 5. Favorite a house within the last 3 days 6. Viewed team listing 2+ times within the last week 7. Viewed this listing 2+ times within the last week Action Icons You have the ability to: send an email, add a new task, add a new note or add a call log for any of your priority leads while on this page. Additionally you can click on the leads name, which will bring you to their profile page. 27 Auto Tasks – BROKER ONLY Library Auto Tasks Auto Tasks are automatic tasks that a Broker/Admin can create based on an action that their agents regularly take. Example: Adding an auto task to "follow up call" a client the day following a showing. Adding this one time to auto tasks will ensure that it will be added to any agent’s tasks list the day following a showing. Auto Tasks can also be created based on the activity of a lead status. Example: If any agents have a hot lead that returned to the site within a specific time frame that agent will be notified via their task list to email/ call them if set up via Auto Tasks. This is a way to have complete accountability and oversight of your agents. Not only are you triggering tasks on their dashboard but you can also see if they are fulfilling those tasks. This is a way to make sure nothing falls through the cracks, ensuring they are doing the basic follow up with a lead that they might otherwise forget. We have "library auto tasks" that you can preview and copy over to use or you can add custom tasks yourself. Add Task Click on “Add Task” to add a relevant auto task that will apply to your entire team. Example: In the status dropdown: - Choose "Hot" - Task Trigger "returns to site after" - Choose "equal than", - Choose "2" and add the timeframe to "days" - Choose action to take "follow up call" and assignee "broker". 28 What this means: What we can see from this auto task created is: “Any hot lead that returns to the site within 2 days will trigger a task for the broker/agent to follow up and call this lead on their today’s task dashboard". You can also add a note that will be displayed in the task list if you want to be more descriptive of the task to your agents. Edit/Delete Task Once the auto task is created it will show on the auto task dashboard page and give you the ability to delete, deactivate or edit as needed. 29 Settings Front End Manage General Settings – BROKER ONLY Under "Manage General Settings" via the “Settings” tab we have the ability for the Broker to add their chat widget to their consumer site by pasting the embed code directly into our text box. After applying that code and selecting the save button the widget should appear on the consumer site immediately. We also have the ability to customize the price range that will appear on the consumer site's home page. Please note: This price range will only appear if a unique visitor has not performed a search. If the search has been performed previously the home page thumbnails will show properties relevant to the users previous search criteria. Lastly we have a "default sort" drop down: this allows the broker to set the sort for which properties they prefer to show on the "search" page. These range from "highest to lowest", to "days on market, new to old", etc. Having this feature allows brokers to further customize their consumer site ensuring the page they land on is the one targeted by the broker. Social Icon inputs are at the bottom of this page. By adding your team’s link(s) to your preferred social network(s) the icon(s) will appear and will be clickable in the footer of your consumer site. Manage Property Details Widgets & Display Info – BROKER ONLY Another setting you have the ability to customize is the property detail page on your consumer site. You can re-arrange the fields listed on the page by selecting your preferred fields through our drop down. Brokers have preference on what criteria he or she wants to display to their leads, and therefore we opened up the ability for them to adjust it themselves through our backend system. Adjusting these options will display on the property detail page in accordance with the selected fields from this page. 30 Manage Property Thumbnails – BROKER ONLY We have given further customization ability on your consumer site through the "manage property thumbnails" tab. Here you can manage all thumbnails in any view (grid, photo, map, and list) by adding and rearranging to your liking. The drop down allows you to pull the specific data you are looking for directly from the MLS, while you can add abbreviations and titles to each field that display directly on your consumer site. We have also given the ability for you to "show your MLS logo" on the thumbnails from a dropdown on this page. Please note: It is your responsibility to ensure you are RESPA compliant if you decide to remove the MLS logo. Cole Realty (Pre-authenticated login) - BROKER ONLY Cole Realty service is another integration that Team Leads provides to its users. Go to www.colereatlyresource.com to learn more. Cole Realty gives agents the ability to search a radius around any given address in their MLS. Upon searching this radius a list of addresses and email addresses are provided to the agent. The agent then has the ability to import those leads into the Team Leads system via the Prospective Tab on the Seller side. Example: Many people use this service if they just sold a house at 123 Flyway St. They pin that as the main address and get all addresses within a 5-mile radius of that location. Upon doing so they will send postcards/flyers to these addresses letting them know the sale price of their neighbor. This is just one way to use Cole Realty effectively. Upon clicking on the Cole Realty button under Settings you will notice a registration page where you can gain access to their system. From there you can import directly into Team Leads. 31 The same functionality exists when clicking on the Cole Realty icon on the Seller side of the system. If your account is active it will log you in, if it is not it will ask you to register. Please note: Current Cole Realty users should notify Team Leads of their subscription. Team Leads will notify Cole and access will be granted to use the interface directly from Team Leads either via the Settings Tab or directly by clicking on the Cole Realty icon on the Seller side. Manage Custom Pages – BROKER ONLY This page allows you to add and create content specific for certain cities within your consumer site. By adding this content you will increase your sites page rank and be in better position to achieve a greater organic rank through search engines. Additionally you are able to provide insight to your potential leads by giving them unique information on a certain area/location in your market. You can add as many locations that appear in your MLS as possible. The more detail and information you are able to give your users the more likely they are to stay engaged in your consumer site. Manage Testimonials – BROKER ONLY The manage testimonials tab is managed in the Settings tab of the Broker/Admins backend. From here you can add or edit any current testimonials that display on your consumer site under the “testimonials” tab. We have provided the ability for you to add a video as a testimonial or just strictly text. The fields available for input are: testimonial type, testimonial given for, testimonial given by, thumbnail photo and description. Manage Property’s Detailed Information- BROKER ONLY Our system has the ability to pull all of your MLS data and allow you to customize the location of this on your consumer site through "drag and drop" functionality. 32 You have the ability to create/edit heading names and move fields to within any heading you desire. This information will display in the “more details” section of the property detail page on your consumer site. Please note: Despite having the fields active in your backend system only the fields that are relevant to the specific property will display on the consumer site. For example: I could have “garage” active in manage property detail information under the heading “exterior”. However, if 123 Flyway St does not have a garage then this field will not display on the property detail page. Suggestion: Since properties have limited information we suggest adding as many fields as possible to your “manage property’s detailed information” page. This ensures that every property will have as many relevant listed fields as possible under “more options” for the users viewing pleasure. Manage Advanced Search Settings – BROKER ONLY Our system has the ability to pull all of your MLS data and allow you to customize the location of this on your consumer site through "drag and drop" functionality. You have the ability to create/edit heading names and move fields to within any heading you desire. This information will display in “advanced search” section of the consumer site. The 'search" bar is non editable however it does display so you can see the order of which your fields are positioned. Please note: whatever changes you make on this page will reflect on the "Add a Listing Alerts" expandable pod located 33 on the “Lead Profile” page as well as on the "Ideal Leads" page. We have the ability to provide your fields different options for displaying such as: checkbox, multi-checkbox, select box, multi select box, and text box. Please email support to customize these to your preference. Lead Widgets Search Widget We strongly advise you to add this widget to any websites you own that feature you as a real estate agent. This will help centralize all your leads in our system. Additionally, it will allow you to increase your lead count by simply adding our iframe code on your page. This gives the user the ability to search for homes on a site you own that currently doesn’t have this functionality providing them heightened usability. Here is an example of how the lead widget may appear on a site you own: http://www.theryandallasteam.com/custompages_reports/b1977.htm 3rd Party Integrations Gmail Manage Google Services allows you to sync your Gmail as well as your calendar with our system. You must have a Gmail account for the synchronization to work. It is not required but strongly advised that you sync your email with our system, as it will allow emails from your leads to funnel into their lead profile, as well as allow you to have your calendar in our system in sync with your Google calendar. There are 3 steps that must “MATCH” for your synchronization to work. 34 1. Your Bomb Bomb email listed needs to match your TL system email 2. Your email needs to be a Gmail address 3. You need to perform the sync by selecting the checkboxes on the page, clicking save and logging into your Gmail account Vulcan You can set up Vulcan 7 voicemail as well as view all of your call history from this tab. By clicking on either button you directly access the Vulcan system via a pop up which provides detailed instructions on how to proceed. Additionally, we have added all of the Vulcan 7 functionality to this window allowing you to view your summary, message library, do not call lists, disposition sets and settings tabs. Any changes on this page will be reflected during your dial session in our system. Bomb Bomb Once you send your first email through our system Bomb Bomb will auto generate a password, which will be display on this page. You can use this password to login to bombomb.com directly should you wish. Once logged in you have the ability to create videos, and templates that will seamlessly sync to our backend system. You can access these within our email sending functionality. Additionally, you have full access to any of the new features Bomb Bomb provides directly through their site. Templates Emails Email templates are similar to the way our drip plans are structured. You will be able to create your own templates, also use templates 35 created by your team and use templates that have been provided by the Team Leads community. Once you have created or copied templates you can then categorize them into customizable folders and subfolders which are identified by our expandable pod drop down arrow. You are able to "drag and drop" all of these templates to put them in the proper order or proper folder for organizational purposes. We have the ability for you to "preview" and "remove" all templates that you have created. We have provided numerous branded and nonbranded templates that cover a wide variety of different communication forms such as: seasonal, holiday, closings, staging’s, thank you, etc. All templates are readily available when sending an email on the right hand side of the email box under "use template". Through the email window you are able to "save as template" any email you feel would be beneficial to use again at a later date. Listing Alerts – BROKER ONLY We have customized a pre-written listing alert template for you to use. This is displayed under the “Listing Alerts” tab under “Headings” in the Settings tab. We have added this feature in our backend system so you can have input on displaying emails to your clients in your preferred fashion. We have included a rich text editor here for you to add styles, images to the template that you send out daily to leads. Additionally, you can adjust your settings on how often emails are emailed to your leads, and how many properties should show in each email. Please note: You can also customize this on a per lead basis by going into the lead profile under the "add listing alerts" tab. We recommend tweaking and viewing all emails prior to sending out by using the "preview" button and/or "send me test email" button. If you have added text that you wish to remove you can also use the "reset to default" button, which will pull up our standard listing alert template. Imports – BROKER ONLY 36 Leads Imported The leads imported button under “Settings” shows the history of all imports done. Here you will see: filename, source, date/time, and the status/results of the import. You can drill down further by clicking on the hyperlink under “status” to show you a more detailed report of your specific import. Manage Lead Import Sources The “manage lead import sources” option is accessible via the “Settings” tab. The source name shows any previously created imports. Here you can edit the name of the source for future imports, or delete the name history altogether Lead Import Template Lead import template allows you to customize the email that you choose to send to your clients. This functionality is the same as for our “Listing Alert templates” tab in Settings. This section allows you to edit the subject and body of the email that will be sent out to leads using our rich text editor to customize and format it to your liking. You can test or preview the email as well as “reset to default” if you made some changes you don’t want to save. When preparing the custom email you still have “auto replace variables” you can use to ensure the email that is sent out is specific to the lead its intended for. Some of the variables available are “Site URL, Lead First Name, etc.” You can test this functionality by adding it in the body of the email and then selecting “preview”. 37 SELLER SIDE Lead Profile Property Info The property info button is located inside the seller leads profile. Here you are able to customize and edit the leads address. You can manually input their address or you can select their property from the MLS button. Selecting it from the MLS is beneficial as this is one of the necessary steps in setting up a client for their market analysis emails. Upon filing it out and refreshing the page you will see their address appear in the lead profile as well as the manage seller leads page. Showing Feedback Showing Feedback is an expandable pod that is located in the Seller Lead profile page. This allows the agent to take notes, add the showing date and give a description of any showing information necessary for the property. The date field is required to fill out. Anything added in this pod is also accessible via the communications timeline. Market Analysis Market Analysis is an expandable pod that is located in the Seller Lead profile page. Market Analysis allows the agent to send an auto generated email to the lead on a daily, weekly or monthly basis. This allows your lead to be up to date and informed on properties similar to theirs in the MLS. This email includes all the details of the leads property i.e. # of beds, baths, square footage, etc. and then compares it against similar properties in the market. 38 The benefit of this is the lead is able to see exactly what their price is compared to other properties in their area with the same specifications. This analysis will give the total amount of properties that are similar to the leads property in that given zip code, it will narrow it down further to the type of home in that given zip code, and then even to the numbers of bedrooms/ baths and square footage in that given zip code. To activate the market analysis the agent must complete 3 steps such as: 1. There must be an assigned agent to the lead 2. There must be a valid property address, which includes city and zip code 3. The property info must have the type of home, the sq. footage, bedrooms and baths as well as price. Prospectives The Prospective icon is located on the Seller Side and is shown as a Vulcan 7 logo. The Prospective dashboard is going to update on a daily basis via Vulcan 7. Based on your MLS Vulcan 7 will be pushing prospective leads onto this page targeting specifically your preferences. Preferences range from: price point, cities, zip codes and statuses. Vulcan 7 has the ability to push leads into our system on a daily basis with the status of: expired, withdrawn or for sale by owner. These leads are not yet considered "active leads" therefore they must be qualified prior to making them a seller lead. There are a few different ways to sort through your prospective leads. 1. We have a search by: which includes first name/last name/email and phone number. 2. You can sort through status type, customize the date range, and add the type of communication you had with the prospective lead through a drop down box. The drop down box allows you 39 to filter prospective leads that you have or have not yet contacted to ensure no one gets overlooked. 3. You can also add notes on the prospective lead and create a mass dial session right from this page. The broker has the ability to view who the prospective leads are assigned to, and sort by agent name. 4. The clock on the left hand side in line with the checkboxes allows the user to sort by oldest to newest leads. 5. You also have the ability to click on the leads name and it will pop up a personal profile of that prospective lead. This will include the type of lead, the date they were uploaded and all contact information available. Additionally any notes will pass through in this pop up and a complete description of the property. You can make these prospective leads actual leads prior to calling them by clicking the "make lead" button for individual leads, these leads can also be trashed individually. The bottom of the page allows you to mass dial through Vulcan 7, trash or untrash a mass amount of leads and make multiple leads with one click of the button. Cole Realty Clicking on the Cole Realty icon brings you to the subscription page for Cole. Cole Realty is an additional integration that is provided in our system, and an additional fee of $395 annually which is paid directly to Cole through signing up in our system. You can access this under the Settings tab under "Cole Realty (Pre Authorized Login)". Cole provides unlimited neighborhood leads; you are able to pinpoint a specific neighborhood by doing a radius search. Within that search you will receive all contact information (phone number(s), address) from the properties within the radius limit. The unique part of having Cole Realty is you can target an abundant amount of properties around a given location and have the syncing 40 ability to import all of that data directly into our Team Leads system for qualifying and nurturing. For more information on Cole Realty please visit this link: http://www.colecommunity.com/four-steps-to-real-estate-success/ 41 Questions for Team Leads: 1 2 3 4 5 6 7 8 9 10 42