1
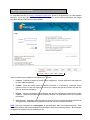
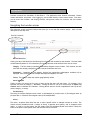
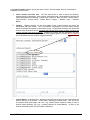
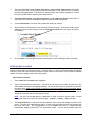
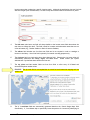
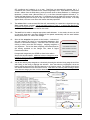
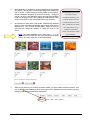
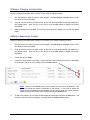
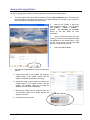
Film Location & Project Management On‐Line Solution Georgia Film, Music & Digital Entertainment Office (GFMDE) Table of Contents
WHAT IS REEL-SCOUTTM? ............................. 2 Reel-ScoutTM Benefits................................... 2 Reel-ScoutTM Technical Specifics .................. 2 STARTING REEL-SCOUTTM ............................. 3 LOCATIONS .................................................. 4 Navigating the Location screen .................... 4 Narrow Results by ........................................ 4 Search by alpha ........................................... 4 Sort Results by ............................................ 4 Action… ....................................................... 4 Prev | Next .................................................. 5 Location Title ............................................... 5 Adding a New Contact ................................ 27 Exporting Contact Data ............................... 29 CLIENT PROJECTS ....................................... 30 Navigating the Project screen..................... 30 Narrow Results by ....................................... 30 Search by alpha.......................................... 30 Action… ..................................................... 31 Prev | Next ................................................ 31 Entering Projects ........................................ 31 Add Project Information ............................... 31 Adding Contact Information ....................... 37 Recording Client Correspondences ............. 40 Finding a Specific Location ........................... 5 Recording Locations Used by Project .......... 41 Entering New Locations ............................... 8 Add Location Information .............................. 8 Searching for an Existing Project ................ 42 Adding Location Contact Information ........ 13 Adding Location Photos ............................. 16 Editing, Copying or Removing Projects ....... 44 Exporting Project Data ............................... 46 Editing or Changing Location Data ............. 19 PACKAGES .................................................. 48 Adding or Removing a Contact ................... 19 Creating a New Location Package ............... 48 Removing or Editing Photos ....................... 20 Viewing a Package as Seen by Client .......... 55 Moving and Copying Photos ....................... 21 Copying an Existing Package ...................... 58 Reviewing Location Statistics .................... 22 CREW .......................................................... 60 Exporting Locations Data ........................... 23 Navigating the Crew screen ........................ 60 Narrow Results by ....................................... 60 Sort Results by ........................................... 60 CONTACTS .................................................. 24 Navigating the Contact screen ................... 24 Search by alpha .......................................... 24 Sort Results by ........................................... 24 Prev | Next ................................................. 24 Action… ...................................................... 24 Looking Up a Specific Contact .................... 25 Narrow Results by ....................................... 25 Editing, Copying or Removing Contacts ...... 26 Open Registration ....................................... 61 Approving Crew Records ............................ 66 Logging Off ................................................. 68 FREQUENTLY ASKED QUESTIONS ............... 69 What is Reel-ScoutTM?
Developed specifically for the Film Commission Office, Reel-Scout TM is a digital film library that is fully
integrated with project and client management. It is driven by a web-based response system.
The application stores each location’s description and profile as well as associated contact information. It then
combines a comprehensive contact management system containing project and client data with the digital
library to create online, customized, URL “packages.” These packages are accessed by the location scout and
production studio representatives via a short, personalized email message — thus avoiding the transmission of
large image files and text descriptions.
Reel-Scout TM is an easy-to-use, yet sophisticated film location management solution designed to help film
commissions leverage proven technology to respond faster and more accurately to the specific needs of its
clients all while making themselves an integral part of the site location process.
Reel-ScoutTM Benefits
•
•
•
•
•
•
•
•
Reduces the response time from 3 - 4 days to 3 – 4 minutes
Develops the relationship with the location scout faster
Saves hundreds of dollars in postage annually by sending only the “agreed-upon” locations
Saves hundreds of hours of staff time annually in administrative tasks
Cross-references all images in dozens of ways (by name, by county, by city, by type, by
period, etc.) for easy searching
Cross-reference projects with clients and clients with projects
Accessible anytime, from anywhere
No software installation required for location scout
Reel-ScoutTM Technical Specifics
Reel-Scout TM is a web-based application written using Microsoft technologies (IIS, ASP.NET, AJAX, HTML,
JavaScript) with a Microsoft SQL Server 2008 relational database engine. Reel-Scout™ is architected as an N-tier
system with ASP.NET running on the .NET Framework 3.0. The application is best viewed in Mozilla Firefox 3.5,
Google Chrome 6.0, Apple Safari 5.0 or Internet Explorer 8.0 or higher. Uploading images will require that the
Adobe Flash 10.0 or higher be installed.
Reel-ScoutTM – Locations. Contacts. Projects. Crew.
Page 2
Starting Reel-ScoutTM
To access Reel-ScoutTM, go to http://filmimages.itt.state.ga.us. Access to the application is on a user-assigned
basis only. Initial User Logins and Passwords have been created for current staff and affiliates of the Georgia
Film, Music & Digital Entertainment Office (GFMDE).
There are several major components of the Reel-ScoutTM system:
1. Locations – Simplifies all aspects of location library management. Location information and images can
be easily added and updated.
2. Contacts – Stores the contact names and relevant information in a confidential, centralized, shared
location to allow for easy and single point of entry for contacts that typically interface with the Film
Office in more than one capacity.
3. Projects – Captures the prospects and productions that the Film Commission has dealt with in various
capacities. Production information can be tracked in as much or as little detail as the Film Commission
has/requires.
4. Crew (optional) – Organizes a production directory listing of all local crew and support services based on
the registrations of individuals and companies on-line from the Film Commission’s website.
NOTE: Each major component has a subnavigation, or sub-components, below the component selected. These
components and their related sub-components are described in detail in the following sections. When selected,
the appropriate component will be underlined in red.
Reel-ScoutTM – Locations. Contacts. Projects. Crew.
Page 3
Locations
Locations constitute the foundation of Reel-ScoutTM. The application stores location information, location
contact information, and photos. After logging on, you are taken directly to the Location screen. From here,
you can enter new locations, edit existing locations, add pictures, search for locations, and view location
statistics.
Navigating the Location screen
This interactive screen has several features that allow you to sort and find locations quickly. Here is a brief
description of how they work.
Narrow Results by
Clicking into any of the fields from the following list will sort all the locations by that attribute. The other fields
will automatically default to ‘all’ because only one sorting selection can be selected in the view at a time.
Category – The film industry’s standard classifications assigned to each location. Each location can have
more than one category assigned to it, thus it may be listed more than once.
Subcategory – Depending on the category selected the appropriate subcategories available will be
displayed. Each location can have multiple subcategories assigned to it as well.
County – The county in which the location geographically resides.
Search by alpha
Clicking a letter will narrow the sort only to those records that start with that letter. For example, if the
locations are sorted by category = ‘Businesses’, clicking the letter C will list a location such as Capitol City
Cleaners which is identified as a ‘Business’. Clicking All will show all records in alphabetical order by the sort
(name, category, or county).
Sort Results by
The listing of locations displayed can be sorted: 1) Alphabetically by location name, 2) Chronological order by
file open date, or 3) Reverse chronological order by last modified date.
Action…
The action… dropdown field allows the user to take a specific action on multiple locations at a time. The
actions currently available include: 1) Assign to Group, 2) Approve (show public), and 3) Unapprove (hide
public). In order to run the actions, the user simply clicks the checkboxes beside each location, selects the
action to be taken in the dropdown field, and clicks the blue arrow button.
Reel-ScoutTM – Locations. Contacts. Projects. Crew.
Page 4
Prev | Next
Clicking on these words allow you to page backwards (prev) and
forwards (next) through the list of locations. The application currently
displays five location listings per page for ease of viewing.
YOU CAN ALSO USE YOUR
WEB BROSWER BACK BUTTON
Location Title
Each location’s title is listed next to the first photo of the location and
appears underlined when you hover or cursor over the record. By
clicking on the location title, you can view the detailed location information.
TO MOVE TO A PREVIOUS
SCREEN OF LOCATIONS
Finding a Specific Location
One of the powerful features of Reel-Scout TM is the ability to find places quickly that meet the location scout’s
criteria.
1.
Click search option under the location from the menu list. Note that clicking the location button
itself on the gray bar defaults to the browse option.
Reel-ScoutTM – Locations. Contacts. Projects. Crew.
Page 5
In the Search Locations window, type in your search criteria. The search page allows for a multitude of
combination of search terms.
a.
Search Locations (free-form text). The text entered here is used to search the following:
matching category, subcategory, style, keyword, OR location name. Values entered in this field are
used to apply partial text matching – in other word, a search for ‘MAR’ will return: Location name =
‘Marriott Austin’; Location name = ‘Delmar Beach’; Category = ‘Markets’; Style = ‘Italianate
Marble’.
b.
Category. Category searches are the most popular search criteria because the results are
standardized and most reliable. Once the selection is highlighted, the arrow button pointing
downward will add the selection to the location record. The upward arrow button will remove the
selection from the location record. Hold down the CTRL key while clicking to select more than one
category and then click the arrow button. If desiring all locations that are identified to the main
category, regardless of subcategory, select the main category-[general]. Use the search categories
link for assistance with searching the categories database.
c.
Location Name is a free-form field. Searching in this field can be partial for the initial letters and
words of the title of the location. In other words, searching for location name = ‘mar’ will return
all locations whose name begins with ‘mar’ (e.g., Market Square in Monroe County) as well as
location names containing ‘mar’ (e.g., Lohmann’s Marriott at Central Market). An entry in the
location name field will also check for values in AKA name.
Reel-ScoutTM – Locations. Contacts. Projects. Crew.
Page 6
d.
Location ID# and Photo ID# are also free-form fields. However, they require exact character
searching.
e.
Address is a free-form search field. Results will be pulled for all locations whose Address1 or
Address2 fields match the search criteria.
f.
Region and County fields are single-select drop-down search fields. A value of ‘All’ returns
locations that meet all the criteria selected, regardless of the region or county in which they
reside. Note that when a county is selected, the screen immediately refreshes and the
corresponding region is displayed. The City/Town field is a free-form search field. However, it
requires exact character searching
g.
Within Zip Code is a single-select field that allows the user to select from 1, 5, 10, 20, 50, and 100
miles from any specified US-based zip code.
a. Style is a single-select search field that defines the architectural period or style that is attributed to
a location. Use the blue arrow buttons to move selected values to the right side search criteria.
b. Keyword is a single-select drop down search option. In other words, only one main keywordspecific search can be conducted at a time. These values are custom and set by GFMDE by the
assigned System Administrator.
c. Last Scouted For, Last Scouted By and Filmography are also free-form fields. They require exact
character searching.
d. Last Modified By is a drop-down field whose values are all the users assigned in the system. This
searching function allows the user to pull all records modified by a specific user over a date range
or period of time.
Reel-ScoutTM – Locations. Contacts. Projects. Crew.
Page 7
2.
The photos all locations, only locations with photos or only locations without photos radio boxes
will allow you to filter out any locations that have information in the system but do not currently
have any photographs posted. This function is especially useful when creating a package for a client
but you only want locations that have photo representation.
3.
The approved all locations, only approved locations or only unapproved locations allows users to
easily filter out locations whose data and images have been reviewed and approved.
4.
Click the search button to return all the locations that match your criteria.
5.
Search criteria are summarized in a text box above the search results. If the search results require
additional criteria or further filtering, click the refine search criteria link at the top left of the text
box summary.
6.
Or click search in the subnavigation menu to reset the search criteria and begin a whole new search.
Entering New Locations
Entering a new location is a three-step process. You will be able to: 1) enter the information about the physical
location, 2) enter the contact data for the person/company related to the location, and 3) upload an unlimited
number of electronic images or photo files of the location.
Add Location Information
1.
Click on add under the location menu navigation.
2.
Type in the information for the location. You must enter the name of the location, and then enter any
other needed information in the appropriate boxes. You can use the tab key to move quickly to the next
box while typing. Adding a new location in the library is very easy because the only information that is
necessary to create a location in the database is the location name, city/town, and category. These
fields are indicated with a * by the field label and are circled in RED below. All other field data can be
entered at a later date when the information is known.
NOTE: You must click the next button or done button in order to move to the next screen. Screens
during ‘Add’ mode move in the order that they appear. Location >> Contact >> Photo (see tabs).
3.
The location name field is a free-form text field required in order to save and catalogue a location in the
library. The name is not required to be unique. In other words, the library will store two locations with
the exact same name. The differentiator will be the location id# which is a unique identifier
automatically assigned by Reel-ScoutTM for each location record. You can use the location id# or the
Reel-ScoutTM – Locations. Contacts. Projects. Crew.
Page 8
location name when conducting a specific location search. Although the application does not limit the
character length of the location name, it is best to keep the location name to 30 characters or fewer.
4.
The AKA name (also known as) field will always default to the location name field value unless the
user elects to change the value. This field is used for locations with alternative names that are not
its formal names (e.g., Panther Stadium vs. Bank of America Stadium).
5.
The address field includes two free-form text fields and is not required in order to catalogue a
location in the library. Use of this field is primarily for internal recording purposes only.
6.
The city/town field is a single-select drop down selection field. Selecting the city/town value will
automatically determine the county, region, and state values. Please contact your System
Administrator if you believe these values to be incorrect.
7.
The zip, phone and fax number fields are free form fields to allow entry of US-based and
international phone number values.
REMINDER: The zip code field is not required but is critical for both interactive mapping and live
weather data.
8.
The X, Y coordinate fields are automatically generated based on the ‘Search Google Maps’ field
functionality. X, Y coordinates help to specifically locate the position of a location by identifying its
Reel-ScoutTM – Locations. Contacts. Projects. Crew.
Page 9
GPS coordinates and rendering it on a map. Reel-Scout can automatically generate the X, Y
coordinates once a value is entered into the ‘Search Google Maps’ field. Valid values for the field can
include: address from the fields above, points of interest (such as ‘Mount Rushmore’ or ‘Washington
Monument’), location name (‘Brevard Hotel, NC’), or the exact latitude/longitude collected (X, Y).
Clicking the map it button will render the X, Y coordinates as well as display the location on the map.
You can then drag and move the pin on the map if the location displayed is not accurate. If the map
appears blank, zoom out to see where the location has been pinpointed.
9.
The website field is a web-oriented field that will automatically be created into a hyperlink once the
done or next button is clicked. You do not need to enter in ‘http://’ to ensure that Reel-ScoutTM
recognizes the hyperlink field. The ‘http://’ will automatically be concatenated to the field value to
ensure that the link works when clicked in view mode.
10.
The email field is coded to recognize appropriate email addresses. In view mode, the user can click
on the email value and a new mail message will be opened automatically with the email address
already listed in the ‘To:’ field of the message.
11.
Select all the categories that pertain to the location. A selection of
the main category will result in a pre-populated subcategory field
relevant to the selected category. Hold down the CTRL key while
clicking to select more than one category. Assigning categories is
very important. The list has been completely customized based on
the existing standards at the Georgia Film, Music & Digital
Entertainment Office.
Pre-approved categories by the GFMDE are listed in the table in
Section 8 of this user manual. Additional values or changes are to be
notified to the System Administrator. (“Admin” level access can
make these changes.)
12.
SELECTING SEVERAL
CATEGORIES WILL MAKE
MORE OPTIONS AVAILABLE
WHEN DOING A SEARCH
FOR A CLIENT
You can also directly map categories to a location by browsing the selection listing using the scroll bar
and clicking on the listing to highlight the selection. Once the selection is highlighted, the arrow
button pointing downward will add the selection to the location record. The upward arrow button
will remove the selection from the location record. Hold down the CTRL key while clicking to select
more than one category and then click the arrow button.
Reel-ScoutTM – Locations. Contacts. Projects. Crew.
Page 10
13.
If you need assistance in selecting the appropriate categories for a location, click the search
categories button. Once clicked, a new window is presented that allows you to free-form enter any
value that you would like official search categories for. This function frees the user from having to
recall specifically the main category and/or the subcategory that have been included for the system.
Options will automatically appear in the bottom box. To select categories desired, highlight the
category and click the add button. Hold down the CTRL key while clicking to select more than one
category and then click the add button.
14.
The style field is multi-value selection field, in other words, it can retain more than one value.
Please use the blue arrow keys to select all styles that are applicable to this location.
15.
The keywords field is a multi-valued selection list that includes values customized for the GFMDE.
These keywords are used for items or aspects of a location that are unique and often used when
searching.
16.
The description, site condition, general notes, and usage restriction fields are all free-form textbox
fields with a maximum of 4000 characters stored per field.
17.
The floors field is a drop down box containing values: 1 – 5, 6 – 10, 11-25, > 26. The field is related to
the number of floors or stories that the property holds. The system defaults to no value or ‘--’
selected when adding a new location.
18.
The permit, fees and ownership fields are radio button fields that will accept only one value
(typically Y, N or no choice). These fields relate to the financial and ownership aspects of the
location and are not a required field of input in order to record the location in the database.
Reel-ScoutTM – Locations. Contacts. Projects. Crew.
Page 11
19.
The filmography and directions fields are free-form textboxes with a maximum of 4000 characters stored
per field. GPS coordinates can also be store in Reel-Scout™ using the source, x coordinate, and y
coordinate fields.
20.
The last scouted by and last scouted for fields are free-form text fields. Use these fields to note when
the location was last scouted and for what production. The last scouted date field is date-formatted as
MM/DD/YYYY.
21.
The hidden group drop-down field drives access control and security to location data in Reel-Scout™. For
those film offices that divide locations into various groups, this field is applied.
NOTE: Depending on the user logged into the system, the field value will default to the group in which
the user belongs. However, the user can change the value to a different group in the list but once saved
the user will not be able to view this location unless he/she belongs to the ‘All’ group.
22.
The approved (show public) checkbox is available for film offices with several resources with varying
responsibilities. This function allows the organization to have some users adding/uploading locations and
other designated users reviewing and approving this data for public use.
NOTE: When a location has been marked approved, the yellow highlighting in the browse view is
removed to clearly identify the location as having been reviewed and marked approved for public use.
23.
Click on the next or done button once you have completed all the data entry for the location page.
Clicking next moves the user to the Contact tab of the location entry. Clicking done moves the user back
to the Browse location listing. No data will be saved if you do not select one of these options. All fields
are controlled for display or non-display on client packages within the Configure component.
Reel-ScoutTM – Locations. Contacts. Projects. Crew.
Page 12
Adding Location Contact Information
1.
If the user elects to click next, the application automatically moves to the contact tab page.
2.
The first step to adding a contact to the location is to check to see if the contact is already in the
database. To do this, enter the contact’s first and/or last name and click the lookup button.
3.
When the lookup button is clicked, a set of results will be returned to you in a new window. If you
see the contact that you are looking for, click the green select check next to the appropriate name.
If you do not see the contact you are looking for, you can either search again (by entering variations
of last/first name and clicking the search button) or you can enter the name from scratch.
NOTE: Additional search fields are available including the project, organization and notes
fields should the first and last name fields not be available.
Reel-ScoutTM – Locations. Contacts. Projects. Crew.
Page 13
4.
If you are entering a contact person’s information from scratch, the only required fields are first
name and last name in order to add a new contact record. Adding a contact record here
automatically links the contact person to the location and places them into a generic contact
database so that you can pull their record up again should they be relevant to another location or
project.
5.
The title and organization are free-form text fields and are not required.
6.
The phone1, phone2, mobile, home, pager and fax number fields are free-form fields to allow for
both US-based and international phone numbers. Please apply appropriate US-based phone number
standards.
7.
The website field is a web-oriented field that will automatically be created into a hyperlink once the
done or next button is clicked. You do not need to enter in ‘http://’ to ensure that Reel-ScoutTM
recognizes the hyperlink field. The ‘http://’ will automatically be concatenated to the field value to
ensure that the link works when clicked in view mode.
8.
The email1, email2, address, city/town, zip/postal code and country fields are all free-form text
fields. The state/province field is a free-form field to accommodate both domestic and international
addresses.
9.
The film-friendly? checkbox allows staff to quickly mark contacts that are strong industry supporters.
NOTE: Fields within the shaded area can be marked confidential by clicking the checkbox
field designated with a gold lock icon
in the upper right corner of the shaded area. If
flagged, these fields will not display when printed via the ‘Print Friendly’ button.
10.
The notes field is a free-form text field with a 4000 maximum character limit. This field should be
used sparingly for non-critical data regarding the contact.
Reel-ScoutTM – Locations. Contacts. Projects. Crew.
Page 14
11.
The contact type field is a multi-valued selection list that includes values customized for the Georgia
Film, Music & Digital Entertainment Office. These contact types are used to categorize and group
various types of GFMDE contacts and are helpful when searching.
12.
The active contact checkbox defaults to being checked. This field indicates whether this contact
person is still effectively in the role/position with the designated organization. It is recommended
that all contacts remain in the database for historical point-in-time referencing. If the contact is no
longer with the organization or the data is no longer accurate, it is best to uncheck the active contact
field as opposed to deleting the contact altogether from the database.
13.
Once you are finished with entering all the data on the contact person, click the add button. You will
notice that the contact now appears in a listing below the Add New Contact section. A red ‘X’
button appears beside the contact name to allow the user to remove the relationship between the
location and this particular contact. Please note that clicking the remove button will remove the
contact person only from the location and not from the entire contact database.
14.
Click on the next or done button once you have completed all the data entry for the contact.
Clicking next moves the user to the Photo tab of the location entry. Clicking done moves the user
back to the Browse location listing.
Reel-ScoutTM – Locations. Contacts. Projects. Crew.
Page 15
Adding Location Photos
Each photo image must be in JPEG format and can be stored in the highest resolution that the Film Commission
needs. General resolution and sizing standards for Georgia Film, Music & Digital Entertainment Office are:
9
9
9
9
9
144 - 150 dpi
file size between 200 KB – 1 MB
JPEG compression = 7 good quality
1280 x 1024 resolution (or higher) for large size web browsing
physical photo size no larger than 8.5” x 11” (to allow for standard size page printing)
NOTE: Consideration should be given to the trade-off between size and resolution of image for internal use and
printing as compared to what is best for the client to receive. In other words, the system is capable of
uploading and storing a 10MB image, but is that size of image the best size to send as an electronic package to
the client?
Be sure that these files are accessible to your computer (e.g., on the g:\GFMDE\ shared drive or on a CD-ROM
disk). Images that can be uploaded to Reel-ScoutTM include: digital photos, digital photos that have been
stitched with a software program, scanned photos, etc.
There are two methods to uploading image files to Reel-Scout. The first and quickest method is using the Flash
Uploader which is defaulted on the Photo Tab. The second method is the Basic Uploader which is best used
when selecting specific individual images from multiple sources.
OPTION 1 - FLASH UPLOADER
1.
Enter a date for the image in the date taken field. This field is date formatted and will only accept
MM/DD/YYYY and automatically defaults to the current date. For ease of upload, the date taken
value entered is stored until changed so that the user does not need to reenter the date each time.
2.
Enter the photo credit (or source) of the
image and add appropriate photo notes
if needed.
3.
Now click the Browse for Images button
to locate the image files. This will open
the ‘Choose File’ window where the
folders and drives of the computer will
be displayed. By expanding or collapsing
the directory tree, find the file and click
on it. If there are multiple files that are
to be uploaded, hold the CTRL key to
continue the selection. If all the images
in the folder are to be added, select all.
Click Open. The window will close and
the file name(s) will appear in the file
listing table along with each file storage
size.
4.
At this point the user can click Upload.
Once the upload button is clicked, the
file listing table will display the progress of each file upload via a green progression bar. It should be
noted that these fields are to be used when the image files are less than 1MB each; otherwise, the
upload process may be disconnected due to network limitations. Once the upload is completed, the
page will automatically refresh and all images will be displayed in thumbnail size.
Reel-ScoutTM – Locations. Contacts. Projects. Crew.
Page 16
OPTION 2 - BASIC UPLOADER
NOTE: To toggle between the two upload methods, click on the
link below the Upload button.
1.
In the filename field, type in the location of the file. If you do
not know the exact location, click on browse. This will open the
‘Choose File’ window where you will see the folders and drives of the
computer you are working on. By expanding or collapsing the directory tree, find the file and click on it.
Click Open. The window will close and the file name will appear in the file box.
2.
Enter a date for the
image in the date taken
field. This field is date
formatted and will only
accept MM/DD/YYYY and
automatically defaults to
the current date. For
ease of upload, the date
taken value entered is
stored until changed so
that the user does not
need to reenter the date
each time.
3.
Enter the photo credit
(or source) of the image
and add appropriate
photo notes if needed.
4.
At this point the user can click upload. However, if he/she wishes to upload multiple images with
similar, a series of nine other filename fields are available. To add more image files, the user simply
clicks the browse
button by each field
to locate the others.
It should be noted
that these fields are
to be used when the
image files are less
than
1MB
each;
otherwise,
the
upload process may
be disconnected due
to
network
limitations.
NOTE: If photo
credits or photo notes
are left blank, no data
or field labels will be
displayed. Otherwise,
the data is shown in
the slideshow as seen
below.
Reel-ScoutTM – Locations. Contacts. Projects. Crew.
Page 17
5.
6.
Upon completion, a thumbnail or series of thumbnails of the photo(s)
will appear. This may take a moment depending on the location and
size of the file. If there are photos already loaded for this location,
the new thumbnail will appear at the end of the listing. During this
process, not only is the application storing the large high-resolution
version of the image, but it is also creating the medium (screen-size)
version of the photo as well as the thumbnail for easy reference.
At the bottom of each photo is the number (automatically defaulted
based on order the image was uploaded) that controls which photo is
displayed first. This is called the sort order. Simply click on the
field and then change the numbers to change the order of the
photos.
WHEN BROWSING FOR A PHOTO,
IT IS EASIER TO SEE A
THUMBNAIL PREVIEW OF THE
PHOTO IN ORDER TO LOCATE
THE SPECIFIC IMAGE THAT YOU
NEED. THEREFORE, THE PHOTO
TAB ALWAYS DEFAULTS TO A
THUMBNAIL LISTING WITH
PHOTO TITLE FOR EASY ACCESS
NOTE: The image identified as sort order value = ‘1’ is the
thumbnail that is presented in the client package and locations
listings. This is the ‘hero shot’ of the location series.
7.
AND REFERENCE.
When all the photos for the location have been loaded, you have finished with that location! Now
click on browse under location to return to the main screen. Remember that each location can have
multiple images or photos attached to the location.
Reel-ScoutTM – Locations. Contacts. Projects. Crew.
Page 18
Editing or Changing Location Data
Editing or changing information about a location is very similar to adding a location.
1.
Find the location to which you wish to make changes. See Searching for Locations section of this
User Guide for more information.
2.
Once you find the location you want to edit, go into the record by double-clicking the thumbnail or
the location name. Once you are in the record, click the edit button to change the location
information.
3.
Make the changes and click done. If you do not want to save your changes, you can click the cancel
button.
Adding or Removing a Contact
Editing or changing information about a contact for a location is very similar to adding a location.
1.
Find the location for which you wish to make changes. See Searching for Locations section of this
User Guide for more information.
2.
Once you find the location you want to edit, go into the record by double-clicking the thumbnail or
the location name. Once you are in the record, click the edit button to change the location
information.
3.
Click on the tab for contact.
4.
Locate the contact person in the listing. If you would like to remove the contact person’s relationship
to the location, you can do so by clicking on the red remove button.
NOTE: Clicking on the remove button will not delete the record from the database. This
action will remove the contact’s relationship to the location. If you’d like to delete the
contact record completely from the database, you will need to enter the contact record by
double-clicking on the contact name and then selecting the delete button.
5.
To add a new contact, you can enter the data about the contact and then click the add button. You
will notice that the contact now appears in a listing below the lookup contact section.
Reel-ScoutTM – Locations. Contacts. Projects. Crew.
Page 19
6.
To add a contact already in the database, enter the
contact’s first and/or last name and click the lookup
button.
7.
When the lookup button is clicked, a set of results will
be returned to you in a new window. If you see the
contact that you are looking for, click the green select
arrow next to the appropriate name. If you do not see
the contact you are looking for, you can search again
by entering variations of last/first name and clicking
the search button.
8.
Click done to exit the screen.
Removing or Editing Photos
Editing or removing photos within a location is very similar to
adding a location.
1.
Find the location in which you wish to make changes.
See Searching for Locations section of this User Guide for more information.
2.
Once you find the location you want to edit, go into the record by double-clicking the thumbnail or the location
name. Once you are in the record, click the blue edit button to change the location information.
3.
Click on the tab for photo.
4.
View the thumbnails of all the
images for that location. Click on the
photo you want to remove or edit.
5.
A window will open where you
can change the date taken and photo
credits and notes fields.
6.
Once the changes have been
made, click the save button to save and
close out of the window. If you do not
want to save your changes, you can click
the cancel button.
7.
To delete the single photo, click
the delete button. You will be asked to
confirm the deletion. Click ‘yes’ when
prompted to confirm.
8.
To delete multiple images at a
time, click the checkbox beside the
photo ID under each thumbnail image
and then click the delete selected button. You will be asked to confirm the deletion. Click ‘yes’ when
prompted to confirm.
9.
Click done to exit the screen.
Reel-ScoutTM – Locations. Contacts. Projects. Crew.
Page 20
Moving and Copying Photos
Moving or copying photos within a location is very similar to removing or editing a photo.
1.
To move the photo from one location to another, click the copy to clipboard button. This action will
post the image to a virtual memory location in the system and allow for the user to go to any other
location and paste the image to the new location.
2.
Now find the location in which you
wish to move the image to. You can either
click location — search or location —
browse.
See Searching for Locations
section of this User Guide for more
information.
3.
Once you find the location you want
to edit, go into the record by double-clicking
the thumbnail or the location name. Once
you are in the record, click the blue edit
button to change the information.
4.
5.
Click on the tab for photo.
The clipboard image displays in a gray box with three
options.
a. Copying this image to this location will keep the
original image in the original location and the
system will maintain duplicates of this image.
b. Moving this image to this location will remove the
original image in the original location and the
system. The clipboard image will no longer be
available once this action is completed.
c. Removing the image from the clipboard clears the
virtual memory block and no longer displays the
gray box to the user.
d. Click done to exit the screen.
Reel-ScoutTM – Locations. Contacts. Projects. Crew.
Page 21