1
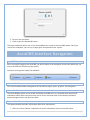
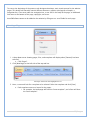
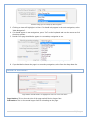
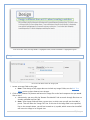
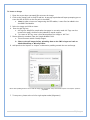
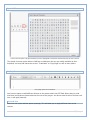
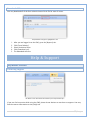
Google Chrome 4.0
AccuCMS
Outline
Contents
Google Chrome 4.0 .............................................................................................................................. 4
Thank you for choosing Blue Archer ............................................................................................... 4
As an AccuCMS user you can: .......................................................................................................... 4
Getting Started ...................................................................................................................................... 4
AccuCMS allows you to: .................................................................................................................... 4
Logging in to AccuCMS ........................................................................................................................ 4
To access the system: ....................................................................................................................... 4
Login Failed ........................................................................................................................................... 5
Forgot the password? ....................................................................................................................... 5
AccuCMS Overview ............................................................................................................................... 6
Content Module ................................................................................................................................. 6
Users Module ..................................................................................................................................... 6
Reports Module ................................................................................................................................. 6
Help .................................................................................................................................................... 7
Log Out .............................................................................................................................................. 7
Accessing the Modules ..................................................................................................................... 7
Content Module Overview .................................................................................................................... 7
Pages Module Overview ...................................................................................................................... 7
Page Fields ........................................................................................................................................ 9
Creating a Page ............................................................................................................................... 10
SEO ................................................................................................................................................... 12
Dual Navigation ............................................................................................................................... 13
Headers & Sub Headers .................................................................................................................. 14
Images.............................................................................................................................................. 15
Rich Text Editor .................................................................................................................................. 16
Removing Formatting ..................................................................................................................... 16
Creating Links ................................................................................................................................. 16
Content Images ............................................................................................................................... 19
Creating a Table .............................................................................................................................. 21
Horizontal Line ................................................................................................................................ 22
Special Characters ........................................................................................................................... 23
2|Page
Styling Text ...................................................................................................................................... 23
Styles & Font ................................................................................................................................ 23
Paragraph Format ........................................................................................................................ 24
Size ............................................................................................................................................... 24
Formatting Options ..................................................................................................................... 24
Bulleted and Numbered Lists ......................................................................................................... 25
Creating a Form .............................................................................................................................. 25
Completing The Page ...................................................................................................................... 27
Navigation Overview ........................................................................................................................... 27
Main Navigation .............................................................................................................................. 27
Sub-Navigation ................................................................................................................................ 28
Files Module Overview........................................................................................................................ 29
Folders ............................................................................................................................................. 29
Moving Files ..................................................................................................................................... 30
Adding/Editing ................................................................................................................................ 30
Thumbnails. ..................................................................................................................................... 31
Templates Module Overview .............................................................................................................. 31
Users Module Overview ...................................................................................................................... 31
New Users ........................................................................................................................................ 31
Permissions ..................................................................................................................................... 33
Find Tool ............................................................................................................................................. 34
Reports Module Overview .................................................................................................................. 35
Form Submits .................................................................................................................................. 35
Download .CSV ................................................................................................................................ 37
Help Module Overview ....................................................................................................................... 37
Contacting Support ......................................................................................................................... 37
Support ............................................................................................................................................ 38
Bugs ................................................................................................................................................. 38
How Do I? ......................................................................................................................................... 38
3|Page
AccuCMS V4.0 User Manual
Google Chrome 4.0
Thank you for choosing Blue Archer
AccuCMS, a web-based software, significantly simplifies website maintenance without restricting the
creativity or control. An intuitive management interface allows users with no programming experience to
independently modify their web page content. At the same time, users with more advanced skills have
access to the HTML code.
As an AccuCMS user, you can:
•
•
Drastically reduce website maintenance costs
Gain the ability to update the content and visual presentation of the website to:
o Better reflect changing needs
o Improve communication capabilities
Getting Started
AccuCMS allows you to:
•
•
•
•
Add and change website text and graphics
Add /edit/delete an unlimited number of pages on the website
Change the website navigation
Create forms, mailing lists, newsletters, and more
Logging in to AccuCMS
To access the system:
1. Open an up-to-date Internet browser such as Google Chrome, Mozilla Firefox, Internet Explorer,
or Safari.
2. Enter the AccuCMS website manager URL - example: www.thewebsite.com/manager. You will be
taken to the system's Login page:
4|Page
The above screen shot shows the login screen for AccuCMS.
3. Enter the Username in the “Username” field.
4. Enter the Password in the “Password” field.
5. Click the [Login] button.
You will now be logged in to the AccuCMS Manager and taken to the navigation screen to access any
area of the system according to the permission levels.
Login Failed
Forgot the password?
1. Click the [Password] button at the bottom of the Login page. This will redirect to a new screen:
5|Page
2. Re-enter the Username.
3. Click on the [Get Password] button.
The login credentials will be sent to the email address on record in the AccuCMS system. Once you
receive the credentials, you can try to login again and proceed to the system.
AccuCMS Interface Navigation
AccuCMS Overview
After successfully logging into AccuCMS, you will be taken to the navigation screen from which you can
access the different functions of the system.
Functions are organized under Four Modules:
Content Module
The Content Module allows management of the website pages, layout, graphics, and navigation.
Users Module
The Users Module grants access to add and delete AccuCMS users, or to modify their permissions.
Information about those users who have access to the restricted areas of the website (password
protected pages online) may also be edited.
Reports Module
The Reports Module provides information about form submissions.
1. Select the “Form Submits” subsection to access information received via online forms.
6|Page
Help
The Help Module provides contact information for our Support line. Support is available Monday-Friday
from 9:00am until 5:00pm. In the summer (June 1st-August 31st), Support hours will be 8am until 4pm.
By Email: [email protected]
By Phone: 412.353.1050 (Press 1 for Support)
Log Out
This last button of the AccuCMS interface navigation exits the website manager.
Accessing the Modules
To get started, click on the appropriate Module, and then select the subsection from the drop-down
menu.
Content Module
Content Module Overview
The content module tab is highlighted in red in the screen shot above.
•
•
•
Select the "Pages" tab to add or delete pages, edit text and links, add or delete graphics, edit
page titles, descriptions, and navigation.
Select the "Files" tab to upload files to the website or to download files from the website.
Select the “Templates” tab for access to the website code.
o Note: This is for more advanced users.
Pages
Most modifications to the website can be made using the "Pages" subsection of the Content Module.
Pages Module Overview
1. Add/delete pages.
2. Edit/delete page text and Hyperlinks (links that are not in the navigation menu, but in the text).
7|Page
3. Change the titles of the website's sections and separate pages, as well as page headers and
footers.
4. Change the titles of the website's navigation links and the order in which they appear online.
5. Edit/delete graphics, i.e. the images on the website pages.
6. Edit/delete forms.
To get started, click on the "Content" tab and then on the "Pages" subsection tab. You will be presented
with the screen containing a list of previously created website pages.
1. The [New Page] button will redirect to the screen where you can select a template for the new
page and then populate the page with specific information.
2. The [Find] button in the sub-navigation menu is used to locate the page by keyword.
3. The [Navigation] button will allow management of the main and sub navigations that appear on
the front-end of the website.
4. The [Publish All Pages] button will make all modifications live online.
5. Clicking on the [Publish all ‘Published’ Pages] button will only publish pages that are already
published.
6. The [Publish All Selected Pages] button publishes selected pages in bulk after the CMS user
marks a check box next to each item.
The page list categories are highlighted in red in the screen shot above.
The information about the website pages are found in 4 columns:
Page Name: This appears in the website's navigation bar on the front-end of the website.
•
Note: To access a page, click on its ‘Page Name.’
File Name: The file name becomes part of the websites URL. Do not include any spaces or special
characters in this name.
•
Example: www.thewebsite.com/about-us
8|Page
Template: This is the name of the template that was used to create a particular page. A "Template" is a
file containing a set of pre-designed formats for text and graphics. These formats can be applied to one
or several pages.
So, instead of creating each page entirely "from scratch", a pre-existing template can be utilized.
The template section of the website will contain the code necessary to make this happen.
Status: This category will declare whether the page has been "Published" or "Modified".
•
•
Published: The page is available and visible on the front-end of the website.
Modified: Internal changes have been made and saved but not yet published for the website
general users to access.
Nav? : "Yes" means that the page is included within the website's main navigation bar or secondary
navigation. "No" means that the page is not visible in navigation, and to access this page general users
must either be directed to this page via a manually configured hyperlink in another page's contents or by
directly typing in the link.
SSL?: Secure Sockets Layer is a method of securing transmission of sensitive information over the
Internet, such as credit card details. All communication is encrypted.
An SSL URL starts with https:// instead of http://. A green lock next to the address bar on may also be
present on the browser. This protocol is usually used for e-commerce. In pages that do not contain any
requests for information that require this level of security, "SSL?" is disabled and marked as "No”.
•
Note, to activate SSL for the website, contact the Blue Archer Support.
Secured? :"Yes" means that access to this page is restricted and in most cases password-protected. "No"
means that the page is open for viewing to any general user.
Active?: "Yes" means that the page is within the website structure. "No" means that the page exists only
on AccuCMS website manager, and is not visible to general website users.
Description: This field allows you to enter a brief description of the page, for internal reference.
Page Fields
Each page in the AccuCMS is broken down into several fields; each of these fields has a specific function.
9|Page
To start at the beginning of the process, web designers develop a static visual concept for the website
pages. This design will normally contain different elements: graphics (the logo for example), a
navigation bar, a text area under the navigation bar, a text area in the body of the page, an additional
link menu at the bottom of the page, copyright, and so on.
AccuCMS allows content to be added to the website by filling out a a set of fields for each page.
Creating a Page
1. A drop-down menu showing pages, files, and templates will display when [Content] has been
selected.
a. Click “Pages”.
2. Click [New Page] on the left side of the top tool bar.
“New Page” location has been highlighted in red
3. Next, a screen will ask for a template to be selected. Select the template and click [Save].
a. Each template serves as a layout for the pages.
i. For example, the homepage will have the “home template”, and a form will have
the “form template”.
10 | P a g e
I have selected the internal template to make this similar to my other pages
4. You will be redirected to edit the page.
a. First, determine the page name. This is what will appear in the navigation of the website.
5. Next, decide on a file name. This must not include any spaces or special characters.
a. For example: !@#/\&) will break the path to the page.
I have highlighted in red where the page name appears on the URL
b. For SEO purposes, it is also best to keep this all lower case
6. An internal description may be added if desired, such as “do not delete” or “training purposes”
a. Only CMS users will be able to see this.
11 | P a g e
SEO
Search Engine Optimization, or SEO, makes it more likely that the website will appear on search engines.
The above fields are for SEO purposes.
1. Browser Title will appear at the top of the browser. Keep this relevant and try to avoid ONLY just
using the company’s name.
a. Example: Keyword | Company Name
The two tabs show the browser title for the AccuCMS and for Blue Archer’s Services page
2. Search Keywords are what people would type into a search engine to find the website.
a. For example: If you are a bakery, you may include “cakes”, “dessert”, or “cupcakes”
b. Please limit this to 2-3 keywords since this is not as relevant in SEO as it previously was.
Search engines will penalize websites for “keyword stuffing”.
i. Keyword Stuffing: Refers to the practice of loading a webpage with keywords or
numbers in an attempt to manipulate a site's ranking in Google search results.
3. Search description is what appears when the website comes up on Google or any other search
engine depending on the search query. Keep it short and relevant.
12 | P a g e
The description underneath “FAQ- Support- Blue Archer” is what appears on search engines
Dual Navigation
Both main and secondary navigation are located on the front-end of the website. It is where viewers can
find links to various pages on the website. In AccuCMS, you have the ability to put the same page in
multiple navigations.
The main navigation is highlighted in green and the sub navigation is highlighted in red
1. Select where the page will be displayed while editing the page.
2. First select [Yes] for “Show this Page in Navigation?”.
13 | P a g e
The above image gives an example of dual navigation.
3. Clicking an item will highlight it in blue. If it should only appear in the main navigation, select
“Main Navigation”.
4. If it should appear in two navigations, press “Ctrl” on the keyboard and use the mouse to click
the other options.
5. Decide if the page should also appear in a secondary navigation or not.
The figure above shows the drop-down options for our secondary navigation
6. If you decided to locate the page in a secondary navigation, select from the drop-down list.
Headers & Sub Headers
Page Headers and Sub-headers are highlighted in red in the screen shot above.
Page Headers: This is the main title of the page and will be the largest font.
Sub-headers: This is the second largest font for a heading on the page.
14 | P a g e
In the screen shot above, the ‘Page Header’ is highlighted in blue, and the ‘Sub-header’ is highlighted in green.
Images
The screen shot above shows the “Image” field.
1. Locate an Image Field on the page.
a. Note: If the design of the pages does not include any Image Fields, see the Rich Text
Editor section to learn how to insert images.
2. Click on the [Choose File] button and locate the image file on the local computer that you would
like to insert.
a. Alternatively, you may click the “Browse Files Module” link to search through files that are
already uploaded into the CMS.
b. Note: Some image fields will have a preset size, in which case you will see the width in
pixels. This will under the "Image File" line. If the size of the image field is not specified,
like in the example above, you will see instead an (x) symbol, which means that AccuCMS
will insert the image in its original size.
15 | P a g e
c. Do not forget to format the images before inserting them into an Image Field.
3. You may add a link associated with the image as well.
a. Please remember to open a link in a new window if it links off of the website.
4. Add Alt text
a. Alt Tags are helpful for people who view pages in text-only mode. Alt Tags can also
increase your page's chances to be indexed by search engines.
b. To create an Alt Tag, enter a brief description of the image in ‘Alt Text’.
Rich Text Editor
The Rich Text Editor (RTE) field allows content, images, links, and other items to be added to the
webpage with ease.
Removing Formatting
The content will still have the original formatting if you decide to copy and paste from Word or another
source. This will affect the way it will look on the front-end of the website unless you remove the
formatting.
For example, on Microsoft Word, it may have a standard font that does not match the font on the
website.
Paste as Plain Text
In the rich text editor, the option to paste as plain text will strip all formatting of the text. The icon looks
like a clipboard with a T in it.
The icon is highlighted in the red square in the screen shot above.
Paste From Word
In the rich text editor, “Pasting From Word” will also strip the text of its formatting. The icon looks like a
clipboard with a W in it.
The icon is highlighted in the red square in the screen shot above.
Creating Links
Content Link: This is for linking an item in content to an internal or external source.
16 | P a g e
1. In the rich text editor, click the icon that looks like a chain link.
2. Make sure the link type is set to “URL” and the protocol is Http://.
3. Insert an external link in the text box under URL.
a.
Note: For external links that takes the user off of the website to another website, use
the entire URL.
b. If it is an internal link, simply type in “/” the file name
i. For example: /my-page
This box will appear once you click the link icon
4. Click the “Target” tab at the top of the popup window to select where the page will open.
a. Frame: This feature is typically not used anymore. However, if you do have a frame, this
will open the link up within the frame.
b. Pop-up: This will open a new window for the browser and pop-up in front of the page they
are currently viewing.
c. New window: This will open in a new browser window redirecting them from the page
they are currently on.
d. Topmost window: This opens the link in the full body of the frame. Again, frames are not
recommended to use, but are available if needed.
e. Same window: This will open the page in the same window of the page they are now
viewing.
f. Parent window: This opens the window in the parent, or main page, of the frame.
17 | P a g e
The link drop-down menu is displayed above.
5. For most links, you will select with “new window” or “same window”.
6. Click [OK].
Anchor Text: Anchor text refers to creating a link to another part of the page itself. This is great for a
FAQ section.
1. Enter the text that you would like to be redirected to. For example, we will say this is the answer.
2. Click the flag icon to create an anchor on the answer text. You will need to select a name for the
anchor.
The anchor text icon is highlighted in red
3. Next, type the content that will be the link. For example, this would be the question of the FAQ.
4. Highlight the text and click the link icon that was mentioned earlier.
5. Under “link type” select “anchor in the text”
18 | P a g e
The screen shot above demonstrates how to set an anchor link.
6. In the drop-down for “By Anchor Name”, select the name you picked when creating the anchor.
7. Click [OK].
Content Images
The RTE option adds images within the content.
The smaller box highlighted in blue allows you to select an image, determine a link, add an alt tag, and select whether or not the
text should wrap. The large box highlighted in red is where the files are stored when added to the ‘Files Module’, you will be able
to select an image from here.
19 | P a g e
To insert an image:
1. Place the cursor where you would like to insert the image.
2. Click on the [Image] icon in the RTE tool bar. A new pop-up window will open prompting you to
enter the URL of the file or the file path in AccuCMS.
a. Note: In order to insert an image using the RTE toolbar, it must first be added in the
AccuCMS Files Module.
3. Select the image you'd like to insert.
4. Enter the Alt Tag text.
a. Alt Tags are helpful for people who view pages in text-only mode. Alt Tags can also
increase the page's chances to be indexed by search engines.
b. To create an Alt Tag, enter a brief description of the image in ‘Alt Text’.
5. Please delete the numbers from the ‘Height & Width’ field.
a. This will ensure mobile friendly images.
b. Please resize all images before uploading them to the CMS using a tool such as
Adobe PhotoShop or Microsoft Paint.
6. Add pixels to the ‘Hspace’ or ‘Vspace’ to determine padding around the text and image.
Above shows padding between the text and the image when ‘Alignment’ wraps text and the ‘HSpace’ and ‘VSpace’ fields are
populated.
7. To wrap text, please select a left or right option under [Alignment].
20 | P a g e
The above screen shot shows where to add a link to an image.
8.
If you would also like the image to serve as a hyperlink, enter the URL of the linked page into the
"Link URL" field. Follow the link rules outlined above.
9. Select a link target from the drop-down menu, self or blank.
10. Click on the [Insert Image] button to complete the action.
Creating a Table
1. Click the table icon. This looks like a square with 6 little boxes inside of it.
2. Select how many rows and columns you will need.
3. Determine the maximum height and width. This will prevent the box from stretching or
appearing distorted.
4. Select whether or not you want a header to appear in one of the rows.
5. Cell spacing refers to how far apart each box of the table will be spaced.
a. You can keep this as a default.
6. Cell padding refers to how thick the lines between each cell is.
a. You can keep this as the default.
7. Select the boarder size if you want a frame around the box.
8. Select the alignment to determine where you would like the box.
a. Center
b. Left
c. Right
9. You can add a caption or summary if you would like.
Please note: You should only use a table for data when necessary since they are not responsive.
Please DO NOT try to create columns using a table. If you do need a table please contact support.
21 | P a g e
The above screen shot shows what properties should be filled out to make a table.
Horizontal Line
The above screen shot shows the [Horizontal Rule] icon highlighted in red and the line it creates in blue.
A horizontal rule, ideal for breaking up text, can be easily inserted using the RTE toolbar.
22 | P a g e
Special Characters
In the screen shot above, the [Special Character] icon is highlighted in red and the selection that pops up area is in blue.
The special character option allows a CMS-user to add items that are not readily available on their
keyboard. You may find characters such as “Trade Mark” or “Copy Right” as well as many others.
Styling Text
Text styling options are listed above.
You have the option to add different formats to the content within the RTE field. Please keep in mind
that fonts and styles were determined at the start of the project. You do not need to select the font each
time; it will apply naturally.
Styles & Font
Please use the styles and font option sparingly. This will allow you to apply different fonts to the
content.
23 | P a g e
Paragraph Format
The screen shot above shows the [Paragraph Format] drop-down menu used to control the styles of the text.
•
•
•
•
Normal: This refers to standard paragraph text.
Heading 1: The largest title on the page, typically the page title. Since a field is provided in the
CMS for [Page Title], you will not need to use the [Heading 1] option.
Heading 2: The most common and second largest heading on the page.
Heading 3-6: The headings will decrease in size as they increase in number. Header 3 displays
larger than heading 4 which displays larger than heading 6.
The “Normal” and “Heading” options are all determined at the start of the project.
Size
While the option does exist to increase the pixel size of the font, it is best not to use this feature. It may
impact the way the text displays across devices.
Our websites utilize responsive programming—meaning they adapt to the size of the screen. If you set
the font pixel in stone using this tool, it will not change with screen size.
For example, if you set it at 20px, that means it is 20px whether it is on a cell phone, television, tablet,
laptop, or desktop.
When you need to change the sizes of text, please use the [Paragraph Format] option.
Formatting Options
You have the following options to style the text in the manner you would like in addition to what was
mentioned above.
24 | P a g e
The
above screen shot shows the options for stylizing text. The colors are associated with the list below
•
•
•
•
•
•
•
Bold
Italic
Underline
Strike
Sub Script
Super Script
Indent left or right
•
•
•
•
•
•
Remove Formatting
Add quotes
Left Align
Center Align
Right Align
Justify
Bulleted and Numbered Lists
The screen shot above shows the numbered lists highlighted in red, while the bulleted lists are in blue.
1.
2.
3.
4.
Select the bulleted or numbered list icon
Begin typing your list
Use the [Enter/Return] key on your keyboard to create a new bullet or number for each item
Use the [Tab] key on your keyboard to add sub items to the list
Creating a Form
Online forms have become a standard part of websites. This can save paperwork and time, while also
providing an excellent means of acquiring customer feedback.
Note: In order to create forms using AccuCMS, you must have an active form template.
Warning: Please do not collect sensitive information on the form. This includes credit card
information or social security numbers. If you need this option, please contact Blue Archer
Support.
25 | P a g e
The image above shows all of the options for a form.
1. Open the form page or create one using a form template (follow the steps outlined in the
Creating a NewPage section).
2. Find the form area on the page; this is typically located near the bottom.
3. Enter the Form Title in the [Form Title] field to identify this form when you receive submissions.
4. Select "Secured" if you have purchased an SSL certificate for the website
•
Please note: Even with an SSL, you cannot collect sensitive information as mentioned
above without an eCommerce module.
5. Select "Yes" if you would like the form information sent to an email address.
• Enter the email address in the [Submit Email Address] field. If you would like the form
submissions directed to multiple email addresses, enter them all separated by a comma.
• Note: All form submissions are stored by default in the Reports Module on the AccuCMS
under the Form Submits tab.
6. Enter a page to take the website to after the form has been submitted in the [Redirect URL] field.
• This is most commonly a “Thank You” page.
• When linking to another page on the website, you will only need the website file name.
i. For example: /thank-you
7. Select a Form Input Field. Select from the drop-down menu the types of fields you would like to
add to the form:
• Text: Most suitable for short text such as a full name, email, or phone number.
i. You may set the “Max” which will determine a character limit.
ii. You may set the “Max Vis” which will increase or decrease the field size.
• Long Text: Ideal for comments or questions.
i. You may set the width and height of this field.
• List Menu: A drop-down menu with the ability to select only one option or more than one
option.
• Radio Button: This includes a ‘Yes’ or ‘No’ option to a question.
• Email Attachment: You may upload a file to the form if this option is used.
i. Please note: You must use the [Submit Email Address] feature if you use this
option.
• Header: This allows you to insert a text title into the form to categorize content.
26 | P a g e
8. Determine required fields by selecting “Yes” or “No” to the required question.
• A site user cannot submit the form until they complete the required fields.
9. Arrange the fields in order by how you would like them to display.
• Tip: Number fields by 10s to make future edits easier.
Completing The Page
When you finish editing and creating the page, you have the options to preview, save, or publish.
•
•
•
Publish: This will make the page live.
Save: This will save the changes, but the page will not be live until you click “publish”.
Preview: This will let you preview the work, but it will not save any changes or make the page
live.
Navigation
Navigation Overview
The AccuCMS [Navigation] button allows you to organize the links in the website navigation.
Main Navigation
The screen shot above shows the [Navigation] button the third in from the left.
Click on the [Navigation] button, and you will be taken to a screen with a list of all of the pages in the
website that are included into the website's top, 2nd, and 3d level navigation menus.
The top level links are displayed in the main navigation menu online.
Sub levels are displayed when the top level link they are associated with has the mouse cursor
positioned over it.
Use the arrow-shaped buttons to move pages up and down in the main or sub-menus, or between
Placeholder Link: You can add a placeholder or a link to a page that already exist in the navigation.
27 | P a g e
1. Click [Add Link/Placeholder]. The placeholder's function will act as a category for the navigation.
When this is selected, an “L” will appear next to the title in the CMS.
a. You will not see the “L” on the front-end of the website.
Please note: Changes made in the navigation occur in real-time meaning they will immediately appear
on the front-end of the website. If you do not see the changes you made, please click [Refresh] on the
browser.
Sub-Navigation
A sub-navigation typically appears on the sidebar of a page. To get started, follow the same steps as the
main navigation.
1. At the main navigation landing page, click [Create New Sub Navigation].
In the screen shot above, the [Create New Sub-Navigation] button is highlighted in red.
2. You will need to add pages to the sub navigation (please see dual navigation) by going to each
individual page and highlighting the sub navigation that appears on the list of options.
You will need to go to each individual page that you want to appear in the navigation and select the
sub-navigation in the box that says “Use this page in Navigations”..
3. You may select the appropriate sub navigation item from the drop-down menu on the main
navigation landing page to change the order of the items.
You may use the drop-down menu to select which navigation you would like to edit.
28 | P a g e
Files
Files Module Overview
In order to insert an image into the RTE or make any file downloadable from the website, you have to
first upload it to the AccuCMS.
For example, if you would like to grant users the ability to download a PDF file of the company profile,
make sure to upload the PDF to the AccuCMS.
Folders
As the number of files on the website starts to grow, you might want to organize them into folders.
The [New Folder] button is highlighted above.
1. Click on the "Files" tab.
2. Select the [New Folder] button in the sub-navigation menu.
The screen shot above shows the fields required for a new folder.
3.
4.
Fill out the fields with necessary information.
a. Title
b. Description
You will be taken back to the Files/Admin page.
a. Click on the folder icon to access the images or to add images in the folder.
b. Please note: Clicking on the title will only give you the option to delete the folder or add
a description.
29 | P a g e
5.
To add a file while inside of a file folder, simply click on the [New File] button in subnavigation.
6. To add a file to a folder if you ARE NOT already in the folder, simply click on the folder icon to
open the folder; then click the [New File] button in sub-navigation.
Moving Files
Files have the ability to move from Folder to Folder.
1. Check the box that is adjacent to the File Name.
2. Click the [Move] button in the Folder's sub navigation line.
3. Select the Folder you wish to move the file to, and click the [Move Files to Current Folder]
button.
4. You will redirect back to the Files/Admin page.
Adding/Editing
The screen shot above shows the [New File] button highlighted.
1. Click on the "Content" tab and select the “Files” tab from the menu.
2. Click on the [New File] button under the tabs.
Complete the information shown above to upload a new file.
3. Fill out the fields with the new file’s information.
4. Click the [Browse] button to locate the file on the local computer.
30 | P a g e
a. If you have multiple files to upload, simply browse and title the first file, then click [Add a
File]. This gives you the ability to upload up to 10 files at once.
5. Click the [Save] button to upload the new file.
6. To edit an existing file, click on the file name.
Thumbnails.
As the list of Files grows, it may get harder to identify them by just the File name. You can choose to
view a thumbnail of the file for a visual.
The above screen shot has the icon and thumb nails highlighted in red.
1. Click the [Display Thumbnails] button.
2. A small thumbnail of the File will now appear to the left of the File name.
Templates
Templates Module Overview
The template section of the CMS stores the website’s code. If you are familiar with programming
languages, this is where you can add Google Analytics or other tracking code.
If you are not familiar, you may want to set the user profile to “no” under “Developer?” This will make
this section no longer visible.
Warning: Something as small as a misplaced semi-colon could damage the website. Please proceed
with caution.
Users
Users Module Overview
New Users
31 | P a g e
1. When logged into the CMS, use the [Users] Module tab in the Interface Navigation; select the
"CMS Users" tab.
2. Click on the [New User] button under the tabs.
The [New User] button is highlighted in the screen shot above.
The screen shot above lists the contact fields for the user.
3. First, complete the basic contact information.
a. User ID: This will be how the user logs into the website.
b. Password: This will be custom to this specific user.
c. Name First: First name.
d. Name Last: Last name.
e. Phone number: Enter the best method to reach this individual.
f. Email: Enter the best email to reach this individual.
32 | P a g e
Permissions
The AccuCMS Users can have varying degrees of access to the system's functions and thus have different
levels of ability to modify the website.
The screen shot above shows some of the permissions you may set.
•
•
•
•
•
•
•
Manage Navigation?: "Yes" will give the new user the permission to shift navigation links up and
down and between top-level and sub-level menus.
Add Pages to Navigation?: "Yes" will allow the new user to add or remove links from the main
and secondary navigations.
Publishing Rights?: "Yes" will allow the new user not only to make modifications in AccuCMS,
but also publish them online.
Admin: .
Developer: This option will give the user access to the template code found in the “Content”
modules. If the user is not familiar with development languages (HTML, CSS, JavaScript), please
be cautious of selecting “Yes” for this permission.
Active: "Yes" means that this user account is active.
Content Pages: This gives the website-user page-by-page access.
33 | P a g e
The above screen shot shows the “Page for Access” section under “Users”
“Page For Access” gives CMS permissions based on the section of the CMS.
•
•
Read: If they can read it, this only means it is visible. They may not make edits.
Write: Those with this permission can both read and edit.
Find Tool
The [Find] option is demonstrated above.
Located on the same toolbar as “New User”, the “Find” tool makes it easy to search through multiple
users by keyword.
34 | P a g e
Reports
Reports Module Overview
Form Submits
The [Reports] module allows you to view any incoming messages from the forms. There is also an option
to download this as a .CSV file.
The “Form Submits” landing page is shown above.
1. To check form submits, select the desired form.
a. This is arranged by:
i. Page: What page the form is located on
ii. Submits: The number of form submits total
iii. Form: Form title
35 | P a g e
As seen above, form submits are arranged by date and time.
2. Click on the form submit that you would like to view.
Above, you will see the answers as well as the form questions.
36 | P a g e
Download .CSV
You may download all of the form submits into an Excel file for ease of access.
The [Download .CSV] file is highlighted in red.
1.
2.
3.
4.
5.
After you are logged in to the CMS, go to the [Reports] tab.
Click [Form Submits].
Select the desired form.
Click [Download .csv].
The download will start.
Help & Support
Help Module Overview
Contacting Support
The above screen shot shows the location of our “Help Contact Info.”
If you ever feel uncertain while using the CMS, please do not hesitate to reach out to support. You may
find the contact information on the [Help] tab.
37 | P a g e
Support
Our support team is available Monday through Friday From 9am to 5pm.
Bugs
There are two different types of support requests.
The first type of support request would be that something is not working right, something looks
strange, or something just is not showing up.
These are considered “bugs”.
They are never billable to fix (on supported, modern browsers). Please do not hesitate to report
something like this to our support department.
Tip: When you are calling or emailing about a bug, thorough details may assist in addressing the issue
sooner.
•
•
•
•
•
When you call or email be sure to include details.
What were you doing or trying to do when the bug happened?
What page did the bug happen on?
Did the bug occur on the front-end or the back-end of the website?
What browser are you using? Chrome, FF, IE, Safari?
How Do I?
The second type of support request would be a CMS question or a “how do I” question.
Our support department is happy to answer these types of questions and to even re-train on items via
phone or email if requested. However, providing this type of support is billable.
Remember, we offer free training sessions that review and answer these questions every other
Wednesday.
You may sign up for as many free training sessions as you want. On CMS training calls you can ask any
questions free of charge.
38 | P a g e