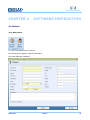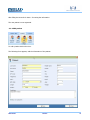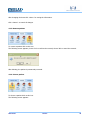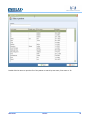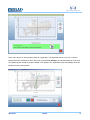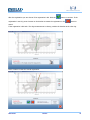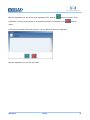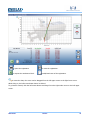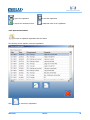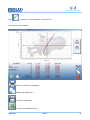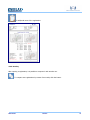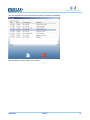
1
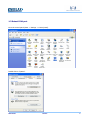
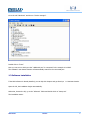
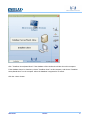
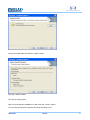
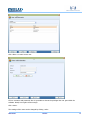
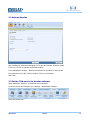
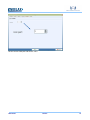
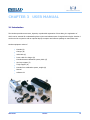
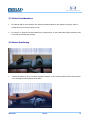
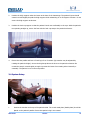
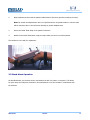
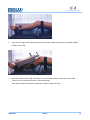
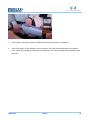
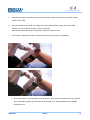
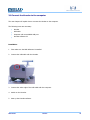
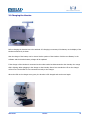
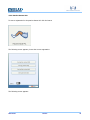
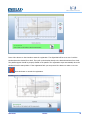
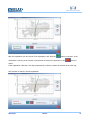
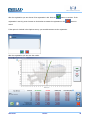
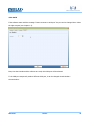
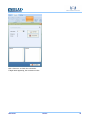
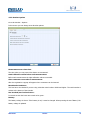
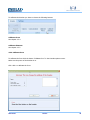
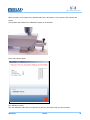
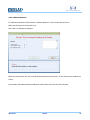
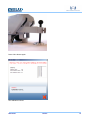
Installation and user manual
© 2012 Monitored Rehab Systems
E1201 Manual Kneelax
Table of contents
CHAPTER 1 Installation Manual .................................................................................................. 3
1.1 Install Kneelax USB driver ............................................................................................................... 3
1.2 Detect COM-port ............................................................................................................................ 6
1.3 Software installation ....................................................................................................................... 7
CHAPTER 2 Prepare your account ............................................................................................. 10
2.1 Starting the Software ................................................................................................................... 10
2.2 Activate Kneelax .......................................................................................................................... 12
2.3 Set the COM-port in the Kneelax software ..................................................................................... 12
CHAPTER 3 User Manual ............................................................................................................ 14
3.1 Introduction ................................................................................................................................. 14
3.2 Clinical Considerations .................................................................................................................. 15
3.3 Patient Positioning ....................................................................................................................... 15
3.4 System Setup .............................................................................................................................. 16
3.5 Stand-Alone Operation ................................................................................................................. 17
3.6 ACL Instrumental Drawer Test ...................................................................................................... 18
3.7 PCL Instrumental Drawer Test ...................................................................................................... 21
3.8 Connect the Kneelax to the computer ............................................................................................ 23
3.9 Charging the Kneelax ................................................................................................................... 24
3.10 Kneelax description .................................................................................................................... 25
CHAPTER 4 Software Instruction .............................................................................................. 26
4.1 Patients ....................................................................................................................................... 26
4.1.1 New patient ........................................................................................................................... 26
4.1.2 Edit patient ............................................................................................................................ 27
4.1.3 Remove patient ..................................................................................................................... 28
4.1.4 Choose patient ...................................................................................................................... 28
4.2 Measurements ............................................................................................................................. 30
4.2.1 Passive Drawer ACL ............................................................................................................... 30
4.2.2 Passive Drawer PCL ............................................................................................................... 35
4.2.3 Open measurement ............................................................................................................... 39
4.2.4 Overlay ................................................................................................................................. 41
4.3 Options ....................................................................................................................................... 43
4.3.1 Language .............................................................................................................................. 43
4.3.2 Serial .................................................................................................................................... 45
4.3.3 Kneelax Options ..................................................................................................................... 47
4.3.4 Calibrate force ....................................................................................................................... 48
4.3.5 Calibrate distance .................................................................................................................. 50
4.3.6 Database ............................................................................................................................... 52
MRS-E1201
Kneelax
2
CHAPTER 1
INSTALLATION MANUAL
1.1 Install Kneelax USB driver
Connect the USB cable to the Kneelax:
Connect the other side of the cable to the computer.
The following balloon appears in the screen:
And after that the "Found new hardware wizard" appears:
MRS-E1201
Kneelax
3
Choose "No, not this time" and click the <Next> button.
Select "Install from a list or specific location" and click the <Next> button.
MRS-E1201
Kneelax
4
Select the option "Search for the best drivers in these locations".
Uncheck "Search removable media".
Check "Include this location in the search".
Click the <Browse> button and browse to the “3rdparty” folder, choose the "USB Drivers" folder on the CD.
Choose your operation system: Windows XP or Vista/ Windows 7.
Click <Next> to continue.
The installation is started…
When done, click the <Finish> button to close the "Found new hardware wizard".
After a few seconds the following balloon appears:
The Kneelax driver installation is done.
MRS-E1201
Kneelax
5
1.2 Detect COM-port
Go to the control panel (Start -> Settings -> Control panel).
Double click on "System" .
MRS-E1201
Kneelax
6
Go to the tab "Hardware" and then to "Device manager".
Double click on "Ports".
Now you can see on which port the "USB Serial port" is connected. In the example it is COM3.
The software‘s auto detect function will automatically search for the connected port.
1.3 Software installation
If the MRS software is already installed, you can skip this chapter and go directly to 2.2 Activate Kneelax.
Open the CD, the installation begins automatically.
Otherwise, browse the CD, go to the "Software" folder and double click on "Setup.exe"
The installation starts:
MRS-E1201
Kneelax
7
Click “Installeer Server/Stand Alone” if the database of the Kneelax should also be on this computer.
If the database has to be elsewhere, choose “Installeer client” on this computer, and choose “Installeer
Server/Stand Alone” on the computer where the database is supposed to be stored.
Click the <Next> button.
MRS-E1201
Kneelax
8
Choose the install folder and click the <Next> button.
Click the <Install> button.
The files are being copied.
After a few seconds the installation is ready. Click the <Finish> button.
You can choose whether the software should be launched or not.
MRS-E1201
Kneelax
9
CHAPTER 2
PREPARE YOUR ACCOUNT
2.1 Starting the Software
To use the Kneelax software, you have to log in.
We preinstalled:
Name:
mr
password: mr
If there are more users necessary, the User Management can be used.
To access the User Management, log in with:
Name:
mradmin
password: mradmin
After logging in as Administrator, the User Administration is available:
Choose Settings – User administration
MRS-E1201
Kneelax
10
Click <New> to create a new user.
Fill in a username and password. Also is it possible to choose the privileges the user gets within the
software. Mostly User rights will be enough.
Click <Save>
The settings of the users can be changed by clicking <edit>
MRS-E1201
Kneelax
11
2.2 Activate Kneelax
After installing the software and logging in to it, the tab “Kneelax” should be visible.
If it is not, it is time to activate the Kneelax module.
Go to Administrator settings – Modules and activate the checkbox for the Kneelax.
The pull down menu under “Start in module” can be set on Kneelax.
Click <OK>
2.3 Set the COM-port in the Kneelax software
When starting the software, no COM-port may be selected.
To choose the correct COM-port, go to Settings – Administrator settings:
Select the Kneelax tab.
MRS-E1201
Kneelax
12
Set the correct COM-port and choose <OK>
MRS-E1201
Kneelax
13
CHAPTER 3 USER MANUAL
3.1 Introduction
The Kneelax provides an accurate, objective, reproducible registration of knee laxity, the registration of
which can be essential for understanding knee injuries and advancement of surgical technologies. Kneelax 3
can be used in conjunction with an optional lap-top computer and software package or stand-alone unit.
Kneelax equipment exists of:
Kneelax (A)
Charger (B)
USB Cable (C)
Power cable for charger (D)
Kneelax distance calibration system, block (E)
Heel cup support (F)
Thigh support (G)
Kneelax force calibration system, weight (H)
Manual
software CD
MRS-E1201
Kneelax
14
3.2 Clinical Considerations
1.
For patients with a recent trauma, the pressure should be based on the patient's tolerance, which is
usually three force level LED lights or less.
2.
For new A.C.L. (Anterior Cruciate Ligaments) reconstructions, no more than three lights should be used
in the first six months after surgery.
3.3 Patient Positioning
1.
Instruct the patient to lie on his spine (Lachman position) on the treatment table with the knees flexed
20 to 25 degrees and the hands at the sides.
MRS-E1201
Kneelax
15
2.
Position the thigh support under the knees at the base of the hamstrings. The patient's knees should
extend over and slightly beyond the thigh support while maintaining 20 to 25 degrees of flexion. Do not
secure the thigh support at this time.
3.
Position the heel cup support so that the patient's heels rest comfortably in the cups. With the patient's
toes pointing straight up, secure the feet with the heel cup strap to the patient's tolerance.
4.
Ensure that the patella and knee of each leg is free of rotation (hip rotation may be adjusted by
rotating the patient's thighs). Secure the thigh strap above the knee to the patient's tolerance. Be
certain the strap is secured tightly enough to prevent the knees from rotating either internally or
externally. The patient is now in the test position.
3.4 System Setup
1.
Position the Kneelax at the top of the patient's tibia. The round metal plate (Patella plate) should be
placed on the patient’s patella. Ensure that patient's leg is not rotated.
MRS-E1201
Kneelax
16
2.
Align Displacement Arm with the patient's tibial tubercle (first bony prominence below the knee).
Note: Be certain the Displacement Arm is not positioned over the patella tendon or else the data
will be inaccurate due to the soft tissue allowing for greater displacement.
3.
Secure the Distal Tibial Strap to the patient's tolerance.
4.
Attach the Proximal Tibial Brace using the strap. Make sure there is no tibial rotation.
The Kneelax is now ready for registration.
3.5 Stand-Alone Operation
As described below, the Kneelax can be used without the aid of a printer or computer. This allows
for quick setup and subjective evaluation. Recommended is to use the Kneelax in combination with
the software.
MRS-E1201
Kneelax
17
1.
Ensure the Kneelax is turned ON.
2.
Place your hands on the patient's quadriceps and feel to ensure that muscle is relaxed. Instruct the
patient that the muscles around the knee joint should remain relaxed throughout the test.
3.
While holding the patient's quadriceps, place the front of the hand across the length of the patella
pad.
4.
Rotate the Pressure Arm Adjustment Knob to raise the Pressure Arm to its highest
point. (Keep around 3-5 mm free-span above.)
3.6 ACL Instrumental Drawer Test
Proper placement of the Kneelax and its support (foot-support and tight-support) are necessary to perform
reliable test results. See 3.3. Patient Positioning.
1
Place the high support at the base of the hamstrings and obtain a knee-flexion angle between 20° and
30°.
MRS-E1201
Kneelax
18
2
Place the foot support under both patient's feet and thus creating a consistent symmetrical rotation
position of the Tibia.
3
Place the Kneelax on the Tibia. The longer arm on the Patella and the shorter arm on the Tibia
Tubercle (not on the Patella Tendon or other soft-tissue!)
When proper fixated the system is prepared for Passive Drawer ACL test.
MRS-E1201
Kneelax
19
4
The Kneelax is switched on and the software provides several options for registration.
5
Push a blue button on the Kneelax to zero the system. Then push the Kneelax down to the desired
force, following by pulling up the Kneelax to the desired force. During registration the software shows
the curve.
MRS-E1201
Kneelax
20
3.7 PCL Instrumental Drawer Test
1
Place the high support at the base of the hamstrings and obtain a knee-flexion angle between 70° and
90°.
Gravity sign.
Place the non-involved knee into the quadriceps neutral angle following by the involved knee in the
same position.
MRS-E1201
Kneelax
21
2
Place the foot support under both patient's feet and thus creating a consistent symmetrical rotation
position of the Tibia.
3
Place the Kneelax on the Tibia. The longer arm on the Patella and the shorter arm on the Tibia
Tubercle (not on the Patella Tendon or other soft-tissue!)
When proper fixated the system is prepared for Passive Drawer PCL test.
4
The Kneelax is switched on and the software provides several options for registration.
5
Push a blue button on the Kneelax to zero the system. Then push the Kneelax down to the desired
force, following by pulling up the Kneelax to the desired force. During registration the software
shows the curve.
MRS-E1201
Kneelax
22
3.8 Connect the Kneelax to the computer
The next chapter will explain how to connect the Kneelax to the computer.
The following items are necessary:
Kneelax
USB cable
Computer with an available USB-port
Kneelax software CD
Installation
1
First make sure the MRS Software is installed.
2
Connect the USB cable with the Kneelax.
3
Connect the other edge of the USB cable with the computer.
4
Switch on the Kneelax.
5
Start up the Kneelax software.
MRS-E1201
Kneelax
23
3.9 Charging the Kneelax
Before charging the Kneelax has to be switched off. Charging is necessary if the battery on the display of the
Kneelax continuously is shown.
Also the charge of the battery can be viewed via the options of the Kneelax. Click the text 'Battery' in the
software and the Kneelax battery voltage will be updated.
If the charger of the Kneelax is connected to the socket outlet but disconnected to the Kneelax, the orange
LED is lighting. When plugging in the charger to the Kneelax, after a few seconds the LED on the charger
will turn red. The Kneelax is now connected correctly to the charger.
When the LED on the charger turns green, the Kneelax is full charged and can be used again.
MRS-E1201
Kneelax
24
3.10 Kneelax description
1. Display
On the display the distance is shown.
2. LED's
The LED's show the force in Newton on the handle of the Kneelax. The green LED is the force of 44N, the
yellow LED 66N, the orange 88N and the red LED is 132N.
3. On/off button
By operating the On/off button, the Kneelax can be switched on or off. If it’s on, the red led will lighten.
4. Registration buttons (only for use with the software)
Push the blue registration buttons on the handle to start the registration. It is also possible to choose
whether a registration has to be redone.
5. USB connector
The Kneelax is connected to the computer by means of this cable.
MRS-E1201
Kneelax
25
CHAPTER 4
SOFTWARE INSTRUCTION
4.1 Patients
4.1.1 New patient
To enter a new patient click on this icon.
The following form appears, enter the information:
The yellow fields are mandatory.
MRS-E1201
Kneelax
26
After filling the items click <Save> for saving the information.
The new patient is now registered.
4.1.2 Edit patient
To edit a patient click on this icon.
The following form appears, edit the information of the patient:
MRS-E1201
Kneelax
27
After changing the items click <Save> for saving the information.
Click <Cancel> to cancel all changes.
4.1.3 Remove patient
To remove a patient click on this icon.
The following screen appears, choose 'Yes' to confirm the removal, choose 'No' to cancel the removal.
After deleting, the patient is permanently removed.
4.1.4 Choose patient
To choose a patient click on this icon.
The following screen appears:
MRS-E1201
Kneelax
28
Double click the name to open the file of the patient or search by Last name, First name or ID.
MRS-E1201
Kneelax
29
4.2 Measurements
4.2.1 Passive Drawer ACL
To start a registration for the passive drawer ACL click the button.
The following screen appears, choose the correct registration:
The following screen appears:
MRS-E1201
Kneelax
30
Press a blue button on the Kneelax to start the registration. The digital dial will be set to zero. Push the
Kneelax down the desired force level. Then pull up the Kneelax slowly to the desired maximum force level.
The patella support should be properly fixated to the patella. The registration stops automatically when the
Kneelax is back in start position.
MRS-E1201
Kneelax
31
After the registration you can choose if the registration is OK. Click the
button to continue. If the
registration is not OK, press a button on the Kneelax to restart the registration or the
button to
cancel.
If the registration is OK and a Two legs measurement is chosen, position the Kneelax at the other leg.
Press a button to start the second registration.
MRS-E1201
Kneelax
32
After the registration you can choose if the registration is OK. Click the
button to continue. If the
registration is not OK, press a button on the Kneelax to restart the registration or the
button to
cancel.
If the option is checked in the Options screen, you can add comment to the registration.
After the registration you can view the results.
MRS-E1201
Kneelax
33
to print the registration.
to export the raw data to Excel.
to save the registration.
to add/read notes of the registration.
to zoom the chart, the cursor can be dragged from the left upper corner to the light lower corner.
While doing so, the left mouse button has to be clicked.
To go back to normal, click the left mouse button and drag it from the right under corner to the left upper
corner.
MRS-E1201
Kneelax
34
4.2.2 Passive Drawer PCL
To start a registration for the passive drawer PCL click the button
The following screen appears, choose the correct registration:
The following screen appears:
MRS-E1201
Kneelax
35
Press a blue button on the Kneelax to start the registration. The digital dial will be set to zero. Push the
Kneelax down the desired force level. Then pull up the Kneelax slowly to the desired maximum force level.
The patella support should be properly fixated to the patella. The registration stops automatically when the
Kneelax is back in start position. If the registration fails you can press a blue button to make a new one.
Click this button to cancel the registration.
MRS-E1201
Kneelax
36
After the registration you can choose if the registration is OK. Click the
button to continue. If the
registration is not OK, press a button on the Kneelax to restart the registration or the
button to
cancel.
If the registration is OK and a Two legs measurement is chosen, position the Kneelax at the other leg.
Click a button to start the second registration.
MRS-E1201
Kneelax
37
After the registration you can choose if the registration is OK. Click the
button to continue. If the
registration is not OK, press a button on the Kneelax to restart the registration or the
button to
cancel.
If the option is checked in the Options screen, you can add comment to the registration.
After the registration you can view the results.
MRS-E1201
Kneelax
38
to print the registration.
to save the registration.
to export the raw data to Excel.
to add/read notes of the registration.
4.2.3 Open measurement
To open a registered registration click the button.
The following screen appears, select the registration:
Click
MRS-E1201
to remove the registration.
Kneelax
39
Click
or click twice on the registration to open this file.
The following screen appears:
To print or preview the registration.
Overlay, see chapter 4.2.4
To save the registration.
To export the raw data to Excel.
MRS-E1201
Kneelax
40
To add/read notes of the registration.
4.2.4 Overlay
After opening a registration, it is possible to compare it with another one.
To compare two registrations by means of an overlay click the button.
MRS-E1201
Kneelax
41
Only the registrations of the involved side are shown. Choose the registration.
Both registrations will be shown on the screen:
MRS-E1201
Kneelax
42
The involved measurements of the registration are shown. The first selected date is purple, the second date
is red.
4.3 Options
4.3.1 Language
The language of the software can be adjusted at tab Settings – Administrator settings
Choose the language in the language box. The software is translated into that language.
MRS-E1201
Kneelax
43
MRS-E1201
Kneelax
44
4.3.2 Serial
If the software starts with the message “Cannot connect to serial port” the port can be changed here. Select
the right comport (see chapter 1.2).
Every time the Kneelax and the software are used, this COM-port will be selected.
If the COM-port temporarily needs a different COM-port, it can be changed via tab Kneelax –
Communication:
MRS-E1201
Kneelax
45
Click <Connect> to check the connection.
If digits start appearing, the connection works.
MRS-E1201
Kneelax
46
4.3.3 Kneelax Options
Go to tab Kneelax – Options.
In this screen you can change some Kneelax options:
Measurement auto close time:
The time when you can press a blue button to remeasured.
Send calibration values before each measurement:
Before each measurement the right calibration values are sended.
Show comment screen after a measurement:
After the registration a popup will appear where comments can be inserted.
New Kneelax hardware:
This box has to be checked if you are using a Kneelax serial number 02XXX and higher. The serial number is
written at the bottom of the Kneelax.
Use involved/non involved colors:
In several screens the boxes are turned red or green.
Battery:
The battery voltage is shown. If the battery is red, it must be charged. When pressing the text “Battery” the
battery voltage is updated.
MRS-E1201
Kneelax
47
To calibrate the Kneelax you have to choose the following buttons:
Calibrate force:
See chapter 4.3.4
Calibrate distance:
See chapter 4.3.5
4.3.4 Calibrate force
To calibrate the force click the button “Calibrate force” in the Kneelax options screen.
Make sure the power of the Kneelax is on.
Click <OK> to calibrate the force.
MRS-E1201
Kneelax
48
Make sure there is no weight on the Kneelax and press a blue button. In the memo a few numbers are
shown.
Then position the Kneelax force calibration system on the Kneelax.
Press a blue button again.
23
The calibration is done.
The new calibration value has to be between 20 and 30, otherwise it was not done correctly.
MRS-E1201
Kneelax
49
4.3.5 Calibrate distance
To calibrate the distance click the button “Calibrate distance” in the Kneelax options screen.
Make sure the power of the Kneelax is on.
Click <OK> to calibrate the distance.
Make sure the two arms are both on a flat surface and press a blue button. In the memo a few numbers are
shown.
Then position the Kneelax distance calibration system under the short arm of the Kneelax.
MRS-E1201
Kneelax
50
Press a blue button again.
The calibration is done.
MRS-E1201
Kneelax
51
4.3.6 Database
In this option, the database location can be changed.
Server: the IP address of the server.
Database path: the path to the database on the server.
To Backup or Restore the database.
MRS-E1201
Kneelax
52
Monitored Rehab Systems B.V.
Claes Tillyweg 2 | 2031 CW Haarlem | The Netherlands
Phone: +31 (0)23 750 5444 | Fax: +31 (0)23 750 5445
www.mrsystems.nl | [email protected]
_______
Monitored Rehab Systems USA
1023 Red Dunes Run | Avon IN 46123
Phone: 513-673-9371
www.kneelax.com | [email protected]
MRS-E1201
Kneelax
53