1
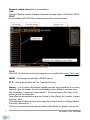
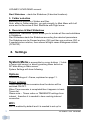
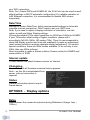
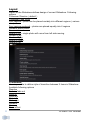
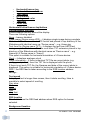
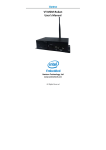
User Manual February 2013 Rev. fw 2.5 Table of Contents 1. 2. 3. 4. 5. 6. 7. Introduction Product Features Usage Scenarios Package Contents Hardware Overview Remote Control Using the i-Frame 7.1. Powering i-Frame 7.2. Main Menu 8. Settings 9. Remote access 10. Description of system files 11. HOME2 – manual monitor adjustment 12. Limited Warranty 2 i-Frame User Manual 1. Introduction Thank you for purchasing i-Frame - high-performance and low-cost digital signage platform with LAN/internet connectivity that allows you to play multimedia content in Full HD quality. The user interface is easy to understand and no additional software is required. Simply insert the memory card or set-up network connection and you can play the media files from selected source. There are following models available – i-Frame HOME, i-Frame HOME2 and i-Frame SIGN. i-Frame HOME presents standalone device that features wooden frame in size ~50x70cm and full-HD IPS LED panel. It can be used as a standard frame on the wall with very rich digital photoframe features. i-Frame HOME2 replaces model HOME . This model is based on 32” professional industry class AMVA panel, it features wooden frame in size ~46x80cm. New construction allows to replace the wooden frame (standard colours – black, natural wood, white, cherry brown) very easily and customized to requested design. -Frame HOME2-XL is based on 46” professional industry class AMVA panel, dimension is 110x60cm. i-Frame SIGN contains identical electronics as i-Frame HOME, the only difference is in missing display which can allow to connect the device to any device that contains HDMI input connector. It is mostly used for in Digital Signage industry, however can be used as well at home and connected to large flat TV devices. The i-Frame SIGN can be attached to rear side of TV via VESA standard holes, eventually there is i-Frame VESA 200/400mm holder available. For presentation from local or internal memory there is no additional settings necessary, for presentation from intranet or internet (incl. Flickr) you have to set wireless connection with credentials. The i-Frame devices are ideal for advertising, retail displays, museum exhibits, galleries, home usage and other applications. The possibility of remote content management via internet without any additional fee and automatic slideshow synchronization with remote source makes it eligible also for maintenance free usage. Just switch it on and the i-Frame can start the show automatically. You can use built-in advanced Timers (internet connection required) or any simple programmable outlet timer to switch it on and off at favourite time 3 i-Frame User Manual 2. Product Features Wireless multimedia device WiFi-N / LAN (HOME2-XL, SIGN) connectivity Supports different multimedia sources Internal memory (1GB), USB/microSD, LAN (SMB/UPnP), Internet, Flickr, FTP, websources... Photo slideshow with music on the background Supported formats VIDEO (MPEG4, MKV,AVI,TS,VOB,MPG, MP4, MOV,3GP...), PICTURE (JPG,BMP,GIF,BMP,TIFF) WWW (ASCII text with filename ABC.www. Each line contains 1 www address.Time delay between lines corresponds to the current Delay valid for Slideshow. PLST (Playlist file, ASCII text with filename ABC.plst. Each line contains command for 1 item within Slideshow) IFR system command file ( for internal memory operations - copy, delete...) Built-in HTML5 browser (http+https) able to run in Slideshow or standalone Mix content play (Photo/Video/WWW) Autoplay for all media formats support Slideshow of all sub-directories Landscape / Portrait presentation mode Multiple transition effects, flying text, fixed image (multi-layer system) Remote Slideshow synchronization/update over LAN or internet Full HD resolution with HDMI output, portrait/landscape, 50/60Hz Multi language Centralized remote surveillance of running devices Fan less design (silent operation) and more...... 3. Usage Scenarios 4 Maintenance and advertisement in public spaces (shops, hospitals..). Operation with remote control over internet (can be used by non-IT users e.g. older parents) by other distant person (family). Family then can change the content of Slideshow by adjusting of own Flickr account or via VPN. Connection and all content will be synchronized. Therefore only ON/OFF can be required by local user. i-Frame User Manual Presentations (with description) controlled and monitored from one place (web portal, VPN, Flickr, FTP, SMB). Instant home direct presentation of ALL photos/videos stored in NAS (the most safe and suitable place for photo/video) 4. Package Contents i-Frame HOME2 1. i-Frame HOME2 device 2. Remote Control 3. User Manual 4. “Invisible” transparent extension 3m cord i-Frame SIGN 1. i-Frame SIGN device 2. Remote Control 3. External Infra sensor 4. User Manual 5. Power Adapter 5. Hardware Overview i-Frame HOME2 1x USB slot: can be used for USB memory, USB keyboard or USB mouse ( faster data input) 1 x microSD slot: for memory card WiFi antenna: non removable antenna for WiFi 802.11 b/g/n connectivity Audio out ( L+R), cinch connection Audio in ( L+R), cinch connection LAN RJ-45 port : HOME2-XL only IrDa built in receiver i-FRAME SIGN 5 i-Frame User Manual 2x USB slot:. used for USB memory, USB keyboard or USB mouse , USB numbering depends on the insertion order, not USB slot position. 1 x microSD slot: for memory card LAN RJ-45 port: wired Ethernet 10/100Mbps connection (RJ45 connector) HDMI out: Full HD video+audio output (connected to monitor/TV) DC in: DC input from Power adapter (use only supplied adapter) Memory slot protection cover: secured by screws against unauthorised removal. VESA mounting: mount holes 75/100mm on metal case (200/400mm available with adapter – optional ) External Infra sensor connector: 2,5” jack connector for external IrDA sensor 6. Remote Control The Remote Control is powered from 1x CR2025 3V battery. To replace the battery, simply press the lock at battery cover and remove the cover with battery. 6 i-Frame User Manual 7. Starting the i-Frame 7.1. Powering i-Frame 1. Connect to power socket, eventually use HDMI video cable to connect i-Frame Sign and TV or monitor. 2. With HOME2, check if needed to use manual switch next to power cord, then use RC and power the device. 3. If you want to present from local memory, insert the memory into the USB or microSD slot. All slots are hot-plug, so you can insert the memory also while the device is running. (if you want present from internal memory, it is needed first to copy files there) 7.2. Main Menu The main screen will show up after power on by default. ( if set Autostart ON (not default), the Slideshow will start automatically). Main screen layout consists of 4 regions: 1. System Menu (System settings) (3 dots on the right top) for Device, Network and Display setting update, SW status… 2. Main Menu Memory – internal memory on board, size is 1,3GB.This location is handled via *.ifr system files (explained later) or direct Web access Memory card slots 1xmicroSD, 2xUSB 2.0.,available/inserted memory is highlighted 7 i-Frame User Manual Network media sources for presentation: LAN Network Samba server (standard network storage used in Windows, NAS) UPnP Any available UPnP/DLNA media source within local network Flickr World #1 photo internet cloud storage for your media files (www.flickr.com) WWW – html page as defined in WWW option FTP – server accessible via File Transfer Protocol History – list of recent Slideshow media sources with possibility to run any address (this list makes the future slideshow from different sources very fast to access, it works as “bookmarks”). The most recent (top line) is the active source for Autostart. Note:Manual presentations are not stored in the History list, except of www and plst files. The selected Slideshow runs according the current device settings (Delay, Transition,Recursion...). There is a special History item as default that allows to quickly access the 8 i-Frame User Manual I-FRAME FLICKR DEMO account. Start Slideshow – starts the Slideshow (2 identical locations) 3. Folder selection Browsing and selection of folders and files. Note: when in Folder selection, you get promptly to Main Menu with Left arrow and to Recursive & Start Slideshow with Right arrow 4. Recursive & Start Slideshow Marking the “Recursive” option allows you to include all files and subfolders in Slideshow. Start Slideshow starts the Slideshow according the selected parameters. The Sideshow can be Paused anytime (OK) and then can continue (OK) or if needed picture rotation, then arrows left/right cause 90degrees rotation (CCW/CW). 8. Settings System Menu is accessible by cursor buttons ( 3 dots in upper right corner) or directly pressing Menu button on RC while being in Main screen. System Settings will show following: Options Detailed settings of i-Frame, explained on page 11. Timer options Timers allow to define scenarios how the device will be switched ON/OFF. When Timer scenario is completed then it appears in basic Timers list. Please note – Timers relies on TIME&DATE settings from internet , therefore it is needed to have working internet connection. WiFi WiFi is enabled by default and it is needed to set up for 9 i-Frame User Manual your WiFi connection. Note: For i-Frame SIGN and HOME2-XL the RJ-45 slot can be used as well, default settings is DHCP automatic configuration) For reliable operation of LAN Ethernet connection, it is recommended to disable WiFi access temporarily. Date/Time Settings of current Date/Time, highly recommended settings is Automatic (requires internet connection). Don’t forget to set your GMT zone. Note: If you need to adjust a display resolution or orientation, use this option as well and follow Display settings. I-Frame has default 720p output resolution for SIGN and 1080p for HOME2. If your TV/monitor allows using of higher resolution, please set it accordingly (full HD=1080p, HD-ready=720p). Then it is recommended to check the display position and size and eventually to make an adjustment (each output resolution requires separate display adjustment). For certain special conditions, there are 50Hz modes available ( if do not why to use 50Hz, then use 60Hz settings) Here is possible to make a screen rotation (Screen mode) for HOME2 and newer edition of SIGN Internet update i-Frame checks the latest firmware version on Internet. Changelog The text file with all firmware revisions history appears. Note – as this file is downloaded from server, internet connection is required. Status General information about current iFrame device. OPTIONS - Display options Delay Time between the consecutive photos during Slideshow ( Range 1sec – 100hrs ) 10 i-Frame User Manual Layout Layout of the Slideshow defines design of current Slideshow. Following options Fullscreen Dissolve ( default ) Fullscreen Fade in/out Four regions – photo can be placed variably into different regions ( various size ) Four regions centered – photos are placed equally into 4 regions Random photo placer Four corners Single fly by – single photo will come from left side moving Double fly by Random fly by Single fly down Single fly up Transition Here is possible to define style of transition between 2 items in Slideshow. Available following options Dissolve Fade in, fade out Zoom in Zoom out Slide left Slide right Random None Zoom effect 11 i-Frame User Manual Grayscale effect Page turn Blinds Zoom in effect Aspect ratio Selection how the screen will be filled out There are 3 options Default – photo is displayed with exact aspect ratio as original Max visible (Aspect ratio preserved) – Photo will use maximum of screen with original aspect ratio. The photo will have mostly border region removed, as the screen ratio is 16:9 and photo will not cover full screen Max visible (Aspect ratio changed) – photo will cover full screen and is adjusted to the screen aspect ratio (therefore not original). Photo is usually heavily modified. Photo order It defines the order how the files and folders are displayed in folder selection and consequently in Slideshow ( random order appears only during Slideshow) Random selection – each presentation is unique as the order will be random Alphabetic order – It works for all items ( Folders&Files) Timestamp order – order according time information Alphabetic order (keep folder structure) – useful for “Recursion ON”. The order will follow first the directories and then the files. Start opacity It defines how slowly/quickly will be new photo displayed (fade-in). Range 0-255, value 0 means slow appearance, value 255 is instant photo appearance. Mostly not needed to change this value. End opacity It defines how slowly/quickly current photo will disappear (fade-out). Range 0-255, value 0 means slow fade-out, value 255 is instant fade-out. Mostly not needed to change this value. Banner options Enable/disable vertical banner of the display on the right side. There are following submenus o Vertical banner left o Vertical banner right 12 i-Frame User Manual o o o o o o o Horizontal banner top Horizontal banner bottom Text speed RSS loation Background color Text font Color font Horizontal/Vertical banner top/bottom Vertical banner left/right Enable/disable banners around the display. There are following options None – banner disabled Fixed image (Device name.JPG) – it displays single image during complete Slideshow. This file must be in JPG format and placed in top directory of the Slideshow with identical name as “Device name” – e.g. iframe.jpg Text from file (Device name.TXT) – it displays the text from ASCII text during complete Slideshow. This file must have TXT extension placed in top directory of the Slideshow with identical name as “Device name” – e.g. iframe.txt (if Device name is “iframe”) This option is suitable for horizontal orientation of i-Frame device. Clock – it displays analogue clock Photo information – if there is identical TXT file as current photo (e.g. pic1.jpg and pic1.txt), then this TXT file is displayed with the photo. If there is not such TXT file, the filename and date of the current photo is displayed. This option is suitable for horizontal orientation of i-Frame device. RSS – the RSS feed is taken according to the RSS location address settings . Text speed If displayed text is longer then screen, then it starts scrolling. Here is possible to select speed of scrolling Very slow Slow Normal Fast Very fast RSS location This field defines the RSS feed address when RSS option for banner selected. Background location 13 i-Frame User Manual Here is possible to define background of enabled banner. Available following colours: Black/Blue/Dark gray/Gray/Green/Light gray/Magenta/Red/White/Yellow Text font Here is possible to choose from more then 20 various fonts (normal, bold..) Color font Font settings for text banner. Available following colors: Black/Blue/Dark gray/Gray/Green/Light gray/Magenta/Red/White/Yellow File mask for Slideshow Here is possible to select (a mask) what types of files are visible in Slideshow . Show photos Show videos Show www lists ( .www) Show playlists (.plst) The WWW file is plain ASCII text with filename ABC.www (using Notepad.exe in Windows means Saving with ANSI Code page, otherwise there will be added some reserved bytes in the header of the file (Unicode, UTF-8), which could cause problem in processing of first line). Each line contains 1 www address, possible to use short names (w/o http or www). Time delay between lines corresponds to the current Delay valid for Slideshow. The PLST file (Playlist file) is plain ASCII text with filename ABC.plst. Each line contains full command for one item within Slideshow. Full details on PLST specification in Chapter 8 – Default settings Date mask for Slideshow Here is possible to select what files are visible within Slideshow, based on Date information. Activate mask type (Disabled, Fixed date, Fixed period) Fixed date (the Slideshow will include files from present date to to the Fixed date as the oldest) Fixed period (the Slideshow will include files within this period only. Example – when set 7days, then Slideshow displays files only from last 7 days only. When Reload enabled, then every new day the files beyond 7 14 i-Frame User Manual days limit will be excluded from Slideshow and new files from current day will be loaded automatically) Note – please check the current date settings (visible in System Menu – Date&Time or here in Options – Date mask for Slideshow). When no internet connection, device will set current date to default 1/1/1970. This will be modified when internet connection available ! Date format Selection of 12hr/24hr time format Enable portrait mode It enables/disables reading of orientation information from EXIF. If selected, all photos are displayed in Portrait mode . Suitable for Slideshow of selected portrait photos. OPTIONS - Network options LAN server As the standard LAN item in menu can search/browse just within current local LAN subnet, this settings is required in following cases 1. Local LAN server, located in the same subnet. Then this option will speed up the availability of this server (typically – 1server in home network) 2. Local LAN server located in other subnet. Then this option is the only way how to reach such server (standard LAN/uPNP search/browse can work in single subnet only) 3. Remote LAN server located anywhere on internet. This option is the only way how to reach this server Note: When used for accessing of remote SMB server, it is often necessary to provide/enable the SMB access on remote router/firewall. Standard open ports required for accessing of the Samba shares are 139 and 445, FTP protocol requires port 21. Fixed server IP address of LAN server Username Password Domain (optional) FTP server 15 i-Frame User Manual FTP server IP address of FTP server used for browsing via FTP option in Main Menu. When requested to use special FTP port ( other then 21 ), use syntax IP_FTP_SERVER:port FTP user FTP password Web browser options WWW starts with Homepage (as defined in WWW address) Empty Using WWW menu item in Main Menu will bring empty screen. Within browser using Menu key on Remote Control will open Bookmark Submenu, where is possible to store favourite websites or load website from this list. Other option how to run html pages (even during Slideshow as standard item) is in using of www file from Folder selection. WWW address This URL address of html page will be used with WWW menu item in Main Menu (e.g. html://www.i-frame.net, www.-frame.net,i-frame.net) Preferred WWW desktop version This option enables to display the html page in full desktop mode as preferred. Flickr account name i-Frame supports direct access to the Flickr accounts. To be able to view Slideshow from Flickr, it is required first to enter the Flickr web address of desired Flickr Photostream. Note: As there have been considerable positive changes in May regarding Flickr user account policy, generally we can summarize there is up to 1TB free space, up to 60 collection, max 200MB/1 picture, max 1GB/1 video ( up to 3mins duration ). Complete info can be found at http://www.flickr.com/help/limits/#150470666 To be able to provide the photos for i-Frame, it is required to create unique Flickr web_address (You – Your_account – Your Flickr web address) – e.g. http://www.flickr.com/photos/naviion/ . In this example, the word “naviion” is the unique web_address and must be entered in the “Flickr account name” dialog. 16 i-Frame User Manual This web_address must be entered prior entering Flickr from Main Menu. Flickr quality It defines quality of downloaded/presented pictures from Flickr. There are 3 levels Low = approx VGA quality Medium = approx HD ready quality High = approx Full HD quality As Flickr is providing various formats from the original pictures on the fly upon request of i-Frame, the exact format/aspect ratio and resolution is based on original files. Note: Please be aware this selection has significant impact on volume of transferred data from server to i-Frame device. Enable reload Synchronization function, for LAN/Flickr/UPnP Slideshow.. It enables/disables reload/synchronization of the current running Slideshow with the remote original Slideshow source. Upon content change on remote server location, the current running Slideshow will be adjusted automatically. Reload interval It defines interval between 2 consecutive controls of server content. Range 1sec – 100hrs. Enable reload must be checked. FTP reporting FTP account It defines the i-Frame account where is device reporting/monitoring to. Standard scenario – Let’s create an i-Frame account on www.i-frame.net web portal . Then, enter this account name into this filed. As a result, you can follow then all i-Frame devices (separated by unique Device_names – see Device name item ) that belong to this account ( grouping ).Now you can get device survey, if running, when being switched on/off, what Slideshow items displayed etc...). Note: First, there must exist such an account on i-frame webportal, if not, start on www.i-frame.net first. FTP reporting It enables/disables reporting to i-frame.net web portal. FTP server 17 i-Frame User Manual Change only when there is request to use CMS portal FTP user / FTP password Credentials for CMS portal. Delay between checks Default 60sec, interval when device communicates with CMS server Include files and folders XML file used for remote communication with CMS server will contain full file listing of all local storage locations (Memory, USB, microSD). It can heavily increase data traffic ( due to high number files and folders) OPTIONS - Audio options Background music It enables MP3 music playback during the Slideshow. The MP3 file(s) must be placed in top directory of the current Slideshow. There are following options Off – music is not played Sequential order – music files are played in the order exactly as displayed Shuffle – music files are played in random order Note: MP3 files are visible in Folder selection, but cannot be selected directly. The visibility is for review of available music files only. Volume Range 0-100, can by adjusted during playback from remote control as well (keys on the side of Remote Control) OPTIONS - System options Start Slideshow after reboot It enables/disables ability to run immediately after restart the last used Slideshow (top line in History). Copy remote files 18 i-Frame User Manual This feature enables unique non-streaming function . First, all requested files for Slideshow are copied to Local memory (must be inserted microSD or USB). Then, the Slideshow is played from this local memory only (therefore no streaming for every picture) This function is very useful for limited internet connection bandwidth or for simultaneous running devices when more video streams could be requested at the same time. In such situation,Wifi router can not provide sufficient bandwidth. Important – when the reload/synchronization function enabled, then upon change of remote files for Slideshow, the files in local memory are synchronized on the background during running Slideshow. Note: When enabled, it can take long time first to copy all files to i-Frame local memory when Slideshow contains a lot of files. Copy folder Here the local storage folder for copied files on USB or microSD is defined. When Copy remote files enabled, then each remote Slideshow creates local copy ( in subfolder ). 3 locations available – SD (default), USB1, USB2 (very rare case) Visible information Selection of status/progress information displayed on screen. Enable photo numbering (Total number of photos and current position) Display progress rotational circle (Show indicator of progress/loading during the Slideshow in the right bottom corner) Check for update (Check for system update over internet. If found, warning message is displayed in bottom line (“New firmware available”). Nothing is processed automatically, it is required to run update manually (Internet update from System Menu) All status information about loading during slideshow (Enables/disables all progress messages during Slideshow) Device name Device name is used for - Using of system special files in Vertical/Horizontal banner - FTP communication and recognition during FTP reporting and remote control (when enabled) Default name is i-Frame + WiFi MAC address. 19 i-Frame User Manual Enable watchdog This enables watchdog that monitors the Slideshows and restarts i-frame device automatically on failure (frozen picture, no response from system...) Reboot options Options to Reboot the device Repeated Reboot (Enabled, Disabled) Repeated Reboot Time (If enabled, then device i restarted at this time every day) Immediate Reboot (Device is immediately restarted) Web interface i-Frame device contains web server that allows direct access to i-Frame via LAN in any web browser. Note - any change requires restart of device. Enable web interface (Enabled / Disabled) Web interface port (default port 8080, can be set any – to access the device in browser, type IP:port in command line, e.g. 192.168.0.100:8080 Username / Password (for device access, default “admin/i-frame”) Language Selection of requested language (English, German, French, Spanish, Czech, Dutch, Portuguese), English default. Load settings File iframe_settings.xml (placed in root of USB or microSD) is loaded into system. Settings contain the History. Save settings Current settings are saved in file iframe_settings.xml (placed in root of USB or microSD). Settings contain the History. Default settings It returns back all settings into factory default setting: Delay between pics Layout Aspect ratio Order of files Start opacity 20 5 Dissolve Default Alphabetic 0 i-Frame User Manual End opacity Show numbering Vertical banner Horizonal banner Text speed Photo/Video Date format Music Volume Reload of files Reload check interval Fixed IP Flickr account Flickr quality Reboot enabled Folder selection after reboot Copy files before start Path of files Device Name Languages Max number of files FTP Reporting FTP account 0 Enabled None None Normal Photo + Video + www dd/MM/yyyy kk:mm Off 50 Disabled 60 Empty Empty Low Disabled Disabled Disabled empty i-Frame-[MAC] English 20.000 Disabled Empty 9. Remote access Intranet direct access Generally, this is direct access within own network. This can be used for larger remote installation but definitely there will happen security issues as open ports on the routers will be needed. The biggest advantage is direct operation with device where all commands and reports are processed immediately. This access relies on Web interface settings in Options. Default, communication is opened via port 8080, with credentials admin/i-frame (all can be modified). Go to System Menu-Status, check current IP address assignment and type in any browser in command line IP_address:port ( example 192.168.0.200:8080). Login popup will appear and enter credentials. 21 i-Frame User Manual The Web interface contains 7 sections ( see bellow ). The i-Frame device can be fully controlled via this Web interface ( including operation with internal memory ). Section “Status” Section “Start slideshow” Section “History” 22 i-Frame User Manual Section “Create playlist” Section “Settings” Section “Timers” 23 i-Frame User Manual Section “Local Memory” Internet indirect remote access This is the most generic type of remote control. This communication is accomplished via independent ftp server. Default used is system i-frame server however communication can be forwarded to any server. As the communication is based on full configuration XML file, full set of commands is supported and it is possible to change any parameter of the device. This access relies on FTP reporting settings in Options. As the device is initializing the communication (out, upload), there is no port security issue and it can be used for large corporate installations. The device is acting according to the XML file located on server, regularly is checking it ( can be set with Delay between checks parameter ( default 60 sec) and in case of any new command or request from GUI of the CMS, the XML file is downloaded and processed in the device. As the final step , device confirms the current status with generation and uploading current XML file back to the server. This XML file contains all parameters used in general device settings and add new commands for Device on/off, Start slideshow and Copy/Delete files to device. 10. Description of system files PLST STRUCTURE 24 i-Frame User Manual This PLAYLIST file can be manually started from filelist or automatically started upon USB/SD insertion ( if filename is “autorun.plst”). Parameters are separated with “,” symbol Parameters are not case sensitive # - lines beginning with "#" and ";" are just comments New line must begin with “SI:”or “HEADER,” (HEADER, just once within each plst, it is valid for all SI: lines. If not defined in HEADER, then value inherits from device current settings) D : delay to the next photo (number in seconds), duration HB : Type of horizontal banner NONE, TEXT, IMAGE, CLOCK, INFO VB : Type of vertical banner NONE, TEXT, IMAGE, CLOCK, INFO ORDER : Ordering of the items RANDOM, NAME, TIME, PATH COPY : false/true if the files should be copied first COPYLOC : Location to copy to TRANS : Used transition to show the photo DISSOLVE, FADE_IN_OUT, ZOOM_IN, ZOOM_OUT, SLIDE_LEFT, SLIDE_RIGHT, RANDOM, NO_TRANSITION, #KEN_BURNS_ZOOM_OUT, GRAY_SCALE, PAGE_TURN, BLINDS LAYOUT: Used layout FULLSCREEN, FOUR_REGIONS, FOUR_REGIONS_CENTERED, RANDOM, CORNERS, SINGLE_FLY, DOUBLE_FLY, RANDOM_FLY, #FLY_DOWN, FLY_UP, MAX R : Find photo also in subfolders (only for DIR) TEXT : Speed of the text VERY_SLOW, SLOW, NORMAL, FAST, VERY_FAST AR : Aspect ratio of the image DEFAULT,STRETCH,ZOOM NUMBER: Numbering TRUE, FALSE TXIM_NAME : Name of the identifier used to retrieve image or text file to be used in a banner. (No extension needed, only file name) TXIM_LOCATION : Location where the image or text file for the banner can be found. SILENT: Surpress visible information during Slideshow, progress rotational circle, loading during slideshow ON, OFF SIPREF: SI preferred item , that runs at defined time not in the sequential order TIM: minute-based parameter within 1-hour cycle SI: Slideshow line with file to be displayed HEADER, - special line defines global parameters for all plst items ( otherwise parameter is valid in given line only ) SD, USB1, USB2, Memory – local storage. Can be used as well relative path to PLST folder, e.g. SI: Subfolder/123.jpg FTP remote location – ftp.i-frame.net/123.jpg or with credentials ftp://username:[email protected]/123.jpg WWW remote location – http://www.cnn.com or www.cnn.com STREAM remote location (when rtcp stream requested) – Stream://www.stream.net Example of plst file HEADER,D:10, LAYOUT:FULLSCREEN, NUMBER:FALSE, SILENT:ON, HB:NONE, VB:NONE, TRANS:DISSOLVE, TXIM_NAME : IF-show,TXIM_LOCATION: SD/iFrame SI:ftp://70199:[email protected]/ds-13.jpg,,HB:info, VB:IMAGE SI:http://www.i-frame.net SI: FolderA/23.jpg # identiical location as PLST file, one folder deeper) SI: USB1/iFrame/ABC.jpg, , ar:zoom, VB:image SIPREF:stream://212.79.96.134:8015, TIM:30, D:300 # This video stream will start repeatedly at reaching 30mins ( 12:30, 13:30 - according system time) and 25 i-Frame User Manual # playback will last 5 minutes ( 300 sec ) ********************************************* PLST file is NOT case sensitive. File locations can be following: Sdcard, SD, Sda1=USB1, Sda2=USB2, Memory, www, ftp, smb…. IFR STRUCTURE .ifr file allows operation with Memory (Memory can be controlled also via local Web access ) Parameters are not case sensitive This file can be manually started from filelist or automatically started upon USB/SD insertion ( if filename is “autorun.ifr”). Processed is according following syntax (XML file): <autocopy> <copy from="USB1/Av" to="MEMORY/Averia/" DeleteBeforeCopy="true"/> <start location="MEMORY/Av"/> <delete location="MEMORY/Av"/> </autocopy> <autocopy></autocopy> obligatory start /end <Copy from=”Source” to=”Destination” DeleteBeforeCopy=”true” Recursion=”true”> if DeleteBeforeCopy or Recursion not present then no Destination delete accomplished and no Recursion <Start location=”Storage_path”/> where is Slideshow immediately started from <Delete location=”Storage_path”/> deletes any file or folder WWW STRUCTURE Simple ASCII file with list of www pages (1line=1URL). Processed with current system Delay, therefore repetition of URL address causes refresh of web page. For Windows users - using Notepad.exe in Windows requests Saving with ANSI Code page, otherwise there will be added some reserved bytes in the header of the file (Unicode, UTF-8), which could cause problem in processing of first line). Save with *.* mask, otherwise there will append .TXT in filename ( LIST.WWW.TXT) which device cannot recognize. www.asc.com http://www.123.com http://www.123.com 26 i-Frame User Manual 11. HOME2 – manual monitor adjustment 27 i-Frame User Manual 12. Limited Warranty As the original purchaser of this product, you receive these warranties from Kobe s.r.o.. Your i-Frame (hereafter referred to as “Device”) will be free from defects in material and workmanship and will perform in substantial compliance with your user documentation accompanying Device for one year from the purchase date providing proper use of Device. Any unauthorized or improper use of Device may cause your warranty to become void. Disclaimer This limited warranty is the only warranty Kobe s.r.o. makes for Device. To the extent allowed by Law, no other warranty applies, whether expressed, implied, or statutory, including any warranty of merchantability, of fitness for a particular purpose, or of non-infringement. This warranty does not cover accidental damage, wear and tear, or consequential or incidental loss. Under no conditions is Kobe s.r.o. liable for loss of or damage to, a computer; nor loss of, or damage to, programs, records, or data; nor any consequential or incidental damages, even if Kobe s.r.o. has been informed of their possibility. 28 i-Frame User Manual