1
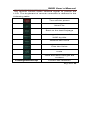
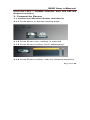
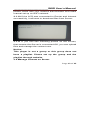
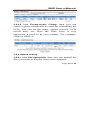
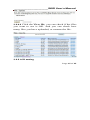
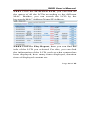
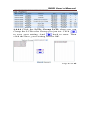
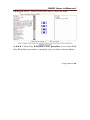
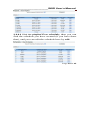
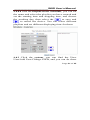
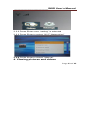
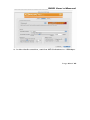
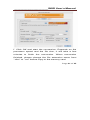
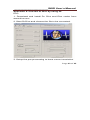
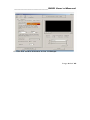
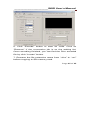
Wireless Signage Display
User’s Manual
_____________________WSD User’s Manual
Table of Contents
1.
Product specification…………………………………4
1.1 Highlight……………………………………………4
1.2 Device Function list.................... .........................6
1.3 Getting started with memory Card……………….7
2.
Remote Control and Keypad…………………………7
3.
Connect to Server……………………………………..9
3.1 Connect to Wireless Router and Server ………..9
3.2 Manage Content on Server……………………...13
3.3 Manual network setting…………………………..22
4.
Viewing pictures and videos………………………...23
4.1 Video Codec list…………………………………..24
4.2 Recommend file format………………………….25
4.3 JPEG file format………………………………….25
Page 2 of 45
_____________________WSD User’s Manual
5.
Other functions……………………………………….26
5.1 Restore factory setting…………………………...26
5.2 LCD display setting………………………………26
5.3 Firmware update………………………………….27
5.4 AutoCopy………………………………………….28
5.5 AutoConfig………………………………………...29
6.
FAQ and trouble shooting…………………………...31
6.1 Frequently Asked Questions…………………….31
6.2 Trouble shooting………………………………….34
Appendix 1: Convert to Divx by using Dr. DivxPro…….37
Appendix 2: Convert to Divx by using Dr. Divx…………42
Page 3 of 45
_____________________WSD User’s Manual
Glossary
Acronym
Description
SOC
System On Chip
HTTP
Hypertext Transfer Protocol
FTP
File Transfer Protocol
Wi-Fi
Type of wireless network
UI
User Interface
GUI
Graphical User Interface
Server
Media
Server
stored
and
with
content
management
software
LCD/LCD Player
Wireless Signage Display with
LCD screen
Frame
Wireless Signage Display with
LCD screen
1. Product specification
Wireless Signage Display is perfect for any application
that requires a robust and extremely low cost WEB
based digital marketing solution.
1.1 Highlight
Page 4 of 45
_____________________WSD User’s Manual
1.1.1 Scheduling and Management. Playlists and media
content can be scheduled to play at specific times of day,
days of the week, or time of the year to reach your target
audience.
1.1.2 User Management and Security Levels. An
unlimited number of user accounts can be created on the
system each with specifically assigned permissions.
1.1.3 Simple Browser Based Interface. The Server
Player Interface allows easy access to manage content
from any web browser. You can even manage your
contents and devices from Android Phone.
1.1.4 Video Integration. Integrate High bit-rate, High
quality, and highly compressed MPEG4, MPEG2 Video
up to resolution at 30fps.
1.1.5 Reporting and Proof of Playback. The reporting
module provides a detailed list of playback timestamps
for each ad, providing the information you need for
invoicing and content tracking.
1.1.6 Display Support and Aspect Ratios. WSD supports
widescreen 16:9 mode, Standard 4:3 mode, and Vertical
Page 5 of 45
_____________________WSD User’s Manual
9:16 poster mode for all display types.
1.1.7 Seamless Content Updates. Updating your content
is instant and seamless. Any updates made to the play
list content are rendered instantly, and playback is never
interrupted.
1.2 Device Function list
1.2.1 Support Secure Digital (SD card and SDHC card)
and Multimedia Memory Card (MMC), Memory Stick/Pro
(Optional), Compact Flash type I/II memory card up to
16GB.
1.2.2 Support standard JPEG photo display up to
30Mega Pixel.
1.2.3 Support the following video format: MPG/AVI
(MPEG1, MPEG2, MPEG4 Motion-JPEG and Divx
codec), up to 720x576, 30fps.
1.2.4 On Screen Display (OSD) menu for brightness
adjustment
1.2.5 Support 8-level Volume adjustment / Mute by
Infrared Remote Control or internet control;
1.2.6 Keypad to operate menu and settings.
Page 6 of 45
_____________________WSD User’s Manual
1.2.7 Build-in speaker with maximum 2W per channel
audio output
1.2.8 Supports firmware updating from memory card or
USB storage device.
1.2.9 Load
network
and
others
settings
from
configuration file in SD Card or USB flash drive.
1.3 Getting started with memory Card
(Ignore this point if the display built with memory.)
Before using the display to play video files or JPEG files,
Please prepare the memory card (here use SD card as
example) according to the following steps:
1.3.1 Format the SD card by computer;
1.3.2 Copy the file (Video or photo) to the SD card
accordingly.
1.3.3 Insert SD card to the card slot of the LCD in the
correct direction.
1.3.4 Connect the power adaptor to the LCD and select
the content from the SD card.
2. Remote Controller and Keypad
Page 7 of 45
_____________________WSD User’s Manual
The remote control emits infrared signal to control the
LCD. The keyboard of remote controller is defined in the
following table.
Turn off the power
Next File
Back to the last file/page
U can get the menu of the
WSD by this
Reduce the voice
Plus the Voice
mute
Click this and u will get the
content
Left/Right/Down/Up
Control the direction
Page 8 of 45
_____________________WSD User’s Manual
Click the LEFT— DOWN—ENTER, then will has the
Restore function
3. Connect to Server
3.1 Connect to Wireless Router and Server
3.1.1 Press Menu to browse Setting page
3.1.2 Press Enter once “setting” is selected
3.1.3 Press Enter to select “Wi-Fi Networking”
3.1.4 Press Enter to select “scan for wireless networks”
Page 9 of 45
_____________________WSD User’s Manual
3.1.5 Choose the correct Wi-Fi network (SSID, check
with your network administrator if necessary)
3.1.6 Enter the password if the WIFI network has a
security password.
Page 10 of 45
_____________________WSD User’s Manual
3.1.7 If SSID and password is correct, the LCD will start
to connect to the WIFI router.
3.1.8 Make sure WIFI router is connected to internet so
the LCD can access to the server on internet.
3.1.9 If the SSID of your WIFI network is not broadcasted,
Page 11 of 45
_____________________WSD User’s Manual
please check with your network administrator and make
manual set up on WIFI network.
3.1.10 If the LCD was connected to Router and Internet
successfully, it will start to download files from Server.
3.1.11 If you can see following picture on the screen,
then means the Server is connected OK, you can upload
files and manage the content now.
Notice:
This player is not a group or this group does not
have a playlist. Please set up the group and the
playlist through website.
3.2 Manage Content on Server
Page 12 of 45
_____________________WSD User’s Manual
The management
program is
running
on
the
following URL: http://www.signagenet.net/
3.2.1 Open the above URL in Internet Explorer and you
will see a login page.
3.2.2 Enter the username and password to login the
system. (Username and password may be different,
please check the username and password provide to you
together with your product.)
3.2.3 Group Setting
3.2.3.1 Click Group-View Group, you can check the
group has been created. You can edit the Group here.
Page 13 of 45
_____________________WSD User’s Manual
3.2.3.2 Click Group-create Group, then you can
create a group which will be used for controlling the
LCD. You can set the name, update interval, LCD
on/off time, etc. Here the Time Zone is very
important, it need to fit your country. For example,
China is GMT+8.
3.2.4 Upload setting
3.2.4.1 Click File-upload file, then you can upload the
files you want to display from your computer.
Page 14 of 45
_____________________WSD User’s Manual
3.2.4.2 Click the View file, you can check if the files
you want to use is OK. And you can check how
many files you have uploaded, or rename the file.
3.2.5 LCD setting
Page 15 of 45
_____________________WSD User’s Manual
3.2.5.1 Click the LCD-View LCD, you can find all
the status of all the LCDs according to the different
MAC. Besides, you can search the LCD by the
keywords/MAC Address/Name/IP Address.
3.2.5.2 Click the Play Report, then you can find the
info of the LCD you selected. For this, you can find
the information of the LCD, such as what content has
been displayed, how many times displayed, duration
time of displayed content etc.
Page 16 of 45
_____________________WSD User’s Manual
3.2.5.3 Click the LCD- Group LCD, then you can
Group the LCD to the Group you just set. Click
to save your setting. And
back to reset. Then
click the Save, your setting will be OK.
Page 17 of 45
_____________________WSD User’s Manual
3.2.5.4 When you get LCD-Assign LCD, you can
assign the different LCDs to a user, then can control
the assigned ones in one time.
3.2.6 Playlist Setting
3.2.6.1 Click the Playlist- Create playlist, then you
can create a playlist Name, and select the files name,
then click t
to the right to save, and
to
cancel,
and
to change the order of the
file you select. Besides, the slideshow delay can be
Page 18 of 45
_____________________WSD User’s Manual
changed here. Then click the save, will be OK.
3.2.6.2 Click the Playlist-view playlist you can find
the Playlist you have created (if you have done that)
Page 19 of 45
_____________________WSD User’s Manual
3.2.6.3 Click the playlist-View schedule, then you can
find the schedule you have created (if you have done
that), and you can edit the schedule here by edit.
Page 20 of 45
_____________________WSD User’s Manual
3.2.6.4 Click the Playlist-create Schedule, you can fill
the name and select the playlist you have created and
set the starting time and stopping time, and choose
to save and
the working day, then select the
to cancel the choice. You can select different
playlists and set different displaying time for them.
3.2.7 Click the system, you can find the View
User/Add User/Change PWD, and you can do there
Page 21 of 45
_____________________WSD User’s Manual
here.
To operate the WSD, the full steps should be this:
Create the Group—Upload the file—Group the
LCD—Create the playlist—Create the schedule—Go
back to the View Group, check if you have chosen the
playlist or schedule and the Time zone.
3.2.8 You can arrange the schedule of one week’s media
content. Define a few playlists at first and create a new
schedule. In the schedule, define the time slot for each
playlist to be added.
3.3 Manual Network Setting
You can set the SSID and IP address manually.
3.3.1 Press Menu to browse Setting page
Page 22 of 45
_____________________WSD User’s Manual
3.3.2 Press Enter once “setting” is selected
3.3.3 Press Enter to select “Wi-Fi Networking”
3.3.4 Press Enter to select” Manual”
4. Viewing pictures and videos
Page 23 of 45
_____________________WSD User’s Manual
4.1 Video Codec list
A codec is a piece of software to define how the video file
is processed; it is a word of Coding and Decoding. Some
codec are developed by commercial companies or
organizations and widely used for different equipments.
The Display supports the following video codec.
Codec
Resolution
name
Bitrate
Audio
Audio
s
format
bitrate
s
MPEG1
720*480
MPEG2
720*480
3000k
MP3/MP2
192kb
8000k
MP3/MP2/
320kb
bps
PCM
ps
2000k
MP3/ PCM
320kb
bps
AVI/MJ
640*480
PEG
AVI/Div
x
ps
bps
720*480
4000k
bps
ps
MP3/ PCM
320kb
ps
5.0+XVI
D
Video files which are not mentioned in the above table
Page 24 of 45
_____________________WSD User’s Manual
may not work well during the playing. In order to achieve
best balance of video quality and capacity of the memory
space, re-encoding of the video files is necessary.
4.2 Recommend file format
Divx format is the one which can have better quality VS
bitrates; it is recommend to be used on this product.
However, there are a few encoding software for Divx, we
suggested to use the official software from Divx, Inc:
DivxPro (Commercial l version) and Dr. Divx (freeware
version) with video bitrate at 1500kbps and audio bitrates
at 160kbps.
Please check appendix to see how to use Dr.Divx or Dr.
DivxPro to do the conversion.
4.3 JPEG file format
The Display can show JPEG photo files. The JPEG file
can have the file extension name as “jpg” or “jpeg”. The
resolution of the JPEG file can be up to 30 Mega pixels.
Inside one folder, every JPEG file will be displayed for 3
seconds. A large JPEG file will need a few seconds to
load into memory if it is placed at the first position. To
Page 25 of 45
_____________________WSD User’s Manual
avoid distortion of JPEG pictures, please make sure the
aspect of JPEG is the same with the LCD. For example,
the 4:3 JPEG file with proper resolution of 1600*1200 is
recommended for 15 inch 4:3 screen.
5. Other functions
5.1 Restore factory setting
5.1.1 Go to "Setting" menu from Main Menu
5.1.2 Click on "Restore Default Setting"
5.1.3 Press "Left", "Down", "OK" key one by one in
order to erase the content on the flash memory on-board
and clear the use's setting, then, it restores to factory
default.
5.1.4 Wait a minute, the LCD will restart automatically, it
means the default settings were restored successfully.
5.1.5 All network settings are cleared. So you have to
scan and connect to your Wi-Fi networks.
5.2 LCD display setting
To get the best display, the LCD has built in On Screen
Display menu to set up the display parameters.
Page 26 of 45
_____________________WSD User’s Manual
Press MENU key on the remote controller, the current
playing will be Paused and the OSD menu will be
popped up. By using the direction keys, you can move
the cursor to the value and press MENU key again to
confirm and save the settings. The screen will update
immediately once the new settings are confirmed. The
brightness, contrast and saturation parameters can be
adjusted to have different display effect.
5.3 Firmware update
The Display supports the updating of firmware from
memory card or USB storage device. Here are the
instructions of updating firmware using SD card.
Please follow the instructions here to update the
firmware if necessary.
5.3.1 Prepare one SD memory card and format it from
computer.
5.3.2 Obtain the updated firmware from reliable source
and copy to the root directory of SD memory card.
Note 1: Make sure the firmware can work with your
hardware!
Page 27 of 45
_____________________WSD User’s Manual
Note 2: Don’t change the filename of the firmware!
5.3.3 Connect the power supply and make sure it is well
connected
5.3.4 Insert the SD card to the card slot of the product
and enter SETTING to select upgrade firmware,
updating will start automatically.
5.3.5 Once the updates completed, the LCD will reboot
automatically, disconnect the power cable and remove
the SD card from the slot. Delete the update file from the
SD card before reusing the SD memory card.
Caution: Do not disconnect the power cable during the
updating process.
Power disconnection during the updating of flash
memory will destroy the firmware.
5.4 AutoCopy
The Display supports the updating of Internal Memory
from USB flash drive. Here are the instructions of
updating contents using USB flash drive.
5.4.1 Prepare one USB flash drive and format it from
computer.
Page 28 of 45
_____________________WSD User’s Manual
5.4.2 Create a folder named “W EB” on the flash drive.
Note 1: Make sure the name is exactly the same with”
WEB”
5.4.3 Place all your contents you want to copy to Internal
Memory into the folder” WEB”.
5.4.4 Create a text file named “AUTOCOPY.TXT” in the
root directory of the flash drive.
Note 2: Make sure the filename is correct!
5.4.5 Plug the flash drive into the USB Host port of
Display, then copying will start automatically and show
the process on the screen.
Caution: Do not disconnect the power cable during the
copying process.
Very Important: All the contents copied from USB flash
drive will be overwritten after you connect the Display to
Content Server. Content from Network has higher priority
than local content. You can disable the wireless network
by restoring to factory setting.
5.5 AutoConfig
The Display can load settings from the file of SD Card
Page 29 of 45
_____________________WSD User’s Manual
and USB flash drive. Here are the instructions of
updating settings using USB flash drive.
5.5.1 Edit a text file named “SYS_CONF.MAD” on your
PC with following content:
[Network]
SSID = WONDEX01; SSID or Network name of your
wireless network
Mode = 2; Encryption of your wireless network, range
from 0 to 3 none -- 0, WEP -- 1, WPA -- 2, WPA2 -- 3
Key = 12345678; Password of your network if applicable
[Audio]
Volume Level = 4; 0-7
sound level
Note: Text after “;” is comment, and will be filtered out by
the Display.
5.5.2 Put this file into the root directory of the flash drive.
Note 1: Make sure the filename is correct!
5.5.3 Plug the flash drive into the USB Host port of
Display, then the display will load the setting from the
config file automatically and then restart the display.
5.5.4 When the Display is restarting, you need plug the
Page 30 of 45
_____________________WSD User’s Manual
flash drive out immediately; otherwise, the settings will
be reloaded looply.
Caution: Do not disconnect the power cable during the
loading process.
6. FAQ and trouble shooting
6.1 Frequently Asked Questions
1. Q: Why some video files will cause the LCD display
hangs up?
A: Some video files are not supported due to the
codec or high data rate. Those files need to be
re-encoded to official DIVX format to achieve smooth
video.
2. Q: Is XVID codec supported by the LCD player?
A: XVID is only partially supported. Because XVID is
an open source project and there are too many encoding
software for XVID and some of them will have different
compressing algorithms. It is difficult to support such
non-standard formats. Please use Divx codec to have
similar quality and compression ratio.
Page 31 of 45
_____________________WSD User’s Manual
3. Q: Why there is no sound?
A: Firstly, please check the volume setting by remote
controller, the sound level should not be “0” or at the
MUTE status. If the volume setting is correct, please
check the video clip on computers to make sure if there
is any audio track inside the file. If the audio track is
coded by PCM (Pulse coded modulation) with high data
rate, it may also cause the sound problem. To solve this,
please re-encode the file with MP3 or AC3 sound track.
4. Q: Why the remote controller can not work?
A: There is an insulation plastic attached to every
remote controller to avoid battery discharging during the
shipment of the product. Please remove the plastic
before using the remote controller. The receiver lens is at
the lower center of the LCD, please make sure it is clean
and nothing placed between the lens and the remote
controller.
5. Q: Sometimes, the remote just stops communicating
with the unit. Have to turn the unit off and back on to get
it to work.
Page 32 of 45
_____________________WSD User’s Manual
A: Maybe the battery of the Remote Control is too low.
You can try to change one.
8. Q: When use the Menu button on the remote or the
unit, there is no way to go back to “play” mode using the
remote,
A: You have to take it up to the top level, and then wait
for the unit to automatically go back into play mode.
9. Q: When I do have a memory card connected, I can
select that from the menu, and it will loop on those
images in that card. However, in connected play, it
doesn't just play that one image, it seems to go back into
the internal memory and play everything there even
though the slideshow for connected play only shows one
photo.
A: Yes, for connected play, it was playing all contents
downloaded from server in WEB dir of internal memory.
10. Q: Can I mount the unit in a vertical (portrait)
orientation?
The mounting system on the back is setup
for a horizontal mounting only.
A: Sure. We have some model of frame that with
Page 33 of 45
_____________________WSD User’s Manual
VESA mount at the back of the Frame. We can also
support rotating the pictures according the Frame's
orientations automatically by adding a sensor.
6.2 Trouble shooting
Please use the following flowchart to do trouble shooting
for the product if necessary.
6.2.1 LCD does not show online while checking from
Browser
Check if LCD connected to the WIFI router by the
following steps:
1. Press Menu to browse setting page and press enter to
enter the settings.
2. Select “wifi networking” and press enter to see the
details. If the wifi connection is successful, you can see
there is an IP address shown there. If not, re-scan the
wifi networking and make sure the password is correct
and connect again. If there is an IP address, you should
check if the WIFI router is connected to the internet.
3. Verify the connection by checking if a computer
connected to the same WIFI router can access the
Page 34 of 45
_____________________WSD User’s Manual
internet.
4. Check the” Server address” setting is correct.
5. Check if there any Firewall in front of the Router/AP.
6.2.2 No display/dark screen
1. Press ESC or MENU key on remote to return to main
menu.
2. Check power adaptor if it is working ok
3. Check the connection of power adaptor
6.2.3 No Sound
1. Check if the setting is mute or sound level 0
2. Check if the video clip has sound track
6.2.4 Dark screen but has sound
Check the video format if it is supported. Some video
files will cause such problem if the Audio codec is MP3
but the video codec is unknown type.
6.2.5 No Playable file
1. Check if the correct folder names were created under
the root directory of SD memory card.
2. Check if the video files with the correct file extension
name, it should be MPG (for MPEG1 and MPEG2) or AVI
Page 35 of 45
_____________________WSD User’s Manual
(for DIVX/XVID codecs).
6.2.6 LCD does not download files from the server while
the status is online.
Check if the LCD is assigned to a group and also the
group has a valid playlist. If playlist and group setting are
correct, try to power off and power on the LCD to force it
to connect to the server one more time. The downloading
process will start within 3 minutes.
6.2.7 LCD does not automatically turn on or turn off
according to the settings in the group
Check if the LCD is assigned to a group and also the
group has a valid setting on LCD ON, LCD OFF and time
zone. You need to set up the time zone properly in order
to make the on/off time to be correct. You also need to
restart the LCD when you changed the time zone
settings. You can access LCD’s Settings to see if the
clock is correct. If the clock is correct and that means the
LCD has a correct time zone setting and synchronized
the time with the server.
Page 36 of 45
_____________________WSD User’s Manual
Appendix 1: Convert to Divx by using Dr. DivxPro
The following steps show how to convert other video
formats into official DIVX video files.
1. Get the encoding software: DivxProor Dr.Divx and
install to your PC, windows XP operation system is
necessary. DivxPro is the commercial software from Divx,
Inc, it can be purchased from Divx.com. Dr.Divx is a
freeware and can be downloaded from Divx website.
When you are using Dr. Divx, the codec software needs
to be downloaded and installed together.
a. Start DivxPro from your PC and choose the file which
you want to convert the file format.
b. Choose advanced settings and set the encoding
parameters accordingly.
Page 37 of 45
_____________________WSD User’s Manual
c. In the Video section, set the advanced setting as the
following picture.
Page 38 of 45
_____________________WSD User’s Manual
d. In the codec section, adjust the bitrates of video to
1500kbps.
Page 39 of 45
_____________________WSD User’s Manual
e. In the Audio section, set the MP3 bitrates to 128kbps.
Page 40 of 45
_____________________WSD User’s Manual
f. Click OK and start the conversion. Depends on the
processor speed and the file size, it will take a few
minutes to finish the conversion. When conversion
finished, please change the file extension name from
“.divx” to “.avi” before copy to the memory card.
Page 41 of 45
_____________________WSD User’s Manual
Appendix 2: Convert to Divx by using Dr.
Divx
1. Download and install Dr. Divx and Divx codec from
www.divx.com
2. Start Dr.Divx and choose the file to be converted.
3. Setup the pre-processing to have correct resolution.
Page 42 of 45
_____________________WSD User’s Manual
4. Set the Codec to have 1500kbps bitrates.
Page 43 of 45
_____________________WSD User’s Manual
5. Set the audio bitrates to be 160kbps.
Page 44 of 45
_____________________WSD User’s Manual
6. Click “Encode” button to start en code. Click on
“Resume” if the conversion job is on the waiting list.
Once encoding finished, you can find the Divx encoded
file by click “Locate” button.
7. Rename the file extension name from “.divx” to “.avi”
before copying to SD memory card.
Page 45 of 45