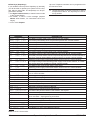
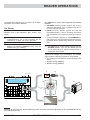
1
2.00
EN50131
Expandable Hybrid Control Panel
User Manual
Default User PIN: 0001
ISO 9001
9105.BNT1
ISO 9001
IT-52587
OHSAS 18001 OHSAS 18001
9192.BSEC
IT - 60983
ISO 14001
9191.BNT2
ISO 14001
IT-52588
Installation of the system must be carried out strictly in accordance with the instructions described in this manual, and in
compliance with the local laws and bylaws in force.
The ABSOLUTA Control panels have been designed and manufactured to the highest standards of quality and performance.
The ABSOLUTA Control panels have no user-changeable components, therefore, they should be serviced by authorized
personnel only.
BENTEL SECURITY does not assume responsibility for damage arising from improper application or use.
The manufacturer recommends that the installed system should be completely tested at least once a month.
Hereby, BENTEL SECURITY, declares that ABSOLUTA Control panels comply with the essential requirements and other
relevant provisions of Directives:
1999/5/EEC The R&TTE Directive
2006/95/EC The low Voltage Directive
2004/108/EC The Electromagnetic Compatibility Directive
This panel complies with EN50131-1: 2008, EN50131-3: 2009 and EN50131-6: 2008
Security Grading: 2
Environmental Class: II
MAINTENANCE
Please verify the correct operation of security system at least once a month.
Periodically, perform the steps below.
— Remove dust accumulation on the panel container, with a damp cloth without use any type of solvent.
— Check the status of the connections and wires.
— Check inside the panel there are no foreign bodies.
— For other security-system devices, such as smoke detectors, infrared and microwave detectors, and inertial detectors, refer
to the instructions for maintenance and testing.
RECYCLING INFORMATION
BENTEL SECURITY recommends that customers dispose of their used equipment (panels, detectors, sirens, and other
devices) in an environmentally sound manner. Potential methods include reuse of parts or whole products and recycling of
products, components, and/or materials.
For specific information see: http://www.bentelsecurity.com/index.php?o=environmental
ELECTRICAL AND ELECTRONIC EQUIPMENT (WEEE) DIRECTIVE
In the European Union, this label indicates that this product NOT be disposed of with household waste. It should be
deposited at an appropriate facility to enable recovery and recycling.
For specific information see: http://www.bentelsecurity.com/index.php?o=environmental
NOTE
In addition to User Manual, the Installation Manual is also available for the ABSOLUTA control panel.
This manuals may be purchased separately, or downloaded, free of charge, from the BENTEL SECURITY website:
www.bentelsecurity.com.
The control keypads of ABSOLUTA control panel are the CLASSIKA and PREMIUM LCD/LED keypads.
ABSOLUTA control panel supports both the new key readers of the ECLIPSE 2 series and the previous versions of
ECLIPSE series.
BENTEL SECURITY srl reserves the right to change the technical specifications of this product without prior notice.
TABLE OF CONTENTS
INTRODUCTION
5
READER OPERATIONS
25
Glossary
Keypads parts
Models
5
5
5
The Reader
The Digital Key
The Reader's Light Indicators
Key at Reader
No Key at Reader
Multiple Systems
Key operations
No Action
Disarm
Away Arm
Arm — A Mode
Arm — B Mode
Disarm Patrol
False Key
The Wireless Key
Away Arming (<)
Stay Arming (=)
Disarming (>)
Other functions (!)
Low Battery
25
26
26
26
26
26
26
26
27
27
27
28
28
28
28
28
28
28
28
28
TELEPHONE OPERATIONS
29
Remote Access via Dialler mode
Remote Access via Answer mode
Typing-in your User PIN
Entering Commands
Cancel Command (#)
On Hook (*)
Remote Talk/Listen-in (1)
Zone/Partitions status (2)
Turn Reserved Outputs ON/OFF (3)
Panel Arming/Disarming (4)
Arm/Disarm Single Partitions (5)
Enable/Disable Teleservice (6)
Clear call queue (7)
Alarms Reset (8)
Disable Current User PIN (9)
29
29
29
30
30
30
30
30
30
31
31
31
31
31
31
SMS OPERATIONS
33
Events Controlled by Caller ID
Events Controlled by SMS
Partition Status
Credit Check
Disabling a PIN
33
34
35
35
35
APPENDIX
37
PIN list
Arming block conditions
37
37
KEYPAD OPERATIONS
Adjusting Volume, Brightness, Contrast
Adjusting Buzzer Volume
Contrast Adjustment
Brightness adjustment
LEDs and signals on Keypads
LEDs and signals on LED Keypads
View signals on LED Keypads
View Partition Status mode on LED keypads
LEDs and signals on LCD Keypads
Display
View Signals on LCD Keypads
View Partition status on LCD Keypads
Fast Keys (Superkeys)
Basic (Arming) Commands
Arming (<PIN> ON)
Disarming (<PIN> OFF)
A, B, C and D Arming (<PIN> A, B, C or D + ON)
Notes on Arming from Keypads
Silencing Alarm Devices from Keypads
Wrong PIN
User PIN/Menu Structure
Accessing the User menu (<PIN> ENTER)
Action
Alarm Reset (1.1)
Extra Time Request (1.2)
Clear Call Queue (1.3)
Teleservice Request (1.4)
Alarm Signals Test (1.5)
Outputs (ON/OFF) (1.6)
Arm Partition (Disarm) (1.7)
Zone Test (1.8)
Clear Fault/ Tamper (1.9)
Program
ON/OFF Answering (2.1)
Enable Installer (Teleservice) (2.2)
Auto-Arm (2.3)
Date/Time (2.4)
PIN Programming (2.5)
Telephone Numbers (2.6)
Change My Pin (2.7)
Zone Bypass (2.8)
Enable/Disable Key (2.9)
View
View LOG (3.1)
Zone Status (3.2)
GSM Module Status (3.3)
Incoming SMS
7
7
7
7
7
7
7
7
7
8
8
8
8
10
11
11
11
12
12
12
12
13
13
14
14
14
15
15
16
16
17
17
18
18
18
19
19
20
20
21
21
22
22
23
23
23
24
24
1
2
9
9
1
05.May.10
13.54
Enter PIN
2
3
4
5
9
10
11
12
13
6
14
7
8
15
16
8
8
7
1
1
7
6
6
3
3
8
A)
1
2
1
05.May.10
8
C)
1
13.54
9
Enter PIN
8
7
10
11
12
13
14
15
16
8
7
3
3
8
8
5
4
5
4
D)
B)
Figure 1 ABSOLUTA supported keypads: A) PREMIUM LCD, B) CLASSIKA LCD, C) PREMIUM LED, D) CLASSIKA LED.
Max Number of Keypads (LCD + LED)
Max Number of LED Keypad
Number of user PINs
Number of keys
Number of Key readers
Number of input expansions
Number of output expansions
Number of power supply stations
Max number of wired zones
Max number of wireless zones
Total max number of combined
(wired+wireless) zones
Number of partitions
Max number of output
Max telephone numbers
ABSOLUTA 16
8
8
31
64
16
32
16
0
16
32
32
ABSOLUTA 42
8
8
63
128
32
32
16
4
42
32
42
ABSOLUTA 104
16
8
127
250
32
32
16
4
104
32
104
8
6
32
8
20
32
16
50
32
Table 1 ABSOLUTA Panel Series Features.
4
Expandable Hybrid Control Panel
ABSOLUTA
INTRODUCTION
Read this guide thoroughly to learn how to use your
system. See the Glossary to learn about the words used
in the instructions.
LED Keypad A command keypad with LEDs. Your Control panel can be controlled via LED Keypads.
Log A list of the last 2000 events
n Glossary
Alarm Zone A limited area of the premises monitored
by detectors (e.g. Motion detectors, Door/Window contacts, etc.).
BPI Device A peripheral device connected to the Control panel by a 4 pin conductor.
Beep An audible signal emitted by the Keypad each
time a key is pressed, or when requested operations
have been completed.
Buzz An audible signal emitted by the Keypad to indicate that a requested operation is impossible, or has
been denied (for example, automatic exit from the User
Menu at a LED keypad).
Buzzer An audible signalling device inside Keypads
and PROXI Readers.
Central Station A private Security Company your
Control panel will send Alarm, Trouble and Emergency
messages to (that is, if remote monitoring is enabled).
Detector A device which signals alarm conditions (e.g.
Glassbreak, Forced entry, etc.).
Dialler A device which sends voice message to programmed phone numbers.
Digital Communicator An integrated on-line device
that sends digital signals.
Digital Key An electronic control key with a random
PIN (selected from over 4,294,967,296 billion combinations).
Display An
Keypads.
alphanumeric
screen
on
the
Reader A peripheral control device which accepts
commands from Digital Keys/Cards (e.g. PROXI Proximity Reader, ECLIPSE2 Readers).
Real-time Instant Audible/Visual signals or communications.
Telemonitoring A remote-monitoring service provided by
a Central Station. This feature will allow the Control panel to
transmit real-time events (e.g. Forced entry, Tamper,
Alarms, etc.) to the Central station.
Teleservice A remote-maintenance service provided
by your Installer. The Teleservice feature allows the Installer to operate on your system over the phone.
n Keypads parts
Figure 1 shows the main components of the PREMIUM
and CLASSIKA Keypads:
P.
1
2
3
4
5
6
7
8
9
LCD
LCD Keypad A command keypad with a display. Your
Control panel can be programmed and controlled via
LCD Keypads.
LED A small coloured light on the Keypads and Readers.
ABSOLUTA
Partition A section of the premises. Each Partition can
have its own Times, PINs and Digital Keys/Cards, etc.
DESCRIPTION
Function LEDs.
Display.
Keys.
Down flip.
Information chart.
Proximity Reader sensitive field.
Fast Keys (Superkeys).
Arrow (scroll keys).
Proximity Reader function LEDs (refer to
"OPERATING YOUR SYSTEM FROM A
READER" section).
n Models
This Manual is designed for anyone using a Control
panel from the ABSOLUTA range. Most of the features
described in this Manual are included on all
ABSOLUTA Control panels. However, some features
are included on certain models only, in such cases, the
name of the Control panel will be specified (see Table 1).
INTRODUCTION
5
LEDs COLOUR
Red
I
a
Red
G
Amber
V
Green
T
Red
S
Red
X
Amber
P
Amber
OFF
ON
Slow Blinking
OFF
ON
Slow Blinking
Fast Blinking
OFF
ON
Slow Blinking
OFF
ON
Slow Blinking
OFF
ON
OFF
ON
OFF
ON
Slow Blinking
Fast Blinking
OFF
ON
Fast Blinking
DESCRIPTION
All the Keypad Partitions are Disarmed.
At least one of the Keypad Partitions is Armed.
During the selection of the single partition.
No alarms or tampers is present.
At least an alarm or tamper is active.
at least one alarm or tamper is in memory or restore of tamper.
Alarm or Tamper at least on one zone or Tamper of Control Panel.
No Trouble.
When the control panel is disarmed, comply with EN50131 at least one Trouble condition, or Tamper, Inactivity, Alarm or memory of alarm, bypassed
zones is present before entering User Menu.
When the control panel is armed the LED is OFF.
A restoral of Fault is in memory.
At least one block condition is present when it is arming.
Ready to Arm: All the Unbypassed Alarm Zones are in Standby status.
At least one block condition is present when it is arming.
No Tamper.
At least one Tamper condition in Memory.
Control panel Closed.
Control panel Open.
All the zones of the Keypad Partitions are Unbypassed, and not in Test status.
At least one of the zones of the Keypad Partitions is Bypassed and in Test status.
At least one zone is in Test status.
At least one zone is Bypassed.
The Installer is Disabled: see User Menu, Enable Inst.
The Installer is Enabled: see User Menu, Enable Inst.
User menu accessed.
Table 2 Real-time signals on LED Keypads.
G
F
R
L
d
x
Amber
Red
Red
Red
/
Red
Red
Red
15
16
Red
Red
See Table 2.
ON Indicates Blown fuse (the fuse protecting the power supply to the detectors).
ON Indicates 220 V Mains failure.
ON Indicates Low Battery, Battery Trouble.
ON
ON
Slow Blinking
Fast Blinking
ON
ON
ON
Indicates that all PINs are set to Factory Default.
Indicates Ongoing call.
Indicates Line down.
Indicates Ongoing call after "Line-down" event.
BPI Trouble (e.g. one of the control or signalling devices is out-of-service).
Indicates that at least one Wireless Zone Detector is Missing.
Indicates that at least one Wireless Zone Detector has a Low Battery.
Table 3 "View Signals" on LED Keypads.
I
Red
1 to 8
Red
ON
OFF
Slow Blinking
OFF
At least a partition, enabled on keypad, is armed.
No one partition, enabled on keypad, is armed.
During the selection of the partitions.
Partition Disarmed, if the LED I is ON;
Partition Not Assigned, if the LED I is OFF.
ON Partition Armed, If the LED I is ON;
Partition Assigned, if the LED I is OFF.
Table 4 'View Partition Status' on LED Keypads.
6
Expandable Hybrid Control Panel
ABSOLUTA
KEYPAD OPERATIONS
ABSOLUTA can manage up to 16 PREMIUM LCD and
PREMIUM LED keypads, CLASSIKA LCD and
CLASSIKA LED Keypads (Figure 1).
1a) To increase the brightness, press and hold the A
key until the desired level is obtained:
1b) To lower the brightness, press and hold the B key
until the desired level is obtained:
Adjusting Volume, Brightness, Contrast
n Adjusting Buzzer Volume
The Buzzer, inside the LED and the LCD Keypad, will
emit an audible signal each time a valid key is pressed
and, if enabled by your Installer, will also signal:
the Exit Time (signalled by slow beeps), the Entry Time
(signalled by fast beeps), errors or Invalid requests (signalled by a Buzz), request Accepted or Done (long
beep), violation of a ‘Chime’ zone, key/Card programming done, Auto-arm Timeout.
To adjust the volume of the internal buzzer:
1) Press and hold the ESC key; the internal buzzer will
start sounding a series of beeps in such manner that the
operator could hear the sound level in real time. Release
the ESC key.
2a) To increase the volume, press the A key a number of
times and/or hold until the desired level is obtained:
2b) To lower the volume, press more times and/or hold B
key until the desired level is obtained.
3) To confirm the chosen level, press the ENTER key
(or wait a few seconds for the keypad to return to the inactive state).
buzzer will still emit sound alerts at extremely
+ The
low volume, even if it has been set to zero.
n Contrast Adjustment
To adjust the contrast of the LCD display, press and
hold:
Ø C to decrease contrast
Ø D to increase contrast
To confirm the selected levels, press ENTER (or simply
wait a few seconds and the keypad will automatically return to the stand by status) (see the PREMIUM keypad
manual for further information).
n Brightness adjustment
It is possible to adjust the brightness of the keys. On the
LCD version the brightness of the backlighting of the
display may also be adjusted. It is also possible to adjust the inactive and the active brightness (the inactive
brightness is the brightness to which the keypad reverts
after 10 seconds of inactivity.
To adjust the active brightness, follow the procedure
described below:
ABSOLUTA
2) Press the OFF key to adjust the inactive brightness:
3a) To increase the brightness, press and hold down
the A key until the desired brightness is reached:
3b) To reduce the brightness, press and hold down the
B key until the desired brightness is reached:
4) Press the ON key to adjust the active brightness and return to step 1a), or press the ENTER key to confirm the
chosen levels, or wait a few seconds for the keypad to return to the inactive state.
LEDs and signals on Keypads
The Keypad signals the system status by its LEDs, display and internal buzzer.
n LEDs and signals on LED Keypads
Table 2 shows the meaning of the real-time signals on
the Keypad LEDs.
n View signals on LED Keypads
Table 3 shows how the Keypad lights will signal the various troubles, Alarm, Tamper or Alarm memory.
From standby status, enter the User PIN (default 0001)
and then press ENTER to access the View signals mode.
Press ESC to exit. Comply EN 50131 (option enabled), if
the Control panel has stored a Trouble, or zone Alarm,
Tamper event, alarm memory the G LED is on.
A In order to with the EN50131-1 and EN50131-3
standards, EN50131 option must be enabled (ask
your installer).
n View Partition Status mode on LED keypads
Table 4 shows how the Keypad lights will signal the status of the Partition.
+ The LED Keypad supports only the Partition 1 to 8.
From standby status, enter the User PIN (default 0001)
and then press ENTER to access the View Partition
Status mode.
Press ESC to exit View Signals.
The View Partition Status will exit automatically after 30
seconds of inactivity.
KEYPAD OPERATIONS
7
n LEDs and signals on LCD Keypads
Table 5 shows the meaning of the indicator LEDs on the
PREMIUM LCD and CLASSIKA LCD Keypads.
n Display
May/26/10 13:54
Enter PIN
During standby status, the display top line shows the
Date and Time, and the bottom line shows the message
Enter PIN. After you have entered a valid PIN, the
display bottom line shows the Partition Status (Figure 2
and Table 6), Troubles (refer to Table 7) and other information (Table 8).
lower line of the display reads "New Message"
+ The
when the GSM Module receives an SMS message
(See "Viewing>Incoming SMS Message" later in
this chapter).
n View Signals on LCD Keypads
Enter your User PIN (default PIN= 0001) and then press
the ENTER key. Comply EN 50131 (option enabled), if the
Control panel has stored a Trouble, or zone Alarm, Tamper event, alarm memory the G LED is on.
the View of Alarms, Tampers and Faults
+ During
you can press the OFF Key to activate the procedure for their clearing. Besides for Tampers and
Faults only you can press 0 (zero) to Restart the
BPI procedure.
n View Partition status on LCD Keypads
The "View Partition status", (Keypads can operate
ONLY on the Partitions they are assigned to), and the
relative character of the partition will blink if the partition
has in memory an Alarm or Tamper.
May/01/10 10:50
DDDDDDDDxxxxx**ÿ
1 2 3 4 5 6 7 8 STbfstri
keypad will stay in the "View Partition status" for
+ The
30 s max and then return to the standby status.
During the View Partition status it is possible to perform the basic operations.
Press D and C to scroll the Keypad's Partitions.
Label AREA
AAADDDDDx x
01
The signals, Trouble, zone Alarm, Tamper event, and
alarm memory, will be shown in the following order after
the ENTER key is pressed:
Alarms,
Tamper,
Troubles,
Bypassed zones,
Active zones.To go back press the ESC key.
Press:
Ø OFF to Disarm the Partition;
Ø ON to Arm the Partition in Away Mode;
Ø A then ON, to Arm the Partition in Stay Mode;
Ø B then ON, to Arm the Partition in Instant Stay Mode.
The first line of display will show the description of the
zone concerned, as follows.
The first 8 characters on the LCD bottom line show the
status of the Keypad Partitions (Table 6).
The characters n. 9 to 13 on the LCD bottom line show
the trouble conditions (Table 7).
The last 3 characters on the LCD bottom line show the
status of Teleservice, Answering Machine and Telephone line (Table 8).
BYPASS! 001/002
ZONE 023 LABEL
12345678STbfstri
If the Control panel has stored several troubles: use A
and B key to scroll the display.
TAMPER 002/002
AS line
Label
AREA
ARMED
01
PREMIUM LCD and CLASSIKA LCD Keypads,
+ On
the numbers below the display will correspond only
to the first 8 Partitions.
Press ESC to quit the View Partition status.
Scheduler enabled
if blinking
Date
Partitions
Status
05/May/10 *13:54
DDADDDAA X
* ÿ
1 2 3 4 5 6 7 8
Time
Troubles
Tampers
Controls
May/01/10 10:50
DDDDDDDDxxxxx**ÿ
After a few seconds the Keypad go back to standby status:
May/01/10 10:50
Enter PIN
Figure 2 The display of a LCD keypad during View
partition status (MAIN PAGE).
8
Expandable Hybrid Control Panel
ABSOLUTA
LEDs
DESCRIPTION
OFF All the keypad Partitions are Disarmed.
I
a
ON At least one of the keypad Partitions is Armed.
Slow Blinking During the selection of partitions.
OFF NO alarms or Tamper active.
G
ON At least one Alarm or Tamper active.
Slow Blinking All Alarm Partition and Tampers are in memory (restored).
OFF When the Keypad's Partitions are disarmed, it signals no info to communicate.
ON When the Keypad's Partitions are disarmed, it signals: Alarms, Tampers, Troubles, Bypassed
Zones, if the Keypad is in Standby Status; Troubles, in the View Partition Status mode.
When a Keypad's Partitions is armed, this LED is disabled.
Slow Blinking All troubles in memory (restored).
The zone Alarm and Tamper events, signalled on the LEDs, refer to zones which belong to the keypad Partitions.
Table 5 LCD keypad.
INITIAL
MODE
DESCRIPTION
Away The system will turn ON the perimeter and internal zones of the respective Partition.
Stay The system will turn ON the perimeter zones of the respective Partition and will leave
the internal zones OFF.
A
P
Z
Stay - 0 Delay The system will turn ON the perimeter zones of the respective Partition and will leave
the internal zones OFF, and will remove the Entry Time from zones which have one.
D
t
*
!
Disarm The system will turn OFF the perimeter and internal zones of the respective Partition.
Test At least one zone is in Test status for the relative partition.
Alarm Partition The corresponding partition is in Alarm Status.
Alarm Memory The corresponding partition has an Alarm in memory.
If the partition is selected, the letters will blink.
Table 6 Arming/Disarming Partitions (LCD Keypads).
ICON SIGN
S
X
T
X
b
X
f
X
s
X
ON
Blinking
ON
Blinking
ON
Blinking
ON
Blinking
ON
Blinking
DESCRIPTION
Control panel Tamper (Control panel open or dislodged).
Control panel Tamper has cleared but at least one Open Panel event in memory.
System Tamper.
System Tamper has cleared but there is at least one System Tamper event in memory.
Tamper on at least one peripheral device (Keypad, Reader, Expander or Receive.
Peripheral Tamper has cleared but there is at least one Peripheral Tamper event in memory.
A False Key/Card is present at a Reader.
At least one False Key/Card event in memory.
A peripheral device (Keypad, Reader, Wireless or Expander) has been disconnected.
At least one Peripheral Trouble event in memory.
Table 7 tamper signals (LCD Keypads).
ICON SIGN
t
*
r
*
i
ÿ
OFF
ON
Blinking
OFF
ON
OFF
ON
Blinking
DESCRIPTION
Installer Disabled.
Installer Enabled.
PIN Transfer Enabled.
Answerphone facility Disabled.
Answerphone facility Enabled.
Line Free.
Line Busy.
Line Down.
Table 8 Telephone signals (LCD Keypads).
ABSOLUTA
KEYPAD OPERATIONS
9
n Fast Keys (Superkeys)
If your Installer has set up the 3 Superkeys (1, 2 and 3),
you will be able to operate your system from the keypad, without using PINs. The Superkeys can be programmed to activate:
Ø the Digital Communicator, to transmit event codes
to the Central Station;
Ø the Dialler, to send a voice message (requires
AS100 Audio Station, for customized voice messages);
Ø one or more Outputs.
MESSAGE
Up to 32 Telephone numbers can be programmed for
the first two actions.
the Superkey for at least 4 seconds. A beep of
+ Hold
acceptance will follow. The Superkeys are not active by default.
DESCRIPTION
Panel
Panel
Panel
Panel
Panel
Panel
Panel
PSx
PSx
bat. low
bat. fail
NO batt.
bat.charg
NO 220v
PSU
low Vout
bat. low
bat. fail
The Battery voltage of the Control panel is less than 11.4 V.
The control panel battery does not pass the Dynamic test. Call the Installer.
The control panel battery is disconnected or absent. Call the Installer.
The control panel is not capable to recharge the battery. Call the Installer.
The Mains power of the Control panel has failed . Call the Installer.
Switching power supply does not work. Call the Installer.
PSx
PSx
NO batt.
bat.charg
Switching power supply of the Power station x does not work. Call the Installer.
The Output voltage of the Switching power supply of the Power station x, is outside
the normal range min 10.2 V max 14.7 V. Call the Installer.
PSx
PSx
PSx
PSx
NO 220v
PSU
low Vout
bat. disc.
The Mains power of the Power station x has failed.
Switching power supply of the Power station x does not work. Call the Installer.
The Power station xis not capable to supply the right output voltage. Call the Installer.
The battery of the Power station x is disconnected when you switch on the Power station x. Call the Installer.
Switching power supply of the Power station x is disconnected. Call the Installer.
Short circuit on Output y of the Power station x. Call the Installer.
The Control panel Clock has been set/unset to Daylight savings time.
PSx
SWT disc.
PSx Vouty short
summer time
Fuse B
Fuse zones
Fuse BPI
Fuse Keybus
Inst. Maintenan.
Surve.Maintenan.
Default Date
Inst. access
Delinquency
Tel. Line
Tel. comm. FTC
WLS batt. low
The output voltage of control panel is low. Call the Installer.
The battery voltage of the Power Station x is less than 10.9 V. Call the Installer.
The battery of Power station x does not pass the Dynamic test or it is disconnected or
the Fuse -protects against Battery polarity inversion- is broken. Call the Installer.
Fuse B is opened -protects the Siren Output.
Zone Fuse is opened-protects the Zones power line.
BPI Fuse is opened-protects the BPI line.
Keybus Fuse is opened-protects the Key-bus.
The date of the periodic checks of the Installer has expired.
The date of the periodic checks of the Central Station has expired.
The Mains power of the Control panel has failed, and the internal clock went to the default -hour/date-. Reprogramming Hour/Date.
The control panel programming has been changed.
The zone"Inactivity Time" has expired, from when the status zone is changed.
Telephone line failure.
A telephone message failed to reach destination.
Low Battery on one or more Wireless devices.
Table 9 Faults -View trouble-
10
Expandable Hybrid Control Panel
ABSOLUTA
Basic (Arming) Commands
You can control seven basic commands From standby
status by typing-in your PIN and pressing the respective
keys (refer to the following Table). Access to ALL commands require entry a valid User PIN.
Factory Default Master User PIN (0001)
! The
must be changed for security reasons (refer to
"Change my PIN" in this section).
Key sequence
(from standby status)
COMMAND
n Disarming (<PIN> OFF)
This command will Disarm all the common Partitions of
the User PIN and the Keypad concerned.
Disarm under Duress (PIN with Duress option enabled). This command requires entry of a Duress PIN.
The Control panel will Disarm the Partitions and will
send the programmed Alarm calls but will not signal the
outgoing calls on the Keypad (usually signalled by a ÿ
over the i icon).
PINs are for forced disarming (disarming
+ DURESS
under threat). The Duress PIN will disarm the system and activate the Digital Communicator— that
will call the Central Station, and dialler—that will
send recorded voice messages to the programmed
telephone numbers.
<PIN> OFF Disarm
<PIN> ON Arm
<PIN> A+ON A Mode Arm
<PIN> B+ON B Mode Arm
<PIN> C+ON C Mode Arm
<PIN> D+ON D Mode Arm
<PIN> ENTER View Area status, if there are
no Troubles. From the View
Area status or Trouble
screen, press ENTER, to access the User menu.
will affect only the Partitions common
+ Commands
to both the User PIN and Keypad concerned (common Partitions).
Invalid commands will be signalled by a buzz and the
following message:
May/26/10 13:54
Invalid PIN!
Disarm by Patrol PIN If a Patrol PIN (PIN with Patrol
option enabled) is used to Disarm the Partitions; the
Control panel will rearm the Partitions automatically
when the programmed Patrol Time expires.
PINs are enabled for Global arming / dis+ PATROL
arming. PATROL PINs can disarm partitions temporarily. Partitions disarmed by a PATROL PIN will
be rearmed automatically when the programmed
Patrol time elapses.
Multi-PIN/Key Disarming If the installer has programmed the multi PIN/Key disarming for a Partition,
you need to enter/use the number of programmed
PINs/Keys to disarm the Partition, before the programmed time expires, as follow (read also the same
paragraph on "Key operations").
1. Enter a valid PIN then press OFF or use a valid Key:
Invalid commands may be due to the User PIN Keypad
Partitions.
not press a key within 30 seconds, the key+ Ifpadyouwilldorevert
automatically to standby status except
during the input of the PIN. If the input is not completed the display keypad will show " WRONG
PIN", after one minute.
The User can ENTER the following commands at the
Keypad.
n Arming (<PIN> ON)
This command will Arm all the common Partitions of the
User PIN and the Keypad concerned.
If a Exit Delay is sett, the keypad will signalize it on the
display and the buzzer will emit a series of beep.
troubles or faults are present in the system, the
+ IfArming
command, by LED Keypad, will not be possible (yellow LED G ON).
Required others
PINs or Keys
2. Press ESC or wait for the display message Enter
PIN, before enter another valid PIN, then press
OFF, or use another valid Key: the display shows the
following message if no other PIN/Key is required
PANEL
DISARMED
otherwise shows the following message
Required others
PINs or Keys
3. Press ESC or wait for the display message Enter
PIN, before enter another valid PIN, then press
OFF, or use another valid Key: the Partitions disarm
PANEL
DISARMED
ABSOLUTA
KEYPAD OPERATIONS
11
n A, B, C and D Arming (<PIN> A, B, C or D + ON)
NOT assign Duress PINs
+ DO
Mode Arming commands.
to A, B, C or D
Each user PIN can be set up to manage four different
Arming mode configurations: A, B, C and D. These configurations determine the Partitions that will Arm, and
those that will Disarm when an A, B, C or D Mode command+ON to confirm the choise, is entered at a Keypad, (the final configuration depends on the User PIN
and Keypad Partitions).
a LED keypad is used, Arming type A and B only
+ Ifallowed
+
+
Keypads can operate ONLY on the Partitions they
are assigned to.
You can Arm/Disarm the Partitions separately using a 6-digit User PIN, as follows: — type in a
6-digit User PIN followed by the 2-digit ID number
of the Partition concerned , then press ON, OFF, A,
B, as required. Example: If the 6-digit User PIN is
135790, and you want to Arm Partition 13 in Away
Mode, type-in 13579013 then press ON. If you
want to Disarm Partition 13, using the same PIN,
type-in 13579013 then press OFF. If you enter
13579013 then press A, B, Partition 13 will Arm in
accordance with the respective configuration.
n Notes on Arming from Keypads
Before your system Arms, your Control panel will check
for the following conditions:
Active Detector, Masked Zone, Detector Fault, Tamper,
Interconnection Fault, Mains Fault, Battery Fault, Alarm
Tx Fault, Siren Fault, Bypassed Zone, Inactive zone,
WLS silent zone.
n Silencing Alarm Devices from Keypads
The quickest way to silence Alarm Signalling Devices
(Sirens and Flashers) is to Disarm the system.
operation will not interrupt the ongoing Alarm
+ This
call, or end the Alarm call cycle. Therefore, it will
be necessary access the User Menu (access allowed to Master User PINs only), and stop the
Alarm calls, via the ‘Clear Call Queue’ option.
Tamper events, which occur when the system is disarmed, can be silenced via the "Reset Alarm" and "Output ON/OFF" option from the User Menu (access
allowed to Master and User PINs).
For further information, refer to "Using Digital
Keys/Cards".
n Wrong PIN
If a wrong PIN is entered, on a LCD keypad the display
will show an error message.
May/14/10
WRONG PIN
10.50
After a few seconds the keypad come back in the
"standby status" and the right PIN can be entered
again. After 10 wrong entries the LCD keypad will lock
for 90 seconds.
Keyboard Locked
Invalid PINS!
On a LED keypad, when a wrong PIN is entered, the
keypad buzzer will emit a Boop. After 10 wrong entries
the LEDs from 1 to 16 will blink: KEYPAD LOCKED for
90 seconds.
If you are operating from an LED keypad, these conditions will be signalled in real-time on the X and V icons
(refer to Table 2).
If you are operating from an LCD keypad, these conditions will be signalled in real-time on the display.
If more Bypassed Zones or Inactive zones are present,
the display shows all alternately at intervals of two seconds.
At this point you can do one of the following:
a) Press the ENTER key and anyway perform the Arming request of control panel;
In the presence of Active Detectors (zones), you
+ cannot
force the arming; it is necessary to remove
the cause.
b) press the ESC key to cancel the Arming request.
12
Expandable Hybrid Control Panel
ABSOLUTA
User PIN/Menu Structure
Accessing the User menu (<PIN> ENTER)
There are three types of User PINs/Menus depending
of possibility to manage the system commands by LCD
keypad. The types of PINs/Menus are:
Enter a valid User PIN then press ENTER to View, if present, the Troubles, or Zone alarms, Tamper events, Alarm
memories, press more time ENTER to access the User
menu. The User menu will allow Users to access ONLY the
options they are enabled (for PREMIUM LCD and
CLASSIKA LCD Keypads): see "User PIN/Menu Structure".
1) Master User PIN/Menu;
2) Normal User PIN/Menu;
3) Limited User PIN/Menu.
OPTIONS
NORMAL
USER
Action 1.1
Action 1.2
Action 1.3
Action 1.4
Action 1.5
Action 1.6
Action 1.7
Action 1.8
Action 1.9
Program 2.1
Program 2.2
Alarm Reset
Extratime request
Clear Call queue
Teleservice request
Alarm Signal test
Output ON/OFF
Arming
Zone Test
Clear Fault/Tamper
ON/OFF Answering
ON/OFF Installer
YES
YES
YES
YES
YES
YES
YES
YES
YES
YES
YES
YES YES
YES
YES
Program 2.3
Program 2.4
Program 2.5
Program 2.6
Program 2.7
Program 2.8
Program 2.9
View 3.1
ON/OFF AutoArm
Date/Time
PIN Programming
Telephone Number
Change my PIN
Zone Bypass
Disable Key
View LOG
YES
YES
YES
YES
YES YES
YES
YES
YES YES YES
View 3.2
View 3.3
View 3.4
LIMITED
USER
TYPE
MASTER
USER
Inside of the 127 available User PINs, the Installer programs which and how many PINs will be Master, Normal and Limited User PINs.
The Master User, the Normal User and the Limited
User can manage the options of User menu as per the
following table.
YES
YES
Zone Status
YES YES YES
GSM Module Status YES YES
Incoming SMS
YES YES
mask for the User is programmed by the
+ Partition
Installer, not by the Master User, who can only enable/disable a User, not create a new one (see procedure 2.5).
USER
1act. 2prg 3view
can access the User Menu also with Armed
+ You
Partitions.
Press 1, 2 or 3 to select the section ACTION, PROGRAM and VIEW of the USER MENU.
Press A and B to scroll the options then press ENTER
to select the displayed option.
Press ESC to return one level.
Users can access the menu at the same
+ Several
time from different keypads.
The User menu provides the following options in three
sections: ACTION, PROGRAM and VIEW.
r ACTION
Ø Alarm Reset
Ø Extra Time request
Ø Clear call queue
Ø Teleservice request
Ø Alarm signals test
Ø Outputs (ON/OFF)
Ø Arm Part.
Ø Zone Test
Ø Clear Fault/Tamp
r PROGRAM
Ø ON/OFF Answering
Ø ON/OFF Installer
Ø ON/OFF Auto-arm
Ø Date/Time
Ø PIN programming
Ø Telephone number
Ø Change my PIN
Ø Zones Bypass
Ø Disable key
r VIEW
Ø View LOG
Ø Zone status
Ø GSM Module Status
Ø Incoming SMS
default, only the User PIN nr. 1 is Available and
+ AtActive
and it is 0001.
operations regarding the Partitions and the
+ The
Zones, will have effect ONLY on the Partitions and
Zone's Partitions, assigned both to the used Keypad and PIN.
ESC to step back to the User menu or wait
+ Press
for 3 minutes.
ABSOLUTA
KEYPAD OPERATIONS
13
Action
n Alarm Reset (1.1)
This option will allow you to restore all Alarm signalling
devices to Standby, and delete the Zone and Partition
Alarm memories.
+
If your installer has enabled the ‘Auto-Reset Memory’ option, your system will reset automatically at
each Arming operation.
LCD KEYPAD
1. Press A or B to view the ALARM Reset option:
n Extra Time Request (1.2)
If the Auto-arm option is enabled, and the system is programmed to Arm automatically at a preset time, the Extra Time request will allow you to delay the Auto-arming
event.
The Installer will set up the Auto-arm and Extra Time
Request events with your installation in mind, and will
provide you with all the necessary information (regarding the partitions involved, and the number of Extra time
requests you can make before an Auto-arm event).
any of the Partitions concerned is unable to im+ Ifplement
the Overtime request, the Keypad will emit
an audible error signal (Boop).
USER
1.1
ALARM Reset
number 1.1 on the display indicates the sec+ The
tion (ACTION) and ALARM Reset is the No. 1 op-
the Auto-Arm option has been disabled (refer to
+ If"Auto-arm
Enable/Disable" in this section), the
Overtime request will be ignored, however, the
keypad will still emit a beep.
tion (and so on).
LCD KEYPAD
2. Press ENTER to perform the ALARM Reset:
ALARM Reset
Are you sure?
USER
Extratime
3. Press ENTER again to execute the option or ESC
to go back. Press ESC to return to the User menu.
If Alarm signalling persists after the Alarms Reset option, the causes of persistent Alarms must be cleared
immediately.
+
1.2
requ.
2. Press ENTER to select the option:
Extratime requ.
Are you sure?
3. Press ENTER to confirm:
While you are viewing the list of Alarm zones, you
can press OFF: the keypad directly will manage the
previous procedure of "Alarm Reset".
User PIN ONLY can restore all Alarms
+ AandMaster
Tampers and delete all Alarm and Tamper
memories.
Extratime requ.
Done !!
Acceptance of the Extra time Request will be confirmed
by an audible feed back signal and the above message.
4. Press ESC to step back to the User menu.
LED KEYPAD
1. Enter your User PIN then press ENTER twice to access the User Menu:
The P (yellow) indicator will fast blink.
2. Press 0 to Reset Alarm / Clear Alarm Mem., as required, or ESC to cancel the request and, in both
cases, exit the Menu.
The keypad will emit a double beep, after pressing 0, to
confirm the operation or a Boop if the operation failed.
14
1. Press A or B to view the Extratime requ. option:
LED KEYPAD
1. Enter your User PIN then press ENTER twice to access the User Menu:
The P (yellow) indicator will fast blink.
2. Press 3 to activate the Overtime Request, or ESC
to quit and, in both cases, exit the Menu.
The keypad will emit a double beep, after pressing
3, to confirm the operation or a Boop if the operation failed.
Expandable Hybrid Control Panel
ABSOLUTA
n Clear Call Queue (1.3)
If your Installer has programmed your Control panel to
send Alarm calls, it will call the programmed telephone
numbers each time an Alarm occurs. In the event of a
False Alarm, this command will allow you to interrupt
the ongoing call, and clear the call queue.
User PIN's can ONLY delete calls gener+ Limited
ated by Events from their Areas, while Main User
PIN's can ALSO delete events from the system if
enabled to do so by the Installer.
+
Disarming with a Main User PIN automatically deletes the calls in the queue, if enabled to do so by
the installer.
LCD KEYPAD
n Teleservice Request (1.4)
If your Installer has set up this facility, this command will
allow you to request on-line assistance (maintenance
that does not require components or wiring).
The Teleservice request will stop any ongoing Telephone calls (Teleservice requests from the User have
priority over other call types), and will send the
Teleservice call (or calls) to the Installer telephone
number (or numbers).
must enable the Installer access, to perform
+ You
the Teleservice request (refer to "Enable Installer
(Teleservice) (2.2)").
you require Teleservice, the Keypad goes
+ When
automatically in standby status because this operation needs that NO user be logged.
1. Press A or B to view the Clear call queue option:
LCD KEYPAD
USER
1.3
Clear call queue
1. Press A or B to view the Teleser. request option:
USER
1.4
Teleser. request
2. Press ENTER to select the option:
Clear call queue
Are you sure?
2. Press ENTER to select the option:
Teleser. request
Are you sure?
3. Press ENTER to confirm:
Clear call queue
Done !!
3. Press ENTER to confirm: the Control Panel will call
the numbers programmed by the installer.
4. Press ESC to step back to the User menu.
LED KEYPAD
1. Enter your User PIN then press ENTER twice to access the User Menu:
Teleservice call will be sent when you press
+ The
ENTER, without any confirmation. To cancel the
Teleservice call — select the Clear Call Queue option from the User Menu (refer to "Clear Call
Queue" in this section).
LED KEYPAD
The P (yellow) indicator will fast blink.
2. Press 8 to interrupt the outgoing calls and clear the
call queue or ESC to quit and exit the menu.
The keypad will emit a double beep, after pressing 8, to
confirm the operation or a Boop if the operation failed,
and in both cases, exit the Menu.
1. Enter your User PIN then press ENTER twice to access the User Menu:
The P (yellow) indicator will fast blink.
2. Press 4 to activate the Teleservice or ESC to quit:
the Control Panel will call the numbers programmed by the installer.
The keypad will emit a double beep, after pressing 4, to
confirm the operation or a boop if the operation failed,
and in both cases, exit the Menu.
Teleservice call will be sent when you press 4.
+ The
To cancel the Teleservice call — select the Clear
Call Queue option from the User Menu (refer to
"Clear Call Queue" in this section).
ABSOLUTA
KEYPAD OPERATIONS
15
n Alarm Signals Test (1.5)
This option will allow you to Test the proper working order
of the Alarm signalling devices.
When you select this option, the Panel Output n. 1 (generally connected to the external siren) is activated for 3
seconds and the Voice Messages and/or the Reporting
Codes are sent to the Telephone Numbers assigned to
the General System Alarm event (ask to your installer
for more information).
n Outputs (ON/OFF) (1.6)
This option will allow you to silence the Alarm Outputs
(Sirens) and turn the appliances (sprinklers, lights, etc.)
ON/OFF.
LCD KEYPAD
1. Press A or B to view the Output<>OFF=STOP option:
USER
1.6
Output<>OFF=STOP
LCD KEYPAD
1. Press A or B to view the Alarm sign. test option:
USER
1.5
Alarm sign. test
2. Press ENTER to turn the appliances ON/OFF and
go to "Turn the appliances ON/OFF", or:
Ø press OFF to silence the Alarm Outputs
Silence ALL
outputs ?
2. Press ENTER to select the option:
Ø press ON to resume the silenced Alarm Outputs
Alarm sign. test
Are you sure?
Activate ALL
outputs ?
3. Press ENTER to perform the Test.
3. Press ENTER to confirm and go back to step 1.
Alarm sign. test
Done !!
4. Press ESC to step back to the User menu.
Turn the appliances ON/OFF Enter the Identification
Number of the required Output:
On/Off Output 04
LED KEYPAD
1. Enter your User PIN then press ENTER twice to access the User Menu:
4
The P (yellow) indicator will fast blink.
On/Off Output 04
label Output 04
2. Press 7 to perform the Test, or ESC to quit.
The keypad will emit a double beep, after pressing 7, to
confirm the operation or a boop if the operation failed,
and in both cases, exit the Menu.
Press ENTER: the Keypad will emit a Boop, if the
selected Output is NOT Reserved for appliance
control, else shows
5 Press:
Ø ON to activate the Output
label Output 04
Active now
Ø OFF to deactivate the Output
label Output 04
Deactivated
6
Press ESC to go back to step 4.
LED KEYPAD
This option is not available on LED keypads.
16
Expandable Hybrid Control Panel
ABSOLUTA
n Arm Partition (Disarm) (1.7)
This option will allow you to Arm or Disarm the Partitions one by one.
+
n Zone Test (1.8)
This option will allow you to test the Zones.
LCD KEYPAD
The single partition can be directly armed from Partition status (refer to "View Partition status (MAIN
PAGE) on LCD Keypads").
USER
Zone test
LCD KEYPAD
1. Press A or B to view the Arm Part. option:
USER
Arm Part.
1.7
---
3. Enter the Identification number of the required Partition:
Arm.Part.
label Part.
1.8
2. Press ENTER to select the option:
Zone test
1=Beep_ 2=Siren_
2. Press ENTER to select the option:
Arm.Part.
1. Press A or B to view the Zone test option:
001
01
3. Select the signal to activate in correspondence of
the test of the Zones:
Ø 1, in correspondence of the test of the Zone the keypad will emit a Beep;
Ø 2, in correspondence of the test of the Zone the siren
will emit an alarm signal.
options 1 and 2 can be selected at the same
+ The
time.
4. Press ENTER to confirm.
4. Press:
Ø ON for Away Arming;
label Part.
Armed
ZONE TEST
Part= -- Zone --
01
5. Press C or D to select ALL the Zones relevant to a
Partition (Part=) or the Zones individually (Zone=).
Press A or B to select the required Partition/Zone.
Ø OFF for Disarming;
label Part.
DISARMED
01
Label. zona 002
Part -- Zona=002
Ø A for Stay Arming;
6. Press ENTER to include in the test the selected
Partition/Zone, then go back to step 5 to select another Zone/Partition or to next step to start the test.
label Part.
01
Stay Armed
7. Press ON to active the test.
Ø B for Zero Delay – Stay Arming.
Test on going
label Part.
01
No delay Armed
In this phase, you can test the alarm and tamper on the
selected Zones. You can see the test result on the keypad.
The keypad quits from the User Menu.
LED KEYPAD
LED KEYPAD
This option is not available on LED keypads.
This option is not available on LED keypads.
ABSOLUTA
KEYPAD OPERATIONS
17
n Clear Fault/ Tamper (1.9)
This option will allow you to delete the Zone and Partition Fault and Tamper memories and set all Alarm signalling devices to Standby.
Alarm signal persists after a Clear Fault/Tamp
+ Ifcommand,
the causes of persistent Alarms must
be cleared immediately.
Program
n ON/OFF Answering (2.1)
This option will allow you to turn ON/OFF the Answering
device. If the Answering device is ON, the Control panel
will answer incoming calls with a Voice message: your
installer has recorded the required Voice messages for
your system.
LCD KEYPAD
LCD KEYPAD
1. Press A or B to view the Clear Fault/Tamp option.
USER
1.9
Clear Fault/Tamp
1. Press A or B to view the ON/OFF Answering option.
USER
2.1
ON/OFF Answering
2. Press ENTER to select the option:
2. Press:
Ø ON to Enable the Answering device;
Clear Fault/Tamp
1=Fau._ 2=Tamp._
3. Select 1 to delete Faults and/or 2 to delete Tampers, then press ENTER to confirm:
Clear Fault/Tamp
Are you sure?
Answering System
Enabled
Ø OFF to Disable the Answering device;
Answering System
Disabled
4. Press ENTER to delete Faults and/or Tampers
(memories and active).
Clear Fault/Tamp
Done!
Ø ESC to step back to the User menu.
Answering device facility is enabled, an * will
+ Ifbetheshown
on the display directly above the r.
LED KEYPAD
5. Press ESC to step back to the User menu.
+
From "Stand-by status" after entering the User
PIN, if display shows Faults and/or Tamper, you
can press the OFF key: the keypad directly will
manage the previous procedure of "Clear
Fault/Tamper".
LED KEYPAD
1. Enter your User PIN then press ENTER twice to access the User Menu:
The P (yellow) indicator will fast blink.
2. Press 6 to Clear Fault/Tamper, as required, or ESC
to cancel the request and, in both cases, exit the
Menu.
1. Enter your User PIN then press ENTER twice to access the User Menu:
The P (yellow) indicator will fast blink.
2. Press 9 to toggle the status — Enable / Disable.
3. Press ENTER to confirm, or ESC to quit and, in
both cases, exit the Menu: the keypad will emit a
beep, after pressing 9.
Ø LED x ON, Answering device Enabled.
Ø LED x Slow Blinking, Answering device Disabled.
The LED x stay ON only when the USER MENU
+ mode
is active.
The keypad will emit a double beep, after pressing 6, to
confirm the operation or a boop if the operation failed.
18
Expandable Hybrid Control Panel
ABSOLUTA
n Enable Installer (Teleservice) (2.2)
This option will allow you to Enable/Disable the Installer to access the panel locally, using the keypad (Installer Level -default) and remotely, by Teleservice
calls, and PIN Transfer (ask the Installer).
n Auto-Arm (2.3)
Your Installer may have set up Partitions to turn
ON/OFF at preset times (scheduler).
Auto-Arm option will disarm the Partitions at
+ The
set time, even if they are in alarm status.
LCD KEYPAD
1. Press A or B to view the ON/OFF Installer option.
This option will allow you to turn the Scheduler
ON/OFF. If ON, on the LCD keypads, a star (*) will blink
near the time.
USER
2.2
ON/OFF Installer
LCD KEYPAD
1. Press A or B to view the ON/OFF Auto Arm option.
2. Press:
Ø OFF to disable the Installer access;
USER
2.3
ON/OFF Auto Arm
Installer
Disabled
2. Press:
Ø ON to enable the Installer access.
Ø ON to Enable the Scheduler;
Installer
Enabled
Auto Arming
Enabled
3. If the Installer is enabled, press ENTER to proceed
to the next step; otherwise, press ESC to return to
the User menu.
ON/OFF
PIN Transfer
Ø OFF to Disable the Scheduler.
Auto Arming
Disabled
3. Press the ESC to step back to the User menu.
4. Press:
Ø ON to enable PIN Transfer
LED KEYPAD
PIN Transfer
Enabled
1. Enter your User PIN then press ENTER twice to access the User Menu:
The P (yellow) indicator will fast blink.
Ø OFF to disable PIN Transfer
PIN Transfer
Disabled
2. Press 1 to toggle the status — Enable / Disable.
Ø LED 1 ON, Auto-Arm Enabled.
Ø LED 1 Slow Blinking, Auto-Arm Disabled.
5. Press ESC to return to the User Menu.
LED KEYPAD
3. Press ENTER to confirm, or ESC to quit and, in
both cases, exit the Menu.
1. Enter your User PIN then press ENTER twice to access the User Menu: The P indicator will fast blink.
The LED 2 stays ON only when the USER MENU
+ mode
is active.
2. Press 2 to toggle the status — Enable / Disable.
Ø LED 2 ON, Installer (teleservice) Enabled.
Ø LED 2 Slow Blinking, Installer (teleservice) Disabled.
3. Press ENTER to confirm, or ESC to quit and, in
both cases, exit the Menu.
LED 2 stay ON only when the USER MENU
+ The
mode is active.
Transfer CANNOT be enabled/disabled from a
+ PIN
LED Keypad.
ABSOLUTA
KEYPAD OPERATIONS
19
n Date/Time (2.4)
This option will allow you to set the current Date and
Time.
n PIN Programming (2.5)
This option will allow you to set, enable/disable the User
PINs.
LCD KEYPAD
ONLY the User PIN no. 1 is Enabled and
+ Atit isdefault,
0001.
1. Press A or B to view the Date/Time option:
USER
Date/Time
The User PIN Programming can follow two procedures,
depending on the User PIN type (ask to your installer):
Manual or Automatic (default).
2.4
LCD KEYPAD
2. Press ENTER to select the option:
Date/Time
mm/dd/yy
1. Press A or B to view the User PIN progr. option:
hh:mm
3. Enter the new Date and Time, then press ENTER to
confirm or ESC to quit, and step back to the User
Menu.
Date and Time option will NOT allow you to
+ The
change the digits individually, therefore, you must
enter the entire Date and Time. If you press
ENTER before completion, the setting will be deleted.
Date/Time format depends on the choice of language:
Ø Italian = dd/mm/yyyy hh:mm
Ø English = mm/gg/yyyy hh:mm
Ø Others = yyyy/mm/dd hh:mm
LED KEYPAD
This option is not available on LED keypads.
USER
2.5
User PIN progr.
2. Press ENTER to select the option:
label User
001
User 001 Enabled
3. Press A or B to scroll the list of PINs: the display shows
the User PIN status (Free, Enabled or Disabled).
Label User
002
User 002 Enabled
4.
Ø
Ø
Ø
If you select a set (not Free) User PIN, you can press:
OFF to disable the User PIN;
ON to enable the User PIN;
ENTER to set the PIN, and go to the step 6a or 6b.
Label User
003
User 003 Free
5. If you select a Free PIN, you can press ENTER and
go to step 6a or 6b.
Manual PIN You can choose your own preferred PIN.
Label User
PIN
003
6a Enter the required PIN (4 to 6 digits required) than
press ENTER: the * sign will mask the entered digits.
Label User
Again
003
7a Enter again the PIN than press ENTER and go
back to step 3.
Automatic PIN The Panel generates a random PIN for
you.
Label User
003
PIN
07290
20
Expandable Hybrid Control Panel
ABSOLUTA
Automatic PIN does not allow Users to have
+ The
the same PINs.
n Change My Pin (2.7)
This option will allow you to change your PIN.
6b Press ENTER to go back to step 3.
ONLY the User PIN no. 1 is Enabled and
+ Atit isdefault,
0001.
LED KEYPAD
LCD KEYPAD
This option is not available on LED keypads.
1. Press A or B to view the Change my PIN option:
n Telephone Numbers (2.6)
This option will allow you to change/delete the Telephone numbers.
LCD KEYPAD
2. Press ENTER to select the option:
1. Press A or B to view the Telephone Num. option:
USER
2.6
Telephone Num.
USER
new PIN
3. Enter the new PIN (4 to 6 digits required) then press
ENTER:
2. Press ENTER to select the option:
Tel. Num.
USER
2.7
Change my PIN
USER
Again
--
3. Enter the Identification number of the required
Phone number, then press ENTER:
Ø If you choose a Digital Dialler Phone Number, the
display shows the following message.
4. Because the digits are masked by stars, enter
again the PIN to avoid errors, then press ENTER: If
the two PINs match, the keypad save the new PIN
and go back to the User Menu, else it keep the old
PIN and go back to step 3.
Label Tel.n
03
Rsrvd digi. comm
LED KEYPAD
can set ONLY the Voice Dialler Phone Num+ You
bers, then press ESC and go back to step 3.
Ø If you choose a Voice Dialler Phone Number, the
display shows the current number, or an empty field:
the first digit will blink to indicate that it is ready for
programming.
1. Enter your User PIN then press ENTER twice to access the User Menu:
The P (yellow) indicator will fast blink.
2. Press ON to change your PIN: red LEDs from 2 to 7
start to Fast blinking.
01
3. Enter the new PIN (4 to 6 digits required): starting
from LED 2, the LEDs become steady on at each
PIN digit entry.
4. Enter the required Phone number:
Ø Use keys 0 through 9 to enter the Phone number;
Ø Press A to insert a short pause of 200 milliseconds,
indicated by the dash (-);
Ø Press D to insert a long pause of 500 milliseconds,
indicated by the underscore (_);
Ø Press ON to insert the star (*);
Ø Press OFF to insert the pound (#);
Ø Press C to cancel an entry error;
Ø Press ESC to cancel all characters.
4. Press ENTER to confirm the first PIN entry: red
LEDs from 10 to 15 start to Fast blinking.
Label Tel.n
>
5. Because you can't see the entered digits, enter
again the PIN to avoid errors: starting from LED 10,
the LEDs become steady on at each PIN digit entry.
6. Press ENTER: If the two PINs match, the keypad
emit a double beep and go back to the User Menu,
else it emit a boop and go back to step 4.
5. Press ENTER to confirm the Phone number and go
back to step 3.
LED KEYPAD
This option is not available on LED keypads.
ABSOLUTA
KEYPAD OPERATIONS
21
n Zone Bypass (2.8)
This option will allow you to Bypass/Un-Bypass the
zones of the User PIN Partitions.
LCD KEYPAD
n Enable/Disable Key (2.9)
This option will allow you to Enable/Disable the Keys.
Key can be Enabled/Disabled ONLY by PINs
+ Awhich
operate the Partitions it is assigned to.
1. Press A or B to view the Zone Bypass option:
USER
Zone Bypass
2.8
1. Press A or B to view the Dis/Ena.key option:
2. Press ENTER to select the option:
Zone Bypass
LCD KEYPAD
---
USER
Dis/Ena.Key
2.9
2. Press ENTER to select the option:
3. Enter the Identification number of the required
Zone, then press:
Ø ON to bypass the zone;
Label zone
001
Bypassed now
Key
1=WLS
2=BPI
3. Select the Key type to Disable/enable:
Ø Press 1 for Wireless Keys
WLS key
Ø OFF to include (Un-Bypass) the zone.
Label zone
001
Included
___
Ø Press 2 for Proximity (BPI) Keys
Key
___
4. Press ESC to go back to step 3.
4. Enter the Identification Number of the Key to Disable/Enable, then press:
Ø OFF to disable the Key
LED KEYPAD
This option is not available on LED keypads.
label key
001
Disabled
Ø ON to Enable the Key
label key
001
Enabled
5. Press ESC to go back to step 4.
LED KEYPAD
This option is not available on LED keypads.
22
Expandable Hybrid Control Panel
ABSOLUTA
View
n View LOG (3.1)
You can view the event in the logger as follow.
n Zone Status (3.2)
You can view the zone status (standby, alarm, tamper,
short-circuit, bypassed, included) and bypass the
zones as follow.
LCD KEYPAD
LCD KEYPAD
1. Press A or B to view the View LOG option:
USER
View LOG
3.1
USER
Zone status
2. Press ENTER to select the option:
3.2
2. Press ENTER to select the option:
View LOG
1=Last 2=since..
Zone status
3. Press 1 to view the events from the last and skip to
step 5 or, press 2 to view the events from a specific
date and time:
Data/Time
mm/dd/yy hh:mm
EV.0125
User entry
5. Press A and B to scroll the events. Press C and D to
scroll the details of the event.
WHO
---
3. Select the required zone by entering its Identification number or scrolling by pressing A and B: the
display bottom line shows the label of the selected
zone.
Zone status
label zone
4. Enter the required Data and Time to start to view
the events, then press ENTER:
Ø the display top line shows the order number of the event;
Ø the display bottom line shows the event description.
EV.0125
INSTALLER
1. Press A or B to view the Zone Status option:
001
001
4. Press ENTER: the display bottom line shows the
zone status as follow.
Ø ST_BY: the zone is in standby.
Ø ACTIVE: the zone is active.
Ø OPEN: the zone is open (tampered).
Ø SHORT: the zone is short-circuited.
Ø WORKING: the zone is operative (included).
Ø BY-PASS: the zone is bypassed.
label zone
001
ST-BY
WORKING
5. Press:
The display top line shows the detail name on the right,
as follow.
Ø WHO: depending on the event, the Zone, the Key
(Card/Tag), the Wireless Key or the Super Key that
had generated the event.
Ø WHERE: depending on the event, the Wireless Receiver, the RS232 port, the USB port, the Telephone
Line, the System, the Panel, the Keypad, the Key
reader, the Expander In, the Main Board, the Expander Out or the Power Station where the event occurred.
Ø PARTIT.: depending on the event, the involved Partitions.
Ø WHEN: the date and time when the event has occurred.
Ø OFF to bypass the zone
label zone
001
Bypassed now
Ø ON to include the zone
label zone
001
Included
6. Press ESC to go back to step 3.
LED KEYPAD
This option is not available on LED keypads.
LED KEYPAD
This option is not available on LED keypads.
ABSOLUTA
KEYPAD OPERATIONS
23
n GSM Module Status (3.3)
This option allows you to view the GSM Module's status.
LCD KEYPAD
7. Press:
Ø ON to scroll the message automatically from left to
right;
Ø OFF to stop scrolling;
Ø C to scroll the message manually from right to left;
Ø D to scroll the message manually from left to right.
1. Press A or B to view GSM Status:
LED KEYPAD
USER
GSM Status
3.3
This option is not available on LED keypads.
2. Press ENTER to select the option:
GSM OK! ^:***
VODAFONE
The display shows the GSM Module's status on the top
line, on the left, the GSM signal's strength on the right,
and the name of the GSM operator on the bottom line,
as described below.
Ø GSM OK: the GSM Module is working normally.
Ø Link Lost: ...
Ø Fault: ...
Ø Wrong Firmware: ...
Ø ^: no asterisks mean no GSM signal; three asterisks
(***) mean that the GSM signal's strength is excellent.
3. If the GSM Module's status is OK, press ENTER to
view the telephone number of the SIM card placed
in the GSM Module:
ABSOLUTA TEL. N.
+39328456789
If the display shows NO
+ staller.
NUMBER, contact the in-
4. Press ENTER to check on your remaining credit:
n Incoming SMS
This option allows you to see the SMS received by the
GSM Module.
control panel saves ONLY the last SMS re+ The
ceived.
control panel does NOT save SMS activating
+ The
or deactivating events (#ABS#E#), personalizing
the command string (#ABS#PRG#), disabling the
PIN (#ABS#BLOCK#), requesting a check on the
credit remaining (#ABS#C#), and requesting the
status of the Areas (#ABS#A).
LCD KEYPAD
1. Press A or B to show the Incoming SMS.
USER
3.4
Incoming SMS
2. Press ENTER to select the option and the display
will show the date and time when the message arrived on the top line and the number that sent the
message on the bottom line.
09/09/09
09:20
+390861839060
3. Press ENTER to view the message:
PayAsYouGoBal.
Are You Sure?
5. Press ENTER to confirm and the control panel will
send an SMS message to the GSM operator to
check on the credit remaining:
PayAsYouGoBal.
Waiting Please
6. When the control panel receives the message with
the credit information, the display shows SMS
(x/n) on the top line, where x is the number of the
message displayed on the bottom line and n is the
number of messages received, with an asterisk (*)
if the message has not been read yet:
A message
for Absoluta.
4. Press:
Ø ON to scroll the message automatically from left to
right;
Ø OFF to stop scrolling;
Ø C to scroll the message manually from right to left;
Ø D to scroll the message manually from left to right.
LED KEYPAD
This option is not available on LED keypads.
SMS 1/1 *
Your balance is
24
Expandable Hybrid Control Panel
ABSOLUTA
READER OPERATIONS
The ABSOLUTA control panel supports the following
Readers.
Ø ECLIPSE2 Proximity Reader (Figure 3b): it has a
sensitivity field where you must held the Key to perform the required operation.
Ø PROXI Proximity Reader (Figure 3d): like the
ECLIPSE2 Reader, it has a sensitivity field where
you must held the Key to perform the required operation.
Ø Proximity Reader integrated on the PREMIUM Keypad (Figure 3e): these Keypads have built in Proximity Reader able to detect a Key held in its sensitivity
field.
The Digital Keys will allow you to perform all the basic
operations from enabled Readers.
The Reader
Readers have 3 light indicators: Red, Amber
Green.
and
comply with EN50131, 30 seconds after every
+ To
arming/disarming, the 3 light indicators will be
switched off to “hide” the control unit status.
A In order to comply with the EN50131-1 and
ABSOLUTA Control Panel supports also the
+ The
ECLIPSE Reader. If you use this Reader be sure
EN50131-3 standards, EN50131 option must be
enabled (ask your installer).
that its LEDs show the required status before releasing the inside switch.
ABSOLUTA manages up to 32 Readers. The Installer
will program the following options for each Reader:
Ø The Partitions the Reader can control (Reader Partitions);
Ø A Mode Arming (AMBER);
Ø B Mode Arming (GREEN).
a)
f)
PROXI LEDs
www.bentelsecurity.com
Sat
Miniproxi
05.May.10
13.50
Insert PIN
b)
d)
Proxi sensitive
field
ECLIPSE2
sensitive field
c)
e)
Proxi sensitive field
®
Figure 3 a) SAT Digital key, b) ECLIPSE2 key reader, c) PROXI-CARD card, d) PROXI reader, e) PREMIUM LCD keypad; f) MINIPROXI Tag..
ABSOLUTA
READER OPERATIONS
25
When you present a Key to the Reader's sensitivity
field, you can perform the operations described in this
section.
Each Key has a random code, selected from over 4 billion combinations, that ensure an high security grade.
Your Installer, during the programming phase, enrolls
the Keys that you can use on the system and assigns
their a label to identify the relative user: in this way you
can recognize in the Event Logger, who does what.
The ABSOLUTA control panel supports up to 250 Keys.
Also the Keys are programmed to operate on specific
Partitions, as per the Readers.
Manual, the word Key refers to the Sat Key,
+ InthethisPROXI-CARD
Card and the MINI-PROXI Tag
and, the word Reader refers to the ECLIPSE2 and
PROXI Readers and the Proximity Reader inside
the PREMIUM Keypad, unless otherwise stated.
GREEN
AMBER
The ABSOLUTA control panel supports the following
Digital Keys.
Ø SAT Proximity Key (Figure 3a): it is able to work with
all the Readers.
Ø PROXI-CARD Card (Figure 3c): it is able to work
with all the Readers.
Ø MINIPROXI Tag (Figure 3f): it is able to work with all
the Readers.
n No Key at Reader
When no Key is present at the Reader, the Light
Indicators will signal as shown in the following table.
RED
The Digital Key
DESCRIPTION
OFF OFF OFF The system is Disarmed.
ON OFF OFF At least one Reader's Partition is Armed.
ON ON OFF The system is armed in A mode.
ON OFF ON The system is armed in B mode.
Fast flash on RED LED indicates a running alarm
Slow flash on RED LED indicates an alarm memory
The Partitions that are not controlled by the Reader will
not affect the Light Indicators.
Installer can program the Reader's Light
+ The
Indicators to signal the System status at all times,
or alternatively, only in response to a Valid Key
(Light Indicators OFF when no Key is present,
comply with EN50131).
Multiple Systems
The Reader's Light Indicators
The Keys can be programmed (by the Installer) to operate on more than one System, and to manage different
Partitions on each System.
The Readers have 3 light indicators that operate depending if the Key is present on the Reader or not.
Key operations
n Key at Reader
When a Key is detected by the Reader, the light
indicators will signal as follows.
Ø Fast Blinking on ALL the Light Indicators: this will
occur when a False Key is present at the Reader.
Ø Slow Blinking on ALL the Light Indicators: this
will occurs when not programmed keys with
PATROL option is near the sensitive field of Reader
for more than 10 seconds, or until all three LEDs start
slow Blinking, and no Arming/Disarming operation
shall be performed.
Ø RED Light Indicator ON: the system will Arm when
you remove the Key from the Reader.
Ø RED Light Indicator blinking: arming blocking conditions has been detected.
Ø AMBER Light Indicator ON: the system will arm in
A Mode when you remove the Key from the Reader.
Ø AMBER Light Indicator blinking: A Mode arming
blocking conditions has been detected.
Ø GREEN Light Indicator ON: the system will arm in B
Mode when you remove the Key from the Reader.
Ø GREEN Light Indicator blinking: B Mode arming
blocking conditions has been detected.
26
The Keys can:
Ø No Action
Ø Disarm
Ø Away Arm
Ø Arm — A Mode
Ø Arm — B Mode
Ø Patrol Disarm
n No Action
This operation keeps the Partitions' status as the one
that was theirs before the Key was brought close to the
Reader.
1. Hold the Key near the sensitive field of the Reader.
2. Remove the Key when ALL the light indicators are
blinking slowly (about 10 seconds): in EN50131
mode, the Reader will show the Areas' status momentarily.
Expandable Hybrid Control Panel
ABSOLUTA
n Disarm
This operation will Disarm all the Partitions common to
both the Digital Key and Reader in use.
n Away Arm
This operation will Arm all the Partitions common to
both the Key and Reader in use.
1. Hold the Key near the sensitive field of the Reader:
the Green light indicator will blink briefly to show
that the Partitions have been disarmed.
1. Hold the Key near the sensitive field of the Reader.
2. Remove the Key when ALL the light indicators turn
OFF (Figure 4a).
the programmed block conditions, for Arm+ Ifing,oneisofactive,
you cannot Arm; the three light indi-
the programming phase, the Installer can
+ During
enable or not the Key to clear the Partition calls or
Control Panel calls when the system will be disarmed.
Multi-PIN/Key Disarming If the installer has programmed the multi PIN/Key disarming for a Partition,
you need to enter/use the number of programmed
PINs/Keys to disarm the Partition, before the programmed time expires, as follow (read also the same
paragraph on "Basic (Arming) Commands".
1. Enter a valid PIN then press OFF or hold a valid Key
near the sensitive field of the Reader: the Green
light indicator blinks few seconds, then the Red
light indicator turns ON indicating that you need to
use another PIN/Key to disarm the Partitions.
2. Press ESC or wait for the display message Enter
PIN, before enter another valid PIN, then press
OFF, or hold another valid Key near the sensitive
field of the Reader: the Red light indicator turns
OFF indicating the Partition disarming otherwise,
the Green light indicator blinks few seconds and
the Red light indicator stay ON, indicating that you
need another PIN/Key to disarm the Partitions.
3. Press ESC or wait for the display message Enter
PIN, before enter another valid PIN, then press
OFF, or hold another valid Key near the sensitive
field of the Reader: the Red light indicator turns
OFF indicating the Partition disarming.
2. Remove the Key when the Red indicator light turns
ON (Figure 4b).
cators, first, flash one at a time and then begin to
flash all together.
comply with EN50131 for the Reader, all 3 light
+ To
indicators will be switched off to "hide" the control
panel status, if the relative option is enabled.
n Arm — A Mode
This operation will Arm and Disarm the Partitions in accordance with the A Mode Arming configuration (programmed by the Installer).
1. Hold the Key near the sensitive field of the Reader:
the light indicators will light in turn (at 2 second intervals), as shown in Figure 4.
2. Remove the Key when the Red and Amber light indicators are ON (Figure 4c): at this point the system
will Arm in A Mode.
the Reader's EN50131 option is DISABLED,
+ When
the Amber light indicator turns OFF when you remove the Key, if the Key's Partitions does not
match the Reader's Partitions.
For example: if a Key is assigned to the Partition n. 1
and a Reader is assigned to the Partitions n. 1 and 2,
the Amber light indicator turns ON when you hold the
Key near the Reader; when you remove the Key from
the Reader, only the Partitions n. 1 arms in A Mode
and the Amber light indicator turns OFF.
ww
w.b
e
nte
lse
cu
rity
.co
m
Figure 4 Disarm/Arm from ECLIPSE2 reader.
ABSOLUTA
READER OPERATIONS
27
n Arm — B Mode
This operation will Arm and Disarm the Partitions in accordance with the B Mode Arming configuration (programmed by the Installer).
1. Hold the Key near the sensitive field of the Reader:
the light indicators will light in turn (at 2 second intervals), as shown in Figure 4.
2. Remove the Key when the Red and Green light indicators are ON (Figure 4d): at this point the system
will Arm in B Mode.
When the Reader's EN50131 option is DISABLED,
+ the
Green light indicator turns OFF when you remove the Key, if the Key's Partitions does not
match the Reader's Partitions.
For example: if a Key is assigned to the Partition n. 1
and a Reader is assigned to the Partitions n. 1 and 2,
the Green light indicator turns ON when you hold the
Key near the Reader; when you remove the Key from
the Reader, only the Partition n. 1 arms in B Mode
and the Green light indicator turns OFF.
n Disarm Patrol
Keys with the Patrol option can Disarm the system for
the programmed Patrol Time.
n False Key
When an unrolled (false) Key is present at the Reader,
ALL the Reader's light indicators fast blinking.
+
A Reader tamper will be generated if you present
10 time a false Key at the Reader.
The Wireless Key
If your system is equipped with a Wireless Receiver, it
will be possible to control all the main functions from remote locations by means of Wireless Keys (see Figure 5). This paragraph describes the functions that can
be controlled by Wireless Keys.
operations performed by Wireless Keys will
+ The
not be confirmed by any type of feed back signal
(audible or visual), unless done in the vicinity of a
Reader or a Keypad, or a device that has been especially set up to provide feed back signals.
n Away Arming (<)
Press the button until the LED turns ON (see Fig. 5), to
Arm all the Partitions of the Wireless Key in use.
n Stay Arming (=)
Press the button until the LED turns ON (see Fig. 5), to
Arm the system in A Mode.
n Disarming (>)
Press the button until the LED turns ON (see Fig. 5), to
Disarm all the Partitions of the Wireless Key in use.
n Other functions (!)
Press the button until the LED turns ON (see Fig. 5), to
activate the special functions programmed for the Wireless Key in use (example: B Mode arming, Superkey or
both).
n Low Battery
If any of the Wireless Key batteries starts to run low, the
G LED on the Keypads will Turn ON.
the system Trouble conditions are signalled by
+ All
the G LED. Therefore, if this LED turns ON, you
must access the View Trouble Mode for details.
The Low Wireless Battery condition will be signalled in
View Trouble Mode by the [Bat.low WLS] message
(refer to “View Trouble Mode” in the “OPERATING
YOUR SYSTEM FROM A KEYPAD” section).
The Event Logger will provide the details of the Wireless key that has triggered the Low battery condition.
LED
A In accordance with the EN50131-1 standard, the
Panasonic
CR2025
3V
+
system does not arm if there is a low battery condition, when you perform an arming request: the external siren will emit a double squawk. You can
verify the cause that inhibits the arming (low battery), through an LCD keypad, and force the arming: the external siren will emit a squawk to signal
the arming.
Call your installer and have the battery replaced.
Figure 5 Wireless key.
28
Expandable Hybrid Control Panel
ABSOLUTA
TELEPHONE OPERATIONS
If your Installer has enabled the User PINs, you will be
able to control your system via any touch-phone.
recording the customized voice messages,
+ For
your system has a AS100 Stand-alone Audio station.
Two conditions are possible:
Ø Teleservice Enabled;
Ø Teleservice Disabled.
N. 1 CANNOT access the system by tele+ PIN
phone.
Teleservice Enabled If the Answer and Teleservice
facilities are both Enabled, the Control Panel will answer your call after the programmed number of rings. It
will emit a high-pitch audible signal (beep), wait approximately 10 seconds then will play the Welcome message. At this point, you can enter your PIN and send the
required commands over the phone.
You can access the system over the phone:
Ø by receiving a call from the Control panel (Dialler
mode);
Ø by calling the Control panel, when the Answering device facility is enabled (Answer mode).
Teleservice Disabled If the Teleservice facility is Disabled, the Control Panel will answer your call after the
programmed number of rings, then will play the Welcome message and asks you to enter your PIN to access to the remote control.
Remote Access via Dialler mode
Typing-in your User PIN
If your installer has duly set up your Control panel, the
Dialler will send voice messages to the programmed
telephone numbers when Alarm, Tamper, Fault conditions are detected. If you receive a Dialler call, you will
be able to access your system during the call by entering your PIN on the telephone keypad. You can enter
your PIN while the message is playing, or during the
pauses between message announcements.
You can type-in your PIN while the message is playing,
or during the pauses between message announcements, regardless of the Telephone Access mode
(Dialler or Answer Mode). To type-in your PIN:
Each PIN can be programmed to control specific functions and Partitions.
Confirm successful calls option is Enabled,
+ Ifyouthemust
press the * (Star) key while the voice
message is still running, otherwise the Control
panel will consider the call “Unsuccessful”, and will
carry out the programmed Actions.
Remote Access via Answer mode
If your installer has set up your Control panel to answer
incoming calls, you will be able to access your system
via the Answering device facility.
Answering function must be Enabled (refer to
+ The
"OPERATING YOUR SYSTEM FROM A
KEYPAD>Program>ON/OFF Answering (2.1)",
otherwise, you will be unable to access your system via remote telephone.
1. Press #.
2. Enter your PIN.
3. Press #.
the Vocal Guide is disabled, when your system
+ Ifrecognizes
your PIN, it will emit an audible feed
back signal (beep, beep), and will accept commands. If your system DOES NOT recognize your
PIN, it will emit an audible error signal (boop).
the Vocal Guide is enabled, a series of messages
+ Ifexplains
the procedures for operating the system
from a telephone. The Vocal Guide must be enabled by the Installer.
+ Press # to repeat the messages from the start.
The system will end the call automatically, if no valid
PIN is entered within 30 seconds (at default). This interval can be customized from 1 to 254 seconds.
NOT use a telephone with a redial button to
+ DO
Arm or Disarm your system, as this may put your
system security at risk.
ABSOLUTA
TELEPHONE OPERATIONS
29
Entering Commands
Once your PIN has been recognized, you can enter the
Command Codes.
+
The system will end the call automatically, if no Key
is pressed within 2 minutes.
n Zone/Partitions status (2)
This command will allow you to check on the status of
the Zones and of the Partitions.
Zone and Partition Identifier number must al+ The
ways be 3 digits long. If necessary enter the required 0 to fit.
n Cancel Command (#)
Press # to cancel the Command, and step back to the
Enter data phase.
1. Press 2 to check the Zone and Partitions status.
Press # to delete incorrect digits: the system will emit
an audible feed back signal (2 beeps) to confirm that the
data has been deleted.
Partitions status Press in sequence 1??? to
know the current status of the Partition ???.
n On Hook (*)
If you are accessing your system via "Answering device" mode, press * to end the call.
n Remote Talk/Listen-in (1)
+ This command requires the AS100 Audio station.
Ø Press 1 to start the Remote Listen-in session, via
the Audio Station microphone.
Ø Press 1 again to start the One-way Talk session,
via the Audio station speaker.
press 1 to switch from One-way Talk
+ Iftorequired,
Listen-in mode, and vice versa. The One-way
Talk and Listen-in modes cannot be active at the
same time.
Ø Press 2 to start the Two-way Talk / Listen-in session, via the Audio Station microphone and speaker.
This feature will allow you to listen in on the protected
premises and talk to whoever is present.
Two-way Talk / Listen-in sessions can also be activated by the Personal Panic Button thus making this
feature extremely useful in emergency situations involving the elderly or disabled.
press 1 during the Two-way Talk session,
+ IftheyouControl
panel will switch to Listen-in mode.
the sound quality of the Two-way Talk session is
+ Ifpoor,
use the One-way Talk and Listen-in modes
(press 1).
Ø Press 4 to reduce the remote microphone audio
gain.
Ø Press 5 to centre the remote microphone audio
gain.
Ø Press 6 to increase the remote microphone audio
gain.
2. Press 1 for Partition status or 2 for Zones status.
The Partition status will be indicated by the following
messages:
<<Armed>> (Message 200), if the Partition is armed;
<<Armed stay>> (Message 201), if the Partition is
armed in stay mode;
<<Armed stay with zero delay>> (Message 202), if
the Partition is armed in stay mode with 0 delay;
<<Disarmed>> (Message 203), if the Partition is disarmed.
boop, If Partition Identifier entered is 0.
After the message, the system will go back to step 1.
Zone status Press in sequence 2??? to know the
current status of the Zone ???.
The Zone status will be indicated by the following messages:
<<Active zone>> (Messagge194), if the zone is active;
<<Tampered zone>> (Message 195), if the zone is
Tampered;
<<Zone in fault>> (Message 196), if the zone is fault;
<<Zone in alarm>> (Message 197), if the zone in alarm;
<<Standby zone>> (Message 198), if the zone is in standby;
boop, if zone Identifier entered is 0.
After the message, the system will go back to step 1.
n Turn Reserved Outputs ON/OFF (3)
This command will allow you to turn ON/OFF the appliances (Sprinkler system, Courtesy lights, etc.) connected to the Reserved Outputs.
Output Identifier number must always be with
+ The
2 digits long, if necessary enter the required 0 to fit.
1. Press 3 to access Output control.
2. Enter the Identifier number of the required Output.
3. Press 1 to turn ON, or 0 to turn OFF the appliance
connected to the selected Output.
An audible signal will communicate the result of the
command:
Beep, if action done;
Boop, if action fails.
The appliance will turn ON/OFF immediately, and the
system will go back to step 1.
30
Expandable Hybrid Control Panel
ABSOLUTA
n Panel Arming/Disarming (4)
This command will allow you to Arm and Disarm the
Panel in accordance with programming.
1. Press 4 to access Arming/Disarming.
2.
Ø
Ø
Ø
Ø
Press:
0 to know the current status of the Partition Panel;
1 to Arm the Panel;
2 to Disarm the Panel;
either 3, 4, 5 or 6 to Arm the Panel, respectively
in A, B, C or D Mode.
+ Will be armed/disarmed ONLY the PIN's Partitions.
The Control Panel status will be indicated by the following messages:
<<Panel armed>> (Messages 199+200), if the Panel is
armed;
<<Panel disarmed>> (Messages 199+203), if the
panel is Disarmed;
<<Not ready, action will not be executed>> (Message 204), if there is any problem that inhibits the Panel
arming;
<<Not ready, press one to arm anyway>> (Message
205), if there is any problem that inhibits the Panel arming, but it is possible to arm anyway.
In the last case, if 1 is pressed anyway to arm, the
messages <<Panel armed>> will follow (Message
199+200).
The Partitions will Arm/Disarm immediately, and the
system will go back to step 1.
n Arm/Disarm Single Partitions (5)
This command will allow you to Arm/Disarm the Partitions individually.
Partition Identifier number must always be 2
+ The
digits long, if necessary enter the required 0 to fit.
1. Press 5 to access Arm/Disarm Single Partitions.
2. Enter the Identifier number of the Partition.
3.
Ø
Ø
Ø
Ø
The partition status will be indicated by the following
messages:
<<Armed>> (Message 200), if any action of arming
was successful;
<<Disarmed>> (Message 201), if any action of disarming was successful;
<<Not ready, action will not be executed>> (Message 204), if any action of arming has been refused;
<<Not ready, press one to arm anyway>>
(Message 205), if the partition is not ready to arm, but it
is possible to arm anyway.
If 1 is pressed anyway to arm, the messages
<<Armed>> will follow (Message 200).
The Partition will Arm/Disarm immediately, and the system will go back to step 1.
n Enable/Disable Teleservice (6)
This command will allow you to Enable/Disable the
Teleservice facility (Installer).
1. Press 6 to Enable/Disable the Teleservice (Installer).
2. Press 1 to enable or 0 to disabled Teleservice:
An audible signal will communicate the result of the
command:
Beep, if action done;
Boop, if action fails.
n Clear call queue (7)
If you are accessing your system via Answering device
mode, press 7 to end the call.
If you are accessing your system via Dialler mode (after
receiving an Alarm message), press 7 to interrupt the
ongoing Alarm, and clear the call queue.
A beep will communicate the positive result of the required action.
n Alarms Reset (8)
This command will allow you to clear Partition and/or
Control panel Alarms, and restore the system to
standby, depending on the Access level of the PIN used
via Telephone.
Press:
1 to Arm the Partition in Away mode;
2 to Disarm the Partition;
3 to Arm the Partition in Stay mode;
4 to Arm the Partition in Stay with Zero Delay mode.
A beep will communicate the positive result of the required action.
n Disable Current User PIN (9)
This command will allow you to Disable the entered
User PIN:
Ø a beep will communicate the positive result of the required action.
security feature will allow you to protect your
+ This
system against unauthorized access. If you Disable a PIN via Telephone it cannot be used again
until it is Re-enabled via the User menu (refer to
“PIN Programming”).
ABSOLUTA
TELEPHONE OPERATIONS
31
32
Expandable Hybrid Control Panel
ABSOLUTA
SMS OPERATIONS
The operations described in this chapter are possible
only if the installer has installed the GSM Module in your
control panel and has carried out the respective programming: ask your installer which operations are possible with your control panel.
Events Controlled by Caller ID
+
When the control panel receives a call from one of the
Phone Numbers listed in Table 10, it waits for a few
rings, then it hangs up and activates the respective
Event: the control panel then confirms with one ring to
the phone number, if enabled to do so by the installer.
Some of the operations described in this chapter
require you to send your PIN by SMS. To increase
the security of your system, once the operation requested has been completed, you can disable your
PIN as described in the respective paragraph, so
that no one else can use it without your knowledge.
You can activate some events (See Table 10) simply by
calling the control panel's GSM number, at no cost.
ring for confirmation may be delayed if there
+ The
are other calls in the queue or it may be lost if the
queue is full or because of problems with the GSM
network.
N.
1
2
3
4
5
6
7
8
9
10
11
12
13
14
15
16
Phone Numbers
Event
N.
17
18
19
20
21
22
23
24
25
26
17
28
29
30
31
32
Phone Numbers
Event
Table 10 Events Controlled by Caller ID.
ABSOLUTA
SMS OPERATIONS
33
event is activated and deactivated ONLY if the
+ The
PIN and the event share at least one Partition (see
Events Controlled by SMS
You can activate and deactivate events (Table 11) by
sending the following SMS to the control panel's GSM
number:
the Partitions column in Table 11).
#ABS#E#<PIN>#<ON|OFF>#<Command
String>#<Text>
Ø PIN: a User PIN enabled to manage the control panel
by SMS.
Ø ON|OFF: ON activates the event; OFF deactivates
the event.
Ø Command String: the string programmed by the installer, which is NOT case-sensitive (see the Command String column in Table 11).
Ø Text: additional text that can be used to assign a description to the command message and is ignored by
the control panel.
N.
Command String
Event
Partitions
1 2 3 4 5 6 7 8 9 10 11 12 13 14 15 16
1
2
3
4
5
6
7
8
9
10
11
12
13
14
15
16
17
18
19
20
21
22
23
24
25
26
27
28
29
30
31
32
Table 11 Events Controlled by SMS.
34
Expandable Hybrid Control Panel
ABSOLUTA
Partition Status
Credit Check
You can check on the status of the control panel's Partitions by sending the following SMS to the control
panel's GSM number:
You can check on the credit remaining for the SIM in the
control panel by sending the following SMS to the control panel's GSM number:
#ABS#A#<PIN>#<Text>
#ABS#C#<PIN>#<Text>
Ø PIN: a User PIN enabled to manage the control panel
by SMS.
Ø Text: an additional text that can be used to assign a
description to the command message and is ignored
by the control panel.
Ø PIN: a User PIN enabled to manage the control panel
by SMS.
Ø Text: additional text that can be used to assign a description to the command message and is ignored by
the control panel.
The control panel will respond with the following SMS:
The control panel will forward the message received
from the mobile telephone operator to the telephone
number from which the request was made.
#ABS#A#<SMS Label>-<A|P|Z|D|t|*|!>,...,<SMS Label>-<A|P|Z|D|t|*|!>
SMS Label: the code assigned to the Partition by the installer (see table below).
A|P|Z|D|t|*|!: the Partition's status as described in Table 6 on page 9.
SMS sent in reply may be delayed if there are
+ The
other calls in the queue or may be lost if the queue
is full or there are problems with the GSM network.
programmed to do so by the installer, the credit
+ Ifmessage
will be forwarded periodically to the first
number in the Phonebook.
N.
1
Partition Label
SMS Label
2
3
4
credit remaining can also be checked from an
+ The
LCD keypad as described in the section
"OPERATING YOUR SYSTEM FROM
KEYPAD>View>GSM Module Status (3.3)".
5
6
A
Disabling a PIN
7
8
9
You can disable your PIN by sending the following SMS
to the control panel's GSM number:
#ABS#BLOCK#<PIN>#<Text>
10
11
12
13
14
15
16
Ø PIN: a User PIN enabled to manage the control panel
by SMS.
Ø Text: additional text that can be used to assign a description to the command message and is ignored by
the control panel.
SMS sent in reply will show only the status of
+ The
the Partitions assigned to the PIN used to make the
PIN can be enabled from an LCD keypad, as
+ The
described in the section "OPERATING YOUR
SYSTEM FROM A KEYPAD>Program>PIN Programming (2.5)".
request.
SMS sent in reply may be delayed if there are
+ The
other calls in the queue or may be lost if the queue
is full or there are problems with the GSM network.
ABSOLUTA
SMS OPERATIONS
35
NO.
LABEL
NO.
LABEL
NO.
1
44
86
2
45
87
3
46
88
4
47
89
5
48
90
6
49
91
7
50
92
8
51
93
9
52
94
10
53
95
11
54
96
12
55
97
13
56
98
14
57
99
15
58
100
16
59
101
17
60
102
18
61
103
19
62
104
20
63
105
21
64
106
22
65
107
23
66
108
24
67
109
25
68
110
26
69
111
27
70
112
28
71
113
29
72
114
30
73
115
31
74
116
32
75
117
33
76
118
34
77
119
35
78
120
36
79
121
37
80
122
38
81
123
39
82
124
40
83
125
41
84
126
42
85
127
43
86
LABEL
Table 12 PIN list.
36
Expandable Hybrid Control Panel
ABSOLUTA
APPENDIX
PIN list
Arming block conditions
Table 12 shows the Label assigned to the User PIN:
Ø the NO. column shows the Identifier number of the
User PIN;
Ø the LABEL column (to be filled in by the Installer) is
for the PIN User’s name.
The Table 13 on the next pages shows the conditions
that prevent the system arming, as they are reported
(Feedback) and if you can force the arming (ARM), in
different operation modes (EN50131).
ABSOLUTA
APPENDIX
37
Blocking
Condition
Already Armed
Fault Zone
EN50131
LCD Keypad
Feedback
LED Keypad
ARM. Feedback
Yes
Display Mess.
No
Boop
No
Display Mess.
No
Boop
Yes
Display Mess.
F
Cont. Boop
No
Display Mess.
F
Cont. Boop
Display Mess. No
2
No
Display Mess. No
2
Yes
Display Mess.
F
Cont. Boop
No
Display Mess.
F
Cont. Boop
Yes
Display Mess.
F
Cont. Boop
No
Display Mess.
F
Cont. Boop
Yes
Display Mess.
No
Boop
No
Display Mess.
No
Boop
Yes
Display Mess.
No
Boop
No
Display Mess.
No
Boop
Yes
Display Mess.
F
Cont. Boop
No
Display Mess.
F
Cont. Boop
Yes
Display Mess.
No
Cont. Boop
No
Display Mess.
F
Cont. Boop
Yes
Display Mess.
No
Cont. Boop
No
Display Mess.
F
Cont. Boop
Yes
Display Mess.
F
Cont. Boop
No
Display Mess.
F
Cont. Boop
Yes
Display Mess.
F
Cont. Boop
No
Display Mess.
F
Cont. Boop
Yes
Display Mess.
F
Cont. Boop
No
Display Mess.
F
Cont. Boop
Yes
Display Mess.
F
Cont. Boop
No
Display Mess.
F
Cont. Boop
Yes
Display Mess.
No
Cont. Boop
No
Display Mess.
F
Cont. Boop
Request already
done
Yes
Display Mess.
No
Boop
No
Display Mess.
No
Boop
Active Autobypassed Zone
Yes
Display Mess.
F
Cont. Boop
No
Display Mess.
F
Cont. Boop
Keyfob Low
Battery
Yes
Display Mess.
F
Cont. Boop
No
Display Mess.
F
Cont. Boop
Active Zone
Bypassed Zone
Inactive Zone
Already
Disarmed
No Action
Masked Zone
Tampered Zone
Failed
Interconnection
Mains Fault
Battery Fault
Communicator
Fault
Siren Fault
System Tamper
Yes
Cont. Boop
Keyreader
LED1
ARM.
N/A
No: exit
G
ENTER to force
ESC to abort
3
Cont. Boop
No: ESC to exit
Feedback
ARM.
Fast Blink
Yes
Fast Blink
Yes
Fast Blink
No
LED ON
Yes
Fast Blink
No
Fast Blink
No
X
ENTER to force
ESC to abort
Fast Blink
No
LED ON
Yes
T
ENTER to force
ESC to abort
Fast Blink
No
LED ON
Yes
N/A
No
Fast Blink
No
Fast Blink
No
N/A
No
Fast Blink
No
Fast Blink
No
T
ENTER to force
ESC to abort
Fast Blink
No
LED ON
Yes
No: ESC to exit
Fast Blink
No
ENTER to force
LED ON
Yes
No: ESC to exit
Fast Blink
No
ENTER to force
LED ON
Yes
R
ENTER to force
ESC to abort
Fast Blink
No
LED ON
Yes
L
ENTER to force
ESC to abort
Fast Blink
No
LED ON
Yes
x
ENTER to force
ESC to abort
Fast Blink
No
LED ON
Yes
a
G
ENTER to force
ESC to abort
Fast Blink
No
LED ON
Yes
No: ESC to exit
Fast Blink
No
ENTER to force
LED ON
Yes
Fast Blink
No
Fast Blink
No
T
/
T
N/A
No
N/A
ENTER to force
ESC to abort
Fast Blink
No
LED ON
Yes
G
ENTER to force
ESC to abort
Fast Blink
No
LED ON
Yes
Table 13 Arming Block Conditions: 1) The arming block condition is indicated by the fast blinking of the LEDs in this
column; F) Force arming; Cont. Boop).Continuous Boop; 2) You can force the arming when the Active Zone is an
Hold-up Zone; 3) Fast Blinking of Partition's LEDs that have active zones; Squawk) sound emitted from an external siren; 4) The Squawk can be avoided.
38
Expandable Hybrid Control Panel
ABSOLUTA
Keyfob
Command Zone
BOSS Software
By Telephone
Feedback
ARM.
Feedback
Squawk-Squawk
No
Squawk-Squawk
No
Message
No
Squawk-Squawk
No
Squawk-Squawk
No
Message
No
Squawk-Squawk
No
Squawk-Squawk
No
Message
F
Voice Mess.
Squawk4
Yes
Squawk4
Yes Message
F
Voice Mess.
Squawk-Squawk
No
Squawk-Squawk
No
Message
No
Squawk-Squawk
No
Squawk-Squawk
No
Message
No
Squawk-Squawk
No
Squawk-Squawk
No
Message
Squawk
4
Squawk-Squawk
Squawk
4
4
Yes
Squawk
No
Squawk-Squawk
4
ARM. Feedback ARM. Feedback ARM.
Event Schedule
Feedback
ARM.
Voice Mess. No
Dedicated Event
No
Voice Mess. No
None
Yes
F
Dedicated Event
No
F
None
Yes
Voice Mess. No
Dedicated Event
No
Voice Mess. No
Dedicated Event
No
F
Voice Mess.
F
Dedicated Event
No
Yes Message
F
Voice Mess.
F
None
Yes
No
Message
F
Voice Mess.
F
Dedicated Event
No
Yes Message
F
Voice Mess.
F
None
Yes
Yes
Squawk
Squawk-Squawk
No
Squawk-Squawk
No
Message
No
Voice Mess. No
Dedicated Event
No
Squawk-Squawk
No
Squawk-Squawk
No
Message
No
Voice Mess. No
Dedicated Event
No
Squawk-Squawk
No
Squawk-Squawk
No
Message
No
Voice Mess. No
Dedicated Event
No
Squawk-Squawk
No
Squawk-Squawk
No
Message
No
Voice Mess. No
Dedicated Event
No
Squawk-Squawk
No
Squawk-Squawk
No
Message
F
Voice Mess.
F
Dedicated Event
No
Yes Message
F
Voice Mess.
F
None
Yes
No
Message
F
Voice Mess.
F
Dedicated Event
No
Yes Message
F
Voice Mess.
F
None
Yes
No
Message
F
Voice Mess.
F
Dedicated Event
No
Yes Message
F
Voice Mess.
F
None
Yes
No
Message
F
Voice Mess.
F
Dedicated Event
No
Yes Message
F
Voice Mess.
F
None
Yes
No
Message
F
Voice Mess.
F
Dedicated Event
No
Yes Message
F
Voice Mess.
F
None
Yes
No
Message
F
Voice Mess.
F
Dedicated Event
No
Yes Message
F
Voice Mess.
F
None
Yes
No
Message
F
Voice Mess.
F
Dedicated Event
No
Yes Message
F
Voice Mess.
F
None
Yes
No
Message
F
Voice Mess.
F
Dedicated Event
No
Yes Message
F
Voice Mess.
F
None
Yes
Squawk
4
4
Yes
Squawk
Squawk-Squawk
No
Squawk-Squawk
Squawk4
Yes
Squawk4
Squawk-Squawk
No
Squawk-Squawk
Squawk4
Yes
Squawk4
Squawk-Squawk
No
Squawk-Squawk
Squawk4
Yes
Squawk4
Squawk-Squawk
No
Squawk-Squawk
Squawk4
Yes
Squawk4
Squawk-Squawk
No
Squawk-Squawk
Squawk
4
Squawk-Squawk
Squawk
4
Squawk-Squawk
Squawk
4
4
Yes
Squawk
No
Squawk-Squawk
4
Yes
Squawk
No
Squawk-Squawk
4
Yes
Squawk
Squawk-Squawk
No
Squawk-Squawk
No
Message
No
Voice Mess. No
Dedicated Event
No
Squawk-Squawk
No
Squawk-Squawk
No
Message
No
Voice Mess. No
Dedicated Event
No
Squawk-Squawk
No
Squawk-Squawk
No
Message
F
Voice Mess.
F
Dedicated Event Yes
Yes Message
F
Voice Mess.
F
None
Yes
No
Message
F
Voice Mess.
F
Dedicated Event
No
Yes Message
F
Voice Mess.
F
None
Yes
Squawk
4
Squawk-Squawk
Squawk
4
ABSOLUTA
4
Yes
Squawk
No
Squawk-Squawk
Yes
Squawk
4
APPENDIX
39
Via Gabbiano, 22
Zona Ind. S. Scolastica
64013 Corropoli (TE)
ITALY
Tel.: +39 0861 839060
Fax: +39 0861 839065
e-mail: [email protected]
http: www.bentelsecurity.com
UK/FR ABSOLUTA DOC.MANUALS KIT
PFNKTBL6ABSDINT2
ISTISBLEKE
ISTUSBLEKE
ISTISBLFKE
ISTUSBLFKE
4.0
4.0
3.0
3.0
ABSOLUTA INSTALLER MANUAL
ABSOLUTA USER MANUAL
MANUEL D’INSTALLATION ABSOLUTA
MANUEL DE L’UTILISATEUR ABSOLUTA
MADE
IN
ITALY
ISTUSBLEKE 4.0 190612 V10
ETIIMBL6ABSDINT 3.0
ABS-DOC/INT