1
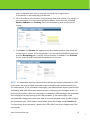
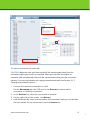
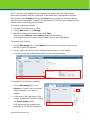
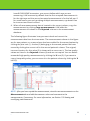
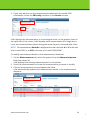
USER MANUAL Icare® LINK (Model: TS01) USER MANUAL v.2.1 (5/14 EN) TS01-002 EN This device complies with: Medical Device Directive 93/42/EEC Canadian Medical Device Regulations Copyright © 2014 Icare Finland Oy Made in Finland Icare Finland Oy Äyritie 22, FI-01510 Vantaa, Finland Tel. +358 9 8775 1150, Fax +358 9 728 6670 Internet: www.icaretonometer.com, e-mail: [email protected] www.icaretonometer.com 2 Table of contents 1. Introduction ............................................................................................................... 4 2. Getting started .......................................................................................................... 5 2.1 System requirements .......................................................................................... 5 2.2 Installing Icare® LINK .......................................................................................... 5 2.3 Starting Icare® LINK ............................................................................................ 7 2.4 Configuring Icare® LINK ..................................................................................... 8 2.5 Using Icare® LINK................................................................................................ 9 3. Patient management ................................................................................................ 9 3.1 Adding patients .................................................................................................... 9 3.2 Modifying patient details .................................................................................. 10 4. Tonometer management ....................................................................................... 11 4.1 Connecting tonometers .................................................................................... 11 4.2 Loaning tonometers to patients ...................................................................... 13 4.3 Viewing the loan status of tonometers ........................................................... 16 4.4 Modifying tonometer and loan details ............................................................ 16 4.5 Clearing tonometer measurement memory .................................................. 18 5. Measurement management .................................................................................. 19 5.1 Adding measurements...................................................................................... 19 5.1.1 Adding measurements manually .............................................................. 19 5.1.2 Copying measurements from a tonometer ............................................. 20 5.1.3 Importing measurements from a data file ............................................... 23 5.2 Viewing and modifying measurements........................................................... 23 5.3 Printing and exporting measurements ........................................................... 25 5.4 Deleting measurements ................................................................................... 26 6. Software updates .................................................................................................... 27 www.icaretonometer.com 3 1. Introduction CAUTION! Before using Icare® LINK, read this manual carefully and keep it for future use. This manual contains important information on using the product. Icare® LINK (type designation TS01) is used to store the measurements of intraocular pressure (IOP) in the human eye, and to track treatment efficiency and long-term progression. With LINK, the accumulated measurement history can be examined as a numerical chart or graphic presentation, and printed for delivery to relevant parties. NOTE: Use LINK only for storing IOP measurement data. Any other use is improper and the manufacturer cannot be held liable for resulting damage or consequences . Both health care professionals and patients can use LINK: Health care professionals can use either Icare® PRO, Icare® ONE, Icare® HOME tonometers to manage the measurement data of their patients with LINK Patients with their own Icare® ONE/HOME tonometer can use LINK to monitor their IOP values at home. You can use LINK to: Add patients and modify their details Add measurement data manually, by copying from Icare® tonometers, or by importing from data files Add comments to individual measurements for future reference View and delete measurement data in the measurement database Print measurement data or save (export) it as data files Loan Icare® tonometers to patients and monitor the loan status Manage the memory content of connected tonometers. LINK consists of a database for measurement data and of the user interface through which you can manage the data. You can connect an Icare® tonometer to the computer running the LINK software, and use LINK to both read measurement data from the tonometer, and manage the tonometer memory. You can enter the measurement data manually to LINK, or copy it directly from Icare® tonometers. The copy function means that a patient can use an Icare® ONE/HOME tonometer at home to take measurements and visit a health care professional only when there is enough data for the needed analysis. The tonometer stores the measurements the patient takes, and when the patient www.icaretonometer.com 4 visits a health care professional, all the data in the tonometer can be copied to LINK and used immediately. The patient does not need to visit a health care professional each time a measurement is needed, but only when an assessment of their situation and an analysis of the measurement data is required. The copy function can also help a health care professional who is taking measurements using an Icare® PRO tonometer. The health care professional can take measurements from multiple patients during the day, and copy all the measurement data for all the patients at once at the end of the day. 2. Getting started Before you can use LINK, you have to install it and modify the language settings to fit your needs. 2.1 System requirements LINK has the following system requirements: Operating system: Microsoft Windows® XP with Service Pack 2 or newer, Windows 7 and 8 (32 and 64-bit) Memory (RAM): 256 MB Hard disk space: 64 MB Screen resolution: 1024x768 or higher Standard compliance: the system must comply with IEC 60950. 2.2 Installing Icare® LINK LINK uses a license from an Icare® PRO or Icare® ONE/HOME tonometer. During the installation, you must connect an Icare® tonometer to LINK to activate the license. If you are a user of the Icare TA01i tonometer, you are authorized to activate the license during the installation by pressing “I have TA01”. To install LINK: 1. Go to http://www.icaretonometer.com and click the LINK download banner. 2. Click the Download LINK <version> <language> link. Note that <language> defines the language used in the installation wizard and the language used by default in the LINK user interface. You can change the language of the LINK user interface after the installation, if needed. www.icaretonometer.com 5 3. In the File Download window, click Save to save the installation file on your computer. Do you want to open or save IcareInstaller-1.70-IcareLINK-na-na-en.exe from register.icaretonometer.com? Open Cancel Save 4. Double-click the saved installation file to start the installation. The installation wizard opens. 5. Follow the instructions in the installation wizard to finalize the installation. During the installation, LINK displays a pop-up window asking you to connect a tonometer or in case you are a TA01 user to press “I have TA01”. To connect the tonometer, follow the instructions in Section ‘4.1 Connecting tonometers’. www.icaretonometer.com 6 6. After you have connected tonometer, the license activates and the installation wizard states that LINK has been successfully installed. To close the wizard, click Close. When the LINK installation is ready, you have an Icare LINK shortcut icon on your computer desktop. 2.3 Starting Icare® LINK To start LINK, double-click the Icare LINK shortcut icon on the desktop. The LINK user interface opens. 5 1 2 3 4 www.icaretonometer.com 7 The user interface consists of the following components: 1. Tabs Click the tabs to access the screens for managing tonometers, measurement data and patients, and settings. NOTE: The Borrowing tab is only visible if it has been set to be visible on the Settings tab. 2. Fields The fields consist of a field name and a box where you can insert a value for the field. You can type the value into the field or, in some cases, select it from a drop-down list. 3. Tables Tables contain measurement information: To modify information in a table, click the cell and enter the new value. Note that some cells cannot be modified. To select multiple rows in a table, click the first row, and while keeping the mouse button pressed, paint over the consecutive rows you want to select. 4. Buttons Click the buttons to open pop-up windows or modify the content of the tables on the screen. If a button cannot be used, it is grayed out. For example, if there are no measurements on the Measurements tab’s table, the Remove selected measurements button is grayed out since there are no measurements to delete. NOTE: When you click a button which removes data from a database or tonometer, a red confirmation button is displayed next to the original button for 5 seconds. To confirm the data removal, you must click the confirmation button before it disappears. 5. X button Click X to close and exit LINK. 2.4 Configuring Icare® LINK The LINK settings are defined on the Settings tab. The following settings are available: Language From the Software language field dropdown list, select the language you want to use www.icaretonometer.com 8 in the LINK user interface. By default, the language you selected for the installation wizard is used. Show Borrowing tab This setting defines whether the Borrowing tab is visible. If you loan your Icare® ONE/HOME tonometers to patients for home use, and you want to monitor the loan status of the tonometers in LINK, check the checkbox. 2.5 Using Icare® LINK To save measurement data for a patient into LINK and to use the data, you must perform your tasks in the following order: 1. Make sure that the patient whose measurement data you are saving is in the patient database. If not, add the patient to the database. For more information, see Section ‘3.1 Adding patients’. 2. Add measurement data manually to the measurement database, copy it from a tonometer, or import it from a data file. For more information, see Section ‘5.1 Adding measurements’. 3. View the measurement data and comment it, if necessary. For more information, see Section ‘5.2 Viewing and modifying measurements’. 4. Print out measurement data reports, if necessary. If you need to provide measurement data to another health care professional, export the measurement data to a data file for storing and sending. For more information, see Section ‘5.3 Printing and exporting measurements’. 3. Patient management In LINK, you can add patients and modify the patient details. 3.1 Adding patients To add a patient to the patient database: 1. On the Measurements tab, click New patient. The patient details at the top of the screen become empty. www.icaretonometer.com 9 2. Enter the patient details into the Name and Patient ID fields. After you have filled in the details, LINK automatically adds the new patient to the patient database. You can find the new patient from the Measured person field drop-down list. 3.2 Modifying patient details To modify patient details: 1. On the Measurements tab, select the patient from the Measured person field drop-down list. LINK shows the patient details. 2. Modify the patient details in the Name and Patient ID fields. LINK automatically updates the patient details in the patient database. www.icaretonometer.com 10 4. Tonometer management You can connect an Icare® tonometer to LINK to modify the owner information of the tonometer, view the measurement data in the tonometer and copy it to LINK, and delete the data in the tonometer. For more information about handling measurement data, see Section ‘5. Measurement management’. When you connect an Icare® tonometer to LINK for the first time, LINK uses the computer’s Internet connection to contact Icare® servers and ensure that the tonometer has been registered on the servers. If the tonometer has not been registered, LINK automatically registers it. You can connect the tonometer and copy measurement data from it to any computer which has LINK installed, but you can only modify the tonometer owner details with the LINK instance (the PC) where the tonometer was first registered. If you have patients who borrow your Icare® tonometers, you can maintain information on which tonometers are available, who has borrowed which tonometer and when they are due to return it. To loan a tonometer or mark it as returned, the tonometer must be connected to LINK. You can, however, extend the return date of a loaned tonometer without connecting it to LINK. 4.1 Connecting tonometers You can only connect one Icare® tonometer at a time to LINK. To connect a tonometer to LINK, you need the USB cable provided with the tonometer. The tonometer does not need to be switched on when you connect it. If the Icare® PRO tonometer is on when connected, its screen becomes black and its buttons inactive. A connected tonometer cannot be used. To connect and register the tonometer: 1. Attach the USB cable to the LINK computer’s USB port. 2. Attach the USB cable to the tonometer’s USB port. For the exact location of the tonometer’s USB port, see the tonometer manual. If you are connecting the tonometer for the first time, the tonometer registration pop-up window opens. If the tonometer has been registered previously, the Device tab appears, the measurement data from the tonometer is shown and you can skip Step 3. 3. To register a tonometer: a. Make sure that the computer is connected to internet. If internet connection is not available, you can still continue registration and when www.icaretonometer.com 11 your computer next time is internet connected the registration information is automatically transferred. b. Fill in the device information: the purchase date and retailer, the owner of the tonometer, and the owner address details. Note that the yellowed Name, Address and Country fields are mandatory and cannot be left empty. c. Click Save. The Device tab appears and the measurement data from the tonometer is shown. If the tonometer is an Icare® ONE/HOME tonometer and the Borrowing tab is visible, the tonometer is added to the Devices list on that tab and is available for patients to borrow. NOTE: It is important that the internal time in all the tonometers connected to LINK is the same, because multiple tonometers can be used to take measurements from the same patient. If the tonometer times differ, the measurement reports can become misleading and show the measurement results in the wrong chronological order. To prevent this problem, after the tonometer is connected, LINK compares the tonometer time setting to the time setting of the LINK computer. If the values differ, LINK automatically changes the tonometer time to use the computer time. If LINK changes the tonometer time, LINK shows a notification about the change on the Device tab. To disconnect the tonometer, detach the USB cable from the computer and the tonometer. www.icaretonometer.com 12 4.2 Loaning tonometers to patients Icare® ONE/HOME tonometers can be loaned to patients so that they can take regular measurements easily at home. To loan a tonometer or to mark the loan as returned, you must connect the tonometer to LINK. You can see the status of each tonometer in the Devices list on the Borrowing tab. If there is no patient’s name in the Borrower column before the Returning column and the Returning column is empty, the tonometer is available and can be loaned to a patient. www.icaretonometer.com 13 To loan a tonometer: CAUTION: Make sure that you have copied all the old measurement data from the tonometer before you loan it. When you loan a tonometer, LINK automatically clears all the measurement data from the tonometer memory. For more information on copying measurement data, see Section ‘5.1.2 Copying measurements from a . 1. Connect the tonometer to be loaned to LINK. On the Borrowing tab, the USB icon in the Devices list shows which tonometer is currently connected. 2. In the Devices list, select the connected tonometer. 3. On the right side of the screen, in the borrower details, start writing the name of the patient to the Search field. The patients in the patient database that match the search are listed below the Search field. When you see the patient you want, click the patient’s name. Check that the patient’s phone number is visible in the Phone number field. If the patient has not previously borrowed a tonometer, their phone number is not in the database. If the patient’s phone number is not visible, write the phone number into the field. If the search does not reveal the patient, the patient is not in the patient database yet. If the patient is not in the database, click New person and add the patient details into the Name, Patient ID and Phone fields. Note that the Name and Patient ID fields are mandatory. 4. In the Loan section, click the calendar icons to select dates for the Loaning date and Return date fields. You can also define additional details to the Additional information field, if necessary. 5. The tonometer measurement memory is automatically cleared, and LINK adds the loan details for the tonometer to the Devices list. www.icaretonometer.com 14 3 4 5 To mark a tonometer as returned: CAUTION: Make sure that you have copied all the measurement data from the tonometer before you mark it as returned. When you mark the tonometer as returned, LINK automatically clears all the measurement data from the tonometer memory. For more information on copying measurement data, see Section ‘5.1.2 Copying measurements from a ’. 1. Connect the returned tonometer to LINK. On the Borrowing tab, the USB icon in the Devices list shows which tonometer is currently connected. 2. In the Devices list, select the connected tonometer. 3. On the right side of the screen, click Return. 4. LINK automatically clears the tonometer measurement memory, and deletes the loan details for the tonometer from the Devices list. www.icaretonometer.com 15 3 2 4.3 Viewing the loan status of tonometers You can view the status of all Icare® ONE/HOME tonometers on the Borrowing tab in the Devices list: If the tonometer is available and can be loaned to a patient, there is no patient name in the Borrower column before the Returning column. If the tonometer has been loaned to a patient, there is a patient name in the Borrower column before the Returning column and the Returning column shows the date when the patient is expected to return the tonometer. If the patient has not returned a tonometer on time, there is a patient’s name in the Borrower column before the Returning column and the Returning column shows an ‘Overdue’ text, the number of days the loan is overdue, and the phone number of the patient. 4.4 Modifying tonometer and loan details You can modify the owner and loan details of a tonometer. You can also modify the identifier of the tonometer. To modify the details or the identifier, you must connect the tonometer to LINK. www.icaretonometer.com 16 NOTE: You can only modify the tonometer owner details with the LINK instance where the tonometer was first registered. If the tonometer is connected to another LINK instance, the Change button on the Device tab is grayed out. Since you do not have the loaned tonometer, however (the patient has it), you can also modify the loan details without connecting the tonometer. To modify tonometer details: 1. Connect the tonometer to LINK. 2. On the Device tab, click Change. 3. Modify the owner detail fields and click Save. Note that the Address and Country fields are mandatory. LINK updates the tonometer owner details in the device database. To modify loan details: 1. On the Borrowing tab, in the Devices list, select the tonometer whose loan details you want to update. 2. On the right side of the screen, update the borrower or loan details. LINK automatically updates the details in the device database. 2 1 To modify the tonometer identifier: 1. On the Borrowing tab, in the Devices list, select the tonometer 2 whose identifier you want to update. 2. At the top of the right side of the screen, update the identifier above the Serial number field. 1 LINK automatically updates the identifier in the device database. www.icaretonometer.com 17 4.5 Clearing tonometer measurement memory When you copy measurement data from the tonometer to LINK, LINK does not automatically delete the copied data from the tonometer. Although the tonometer has ample memory, it is useful to delete copied data from the tonometer regularly. CAUTION: If you loan tonometers to patients, LINK automatically clears the tonometer memory each time you mark a tonometer as loaned or returned on the Borrowing tab. For more information, see Section ‘4.2 Loaning tonometers to patients’. To clear all measurement data from the tonometer: 1. Connect the tonometer to LINK. 2. On the Device tab, click Clear device measurements. 3. To confirm the deletion, click Confirm measurement removal. Note that the confirmation button is only available for 5 seconds. 2 www.icaretonometer.com 3 18 5. Measurement management Measurement management in LINK consists of four main functions. You can: Add measurement data to measurement database. You can add data manually through the LINK user interface, or you can copy data from connected tonometers, or import data from a LINK-file. View and modify measurement data. You can view the measurement data in the measurement database as a list and a graphical chart. You can also modify the measurement details and add comments to individual measurements for future reference. Print and export measurement data. You can print measurement data to share it with the patient, insurance company etc. or export it as a data file. Delete measurement data from the measurement database. You can delete unnecessary measurements. You can select from Excel, PDF or a predefined text file format (lm) that only LINK can read to export the measurement data, Export Excel file-, Export PDF file-, Export LINK file-buttons respectively. You can import measurement data that are in the predefined text file format (lm), that only LINK can read, by using the Import LINK file-button. You can use these data files to transfer measurement data between separate LINK systems, for example, between different organizations treating the same patient. 5.1 Adding measurements You can add measurements to the measurement database manually, by copying them from a connected tonometer, or by importing from a LINK-file. 5.1.1 Adding measurements manually To add a measurement to the measurement database: 1. On the Measurements tab, from the Measured person field drop-down list, select the patient whose measurement you want to add. LINK displays the existing measurements for the patient. 2. Click Input new measurement. LINK adds an empty row to the measurement table. 3. Fill in the details on the empty measurement row. In the Device field drop-down list, NCT refers to a non-contact tonometer and GAT to a Goldman applanation tonometer. www.icaretonometer.com 19 After you have filled in the details, LINK automatically adds the new measurement to the measurement database. 1 2 3 5.1.2 Copying measurements from a tonometer All patients whose measurements are to be copied must exist in the patient database before the copy. For more information about adding new patients, see Section ‘3.1 Adding patients’. To copy measurements from a connected tonometer to the measurement database: 1. Connect the tonometer to LINK. On the Device tab, LINK displays all the new measurement data in the tonometer in the New measurements section: Each measurement is on its own row. Next to the measurement value are 1-4 pillars which describe the quality grade of the measurement. The low quality measurements with a grade of 3 or 4 are listed in the Rejected column and are not copied to the measurement database. Only the high quality measurements with a grade of 1 or 2 are copied. If you do not want to copy a specific high quality measurement for some reason, move it to the Rejected column by clicking the X icon on the left end of the row. www.icaretonometer.com 20 LINK compares all the measurements in the tonometer with the measurement database, and shows only the measurements which are not yet present in the measurement database. Icare® ONE/HOME tonometers do not display exact measurements. Instead, they give the measurement value as a range, for example, ‘5-7’. As long as no Icare® PRO tonometer has been connected to LINK or the LINK was not installed for an Icare® TA01 user, the measurement values from the Icare® ONE/HOME tonometers are consequently copied and saved as ranges. For Icare® TA01 users or after an Icare® PRO tonometer has been connected to LINK at least once, all measurement values (from all Icare® tonometers) are copied and saved as exact readings, for example, ‘6,3’ from Icare® PRO or ‘6’ from Icare® ONE/HOME tonometer. 2. In the drop-down list above the measurements, select the patient to whom the measurements belong. In case of a loaned Icare® tonometer, LINK automatically selects the borrower. If the tonometer contains measurements for multiple patients, click the plus icon next to the drop-down list to create a new column for a second patient, and select the patient from the new drop-down list. Repeat this action until you have created columns and selected the names of all the patients whose measurements are listed. 3. Move each measurement to the correct patient and the correct eye, if necessary. On each row, click the cell (under the correct patient and eye) where the measurement belongs. If you have added columns for multiple patients, you must move the measurements for the additional patients from the first column to the corresponding patients’ columns. In addition, in the case of the Icare® ONE/HOME tonometer, you must check that the eye information for each measurement is correct. When using the www.icaretonometer.com 21 Icare® ONE/HOME tonometer, you cannot define which eye you are measuring. LINK assumes by default that the first accepted measurement is for the right eye and the second accepted measurement is for the left eye. If for some reason you end up taking multiple measurements, eye details can be incorrect and must be fixed. 4. When all new measurement data is located in the correct column, copy the measurements by clicking Copy measurements. LINK adds the measurements not shown in the Rejected column to the measurement database. The following figure illustrates how you must check and correct the measurement data from the tonometer. The measurements shown in the figure are for two patients, so a new column has been added for the second patient by clicking the plus icon (1). A value (2) belonging to the second patient has been moved by clicking the correct cell in the second patient’s column. The original, incorrect location for this value (3) is shown with a cross over it. The low quality values are listed in the Rejected column (4) and are not copied. You can delete unneeded high quality measurements by clicking the X icon (5). If you want to copy a low quality value, you can move it to the patient column by clicking the X icon (5). NOTE: After you have copied the measurements, view the new measurements on the Measurements tab and add the measurer value and comments to the measurements, if necessary. For more information, see Section ‘5.2 Viewing and modifying measurements’. www.icaretonometer.com 22 5.1.3 Importing measurements from a data file To import measurements from a LINK-file that has the lm-extension to the measurement database: 1. On the Measurements tab, click Import Icare LINK file. A pop-up window opens. 2. In the pop-up window, click the folder icon, browse to the LINK-file you want, and click Open. 3. To import the measurements in the selected data file, click Import. The measurements are added to the measurement database, and the popup window closes. Note that if any of the measurements in the data file are already present in the measurement database, they are automatically ignored and not imported. If any of the measurements in the data file are for new patients, the name and identity number of the new patients are added to the patient database. 1 5.2 Viewing and modifying measurements You can view and modify the measurement data in the measurement database. Note that you can only modify the comments (condition and medication) and the measurer information for measurements copied from tonometers. You can modify all measurement details for manually-added measurements. To view measurements from the measurement database: 1. On the Measurements tab, select the patient from the Measured person field drop-down list. LINK displays all the existing measurements for the patient. www.icaretonometer.com 23 2. If you only want to see the measurements taken with the Icare® PRO tonometers, select the PRO only checkbox in the Device column. 1 2 LINK displays the measurements in chronological order. In the graphic chart on the right side of the screen, LINK displays each measurement as a single dot or cross, and measurements taken during the same day are connected with a line. NOTE: The measurement Attitude is displayed as either the letter H or V in the case of an Icare® PRO, or as N/A in the case of a Icare® ONE/HOME. To modify measurement details in the measurement database: 1. On the Measurements tab, select the patient from the Measured person field drop-down list. LINK displays the existing measurements for the patient. 2. Scroll the measurements to locate the measurement you want to modify. 3. Click the measurement row and update the fields. LINK automatically updates the measurement details in the measurement database. 1 3 www.icaretonometer.com 24 5.3 Printing and exporting measurements You can print measurements or export them to a data file. To print measurement data: 1. On the Measurements tab, select the patient from the Patient field dropdown list. The existing measurements for the patient are shown. 2. If you do not want to print all the measurements, scroll the measurements and select the ones you need. NOTE: You can only select a group of consecutive measurements. You cannot select multiple individual measurements with unselected rows in between. 3. In the Print field, make sure that the correct radio button is selected: all measurements or selected measurements. 4. Click Print. 5. In a pop-up window, select the printer and print settings, and click Print. To export measurement data to a data file: 1. On the Measurements tab, click Export Excel file, Export PDF file or Export Icare LINK file. A pop-up window opens. 2. In the pop-up window, click the folder icon, browse to the folder you want and click OK. 3. To export the data file to the selected location, click Export. The data file is created in the selected folder with the file name <patient name>_<current date>.icare. www.icaretonometer.com 25 5.4 Deleting measurements To delete measurements from the measurement database: 1. On the Measurements tab, select the patient from the Measured person field drop-down list. The existing measurements for the patient are shown. 2. Scroll the measurements and select the single measurement or the group of measurements you want to delete. 3. To delete the measurements, click Remove selected measurements. 4. To confirm the deletion, click Confirm measurement removal. Note that the confirmation button is only available for 5 seconds. 3 www.icaretonometer.com 4 26 6. Software updates You can perform software updates both for the LINK software and for the connected tonometers. Updates, however, require the LINK computer to be connected to the Internet. Every time LINK is started, it automatically checks whether any updates for the LINK software are available on the Icare® servers. If a LINK software update is found, a notification is shown at the top of the Measurements tab. To install the update, click Start update. You can also continue without updating. Every time you connect a tonometer to LINK, LINK automatically checks if any software updates are available for the tonometer software on the Icare servers. If a tonometer software update is found, a notification is shown at the top of the Device tab. To install the update, click Start update. You can also continue without updating. NOTE: Never disconnect a tonometer while a software update is on-going. Disconnecting during update can damage the tonometer and render it inoperable. www.icaretonometer.com 27