1
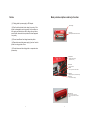
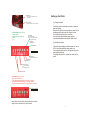
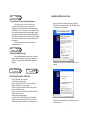
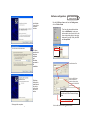
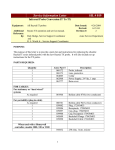
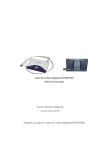
Quick Start Instructions
Setup Instruction Sheet for Craft Cutter.
Craft and Scrapbooking Cutter
STEP 1
Install
User Manual
the FunTime software
Install
STEP 2
RocKey2 on computer
STEP 3
Connect
the cutter to a PC
STEP 4
Install
Gazelle
USB printer driver
USB port
STEP 5 Run FunTime
Configure your cutter
Printed in Canada
FunTime 2008-02-28
1
2
Thanks for choosing our mini cutters:
We are happy to find you joining the ever rapidly growing
family of computer peripherals users.
By purchasing our cutter, you have become the owner of
one of the most versatile single-tool cutters in the market.
It is compact, reliable, the highest quality and has been
assembled with the application of the most stringent
quality checks.
But even more important, it is easy to use, as the following
guide will show you.
We will tell you how to use your plotter and how to keep
your plotter in good condition. If you have trouble in using
the cutting plotter, please turn off the machine's power,
then look for the solution in this manual; or connect to the
machine dealer who will help you to resolve the problem.
3
CONTENTS
(1) Notice when using your cutting plotter
(2) Cutting plotter accessories
(3) Main parts descriptions and key's function
(4) Setting up the Plotter
(5) Cutting blade and plotting pen
(6) Load media / Load paper
4
Main parts descriptions and key's function
Notice
(1) Cutting plotter’s power supply is DC Adaptor.
Head carriage
(2) Don't touch the plotter’s track when it is running. If the
plotter is damaged or works incorrectly for this reason, we
will repair your plotter but we WILL charge for any broken
parts & labor, we are able to spot when this has happened
very easily.
Pinch roller
White plastic wheels to feed media.
(3) Prevent small items from being drawn into plotter.
(4) Please disconnect the power supply if you don't use the
plotter for a long period of time.
(5) Do not disconnect the cutting plotter or computer when
powered up.
Clamp bracket
Hold blade holder assembly
(up and down motion)
Blade holder
Use to hold a blade
Guideline
Used as a guide when media is loaded
Cutting strip
White plastic strip that protect blade damage
Media roller
Prevent media from warping
Media hold lever.
Raise and lower the pinch rollers.
Lowering the pinch rollers to hold media
in place.
5
6
AC adapter jack
Used for connecting the cable for AC/DC
power adapter
USB port interface
Used to connect cutter to computer USB port
In Green State (mode), you can:
- Change speed
- Change the force (pressure)
- Reset
- Cut
STATUS LED
OFF = ON-Line state
Ready to receive data from computer.
ON = OFF-Line state
FLASHING
Registration marks
Power ON/Off led.
Standby switch
Turns the cutter ON and OFF
Setting up the Plotter
(1) Placing the plotter
The plotter should be mounted on as near a horizontal
plane as possible.
Make sure the plotter has enough space to insert vinyl or
media paper at the back and eject vinyl at the front.
Do not shake the plotter when it is running.
Do not touch the plotter with anything magnetic.
Keep the environment surrounding the plotter clean.
(2) Initializing the plotter:
Connect the power adaptor; switch the power on, the red
LED on the keyboard will light when power is on.
The carriage should be move to the right side, this is the
cutting plotter initializing.
The speed and pressure in 7 grades are shown on the
panel.
Status button
Restart button
Blade/pen force button
+=
=
-
Increase cutting force
Decrease cutting force
SPEED control button
In Red State (mode), you can:
- Move in or out the media
- Test cutting parameters (test cut) = Press Test 2 button
- Activate the cropmarks reading = Press Test 1 button
- Stop the cropmarks reading = Press Test 1 button 2 seconds
Red led glow = Red State
Note: Never move the pinch roller handle side to side by
using the arm, instead, move it by the centre.
7
8
STEP 2
Installation USB printer driver
Install
the FunTime software
To install the FunTime scrapbooking software:
Check that the cutter is not connected to your
computer. Start Windows, be sure to close all open
programs and insert the FunTime Scrapbooking program
CD-ROM into the CD or DVD drive of your computer. If the
autorun is active you will see the presentation screen.
When you connect the cutter to the computer using the
USB cable and you power ON the cutter, Windows detects
the presence of a new hardware.
New hardware found
If you wish to install FunTime program software click
the button to select your craft cutter and click the install
button to reach the proper slide to begin installation and exit
presentation.
Follow on the screen indication to complete the
software installation.
STEP 3
Install
RocKey2 on computer
Security key installation (dongle).
You can install anytime the security key, no driver to
install or search, just place the security key (dongle) in a
USB port. This can be done anytime before running the
program.
STEP 4
Connect
STEP 5
the cutter to a PC
Check not this time
Check the box not this time to indicate USB driver to be
installed
Install
USB printer driver
(4) Connecting to the computer:
Turn Off the power of the computer.
Turn Off the power of the cutter.
Have in hand the USB CD driver "Cutok" as the driver.
Need a free USB port on your computer.
Power ON computer and power ON the cutter, wait for a
moment until Windows run.
Connect one side of the USB cable to computer USB port,
and the other end to cutter.
Windows detect a New Hardware
Insert Driver CD to install USB Driver. After installation
restart the computer to activate the driver, run FunTime
Scrapbooking and from setting menu configure the cutter.
9
Check the box install from a list or
from a specific location like CD-ROM
Check the box to install the driver selected from a list or a
specific loacation.
10
Software configuration:
Install driver
from a list or
a specific
location.
The driver
was found at
the place
indicated
and
Windows
proceeds to
its
installation.
Windows
finished the
installation of
the printer
driver, click
the Finish
button.
Start again the computer.
STEP 6 Run FunTime
Configure your cutter
Run the FunTime software and from the Setting menu,
click on Plotter Codes
Then from the setup plotter window
click on Add/Remove. Locate your
plotter model, select it and click on the
arrow to place the plotter in the active
windows to the right. Finally click OK
and Accept/Save
Craft ROBO
Craft ROBO Pro II
FunCut DC240
FunCut DC330
Silhouette
Wishblade
X Xyron (pink)
CraftMate
ScrapSavvy
Klick-N-Kut
Gazelle BT
Gazelle
Use Windows Port.
Gazelle
Click the USB Cutter
button to open the
selection printer driver
box, select CutOK USB
printer driver.
Adobe PDF
Auto Microsoft Office Document Image
Writer
Canon iP4300
CUTOK DC330
Graphtec Craft ROBO
Click the OK button and the Accept/Save button.
11
12
Plotting pen:
Close screw
Holder shell
Plotting pen
Cutting plotters can be just as easily used as a pen
plotter for CAD/CAM work, just insert the pen holder
(supplied) and you can use the ball pen as plotting pen;
keep the ball pen out of the holder between 4mm to 5mm.
(3/16 inch)
Set the knife holder or pen holder on holder's seat:
Turn off the plotter power.
Set the holder on holder's seat, close the screw of seat of
holder.
Load media / Load paper
Load media / Load paper:
Before you can move the roller, you must lift the handle
first; the roller will not move until you do this.
Lift the handle, the roller will lift 1-2mm, then you can load
your media.
Press down the handle, then you can press the Status
button to obtain Off Line using the Speed buttons + or - to
feed media continuously, the paper will roll to front or back;
please confirm the paper must move straightly during the
distance that you want to cut, press the reset button to
obtain the Green State (On-Line).
Adjust the speed and pressure, and then you can output
the data to the plotter.
13
14