1
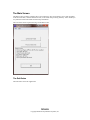
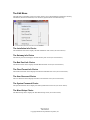
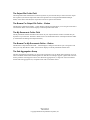
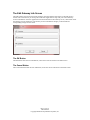
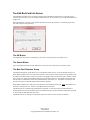
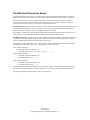
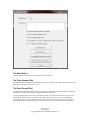
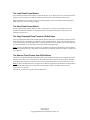
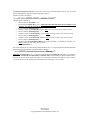
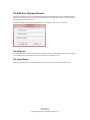
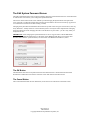
Bellatrix
CCM Sales Application
User Manual
Page 1 of 33
182-0064-02
Copyright 2009-2012 by Bellatrix Systems, Inc.
Introducing the Bellatrix Card-Trak System ................................................................................................... 3 Getting Started ................................................................................................................................................. 4 Contacting Technical Support ......................................................................................................................... 6 Security and Backups ...................................................................................................................................... 6 The Bellatrix Flash Drive ................................................................................................................................ 7 The Login Screen ............................................................................................................................................ 7 The Main Screen .............................................................................................................................................. 8 The File Menu ................................................................................................................................................. 9 The Edit Menu ............................................................................................................................................... 10 The Edit Installation Info Screen ................................................................................................................... 11 The Edit Gateway Info Screen ...................................................................................................................... 13 The Edit Bad-Card Info Screen ..................................................................................................................... 14 The Edit Fixed Format Info Screen ............................................................................................................... 16 The Edit User Password Screen .................................................................................................................... 21 The Edit System Password Screen ................................................................................................................ 22 The Edit Wand Setup Screen ......................................................................................................................... 23 The Manage Card Reader Pairings Screen .................................................................................................... 25 Appendix 1: Cloning a PDA or Wand ........................................................................................................... 27 Appendix 2: Adding a New PDA or Wand ................................................................................................... 29 Appendix 3: The Card-Trak System .............................................................................................................. 30 Appendix 4: Installation File Folder Layout ................................................................................................. 33 Page 2 of 33
182-0064-02
Copyright 2009-2012 by Bellatrix Systems, Inc.
Introducing the Bellatrix Card-Trak System
The Bellatrix Card-Trak System is an integrated and secure system that enables you to make single-copy
newspaper sales via either coin or credit card purchase.
At the front end of the system is the single-copy newsrack. The newsrack accepts coin as well as credit card
purchases. The sales data is securely stored in the Credit Card Module (aka CCM or Card Reader) of the
newsrack.
In the middle stands the Pocket PC PDA and the Card-Trak Wand. The PDA and the Wand communicate
with the newsrack to transmit setup data and to collect sales data. They also dock with the PC and upload
the sales data. The PDA runs proprietary Bellatrix software applications (CCM Setup and CCM Collect)
and the Wand is a proprietary Bellatrix device.
At the back end of the system is the Internet-connected PC. The PC processes the sales data from the PDA
and Wand and uploads it to the credit card processing Gateway. The PC runs proprietary Bellatrix software
(CCM Sales).
See “Appendix 3: The Card-Trak System” for some general usage rules for the Card-Trak System.
The next section describes the system requirements and explains installation and setup.
Page 3 of 33
182-0064-02
Copyright 2009-2012 by Bellatrix Systems, Inc.
Getting Started
The CCM Sales Application runs on a Windows XP/7 PC. The CCM Sales Application is used to send
newspaper credit-card sales data, collected from newsracks, to the credit card processing Gateway. The
Application is also used to distribute security-related information to the PDAs, Wands and newsracks.
The rest of this section describes how to get started with the installation of the Bellatrix Card-Trak System.
The sections following this one describe how to use the CCM Sales Application.
System Requirements
•
Internet-connected Windows XP/7 PC with at least two free USB ports.
•
Optional: M3 Sky PDAs.
•
PDA charging/USB sync cradle (one per PDA, if PDAs are being used).
•
Microsoft ActiveSync Version 4.5 or higher (if PDAs are being used).
•
Optional: Bellatrix Card-Trak Wands.
•
Two Bellatrix Flash Drives.
•
Bellatrix Installation CD-ROM.
Installation Steps
1.
If PDAs are being used, install Microsoft ActiveSync on the PC. Follow the on-screen instructions
to complete the installation. Be sure to create a “Partnership” between the PC and each PDA.
Also, be sure to enable PC/PDA File synchronization for each PDA.
2.
Place the Bellatrix Installation CD-ROM in the PC’s CD-ROM drive and navigate to view the
contents of the CD-ROM.
If you are installing to a 64-bit version of Windows, run the “Bellatrix Card-Trak for 64-bit
PC.MSI” file.
If you are installing to a 32-bit version of Windows, run the “Bellatrix Card-Trak for 32-bit
PC.MSI” file.
Follow the on-screen instructions to install the software and user manuals on the PC (see
“Appendix 4: Installation File Folder Layout”).
IMPORTANT: The installation folder MUST be C:\Program Files\Bellatrix\ (which is the
default setting). Card-Trak will not work if the installation folder is changed.
3.
Store the Bellatrix Installation CD-ROM in a secure location separate from the PC.
4.
Protect both the PC and the PDAs with strong login passwords and restricted access.
Page 4 of 33
182-0064-02
Copyright 2009-2012 by Bellatrix Systems, Inc.
Setup Steps
Note: See the sections below for more thorough explanations.
1.
Complete the Installation Steps listed above.
2.
Insert one of the Bellatrix Flash Drives into one of the PC’s USB ports. This Bellatrix Flash Drive
shall now be called “the first Bellatrix Flash Drive” (for later reference).
3.
Run the CCM Sales Application.
4.
At the Login screen enter the default User Password (“Bellatrix1”). The Main screen displays.
5.
Click the “Edit” menu and choose the “User Password” choice. The Edit User Password screen
displays. Enter a new strong User Password (the default Old Password is “Bellatrix1”).
6.
Click the “Edit” menu and choose the “System Password” choice. The Edit System Password
screen displays. Enter a new strong System Password (the default Old Password is “Bellatrix1”).
7.
Click the “Edit” menu and choose the “Installation Info” choice. The Edit Installation Info screen
displays. Enter the Installation info.
8.
Click the “Edit” menu and choose the “Gateway Info” choice. The Edit Gateway Info screen
displays. Enter the Gateway info.
9.
If Card-Trak Wands are being used, click the “Edit” menu and choose the “Wand Setup” choice.
The Edit Wand Setup screen displays. For each Wand, do the following:
a. Attach the Wand to the PC via a standard USB Cable.
b.
Use the Wand ID Set button to assign the Wand a unique Wand ID.
c.
Detach the Wand from the USB Cable.
Please see section below for details on using the Edit Wand Setup screen.
10. Exit the CCM Sales Application.
11. Insert the second Bellatrix Flash Drive into a USB port and copy the entire contents of the first
Bellatrix Flash Drive to the second Bellatrix Flash Drive. IMPORTANT: Be sure to copy FROM
the first Bellatrix Flash Drive (see step 2, above) TO the second Bellatrix Flash Drive (copying the
other direction will render the system unusable).
12. Remove both Bellatrix Flash Drives from the USB ports and store them in a secure location.
13. If PDAs are being used, connect and sync each PDA with the PC via ActiveSync (be sure
PC/PDA File synchronization is enabled).
14. If PDAs are being used, use the PDA CCM Setup Application to setup each newsrack (see the
Bellatrix Pocket PC CCM Setup Application User Manual). IMPORTANT: Be sure that each
newsrack receives a unique Group ID/CCM ID pair.
If Card-Trak Wands are being used, then each newsrack must be setup via the PC CCM Setup
Application in conjunction with the Wand (see the Bellatrix Card-Trak Wand and CCM Setup
Application User Manual). IMPORTANT: Be sure that each newsrack receives a unique Group
ID/CCM ID pair.
15. You are now ready to periodically collect sales data from each newsrack via the PDA CCM
Collect Application (see the Bellatrix Pocket PC CCM Collect Application User Manual) or the
Card-Trak Wand. Note that only the PDA or Wand that was used to setup the newsrack can
communicate with the newsrack.
Page 5 of 33
182-0064-02
Copyright 2009-2012 by Bellatrix Systems, Inc.
Contacting Technical Support
Technical support is available through Bellatrix Systems, Inc. at 1-800-451-9753 Monday through Friday
from 8:00am to 5:00pm (Pacific Time).
Security and Backups
Since the Card-Trak System deals with credit card sales data, you should take steps to ensure that your
PDAs, Wands, computers and networks are secure. The Payment Card Industry Security Standards Council
has published a document named the Payment Card Industry (PCI) Data Security Standard. You should
review this document and follow the requirements as they apply to your company.
Also, it is important to maintain current backups of both the Windows PC and the Bellatrix Flash Drive
(see section below). If the Card-Trak System files are lost or damaged, it may be impossible to run the
Application and it may be impossible to process existing sales data. Therefore, it is important to backup
the Windows PC and the Bellatrix Flash Drive whenever the Application configuration changes (i.e., after
initial installation of the Application or after any change to the System Password, User Password,
Installation settings or Gateway settings).
Page 6 of 33
182-0064-02
Copyright 2009-2012 by Bellatrix Systems, Inc.
The Bellatrix Flash Drive
The Bellatrix Flash Drive is a specially configured USB flash drive device. It must be inserted into one of
the PC’s USB ports before the CCM Sales Application is run. The Application will not run if the Bellatrix
Flash Drive is not present.
The system was delivered with two Bellatrix Flash Drives. The contents of each Bellatrix Flash Drive must
always remain an identical copy of the other (for backup and disaster recovery). Therefore, whenever the
System Password is changed, the entire contents of the currently inserted Bellatrix Flash Drive must be
copied to the other (spare) Bellatrix Flash Drive. Note that only changes to the System Password affect the
Bellatrix Flash Drive.
IMPORTANT: After changing the System Password, be sure to copy the entire contents FROM the
currently inserted Bellatrix Flash Drive TO the other (spare) Bellatrix Flash Drive (copying the other
direction will render the system unusable).
When not in use, the Bellatrix Flash Drives should be stored in a secure location separate from the PC.
The Login Screen
The Login screen (see below) displays first when the Application runs. It prompts you for the User
Password. After installation, the default User Password is “Bellatrix1”.
The OK Button
The OK button checks for the validity of the User Password you have entered. If the password is valid, the
Application checks for the Bellatrix Flash Drive (see section above); if the Bellatrix Flash Drive is found,
the Main screen displays. If the password is not valid the Application delays for five seconds and then
closes.
The Cancel Button
The Cancel button closes both the Login screen and the Application.
Page 7 of 33
182-0064-02
Copyright 2009-2012 by Bellatrix Systems, Inc.
The Main Screen
The Main screen (see below) displays after a successful login. This screen allows you to send newspaper
credit-card sales data, collected from newsracks, to the credit card processing Gateway. It also allows you
to synchronize Card-Trak Wands and edit setup information.
The rest of this section explains the usage of the Main screen.
The Exit Button
The Exit button closes the Application.
Page 8 of 33
182-0064-02
Copyright 2009-2012 by Bellatrix Systems, Inc.
The Process Sales Data Button
The Process Sales Data button does the following:
• Attempts to send any sales data to the Gateway that could not be sent on previous attempts.
• Moves all sales data files from the PDA and Wand sync folders to a PC Bellatrix folder.
• Attempts to send sales data to the Gateway.
• Updates Bad-Card data (see section below).
• Generates output files.
Status updates display in the text box below the button.
Follow these steps to process sales data:
1. Use the CCM Collect Application on the PDAs to collect sales data (see the Bellatrix Pocket PC
CCM Collect Application User Manual).
Use the Card-Trak Wands to collect sales data (see the Bellatrix Card-Trak Wand and CCM Setup
Application User Manual).
2.
Dock each PDA to the PC and synchronize the PDA.
3.
Undock all PDAs from the PC.
4.
Run the CCM Sales Application on the PC.
5.
Synchronize each Card-Trak Wand via the Synchronize Wand button.
6.
Press the Process Sales Data button and follow the on-screen prompts.
7.
Synchronize each Card-Trak Wand via the Synchronize Wand button.
8.
Exit the CCM Sales Application.
9.
Dock each PDA to the PC and synchronize the PDA.
10. Undock all PDAs from the PC.
11. Fully charge each PDA in preparation for the next data collection.
The File Menu
The File menu on the Main screen (see below) allows you to exit the application.
The Exit Choice
The Exit choice closes the Application.
Page 9 of 33
182-0064-02
Copyright 2009-2012 by Bellatrix Systems, Inc.
The Edit Menu
The Edit menu on the Main screen (see below) allows you to edit Installation information, Gateway
information, Bad-Card information, User Password, System Password and Wand setup.
The Installation Info Choice
The Installation Info choice displays the Edit Installation Info screen (see section below).
The Gateway Info Choice
The Gateway Info choice displays the Edit Gateway Info screen (see section below).
The Bad-Card Info Choice
The Bad-Card Info choice displays the Edit Bad-Card Info screen (see section below).
The Fixed Format Info Choice
The Fixed Format Info choice displays the Edit Fixed Format Info screen (see section below).
The User Password Choice
The User Password choice displays the Edit User Password screen (see section below).
The System Password Choice
The System Password choice displays the Edit System Password screen (see section below).
The Wand Setup Choice
The Wand Setup choice displays the Edit Wand Setup screen (see section below).
Page 10 of 33
182-0064-02
Copyright 2009-2012 by Bellatrix Systems, Inc.
The Edit Installation Info Screen
The Edit Installation Info screen (see below) displays when the Installation Info choice on the Edit menu is
clicked. This screen allows you to specify an Installation ID, an Output File Folder and a My Documents
Folder. It also allows you to turn sale aggregation on or off.
Note that the first time you access this screen after installing the software the Installation ID and Output
File Folder fields are blank.
The OK Button
The OK button stores the new information, closes this screen and returns to the Main screen.
The Cancel Button
The Cancel button discards the new information, closes this screen and returns to the Main screen.
The Installation ID Field
The Installation ID field will be inserted at the beginning of all output filenames that are created by the
Application. This field should be unique across all PC installations (so the output filenames from this
installation can be uniquely identified across the entire company). If this field is left blank, nothing is
inserted in the output filenames.
Page 11 of 33
182-0064-02
Copyright 2009-2012 by Bellatrix Systems, Inc.
The Output File Folder Field
The Output File Folder field names a location anywhere on your network that you wish to have the output
files copied to (note that the output files will also be placed in the C:\Program Files\Bellatrix\Output
folder). If this field is left blank, the output files will not be copied to the network.
The Browse For Output File Folder… Button
The Browse For Output File Folder… button displays a dialog box that allows you to navigate to and select
a network file folder. Your selection displays in the Output File Folder field.
The My Documents Folder Field
The My Documents Folder field names the location of your “My Documents” folder. The folder may be
anywhere on your network. The field’s default value is the traditional location of the My Documents folder
(C:\Documents and Settings\user\My Documents).
The Browse For My Documents Folder… Button
The Browse For My Documents Folder… button displays a dialog box that allows you to navigate to and
select your “My Documents” folder. Your selection displays in the My Documents Folder field.
The Sale Aggregation Group
The Sale Aggregation group allows you to turn sale aggregation on or off. When sale aggregation is on, all
sales to the same credit card are added together into one sale. For example, suppose a given credit card was
used to purchase 10 newspapers at $0.75 each. With sale aggregation on, a single sale of $7.50 would be
issued. With sale aggregation off, 10 separate sales of $0.75 would be issued.
Page 12 of 33
182-0064-02
Copyright 2009-2012 by Bellatrix Systems, Inc.
The Edit Gateway Info Screen
The Edit Gateway Info screen (see below) displays when the Gateway Info choice on the Edit menu is
clicked. This screen allows you to keep the CCM Sales Application in step with your current Gateway
account information. Since the Application must send sales data to the Gateway server, it must know about
the Gateway account. Each time your Gateway account information changes you must make the
corresponding changes on this screen.
The OK Button
The OK button stores the new information, closes this screen and returns to the Main screen.
The Cancel Button
The Cancel button discards the new information, closes this screen and returns to the Main screen.
Page 13 of 33
182-0064-02
Copyright 2009-2012 by Bellatrix Systems, Inc.
The Edit Bad-Card Info Screen
The Edit Bad-Card Info screen (see below) displays when the Bad-Card Info choice on the Edit menu is
clicked. This screen allows you to turn Bad-Card detection on or off and allows you to adjust the Bad-Card
trigger level.
Bad-Card detection is meant to stop repeated purchases with a credit card that is consistently rejected by
the credit card processing Gateway.
The OK Button
The OK button stores the new information, closes this screen and returns to the Main screen.
The Cancel Button
The Cancel button discards the new information, closes this screen and returns to the Main screen.
The Bad-Card Detection Group
The Bad-Card Detection group allows you to turn Bad-Card detection on or off. The default setting is on.
When Bad-Card detection is on, each credit card that is rejected by the credit card processing Gateway will
be added to the Bad-Card List. However, this may only happen if the card has been used a number of times
that is equal to or greater than the Bad-Card Trigger (see below). Moreover, the number of times the card
has been used is calculated over the current data collection period only (i.e., the number of times the card
has been used does not include multiple data collection periods).
When Bad-Card detection is off, rejected credit cards are not marked as bad cards. Note: When Bad-Card
detection is turned from on to off, the current Bad-Card List is deleted.
The Bad-Card List is automatically distributed to each PDA via ActiveSync the next time the PDA is
docked. Each CCM receives the Bad-Card List automatically the next time the PDA CCM Collect program
is used to collect sales data from that CCM.
The Bad-Card List can hold up to 50 bad cards (which are stored in a first-in-first-out fashion).
Page 14 of 33
182-0064-02
Copyright 2009-2012 by Bellatrix Systems, Inc.
The Bad-Card Trigger Field
The Bad-Card Trigger field (labeled “Number of failed sales to trigger Bad Card”) allows you to set the
“trigger point” at which a rejected card will be placed in the Bad-Card List (1 to 99, inclusive). The default
setting is 3.
If a card has been used a number of times that is equal to or greater than the Bad-Card Trigger and if the
card is rejected by the credit card processing Gateway it will be added to the Bad-Card List. As stated
above, the number of times the card has been used is calculated over the current data collection period only
(i.e., the number of times the card has been used does not include multiple data collection periods).
Since the Bad-Card List can hold only 50 bad cards, it is important to adjust the Bad-Card Trigger field so
that it includes only cards used for repeated purchases that are consistently rejected by the credit card
processing Gateway. The default setting of 3 should provide the desired result, but you may want to adjust
this setting.
Page 15 of 33
182-0064-02
Copyright 2009-2012 by Bellatrix Systems, Inc.
The Edit Fixed Format Info Screen
The Edit Fixed Format Info screen (see below) displays when the Fixed Format Info choice on the Edit
menu is clicked. This screen allows you to create, edit, distribute and remove fixed-format specifications.
This section has four parts. First, the fixed-format card is described. The magnetic stripe is described
second. Third, the usage of the Edit Fixed Format Info screen is given. Finally, a generic fixed-format
layout is given (in case you wish to create your own fixed-format cards).
The fixed-format card: A fixed-format card is just like a credit card except the data on a fixed-format card
is predetermined and, therefore, known before the card is swiped through the card reader. The data on a
credit card is known only after the card is swiped through the card reader.
For example, a college may create and issue student cards with predetermined data. Since the data on the
student cards is “fixed” ahead of time, these would be considered fixed-format cards.
The magnetic stripe: The magnetic stripe is the (usually) black stripe on the back of all credit cards and all
fixed-format cards. The magnetic stripe contains the data. Creating a fixed-format specification requires
that you understand the layout of the data on the magnetic stripe.
The magnetic stripe contains three rows—called Tracks—of data. Each Track has limitations on both the
length and type of data that it may contain. These limitations are listed below.
Track 1 Data Limitations:
• Maximum number of characters: 78
• Accepted characters: 0-9, A-Z, space, #, $, %, (, ), -, ., /, ?, ^
Track 2 Data Limitations:
• Maximum number of characters: 39
• Accepted characters: 0-9, :, ;, =, ?
Track 3 Data Limitations:
• Maximum number of characters: 106
• Accepted characters: 0-9, :, ;, =, ?
Your fixed-format specification must be for one of the three Tracks. In order to create your fixed-format
specification you must know the exact layout of the data on the chosen Track on the fixed-format card.
The usage of the Edit Fixed Format Info screen is described next.
Page 16 of 33
182-0064-02
Copyright 2009-2012 by Bellatrix Systems, Inc.
The Done Button
The Done button closes this screen and returns to the Main screen.
The Track Number Field
The Track Number field specifies the magnetic stripe Track number for the fixed-format specification. The
drop-down list allows you to choose 1, 2 or 3.
The Fixed Format Field
The Fixed Format field specifies the magnetic stripe data for the fixed-format specification. The data may
be typed in or automatically inserted via a keyboard wedge card reader.
To use a keyboard wedge card reader, first attach the reader to your PC then be sure the cursor is in the
Fixed Format field and swipe a card through the reader. The data read from the card is automatically
inserted at the cursor. Note that all data from all Tracks on the card may be inserted. You will need to
delete the data from all Tracks except the one Track you choose to use in the fixed-format specification.
Page 17 of 33
182-0064-02
Copyright 2009-2012 by Bellatrix Systems, Inc.
The Fixed Format field may contain special placeholder indicators. These placeholders are listed on the
Edit Fixed Format Info screen, just below the Fixed Format field. Except where noted below, all
placeholders are optional.
Card Expiration Day of Month Placeholder: Insert “dd” as a placeholder for Card Expiration Day of
Month. This placeholder must be accompanied by both the Card Expiration Month and Card Expiration
Year placeholders.
Card Expiration Month Placeholder: Insert “mm” as a placeholder for Card Expiration Month. This
placeholder must be accompanied by the Card Expiration Year placeholder.
Card Expiration Year Placeholder: Insert “yy” as a placeholder for Card Expiration Year. It is assumed
that the year contains the last two digits only (e.g., 09 for the year 2009). This placeholder must be
accompanied by the Card Expiration Month placeholder.
Ignored Character Placeholder: Insert the character “~” as a placeholder for an ignored character. Fixedformat cards may have variable data on them. At first glance, this appears to be a contradiction. After all,
why would a fixed-format card have variable data? However, it is common practice to have some of the
data be fixed and some of the data be variable so that each card may be uniquely identified.
For example, a college campus may want to issue fixed-format cards to their students, but have a unique
Student ID field on each card. In this case, the Student ID field would be the “variable data” on the fixedformat card.
Since the content of variable data is not known by the card reader ahead of time, it must be effectively
ignored by the card reader. Each character of the variable data may be ignored by inserting the Ignored
Character Placeholder where the variable-data character is located (see the example, below).
Capture Field Placeholder: Insert the character “c”—repeated 1 to 26 times, contiguously—as a
placeholder for the Capture Field. The Capture Field is exactly the same as a series of ignored characters
(see above) except that “captured” characters will be automatically inserted in the output sales report.
The Capture Field provides a way for you to record some of the data from the fixed-format card and insert
that data into the sales report (see the example, below). The captured data may be variable (see above) or
fixed. Since the data will be displayed in the Name field of the sales report, it is limited to a maximum of
26 characters (the maximum length of the Name field).
Placeholder Example: Suppose that a fixed-format card has data only on Track 2 as follows:
“;11223333311213?”
The data layout is defined as:
• Fixed Start Sentinel “;”
• Fixed 2-digit School ID “11”
• Variable 2-digit Location ID “22”
• Variable 4-digit Student ID “3333”
• Variable 6-digit Card Expiration Date given as Day-of-Month “31”, Month “12” and Year “13”
• Fixed End Sentinel “?”
Further suppose that we wish to ignore Location ID and capture Student ID. This means that the Start
Sentinel, School ID and End Sentinel must be transcribed as fixed-format fields. The Location ID must be
ignored. The Student ID must be captured. And the Card Expiration Date must be specified.
Given this description, the Track Number Field should be set to “2” and the Fixed Format Field should be
specified using fixed characters and placeholders as follows:
“;11~~ccccddmmyy?”
IMPORTANT: This example is for illustrative purposes only and was not meant to be a realistic fixedformat layout. See below for a generic fixed-format layout.
Page 18 of 33
182-0064-02
Copyright 2009-2012 by Bellatrix Systems, Inc.
The Load Fixed Format Button
The Load Fixed Format button displays an Open dialog box so you may browse for a stored fixed-format
file that you wish to open. Note that fixed-format files always have the filename extension CFG.
If the fixed-format file you select is valid, its contents displays in the Track Number and Fixed Format
fields. Otherwise, an error message displays.
The Save Fixed Format Button
The Save Fixed Format button displays a Save As dialog box so you may store the data in the Track
Number and Fixed Format fields to a fixed-format file. Note that fixed-format files always have the
filename extension CFG.
The Copy Displayed Fixed Format to PDAs Button
The Copy Displayed Fixed Format to PDAs button takes the data in the Track Number and Fixed Format
fields and copies it to each PDA sync folder for system-wide distribution. That is, the next time a PDA is
sync’ed with the PC, the fixed-format data is copied to the PDA. Once on the PDA, the fixed-format data
may be downloaded to any card reader via the PDA CCM Setup application.
Note: If Card-Trak Wands are being used, the PC CCM Setup Application and Wand are used together to
transmit fixed-format data to a card reader (see the Bellatrix Card-Trak Wand and CCM Setup Application
User Manual).
The Remove Fixed Format from PDAs Button
The Remove Fixed Format from PDAs button removes the fixed-format data from each PDA sync folder.
The next time a PDA is sync’ed with the PC, the fixed-format data is removed from the PDA. The PDA
CCM Setup application may be used to remove the fixed-format data from any card reader at any time.
Note: If Card-Trak Wands are being used, the PC CCM Setup Application and Wand are used together to
remove fixed-format data from a card reader (see the Bellatrix Card-Trak Wand and CCM Setup
Application User Manual).
The next section describes a generic fixed-format layout.
Page 19 of 33
182-0064-02
Copyright 2009-2012 by Bellatrix Systems, Inc.
A Generic Fixed-Format Layout: If you wish to create your own fixed-format layout for your own fixedformat cards, Bellatrix suggests the following generic layout.
All data on Track 2 as follows:
“;===111111=222222=333333=444444=311213?”
The data layout is defined as:
• Fixed 4-character Preamble “;===”
• Fixed 6-digit Company ID “111111” Important: Since this field value must be unique to your
company, you must be assigned this field value by Bellatrix.
• Fixed 1-character Field Separator “=”
• Variable 6-character Location ID “222222” Note: You may set this to any value you wish.
• Fixed 1-character Field Separator “=”
• Variable 6-character Promotion ID “333333” Note: You may set this to any value you wish.
• Fixed 1-character Field Separator “=”
• Variable 6-character Customer ID “444444” Note: You may set this to any value you wish.
• Fixed 1-character Field Separator “=”
• Variable 6-digit Card Expiration Date given as Day-of-Month “31”, Month “12” and Year “13”
Note: You may set this to any value you wish.
• Fixed End Sentinel “?”
Given this description, the Track Number Field should be set to “2” and the Fixed Format Field should be
specified using fixed characters and placeholders as follows:
“;===111111=cccccccccccccccccccc=ddmmyy?”.
Important: Company ID (“111111”) must be replaced with the Company ID assigned to your company
by Bellatrix. Location ID, Promotion ID and Customer ID are all included in a Capture Field and will,
therefore, be inserted in the output sales report. All fixed-format cards must have data on Track 2 in order
to activate the card reader (although the fixed-format data itself may be on any Track).
Page 20 of 33
182-0064-02
Copyright 2009-2012 by Bellatrix Systems, Inc.
The Edit User Password Screen
The Edit User Password screen (see below) displays when the User Password choice on the Edit menu is
clicked. This screen allows you to change the User Password. Note that the User Password also appears on
the Login screen (see section above).
You should change the User Password periodically—we suggest at least once every 90 days.
The OK Button
The OK button stores the new User Password if the Old Password is valid and the New Password matches
the Confirm Password. It then closes this screen and returns to the Main screen.
The Cancel Button
The Cancel button discards the new information, closes this screen and returns to the Main screen.
Page 21 of 33
182-0064-02
Copyright 2009-2012 by Bellatrix Systems, Inc.
The Edit System Password Screen
The Edit System Password screen (see below) displays when the System Password choice on the Edit menu
is clicked. This screen allows you to change the System Password.
The text box at the bottom of the screen reminds you that changing the System Password requires that
every newsrack’s CCM must be hard-reset and setup (see the Bellatrix Pocket PC CCM Setup Application
User Manual for instructions on hard-resetting a CCM).
Changing the System Password should be done when the system is first setup (see section above) and very
rarely thereafter—usually if there is concern that the system’s security has been compromised. Changing
the System Password is like changing the locks on all the doors of your house—you do it only when you
really need to do it.
IMPORTANT: After changing the System Password, be sure to copy the entire contents FROM the
currently inserted Bellatrix Flash Drive TO the other (spare) Bellatrix Flash Drive (copying the other
direction will render the system unusable). See the section “The Bellatrix Flash Drive”, above.
The OK Button
The OK button stores the new System Password if the Old Password is valid and the New Password
matches the Confirm Password. It then closes this screen and returns to the Main screen.
The Cancel Button
The Cancel button discards the new information, closes this screen and returns to the Main screen.
Page 22 of 33
182-0064-02
Copyright 2009-2012 by Bellatrix Systems, Inc.
The Edit Wand Setup Screen
The Edit Wand Setup screen (see below) displays when the Wand Setup choice on the Edit menu is clicked.
This screen allows you to setup and manage Card-Trak Wands.
IMPORTANT: The functions on this screen will only work when a Card-Trak Wand is connected to the
PC via a standard USB Cable.
The Done Button
The Done button closes this screen and returns to the Main screen.
The Wand Software Version Get Button
The Wand Software Version Get button retrieves and displays the Wand’s software version.
The Wand Date and Time Get Button
The Wand Date and Time Get button retrieves and displays the Wand’s current date and time.
The Wand Date and Time Set Button
The Wand Date and Time Set button sets the Wand’s date and time to be the same as the PC’s date and
time.
Page 23 of 33
182-0064-02
Copyright 2009-2012 by Bellatrix Systems, Inc.
The Wand ID Get Button
The Wand ID Get button retrieves and displays the Wand’s ID.
The Wand ID Set Button
The Wand ID Set button sets the Wand’s ID to the value in the Wand ID edit box.
IMPORTANT: Each Wand in your entire Card-Trak system must have a unique Wand ID. It may be
impossible to process your sales data if duplicate or default Wand IDs are used.
The Hard-Reset Wand Button
The Hard-Reset Wand button sets the Wand back to its factory default settings. In the process, all sales data
is deleted from that Wand, all bad-card data is deleted from that Wand, all Card Reader pairings for that
Wand are lost and the Wand ID is set to zero.
It takes about 30 seconds for the hard-reset process to complete. During that time, the Wand’s Red LED
turns on. When the process is complete, the Wand’s Red LED turns off and a message displays on the PC.
The Delete Sales Data Button
The Delete Sales Data button deletes all sales data from that Wand.
It takes about 30 seconds for the process to complete. When the process is complete, a message displays on
the PC.
The Delete Bad-Card Data Button
The Delete Bad-Card Data button deletes all bad-card data from that Wand.
It takes several seconds for the process to complete. When the process is complete, a message displays on
the PC.
The Manage Card Reader Pairings Button
The Manage Card Reader Pairings button displays the Manage Card Reader Pairings screen (see section
below).
Page 24 of 33
182-0064-02
Copyright 2009-2012 by Bellatrix Systems, Inc.
The Manage Card Reader Pairings Screen
The Manage Card Reader Pairings screen (see below) displays when the Manage Card Reader Pairings
button on the Edit Wand Setup screen is clicked. This screen allows you delete Wand-Card Reader
pairings.
IMPORTANT: The Wand must be synchronized with the PC immediately before making changes via this
screen.
When a Wand is used to setup a Card Reader, that Wand is effectively “paired” with that Card Reader. This
means that only that Wand will be able to communicate with that Card Reader and only that Wand will be
able to collect sales data from that Card Reader. That is, the Card Reader will NOT communicate with any
other Wand or PDA.
Since the Wand may hold a maximum of 200 Wand-Card Reader pairings, you may need a way to delete
unused pairings to make way for new pairings. This screen enables exactly that.
The Done Button
The Done button closes this screen and returns to the Edit Wand Setup screen.
Page 25 of 33
182-0064-02
Copyright 2009-2012 by Bellatrix Systems, Inc.
The Group ID/CCM ID Edit Box
The Group ID/CCM ID edit box lists the Group ID/CCM ID from each Card Reader that is paired with the
attached Wand. Each line in the edit box represents one Card Reader. In the image above, there are three
Card Readers represented: Card Reader 00001/00002, Card Reader 00012/00034 and Card Reader
10900/01896.
To select a Card Reader for deletion from the list, simply click on the desired line in the list.
The Delete Selected Pairing Button
The Delete Selected Pairing button deletes the selected line in the Group ID/CCM ID edit box. The change
is not committed until the Save button is pressed.
The Save Button
The Save button saves any changes made to contents of the Group ID/CCM ID edit box.
Page 26 of 33
182-0064-02
Copyright 2009-2012 by Bellatrix Systems, Inc.
Appendix 1: Cloning a PDA or Wand
Only the PDA or Wand that was used to setup a CCM can communicate with that CCM. However, if a
PDA or Wand must be replaced (e.g., the original was lost or broken), it is possible to create a copy of
(clone) the original PDA or Wand.
Steps for Cloning a PDA
1.
Connect and sync the original PDA with the PC via ActiveSync (be sure PC/PDA File
synchronization is enabled).
2.
Disconnect the original PDA from the PC.
3.
Connect the new PDA to the PC.
4.
Use ActiveSync to create a “Partnership” between the PC and the new PDA. Be sure to enable
PC/PDA File synchronization.
5.
On the PC, use File Explorer to navigate to the Bellatrix\Misc sub-folder of the original PDA’s
sync folder (which is in the PC’s My Documents folder).
6.
On the PC, copy the entire contents of the original PDA’s Bellatrix\Misc sub-folder to the new
PDA’s corresponding Bellatrix\Misc sub-folder. Allow the copy to overwrite any files in the new
PDA’s sub-folder.
7.
Allow ActiveSync to sync the new PDA with the PC.
8.
Disconnect the new PDA from the PC.
9.
Protect the new PDA with a strong login password.
10. The new PDA can now communicate with all the CCMs that the original PDA could do.
11. Retire the original PDA.
Page 27 of 33
182-0064-02
Copyright 2009-2012 by Bellatrix Systems, Inc.
Steps for Cloning a Wand
1.
Connect the original Wand to the PC via a standard USB Cable.
2.
On the PC, run the CCM Sales Application.
3.
On the Main screen, click the Synchronize Wand button.
4.
Disconnect the original Wand from the PC.
5.
On the PC, use File Explorer to navigate to the C:\Program Files\Bellatrix\Config folder. Rename
the original Wand’s CFG file from WandxxxxxCC.CFG to WandxxxxxCCOriginal.CFG (where
xxxxx is the original Wand’s ID).
6.
Connect the new Wand to the PC via a standard USB Cable.
7.
On the CCM Sales Application, drop down the Edit menu and choose the Wand Setup choice.
8.
On the Edit Wand Setup screen, enter the original Wand’s ID in the Wand ID edit box and press
the Wand ID Set button. This sets the new Wand’s ID to be the same as the original Wand’s ID.
9.
On the PC, use File Explorer to navigate to the C:\Program Files\Bellatrix\Config folder. Delete
the WandxxxxxCC.CFG file (where xxxxx is the original Wand’s ID). Rename the
WandxxxxxCCOriginal.CFG file to WandxxxxxCC.CFG (where xxxxx is the original Wand’s
ID).
10. On the Edit Wand Setup screen, click the Manage Card Reader Pairings button.
11. On the Manage Card Reader Pairings screen, click the Save button.
12. On the Manage Card Reader Pairings screen, click the Done button.
13. On the Main screen, click the Synchronize Wand button.
14. Exit the CCM Sales Application.
15. The new Wand can now communicate with all the CCMs that the original Wand could do.
16. Retire the original Wand.
Page 28 of 33
182-0064-02
Copyright 2009-2012 by Bellatrix Systems, Inc.
Appendix 2: Adding a New PDA or Wand
On occasion, you may need to add a new PDA or Wand to the system (rather than “cloning” an existing
PDA or Wand, as described above).
Steps for Adding a New PDA
1.
Connect the new PDA to the PC.
2.
Use ActiveSync to create a “Partnership” between the PC and the new PDA. Be sure to enable
PC/PDA File synchronization.
3.
On the PC, use File Explorer to navigate to the Bellatrix\Misc sub-folder of one of an OLD PDA’s
sync folder (which is in the PC’s My Documents folder).
4.
On the PC, copy the S1.CFG and S2.CFG files from the OLD PDA’s Bellatrix\Misc sub-folder to
the new PDA’s corresponding Bellatrix\Misc sub-folder.
5.
Allow ActiveSync to sync the new PDA with the PC.
6.
Protect the new PDA with a strong login password.
7.
The new PDA is now ready to use.
Steps for Adding a New Wand
1.
Run the CCM Sales Application.
2.
Click the “Edit” menu and choose the “Wand Setup” choice. The Edit Wand Setup screen
displays. Do the following:
a. Attach the Wand to the PC via a standard USB Cable.
b.
Use the Wand ID Set button to assign the Wand a unique Wand ID.
c.
Detach the Wand from the USB Cable.
Please see section above for details on using the Edit Wand Setup screen.
3.
Exit the CCM Sales Application.
Page 29 of 33
182-0064-02
Copyright 2009-2012 by Bellatrix Systems, Inc.
Appendix 3: The Card-Trak System
Overview
The Bellatrix Card-Trak System is made up of the following parts:
• Microsoft Windows XP/7 PCs with Bellatrix software
• M3 Sky PDAs with Bellatrix software
• Bellatrix Card-Trak Wands
• Newsracks with Bellatrix Card Readers (CCMs)
Newsracks collect and store sales data. PDAs and Wands setup newsracks and collect sales data from
newsracks. PCs gather sales data from PDAs and Wands and process the sales data to generate output files
and issue credit card transactions to a credit card processing Gateway.
Newsracks are managed by dividing them up into logical Groups. For example, all newsracks at the local
airport could be placed into one Group. Each Group is assigned a unique Group ID and each newsrack in a
Group is assigned a CCM ID that is unique within that Group.
A PDA or Wand can service part of one Group, all of one Group or multiple Groups. However, only the
PDA or Wand that setup a newsrack can service that newsrack (until that newsrack is setup via a different
PDA or Wand).
A PC can service one or more PDAs and/or Wands.
The diagram below illustrates the concept.
Page 30 of 33
182-0064-02
Copyright 2009-2012 by Bellatrix Systems, Inc.
Group ID 1
Newsrack
CCM ID 1
PDA 1
Newsrack
CCM ID 2
…
Newsrack
CCM ID n
Group ID 2
PC 1
Newsrack
CCM ID 1
…
Newsrack
CCM ID 2
…
Newsrack
CCM ID n
PDA 2
…
Group ID 3
Newsrack
CCM ID 1
Newsrack
CCM ID 2
…
Newsrack
CCM ID n
Page 31 of 33
182-0064-02
Copyright 2009-2012 by Bellatrix Systems, Inc.
Usage Rules
Following is a set of general usage rules for the Card-Trak System.
•
Only the PDA or Wand used to setup a newsrack can communicate with that newsrack. However,
a PDA or Wand can be “cloned” to look like another PDA or Wand.
•
Sales data encrypted by a newsrack can only be decrypted by the PC that that newsrack’s PDA or
Wand docks to.
•
Each Group must have a unique Group ID.
•
Each newsrack in a Group must have the same Group ID and a unique CCM ID.
•
To move a newsrack from one Group to another, or to assign a newsrack a new CCM ID within
the same Group when the Groups are serviced by the same PDA or Wand, you must:
•
o
Collect the data from the newsrack with the PDA or Wand. That is, do a regular data
collection/processing with the PDA or Wand.
o
Hard-reset the newsrack.
o
Setup the newsrack with the PDA or Wand (and assign it the new Group ID and CCM
ID).
To move a newsrack from one Group to another when the Groups are serviced by different PDAs
or Wands, you must:
o
Collect the data from the newsrack with the old PDA or Wand. That is, do a regular data
collection/processing with the old PDA or Wand.
o
Hard-reset the newsrack.
o
Setup the newsrack with the new PDA or Wand (and assign it the new Group ID and
CCM ID).
Page 32 of 33
182-0064-02
Copyright 2009-2012 by Bellatrix Systems, Inc.
Appendix 4: Installation File Folder Layout
The installation process creates a folder named C:\Program Files\Bellatrix. This folder contains several
other folders. The contents of these folders are explained below.
C:\Program Files\Bellatrix
The C:\Program Files\Bellatrix folder is the main folder for the Card-Trak System installation.
C:\Program Files\Bellatrix\Applications
The C:\Program Files\Bellatrix\Applications folder stores the CCM Sales Application and the CCM Setup
Application.
C:\Program Files\Bellatrix\Config
The C:\Program Files\Bellatrix\Config folder stores a variety of configuration files used by the Card-Trak
System.
C:\Program Files\Bellatrix\History
The C:\Program Files\Bellatrix\History folder stores all current and previous output files.
C:\Program Files\Bellatrix\Output
The C:\Program Files\Bellatrix\Output folder stores all current output files.
C:\Program Files\Bellatrix\Temp
The C:\Program Files\Bellatrix\Temp folder is a scratch workspace for the Card-Trak System.
C:\Program Files\Bellatrix\UserManuals
The C:\Program Files\Bellatrix\UserManuals folder stores all Card-Trak System User Manuals.
C:\Program Files\Bellatrix\WandData
The C:\Program Files\Bellatrix\WandData folder is a scratch workspace for Card-Trak Wand data.
Page 33 of 33
182-0064-02
Copyright 2009-2012 by Bellatrix Systems, Inc.